# Apple Pay
Permita pagamentos seguros com Apple Pay no iPhone, iPad ou Apple Watch.
Consulte a [documentação de compatibilidade](https://support.apple.com/en-us/HT208531) da Apple para saber quais dispositivos aceitam Apple Pay.
O Apple Pay é compatível com a maioria dos produtos e recursos da Stripe. Os usuários da Stripe podem aceitar [Apple Pay](https://stripe.com/apple-pay) em aplicativos iOS em iOS 9 e mais recentes, e na web com Safari iniciando por iOS 10 ou macOS Sierra. Não há tarifas adicionais para processar pagamentos com Apple Pay e os [preços](https://stripe.com/pricing/local-payment-methods#apple-pay) são os mesmos de outras transações com cartão.
O Apple Pay está disponível para titulares de cartão em bancos participantes de países aceitos. Para obter mais informações, consulte a documentação da Apple sobre [bancos participantes](https://support.apple.com/en-us/ht204916).
#### Propriedades da forma de pagamento
- **Localização dos clientes**
Em todo o mundo, exceto Índia
- **Moeda de apresentação**
Ver [moedas de apresentação aceitas](https://docs.stripe.com/currencies.md#presentment-currencies)
- **Confirmação do pagamento**
Iniciada pelo cliente
- **Família da forma de pagamento**
Carteira
- **Pagamentos recorrentes**
[Sim](https://docs.stripe.com/apple-pay.md#recurring-payments)
- **Frequência de repasses**
Cronograma de repasses padrão
- **Aceita Connect**
Sim
- **Aceita contestações**
[Sim](https://docs.stripe.com/apple-pay/disputes-refunds.md#disputed-payments)
- **Aceita captura manual**
Sim
- **Reembolsos totais/parciais**
[Sim/Sim](https://docs.stripe.com/apple-pay/disputes-refunds.md#refunds)
#### Locais da empresa
Contas Stripe em todo o mundo, exceto na Índia, podem aceitar pagamentos Apple Pay com liquidação em moeda local.
#### Suporte de produto
- Connect
- Checkout1
- Payment Links
- Elements
- Subscriptions
- Invoicing
1Quando o [ui_mode](https://docs.stripe.com/api/checkout/sessions/create.md#create_checkout_session-ui_mode) do checkout é `embedded_page`, ele oferece suporte apenas às versões 17 ou posteriores do Safari e o iOS.
## Fluxo de pagamentos
Veja abaixo uma demonstração do fluxo de pagamento do Apple Pay na sua página de checkout:
## Elegibilidade para compras no aplicativo com Apple Pay
Este guia explica como configurar seu aplicativo para aceitar o Apple Pay diretamente para bens físicos, serviços e outros itens qualificados. A Stripe processa esses pagamentos, e você paga apenas as [tarifas de processamento da Stripe](https://stripe.com/pricing).
Para produtos digitais, conteúdos e assinaturas vendidos nos Estados Unidos ou no Espaço Econômico Europeu (EEE), seu aplicativo pode aceitar o Apple Pay redirecionando para uma página de pagamentos externa. Você pode usar as seguintes interfaces de pagamento:
- [Stripe Checkout](https://docs.stripe.com/mobile/digital-goods/checkout.md)
- [Web Elements](https://docs.stripe.com/mobile/digital-goods/custom-checkout.md)
- [Links de pagamento](https://docs.stripe.com/mobile/digital-goods/payment-links.md) (melhor para um número limitado de produtos e preços)
Em outras regiões, seu aplicativo não pode aceitar o Apple Pay para produtos digitais, conteúdo ou assinaturas.
## Aceitar Apple Pay
A Stripe oferece vários métodos para adicionar o Apple Pay como forma de pagamento. Para obter detalhes da integração, selecione o método de sua preferência:
# iOS React Native
Você pode usar o SDK da Stripe para [React Native](https://github.com/stripe/stripe-react-native) para aceitar tanto Apple Pay quanto pagamentos tradicionais com cartão de crédito. Antes de começar, você precisa se inscrever no [Programa de Desenvolvedores da Apple](https://developer.apple.com/programs/) e [configurar a Stripe no servidor e no aplicativo](https://docs.stripe.com/payments/accept-a-payment.md?payment-ui=mobile&platform=react-native#react-native-setup). Em seguida, siga estas etapas:
1. [Solicitar um ID de comerciante da Apple](https://docs.stripe.com/apple-pay.md#merchantid)
2. [Criar um certificado Apple Pay](https://docs.stripe.com/apple-pay.md#csr)
3. [Integrar com Xcode](https://docs.stripe.com/apple-pay.md#xcode-pay)
4. [Configurar o ID de comerciante da Apple no StripeProvider](https://docs.stripe.com/apple-pay.md#set-merchantid)
5. [Verificar se Apple Pay é aceito](https://docs.stripe.com/apple-pay.md#check-if-apple-pay-supported)
6. [Apresentar a descrição da compra](https://docs.stripe.com/apple-pay.md#present-payment-sheet)
7. [Enviar o pagamento à Stripe](https://docs.stripe.com/apple-pay.md#handle-payment)
> Se você usa o React Native e a Expo, a Expo Go não é compatível com Apple Pay. Para usar o Apple Pay com a Expo, é preciso criar uma [versão de desenvolvimento](https://docs.expo.dev/get-started/set-up-your-environment/?mode=development-build&platform=ios). Se você já tem um projeto da Expo Go, pode [migrá-lo para uma versão de desenvolvimento](https://docs.expo.dev/develop/development-builds/expo-go-to-dev-build/).
## Solicitar um ID de comerciante da Apple
Obtenha um ID de comerciante da Apple [solicitando um novo identificador](https://developer.apple.com/account/resources/identifiers/add/merchant) no site de desenvolvedores da Apple.
Preencha o formulário com descrição e identificador. A descrição é para seu controle e pode ser modificada no futuro. A Stripe recomenda que você use o nome do aplicativo como identificador (por exemplo, `merchant.com.{{YOUR_APP_NAME}}`).
## Criar um certificado do Apple Pay
Crie um certificado para criptografia de dados de pagamento pelo aplicativo.
Vá até [Configurações de certificado do iOS](https://dashboard.stripe.com/settings/ios_certificates) no Dashboard, clique em **Adicionar novo aplicativo** e siga o guia.
Baixe um arquivo de solicitação de assinatura de certificado (CSR) para obter um certificado seguro da Apple que permite usar o Apple Pay.
Um arquivo CSR deve ser usado para emitir exatamente um certificado. Se você trocar seu ID de comerciante da Apple, acesse as [Configurações de certificado do iOS](https://dashboard.stripe.com/settings/ios_certificates) no Dashboard para obter um novo CSR e certificado.
## Integrar com Xcode
Adicione as funções do Apple Pay ao aplicativo. No Xcode, abra as configurações do projeto, clique na guia **Signing & Capabilities** e adicione o recurso **Apple Pay**. Talvez seja necessário fazer login na sua conta de desenvolvedor. Selecione o ID de comerciante criado anteriormente e o aplicativo já pode aceitar Apple Pay.
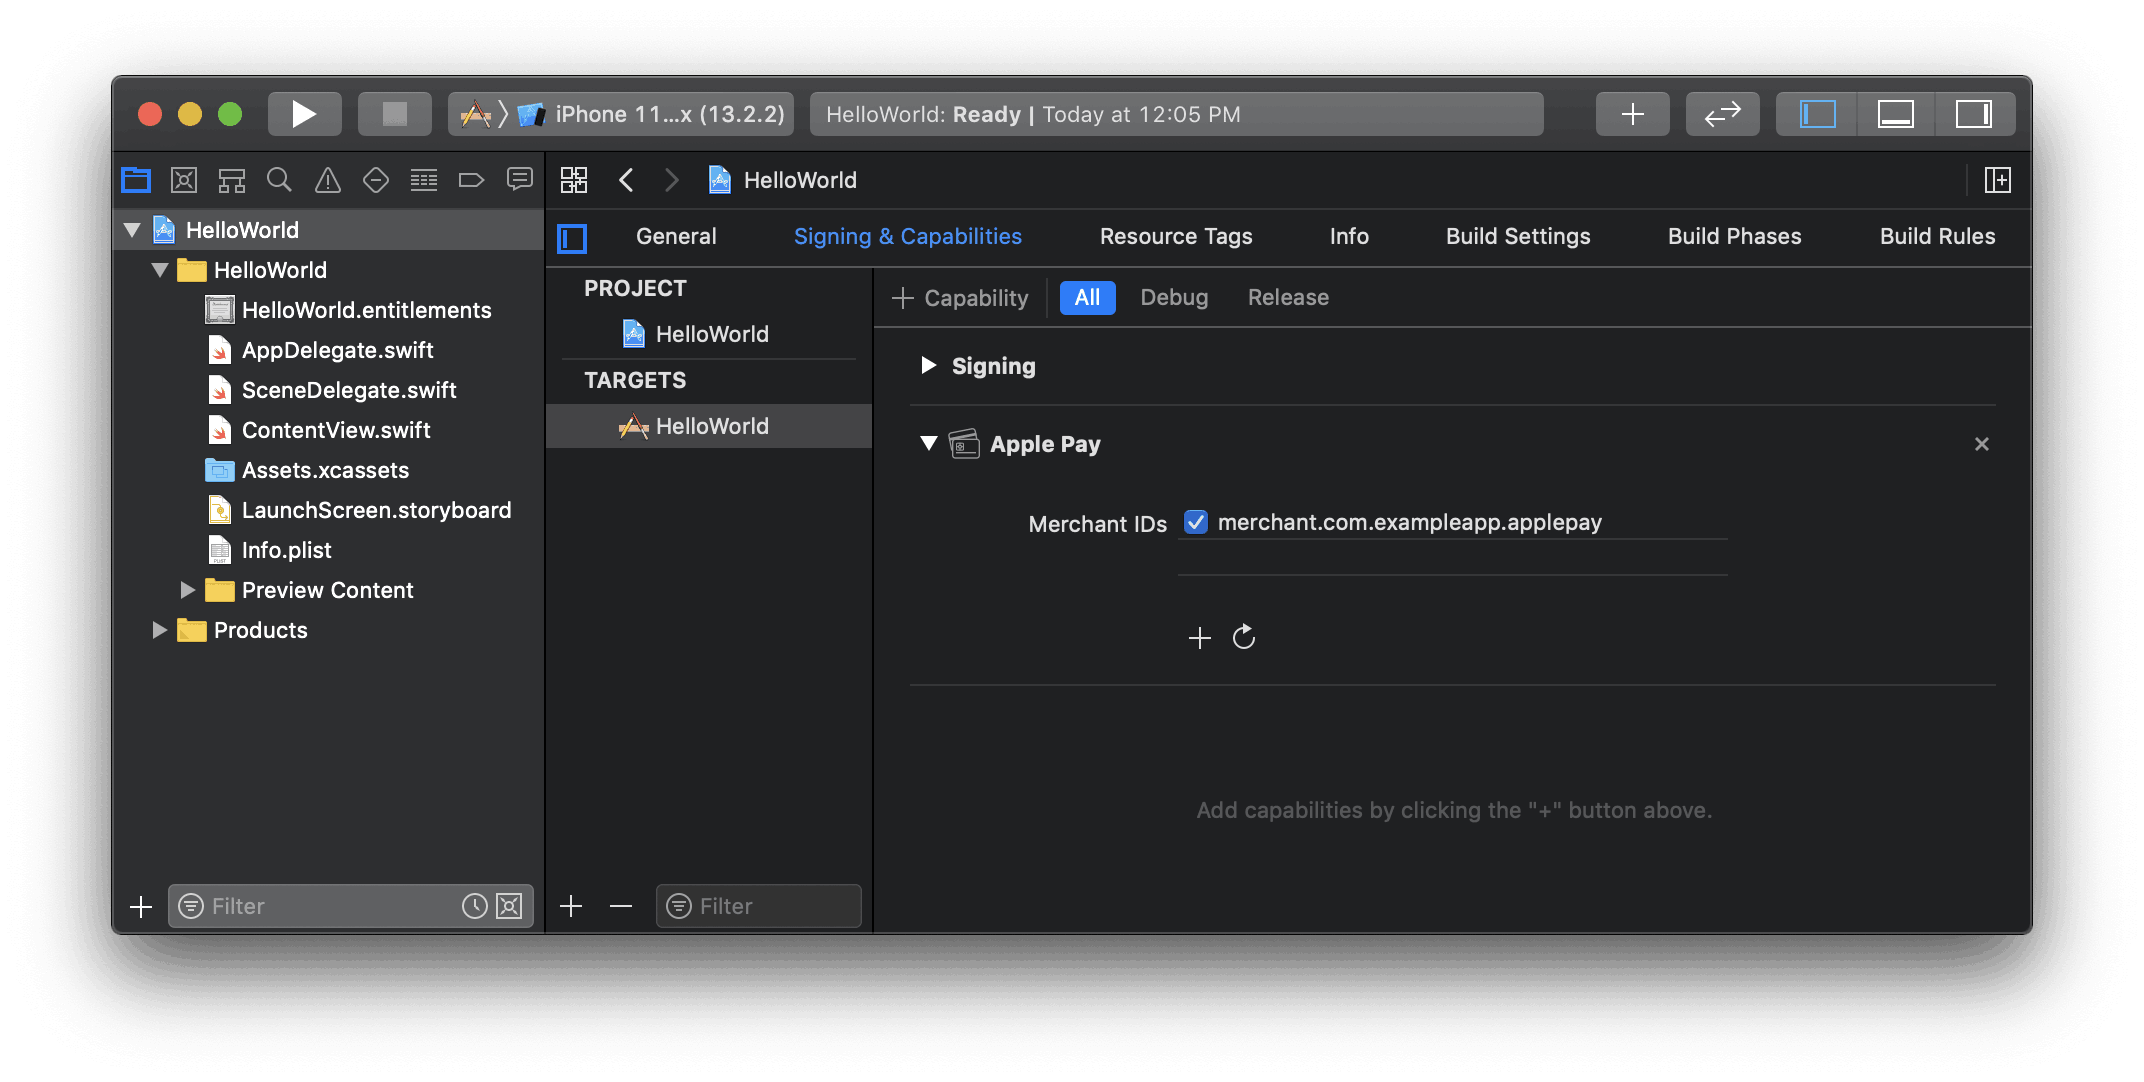
Habilitar o recurso Apple Pay no Xcode
## Configurar o ID de comerciante da Apple no StripeProvider
No componente `StripeProvider`, especifique o ID de comerciante da Apple que você solicitou:
```jsx
import { StripeProvider } from '@stripe/stripe-react-native';
function App() {
return (
{/* Your app code here */}
);
}
```
## Verificar se o Apple Pay é aceito
Antes de mostrar o Apple Pay como forma de pagamento no aplicativo, verifique se o dispositivo do usuário aceita Apple Pay e se o usuário adicionou um cartão à sua carteira:
```jsx
import { PlatformPayButton, isPlatformPaySupported } from '@stripe/stripe-react-native';
function PaymentScreen() {
const [isApplePaySupported, setIsApplePaySupported] = useState(false);
useEffect(() => {
(async function () {
setIsApplePaySupported(await isPlatformPaySupported());
})();
}, [isPlatformPaySupported]);
// ...
const pay = async () => {
// ...
};
// ...
return (
{isApplePaySupported && (
)}
);
}
```
## Criar o Payment Intent
### Lado do servidor
Crie um endpoint que crie um PaymentIntent com um [valor](https://docs.stripe.com/api/payment_intents/object.md#payment_intent_object-amount) e uma [moeda](https://docs.stripe.com/api/payment_intents/object.md#payment_intent_object-currency). Sempre decida quanto cobrar do lado do servidor, um ambiente seguro, em vez do lado do cliente. Isso evita que clientes mal-intencionados possam escolher os preços.
#### curl
```bash
curl https://api.stripe.com/v1/payment_intents \
-u <>: \
-d "amount"=1099 \
-d "currency"="usd"
```
### Do lado do cliente
Crie um método que solicite um PaymentIntent do seu servidor:
```jsx
function PaymentScreen() {
// ...
const fetchPaymentIntentClientSecret = async () => {
const response = await fetch(`${API_URL}/create-payment-intent`, {
method: 'POST',
headers: {
'Content-Type': 'application/json',
},
body: JSON.stringify({
some: 'value',
}),
});
const { clientSecret } = await response.json();
return clientSecret;
};
// ...
}
```
### Solução de problemas
Quando ocorrem erros da API Stripe durante a criação de tokens, é provável que o problema esteja no certificado do Apple Pay. Gere um novo certificado e carregue-o na Stripe, como descrito nesta página. Use um CSR obtido do Dashboard (não use certificados gerados por você mesmo). Muitas vezes, o Xcode armazena incorretamente certificados antigos no cache. Por isso, além de gerar um novo certificado, a Stripe recomenda que você também crie outro ID de comerciante da Apple.
O erro:
> Você não adicionou a conta de comerciante da Apple à Stripe
pode indicar que o aplicativo está enviando dados criptografados com um CSR/certificado anterior (que não é da Stripe). No seu ID de comerciante da Apple, revogue todos os certificados gerados por CSRs que não sejam da Stripe . Se o erro persistir, exclua o ID de comerciante da conta Apple e crie o ID novamente. Em seguida, crie um certificado baseado no mesmo CSR (fornecido pela Stripe) usando anteriormente. Não é necessário carregar esse novo certificado para a Stripe. Para concluir, desative e ative as credenciais do Apple Pay no aplicativo para atualizá-las.
## Apresentar a descrição da compra
Na [`PlatformPayButton` ](https://stripe.dev/stripe-react-native/api-reference/index.html#PlatformPayButton), no `onPress` chame `confirmPlatformPayPayment` para abrir a folha do Apple Pay. Para exibir os itens do carrinho do cliente na folha de pagamento, passe os itens como argumento. O último item deve representar sua empresa e o total; ele aparece na folha com a palavra “Pay” antes do valor (por exemplo, “Pay iHats, Inc. 50 USD”).
> No código que gerencia a ação do cliente, não inclua ações complexas ou assíncronas antes de exibir a descrição do pagamento. Se a ação do usuário não invocar diretamente a descrição do pagamento, o Apple Pay retorna um erro.
```jsx
import { confirmPlatformPayPayment } from '@stripe/stripe-react-native';
function PaymentScreen() {
// ... see above
const pay = async () => {
const clientSecret = await fetchPaymentIntentClientSecret()
const { error, paymentIntent } = await confirmPlatformPayPayment(
clientSecret,
{
applePay: {
cartItems: [
{
label: 'Example item name',
amount: '14.00',
paymentType: PlatformPay.PaymentType.Immediate,
},
{
label: 'Tax',
amount: '1.60',
paymentType: PlatformPay.PaymentType.Immediate,
},
{
label: 'iHats, Inc.',
amount: '15.60',
paymentType: PlatformPay.PaymentType.Immediate,
},
],
merchantCountryCode: 'US',
currencyCode: 'USD',
requiredShippingAddressFields: [
PlatformPay.ContactField.PostalAddress,
],
requiredBillingContactFields: [PlatformPay.ContactField.PhoneNumber],
},
}
);
if (error) {
// handle error
} else {
Alert.alert('Success', 'Check the logs for payment intent details.');
console.log(JSON.stringify(paymentIntent, null, 2));
}
};
// ... see above
}
```
## Optional: Criar uma forma de pagamento [Do lado do cliente]
Se você confirmar seu pagamento no servidor, poderá usar Apple Pay somente para coletar um `PaymentMethod` em vez de confirmar um pagamento. Para fazer isso, chame o método `createPlatformPayPaymentMethod`:
```javascript
import {PlatformPayButton, isPlatformPaySupported, createPlatformPayPaymentMethod} from '@stripe/stripe-react-native';
function PaymentScreen() {
const [isApplePaySupported, setIsApplePaySupported] = useState(false);
useEffect(() => {
(async function () {
setIsApplePaySupported(await isPlatformPaySupported());
})();
}, [isPlatformPaySupported]);
const createPaymentMethod = async () => {
const { error, paymentMethod } = await createPlatformPayPaymentMethod({
applePay: {
cartItems: [
{
label: 'Example item name',
amount: '14.00',
paymentType: PlatformPay.PaymentType.Immediate,
},
{
label: 'Total',
amount: '12.75',
paymentType: PlatformPay.PaymentType.Immediate,
},
],
merchantCountryCode: 'US',
currencyCode: 'USD',
},
});
if (error) {
Alert.alert(error.code, error.message);
return;
} else if (paymentMethod) {
Alert.alert(
'Success',
`The payment method was created successfully. paymentMethodId: ${paymentMethod.id}`
);
}
};
return (
{isApplePaySupported && (
)}
);
}
```
## Optional: Pagamentos recorrentes [Do lado do cliente]
No iOS 16 ou posterior, é possível adotar [tokens de comerciante](https://developer.apple.com/apple-pay/merchant-tokens/) definindo o campo `request` no objeto de parâmetros `confirmPlatformPayPayment()`'s e `confirmPlatformPaySetupIntent`’s `applePay`.
```js
await confirmPlatformPayPayment(
clientSecret,
{
applePay: {
// Make sure to include the rest of the necessary fields
request: {
type: PlatformPay.PaymentRequestType.Recurring,
description: 'String describing my payment',
managementUrl:
'www..com',
billing: {
paymentType: PlatformPay.PaymentType.Recurring,
intervalUnit: PlatformPay.IntervalUnit.Month,
intervalCount: 3,
label: 'My label',
amount: '39.00',
},
},
},
}
);
```
Para saber mais sobre como usar pagamentos recorrentes com o Apple Pay, consulte a [documentação do PassKit da Apple](https://developer.apple.com/documentation/passkit/pkpaymentrequest).
## Optional: Rastreamento de pedidos [Do lado do cliente]
Para adotar o [rastreamento de pedidos](https://developer.apple.com/design/human-interface-guidelines/technologies/wallet/designing-order-tracking) em iOS 16 ou posterior, use o callback `setOrderTracking` para o componente `PlatformPayButton`.
Em sua implementação:
1. Obtenha em seu servidor os detalhes do pedido concluído.
2. Chame o gerenciador de conclusão informado em `setOrderTracking` com os resultados do seu servidor.
```jsx
{
const { orderIdentifier, orderType, authToken, webServiceUrl } =
fetchOrderDetailsFromMyBackend();
completion(orderIdentifier, orderType, authToken, webServiceUrl);
}}
/>
```
Para saber mais sobre o rastreamento de pedidos, consulte a [documentação de pedidos da carteira da Apple](https://developer.apple.com/documentation/walletorders).
## Testar Apple Pay
Para testar o Apple Pay, use um número de cartão de crédito real e suas [chaves de API](https://docs.stripe.com/keys.md) de teste. A Stripe reconhece que você está testando e retorna um token de cartão de teste para que possa fazer pagamentos de teste em um cartão em modo de produção sem cobrá-lo.
Não é possível salvar [cartões de teste da Stripe](https://docs.stripe.com/testing.md#use-test-cards) ou [cartões de teste da Apple Pay](https://developer.apple.com/apple-pay/sandbox-testing/) em carteiras da Apple Pay para testar o Apple Pay.
## See also
- [Integração iOS](https://docs.stripe.com/payments/accept-a-payment.md?payment-ui=mobile&platform=ios)
- [Apple Pay na Web](https://docs.stripe.com/elements/express-checkout-element.md)
- [Práticas recomendadas do Apple Pay](https://docs.stripe.com/apple-pay/best-practices.md)