Apple Pay
Allow customers to securely make payments using Apple Pay on their iPhone, iPad, or Apple Watch.
Apple Pay is compatible with most Stripe products and features. Stripe users can accept Apple Pay in iOS applications in iOS 9 and above, and on the web in Safari starting with iOS 10 or macOS Sierra. There are no additional fees to process Apple Pay payments, and pricing is the same as for other card transactions.
Apple Pay is available to cardholders at participating banks in supported countries. For more information, refer to Apple’s participating banks documentation.
Payment flow
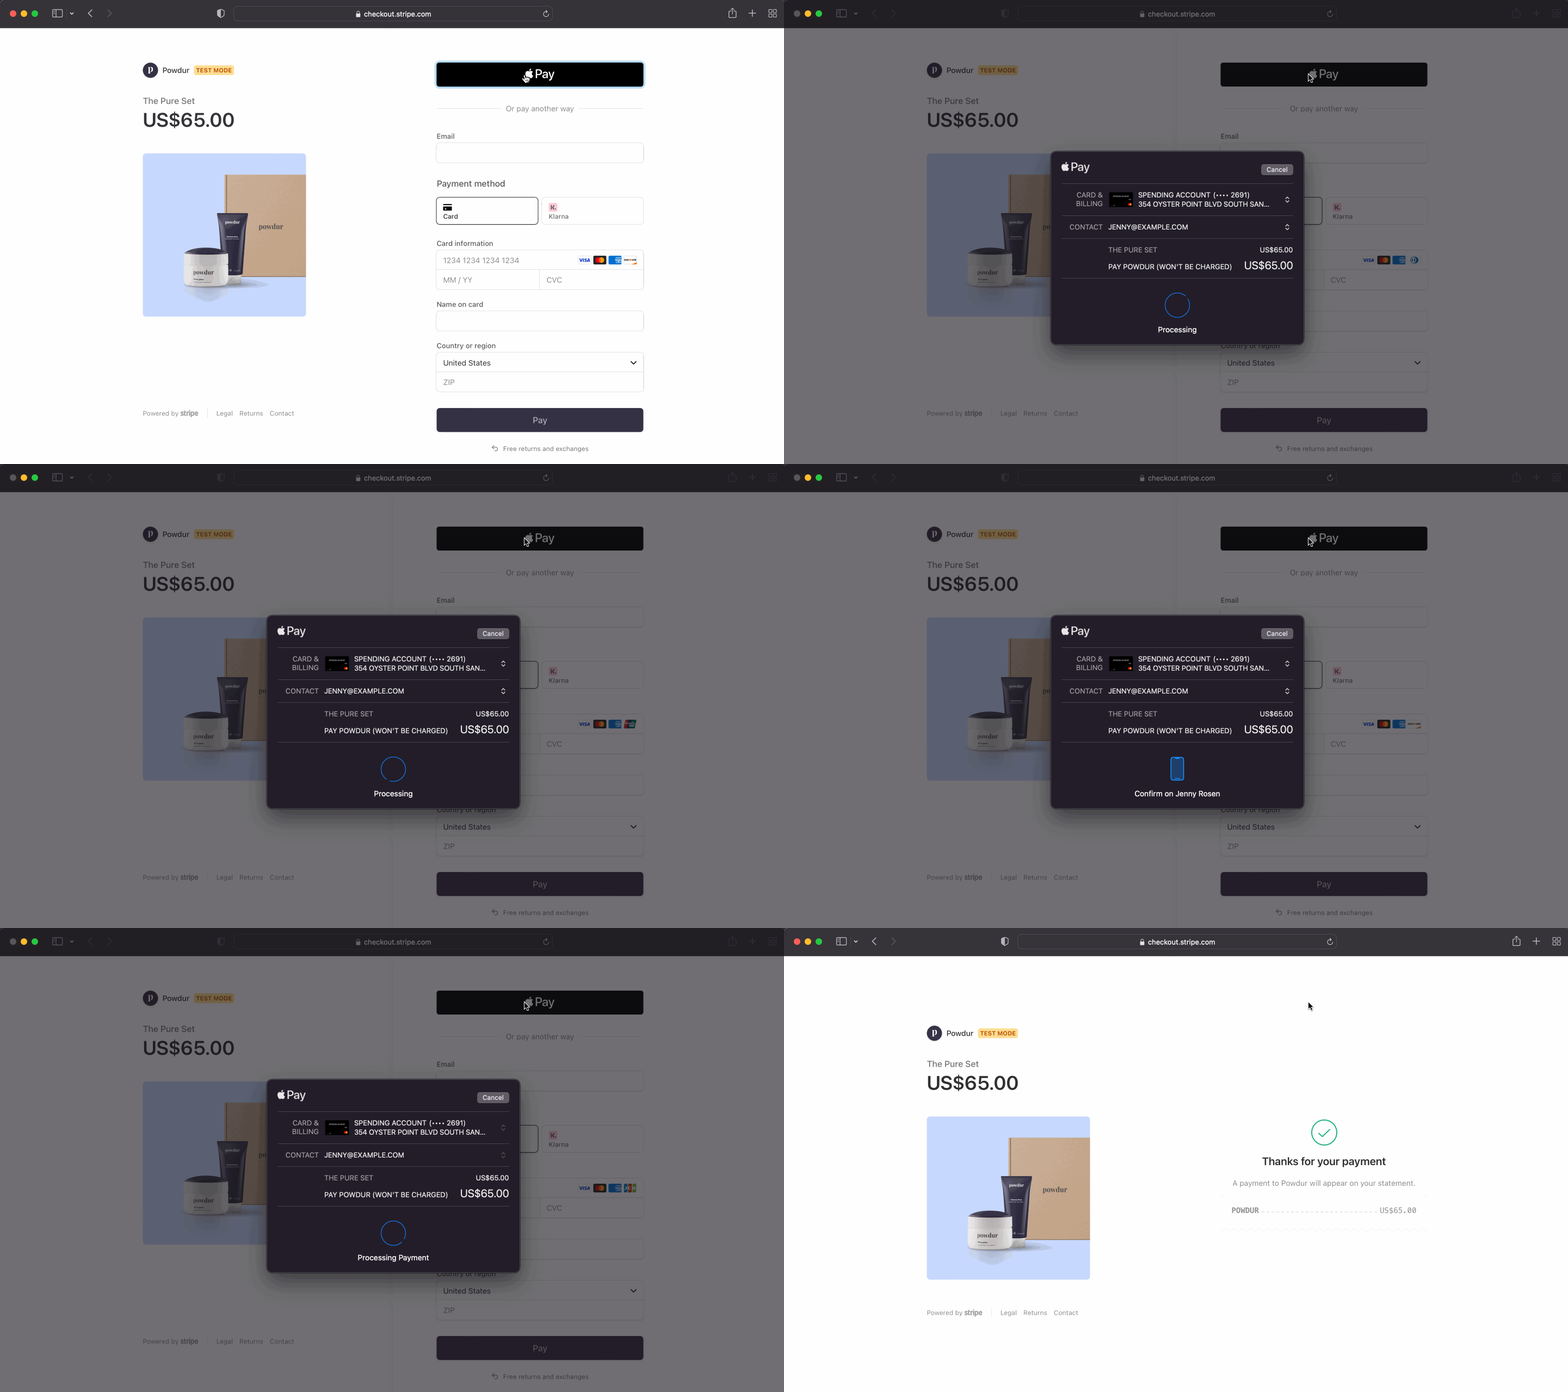
Below is a demonstration of the Apple Pay payment flow from your checkout page:

In-app purchase eligibility for Apple Pay
This guide explains how to configure your app to accept Apple Pay directly for physical goods, services, and other eligible items. Stripe processes these payments, and you pay only Stripe’s processing fees.
For digital products, content, and subscriptions sold in the United States or European Economic Area (EEA), your app can accept Apple Pay by redirecting to an external payment page. You can use the following payment UIs:
- Stripe Checkout
- Web Elements
- Payment Links (best for limited numbers of products and prices)
In other regions, your app can’t accept Apple Pay for digital products, content, or subscriptions.
Accept Apple Pay
Stripe offers a variety of methods to add Apple Pay as a payment method. For integration details, select the method you prefer:
Note
If you’re using Stripe’s prebuilt UI, follow the steps in this guide instead.
With the Stripe iOS SDK, you can accept both Apple Pay and traditional credit card payments. Before starting, you need to be enrolled in the Apple Developer Program. Next, follow these steps:
- Set up Stripe
- Register for an Apple Merchant ID
- Create a new Apple Pay certificate
- Integrate with Xcode
- Check if Apple Pay is supported
- Create the payment request
- Present the payment sheet
- Submit the payment to Stripe
Set up StripeServer-sideClient-side
First, you need a Stripe account. Register now.
Server-side
This integration requires endpoints on your server that talk to the Stripe API. Use the official libraries for access to the Stripe API from your server:
Client-side
The Stripe iOS SDK is open source, fully documented, and compatible with apps supporting iOS 13 or above.
Note
For details on the latest SDK release and past versions, see the Releases page on GitHub. To receive notifications when a new release is published, watch releases for the repository.
Configure the SDK with your Stripe publishable key on app start. This enables your app to make requests to the Stripe API.
Register for an Apple Merchant ID
Obtain an Apple Merchant ID by registering for a new identifier on the Apple Developer website.
Fill out the form with a description and identifier. Your description is for your own records and you can modify it in the future. Stripe recommends using the name of your app as the identifier (for example, merchant.).
Create a new Apple Pay certificate
Create a certificate for your app to encrypt payment data.
Go to the iOS Certificate Settings in the Dashboard, click Add new application, and follow the guide.
Download a Certificate Signing Request (CSR) file to get a secure certificate from Apple that allows you to use Apple Pay.
One CSR file must be used to issue exactly one certificate. If you switch your Apple Merchant ID, you must go to the iOS Certificate Settings in the Dashboard to obtain a new CSR and certificate.
Integrate with Xcode
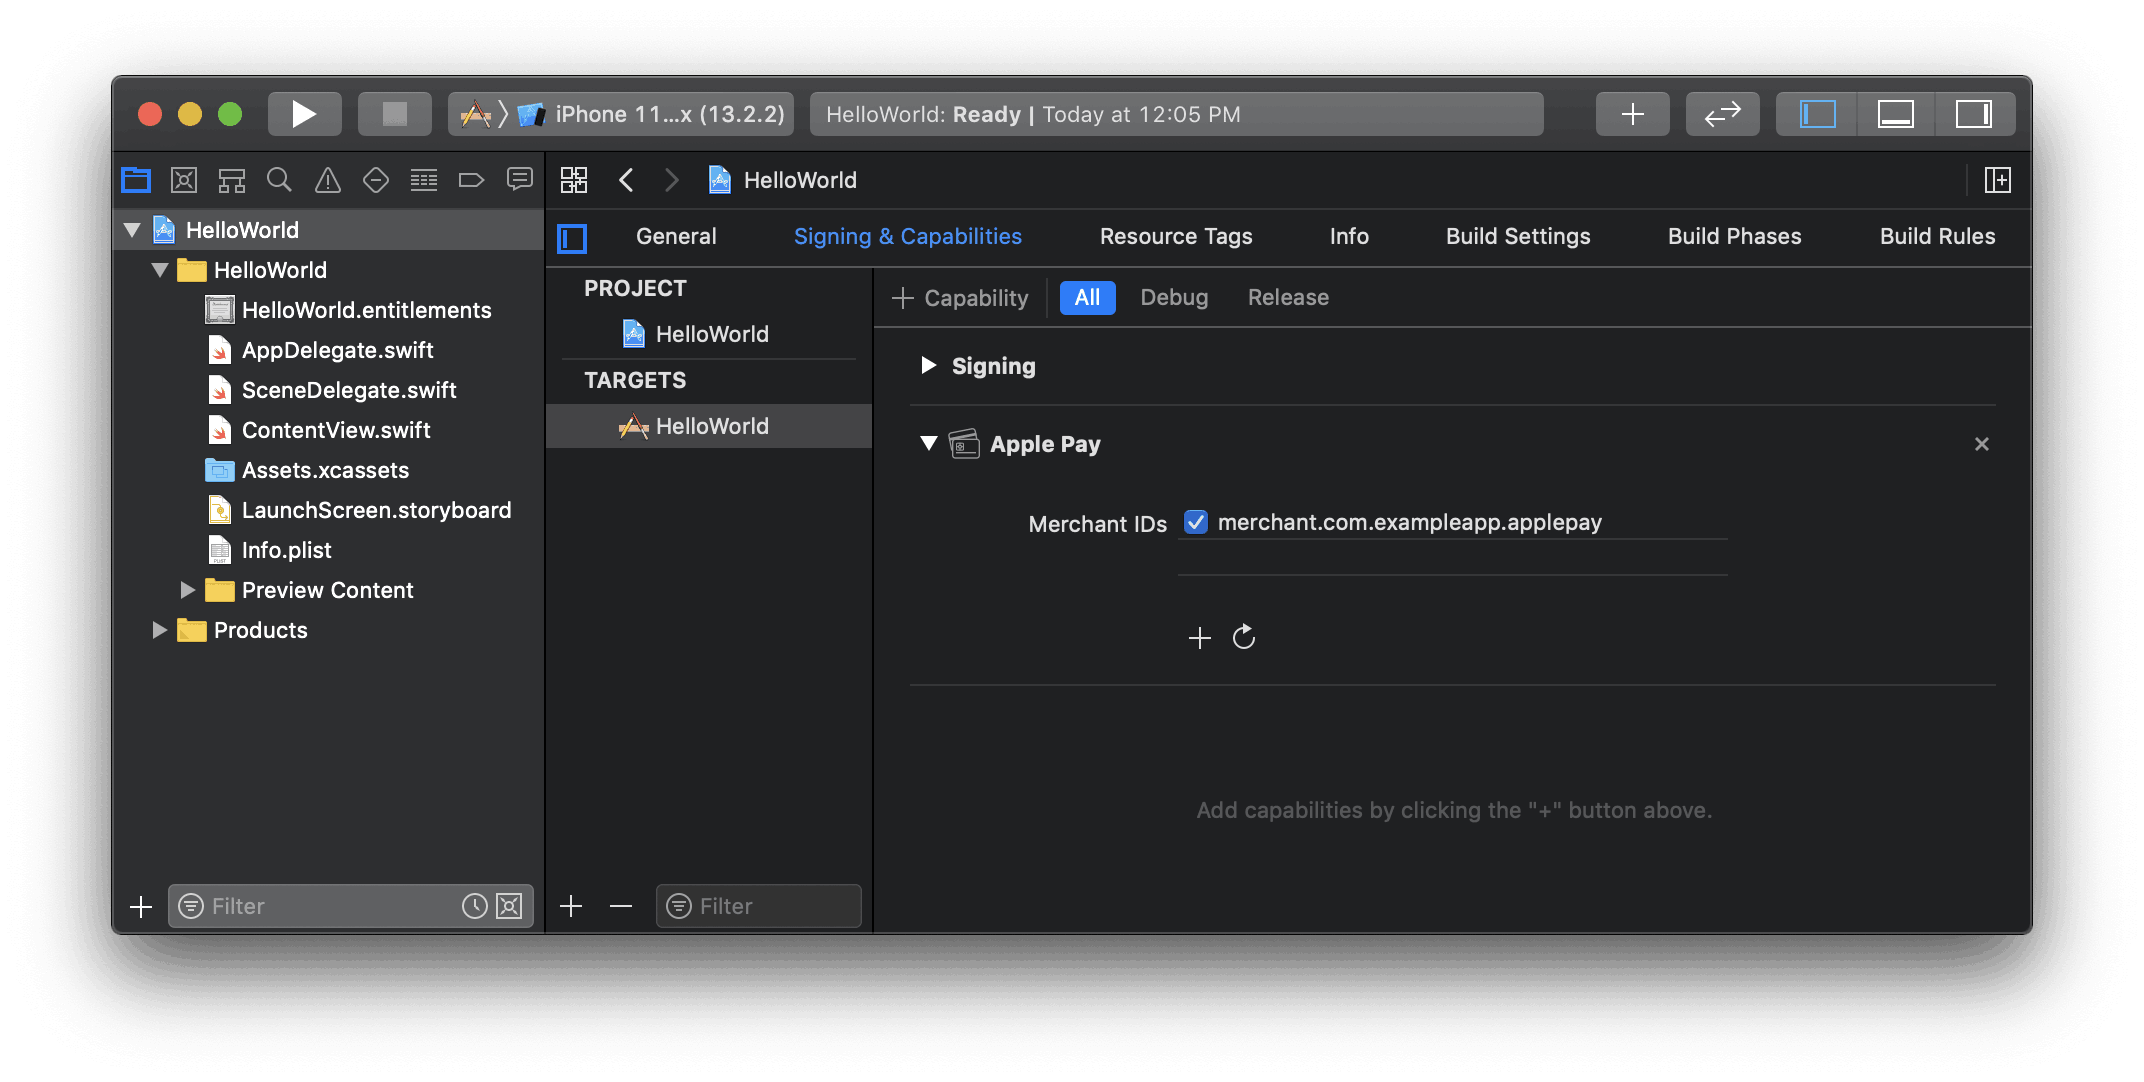
Add the Apple Pay capability to your app. In Xcode, open your project settings, click the Signing & Capabilities tab, and add the Apple Pay capability. You might be prompted to log in to your developer account at this point. Select the merchant ID you created earlier, and your app is ready to accept Apple Pay.

Enable the Apple Pay capability in Xcode
Check if Apple Pay is supported
Before displaying Apple Pay as a payment option in your app, determine if the user’s device supports Apple Pay and that they have a card added to their wallet:
Create the payment request
When the user taps the Apple Pay button, call StripeAPI paymentRequestWithMerchantIdentifier:country:currency: to create a PKPaymentRequest.
Then, configure the PKPaymentRequest to display your business name and the total. You can also collect information like billing details or shipping information.
See Apple’s documentation for full guidance on how to customize the payment request.
Present the payment sheet
Create an STPApplePayContext instance with the PKPaymentRequest and use it to present the Apple Pay sheet:
Apple requires that user gestures trigger the Apple Pay modal (for example, clicking a button or interacting with the form). Make sure your code adheres to the following:
- Invoke the payment sheet directly with a user activation event.
- Add the code for the payment sheet at or near the top of your user gesture event handler, before any asynchronous or long-running code.
- Set a reasonable time limit to call
confirmPaymentafter the user gesture.
Submit the payment to Stripe
Server-side
Make an endpoint that creates a PaymentIntent with an amount and currency. Always decide how much to charge on the server side, a trusted environment, as opposed to the client side. This prevents malicious customers from choosing their own prices.
Client-side
Troubleshooting
If you’re seeing errors from the Stripe API when attempting to create tokens, you most likely have a problem with your Apple Pay Certificate. You’ll need to generate a new certificate and upload it to Stripe, as described on this page. Make sure you use a CSR obtained from your Dashboard and not one you generated yourself. Xcode often incorrectly caches old certificates, so in addition to generating a new certificate, Stripe recommends creating a new Apple Merchant ID as well.
If you receive the error:
You haven’t added your Apple merchant account to Stripe
it’s likely your app is sending data encrypted with a previous (non-Stripe) CSR/Certificate. Make sure any certificates generated by non-Stripe CSRs are revoked under your Apple Merchant ID. If this doesn’t resolve the issue, delete the merchant ID in your Apple account and re-create it. Then, create a new certificate based on the same (Stripe-provided) CSR that was previously used. You don’t need to upload this new certificate to Stripe. When finished, toggle the Apple Pay Credentials off and on in your app to ensure they refresh properly.
App Clips
The StripeApplePay module is a lightweight Stripe SDK optimized for use in an App Clip. Follow the above steps to add the StripeApplePay module to your App Clip’s target.
Note
The StripeApplePay module is only supported in Swift. Objective-C users must import STPApplePayContext from the Stripe module.
Migrating from STPApplePayContext
If you’re an existing user of STPApplePayContext and wish to switch to the lightweight Apple Pay SDK, follow these steps:
- In your App Clip target’s dependencies, replace the
Stripemodule with theStripeApplePaymodule. - In your code, replace
import Stripewithimport StripeApplePay. - Replace your usage of
STPApplePayContextDelegatewith the newApplePayContextDelegateprotocol. - Change your implementation of
applePayContext(_to accept a:didCreatePaymentMethod:) StripeAPI..PaymentMethod - Change your implementation of
applePayContext(_to accept an:didCompleteWith:error:) STPApplePayContext..PaymentStatus
import Stripe

class CheckoutViewController: UIViewController, STPApplePayContextDelegate {
    func applePayContext(_ context: STPApplePayContext,
      didCreatePaymentMethod paymentMethod: STPPaymentMethod,
      paymentInformation: PKPayment,
    ) async throws -> String {
        // ...
    }

    func applePayContext(_ context: STPApplePayContext,
      didCompleteWith status: STPPaymentStatus,
      error: Error?) {
        // ...
    }
}
import StripeApplePay

class CheckoutViewController: UIViewController, ApplePayContextDelegate {
    func applePayContext(_ context: STPApplePayContext,
      didCreatePaymentMethod paymentMethod: StripeAPI.PaymentMethod,
      paymentInformation: PKPayment
        // ...
    } async throws -> String {

    func applePayContext(_ context: STPApplePayContext,
      didCompleteWith status: STPApplePayContext.PaymentStatus,
      error: Error?) {
        // ...
    }
}
Recurring payments
In iOS 16 or later, you can adopt merchant tokens by setting the recurringPaymentRequest or automaticReloadPaymentRequest properties on PKPaymentRequest.
Recurring payments can use saved payment methods for off-session transactions only.
To learn more about how to use recurring payments with Apple Pay, see Apple’s PassKit documentation.
Order tracking
To adopt order tracking in iOS 16 or later, implement the applePayContext(context:willCompleteWithResult:handler:) function in your ApplePayContextDelegate. Stripe calls your implementation after the payment is complete, but before iOS dismisses the Apple Pay sheet.
In your implementation:
- Fetch the order details from your server for the completed order.
- Add these details to the provided PKPaymentAuthorizationResult.
- Call the provided completion handler on the main queue.
To learn more about order tracking, see Apple’s Wallet Orders documentation.
Test Apple Pay
To test Apple Pay, you must use a real credit card number and your test API keys. Stripe recognizes that you’re testing and returns a successful test card token for you to use, so you can make test payments on a live card without charging it.
You can’t save Stripe test cards or Apple Pay test cards to Apple Pay wallets to test Apple Pay.