# Apple Pay
Allow customers to securely make payments using Apple Pay on their Apple device.
Apple Pay is a digital wallet that lets customers pay with a card stored on their Apple device instead of manually entering their card details. Customers can pay with Apple Pay on their iPhone, iPad, Mac, or Apple Watch. Refer to Apple’s [compatibility documentation](https://support.apple.com/en-us/HT208531) for the full list of supported devices.
For Payment Links or hosted Checkout, Apple Pay works with no additional configuration. For Elements or embedded Checkout, you need to register your domain for Apple Pay to work. In-app payments require additional configuration changes.
#### Payment method properties
- **Customer locations**
Worldwide1
- **Presentment currency**
See [supported presentment currencies](https://docs.stripe.com/currencies.md#presentment-currencies)
- **Payment confirmation**
Customer-initiated
- **Payment method family**
Wallet
- **Recurring payments**
[Yes](https://docs.stripe.com/apple-pay.md#recurring-payments)
- **Payout timing**
Standard payout timing applies
- **Connect support**
Yes
- **Dispute support**
[Yes](https://docs.stripe.com/apple-pay/disputes-refunds.md#disputed-payments)
- **Manual capture support**
Yes
- **Refunds / Partial refunds**
[Yes / Yes](https://docs.stripe.com/apple-pay/disputes-refunds.md#refunds)
1 Apple Pay recurring support for Indian customers is coming soon.
#### Business locations
Stripe accounts worldwide can accept Apple Pay payments with local currency settlement.
#### Product support
- Connect
- Checkout1
- Payment Links
- Elements
- Subscriptions
- Invoicing
1When Checkout’s [ui_mode](https://docs.stripe.com/api/checkout/sessions/create.md#create_checkout_session-ui_mode) is `embedded_page`, it only supports version 17 or later of Safari and iOS.
## App Store in-app purchase rules for Apple Pay
This guide explains how to configure your app to accept Apple Pay directly for physical goods, services, and other eligible items. Stripe processes these payments, and you pay only the Stripe [processing fees](https://stripe.com/pricing).
For digital products, content, and subscriptions sold in the United States or European Economic Area (EEA), your iOS app can accept Apple Pay by redirecting to an external payment page. You can use the following payment UIs:
- [Stripe Checkout](https://docs.stripe.com/mobile/digital-goods/checkout.md)
- [Web Elements](https://docs.stripe.com/mobile/digital-goods/custom-checkout.md)
- [Payment Links](https://docs.stripe.com/mobile/digital-goods/payment-links.md) (best for limited numbers of products and prices)
In other regions, your iOS app can’t accept Apple Pay for digital products, content, or subscriptions.
## Accept Apple Pay
Stripe offers a variety of methods to add Apple Pay as a payment method. For integration details, select the method you prefer:
# React Native iOS
Use the Stripe [React Native SDK](https://github.com/stripe/stripe-react-native) to accept both Apple Pay and traditional credit card payments. Before starting, enroll in the [Apple Developer Program](https://developer.apple.com/programs/) and [set up Stripe on your server and in your app](https://docs.stripe.com/payments/accept-a-payment.md?payment-ui=mobile&platform=react-native#react-native-setup). Then, [register for an Apple Merchant ID](https://docs.stripe.com/apple-pay.md#merchantid) and [create a new Apple Pay certificate](https://docs.stripe.com/apple-pay.md#csr).
1. [Integrate with Xcode](https://docs.stripe.com/apple-pay.md#xcode-pay)
2. [Set your Apple Merchant ID in StripeProvider](https://docs.stripe.com/apple-pay.md#set-merchantid)
3. [Check if Apple Pay is supported](https://docs.stripe.com/apple-pay.md#check-if-apple-pay-supported)
4. [Present the payment sheet](https://docs.stripe.com/apple-pay.md#present-payment-sheet)
5. [Submit the payment to Stripe](https://docs.stripe.com/apple-pay.md#handle-payment)
> If you use React Native and Expo, Expo Go doesn’t support Apple Pay. To use Apple Pay with Expo, you must create a [development build](https://docs.expo.dev/get-started/set-up-your-environment/?mode=development-build&platform=ios). If you already have an Expo Go project, you can [migrate it to a development build](https://docs.expo.dev/develop/development-builds/expo-go-to-dev-build/).
## Register for an Apple Merchant ID
Obtain an Apple Merchant ID by [registering for a new identifier](https://developer.apple.com/account/resources/identifiers/add/merchant) on the Apple Developer website.
Fill out the form with a description and identifier. Your description is for your own records and you can modify it in the future. Stripe recommends using the name of your app as the identifier (for example, `merchant.com.{{YOUR_APP_NAME}}`).
## Create a new Apple Pay certificate
Create a certificate for your app to encrypt payment data.
Go to the [iOS Certificate Settings](https://dashboard.stripe.com/settings/ios_certificates) in the Dashboard, click **Add new application**, and follow the guide.
Download a Certificate Signing Request (CSR) file to get a secure certificate from Apple that allows you to use Apple Pay.
One CSR file must be used to issue exactly one certificate. If you switch your Apple Merchant ID, you must go to the [iOS Certificate Settings](https://dashboard.stripe.com/settings/ios_certificates) in the Dashboard to obtain a new CSR and certificate.
## Integrate with Xcode
Add the Apple Pay capability to your app. In Xcode, open your project settings, click the **Signing & Capabilities** tab, and add the **Apple Pay** capability. You might be prompted to log in to your developer account at this point. Select the merchant ID you created earlier, and your app is ready to accept Apple Pay.
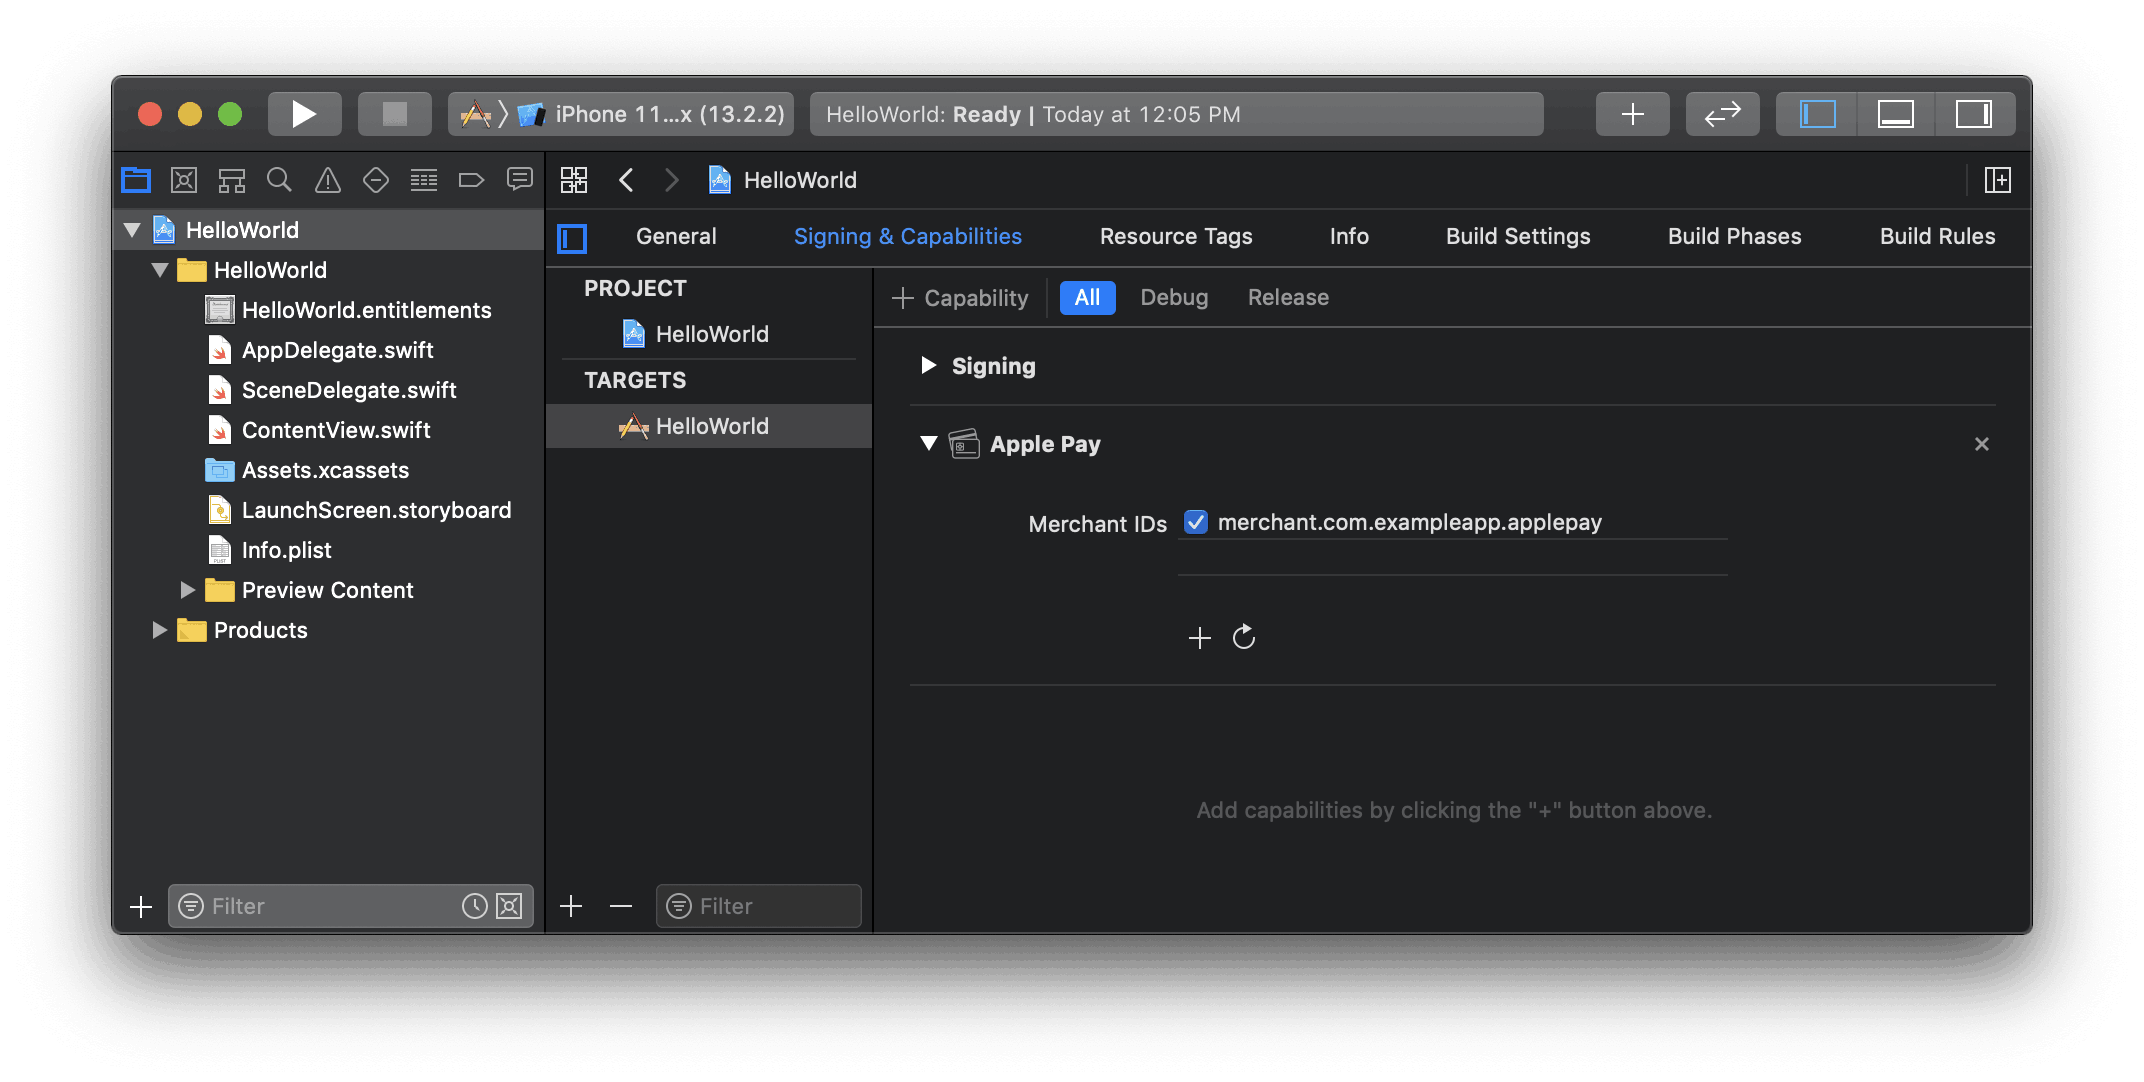
Enable the Apple Pay capability in Xcode
## Set your Apple Merchant ID in StripeProvider
In the `StripeProvider` component, specify the Apple Merchant ID that you successfully registered for:
```jsx
import { StripeProvider } from '@stripe/stripe-react-native';
function App() {
return (
{/* Your app code here */}
);
}
```
## Check if Apple Pay is supported
Before displaying Apple Pay as a payment option in your app, determine if the user’s device supports Apple Pay and that they have a card added to their wallet:
```jsx
import { PlatformPayButton, isPlatformPaySupported } from '@stripe/stripe-react-native';
function PaymentScreen() {
const [isApplePaySupported, setIsApplePaySupported] = useState(false);
useEffect(() => {
(async function () {
setIsApplePaySupported(await isPlatformPaySupported());
})();
}, [isPlatformPaySupported]);
// ...
const pay = async () => {
// ...
};
// ...
return (
{isApplePaySupported && (
)}
);
}
```
## Create the Payment Intent
### Server-side
Make an endpoint that creates a PaymentIntent with an [amount](https://docs.stripe.com/api/payment_intents/object.md#payment_intent_object-amount) and [currency](https://docs.stripe.com/api/payment_intents/object.md#payment_intent_object-currency). Always decide how much to charge on the server side, a trusted environment, as opposed to the client side. This prevents malicious customers from choosing their own prices.
#### curl
```bash
curl https://api.stripe.com/v1/payment_intents \
-u <>: \
-d "amount"=1099 \
-d "currency"="usd"
```
### Client-side
Create a method that requests a PaymentIntent from your server:
```jsx
function PaymentScreen() {
// ...
const fetchPaymentIntentClientSecret = async () => {
const response = await fetch(`${API_URL}/create-payment-intent`, {
method: 'POST',
headers: {
'Content-Type': 'application/json',
},
body: JSON.stringify({
some: 'value',
}),
});
const { clientSecret } = await response.json();
return clientSecret;
};
// ...
}
```
### Troubleshooting
If you’re seeing errors from the Stripe API when attempting to create tokens, you most likely have a problem with your Apple Pay Certificate. You’ll need to generate a new certificate and upload it to Stripe, as described on this page. Make sure you use a CSR obtained from your Dashboard and not one you generated yourself. Xcode often incorrectly caches old certificates, so in addition to generating a new certificate, Stripe recommends creating a new Apple Merchant ID as well.
If you receive the error:
> You haven’t added your Apple merchant account to Stripe
it’s likely your app is sending data encrypted with a previous (non-Stripe) CSR/Certificate. Make sure any certificates generated by non-Stripe CSRs are revoked under your Apple Merchant ID. If this doesn’t resolve the issue, delete the merchant ID in your Apple account and re-create it. Then, create a new certificate based on the same (Stripe-provided) CSR that was previously used. You don’t need to upload this new certificate to Stripe. When finished, toggle the Apple Pay Credentials off and on in your app to ensure they refresh properly.
## Present the payment sheet
In the [PlatformPayButton](https://stripe.dev/stripe-react-native/api-reference/index.html#PlatformPayButton) `onPress` prop, call `confirmPlatformPayPayment` to open an Apple Pay sheet. To display the customer’s cart items on the payment sheet, pass the items as an argument. The final item must represent your company and the total; it appears in the sheet with the word “Pay” prepended (for example, “Pay iHats, Inc. 50 USD”).
> In your code that handles the customer action, don’t include any complex or asynchronous actions before displaying the payment sheet. If the user action doesn’t directly invoke the payment sheet, Apple Pay returns an error.
```jsx
import { confirmPlatformPayPayment } from '@stripe/stripe-react-native';
function PaymentScreen() {
// ... see above
const pay = async () => {
const clientSecret = await fetchPaymentIntentClientSecret()
const { error, paymentIntent } = await confirmPlatformPayPayment(
clientSecret,
{
applePay: {
cartItems: [
{
label: 'Example item name',
amount: '14.00',
paymentType: PlatformPay.PaymentType.Immediate,
},
{
label: 'Tax',
amount: '1.60',
paymentType: PlatformPay.PaymentType.Immediate,
},
{
label: 'iHats, Inc.',
amount: '15.60',
paymentType: PlatformPay.PaymentType.Immediate,
},
],
merchantCountryCode: 'US',
currencyCode: 'USD',
requiredShippingAddressFields: [
PlatformPay.ContactField.PostalAddress,
],
requiredBillingContactFields: [PlatformPay.ContactField.PhoneNumber],
},
}
);
if (error) {
// handle error
} else {
Alert.alert('Success', 'Check the logs for payment intent details.');
console.log(JSON.stringify(paymentIntent, null, 2));
}
};
// ... see above
}
```
## Optional: Create a Payment Method [Client-side]
If you confirm your payment on your server, you can use Apple Pay to only collect a `PaymentMethod` instead of confirming a payment. To do so, call the `createPlatformPayPaymentMethod` method:
```javascript
import {PlatformPayButton, isPlatformPaySupported, createPlatformPayPaymentMethod} from '@stripe/stripe-react-native';
function PaymentScreen() {
const [isApplePaySupported, setIsApplePaySupported] = useState(false);
useEffect(() => {
(async function () {
setIsApplePaySupported(await isPlatformPaySupported());
})();
}, [isPlatformPaySupported]);
const createPaymentMethod = async () => {
const { error, paymentMethod } = await createPlatformPayPaymentMethod({
applePay: {
cartItems: [
{
label: 'Example item name',
amount: '14.00',
paymentType: PlatformPay.PaymentType.Immediate,
},
{
label: 'Total',
amount: '12.75',
paymentType: PlatformPay.PaymentType.Immediate,
},
],
merchantCountryCode: 'US',
currencyCode: 'USD',
},
});
if (error) {
Alert.alert(error.code, error.message);
return;
} else if (paymentMethod) {
Alert.alert(
'Success',
`The payment method was created successfully. paymentMethodId: ${paymentMethod.id}`
);
}
};
return (
{isApplePaySupported && (
)}
);
}
```
## Optional: Recurring payments [Client-side]
In iOS 16 or later, you can adopt [merchant tokens](https://developer.apple.com/apple-pay/merchant-tokens/) by setting the `request` field in `confirmPlatformPayPayment()`'s and `confirmPlatformPaySetupIntent`’s `applePay` params object.
```js
await confirmPlatformPayPayment(
clientSecret,
{
applePay: {
// Make sure to include the rest of the necessary fields
request: {
type: PlatformPay.PaymentRequestType.Recurring,
description: 'String describing my payment',
managementUrl:
'www..com',
billing: {
paymentType: PlatformPay.PaymentType.Recurring,
intervalUnit: PlatformPay.IntervalUnit.Month,
intervalCount: 3,
label: 'My label',
amount: '39.00',
},
},
},
}
);
```
To learn more about how to use recurring payments with Apple Pay, see [Apple’s PassKit documentation](https://developer.apple.com/documentation/passkit/pkpaymentrequest).
## Optional: Order tracking [Client-side]
To adopt [order tracking](https://developer.apple.com/design/human-interface-guidelines/technologies/wallet/designing-order-tracking) in iOS 16 or later, use the `setOrderTracking` callback for the `PlatformPayButton` component.
In your implementation:
1. Fetch the order details from your server for the completed order.
2. Call the provided completion handler in `setOrderTracking` with the results from your server.
```jsx
{
const { orderIdentifier, orderType, authToken, webServiceUrl } =
fetchOrderDetailsFromMyBackend();
completion(orderIdentifier, orderType, authToken, webServiceUrl);
}}
/>
```
To learn more about order tracking, see [Apple’s Wallet Orders documentation](https://developer.apple.com/documentation/walletorders).
## Test Apple Pay
To test Apple Pay, you must use a real credit card number and your test [API keys](https://docs.stripe.com/keys.md). Stripe recognizes that you’re testing and returns a successful test card token for you to use, so you can make test payments on a live card without charging it.
You can’t save [Stripe test cards](https://docs.stripe.com/testing.md#use-test-cards) or [Apple Pay test cards](https://developer.apple.com/apple-pay/sandbox-testing/) to Apple Pay wallets to test Apple Pay.
## See also
- [iOS Integration](https://docs.stripe.com/payments/accept-a-payment.md?payment-ui=mobile&platform=ios)
- [Apple Pay on the Web](https://docs.stripe.com/elements/express-checkout-element.md)
- [Apple Pay Best Practices](https://docs.stripe.com/apple-pay/best-practices.md)