How UI extensions work
Learn about the UI extensions system, and how you can extend the Stripe Dashboard.
Stripe Apps UI extensions let you render your own UI into Stripe’s products using TypeScript and React. These tools should be familiar if you’ve developed in React. But because they run within a secure sandboxed iframe embedded on another web page, they differ from standard browser-based React applications in several ways.
Overview
UI extensions are written in TypeScript and use React to create UI using Stripe’s UI toolkit. Unlike other React environments, UI extensions don’t support arbitrary HTML. Instead, they exclusively use UI components provided by Stripe. The structure of a UI extension involves some key directories and files:
stripe-app.: The app manifest. It describes how apps interact with Stripe, including what permissions they need, whether they have a UI extension, and—if so—where that extension appears in Stripe’s UI.json package.: NPM package metadata. The UI extensions are regular NPM packages. You can manage dependencies using npm or yarn.json src: The actual TypeScript source code for the UI extension. By default, the CLI places a generic view insrc/viewswith a corresponding entry instripe-app..json
Developing a UI extension relies on the Stripe CLI app plugin. The CLI takes care of initializing apps with the correct structure, configuring the app manifest, running a development server, and bundling the app appropriately for submission to Stripe.
Developing a UI extension
- As the app developer, you write views, which are React components registered to appear whenever a specific viewport appears on the screen. For example, to make a view appear whenever a user is viewing an invoice details page, register it to the viewport
stripe..dashboard. invoice. detail - When you’re ready to upload your app, CLI commands help you bundle up your code, upload it to Stripe, and host your app on Stripe’s CDN.
- When your app’s UI extension gets initialized, Stripe downloads the app’s code into a sandboxed iframe.
- When a user goes to a page that has a particular viewport (for example,
/invoices/inv_):1283 - Stripe defines the UI extension’s view inside the iframe with the context provided by the viewport.
- Stripe passes the view to the Dashboard to be displayed to users.
- When users interact with the UI extension (for example, by clicking a button), event handlers in the UI extension iframe receive the event and can update the view.
Views and viewports
To display UI to users of an app, create a React view and register it with a viewport.
Views are React components that the app exports. Viewports are identifiers that indicate where the view displays. When you upload an app, all views exported by the app register with the associated viewport.
Views automatically register with viewports when you run stripe apps add view. Behind the scenes, this adds an entry to the app manifest.
{
  //... other manifest properties
  "ui_extension": {
    "views": [
      {
          "viewport": "stripe.dashboard.invoice.detail", // See all valid values at stripe.com/docs/stripe-apps/reference/viewports
          "component": "NameOfComponent" // This is provided by you
      }
      // ... additional views
    ]
  }
}
Lifecycle of a UI extension
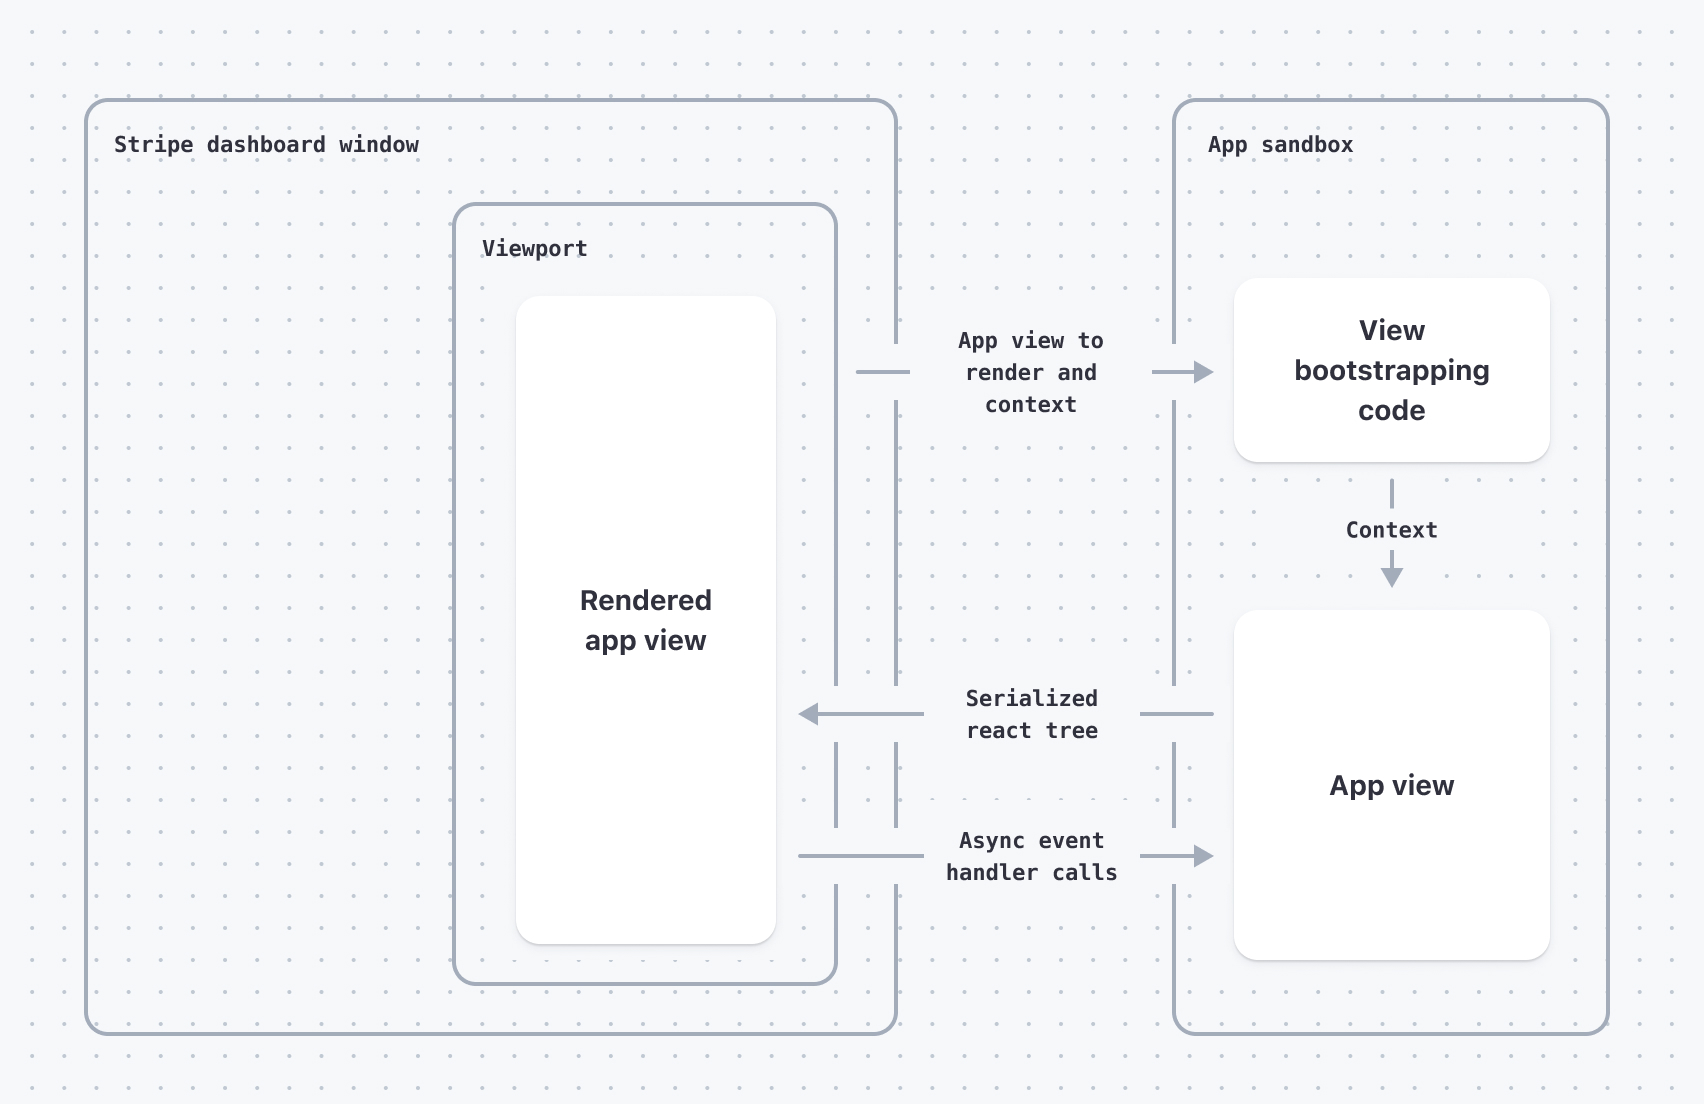
UI extensions run in an invisible, sandboxed iframe that asynchronously sends UI updates to the Stripe Dashboard. A single sandboxed iframe can accommodate multiple views at the same time.
The lifecycle of the sandboxed iframe and the views it powers works like this:
- The Dashboard loads the UI extension iframe, which happens between when the Dashboard loads and when the user opens the app.
- When a view needs to be displayed, the Dashboard waits for the sandboxed iframe to initialize, and then directs it to mount the correct view and passes in the appropriate context.
- When the user dismisses the view (for example, when they close the app drawer), the view unmounts. Unmounting the view removes it from the DOM and from the sandboxed React tree.
- The sandboxed iframe might stay running or shut down depending on resource usage. The only guarantee is that the Dashboard makes a best-effort attempt to allow useEffect and other cleanup handlers to run before terminating the iframe.
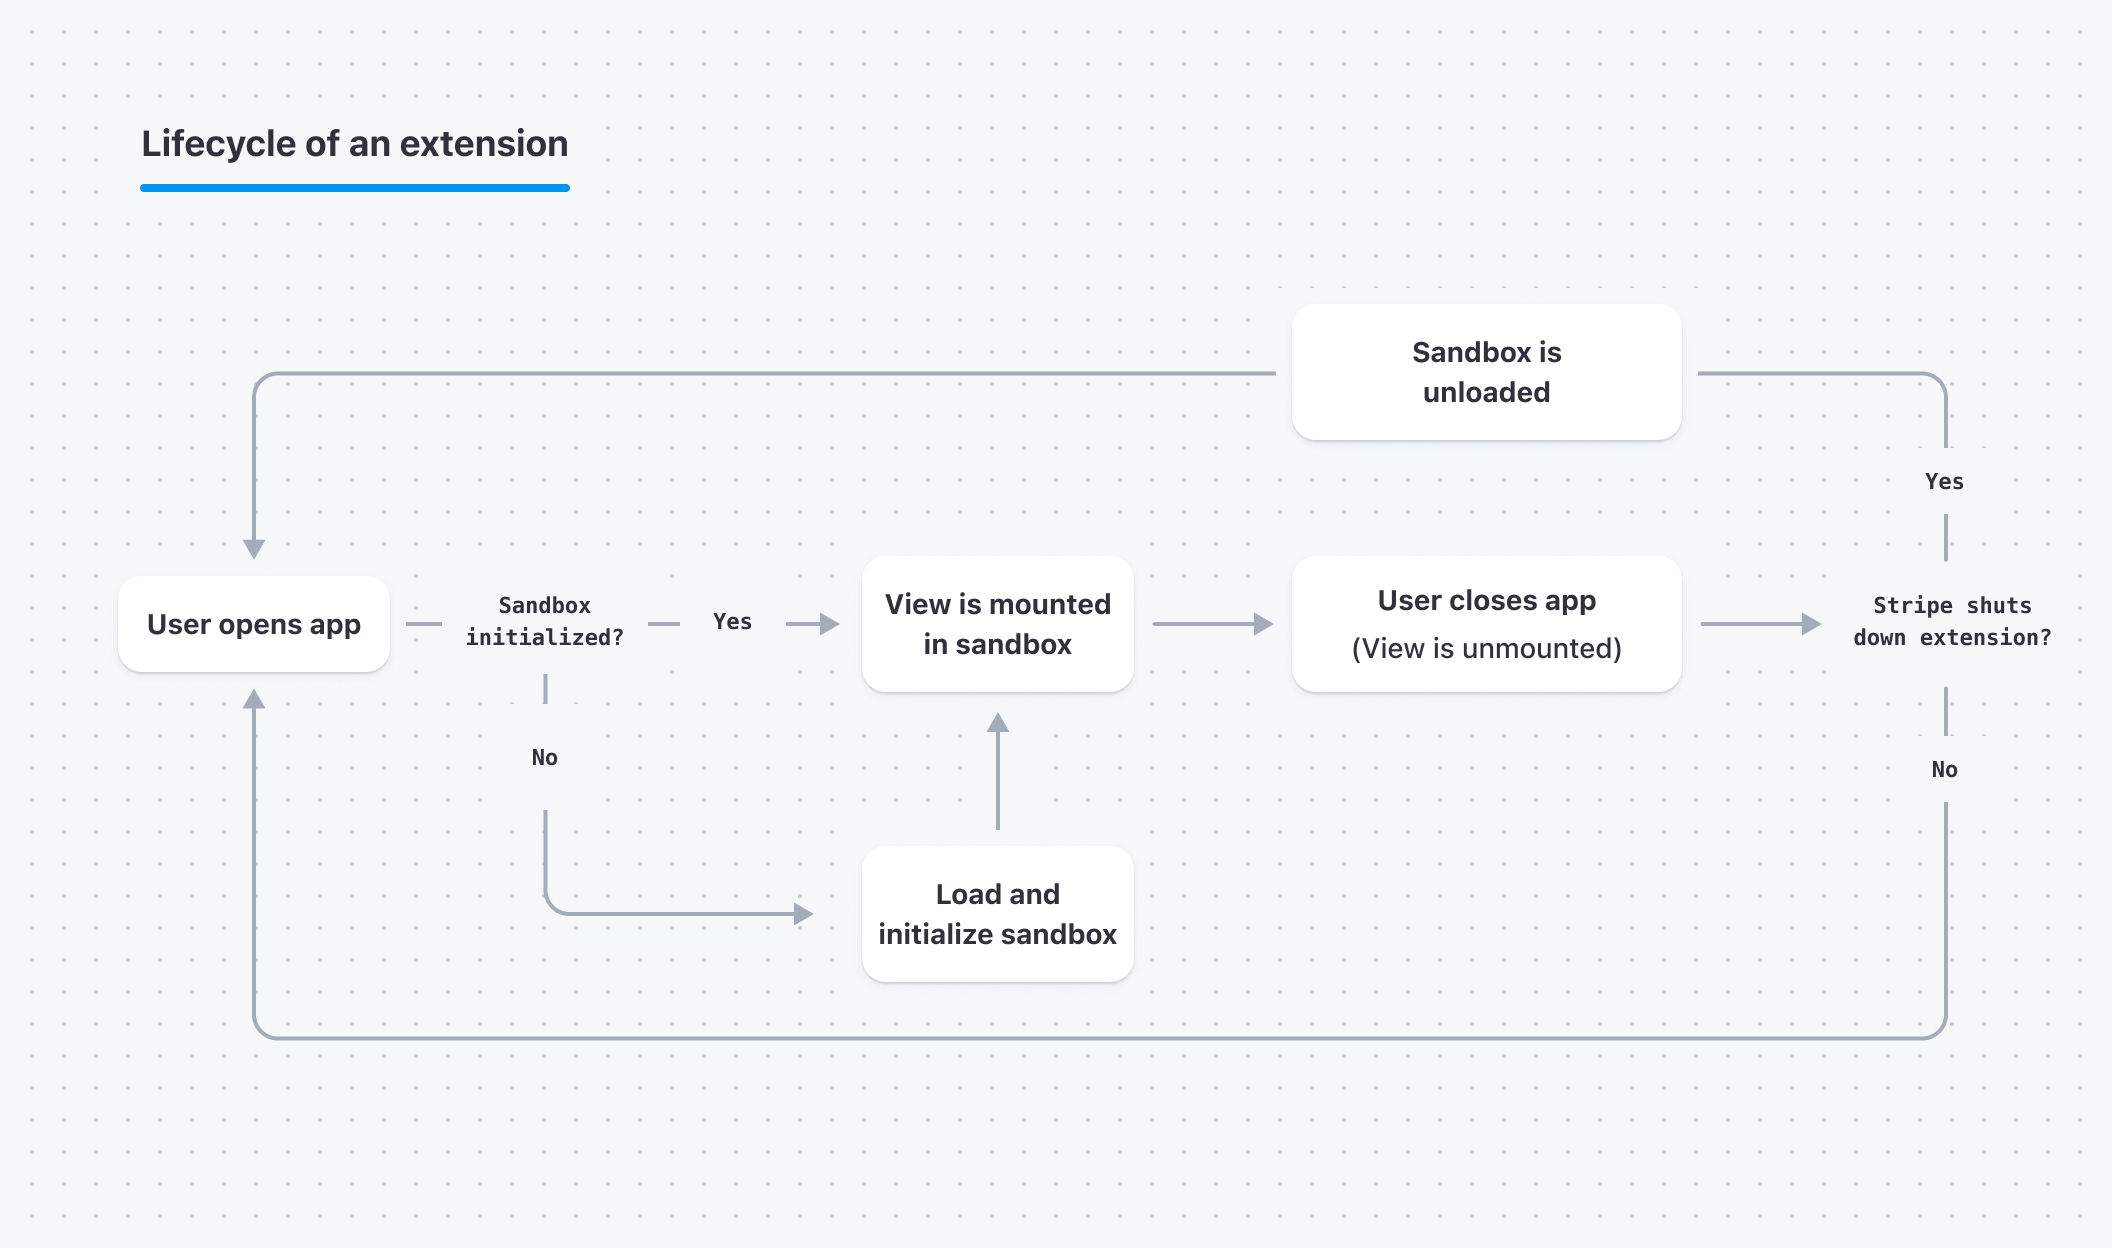
Lifecyle of a Stripe Apps UI extension
Sandboxed iframe limitations
Because of the unique sandbox environment where UI extension code runs, a Stripe Apps UI extension can’t do everything that a regular React app running in a full browser context can do.
Main differences between Stripe Apps and regular React apps
- Stripe Apps don’t have direct access to the DOM. They run in an iframe with a separate DOM that’s invisible from the Dashboard.
- The Dashboard proxies and serializes all data to the app. UI toolkit components only accept serializable data.
- The Dashboard also proxies and serializes all props to the app, so functions passed to or triggered by UI toolkit components are asynchronous.
React and JavaScript limitations
The restrictions below affect what you can do with React and JavaScript when developing your app. The React tree doesn’t render to the DOM until the Stripe Dashboard host environment deserializes and evaluates it. The DOM for the app updates, and the instance of React in the Dashboard manages data input.
Global document and window objects are limited
The DOM environment that the UI extension code is running in is locked down by the sandboxed iframe. This means that top-level APIs like localStorage, indexedDB, and BroadcastChannel are unavailable. Any DOM API that relies on the same-origin policy doesn’t work as expected because sandboxed iframes have a null origin.
React ref props are unsupported
UI components don’t support React ref props because the React tree is serialized and passed to the Stripe Dashboard to be rendered. The DOM that the components are eventually rendered into is inaccessible from the App code running in the sandboxed iframe.
Apps can’t control the React version
The default package. file generated with each Stripe app doesn’t have a dependency entry for react. Adding a specific version of React in the package. file of the Stripe app doesn’t control which React version renders your app; it only performs type checking and unit testing. The Stripe Dashboard uses its version of React (currently version 17.0.2) to render all apps. To ensure compatibility, only change it if Stripe instructs you to.
Use uncontrolled components for interactions
The Dashboard serializes and proxies all data input to the app, which results in input lag while using React controlled components. This lag is perceptible by the user and can potentially overwrite characters that they typed in the meantime. It also results in the cursor skipping to the end of a text input if they try to edit text at the beginning.
To reduce lag in your app, use user inputs in an uncontrolled manner:
import {useState} from 'react';
import {TextArea} from '@stripe/ui-extension-sdk/ui';

const App = () => {
  const defaultValue = 'Initial TextArea value';
  const [text, setText] = useState(defaultValue);
  return (
    <>
      <TextArea
        label="Message"
        // This doesn't work ❌
        // Attempting to edit text at the beginning skips the cursor to the end
        value={text}
        onChange={e => setText(e.target.value)}
      />
      <TextArea
        label="Message"
        // This will work ✅
        defaultValue={defaultValue}
        onChange={e => setText(e.target.value)}
      />
    </>
  );
};
UI component restrictions
The restrictions below apply to UI components. While your extension runs in an isolated environment, UI components render directly in the Dashboard. The SDK informs the Dashboard to render UI toolkit components, which results in the following limitations.
Components can’t stop event propagation
Because event handlers are called asynchronously, the event has already propagated by the time the app’s event handler is called. As a result, the app can’t stop event propagation or bubbling.
Components only accept serializable data types as props
UI components only accept serializable data types. Passing unserializable data types like Map or Set as a prop to a UI Toolkit component throws an error.
Use only simple types, functions, or React events as props. Supported types are:
- Strings, numbers,
true,false,null, andundefined - Objects whose keys and values are all simple types
- Arrays whose values are all simple types
- Functions, but they become asynchronous when proxied. Any functions passed as arguments or returned are also subject to the type limitations
- React events
Components don’t support render functions
React renders synchronously, but functions passed to UI components become asynchronous after the Dashboard proxies them to the app. Functions that generate markup passed to a UI component don’t finish rendering in time for React to use their results. As a result, no UI components accept render functions.
This means that the following patterns don’t work:
// This doesn't work ❌
<ItemProvider>
  {(data) => (
    <Item data={data} />
  )}
</ItemProvider>
// This doesn't work ❌
<Item renderFooter={() => <div>footer</div>} />
JSX can only be passed to non-children props as a single node
UI components support props that take a single React element:
// This will work ✅
<Item footer={<div>footer</div>} />
More complex JSX data structures are unsupported, however:
// This doesn't work ❌
<Item footer={[<div>one</div>, <div>two</div>]} />
// This doesn't work ❌
<Item footer={{
  one: <div>one</div>,
  two: <div>two</div>
}} />
If you need to pass multiple React elements to a UI component, wrap them in a fragment:
// This works ✅
<Item footer={
  <>
    <div>one</div>
    <div>two</div>
  </>
}/>
A similar constraint applies to children. Arrays and objects containing JSX are unsupported, but multiple React elements are allowed:
// This works ✅
<Item>
  <div>one</div>
  <div>two</div>
</Item>
Installing NPM Packages
There aren’t any restrictions on adding third-party NPM packages to Stripe Apps; feel free to install packages as you see fit. However, not all packages work as expected given the sandboxed iframe limitations of UI extensions.
Using a utility library like lodash is fine, because lodash doesn’t require DOM access:
import { Box, Button } from "@stripe/ui-extension-sdk/ui";
import { useState } from "react";
import kebabCase from "lodash/kebabCase";

const text = "A note to the user";

const App = () => {
  const [isKebabCase, setIsKebabCase] = useState(false);
  return (
    <>
      {/* This will work ✅ */}
      <Box>{isKebabCase ? kebabCase(text) : text}</Box>
      <Button
        onPress={() => {
          setIsKebabCase(!isKebabCase);
        }}
      >
        Toggle kebab-case
      </Button>
    </>
  );
};
Using a form library like react-hook-form won’t work because react-hook-form uses Refs to manage form state:
import { TextField } from "@stripe/ui-extension-sdk/ui";
import { useForm } from "react-hook-form";

const App = () => {
  const { register } = useForm();
  const { onChange, name, ref } = register("firstName");
  return (
    <TextField
      label="First name"
      placeholder="Enter your name"
      name={name}
      onChange={onChange}
      // This doesn't work ❌
      ref={ref}
    />
  );
};