# Add authorization flows
Implement PKCE OAuth workflows in your Stripe app.
You can implement OAuth with your *UI extension* (A set of APIs that allow you to inject user interface elements into the Stripe Dashboard using TypeScript and React) in the Dashboard to retrieve access tokens from an OAuth provider instead of building an OAuth backend. If the user gives your *Stripe App* (An app that you can build on top of Stripe to customize the functionality of the Stripe Dashboard UI, leverage Stripe user data, store data on Stripe, and more) access to an OAuth provider, they can interact with the services of the OAuth provider directly from your Stripe app in the Dashboard.
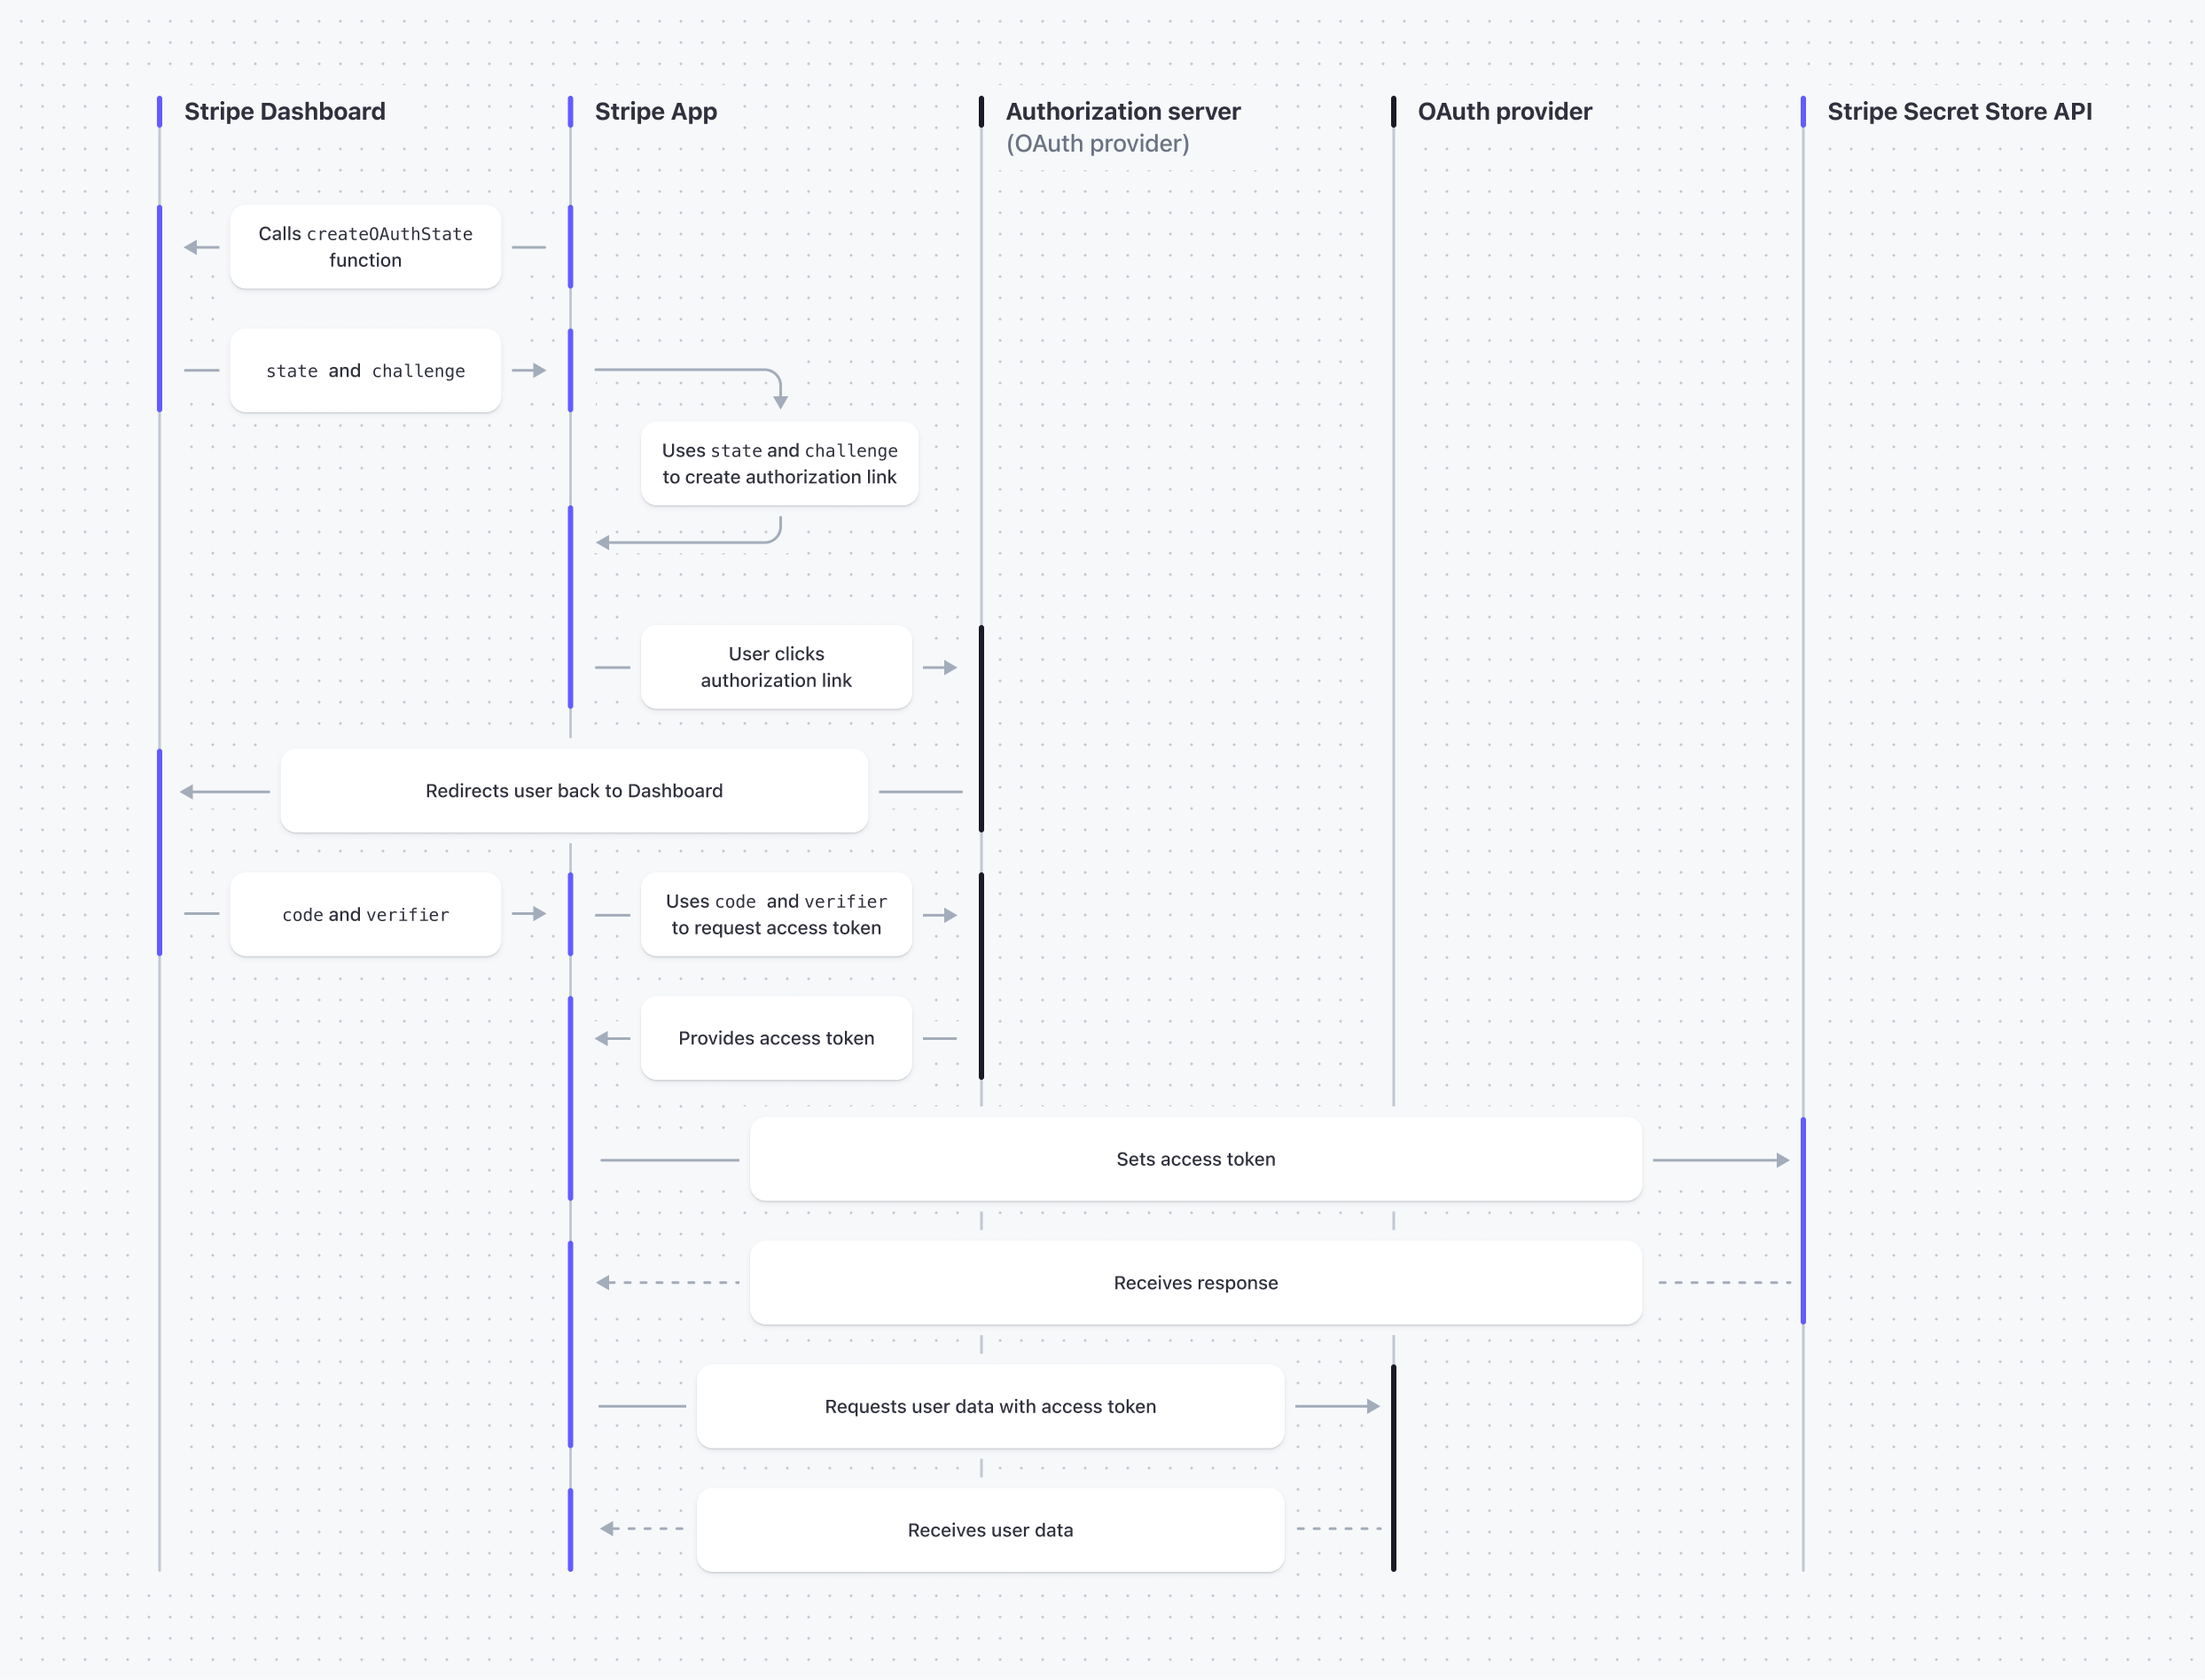
OAuth flow with a Stripe app
## Before you begin
- Ensure that your OAuth provider supports the [Proof Key for Code Exchange (PKCE)](https://auth0.com/docs/get-started/authentication-and-authorization-flow/authorization-code-flow-with-proof-key-for-code-exchange-pkce) flow.
- If you haven’t already, create an app with your OAuth provider to connect and use with your Stripe App.
- [Create a Stripe app](https://docs.stripe.com/stripe-apps/create-app.md) and [build a UI](https://docs.stripe.com/stripe-apps/build-ui.md). The UI extension retrieves the access token from the OAuth provider with the PKCE flow.
## Create an authorization link
End users click an authorization link from your app to start the OAuth flow and give your app access to the service of the OAuth provider.
1. Create the *test mode* (Test mode is another way to test changes to your integration without affecting production. A sandbox is the default and recommended way to test integrations. All Stripe features are available in test mode but you can't create live charges unless you're in live mode) and *live mode* (Use this mode when you’re ready to launch your app. Card networks or payment providers process payments) OAuth redirect URLs. This process also applies in a *sandbox* (A sandbox is an isolated test environment that allows you to test Stripe functionality in your account without affecting your live integration. Use sandboxes to safely experiment with new features and changes) environment. The redirect URL is unique to your app and includes your app `id` in the path. For example, if the `id` field in your [app manifest](https://docs.stripe.com/stripe-apps/reference/app-manifest.md) is `"id": "com.example.oauth-example"`:
- The test mode URL is:
```
https://dashboard.stripe.com/test/apps-oauth/com.example.oauth-example
```
- The live mode URL is:
```
https://dashboard.stripe.com/apps-oauth/com.example.oauth-example
```
2. Register the test and live OAuth redirect URLs with your OAuth provider.
3. From your app’s UI extension, create a pathway that routes users from your Stripe app to authorize the OAuth provider by passing the following parameters in the OAuth redirect URLs:
| Parameter | Value |
| ----------------------- | -------------------------------------------------------------------------------------------------------------------------------------------------------- |
| `response_type` | This is always `code`. The PKCE flow uses `code` as the value to request an authorization code from the OAuth provider. |
| `client_id` | The ID of your OAuth app assigned from your OAuth provider. |
| `redirect_uri` | The Stripe app’s OAuth redirect URL. This is the URL the OAuth provider uses to redirect a user to your app. |
| `state` | The `state` return value from the [createOAuthState](https://docs.stripe.com/stripe-apps/reference/extensions-sdk-api.md#createOAuthState) function. |
| `code_challenge` | The `challenge` return value from the [createOAuthState](https://docs.stripe.com/stripe-apps/reference/extensions-sdk-api.md#createOAuthState) function. |
| `code_challenge_method` | This is always `S256`. |
You can use the following code example to route users from your Stripe App to authorize a third-party app using the OAuth redirect URLs and the [Button](https://docs.stripe.com/stripe-apps/components/button.md) UI component:
```ts
import {
ContextView,
Button,
} from '@stripe/ui-extension-sdk/ui';
import * as React from 'react';
import {createOAuthState} from '@stripe/ui-extension-sdk/oauth';
import type {ExtensionContextValue} from '@stripe/ui-extension-sdk/context';
const {useState, useEffect} = React;
const clientID = 'your_client_id';
const getRedirectURL = (mode: 'live' | 'test') => `https://dashboard.stripe.com/${
mode === 'test' ? 'test/' : ''
}apps-oauth/com.example.oauth-example`;
const getAuthURL = (state: string, challenge: string, mode: 'live' | 'test') =>
`https://www.example.com/oauth2/authorize?response_type=code&client_id=${clientID}&redirect_uri=${getRedirectURL(mode)}&state=${state}&code_challenge=${challenge}&code_challenge_method=S256`;
const ExampleApp = ({environment}: ExtensionContextValue) => {
const {mode} = environment;
const [authURL, setAuthURL] = useState('');
useEffect(() => {
createOAuthState().then(({state, challenge}) => {
setAuthURL(getAuthURL(state, challenge, mode));
});
}, [mode]);
return (
);
};
export default ExampleApp;
```
## Retrieve an access token from the OAuth provider
Your app can only make requests on behalf of the current user. After the user authorizes your app, the Dashboard passes their OAuth data to your app through the `code` and `verifier` values of the `oauthContext` [context prop](https://docs.stripe.com/stripe-apps/reference/extensions-sdk-api.md#props).
Only valid authorization attempts allow your app to read the `code`, `verifier`, and if applicable, custom `state` values. An authorization attempt is valid if the OAuth provider redirects to the `redirect_uri` and includes the `state` value in the matching query string parameter of the authorization link. The `state` value must be identical to the `state` value returned by `createOAuthState` function (when you created the authorization link).
From your app’s UI extension, retrieve the access token from the OAuth provider with the following parameters:
| Parameter | Value |
| --- | --- |
| `code` | The value of the `oauthContext.code` [React prop](https://docs.stripe.com/stripe-apps/reference/extensions-sdk-api.md#props). |
| `grant_type` | This is always `authorization_code`. |
| `code_verifier` | The value of the `oauthContext.verifier` [React prop](https://docs.stripe.com/stripe-apps/reference/extensions-sdk-api.md#props). |
| `client_id` | Your client ID from the OAuth provider. |
| `redirect_uri` | The Stripe app’s OAuth redirect URL. |
You can use the following code example to retrieve an access token from an OAuth provider:
```ts
import {ContextView} from '@stripe/ui-extension-sdk/ui';
import * as React from 'react';
import type {ExtensionContextValue} from '@stripe/ui-extension-sdk/context';
const {useState, useEffect} = React;
// Store the authorization token data.
interface TokenData {
account_id: string;
access_token: string;
expires_in: number;
}
const clientID = 'your_client_id';
const getRedirectURL = (mode: 'live' | 'test') => `https://dashboard.stripe.com/${
mode === 'test' ? 'test/' : ''
}apps-oauth/com.example.oauth-example`;
// Fetch the authorization token from an example authorization server.
const getTokenFromAuthServer = async ({code, verifier, mode}: {code: string, verifier: string, mode: 'live' | 'test'}): Promise => {
try {
const response = await fetch(`https://api.example.com/oauth2/token?code=${code}&grant_type=authorization_code&code_verifier=${verifier}&client_id=${clientID}&redirect_uri=${getRedirectURL(mode)}`, {
method: 'POST',
headers: { 'Content-Type': 'application/x-www-form-urlencoded' },
});
if (response.ok) {
return await response.json();
}
throw new Error(await response.text());
} catch (e) {
console.error('Unable to retrieve token from authorization server:', (e as Error).message);
return null;
}
};
const ExampleApp = ({environment, oauthContext}: ExtensionContextValue) => {
const [tokenData, setTokenData] = useState(null);
const code = oauthContext?.code || '';
const verifier = oauthContext?.verifier || '';
const {mode} = environment;
useEffect(() => {
if (code && verifier && !tokenData) {
getTokenFromAuthServer({code, verifier, mode}).then(setTokenData);
}
}, [code, verifier, mode, tokenData]);
return (
)
};
export default ExampleApp;
```
## Set and find an access token
Set and find the access token in the Secret Store API to enable your app to store and use it in later sessions:
1. Add the `secret_write` permission to your app:
```bash
stripe apps grant permission "secret_write" "Allows storing secrets between page reloads"
```
2. From your app’s UI extension, set the access token in the Secret Store API:
```ts
import {ContextView} from '@stripe/ui-extension-sdk/ui';
import * as React from 'react';
import Stripe from 'stripe';
import {createHttpClient, STRIPE_API_KEY} from '@stripe/ui-extension-sdk/http_client';
import type {ExtensionContextValue} from '@stripe/ui-extension-sdk/context';
const {useState, useEffect} = React;
interface TokenData {
account_id: string;
access_token: string;
expires_in: number;
}
const clientID = 'your_client_id';
const getRedirectURL = (mode: 'live' | 'test') => `https://dashboard.stripe.com/${
mode === 'test' ? 'test/' : ''
}apps-oauth/com.example.oauth-example`;
// Fetch the authorization token from an example authorization server.
const getTokenFromAuthServer = async ({code, verifier, mode}: {code: string, verifier: string, mode: 'live' | 'test'}): Promise => {
try {
const response = await fetch(`https://api.example.com/oauth2/token?code=${code}&grant_type=authorization_code&code_verifier=${verifier}&client_id=${clientID}&redirect_uri=${getRedirectURL(mode)}`, {
method: 'POST',
headers: { 'Content-Type': 'application/x-www-form-urlencoded' },
});
if (response.ok) {
return await response.json();
}
throw new Error(await response.text());
} catch (e) {
console.error('Unable to retrieve token from authorization server:', (e as Error).message);
return null;
}
};
const stripe = new Stripe(STRIPE_API_KEY, {
httpClient: createHttpClient(),
apiVersion: '2026-06-24.dahlia',
});
// Save the token to Secret Store API
const saveTokenData = async ({userID, tokenData}: {userID: string, tokenData: TokenData}) => {
try {
await stripe.apps.secrets.create({
scope: { type: 'user', user: userID },
name: 'oauth_token',
payload: JSON.stringify(tokenData),
});
} catch (e) {
console.error('Unable to save token to Secret Store API:', (e as Error).message);
}
}
const ExampleApp = ({userContext, environment, oauthContext}: ExtensionContextValue) => {
const [tokenData, setTokenData] = useState(null);
const code = oauthContext?.code || '';
const verifier = oauthContext?.verifier || '';
const {mode} = environment;
const {id: userID} = userContext;
useEffect(() => {
if (code && verifier && !tokenData) {
getTokenFromAuthServer({code, verifier, mode}).then(tokenData => {
if (tokenData) {
setTokenData(tokenData);
saveTokenData({userID, tokenData});
}
});
}
}, [code, verifier, mode, userID, tokenData]);
return (
)
};
export default ExampleApp;
```
For more information, see [Set a secret](https://docs.stripe.com/api/apps/secret_store/set.md).
3. From your app’s UI extension, find the access token in the Secret Store API:
```ts
import {ContextView} from '@stripe/ui-extension-sdk/ui';
import * as React from 'react';
import Stripe from 'stripe';
import {createHttpClient, STRIPE_API_KEY} from '@stripe/ui-extension-sdk/http_client';
import type {ExtensionContextValue} from '@stripe/ui-extension-sdk/context';
const {useState, useEffect} = React;
interface TokenData {
account_id: string;
access_token: string;
expires_in: number;
}
const stripe = new Stripe(STRIPE_API_KEY, {
httpClient: createHttpClient(),
apiVersion: '2026-06-24.dahlia',
});
// Read the token from Secret Store API
const getTokenFromSecretStore = async (userID: string): Promise => {
try {
const response = await stripe.apps.secrets.find({
scope: { type: 'user', user: userID },
name: 'oauth_token',
expand: ['payload'],
});
const secretValue: string = response.payload!;
return JSON.parse(secretValue) as TokenData;
} catch (e) {
console.error('Unable to retrieve token from Secret Store API:', (e as Error).message);
return null;
}
};
const ExampleApp = ({userContext}: ExtensionContextValue) => {
const [tokenData, setTokenData] = useState(null);
const {id: userID} = userContext;
useEffect(() => {
if (!tokenData) {
getTokenFromSecretStore(userID).then(setTokenData);
}
}, [userID, tokenData]);
return (
)
};
export default ExampleApp;
```
For more information, see [Find a secret](https://docs.stripe.com/api/apps/secret_store/find.md).
## See also
- [Store secrets](https://docs.stripe.com/stripe-apps/store-secrets.md)
- [Server-side logic](https://docs.stripe.com/stripe-apps/build-backend.md)
- [Upload your app](https://docs.stripe.com/stripe-apps/upload-install-app.md)