Add an app settings page
Create a page that allows users to configure their settings for your Stripe app.
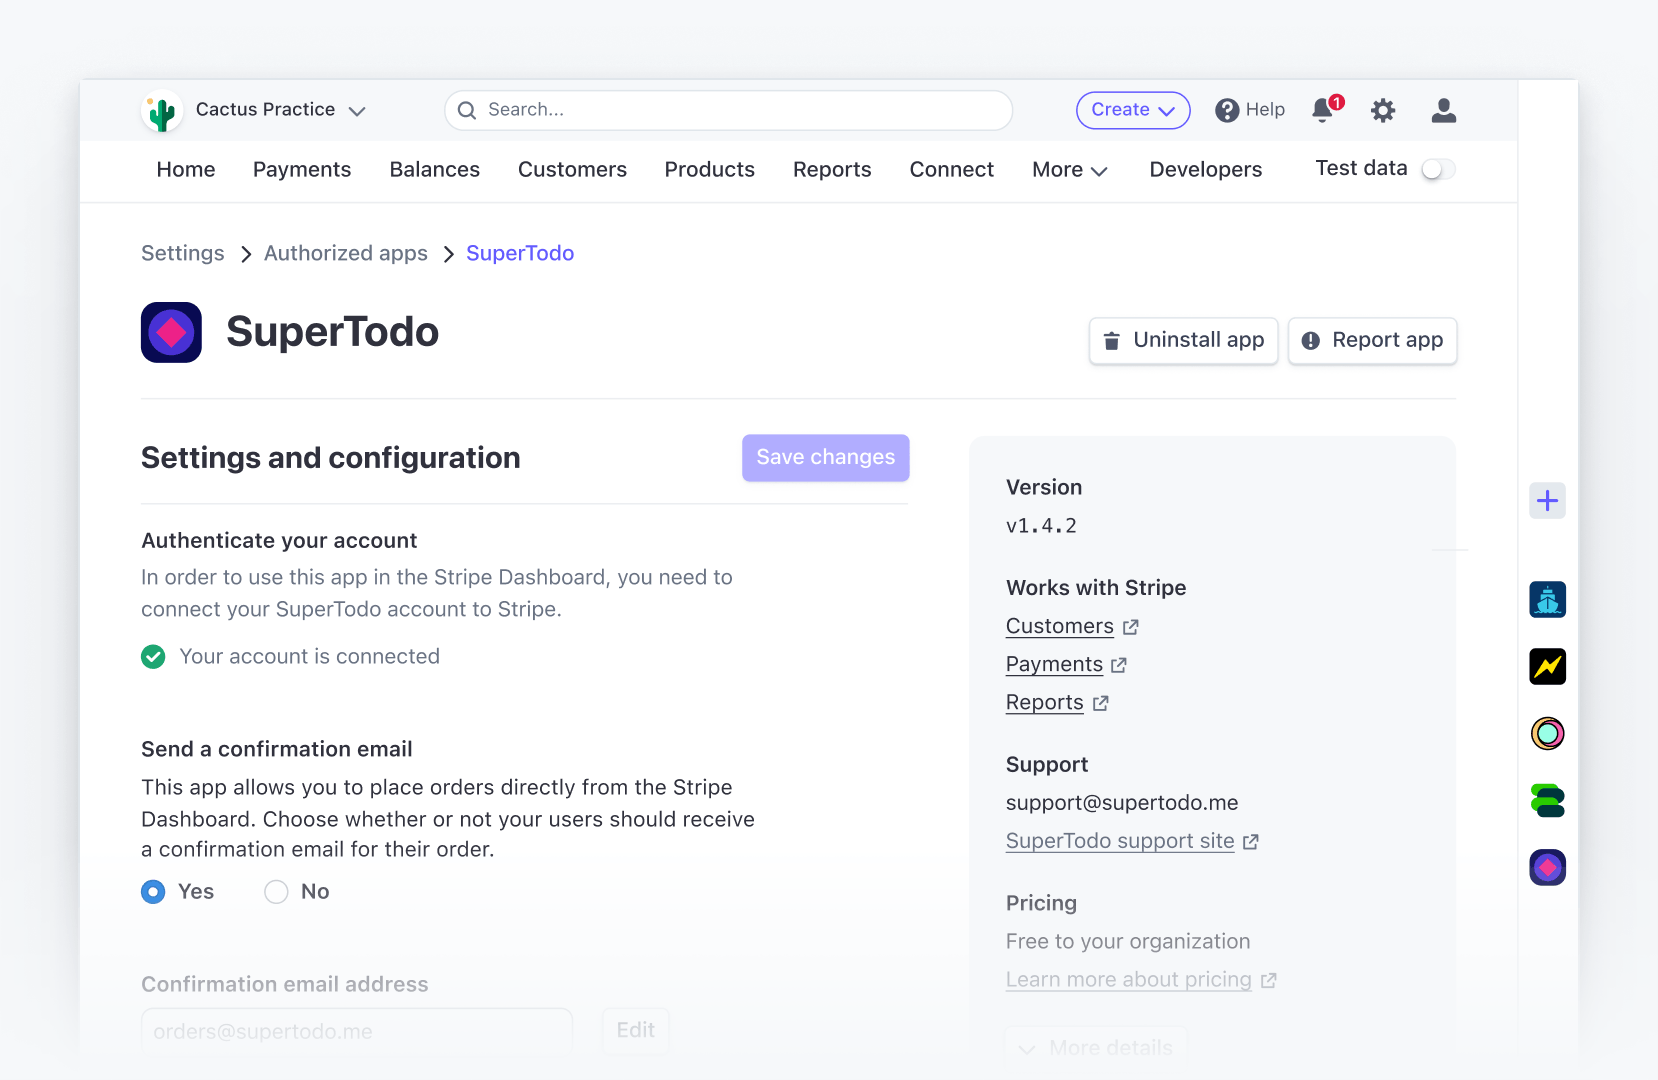
When you upload your app to Stripe, we create an app settings page in the Stripe Dashboard. The rest of the page is open for you to create custom settings.
How to use app settings
An account administrator who installs your app can use the settings page in several ways:
- Configuring your app for their use case: For example, say a business on Stripe wants to synchronize payments data from the last seven days with another application. Your settings page can provide a dropdown menu to let admin users select 1 week as the time period. The configuration applies globally on the account, meaning all users on that Stripe account now see data from the past week in your app.
- Authenticating users: If your app connects to a different application—outside of Stripe—you need a place for Stripe users to log in to the other app, pass credentials, and handle authentication. The settings page is the best place for users to link accounts in this way. For example, an app that uses a third-party API like Zendesk needs a
SettingsViewto authenticate a user with their Zendesk account. - Uninstalling an app: The only place to uninstall an app is the settings page. You can’t remove the uninstall button from the settings page. There are also buttons for users to report your app and view its marketplace listing if you have one.
What you can do with it
By default, the settings page includes buttons for uninstalling and reporting your app, plus various app details. To populate the page with custom settings, use SettingsView. This view root component renders in the settings page. Add UI components, like tabs and form fields, to create the user experience you want.

What SettingsView looks like in the Stripe Dashboard
How to customize the settings page
Populate your app’s empty settings page by defining a settings view and composing a UI to let your users set up and configure your app.
You have control over the design of your app settings page. In the developer preview mode, the settings page appears as a smaller view. In live mode, your settings page is a full screen.
Add a settings view
Define a settings view with the CLI:
stripe apps add settings
You can name your settings component anything you want. The generated settings view is available in the src/views directory. In the app manifest, your new view is tied to the settings viewport in a ui_ field:
{
  ...,
  "ui_extension": {
    "views": [
      ...,
      {
        "viewport": "settings",
        "component": "AppSettings"
      }
    ],
  }
}
This code shows how a view is a pairing of a React component plus a specified viewport. In this case, the AppSettings view root component appears on the settings page of the Stripe Dashboard—the settings viewport.
The SettingsView view root component isn’t tied to a specific object, but tied instead to the settings viewport. The settings viewport maps to predefined locations in the Dashboard, outside of the app drawer.
Preview your settings page
While previewing your app locally, test your SettingsView at https://dashboard.stripe.com/apps/settings-preview to see what it looks like.
After you upload your app, your SettingsView renders on the app settings page in the Dashboard. To see it live, go to https://dashboard. and replace YOUR_ with the ID you specified when creating your app.
Save the values
When a user configures their settings, your app needs to apply those settings. Provide a function to pass to the SettingsView component for handling the save event. Clicking the Save button triggers the save event.
The onSave callback function receives an object of values. This object maps any form elements into key value pairs where the element name attribute is the key and the element value attribute is the value:
/**
  * An example app settings view that provides two settings fields of first & last name.
  * The fields are combined into a single string value and passed to an external API.
  */
import {SettingsView, TextField} from "@stripe/ui-extension-sdk/ui";

const ExampleAppSettings = () => {
  // Define a callback function to pass to the onSave event.
  const saveSettings = async (values: any) => {
    try {
      // Extract our fields from the values object. The key is the name attribute of the form element.
      const { firstname, lastname } = values;
      // Make a POST request to an external API
      const result = await fetch(
        'https://www.my-api.com/',
        {
          method: 'POST',
          body: JSON.stringify({
            fullName: `${firstname} ${lastname}`,
          }),
        }
      );
      await result.text();
    } catch (error) {
      console.error(error);
    }
  };

  return (
    /* Assign our callback function to the onSave property */
    <SettingsView onSave={saveSettings}>
      { /* A name attribute for each field is required to handle the form data in the onSave callback */ }
      <TextField
        name="firstname"
        label="First name"
      />
      <TextField
        name="lastname"
        label="Last name"
      />
    </SettingsView>
  );
};

export default ExampleAppSettings;
For more information, see the SettingsView reference.
Store and retrieve settings
To handle storage and retrieval of the settings values, connect the SettingsView component to an app backend or a third-party service that includes application settings.
See a settings UI example.
Display a success message
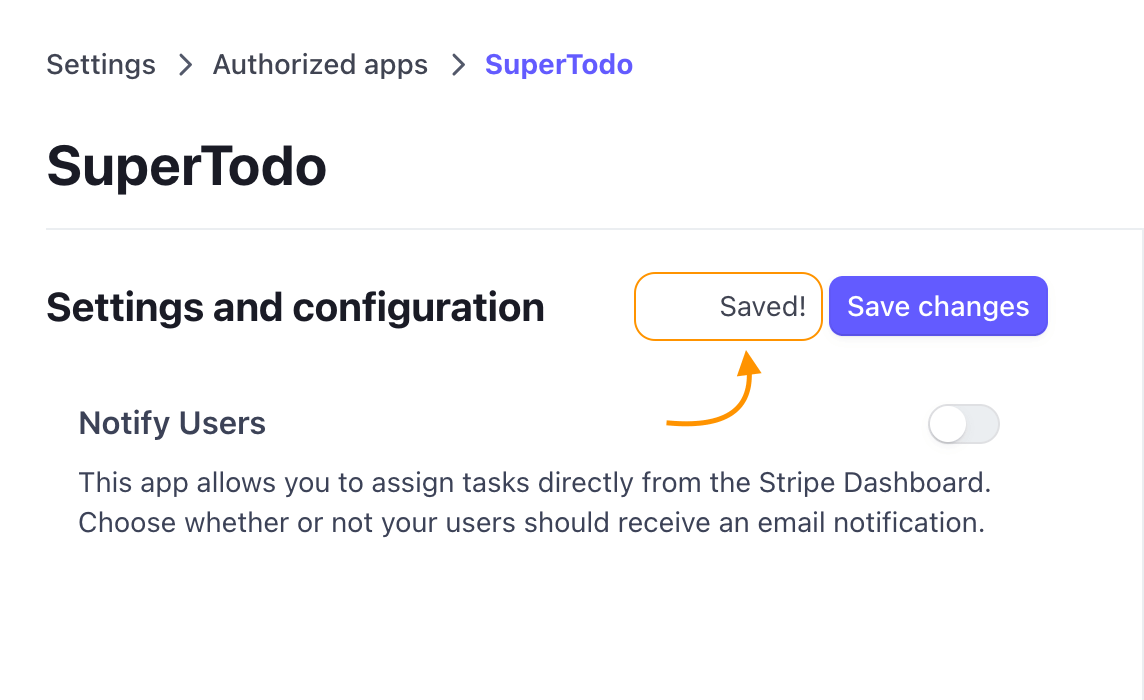
Make sure your UI tells users they’ve successfully saved their settings choices. Use the statusMessage property to display a success message when a user clicks the save button.

An example of SettingsView displaying a status message.
Here’s the code for this example, where a SettingsView generates a status message to the left of the save button:
import {useState} from 'react';
import {SettingsView, TextField} from "@stripe/ui-extension-sdk/ui";

/**
 * An example app settings view that provides two settings fields of first & last name.
 * The fields are combined into a single string value and passed to an external API.
 * The user is notified of the status of their settings form through the statusMessage property.
 */
const ExampleAppSettings = () => {
  // useState to track the status of the form. Changing the status value triggers a rerender.
  const [status, setStatus] = useState('');

  // Define a callback function to pass to the onSave event.
  const saveSettings = async (values: any) => {
    // Update the form status with a loading message.
    setStatus('Saving...');
    try {
      const { firstname, lastname } = values;
      const result = await fetch(
        'https://www.my-api.com/',
        {
          method: 'POST',
          body: JSON.stringify({
            fullName: `${firstname} ${lastname}`,
          }),
        }
      );
      await result.text();
      // Update the form status with a success message.
      setStatus('Saved!');
    } catch (error) {
      console.error(error);
      // Update the form status with an error message.
      setStatus('There was an error saving your settings.');
    }
  };

  return (
    // Assign our callback function to the onSave property & pass the current value of statusMessage
    <SettingsView
      onSave={saveSettings}
      statusMessage={status}
    >
      <TextField
        name="firstname"
        label="First name"
      />
      <TextField
        name="lastname"
        label="Last name"
      />
    </SettingsView>
  );
};

export default ExampleAppSettings;
You can also create your own unique designs to communicate status to your app’s users using UI components.