# Apple Pay
顧客が iPhone、iPad、および Apple Watch で Apple Pay を使用して安全に支払いを実行できるようにします。
Apple Pay に対応しているデバイスについては、Apple の[互換性に関するドキュメント](https://support.apple.com/en-us/HT208531)を参照してください。
Apple Pay は、ほとんどの Stripe プロダクトおよびサービスと互換性があります。Stripe ユーザーは、iOS 9 以降の iOS アプリケーション、および iOS 10 または macOS Sierra 以降の Safari (ウェブ) で [Apple Pay](https://stripe.com/apple-pay) を受け付けることができます。Apple Pay 決済の処理に追加料金はかからず、他のカード取引と同じ[料金体系](https://stripe.com/pricing/local-payment-methods#apple-pay)が適用されます。
Apple Pay を利用できるのは、サポート対象国の加盟銀行のカードの保有者です。詳細については Apple の[加盟銀行](https://support.apple.com/en-us/ht204916)に関するドキュメントをご覧ください。
#### 決済手段のプロパティ
- **顧客の所在地**
インドを除く世界各地
- **取引通貨**
[サポートされている取引通貨](https://docs.stripe.com/currencies.md#presentment-currencies)を参照してください
- **支払いの確定**
顧客主導
- **決済手段の種類**
ウォレット
- **継続課金**
[はい](https://docs.stripe.com/apple-pay.md#recurring-payments)
- **入金サイクル**
標準の入金タイミングを適用
- **Connect のサポート**
あり
- **不審請求の申し立てのサポート**
[可](https://docs.stripe.com/apple-pay/disputes-refunds.md#disputed-payments)
- **手動キャプチャーのサポート**
あり
- **返金 / 一部返金**
[可 / 可](https://docs.stripe.com/apple-pay/disputes-refunds.md#refunds)
#### ビジネスの所在地
インドを除く世界各地の Stripe アカウントは、Apple Pay による支払いを現地通貨決済で受け付けることができます。
#### サポート対象のプロダクト
- Connect
- Checkout1
- Payment Links
- Elements
- Subscriptions
- Invoicing
1Checkout の [ui_mode](https://docs.stripe.com/api/checkout/sessions/create.md#create_checkout_session-ui_mode) が `embedded_page` の場合、Safari と iOS のバージョン 17 以降のみがサポートされます。
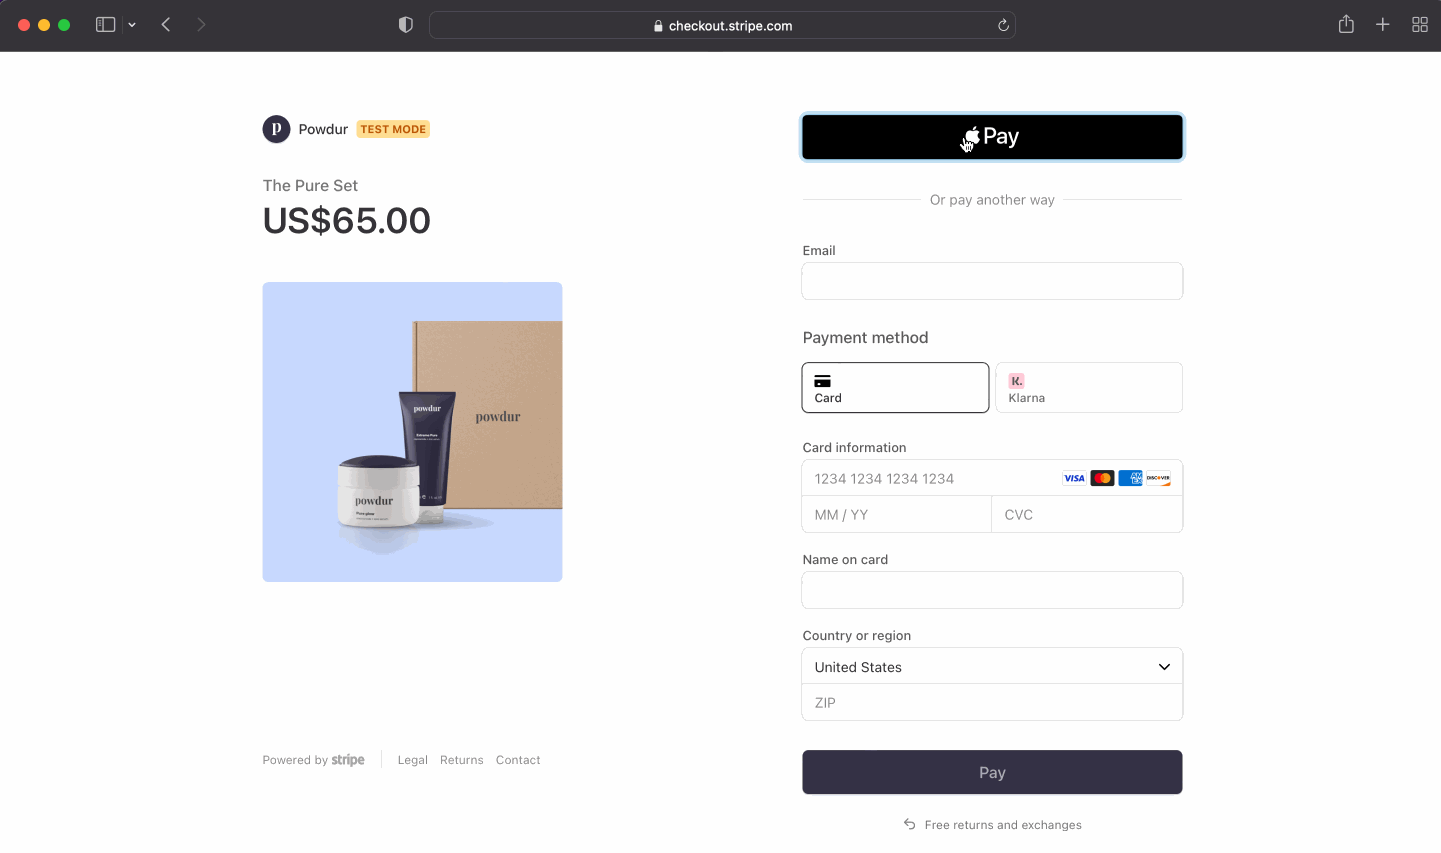
## 決済フロー
以下は、決済ページから行われる Apple Pay の決済フローのデモンストレーションです。
## Apple Pay のアプリ内課金の資格
このガイドでは、物理的な製品、サービス、その他の対象となる品目に対し、Apple Pay を直接受け付けるように App を設定する方法について説明します。Stripe はこれらの決済を処理し、Stripe の [処理手数料](https://stripe.com/pricing) のみを支払います。
アメリカまたは欧州経済領域 (EEA) で販売されるデジタル製品、コンテンツ、サブスクリプションの場合、アプリは、外部の決済ページにリダイレクトすることで Apple Pay を受け付けることができます。使用できる支払い UI は次のとおりです。
- [Stripe Checkout](https://docs.stripe.com/mobile/digital-goods/checkout.md)
- [Web Elements](https://docs.stripe.com/mobile/digital-goods/custom-checkout.md)
- [Payment Links](https://docs.stripe.com/mobile/digital-goods/payment-links.md) (商品数と価格が限定されている場合に最適)
その他の地域では、デジタル製品、コンテンツ、またはサブスクリプションに対して App で Apple Pay を使用することはできません。
## Apple Pay を受け付ける
Stripe では、さまざまな方法で Apply Pay を支払い方法として追加することができます。組み込みの詳細については、各方法から選択してご確認ください。
# React Native iOS
Stripe [React Native SDK](https://github.com/stripe/stripe-react-native) を使用すると Apple Pay と従来のクレジットカード払いの双方を受け付けられます。開始する前に、[Apple 開発者プログラム](https://developer.apple.com/programs/)に登録し、[サーバーとアプリで Stripe を設定](https://docs.stripe.com/payments/accept-a-payment.md?payment-ui=mobile&platform=react-native#react-native-setup)する必要があります。次の手順は以下のとおりです。
1. [Apple 加盟店 ID を登録する](https://docs.stripe.com/apple-pay.md#merchantid)
2. [新しい Apple Pay 証明書を作成する](https://docs.stripe.com/apple-pay.md#csr)
3. [Xcode を導入する](https://docs.stripe.com/apple-pay.md#xcode-pay)
4. [StripeProvider で Apple 加盟店 ID を設定する](https://docs.stripe.com/apple-pay.md#set-merchantid)
5. [Apple Pay がサポートされているかを確認する](https://docs.stripe.com/apple-pay.md#check-if-apple-pay-supported)
6. [支払い画面を表示する](https://docs.stripe.com/apple-pay.md#present-payment-sheet)
7. [Stripe に支払いを送信する](https://docs.stripe.com/apple-pay.md#handle-payment)
> React Native と Expo を使用している場合、Expo Go は Apple Pay に対応していません。Apple Pay を Expo で使用するには、[開発ビルド](https://docs.expo.dev/get-started/set-up-your-environment/?mode=development-build&platform=ios)を作成する必要があります。すでに Expo Go プロジェクトがある場合は、[開発ビルドに移行](https://docs.expo.dev/develop/development-builds/expo-go-to-dev-build/)できます。
## Apple 加盟店 ID を登録する
Apple Developer Web サイトで [新規 ID を登録](https://developer.apple.com/account/resources/identifiers/add/merchant) して、Apple 加盟店 ID を取得します。
フォームに説明と ID を入力します。説明はお客様の記録用であり、後で変更できます。アプリの名前を ID として使用することをお勧めします (`merchant.com.{{YOUR_APP_NAME}}` など)。
## 新しい Apple Pay 証明書を作成する
支払いデータを暗号化するためのアプリの証明書を作成します。
ダッシュボードの [iOS certificate settings (iOS 証明書の設定)](https://dashboard.stripe.com/settings/ios_certificates) に移動して、**新規アプリケーションを追加**をクリックし、表示されるガイドに従います。
証明書署名リクエスト (CSR) ファイルをダウンロードして、Apple Pay の利用を可能にする安全な証明書を Apple から取得します。
1 つの CSR ファイルを使用して証明書を 1 つだけ発行する必要があります。Apple 加盟店 ID を切り替えた場合、ダッシュボードの [iOS Certificate Settings (iOS 証明書の設定)](https://dashboard.stripe.com/settings/ios_certificates) に移動して、新しい CSR と証明書を取得する必要があります。
## Xcode を導入する
Apple Pay ケイパビリティをアプリに追加します。Xcode でプロジェクト設定を開き、**Signing & Capabilities (署名およびケイパビリティ)** タブを選択して、**Apple Pay** ケイパビリティを追加します。この段階で開発者アカウントへのログインを要求される場合があります。前の手順で作成した加盟店 ID を選択すると、アプリで Apple Pay を受け付けられるようになります。
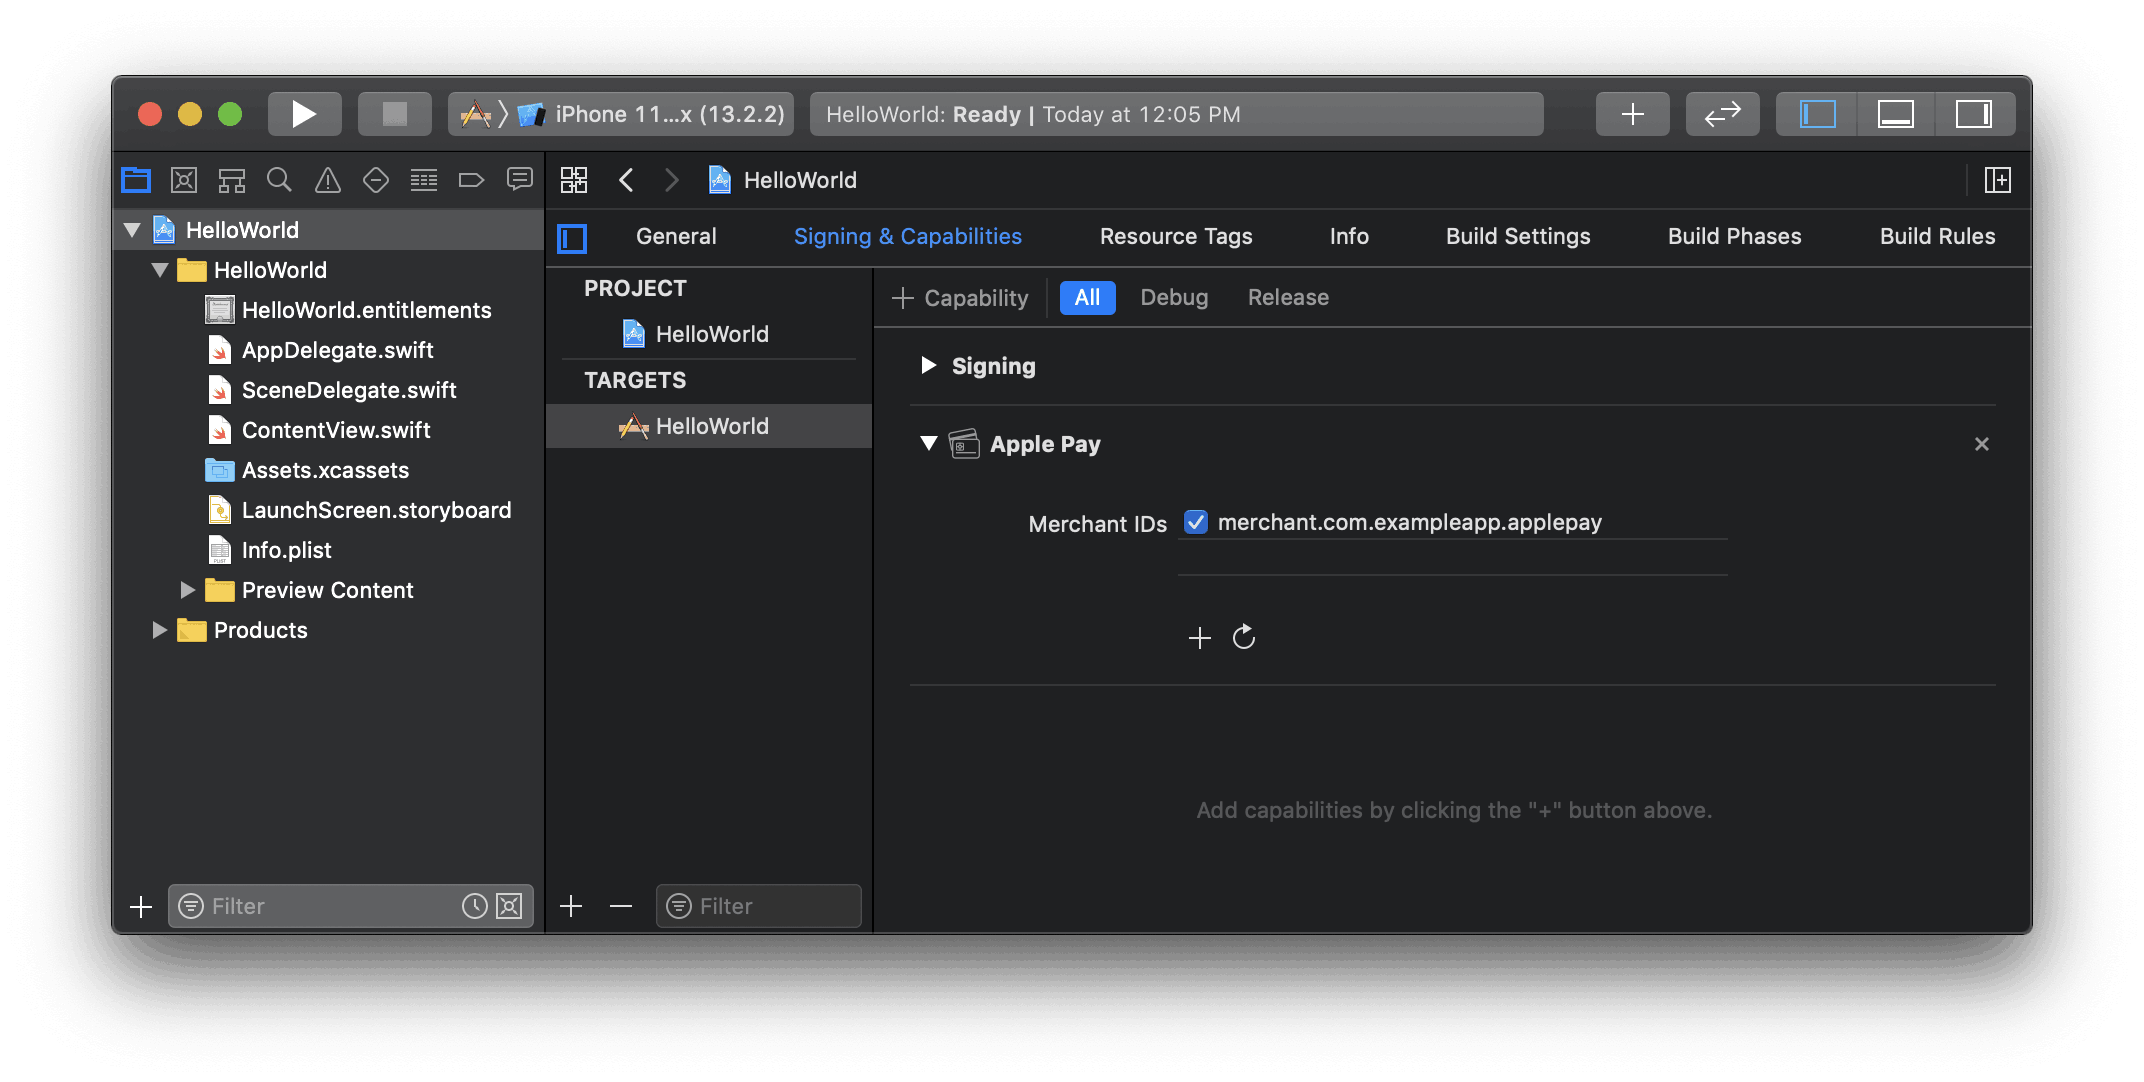
Xcode で Apple Pay ケイパビリティを有効化する
## StripeProvider で Apple 加盟店 ID を設定する
`StripeProvider` コンポーネントで、登録した Apple 加盟店 ID を指定します。
```jsx
import { StripeProvider } from '@stripe/stripe-react-native';
function App() {
return (
{/* Your app code here */}
);
}
```
## Apple Pay がサポートされているかを確認する
アプリ内で Apple Pay を支払いオプションとして表示する前に、ユーザーのデバイスが Apple Pay に対応しているか、およびユーザーのウォレットにカードが追加されているかを判別します。
```jsx
import { PlatformPayButton, isPlatformPaySupported } from '@stripe/stripe-react-native';
function PaymentScreen() {
const [isApplePaySupported, setIsApplePaySupported] = useState(false);
useEffect(() => {
(async function () {
setIsApplePaySupported(await isPlatformPaySupported());
})();
}, [isPlatformPaySupported]);
// ...
const pay = async () => {
// ...
};
// ...
return (
{isApplePaySupported && (
)}
);
}
```
## Payment Intent を作成する
### サーバー側
[amount (金額)](https://docs.stripe.com/api/payment_intents/object.md#payment_intent_object-amount) と [currency (通貨)](https://docs.stripe.com/api/payment_intents/object.md#payment_intent_object-currency) を指定して PaymentIntent を作成するエンドポイントを設定します。支払い金額は、クライアント側ではなく、常に信頼できる環境のサーバー側で指定してください。これにより、悪意のある顧客が金額を恣意的に選択できないようにします。
#### curl
```bash
curl https://api.stripe.com/v1/payment_intents \
-u <>: \
-d "amount"=1099 \
-d "currency"="usd"
```
### クライアント側
サーバーから PaymentIntent をリクエストするメソッドを作成します。
```jsx
function PaymentScreen() {
// ...
const fetchPaymentIntentClientSecret = async () => {
const response = await fetch(`${API_URL}/create-payment-intent`, {
method: 'POST',
headers: {
'Content-Type': 'application/json',
},
body: JSON.stringify({
some: 'value',
}),
});
const { clientSecret } = await response.json();
return clientSecret;
};
// ...
}
```
### トラブルシューティング
トークンの作成時に Stripe API のエラーが表示される場合は、お客様の Apple Pay 証明書に問題のあるケースがほとんどです。前述のように、新しい証明書を生成して Stripe にアップロードする必要があります。自身で生成したものではなく、必ずダッシュボードから取得した CSR を使用してください。Xcode は誤って古い証明書をキャッシュに入れることがよくあるため、新しい証明書を生成するだけではなく、新しい Apple 加盟店 ID を作成することもお勧めします。
次のエラーを受信した場合:
> Stripe に Apple 加盟店アカウントを追加していません
アプリが以前の (Stripe 以外の) CSR/証明書を使用して暗号化されたデータを送信している可能性があります。お客様の Apple 加盟店 ID で、Stripe 以外の CSR によって生成された証明書が取り消されていることを確認してください。それでも問題が解決しない場合は、お客様の Apple アカウントの加盟店 ID を削除してから再作成してください。その後、前回使用したものと同じ (Stripe が提供した) CSR から新しい証明書を作成します。この新しい証明書を Stripe に再度アップロードする必要はありません。完了したら、アプリで Apple Pay 証明書をオフにしてからオンに切り替え、正しく更新されていることを確認します。
## 支払い画面を表示する
[`PlatformPayButton` の ](https://stripe.dev/stripe-react-native/api-reference/index.html#PlatformPayButton)`onPress` プロパティ内で `confirmPlatformPayPayment` を呼び出すと、Apple Pay シートを開くことができます。支払いシートに顧客のカート商品を表示するには、アイテムを引数として渡してください。最後のアイテムは自社と合計金額を表す必要があり、シート上では “Pay” が前置された形式で表示されます(例:「Pay iHats, Inc. 50 USD」)
> 顧客のアクションを処理するコードには、決済画面を表示する前に複雑なアクションや非同期のアクションを含めないでください。ユーザーアクションが決済画面を直接呼び出さない場合、Apple Pay はエラーを返します。
```jsx
import { confirmPlatformPayPayment } from '@stripe/stripe-react-native';
function PaymentScreen() {
// ... see above
const pay = async () => {
const clientSecret = await fetchPaymentIntentClientSecret()
const { error, paymentIntent } = await confirmPlatformPayPayment(
clientSecret,
{
applePay: {
cartItems: [
{
label: 'Example item name',
amount: '14.00',
paymentType: PlatformPay.PaymentType.Immediate,
},
{
label: 'Tax',
amount: '1.60',
paymentType: PlatformPay.PaymentType.Immediate,
},
{
label: 'iHats, Inc.',
amount: '15.60',
paymentType: PlatformPay.PaymentType.Immediate,
},
],
merchantCountryCode: 'US',
currencyCode: 'USD',
requiredShippingAddressFields: [
PlatformPay.ContactField.PostalAddress,
],
requiredBillingContactFields: [PlatformPay.ContactField.PhoneNumber],
},
}
);
if (error) {
// handle error
} else {
Alert.alert('Success', 'Check the logs for payment intent details.');
console.log(JSON.stringify(paymentIntent, null, 2));
}
};
// ... see above
}
```
## Optional: 支払い方法を作成する [クライアント側]
サーバーで支払いを確定する場合は、Apple Pay を使用して、支払いを確定する代わりに `PaymentMethod` の収集のみを実行できます。これを行うには、`createPlatformPayPaymentMethod` メソッドを呼び出します。
```javascript
import {PlatformPayButton, isPlatformPaySupported, createPlatformPayPaymentMethod} from '@stripe/stripe-react-native';
function PaymentScreen() {
const [isApplePaySupported, setIsApplePaySupported] = useState(false);
useEffect(() => {
(async function () {
setIsApplePaySupported(await isPlatformPaySupported());
})();
}, [isPlatformPaySupported]);
const createPaymentMethod = async () => {
const { error, paymentMethod } = await createPlatformPayPaymentMethod({
applePay: {
cartItems: [
{
label: 'Example item name',
amount: '14.00',
paymentType: PlatformPay.PaymentType.Immediate,
},
{
label: 'Total',
amount: '12.75',
paymentType: PlatformPay.PaymentType.Immediate,
},
],
merchantCountryCode: 'US',
currencyCode: 'USD',
},
});
if (error) {
Alert.alert(error.code, error.message);
return;
} else if (paymentMethod) {
Alert.alert(
'Success',
`The payment method was created successfully. paymentMethodId: ${paymentMethod.id}`
);
}
};
return (
{isApplePaySupported && (
)}
);
}
```
## Optional: 継続課金 [クライアント側]
iOS 16 以降では、`confirmPlatformPayPayment()` および `confirmPlatformPaySetupIntent` の `applePay` パラメーターオブジェクトで `request` フィールドを設定することで[加盟店トークン](https://developer.apple.com/apple-pay/merchant-tokens/)を導入することができます。
```js
await confirmPlatformPayPayment(
clientSecret,
{
applePay: {
// Make sure to include the rest of the necessary fields
request: {
type: PlatformPay.PaymentRequestType.Recurring,
description: 'String describing my payment',
managementUrl:
'www..com',
billing: {
paymentType: PlatformPay.PaymentType.Recurring,
intervalUnit: PlatformPay.IntervalUnit.Month,
intervalCount: 3,
label: 'My label',
amount: '39.00',
},
},
},
}
);
```
Apple Pay で継続支払いを使用する方法の詳細については、[Apple の PassKit に関するドキュメント](https://developer.apple.com/documentation/passkit/pkpaymentrequest)をご覧ください。
## Optional: 注文の追跡 [クライアント側]
iOS 16 以降で[注文の追跡](https://developer.apple.com/design/human-interface-guidelines/technologies/wallet/designing-order-tracking)を導入するには、`PlatformPayButton` コンポーネントの `setOrderTracking` コールバックを使用します。
実装内で次のようにします。
1. サーバーから、完了した注文の注文詳細を取得します。
2. サーバーからの結果を指定して、指定された完了ハンドラーを `setOrderTracking` で呼び出します。
```jsx
{
const { orderIdentifier, orderType, authToken, webServiceUrl } =
fetchOrderDetailsFromMyBackend();
completion(orderIdentifier, orderType, authToken, webServiceUrl);
}}
/>
```
注文の追跡の詳細については、[Apple のウォレットでの注文に関するドキュメント](https://developer.apple.com/documentation/walletorders)をご覧ください。
## Apple Pay をテストする
Apple Pay をテストするには、実際のクレジットカード番号とテスト [APIキー](https://docs.stripe.com/keys.md)を使用する必要があります。Stripe はテスト中であることを認識し、使用に成功したテストカードトークンを返すため、請求せずにライブカードでテスト支払いを行うことができます。
[Stripeテストカード](https://docs.stripe.com/testing.md#use-test-cards)または [Apple Pay テストカード](https://developer.apple.com/apple-pay/sandbox-testing/)を Apple Pay ウォレットに保存して Apple Pay をテストすることはできません。
## See also
- [iOS Integration](https://docs.stripe.com/payments/accept-a-payment.md?payment-ui=mobile&platform=ios)
- [Apple Pay on the Web](https://docs.stripe.com/elements/express-checkout-element.md)
- [Apple Pay のベストプラクティス](https://docs.stripe.com/apple-pay/best-practices.md)