Apple Pay
允许客户在他们的 iPhone、iPad 或 Apple Watch 上用 Apple Pay 安全地付款。
Apple Pay 与大多数 Stripe 产品和功能兼容。Stripe 用户可以在 iOS 9 及更高版本的 iOS 应用程序以及 iOS 10 或 macOS Sierra 及以上版本的 Safari 网页上接受 Apple Pay。处理 Apple Pay 付款时没有额外费用,定价与其他银行卡交易一样。
Apple Pay 可由在受支持国家的参与银行那里开户的持卡人使用。有关更多信息,请参考 Apple 的参与银行文档。
付款流程
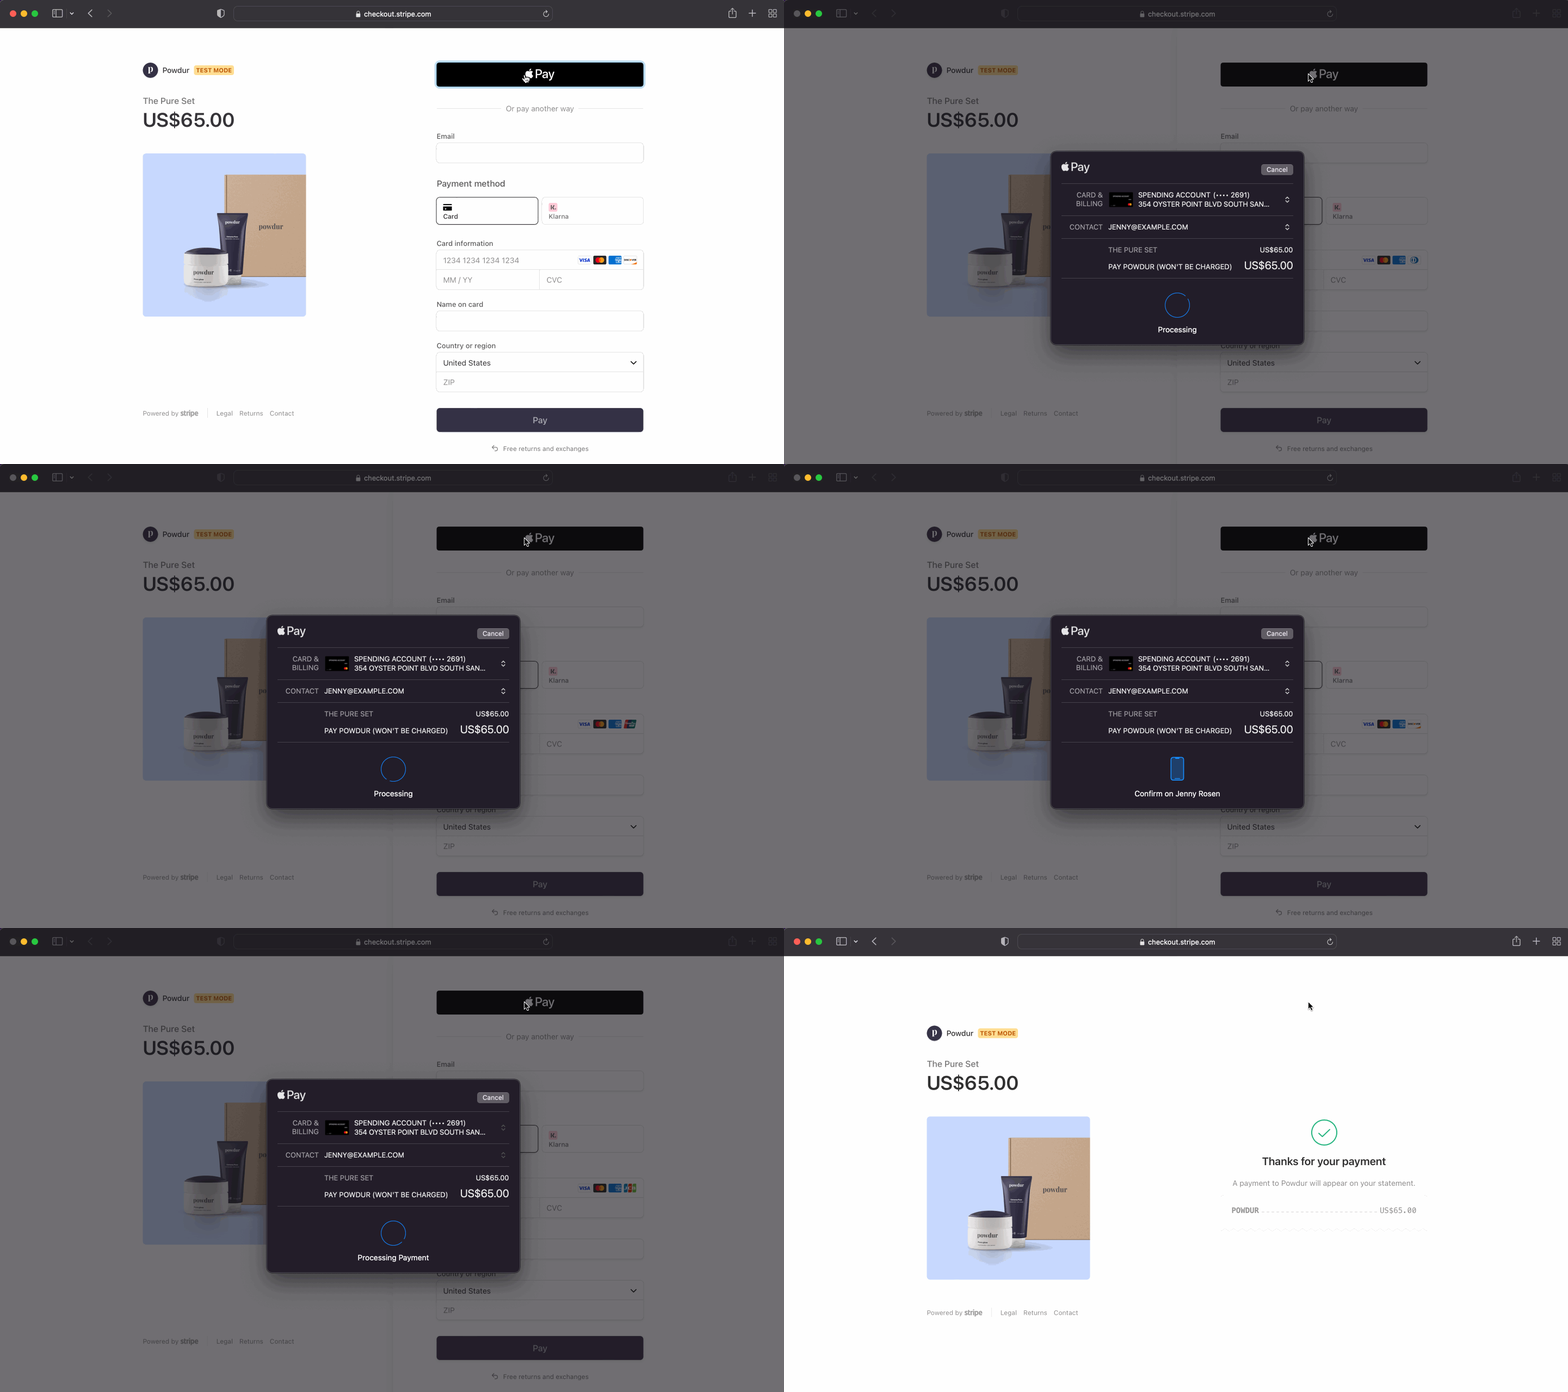
以下是您的结账页面的 Apple Pay 付款流程演示:

Apple Pay 的应用内购买资格
本指南将说明如何配置您的应用,使其可直接通过 Apple Pay 接收实体商品、服务及其他符合条件商品的付款。Stripe 会处理这些支付交易,您只需支付 Stripe 的手续费即可。
对于在美国或欧洲经济区 (EEA) 销售的数字产品、内容及订阅服务,您的应用可通过跳转至外部支付页面的方式接收 Apple Pay 付款。您可使用以下支付用户界面:
- Stripe Checkout
- Web Elements
- Payment Links(最适合产品和定价数量有限的场景)
在其他地区,您的应用无法通过 Apple Pay 接收数字产品、内容或订阅服务相关款项。
接受 Apple Pay
Stripe 提供了多种添加 Apple Pay 的方法。有关集成的详细信息,请选择您最喜欢的方法:
您可以使用 Stripe 的 React Native SDK,同时支持 Apple Pay 和传统信用卡支付。开始之前,您需要加入 Apple Developer Program,并在服务器和应用程序中配置好 Stripe。接下来,按照以下步骤操作:
- 注册 Apple Merchant ID
- 创建新的 Apple Pay 证书
- 用 Xcode 集成
- 在 StripeProvider 中设置您的 Apple Merchant ID
- 检查是否支持 Apple Pay
- 出示支付表单
- 向 Stripe 提交付款
注意
注册 Apple Merchant ID
可通过在 Apple 开发人员网站注册新的标识符来获取 Apple 商家 ID。
在表单中填写描述和标识符。描述内容仅供您自己记录之用,之后可随时更改。Stripe 建议用您的应用的名称作为标识符(例如,merchant.)。
集成 Xcode
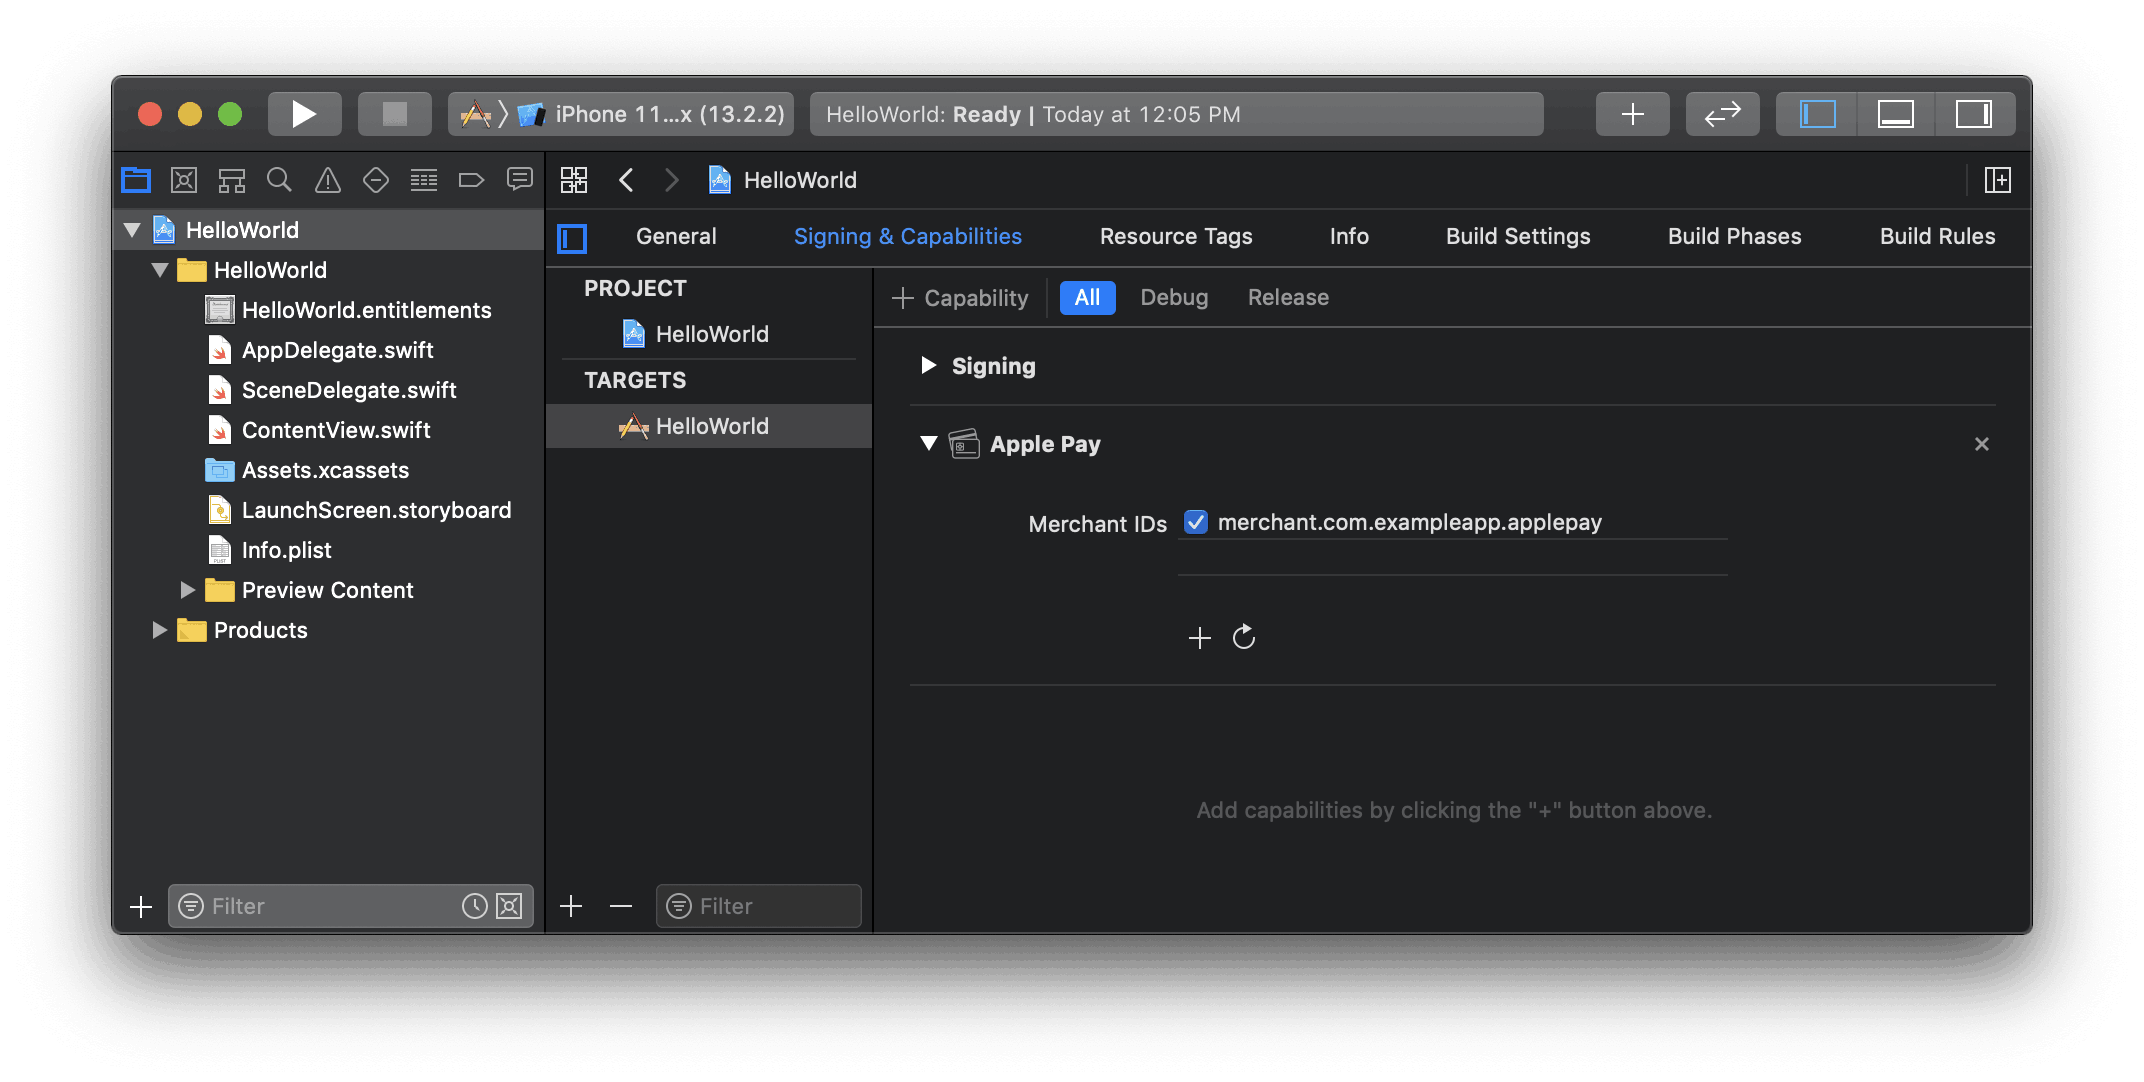
将 Apple Pay 功能添加到您的应用程序。在 Xcode 中,打开您的项目设置,点击签名和功能选项卡,然后添加 Apple Pay 功能。此时,系统可能会提示您登入您的开发人员账户。选择您之前创建的商家 ID,您的应用程序就可以接受 Apple Pay 了。

在 Xcode 中启用 Apple Pay 功能
在 StripeProvider 中设置您的 Apple Merchant ID
在 StripeProvider 组件中,指定您成功注册的 Apple Merchant ID:
import { StripeProvider } from '@stripe/stripe-react-native'; function App() { return ( <StripeProvider publishableKey="" merchantIdentifier="merchant.com.{{YOUR_APP_NAME}}" > // Your app code here </StripeProvider> ); }pk_test_TYooMQauvdEDq54NiTphI7jx
检查是否支持 Apple Pay
在您的应用程序中显示 Apple Pay 此支付选项之前,请确定用户的设备支持 Apple Pay,并且他们的钱包中添加了银行卡:
import { PlatformPayButton, isPlatformPaySupported } from '@stripe/stripe-react-native';

function PaymentScreen() {
  const [isApplePaySupported, setIsApplePaySupported] = useState(false);

  useEffect(() => {
    (async function () {
      setIsApplePaySupported(await isPlatformPaySupported());
    })();
  }, [isPlatformPaySupported]);

  // ...

  const pay = async () => {
    // ...
  };

  // ...

  return (
    <View>
      {isApplePaySupported && (
        <PlatformPayButton
          onPress={pay}
          type={PlatformPay.ButtonType.Order}
          appearance={PlatformPay.ButtonStyle.Black}
          borderRadius={4}
          style={{
            width: '100%',
            height: 50,
          }}
        />
      )}
    </View>
  );
}
创建 Payment Intent
服务器端
生成一个端点,创建一个具有 amount 和 currency 的 PaymentIntent。始终在服务器端决定扣款金额,这是一个可信的环境,客户端不行。这样可防止客户自己选择价格。
客户端
创建一个从您的服务器请求 PaymentIntent 的方法:
function PaymentScreen() {
  // ...
  const fetchPaymentIntentClientSecret = async () => {
    const response = await fetch(`${API_URL}/create-payment-intent`, {
      method: 'POST',
      headers: {
        'Content-Type': 'application/json',
      },
      body: JSON.stringify({
        some: 'value',
      }),
    });
    const { clientSecret } = await response.json();

    return clientSecret;
  };
  // ...
}
故障排除
如果您在尝试创建令牌时看到 Stripe API 出现错误,则很可能是您的 Apple Pay Certificate 有问题。如本页所述,您需要生成一个新证书并上传到 Stripe。请确保您使用的是从您的管理平台获得的 CSR,而不是您自己生成的那个。Xcode 经常错误地缓存旧的证书,所以除了生成新证书外,Stripe 建议创建一个新的 Apple Merchant ID。
如果您收到错误:
您尚未将您的 Apple 商家账户添加到 Stripe
您的应用程序好像正在发送用以前的(非 Stripe) CSR/Certificate 加密的数据。务必撤销您的 Apple Merchant ID 下任何不是由 Stripe 生成的证书。如果这样不能解决问题,请删除您的 Apple 账户中的商家 ID,然后重新创建它。然后,根据之前使用的相同(Stripe 提供的) CSR 创建一个新证书。您不需要将此新的证书上传到 Stripe。完成后,在您的应用程序中打开并关闭 Apple Pay Credentials,以确保正确刷新。
出示支付表单
在 PlatformPayButton 的onPress prop,调用 confirmPlatformPayPayment 打开 Apple Pay 表单。要在支付表单上显示客户的购物车详情,请将各项目作为参数传递。最后一项须代表您的公司和总金额,且显示在表单中时,应在前面加上 “Pay” 一词(例如 “Pay iHats, Inc. $50”)。
注意
在您的那些处理客户操作的代码中,不要在显示支付表单前包含任何复杂或异步操作。如果用户操作不直接调用支付表单,Apple Pay 会返回一个错误。
import { confirmPlatformPayPayment } from '@stripe/stripe-react-native';

function PaymentScreen() {
  // ... see above

  const pay = async () => {
    const clientSecret = await fetchPaymentIntentClientSecret()
    const { error, paymentIntent } = await confirmPlatformPayPayment(
      clientSecret,
      {
        applePay: {
          cartItems: [
            {
              label: 'Example item name',
              amount: '14.00',
              paymentType: PlatformPay.PaymentType.Immediate,
            },
            {
              label: 'Tax',
              amount: '1.60',
              paymentType: PlatformPay.PaymentType.Immediate,
            },
            {
              label: 'iHats, Inc.',
              amount: '15.60',
              paymentType: PlatformPay.PaymentType.Immediate,
            },
          ],
          merchantCountryCode: 'US',
          currencyCode: 'USD',
          requiredShippingAddressFields: [
            PlatformPay.ContactField.PostalAddress,
          ],
          requiredBillingContactFields: [PlatformPay.ContactField.PhoneNumber],
        },
      }
    );
    if (error) {
      // handle error
    } else {
      Alert.alert('Success', 'Check the logs for payment intent details.');
      console.log(JSON.stringify(paymentIntent, null, 2));
    }
  };

  // ... see above
}
可选创建 Payment Method客户端
如果您在您的服务器上确认付款,则可以用 Apple Pay 仅收集 PaymentMethod,而非确认付款。为此,调用 createPlatformPayPaymentMethod 方法:
import {PlatformPayButton, isPlatformPaySupported, createPlatformPayPaymentMethod} from '@stripe/stripe-react-native';

function PaymentScreen() {
  const [isApplePaySupported, setIsApplePaySupported] = useState(false);

  useEffect(() => {
    (async function () {
      setIsApplePaySupported(await isPlatformPaySupported());
    })();
  }, [isPlatformPaySupported]);

  const createPaymentMethod = async () => {
    const { error, paymentMethod } = await createPlatformPayPaymentMethod({
      applePay: {
        cartItems: [
          {
            label: 'Example item name',
            amount: '14.00',
            paymentType: PlatformPay.PaymentType.Immediate,
          },
          {
            label: 'Total',
            amount: '12.75',
            paymentType: PlatformPay.PaymentType.Immediate,
          },
        ],
        merchantCountryCode: 'US',
        currencyCode: 'USD',
      },
    });

    if (error) {
      Alert.alert(error.code, error.message);
      return;
    } else if (paymentMethod) {
      Alert.alert(
        'Success',
        `The payment method was created successfully. paymentMethodId: ${paymentMethod.id}`
      );
    }
  };

  return (
    <View >
      {isApplePaySupported && (
        <PlatformPayButton
          onPress={createPaymentMethod}
          type={PlatformPay.ButtonType.SetUp}
          appearance={PlatformPay.ButtonStyle.WhiteOutline}
          style={{
            width: '65%',
            height: 50,
          }}
        />
      )}
    </View>
  );
}
可选经常性付款客户端
在 iOS 16 及以上版本中,可通过在 confirmPlatformPayPayment() 和 confirmPlatformPaySetupIntent 的 applePay 参数对象中设置 request 字段来采用商家令牌。
await confirmPlatformPayPayment(
  clientSecret,
  {
    applePay: {
      // Make sure to include the rest of the necessary fields
      request: {
        type: PlatformPay.PaymentRequestType.Recurring,
        description: 'String describing my payment',
        managementUrl:
          'www.<a URL where the user can update the payment method for the recurring payment>.com',
        billing: {
          paymentType: PlatformPay.PaymentType.Recurring,
          intervalUnit: PlatformPay.IntervalUnit.Month,
          intervalCount: 3,
          label: 'My label',
          amount: '39.00',
        },
      },
    },
  }
);
要了解有关如何通过 Apple Pay 使用经常性付款的更多信息,请参阅 Apple 的 PassKit 文档。
可选订单跟踪客户端
要在 iOS 16 及以上版本中采用订单跟踪,为 PlatformPayButton 组件使用 setOrderTracking 回调。
在您的部署环境中:
- 从您的服务器获取已完成订单的详情。
- 用结果在
setOrderTracking中从您的服务器调用提供的完成处理程序。
<PlatformPayButton
  // Make sure to include the rest of the necessary props
  setOrderTracking={(completion) => {
    const { orderIdentifier, orderType, authToken, webServiceUrl } =
      fetchOrderDetailsFromMyBackend();
    completion(orderIdentifier, orderType, authToken, webServiceUrl);
  }}
/>
要了解有关订单跟踪的更多信息,请参阅 Apple 钱包订单文档。
测试 Apple Pay
要测试 Apple Pay,必须使用真实的信用卡卡号和测试 API 密钥。Stripe 会识别到您处于测试模式,并返回一个成功的测试卡令牌供您使用,因此您可以在不收款的情况下使用真实卡来测试付款。
您无法将Stripe测试卡或 Apple Pay 测试卡保存到 Apple Pay 钱包来测试 Apple Pay。