# オーソリフローを追加する
Stripe アプリに PKCE OAuth ワークフローを実装します。
OAuth バックエンドを構築する代わりに、ダッシュボードの *UI 拡張機能* (A set of APIs that allow you to inject user interface elements into the Stripe Dashboard using TypeScript and React)を使用して OAuth を実装することで、OAuth プロバイダーからアクセストークンを取得できます。ユーザーが OAuth プロバイダーへのアクセス権を *Stripe アプリ* (An app that you can build on top of Stripe to customize the functionality of the Stripe Dashboard UI, leverage Stripe user data, store data on Stripe, and more)に付与すると、ダッシュボードの Stripe アプリから直接、その OAuth プロバイダーのサービスを操作できます。
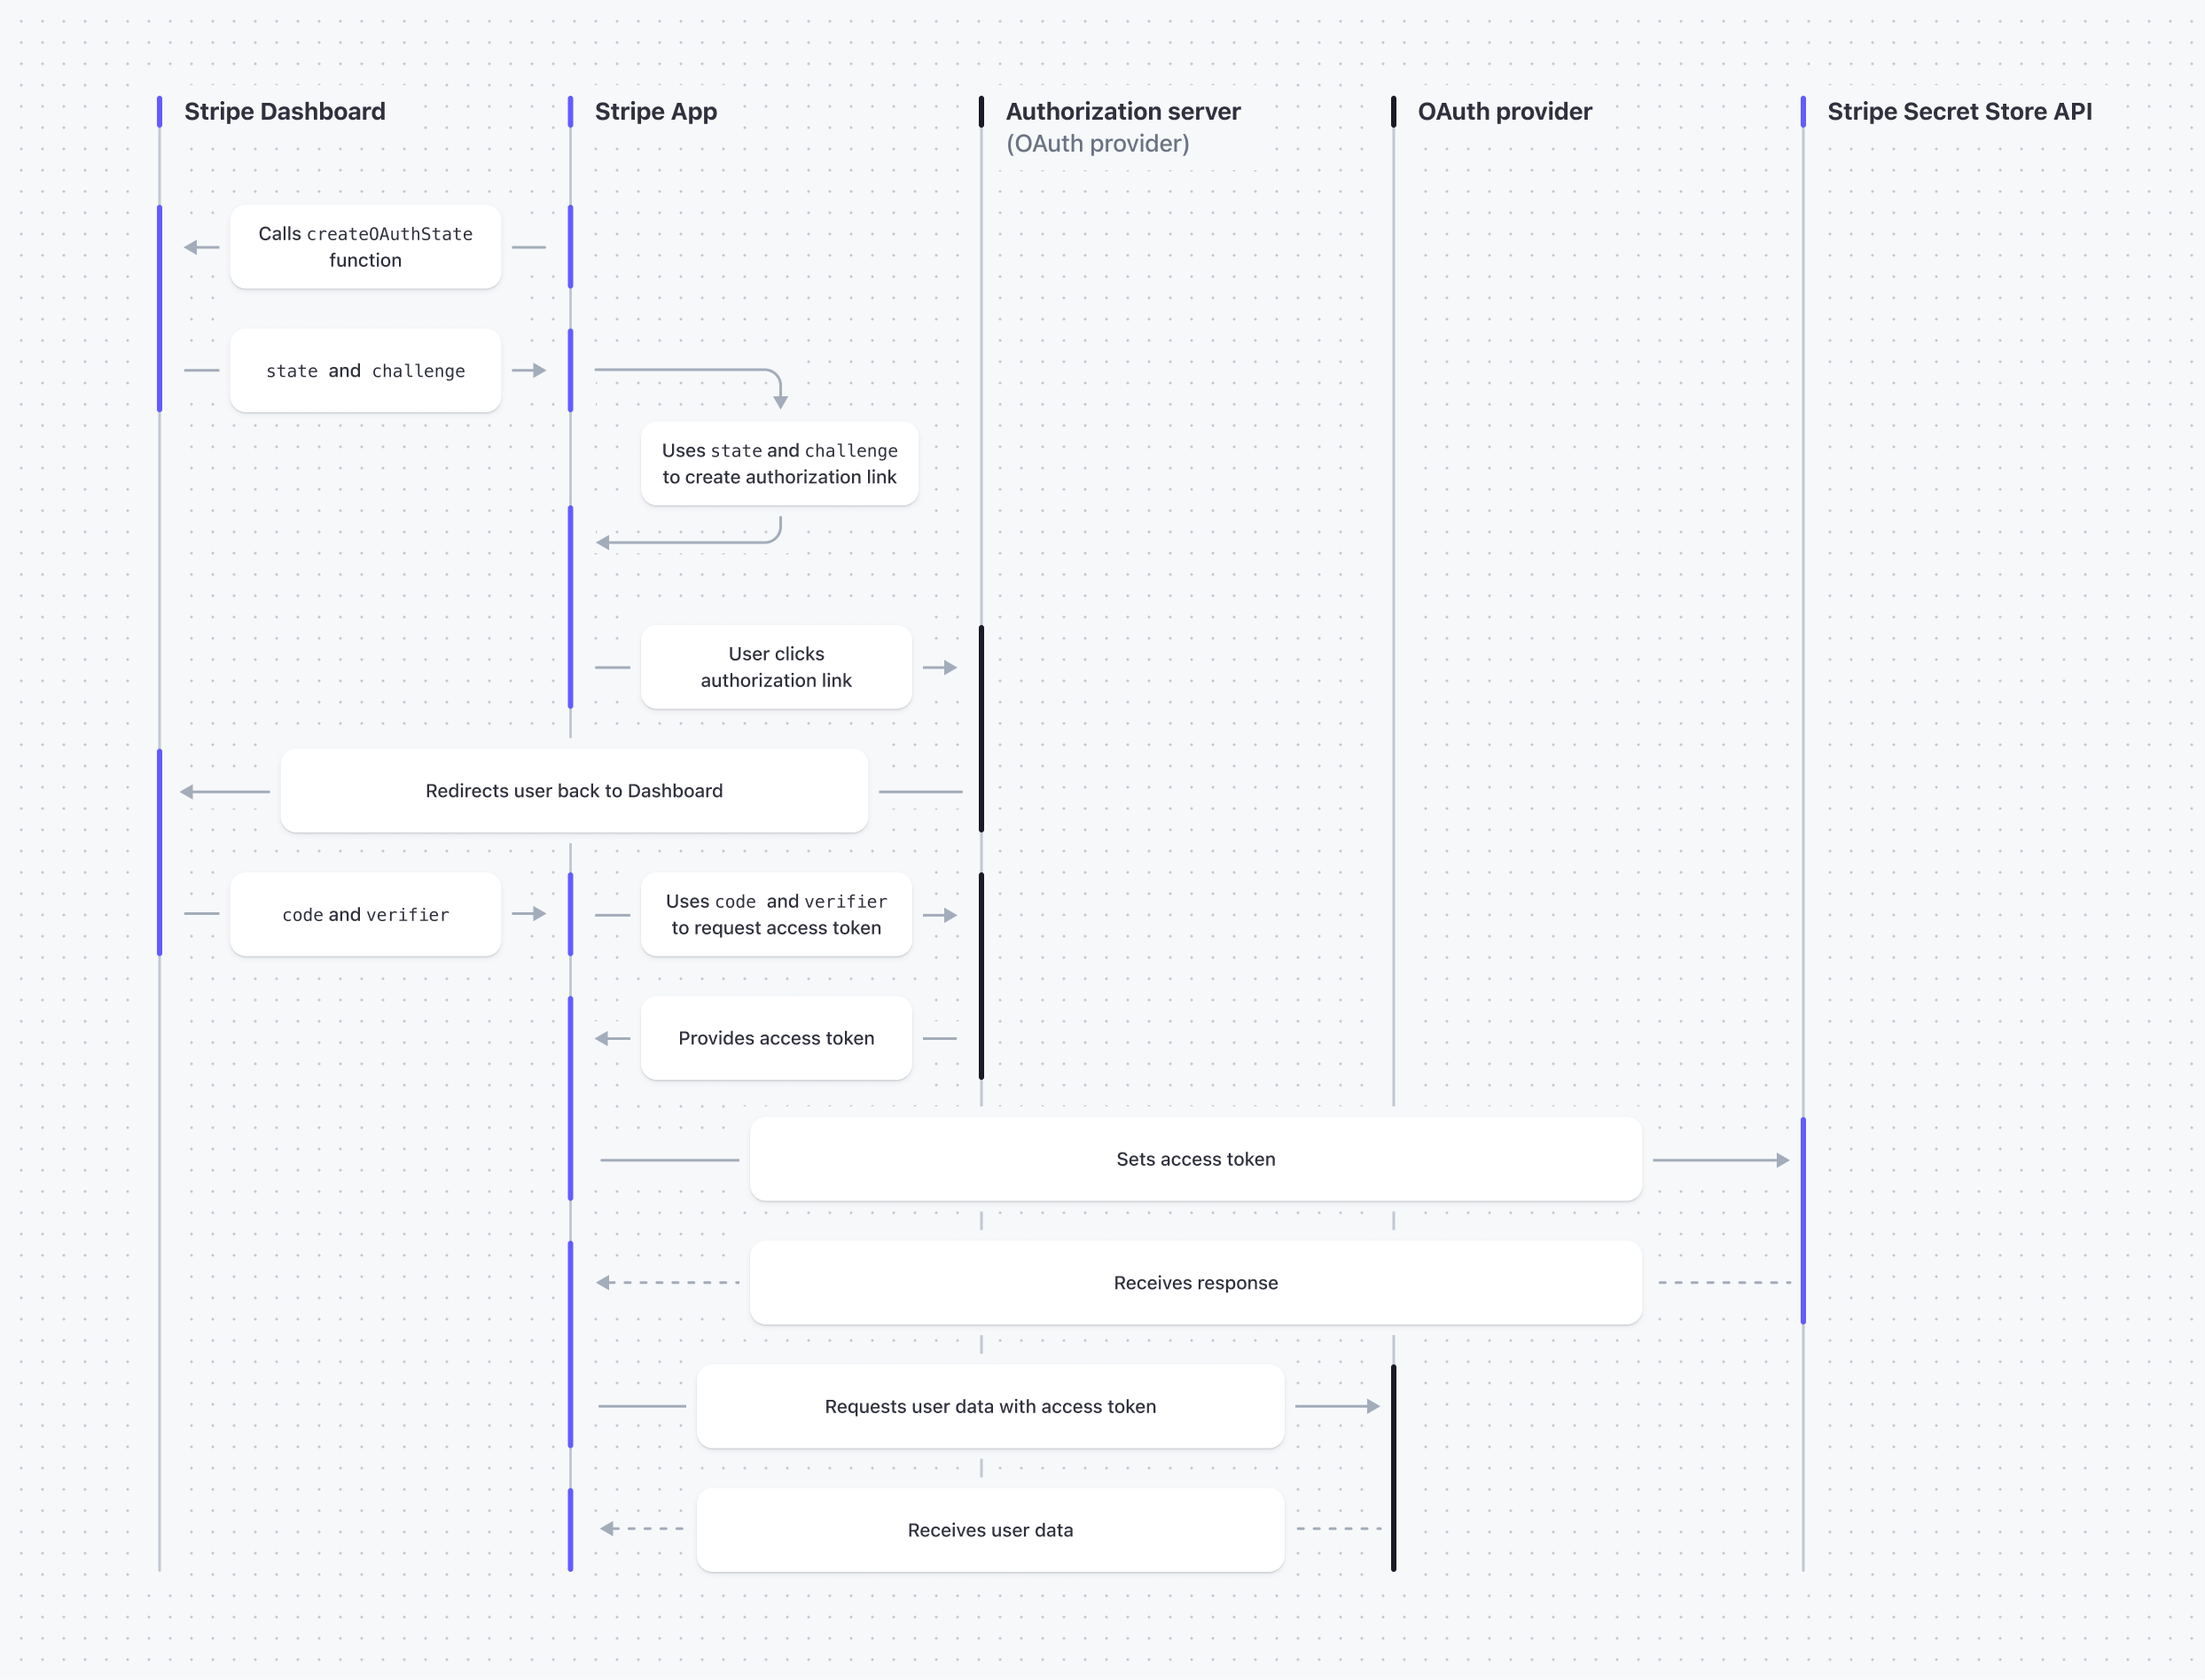
Stripe アプリを使用した OAuth フロー
## Before you begin
- OAuth プロバイダーが [Proof Key for Code Exchange (PKCE)](https://auth0.com/docs/get-started/authentication-and-authorization-flow/authorization-code-flow-with-proof-key-for-code-exchange-pkce) フローに対応していることを確認します。
- まだ作成していない場合は、OAuth プロバイダーを使用してアプリを作成し、Stripe アプリに連結して使用します。
- [Stripe アプリを作成](https://docs.stripe.com/stripe-apps/create-app.md)して、[UI を構築](https://docs.stripe.com/stripe-apps/build-ui.md)します。UI 拡張機能は、PKCE フローを使用して OAuth プロバイダーからアクセストークンを取得します。
## 認証リンクを作成する
エンドユーザーは、アプリから認証リンクをクリックして OAuth フローを開始し、OAuth プロバイダーのサービスへのアクセス権をアプリに付与します。
1. *テスト環境* (Test mode is another way to test changes to your integration without affecting production. A sandbox is the default and recommended way to test integrations. All Stripe features are available in test mode but you can't create live charges unless you're in live mode)と*本番環境* (Use this mode when you’re ready to launch your app. Card networks or payment providers process payments)の OAuth リダイレクト URL を作成します。このプロセスは、*サンドボックス* (A sandbox is an isolated test environment that allows you to test Stripe functionality in your account without affecting your live integration. Use sandboxes to safely experiment with new features and changes)環境にも適用されます。リダイレクト URL はアプリ固有のもので、パスにはアプリの `id` が含まれます。たとえば、[アプリマニフェスト](https://docs.stripe.com/stripe-apps/reference/app-manifest.md)の `id` フィールドが `"id": "com.example.oauth-example"` の場合、次のようになります。
- テスト環境の URL は以下のとおりです。
```
https://dashboard.stripe.com/test/apps-oauth/com.example.oauth-example
```
- 本番環境の URL は以下のとおりです。
```
https://dashboard.stripe.com/apps-oauth/com.example.oauth-example
```
1. OAuth プロバイダーを使用してテスト環境と本番環境の OAuth リダイレクト URL を登録します。
1. アプリの UI 拡張機能から、OAuth リダイレクト URL で以下のパラメーターを渡すことにより、OAuth プロバイダーを認証するための、ユーザーを Stripe アプリからルーティングする経路を作成します。
| パラメーター | 値 |
| ----------------------- | ------------------------------------------------------------------------------------------------------------------------------- |
| `response_type` | これは常に `code` です。PKCE フローでは、OAuth プロバイダーから認証コードをリクエストするための値として `code` が使用されます。 |
| `client_id` | OAuth プロバイダーから割り当てられた OAuth アプリの ID。 |
| `redirect_uri` | Stripe アプリの OAuth リダイレクト URL。これは、OAuth プロバイダーがユーザーをアプリにリダイレクトするために使用する URL です。 |
| `state` | [createOAuthState](https://docs.stripe.com/stripe-apps/reference/extensions-sdk-api.md#createOAuthState) 関数からの `state` 戻り値。 |
| `code_challenge` | [createOAuthState](https://docs.stripe.com/stripe-apps/reference/extensions-sdk-api.md#createOAuthState) 関数からの `challenge` 戻り値。 |
| `code_challenge_method` | これは常に `S256` です。 |
次のコード例を使用して、Stripe App からユーザーの経路を選定し、OAuth リダイレクト URL と[ボタン](https://docs.stripe.com/stripe-apps/components/button.md) UI コンポーネントを使用してサードパーティーアプリをオーソリできます。
```ts
import {
ContextView,
Button,
} from '@stripe/ui-extension-sdk/ui';
import * as React from 'react';
import {createOAuthState} from '@stripe/ui-extension-sdk/oauth';
import type {ExtensionContextValue} from '@stripe/ui-extension-sdk/context';
const {useState, useEffect} = React;
const clientID = 'your_client_id';
const getRedirectURL = (mode: 'live' | 'test') => `https://dashboard.stripe.com/${
mode === 'test' ? 'test/' : ''
}apps-oauth/com.example.oauth-example`;
const getAuthURL = (state: string, challenge: string, mode: 'live' | 'test') =>
`https://www.example.com/oauth2/authorize?response_type=code&client_id=${clientID}&redirect_uri=${getRedirectURL(mode)}&state=${state}&code_challenge=${challenge}&code_challenge_method=S256`;
const ExampleApp = ({environment}: ExtensionContextValue) => {
const {mode} = environment;
const [authURL, setAuthURL] = useState('');
useEffect(() => {
createOAuthState().then(({state, challenge}) => {
setAuthURL(getAuthURL(state, challenge, mode));
});
}, [mode]);
return (
);
};
export default ExampleApp;
```
## OAuth プロバイダーからアクセストークンを取得する
アプリは、現在のユーザーの代理としてのみリクエストを行うことができます。ユーザーがアプリを承認した後、ダッシュボードは、`oauthContext` [コンテキストプロパティ](https://docs.stripe.com/stripe-apps/reference/extensions-sdk-api.md#props)の `code` および `verifier` の値を使用して OAuth データをアプリに渡します。
オーソリの試行が有効な場合のみ、アプリは `code`、`verifier`、および (該当する場合は) カスタムの `state` の値を読み取ることができます。オーソリの試行が有効になるのは、OAuth プロバイダーが `redirect_uri` にリダイレクトし、オーソリリンクの一致するクエリ文字列パラメーターに `state` 値が含まれている場合です。`state` 値は (オーソリリンクを作成したときに) `createOAuthState` 関数によって返される `state` 値と同一である必要があります。
アプリの UI 拡張機能で、以下のパラメーターを指定して OAuth プロバイダーからアクセストークンを取得します。
| パラメーター | 値 |
| --------------- | ------------------------------------------------------------------------------------------------------------------- |
| `code` | `oauthContext.code` [React プロパティ](https://docs.stripe.com/stripe-apps/reference/extensions-sdk-api.md#props)の値。 |
| `grant_type` | これは常に `authorization_code` です。 |
| `code_verifier` | `oauthContext.verifier` [React プロパティ](https://docs.stripe.com/stripe-apps/reference/extensions-sdk-api.md#props)の値。 |
| `client_id` | OAuth プロバイダーからのクライアント ID。 |
| `redirect_uri` | Stripe アプリの OAuth リダイレクト URL。 |
以下のコード例を使用して、OAuth プロバイダーからアクセストークンを取得することができます。
```ts
import {ContextView} from '@stripe/ui-extension-sdk/ui';
import * as React from 'react';
import type {ExtensionContextValue} from '@stripe/ui-extension-sdk/context';
const {useState, useEffect} = React;
// Store the authorization token data.
interface TokenData {
account_id: string;
access_token: string;
expires_in: number;
}
const clientID = 'your_client_id';
const getRedirectURL = (mode: 'live' | 'test') => `https://dashboard.stripe.com/${
mode === 'test' ? 'test/' : ''
}apps-oauth/com.example.oauth-example`;
// Fetch the authorization token from an example authorization server.
const getTokenFromAuthServer = async ({code, verifier, mode}: {code: string, verifier: string, mode: 'live' | 'test'}): Promise => {
try {
const response = await fetch(`https://api.example.com/oauth2/token?code=${code}&grant_type=authorization_code&code_verifier=${verifier}&client_id=${clientID}&redirect_uri=${getRedirectURL(mode)}`, {
method: 'POST',
headers: { 'Content-Type': 'application/x-www-form-urlencoded' },
});
if (response.ok) {
return await response.json();
}
throw new Error(await response.text());
} catch (e) {
console.error('Unable to retrieve token from authorization server:', (e as Error).message);
return null;
}
};
const ExampleApp = ({environment, oauthContext}: ExtensionContextValue) => {
const [tokenData, setTokenData] = useState(null);
const code = oauthContext?.code || '';
const verifier = oauthContext?.verifier || '';
const {mode} = environment;
useEffect(() => {
if (code && verifier && !tokenData) {
getTokenFromAuthServer({code, verifier, mode}).then(setTokenData);
}
}, [code, verifier, mode, tokenData]);
return (
)
};
export default ExampleApp;
```
## アクセストークンを設定して見つける
Secret Store API でアクセストークンを設定して見つけると、アプリでそれを保管して後のセッションで使用できるようになります。
1. アプリに `secret_write` 権限を追加します。
```bash
stripe apps grant permission "secret_write" "Allows storing secrets between page reloads"
```
1. アプリの UI 拡張機能から、Secret Store API でアクセストークンを設定します。
```ts
import {ContextView} from '@stripe/ui-extension-sdk/ui';
import * as React from 'react';
import Stripe from 'stripe';
import {createHttpClient, STRIPE_API_KEY} from '@stripe/ui-extension-sdk/http_client';
import type {ExtensionContextValue} from '@stripe/ui-extension-sdk/context';
const {useState, useEffect} = React;
interface TokenData {
account_id: string;
access_token: string;
expires_in: number;
}
const clientID = 'your_client_id';
const getRedirectURL = (mode: 'live' | 'test') => `https://dashboard.stripe.com/${
mode === 'test' ? 'test/' : ''
}apps-oauth/com.example.oauth-example`;
// Fetch the authorization token from an example authorization server.
const getTokenFromAuthServer = async ({code, verifier, mode}: {code: string, verifier: string, mode: 'live' | 'test'}): Promise => {
try {
const response = await fetch(`https://api.example.com/oauth2/token?code=${code}&grant_type=authorization_code&code_verifier=${verifier}&client_id=${clientID}&redirect_uri=${getRedirectURL(mode)}`, {
method: 'POST',
headers: { 'Content-Type': 'application/x-www-form-urlencoded' },
});
if (response.ok) {
return await response.json();
}
throw new Error(await response.text());
} catch (e) {
console.error('Unable to retrieve token from authorization server:', (e as Error).message);
return null;
}
};
const stripe = new Stripe(STRIPE_API_KEY, {
httpClient: createHttpClient(),
apiVersion: '2026-03-25.dahlia',
});
// Save the token to Secret Store API
const saveTokenData = async ({userID, tokenData}: {userID: string, tokenData: TokenData}) => {
try {
await stripe.apps.secrets.create({
scope: { type: 'user', user: userID },
name: 'oauth_token',
payload: JSON.stringify(tokenData),
});
} catch (e) {
console.error('Unable to save token to Secret Store API:', (e as Error).message);
}
}
const ExampleApp = ({userContext, environment, oauthContext}: ExtensionContextValue) => {
const [tokenData, setTokenData] = useState(null);
const code = oauthContext?.code || '';
const verifier = oauthContext?.verifier || '';
const {mode} = environment;
const {id: userID} = userContext;
useEffect(() => {
if (code && verifier && !tokenData) {
getTokenFromAuthServer({code, verifier, mode}).then(tokenData => {
if (tokenData) {
setTokenData(tokenData);
saveTokenData({userID, tokenData});
}
});
}
}, [code, verifier, mode, userID, tokenData]);
return (
)
};
export default ExampleApp;
```
詳細については、[シークレットを設定する](https://docs.stripe.com/api/apps/secret_store/set.md)をご覧ください。
1. アプリの UI 拡張機能から、Secret Store API でアクセストークンを見つけます。
```ts
import {ContextView} from '@stripe/ui-extension-sdk/ui';
import * as React from 'react';
import Stripe from 'stripe';
import {createHttpClient, STRIPE_API_KEY} from '@stripe/ui-extension-sdk/http_client';
import type {ExtensionContextValue} from '@stripe/ui-extension-sdk/context';
const {useState, useEffect} = React;
interface TokenData {
account_id: string;
access_token: string;
expires_in: number;
}
const stripe = new Stripe(STRIPE_API_KEY, {
httpClient: createHttpClient(),
apiVersion: '2026-03-25.dahlia',
});
// Read the token from Secret Store API
const getTokenFromSecretStore = async (userID: string): Promise => {
try {
const response = await stripe.apps.secrets.find({
scope: { type: 'user', user: userID },
name: 'oauth_token',
expand: ['payload'],
});
const secretValue: string = response.payload!;
return JSON.parse(secretValue) as TokenData;
} catch (e) {
console.error('Unable to retrieve token from Secret Store API:', (e as Error).message);
return null;
}
};
const ExampleApp = ({userContext}: ExtensionContextValue) => {
const [tokenData, setTokenData] = useState(null);
const {id: userID} = userContext;
useEffect(() => {
if (!tokenData) {
getTokenFromSecretStore(userID).then(setTokenData);
}
}, [userID, tokenData]);
return (
)
};
export default ExampleApp;
```
詳細については、[シークレットを探す](https://docs.stripe.com/api/apps/secret_store/find.md)をご覧ください。
## See also
- [シークレットを保存する](https://docs.stripe.com/stripe-apps/store-secrets.md)
- [サーバー側のロジック](https://docs.stripe.com/stripe-apps/build-backend.md)
- [アプリをアップロードする](https://docs.stripe.com/stripe-apps/upload-install-app.md)