Review and take action on connected accounts
View connected accounts with open risk, onboarding, or compliance requirements.
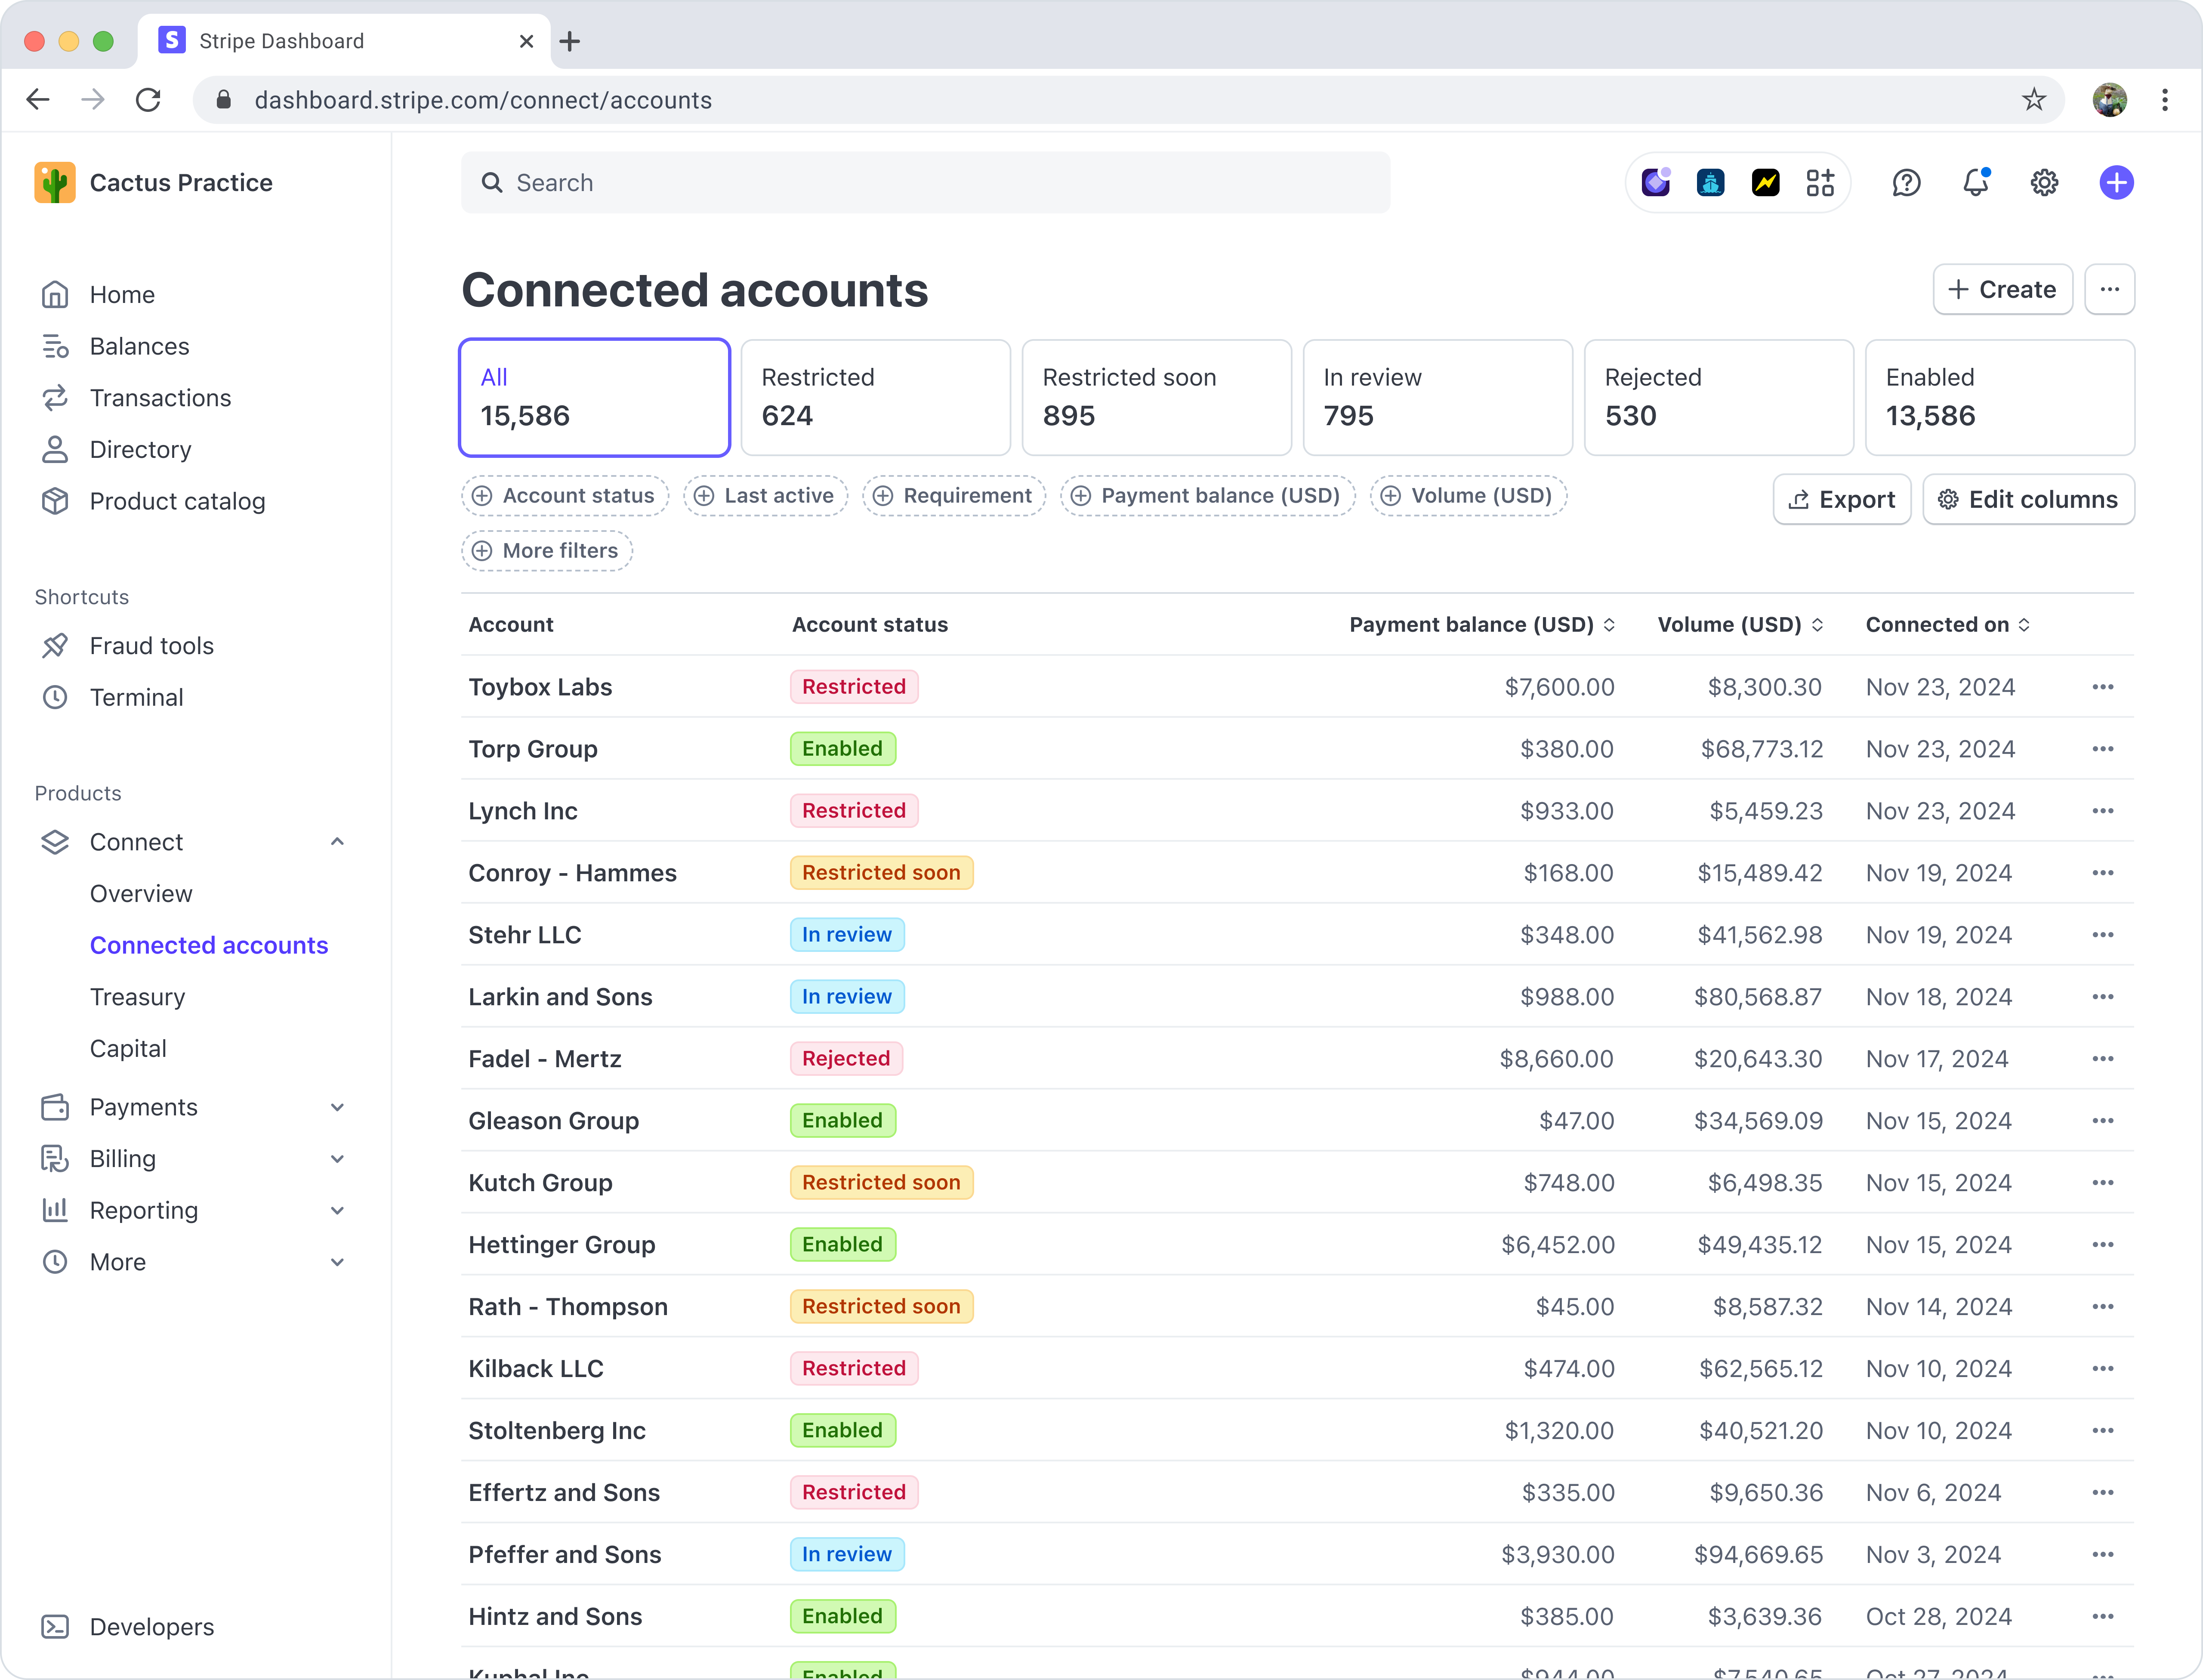
The Connected accounts page in your Dashboard helps you monitor your account’s health by providing a filterable list of all your connected accounts. From there, you can:
- Proactively monitor your accounts: Monitor the status of your accounts with any open risk, onboarding, or verification requirements. View any current or upcoming risk and onboarding restrictions that affect your accounts.
- Identify the exact requirements needed: Understand an account’s status, impacted capabilities, and outstanding requirements without examining webhook logs. View clear instructions on how to resolve open requirements.
- Filter accounts: Filter the list of accounts by volume, requirements, risk signals, and more. View the list of available filters.
- Export a list of accounts: Download a CSV list of accounts, including remediation links that your accounts with open requirements can use to submit information and resolve issues.

To view the accounts in a particular status, select the corresponding tab:
| Tab | Description |
|---|---|
| All | All connected accounts associated with the platform. |
| Restricted | Accounts with at least one inactive capability. These accounts have open risk, onboarding, or verification requirements from Stripe or your platform. |
| Restricted soon | Accounts with currently due risk or compliance requirements on their account. These accounts will have a capability paused at the upcoming due date. |
| In review | Accounts where Stripe is reviewing the information provided by the platform or connected account. |
| Rejected | Every account that has been rejected by Stripe or your platform. |
| Enabled | Accounts in good standing with all primary capabilities enabled. Some of these accounts can have eventually due requirements. To find enabled accounts with requirements that are eventually due, filter by account status enabled and requirement status eventually due. |
| Accounts to review | Accounts that have one or more restricted capabilities, or that are at risk of having one or more capabilities restricted. It combines the accounts listed in the Restricted and Restricted soon tabs. |
| Radar rule matches | Accounts that match one or more Radar rules. This tab appears only if your platform uses Radar. |
Save custom views
After defining the list view’s columns, filters, and sorting, you can save that configuration as a custom view by clicking Save list. Enter a name and click Save as new list. A custom view is only available to the user who creates it.
The saved view appears as a tab in the row of status tabs. You can reposition it by dragging it. To duplicate, rename, or delete the view, click the overflow menu () that appears when you hover over the tab.
You can’t delete the default status tabs, but you can change their displayed columns.
Edit columns
In each view, you have the ability to see default columns with information such as balance, volume, important dates, information needed, and so on.
To change the columns with information about accounts, you can edit the columns in each view. This includes adding, removing or rearranging columns.
Use filters to identify accounts
In each tab, you can customise the list view with filters.
The default filters appear below the status tabs. To add another filter, click More filters. Other filters fall into one of these categories:
- Suggested
- Account
- Properties
- Requirements
- Capability
- Risk management
- Tax
- Metadata
For more information about the available filters, see Connected account filters.
Note
Connected accounts with access to the full Stripe Dashboard show “Unavailable” in the Volume column, unless they have platform controls enabled. Filtering by volume always excludes accounts with unavailable volume data. To identify them, filter the list by platform controls.
Filter for accounts requiring additional information on business model review
To enable Stripe services, your business must comply with the Stripe Terms of Service regarding supported business types, products, and industries. Stripe might require additional information to determine whether we support a connected account’s business. To identify these accounts, use the Requirements filter and select the appropriate requirements, such as Additional business information or Business website information.
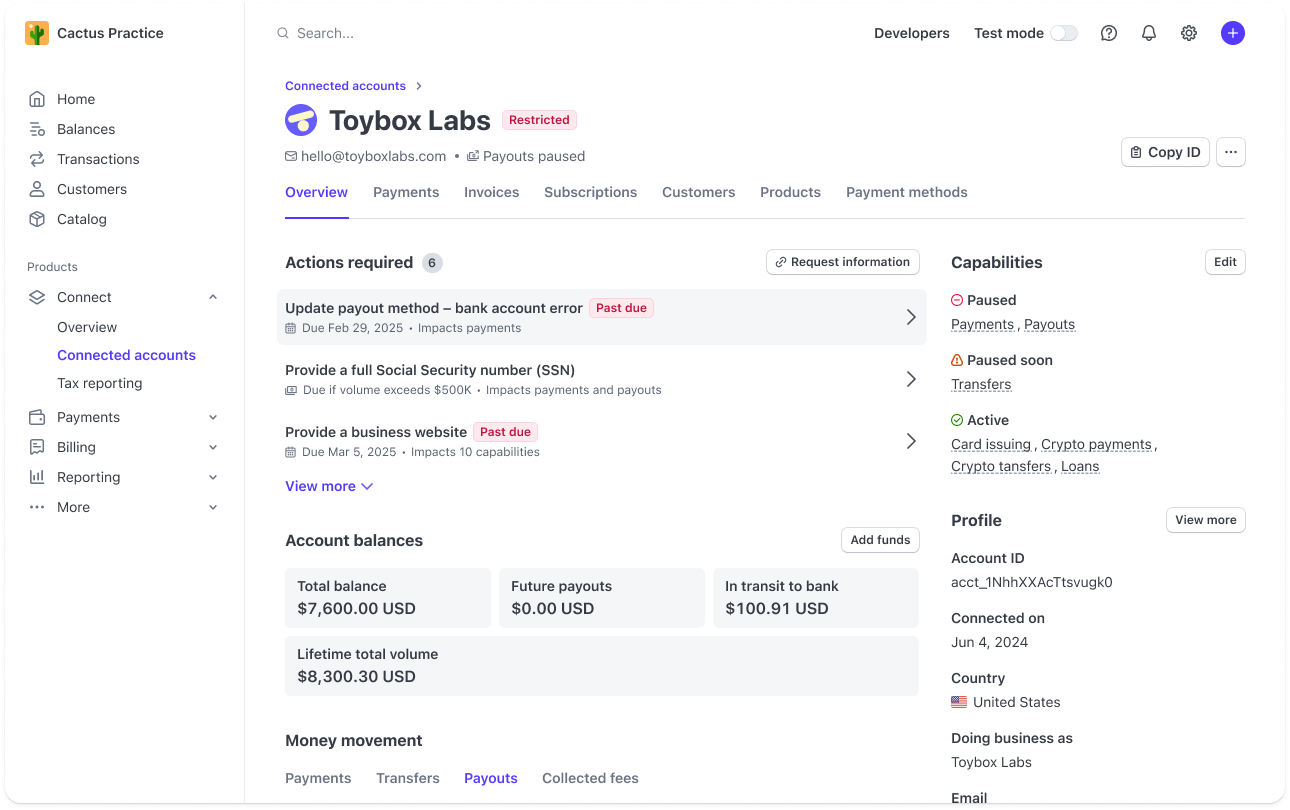
Specific open requirements appear in the Actions required section of the Connected account details page.
Filter for inactive accounts
If an account has no activity for 540 days, Stripe disables certain account capabilities and pauses requirements verification. An inactive account with open requirements can remain in a pending state until you manually update its status.
Stripe considers an account inactive if it doesn’t have any of the following activity:
- The account receives a payout.
- The account accepts a payment.
- The platform transfers a balance to the account.
- The account tops up a balance.
- The account logs into a Stripe-hosted Dashboard.
To identify inactive accounts, use the Last active filter and specify an is before or on date 540 days in the past. You can identify accounts at risk of being disabled for inactivity by using a more recent date, such as 510 days in the past. Review and update the accounts accordingly:
- If the account is only temporarily inactive, open its account details page and look for a notification that Stripe has paused review due to inactivity. If you find that notification, click Mark as active to unpause requirement verification for that account. Otherwise, check for open requirements and address them normally.
- If the account is no longer active, reject it using the Dashboard or API. If the account has a non-zero balance, you must address the balance before you can reject the account.
In addition, to protect Issuing users against card fraud, Stripe disables an account’s Issuing capability when all of the following are true:
- None of the account’s issued cards have completed any transactions in the past 395 days.
- The account has had no payments or Financial Accounts for platforms transactions in the past 395 days.
- The account’s Treasury balance is 9.99 USD or less.
Stripe only disables the entire account’s issuing capability. There is no automatic mechanism to disable individual inactive cards.
Disabling an account’s issuing capability causes any transactions on its issued cards to be declined, but doesn’t affect any other capabilities. To re-enable the issuing capability, the platform must re-sign the terms and conditions for that account.
To reduce the possibility of disabling issuing capabilities, implement a process to identify accounts with no authorised Issuing card transactions in the past 365 days. Notify those accounts that their cards risk deactivation if they have no transactions in the next 30 days.
Export a list of accounts
To download a CSV list of all accounts in the current view, click Export in the top-right corner of the page and select the fields to include. The default export includes the following fields:
- ID
- Account Type
- Business Type
- Country
- Connected on Date (UTC)
By default, the export includes connected accounts based on the current filtered list view. For example, to export a set of connected accounts within a specific timeframe, filter by that time frame before clicking Export.
Include remediation links in the download only if you plan to send them to your connected accounts. Including remediation links increases the export time.
Use Stripe Sigma to identify accounts with open requirements
If you use Stripe Sigma, you can identify accounts that have open requirements or future_. For information about querying for Connect information with Sigma, see Query Connect data.
Review and take action on individual accounts
To investigate the open requirements for an account on the connected accounts list view, click the account to open the Connected account details page with an Actions required list at the top, where you can identify specific requirements and take action. This list doesn’t appear if there aren’t any actionable requirements on the account.

Click a requirement to see the provided information and any error codes associated with that information.
If your platform is responsible for collecting updated requirements, you can view identity verification document files submitted by the connected account. You can only view them in the Dashboard; you can’t access them using the API.
To take action on an outstanding requirement, ask the connected account to submit additional information. If your platform is responsible for collecting updated requirements, you can submit additional information for the account.
Review and appeal unsupported connected accounts
If Stripe can’t support your connected account or requires more information, you can review or submit an appeal from the Dashboard.
- To find these accounts, go to Rejected to view the date of rejection and the reason.
- If you want to appeal the decision, click on the account to open the Connected account details page. If there’s an option to appeal, Actions Required displays a row.
- Depending on the exact information required, you can:
- Send a remediation link to your connected account so they can submit the information.
- Submit the information yourself on behalf of your connected account.