コンテンツにスキップ
アカウントを作成
または
サインイン
Stripe ドキュメントのロゴ
/
AI に質問する
アカウントを作成
サインイン
始める
支払い
財務の自動化
プラットフォームおよびマーケットプレイス
資金管理
開発者向けのツール
始める
支払い
財務の自動化
始める
支払い
財務の自動化
プラットフォームおよびマーケットプレイス
資金管理
概要
Stripe Payments について
構築済みのシステムをアップグレード
支払いの分析
オンライン決済
概要ユースケースを見つけるManaged Payments
Payment Links を使用する
決済ページを構築
高度なシステムを構築
    概要
    クイックスタート
    高度なシステムを設計
    デザインをカスタマイズする
    決済手段を管理
      Express Checkout Element で決済を受け付ける
      カスタムの支払い方法を追加する
      支払い方法をカスタマイズする
      顧客の支払い方法を保存および取得する
    追加情報を収集する
    支払いで税金を徴収
    支払いに使用された決済手段を保存する
    支払いを行わずに顧客の決済手段を保存する
    領収書と支払い済みの請求書を送信する
アプリ内実装を構築
決済手段
決済手段を追加
決済手段を管理
Link による購入の迅速化
支払いインターフェイス
Payment Links
Checkout
Web Elements
アプリ内 Elements
決済シナリオ
カスタムの決済フロー
柔軟なアクワイアリング
オーケストレーション
店頭支払い
端末
他の Stripe プロダクト
Financial Connections
仮想通貨
Climate
ホーム支払いBuild an advanced integrationManage payment methods

注

このページはまだ日本語ではご利用いただけません。より多くの言語で文書が閲覧できるように現在取り組んでいます。準備が整い次第、翻訳版を提供いたしますので、もう少しお待ちください。

Express Checkout Element で決済を受け付ける

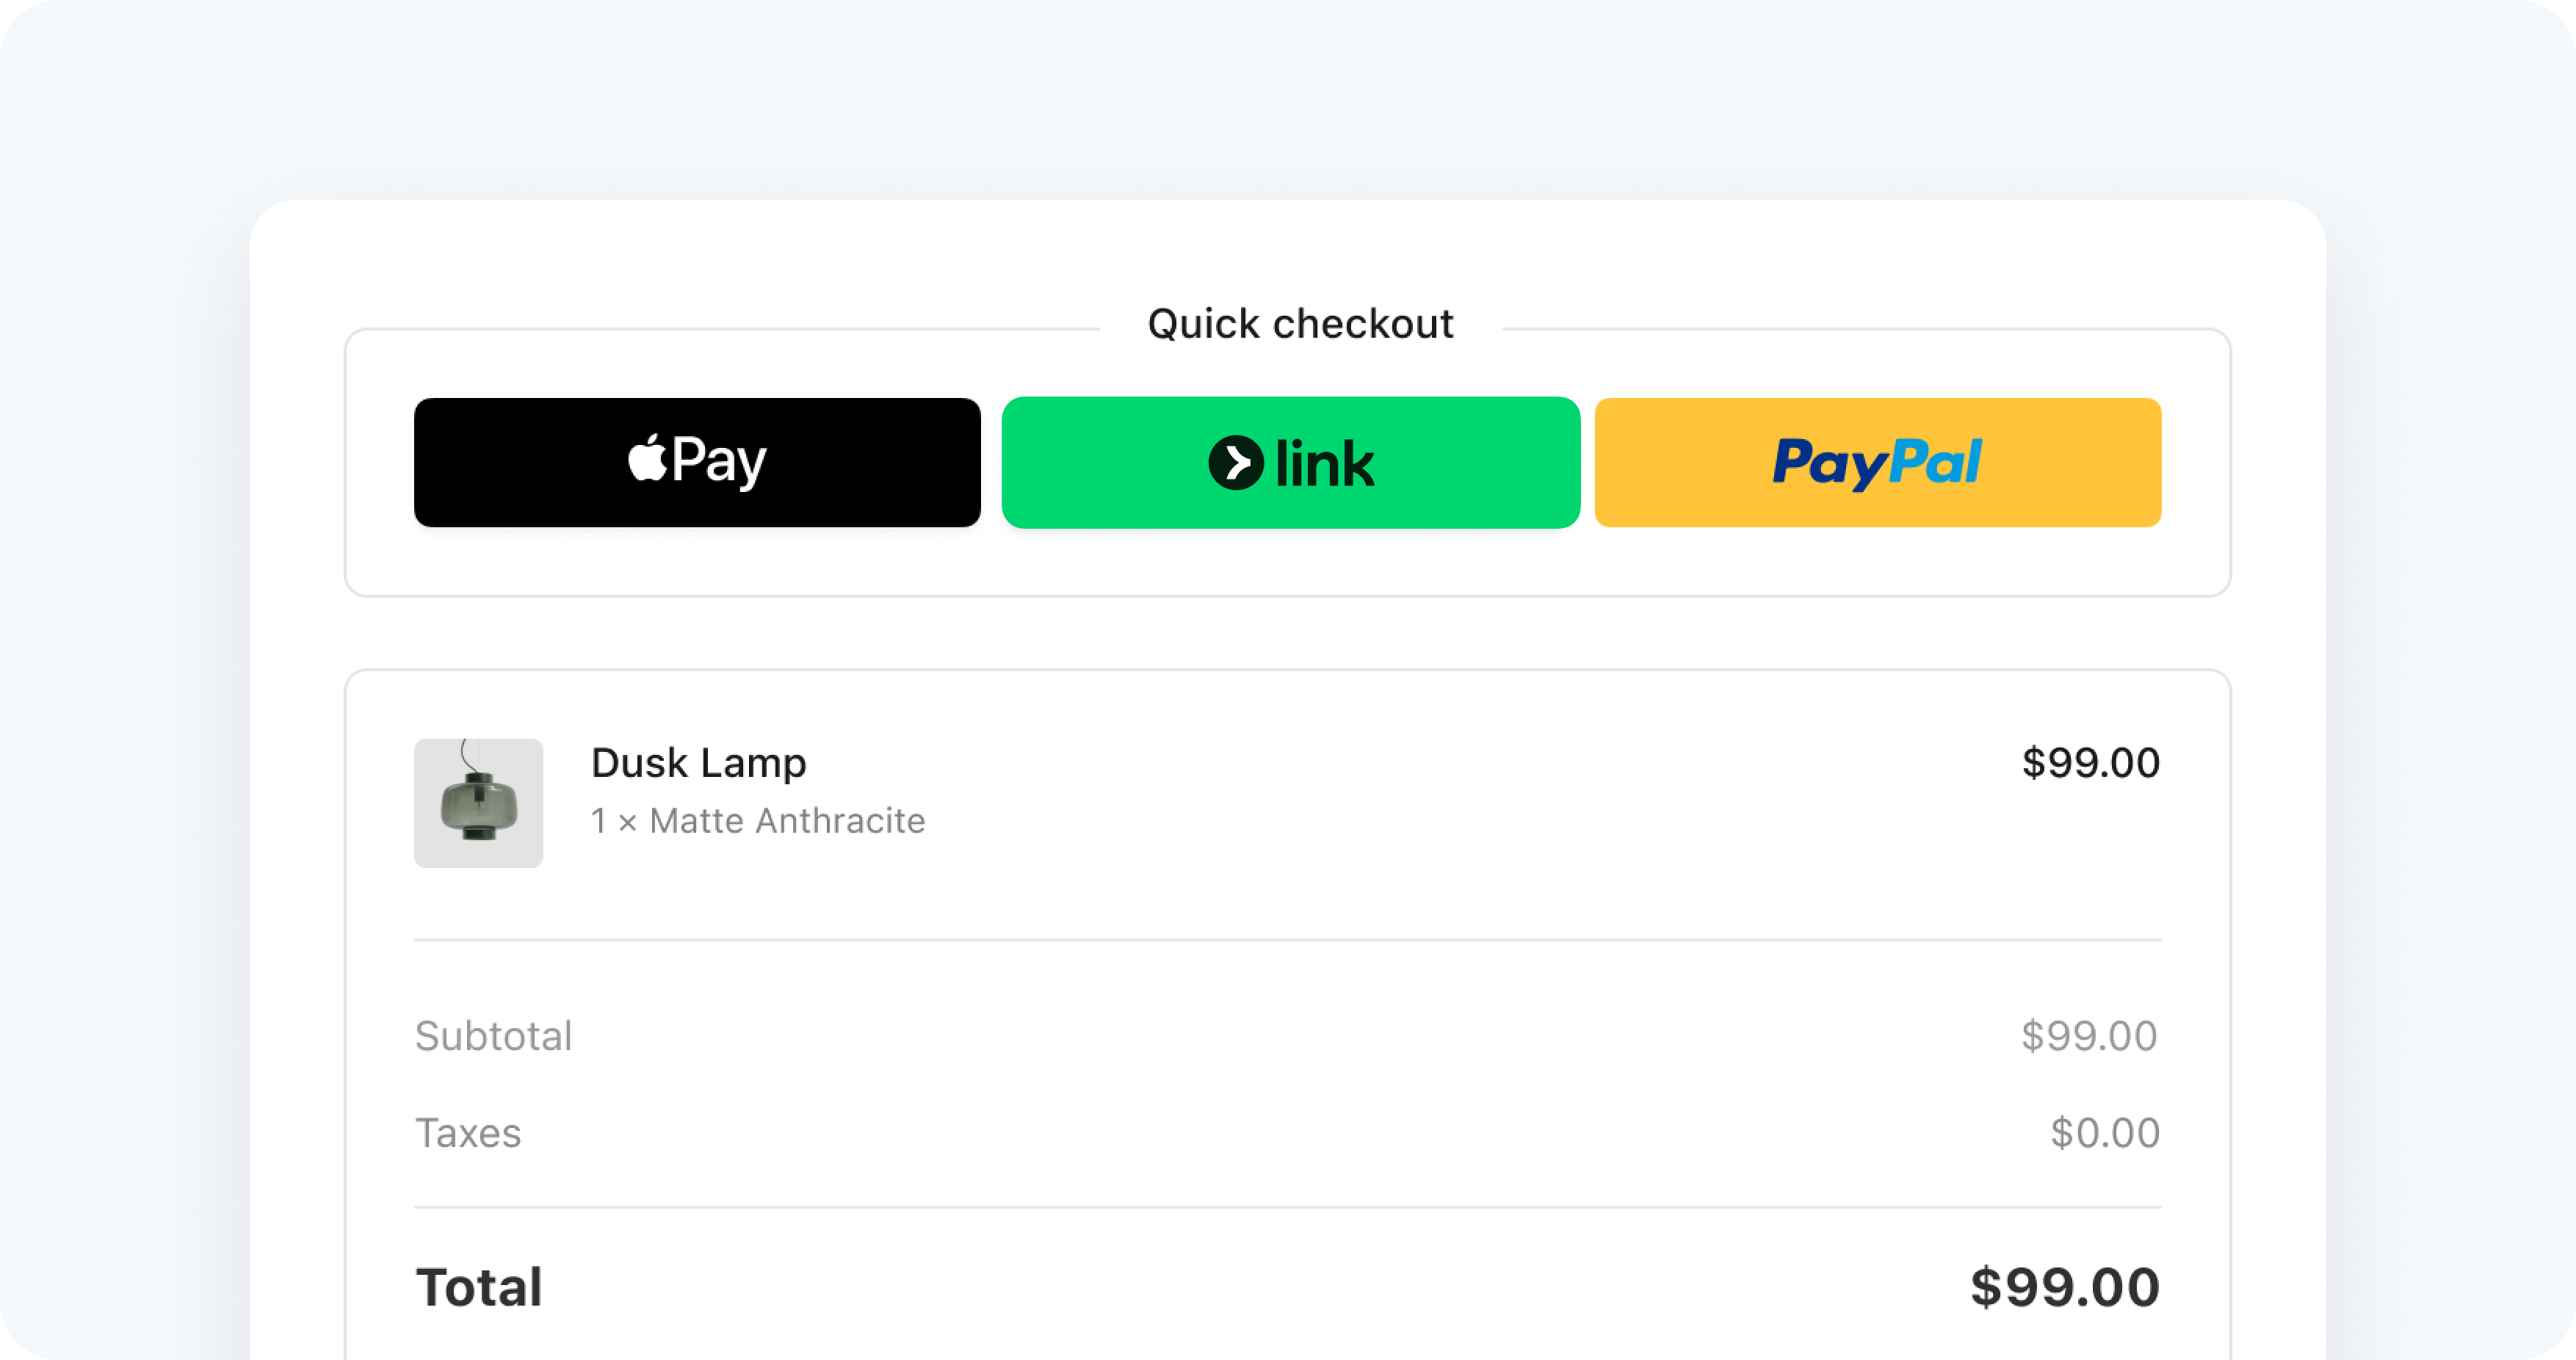
単一の導入を使用して、ワンクリックの支払いボタンで決済を受け付けます。
ページをコピー

The Express Checkout Element is an integration for accepting payments through one-click payment methods buttons. Supported payment methods include Link, Apple Pay, Google Pay, PayPal, Klarna, and Amazon Pay.

顧客が使用するデバイスとブラウザーの組み合わせのサポート状況に応じて、表示される支払いボタンが異なります。互換性のあるデバイスでは、Google Pay と Link が自動的にサポートされます。Apple Pay と PayPal のサポートには追加のステップが必要です。

オプション説明
加盟店の所在国Set this using the publishable key that you use to initialize Stripe.js. To change the country, you must unmount the Express Checkout Element, update the publishable key, then re-mount the Express Checkout Element.
Background colorSet colors using the Elements Appearance API. Button themes are inherited from the Appearance API but you can also define them directly when you create the Element.
Desktop and mobile sizeUse the dropdown to set the max pixel width of the parent element that the Express Checkout Element is mounted to. You can set it to 750px (Desktop) or 320px (Mobile).
Max columns and max rowsSet these values using the layout parameter when you Create the Express Checkout Element.
Overflow menuSet this using the layout parameter when you Create the Express Checkout Element.
Collect shipping addressTo collect shipping information, you must pass options when creating the Express Checkout Element. Learn more about collecting customer details and displaying line items.

Express Checkout Element を使用する際は、Intent の作成前に支払いの詳細を収集することをお勧めします。これまでに Payment Element を導入している場合に、このアプローチを行うにはStripe システムの更新が必要になる場合があります。

はじめに

  • ブラウザーに支払い方法を追加します。たとえば、カードを Google Pay アカウントや Safari のウォレットに追加できます。
  • アプリケーションは HTTPS 経由で提供します。これは、開発環境と本番環境で必須です。ngrok などのサービスを利用できます。
  • サンドボックスと本番環境の両方でドメインを登録します。
  • PayPal サンドボックスアカウントを作成して、実装をテストします。

Stripe を設定する
サーバ側

まず、Stripe アカウントを作成するかサインインします。

アプリケーションから Stripe API にアクセスするには、Stripe の公式ライブラリを使用します。

Command Line
Ruby
# Available as a gem sudo gem install stripe
Gemfile
Ruby
# If you use bundler, you can add this line to your Gemfile gem 'stripe'

支払い方法を有効にする

デフォルトでは、Stripe はお客様の決済手段の設定を使用して、Express Checkout Element ででどの決済手段を有効にするかを決定します。

有効になっている決済手段を手動で上書きするには、payment_method_types 属性を使用して、有効にする決済手段をすべてリストします。

  • インテントを作成する前に支払いを回収する場合は、Elementsプロバイダーオプションの paymentMethodTypes 属性に決済手段のリストを作成します。
  • Elements をレンダリングする前にインテントを作成する場合は、インテントの payment_method_types 属性に決済手段のリストを作成します。

サポートされている決済手段

支払い方法タイプ card を使用すると、Apple Pay と Google Pay が自動的に有効になります。Link を使用する場合は、必ず card 支払い方法タイプも渡します。

支払い方法名Payment method API パラメーター
Apple Paycard
Google Paycard
Linklink, card
PayPalpaypal
Amazon Payamazon_pay
Klarnaklarna

Stripe Elements を設定する
クライアント側

Express Checkout Element は Stripe.js の機能として自動的に使用できるようになります。決済ページに Stripe.js スクリプトを含めるには、HTML ファイルの head にこれを追加します。常に js.stripe.com から Stripe.js を直接読み込むことにより、PCI への準拠が維持されます。スクリプトをバンドルに含めたり、そのコピーを自身でホストしたりしないでください。

checkout.html
<head> <title>Checkout</title> <script src="https://js.stripe.com/v3/"></script> </head>

購入ページで次の JavaScript を使用して、Stripe のインスタンスを作成します。

checkout.js
// Set your publishable key: remember to change this to your live publishable key in production // See your keys here: https://dashboard.stripe.com/apikeys const stripe = Stripe(
'pk_test_TYooMQauvdEDq54NiTphI7jx'
);

次に、モード (支払い、設定、またはサブスクリプション)、金額 および通貨を指定して Elements のインスタンスを作成します。これらの値により、顧客に表示される支払い方法が決定されます。次のステップで、より詳細な設定が可能な Elements オプションをご覧ください。

checkout.js
const options = { mode: 'payment', amount: 1099, currency: 'usd', // Customizable by using the Appearance API. appearance: {/*...*/}, }; // Set up Stripe.js and Elements to use in checkout form. const elements = stripe.elements(options);

オプションAdditional Elements options
クライアント側

Express Checkout Element を作成してマウントする
クライアント側

Express Checkout Element には、HTTPS 接続を介して支払い情報を Stripe に安全に送信する iframe が含まれています。実装を機能させるには、決済ページのアドレスの先頭を http:// ではなく https:// にする必要があります。

決済ページに Express Checkout Element を配置する場所が必要です。支払いフォームで、一意の ID を持つ空の DOM ノード (コンテナー) を作成します。

checkout.html
<div id="express-checkout-element"> <!-- Express Checkout Element will be inserted here --> </div> <div id="error-message"> <!-- Display an error message to your customers here --> </div>

フォームが読み込まれたら、Express Checkout Element のインスタンスを作成し、コンテナーの DOM ノードにマウントします。

checkout.js
// Create and mount the Express Checkout Element const expressCheckoutElement = elements.create('expressCheckout'); expressCheckoutElement.mount('#express-checkout-element');

顧客の詳細情報を収集してラインアイテムを表示する
クライアント側

Express Checkout Element 作成時にオプションを渡します。

支払人の情報を収集する

メールアドレスを収集するには、emailRequired: true を設定して、電話番号を収集するには、phoneNumberRequired: true を設定します。billingAddressRequired はデフォルトで true です。

checkout.js
elements.create('expressCheckout', { emailRequired: true, phoneNumberRequired: true });

Express Checkout Element で PayPal を使用する場合、通常 Stripe は請求先住所からの国の受け取りと表示のみを行います。PayPal がサードパーティーの決済代行業者と情報を共有する方法が原因で、確定イベントのペイロードでは、国のフィールド以外の billingDetails[address] フィールドは空の文字列として表示されます。

配送先情報を収集する

shippingAddressRequired: trueを設定し、shippingRates の配列を渡します。

checkout.js
elements.create('expressCheckout', { shippingAddressRequired: true, allowedShippingCountries: ['US'], shippingRates: [ { id: 'free-shipping', displayName: 'Free shipping', amount: 0, deliveryEstimate: { maximum: {unit: 'day', value: 7}, minimum: {unit: 'day', value: 5} } }, ] });

shippingaddresschange イベントをリッスンして、顧客が配送先住所を選択した際にこれを検出します。このイベントを処理する場合は、resolve または reject のいずれかを呼び出す必要があります。

checkout.js
expressCheckoutElement.on('shippingaddresschange', async (event) => { const response = await fetch('/calculate-shipping', { data: JSON.stringify({ shippingAddress: event.address }) }); const result = await response.json(); event.resolve({ lineItems: result.updatedLineItems, }); });

shippingratechange イベントをリッスンして、顧客が配送料金を選択した際にこれを検出します。このイベントを処理する場合は、resolve または reject のいずれかを呼び出す必要があります。

checkout.js
expressCheckoutElement.on('shippingratechange', async (event) => { const response = await fetch('/calculate-and-update-amount', { data: JSON.stringify({ shippingRate: event.shippingRate }) }); const result = await response.json(); elements.update({amount: result.amount}) event.resolve({ lineItems: result.updatedLineItems, }); });

cancel イベントをリッスンして、顧客が決済インターフェイスを閉じた際に、これを検出します。金額を当初の金額にリセットします。

checkout.js
expressCheckoutElement.on('cancel', () => { elements.update({amount: 1099}) });

ラインアイテムを表示する

lineItems の配列を渡します。:

checkout.js
elements.create('expressCheckout', { lineItems: [ { name: 'Sample item', amount: 1000 }, { name: 'Tax', amount: 100 }, { name: 'Shipping cost', amount: 1000 } ] });

Apple Pay インターフェイスを設定する

Apple Pay インターフェイスの設定方法をご確認ください。

加盟店が開始する取引 (MIT)

ユーザーが Apple Pay で決済する際に、Express Checkout Element click イベントで関連するマーチャントトークンのタイプをリクエストすることで、継続支払い、後払い、自動リロード支払いを設定することができます。Apple Pay マーチャントトークンを実装する際は、Apple Pay の最新ガイドラインに準拠し、将来の実装に対応できるようにすることをお勧めします。

オプションready イベントをリッスンする
クライアント側

オプション支払いボタンを表示するタイミングを管理する
クライアント側

オプションボタンのスタイルを設定する
クライアント側

オプションConfirmationToken を作成する
クライアント側

PaymentIntent を作成する
サーバー側

Stripe は PaymentIntent オブジェクトを使用して、顧客から支払いを回収するお客様の意図を示し、プロセス全体を通して請求の実施と支払い状態の変化を追跡します。

サーバーで金額と通貨を指定し、PaymentIntent を作成します。これは、ステップ 3 で stripe.elements インスタンスに設定した内容と一致している必要があります。請求金額は、クライアント側ではなく、常に信頼できる環境のサーバー側で指定してください。これにより、悪意のある顧客が金額を恣意的に選択できないようにします。

main.rb
Ruby
require 'stripe' Stripe.api_key =
'sk_test_BQokikJOvBiI2HlWgH4olfQ2'
post '/create-intent' do intent = Stripe::PaymentIntent.create({ # To allow saving and retrieving payment methods, provide the Customer ID. customer: customer.id, # In the latest version of the API, specifying the `automatic_payment_methods` parameter is optional because Stripe enables its functionality by default. automatic_payment_methods: {enabled: true}, amount: 1099, currency: 'usd', }) {client_secret: intent.client_secret}.to_json end

返される PaymentIntent には client secret が含まれています。これは、PaymentIntent オブジェクト全体を渡すことなく安全に決済プロセスを完了するために、クライアント側で使用されます。client secret をクライアント側に渡す際には、いくつかの方法を使用できます。

Stripe に支払いを送信する
クライアント側

stripe.confirmPayment を使用し、Express Checkout Element からの詳細を使って支払いを完了します。

注

Amazon Pay、Klarna、PayPal の場合、PaymentIntent で確定した金額と買い手が事前承認した金額が一致している必要があります。金額が一致しないと、支払いは拒否されます。

支払いの完了後に Stripe がユーザーをリダイレクトする場所を指定するには、この関数に return_url を指定します。ユーザーは、最初に中間サイトにリダイレクトされてから、return_url にリダイレクトされる場合があります。支払いが正常に完了するとすぐに return_url にリダイレクトされます。

支払いの完了後にリダイレクトを行わない場合は、redirect を if_required に設定します。これで、リダイレクトベースの支払い方法で購入する顧客のみがリダイレクトされます。

checkout.js
const handleError = (error) => { const messageContainer = document.querySelector('#error-message'); messageContainer.textContent = error.message; } expressCheckoutElement.on('confirm', async (event) => { const {error: submitError} = await elements.submit(); if (submitError) { handleError(submitError); return; } // Create the PaymentIntent and obtain clientSecret const res = await fetch('/create-intent', { method: 'POST', }); const {client_secret: clientSecret} = await res.json(); const {error} = await stripe.confirmPayment({ // `elements` instance used to create the Express Checkout Element elements, // `clientSecret` from the created PaymentIntent clientSecret, confirmParams: { return_url: 'https://example.com/order/123/complete', }, }); if (error) { // This point is only reached if there's an immediate error when // confirming the payment. Show the error to your customer (for example, payment details incomplete) handleError(error); } else { // The payment UI automatically closes with a success animation. // Your customer is redirected to your `return_url`. } });

実装をテストする

本番環境に移行する前に、各支払い方法の組み込みをテストします。支払い方法のブラウザーとの互換性を判断するには、サポートされるブラウザーをご覧ください。iframe で Express Checkout Element を使用している場合、iframe で allow 属性を payment * に設定する必要があります。

注意

Don’t store real user data in sandbox Link accounts. Treat them as if they’re publicly available, because these test accounts are associated with your publishable key.

Link は現在、クレジットカード、デビットカード、および資格要件を満たしたアメリカの銀行口座からの購入にのみ対応しています。Link では、ドメインの登録が必要です。

You can create sandbox accounts for Link using any valid email address. The following table shows the fixed one-time passcode values that Stripe accepts for authenticating sandbox accounts:

値結果
以下に記載されていない任意の 6 桁の数字成功
000001エラー: コードが無効です
000002エラー: コードの有効期限が切れています
000003エラー: 最大試行回数を超えました

オプションStripe Connect で Express Checkout Element を使用する

顧客に Stripe を開示する

Stripe は顧客の Elements とのやり取りに関する情報を収集して、サービスを提供し、不正利用を防止し、サービスを向上します。これには、Cookie と IP アドレスを使用して、1 つの決済フローセッションで顧客に表示する Elements を特定することが含まれます。Stripe がこのような方法でデータを使用するために必要なすべての権利と同意について開示し、これらを取得することはお客様の責任です。詳細については、プライバシーセンターをご覧ください。

参照情報

  • Stripe Elements
  • インテントを作成する前に支払いの詳細を収集する
  • サーバーで支払いを確定する
このページはお役に立ちましたか。
はいいいえ
お困りのことがございましたら 、サポートにお問い合わせください。
早期アクセスプログラムにご参加ください。
変更ログをご覧ください。
ご不明な点がございましたら、お問い合わせください。
LLM ですか?llms.txt を読んでください。
Powered by Markdoc