Skip to content
Create account
or
Sign in
The Stripe Docs logo
/
Ask AI
Create account
Sign in
Get started
Payments
Revenue
Platforms and marketplaces
Money management
Developer resources
Overview
About Stripe payments
Upgrade your integration
Payments analytics
Online payments
OverviewFind your use caseManaged Payments
Use Payment Links
Build a checkout page
Build an advanced integration
    Overview
    Quickstart
    Design an advanced integration
    Customize look and feel
    Manage payment methods
      Accept a payment with the Express Checkout Element
      Add custom payment methods
      Customize payment methods
      Save and retrieve customer payment methods
    Collect additional information
    Collect taxes on your payments
    Save the payment method used for a payment
    Save a payment method without making a payment
    Send receipts and paid invoices
Build an in-app integration
Payment methods
Add payment methods
Manage payment methods
Faster checkout with Link
Payment interfaces
Payment Links
Checkout
Web Elements
In-app Payments
Payment scenarios
Handle multiple currencies
Custom payment flows
Flexible acquiring
Orchestration
In-person payments
Terminal
Beyond payments
Incorporate your company
Crypto
Financial Connections
Climate
Understand fraud
Radar fraud protection
Manage disputes
Verify identities
HomePaymentsBuild an advanced integrationManage payment methods

Accept a payment with the Express Checkout Element

Use a single integration to accept payments through one-click payment buttons.
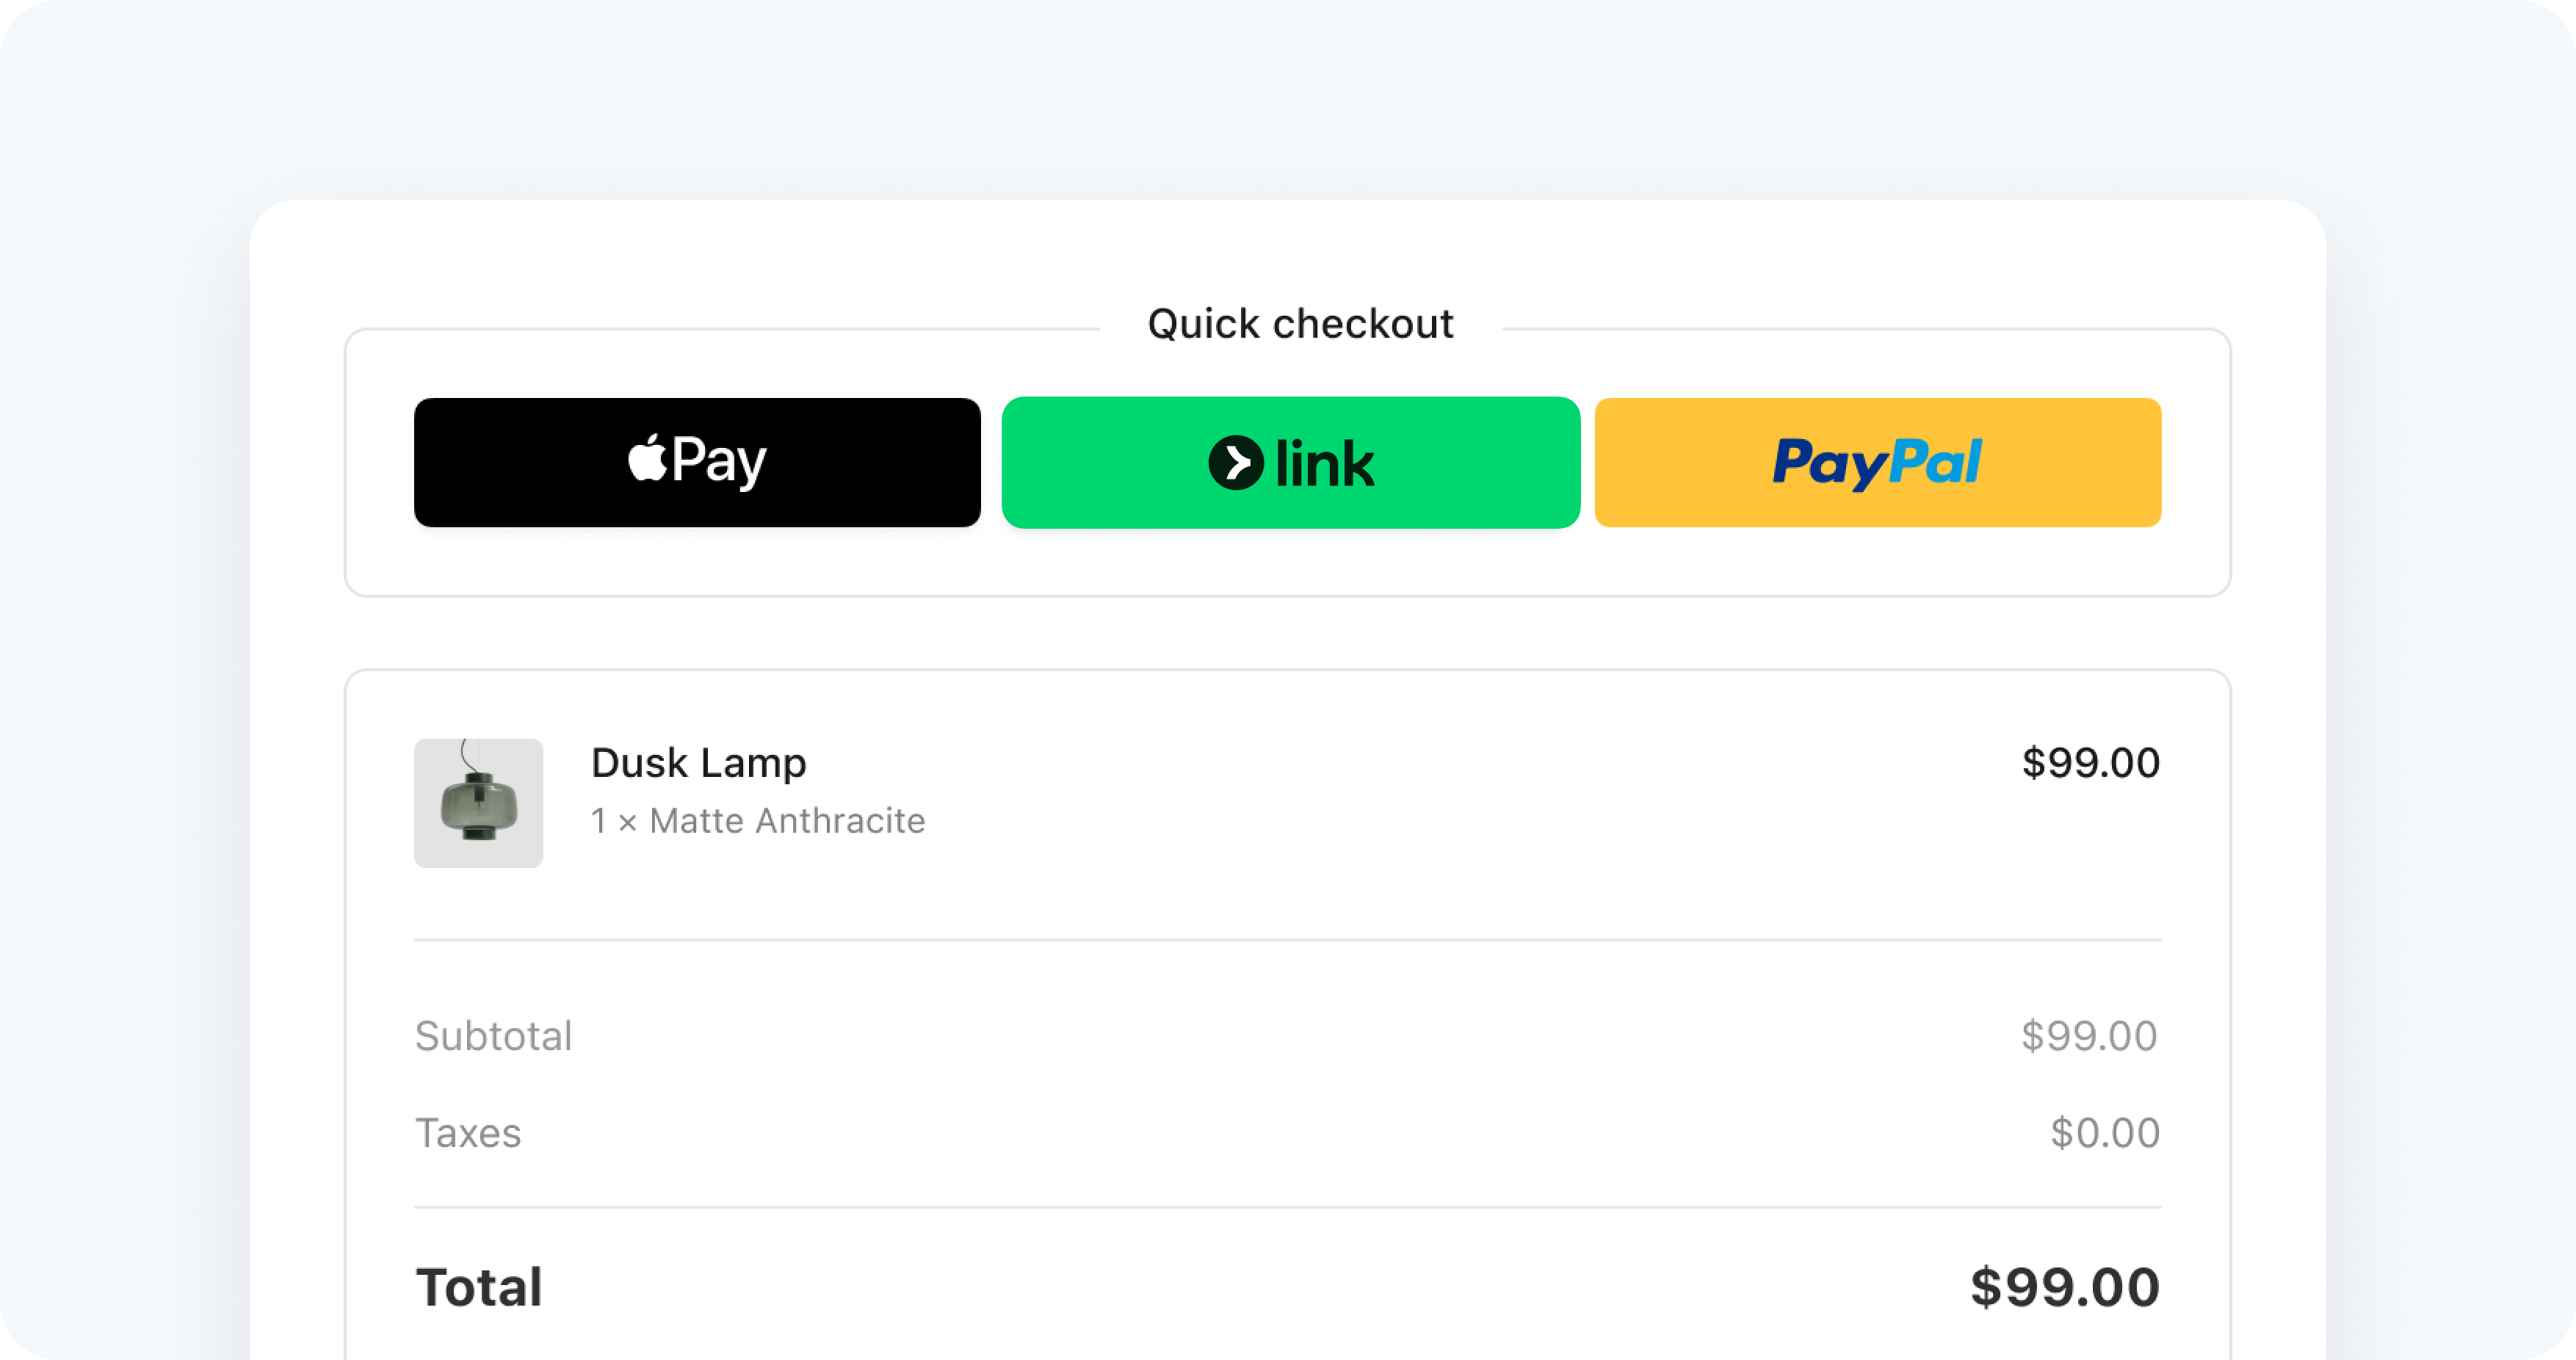
The Express Checkout Element is an integration for accepting payments through one-click payment methods buttons. Supported payment methods include Link, Apple Pay, Google Pay, PayPal, Klarna, and Amazon Pay.

Customers see different payment buttons depending on what their device and browser combination supports. Compatible devices automatically support Google Pay and Link. Supporting Apple Pay and PayPal requires additional steps.

OptionDescription
Merchant countrySet this using the publishable key that you use to initialize Stripe.js. To change the country, you must unmount the Express Checkout Element, update the publishable key, then re-mount the Express Checkout Element.
Background colorSet colors using the Elements Appearance API. Button themes are inherited from the Appearance API but you can also define them directly when you create the Element.
Desktop and mobile sizeUse the dropdown to set the max pixel width of the parent element that the Express Checkout Element is mounted to. You can set it to 750px (Desktop) or 320px (Mobile).
Max columns and max rowsSet these values using the layout parameter when you Create the Express Checkout Element.
Overflow menuSet this using the layout parameter when you Create the Express Checkout Element.
Collect shipping addressTo collect shipping information, you must pass options when creating the Express Checkout Element. Learn more about collecting customer details and displaying line items.

We recommend that you collect payment details before creating an Intent when using the Express Checkout Element. If you previously integrated with the Payment Element, you might need to update your integration to this preferred approach.

Before you begin

  • Add a payment method to your browser. For example, you can add a card to your Google Pay account or to your Wallet for Safari.
  • Serve your application over HTTPS. This is required in development and in production. You can use a service such as ngrok.
  • Register your domain in both a sandbox and live mode.
  • Create a PayPal Sandbox account to test your integration.

Set up Stripe
Server-side

First, create a Stripe account or sign in.

Use our official libraries to access the Stripe API from your application:

Command Line
Ruby
Python
PHP
Java
Node.js
Go
.NET
No results
# Available as a gem sudo gem install stripe
Gemfile
Ruby
Python
PHP
Java
Node.js
Go
.NET
No results
# If you use bundler, you can add this line to your Gemfile gem 'stripe'

Enable payment methods

By default, Stripe uses your payment methods settings to determine which payment methods are enabled in the Express Checkout Element.

To manually override which payment methods are enabled, list any that you want to enable using the payment_method_types attribute.

  • If you collect payments before creating an intent, then list payment methods in the paymentMethodTypes attribute on your Elements provider options.
  • If you create an intent before rendering Elements, then list payment methods in the payment_method_types attribute on your Intent.

Supported payment methods

Apple Pay and Google Pay are automatically enabled when using card payment method type. When using Link, you must also pass the card payment method type.

Payment method namePayment method API parameters
Apple Paycard
Google Paycard
Linklink, card
PayPalpaypal
Amazon Payamazon_pay
Klarnaklarna

Set up Stripe Elements
Client-side

The Express Checkout Element is automatically available as a feature of Stripe.js. Install React Stripe.js and the Stripe.js loader from the npm public registry.

Command Line
npm install --save @stripe/react-stripe-js @stripe/stripe-js

To use the Express Checkout Element component, wrap your checkout page component in an Elements provider. Call loadStripe with your publishable key, and pass the returned Promise to the Elements provider.

The Elements provider also accepts the mode (payment, setup, or subscription), amount, and currency. Many payment methods, including Apple Pay and Google Pay, use these values within their UI. See the next step for more configurable Elements options.

index.jsx
import React from 'react'; import ReactDOM from 'react-dom'; import {Elements} from '@stripe/react-stripe-js'; import {loadStripe} from '@stripe/stripe-js'; import CheckoutPage from './CheckoutPage'; // Make sure to call `loadStripe` outside of a component's render to avoid // recreating the `Stripe` object on every render. const stripePromise = loadStripe(
'pk_test_TYooMQauvdEDq54NiTphI7jx'
); function App() { const options = { mode: 'payment', amount: 1099, currency: 'usd', // Customizable with appearance API. appearance: {/*...*/}, }; return ( <Elements stripe={stripePromise} options={options}> <CheckoutPage /> </Elements> ); }; ReactDOM.render(<App />, document.getElementById('root'));

OptionalAdditional Elements options
Client-side

The Elements object accepts additional options that influence payment collection. Based on the options provided, the Express Checkout Element displays available payment methods from those you’ve enabled. Learn more about payment method support.

PropertyTypeDescriptionRequired
mode
  • payment
  • setup
  • subscription
Indicates whether the Express Checkout Element is used with a PaymentIntent, SetupIntent, or Subscription.Yes
currencystringThe currency of the amount to charge the customer.Yes
amountnumberThe amount to charge the customer, shown in Apple Pay, Google Pay, or BNPL UIs.For payment and subscription mode
setupFutureUsage
  • off_session
  • on_session
Indicates that you intend to make future payments with the payment details collected by the Express Checkout Element. Not supported for PayPal or Klarna using the Express Checkout Element. No
captureMethod
  • automatic
  • automatic_async
  • manual
Controls when to capture the funds from the customer’s account.No
onBehalfOfstringConnect only. The Stripe account ID, which is the business of record. See use cases to determine if this option is relevant for your integration.No
paymentMethodTypesstring[]A list of payment method types to render. You can omit this attribute to manage your payment methods in the Stripe Dashboard.No
paymentMethodConfigurationstringThe payment method configuration to use when managing your payment methods in the Stripe Dashboard. If not specified, your default configuration is used.No
paymentMethodCreationmanualAllows PaymentMethods to be created from the Elements instance using stripe.createPaymentMethod.No
paymentMethodOptions{us_bank_account: {verification_method: string}}Verification options for the us_bank_account payment method. Accepts the same verification methods as Payment Intents.No
paymentMethodOptions{card: {installments: {enabled: boolean}}}Allows manually enabling the card installment plan selection UI if applicable when you aren’t managing your payment methods in the Stripe Dashboard. You must set mode='payment' and explicitly specify paymentMethodTypes. Otherwise an error is raised. Incompatible with paymentMethodCreation='manual'.No

Create and mount the Express Checkout Element
Client-side

The Express Checkout Element contains an iframe that securely sends the payment information to Stripe over an HTTPS connection. The checkout page address must also start with https://, rather than http://, for your integration to work.

Add the ExpressCheckoutElement component to your payment page:

CheckoutPage.jsx
import React from 'react'; import {ExpressCheckoutElement} from '@stripe/react-stripe-js'; const CheckoutPage = () => { return ( <div id="checkout-page"> <ExpressCheckoutElement onConfirm={onConfirm} /> </div> ); };

Collect customer details and display line items
Client-side

Pass options when creating the Express Checkout Element.

Collect payer information

Set emailRequired: true to collect emails, and phoneNumberRequired: true to collect phone numbers. billingAddressRequired is true by default.

CheckoutPage.jsx
const options = { emailRequired: true, phoneNumberRequired: true };

Collect shipping information

Set shippingAddressRequired: true and pass an array of shippingRates:

CheckoutPage.jsx
const options = { emailRequired: true, phoneNumberRequired: true, shippingAddressRequired: true, allowedShippingCountries: ['US'], shippingRates: [ { id: 'free-shipping', displayName: 'Free shipping', amount: 0, deliveryEstimate: { maximum: {unit: 'day', value: 7}, minimum: {unit: 'day', value: 5} } }, ] };

Listen to the shippingaddresschange event to detect when a customer selects a shipping address. You must call either resolve or reject if you choose to handle this event.

CheckoutPage.jsx
const onShippingAddressChange = async ({resolve, address}) => { const response = await fetch('/calculate-shipping', { data: JSON.stringify({ shippingAddress: address }) }); const result = await response.json(); resolve({ lineItems: result.updatedLineItems, }); };

Listen to the shippingratechange event to detect when a customer selects a shipping rate. You must call either resolve or reject if you choose to handle this event.

CheckoutPage.jsx
const onShippingRateChange = async ({resolve, shippingRate}) => { const response = await fetch('/calculate-and-update-amount', { data: JSON.stringify({ shippingRate: shippingRate }) }); const result = await response.json(); elements.update({amount: result.amount}) resolve({ lineItems: result.updatedLineItems, }); };

Listen to the cancel event to detect when a customer dismisses the payment interface. Reset the amount to the initial amount.

CheckoutPage.jsx
const onCancel = () => { elements.update({amount: 1099}) };

Add the event handlers when creating the Element.

CheckoutPage.jsx
<ExpressCheckoutElement options={options} onConfirm={onConfirm} onShippingAddressChange={onShippingAddressChange} onShippingRateChange={onShippingRateChange} onCancel={onCancel} />

Display line items

Pass in an array of lineItems.

CheckoutPage.jsx
const options = { lineItems: [ { name: 'Sample item', amount: 1000 }, { name: 'Tax', amount: 100 }, { name: 'Shipping cost', amount: 1000 } ] };

Configure the Apple Pay interface

Learn how to configure the Apple Pay interface.

Merchant initiated transactions (MIT)

We provide specific options to configure for Apple Pay. Set the applePay.recurringPaymentRequest option to specify a request to set up a recurring payment. When specified, Apple Pay issues a merchant token and provides the customer with a way to manage payment methods for a recurring payment.

CheckoutPage.jsx
const options = { applePay: { recurringPaymentRequest: { paymentDescription: 'My subscription', managementURL: 'https://example.com/billing', regularBilling: { amount: 2500, label: 'Monthly subscription fee', recurringPaymentIntervalUnit: 'month', recurringPaymentIntervalCount: 1, }, } } };

OptionalListen to the ready event
Client-side

After mounting, the Express Checkout Element won’t show buttons for a brief period. To animate the Element when buttons appear, listen to the ready event. Inspect the availablePaymentMethods value to determine which buttons, if any, display in the Express Checkout Element.

CheckoutPage.jsx
import React, {useState} from 'react'; import {ExpressCheckoutElement} from '@stripe/react-stripe-js'; import {onConfirm} from './confirmHandler'; const CheckoutPage = () => { // Optional: If you're doing custom animations, hide the Element const [visibility, setVisibility] = useState('hidden'); const onReady = ({availablePaymentMethods}) => { if (!availablePaymentMethods) { // No buttons will show } else { // Optional: Animate in the Element setVisibility('initial'); } }; return ( <div id="checkout-page"> <div id="express-checkout-element" style={{visibility}}> <ExpressCheckoutElement onConfirm={onConfirm} onReady={onReady} /> </div> </div> ); };

OptionalControl when to show payment buttons
Client-side

You can manage the payment methods that appear in the Express Checkout Element in several ways:

  • In the Stripe Dashboard’s payment methods settings.
  • By using the paymentMethods property to disable payment buttons. Using this property gives you finer control over what your customers see.

The Express Checkout Element displays Apple Pay or Google Pay when the customer is on a supported platform and has an active card. If you want to always display Apple Pay and Google Pay even when the customer doesn’t have an active card, you can also configure this with paymentMethods.

OptionalStyle the button
Client-side

You can style each payment method button differently. For examples of button themes and types, see Google’s and Apple’s resources. You can also use the borderRadius variable in the Appearance API:

CheckoutPage.jsx
const options = { mode: 'payment', amount: 1099, currency: 'usd', appearance: { variables: { // This controls the border-radius of the rendered Express Checkout Element borderRadius: '4px' } } }; const expressCheckoutOptions = { // Specify a type per payment method // Defaults to 'buy' for Google and 'plain' for Apple buttonType: { googlePay: 'checkout', applePay: 'check-out' }, // Specify a theme per payment method // Default theme is based on appearance API settings buttonTheme: { applePay: 'white-outline' }, // Height in pixels. Defaults to 44. The width is always '100%'. buttonHeight: 55 };

Pass in these options while creating the Element and Elements provider.

CheckoutPage.jsx
<Elements stripe={stripePromise} options={options}> <ExpressCheckoutElement options={expressCheckoutOptions} onConfirm={onConfirm} /> </Elements>

OptionalCreate a ConfirmationToken
Client-side

When the customer authorizes a payment, you can create a ConfirmationToken to send to your server for additional validation or business logic prior to confirmation. You must immediately use the created ConfirmationToken to confirm a PaymentIntent or SetupIntent.

CheckoutPage.jsx
import React from 'react'; import {useStripe, useElements, ExpressCheckoutElement} from '@stripe/react-stripe-js'; const CheckoutPage = () => { const stripe = useStripe(); const elements = useElements(); const [errorMessage, setErrorMessage] = useState(); const onConfirm = async (event) => { if (!stripe) { // Stripe.js hasn't loaded yet. // Make sure to disable form submission until Stripe.js has loaded. return; } const {error: submitError} = await elements.submit(); if (submitError) { setErrorMessage(submitError.message); return; } // Create a ConfirmationToken using the details collected by the Express Checkout Element const {error, confirmationToken} = await stripe.createConfirmationToken({ elements, params: { payment_method_data: { billing_details: { name: 'Jenny Rosen', }, }, return_url: 'https://example.com/order/123/complete', } }); if (error) { // This point is only reached if there's an immediate error when // creating the ConfirmationToken. Show the error to your customer (for example, payment details incomplete) setErrorMessage(error.message); } // Send the ConfirmationToken ID to your server for additional logic and attach the ConfirmationToken const res = await fetch('/create-intent', { method: 'POST', body: confirmationToken.id }); const {client_secret: clientSecret} = await res.json(); // Confirm the PaymentIntent const {error: confirmError} = await stripe.confirmPayment({ clientSecret, confirmParams: { confirmation_token: confirmationToken.id }, }); if (confirmError) { // This point is only reached if there's an immediate error when // confirming the payment. Show the error to your customer (for example, payment details incomplete) setErrorMessage(confirmError.message); } else { // The payment UI automatically closes with a success animation. // Your customer is redirected to your `return_url`. } }; return ( <div id="checkout-page"> <ExpressCheckoutElement onConfirm={onConfirm} /> {errorMessage && <div>{errorMessage}</div>} </div> ); };

Create a PaymentIntent
Server-side

Stripe uses a PaymentIntent object to represent your intent to collect payment from a customer, tracking charge attempts and payment state changes throughout the process.

Create a PaymentIntent on your server with an amount and currency. This must match what you set on the stripe.elements instance in step 3. Always decide how much to charge on the server-side, a trusted environment, as opposed to the client-side. This prevents malicious customers from choosing their own prices.

main.rb
Ruby
Python
PHP
Node.js
Java
Go
.NET
No results
require 'stripe' Stripe.api_key =
'sk_test_BQokikJOvBiI2HlWgH4olfQ2'
post '/create-intent' do intent = Stripe::PaymentIntent.create({ # To allow saving and retrieving payment methods, provide the Customer ID. customer: customer.id, # In the latest version of the API, specifying the `automatic_payment_methods` parameter is optional because Stripe enables its functionality by default. automatic_payment_methods: {enabled: true}, amount: 1099, currency: 'usd', }) {client_secret: intent.client_secret}.to_json end

The returned PaymentIntent includes a client secret, which the client-side uses to securely complete the payment process instead of passing the entire PaymentIntent object. You can use different approaches to pass the client secret to the client-side.

Submit the payment to Stripe
Client-side

Use stripe.confirmPayment to complete the payment using details from the Express Checkout Element.

Note

For Amazon Pay, Klarna, and PayPal, the amount you confirm in the PaymentIntent must match the amount the buyer pre-authorized. If the amounts don’t match, the payment is declined.

Provide a return_url to this function to indicate where Stripe should redirect the user after they complete the payment. Your user might be initially redirected to an intermediate site before being redirected to the return_url. Payments immediately redirect to the return_url when a payment is successful.

If you don’t want to redirect after payment completion, set redirect to if_required. This only redirects customers that check out with redirect-based payment methods.

CheckoutPage.jsx
import React from 'react'; import {useStripe, useElements, ExpressCheckoutElement} from '@stripe/react-stripe-js'; const CheckoutPage = () => { const stripe = useStripe(); const elements = useElements(); const [errorMessage, setErrorMessage] = useState(); const onConfirm = async (event) => { if (!stripe) { // Stripe.js hasn't loaded yet. // Make sure to disable form submission until Stripe.js has loaded. return; } const {error: submitError} = await elements.submit(); if (submitError) { setErrorMessage(submitError.message); return; } // Create the PaymentIntent and obtain clientSecret const res = await fetch('/create-intent', { method: 'POST', }); const {client_secret: clientSecret} = await res.json(); // Confirm the PaymentIntent using the details collected by the Express Checkout Element const {error} = await stripe.confirmPayment({ // `elements` instance used to create the Express Checkout Element elements, // `clientSecret` from the created PaymentIntent clientSecret, confirmParams: { return_url: 'https://example.com/order/123/complete', }, }); if (error) { // This point is only reached if there's an immediate error when // confirming the payment. Show the error to your customer (for example, payment details incomplete) setErrorMessage(error.message); } else { // The payment UI automatically closes with a success animation. // Your customer is redirected to your `return_url`. } }; return ( <div id="checkout-page"> <ExpressCheckoutElement onConfirm={onConfirm} /> {errorMessage && <div>{errorMessage}</div>} </div> ); };

Test the integration

Before you go live, test each payment method integration. To determine a payment method’s browser compatibility, see supported browsers. If you use the Express Checkout Element within an iframe, the iframe must have the allow attribute set to payment *.

Caution

Don’t store real user data in sandbox Link accounts. Treat them as if they’re publicly available, because these test accounts are associated with your publishable key.

Currently, Link only works with credit cards, debit cards, and qualified US bank account purchases. Link requires domain registration.

You can create sandbox accounts for Link using any valid email address. The following table shows the fixed one-time passcode values that Stripe accepts for authenticating sandbox accounts:

ValueOutcome
Any other 6 digits not listed belowSuccess
000001Error, code invalid
000002Error, code expired
000003Error, max attempts exceeded

OptionalUse the Express Checkout Element with Stripe Connect

Connect platforms that either create direct charges or add the token to a Customer on the connected account must take additional steps.

  1. On your frontend, before creating the ExpressCheckoutElement, set the stripeAccount option on the Stripe instance:

    const stripe = Stripe(
    'pk_test_TYooMQauvdEDq54NiTphI7jx'
    , { apiVersion: "2025-08-27.basil", stripeAccount:
    '{{CONNECTED_ACCOUNT_ID}}'
    , });
  2. Register all of the domains where you plan to show the Express Checkout Element.

Disclose Stripe to your customers

Stripe collects information on customer interactions with Elements to provide services to you, prevent fraud, and improve its services. This includes using cookies and IP addresses to identify which Elements a customer saw during a single checkout session. You’re responsible for disclosing and obtaining all rights and consents necessary for Stripe to use data in these ways. For more information, visit our privacy center.

See also

  • Stripe Elements
  • Collect payment details before creating an Intent
  • Finalize payments on the server
Was this page helpful?
YesNo
  • Need help? Contact Support.
  • Join our early access program.
  • Check out our changelog.
  • Questions? Contact Sales.
  • LLM? Read llms.txt.
  • Powered by Markdoc