# Crea cargos Direct
Crea cargos directamente en la cuenta conectada y cobra una comisión.
Crea *cargos directos* cuando los clientes realicen la transacción directamente con una cuenta conectada, a menudo sin saber que existe tu plataforma. Con cargos directos:
- El pago aparece como cargo en la cuenta conectada, no en la cuenta de tu plataforma.
- El saldo de la cuenta conectada aumenta con cada pago.
- El saldo de tu cuenta aumenta con las comisiones de la aplicación recibidas de cada pago.
Este tipo de cargo es el más adecuado para las plataformas que proporcionan software como servicio. Por ejemplo, Shopify proporciona herramientas para crear tiendas en línea, y Thinkific permite a quienes ofrecen cursos de educación venderlos en línea.
## Limitaciones de visibilidad de la plataforma
Los cargos Direct tienen una visibilidad limitada a nivel de plataforma. Cuando creas cargos Direct, sucede lo siguiente:
- Los objetos de transacción como `PaymentIntents` y `Charges` existen en la cuenta conectada, no en la plataforma.
- Para acceder a los datos de cargos Direct, debes realizar una consulta a la API de Stripe utilizando el [ID de la cuenta conectada en la cabecera Stripe-Account](https://docs.stripe.com/connect/authentication.md).
Este comportamiento de alcance afecta a servicios de sincronización de datos como Fivetran, así como a otras integraciones de terceros que dependen de consultas a la API a nivel de plataforma. Para recuperar datos de cargos Direct, deben consultar la cuenta conectada, no la plataforma.
> Recomendamos usar cargos directos para las cuentas conectadas que tienen acceso al Dashboard completo de Stripe.
Redirige a los usuarios a una página de pago alojada en Stripe con [Stripe Checkout](https://docs.stripe.com/payments/checkout.md). Comprueba cómo esta integración [se compara con los otros tipos de integración de Stripe](https://docs.stripe.com/payments/online-payments.md#compare-features-and-availability).
#### Esfuerzo de integración
Complexity: 2/5
#### Tipo de integración
Redirigir a la página de pagos alojada en Stripe
#### Personalización de la interfaz de usuario
Personalización limitada
- 20 fuentes preestablecidas
- 3 radios de borde preestablecidos
- Fondo y color de borde personalizados
- Logotipo personalizado
[Probarlo](https://checkout.stripe.dev/)
Primero, [inscríbete](https://dashboard.stripe.com/register) para obtener una cuenta de Stripe.
Usa nuestras bibliotecas oficiales para acceder a la API de Stripe desde tu aplicación:
#### Ruby
```bash
# Available as a gem
sudo gem install stripe
```
```ruby
# If you use bundler, you can add this line to your Gemfile
gem 'stripe'
```
## Crear una sesión de Checkout [Lado del cliente] [Lado del servidor]
Una [sesión de Checkout](https://docs.stripe.com/api/checkout/sessions.md) controla lo que tu cliente puede ver en el formulario de pago, como las partidas, el importe del pedido y la moneda. Agrega un botón de confirmación de compra a tu sitio web que llame a un punto de conexión del lado del servidor para crear una sesión de Checkout.
```html
Checkout
```
En tu servidor, crea una sesión de Checkout y redirige a tu cliente a la [URL](https://docs.stripe.com/api/checkout/sessions/object.md#checkout_session_object-url) que se devuelve en la respuesta.
```curl
curl https://api.stripe.com/v1/checkout/sessions \
-u "<>:" \
-H "Stripe-Account: {{CONNECTEDACCOUNT_ID}}" \
-d "line_items[0][price_data][currency]=usd" \
-d "line_items[0][price_data][product_data][name]=T-shirt" \
-d "line_items[0][price_data][unit_amount]=1000" \
-d "line_items[0][quantity]=1" \
-d "payment_intent_data[application_fee_amount]=123" \
-d mode=payment \
--data-urlencode "success_url=https://example.com/success?session_id={CHECKOUT_SESSION_ID}"
```
- `Stripe-Account`: este encabezado indica un cargo Direct para tu cuenta conectada. La [imagen de marca](https://docs.stripe.com/connect/direct-charges.md#branding) de la cuenta conectada se utiliza en el proceso de compra, lo que permite a tus clientes sentir que están interactuando directamente con la cuenta conectada en lugar de con tu plataforma.
- `line_items`: este atributo representa los artículos que tu cliente está comprando y aparece en la página de proceso de compra alojada por Stripe.
- `payment_intent_data[application_fee_amount]`: este atributo especifica el importe que tu plataforma deduce de la transacción como comisión de la plataforma. Después de que se procesa el pago en la cuenta conectada, se transfiere el `application_fee_amount` a la plataforma. Consulta [Cobra comisiones](https://docs.stripe.com/connect/direct-charges.md#collect-fees) para obtener más información.
- `success_url`: Stripe redirige al cliente a la URL de éxito después de que complete un pago y reemplace la cadena `{CHECKOUT_SESSION_ID}` con el ID de la sesión de proceso de compra. Úsalo para recuperar la sesión de proceso de compra e inspecciona el estado para decidir qué le mostrarás a tu cliente. También puedes adjuntar tus propios parámetros de consulta, que se mantendrán durante el proceso de redireccionamiento. Consulta [personalizar el comportamiento de redireccionamiento en una página alojada en Stripe](https://docs.stripe.com/payments/checkout/custom-success-page.md) para obtener más información.
Visualiza los cargos que creas en tu cuenta conectada en tu [lista de pagos](https://dashboard.stripe.com/test/payments). Los cargos Direct no aparecen en las exportaciones, pero puedes encontrarlos en [informes](https://docs.stripe.com/stripe-reports.md), [Sigma](https://docs.stripe.com/stripe-data/sigma.md) o usando la API.
## Gestionar eventos posteriores al pago [Lado del servidor]
Stripe envía un evento [checkout.session.completed](https://docs.stripe.com/api/events/types.md#event_types-checkout.session.completed) cuando se completa el pago. [Utiliza un webhook para recibir estos eventos](https://docs.stripe.com/webhooks/quickstart.md) y ejecutar acciones, como enviar un correo electrónico de confirmación del pedido a tu cliente, registrar la venta en una base de datos o iniciar el flujo de tareas para un envío.
Escucha estos eventos en lugar de esperar una devolución de llamada del cliente. De su lado, el cliente puede cerrar la ventana del navegador o salir de la aplicación antes de que se ejecute la devolución de llamada. Además, algunos métodos de pago tardan entre 2 y 14 días en confirmar el pago. Si configuras tu integración para escuchar eventos asincrónicos, podrás aceptar varios [métodos de pago](https://stripe.com/payments/payment-methods-guide) con una sola integración.
Stripe recomienda administrar todos los siguientes eventos al cobrar pagos con Checkout:
| Evento | Descripción | Próximos pasos |
| -------------------------------------------------------------------------------------------------------------------------------------------- | --------------------------------------------------------------------------------------------- | ---------------------------------------------------------------------------------------------- |
| [checkout.session.completed](https://docs.stripe.com/api/events/types.md#event_types-checkout.session.completed) | Mediante el envío del formulario de Checkout, el cliente ha autorizado correctamente el pago. | Espera hasta saber si el pago se concreta o no. |
| [checkout.session.async_payment_succeeded](https://docs.stripe.com/api/events/types.md#event_types-checkout.session.async_payment_succeeded) | El pago del cliente se efectuó correctamente. | Entrega los bienes o servicios comprados. |
| [checkout.session.async_payment_failed](https://docs.stripe.com/api/events/types.md#event_types-checkout.session.async_payment_failed) | El pago se rechazó o falló por algún otro motivo. | Ponte en contacto con el cliente por correo electrónico y solicítale que haga un nuevo pedido. |
Todos estos eventos incluyen el objeto [Checkout Session](https://docs.stripe.com/api/checkout/sessions.md). Una vez que el pago se efectúa correctamente, el [estado](https://docs.stripe.com/payments/paymentintents/lifecycle.md) del *PaymentIntent* (The Payment Intents API tracks the lifecycle of a customer checkout flow and triggers additional authentication steps when required by regulatory mandates, custom Radar fraud rules, or redirect-based payment methods) subyacente cambia de `processing` a `succeeded` o a un estado de falla.
## Probar la integración
#### Tarjetas
| Número de tarjeta | Escenario | Cómo hacer la prueba |
| ------------------- | ----------------------------------------------------------------------------------------------------------------------------------------------------------------------------------------------------------------------------------------------------------------------------------------------- | -------------------------------------------------------------------------------------------------------------------------------------- |
| 4242424242424242 | El pago con tarjeta se efectúa correctamente y no requiere autenticación. | Completa el formulario de tarjeta de crédito con el número de tarjeta de crédito y la fecha de vencimiento, el CVC o el código postal. |
| 4000002500003155 | El pago con tarjeta requiere *autenticación* (Strong Customer Authentication (SCA) is a regulatory requirement in effect as of September 14, 2019, that impacts many European online payments. It requires customers to use two-factor authentication like 3D Secure to verify their purchase). | Completa el formulario de tarjeta de crédito con el número de tarjeta de crédito y la fecha de vencimiento, el CVC o el código postal. |
| 4000000000009995 | La tarjeta es rechazada con un código de rechazo `insufficient_funds`. | Completa el formulario de tarjeta de crédito con el número de tarjeta de crédito y la fecha de vencimiento, el CVC o el código postal. |
| 6205500000000000004 | La tarjeta UnionPay puede tener entre 13 y 19 dígitos. | Completa el formulario de tarjeta de crédito con el número de tarjeta de crédito y la fecha de vencimiento, el CVC o el código postal. |
#### Billeteras
| Método de pago | Escenario | Cómo hacer la prueba |
| -------------- | ----------------------------------------------------------------------------------------------------------------------------------------------------------------------------------------------------- | ---------------------------------------------------------------------------------------------------------------------------------------------------------------------------------------------------- |
| Alipay | Tu cliente realiza un pago correctamente con un método de pago basado en redireccionamiento y con [notificación inmediata](https://docs.stripe.com/payments/payment-methods.md#payment-notification). | Elige cualquier método de pago basado en redireccionamiento, completa los datos solicitados y confirma el pago. Luego, haz click en **Completar pago de prueba** en la página de redireccionamiento. |
#### Redireccionamientos bancarios
| Método de pago | Escenario | Cómo hacer la prueba |
| ----------------------------------- | -------------------------------------------------------------------------------------------------------------------------------------------------------------------------------------------------------------------- | ------------------------------------------------------------------------------------------------------------------------------------------------------------------------------------------------------ |
| Débito directo BECS | Tu cliente paga satisfactoriamente con débito directo BECS. | Completa el formulario con el número de cuenta `900123456` y BSB `000000`. El PaymentIntent confirmado pasa en un principio al estado `processing` y, 3 minutos más tarde, a `succeeded`. |
| Débito directo BECS | El pago de tu cliente falla con un código de error `account_closed`. | Completa el formulario con el número de cuenta `111111113` y BSB `000000`. |
| Bancontact, EPS, iDEAL y Przelewy24 | Tu cliente no pasa la autenticación en la página de redireccionamiento de un método de pago basado en redireccionamiento y con notificación inmediata. | Elige cualquier método de pago basado en redireccionamiento, completa los datos solicitados y confirma el pago. Luego, haz click en **Error en el pago de prueba** en la página de redireccionamiento. |
| Pay by Bank | Tu cliente paga satisfactoriamente con un método de pago basado en redireccionamiento y con [notificación diferida](https://docs.stripe.com/payments/payment-methods.md#payment-notification). | Elige el método de pago, completa los datos solicitados y confirma el pago. Luego, haz click en **Completar el pago de prueba** en la página de redireccionamiento. |
| Pay by Bank | Tu cliente no pasa la autenticación en la página de redireccionamiento de un método de pago basado en redireccionamiento y con notificación diferida. | Elige el método de pago, completa los datos solicitados y confirma el pago. Luego, haz click en **Error en el pago de prueba** en la página de redireccionamiento. |
| BLIK | Los pagos BLIK generan errores de varias maneras: errores inmediatos (por ejemplo, el código venció o no es válido), errores demorados (el banco lo rechaza) o tiempos de espera (el cliente no respondió a tiempo). | Usa patrones de correo electrónico para [simular los diferentes errores.](https://docs.stripe.com/payments/blik/accept-a-payment.md#simulate-failures) |
#### Débitos bancarios
| Método de pago | Escenario | Cómo hacer la prueba |
| ------------------- | --------------------------------------------------------------------------------------------- | -------------------------------------------------------------------------------------------------------------------------------------------------------------------------------------- |
| Débito directo SEPA | Tu cliente paga satisfactoriamente con débito directo SEPA. | Completa el formulario con el número de cuenta `AT321904300235473204`. El PaymentIntent confirmado pasa inicialmente al estado “en proceso” y, tres minutos más tarde, a “completado”. |
| Débito directo SEPA | El estado del intento de pago de tu cliente pasa de `processing` a `requires_payment_method`. | Completa el formulario con el número de cuenta `AT861904300235473202`. |
#### Vales
| Método de pago | Escenario | Cómo hacer la prueba |
| -------------- | ------------------------------------------ | -------------------------------------------------------------------------------------------------------- |
| Boleto, OXXO | Tu cliente paga con un vale Boleto u OXXO. | Selecciona Boleto u OXXO como método de pago y envía el pago. Cierra el diálogo después de que aparezca. |
Consulta [Pruebas](https://docs.stripe.com/testing.md) para obtener información adicional para probar tu integración.
## Optional: Habilitar métodos de pago adicionales
Ve a [Administrar métodos de pago para cuentas conectadas](https://dashboard.stripe.com/settings/payment_methods/connected_accounts) en el Dashboard para configurar qué métodos de pago aceptan tus cuentas conectadas. Los cambios en la configuración predeterminada se aplican a todas las cuentas conectadas nuevas y existentes.
Consulta los siguientes recursos para obtener información sobre los métodos de pago:
- [Guía de métodos de pago](https://stripe.com/payments/payment-methods-guide#choosing-the-right-payment-methods-for-your-business) para ayudarte a elegir los métodos de pago correctos para tu plataforma.
- [Funcionalidades de cuenta](https://docs.stripe.com/connect/account-capabilities.md) para asegurarte de que los métodos de pago que elegiste funcionen en tus cuentas conectadas.
- Consulta las tablas de [admisibilidad de métodos de pago y de productos](https://docs.stripe.com/payments/payment-methods/payment-method-support.md#product-support) para asegurarte de que los métodos de pago elegidos funcionen para tus productos y flujos de pago de Stripe.
Para cada método de pago, puedes seleccionar una de las siguientes opciones desplegables:
| |
| |
| **Activado de manera predeterminada** | Tus cuentas conectadas aceptan este método de pago durante el proceso de compra. Algunos métodos de pago solo pueden estar desactivados o bloqueados. Esto se debe a que tus cuentas conectadas con *acceso al Dashboard de Stripe* (Platforms can provide connected accounts with access to the full Stripe Dashboard or the Express Dashboard. Otherwise, platforms build an interface for connected accounts using embedded components or the Stripe API) deben activarlas en su página de configuración. |
| **Desactivado de manera predeterminada** | Tus cuentas conectadas no aceptan este método de pago durante el proceso de compra. Si permites que tus cuentas conectadas con *acceso al Dashboard de Stripe* (Platforms can provide connected accounts with access to the full Stripe Dashboard or the Express Dashboard. Otherwise, platforms build an interface for connected accounts using embedded components or the Stripe API) administren sus propios métodos de pago, podrán activarlo. |
| **Bloqueado** | Tus cuentas conectadas no aceptan este método de pago durante el proceso de compra. Si permites que tus cuentas conectadas con *acceso al Dashboard de Stripe* (Platforms can provide connected accounts with access to the full Stripe Dashboard or the Express Dashboard. Otherwise, platforms build an interface for connected accounts using embedded components or the Stripe API) administren sus propios métodos de pago, no tendrán la opción para activarlo. |
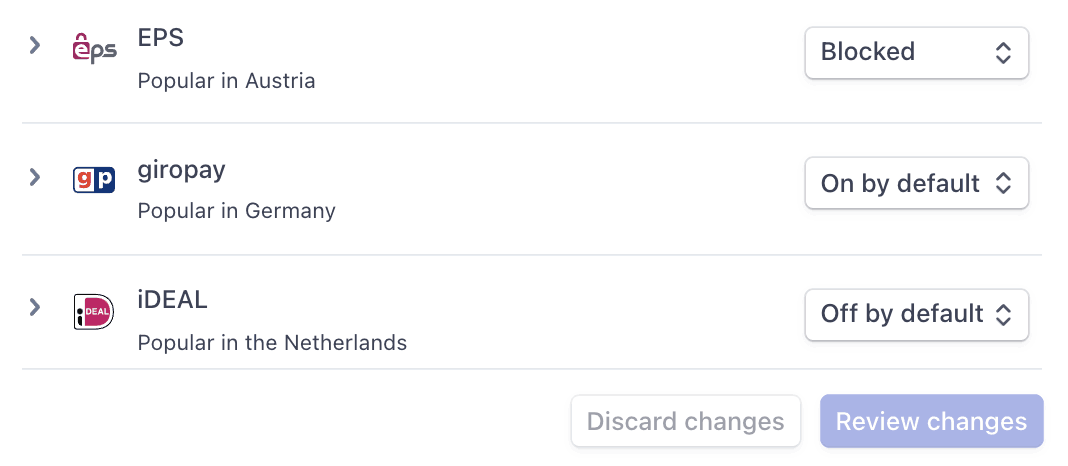
Opciones de métodos de pago
Si realizas un cambio en un método de pago, debes hacer clic en **Revisar cambios** en la barra inferior de la pantalla y en **Guardar y aplicar** para actualizar tus cuentas conectadas.

Cuadro de diálogo Guardar
### Permite que las cuentas conectadas gestionen los métodos de pago
Stripe recomienda permitir que tus cuentas conectadas personalicen sus propios métodos de pago. Esta opción le permite a cada cuenta conectada con *acceso al Dashboard de Stripe* (Platforms can provide connected accounts with access to the full Stripe Dashboard or the Express Dashboard. Otherwise, platforms build an interface for connected accounts using embedded components or the Stripe API) ver y actualizar página [Métodos de pago](https://dashboard.stripe.com/settings/payment_methods). Solo los propietarios de las cuentas conectadas pueden personalizar sus métodos de pago. El Dashboard de Stripe muestra el conjunto de métodos de pago predeterminados que aplicaste a todas las cuentas conectadas nuevas y existentes. Tus cuentas conectadas pueden anular estos valores predeterminados, excluyendo los métodos de pago que hayas bloqueado.
Marca la casilla de verificación **Personalización de la cuenta** para habilitar esta opción. Debes hacer clic en **Revisar cambios** en la barra inferior de la pantalla y luego seleccionar **Guardar y aplicar** para actualizar esta configuración.

Casilla de verificación de personalización de la cuenta
### Capacidades de métodos de pago
Para permitir que tus cuentas conectadas acepten métodos de pago adicionales, sus `cuentas` deben tener funcionalidades de métodos de pago activos.
Si seleccionaste la opción “Activado por defecto” para un método de pago en [Gestionar métodos de pago para tus cuentas conectadas](https://dashboard.stripe.com/settings/payment_methods/connected_accounts), Stripe solicita automáticamente la funcionalidad necesaria para las cuentas conectadas nuevas y las existentes si cumplen con los requisitos de verificación. Si la cuenta conectada no cumple con los requisitos o si quieres tener control directo, puedes solicitar de forma manual la funcionalidad en el dashboard o con la API.
La mayoría de los métodos de pago tienen los mismos requisitos de verificación que la funcionalidad `card_payments`, con algunas restricciones y excepciones. En el [cuadro](https://docs.stripe.com/connect/account-capabilities.md#payment-methods) figuran las funcionalidades de métodos de pago que requieren verificación adicional.
#### Dashboard
[Busca una cuenta conectada](https://docs.stripe.com/connect/dashboard/managing-individual-accounts.md#finding-accounts) en el dashboard para editar sus funcionalidades y ver los requisitos de verificación pendientes.
#### API
Para una cuenta conectada existente, puedes [enumerar](https://docs.stripe.com/api/capabilities/list.md) sus funcionalidades existentes para determinar si necesitas solicitar funcionalidades adicionales.
```curl
curl https://api.stripe.com/v1/accounts/{{CONNECTEDACCOUNT_ID}}/capabilities \
-u "<>:"
```
Solicita funcionalidades adicionales [actualizando](https://docs.stripe.com/api/capabilities/update.md) las funcionalidades de cada cuenta conectada.
```curl
curl https://api.stripe.com/v1/accounts/{{CONNECTEDACCOUNT_ID}}/capabilities/us_bank_account_ach_payments \
-u "<>:" \
-d requested=true
```
Puede haber un retraso antes de que la capacidad solicitada se active. Si la capacidad tiene algún requisito de activación, la respuesta lo incluye en las matrices de `requirements`.
## Cobra comisiones
Como plataforma, puedes aceptar pagos en tus cuentas conectadas por una parte de cada transacción en forma de comisiones de solicitud. Puedes establecer las comisiones de la plataforma de las siguientes maneras:
- Utiliza la [herramienta de tarifas de la plataforma](https://docs.stripe.com/connect/platform-pricing-tools.md) para establecer y probar las reglas de tarifas. Esta función que no requiere programación del Dashboard de Stripe solo está disponible actualmente para plataformas responsables de pagar las comisiones de Stripe.
- Especifica las comisiones de la solicitud directamente en un [PaymentIntent](https://docs.stripe.com/api/payment_intents/object.md). Las comisiones establecidas con este método anulan la lógica de tarifas especificada en la herramienta de tarifas de la plataforma.
Tu plataforma puede cobrar una comisión de la plataforma con las siguientes limitaciones:
- El valor del importe de la comisión de la aplicación (`application_fee_amount`) debe ser positivo e inferior al importe del cargo. El importe del cargo es el tope de la comisión de la plataforma que se puede cobrar.
- No se aplican comisiones adicionales de Stripe a la comisión de la plataforma en sí.
- En concordancia con los requisitos reglamentarios y de cumplimiento normativo de Brasil, las plataformas establecidas fuera de Brasil con cuentas conectadas brasileñas no pueden cobrar comisiones de la plataforma a través de Stripe.
- La moneda de `application_fee_amount` depende de algunos factores de [varias monedas](https://docs.stripe.com/connect/currencies.md).
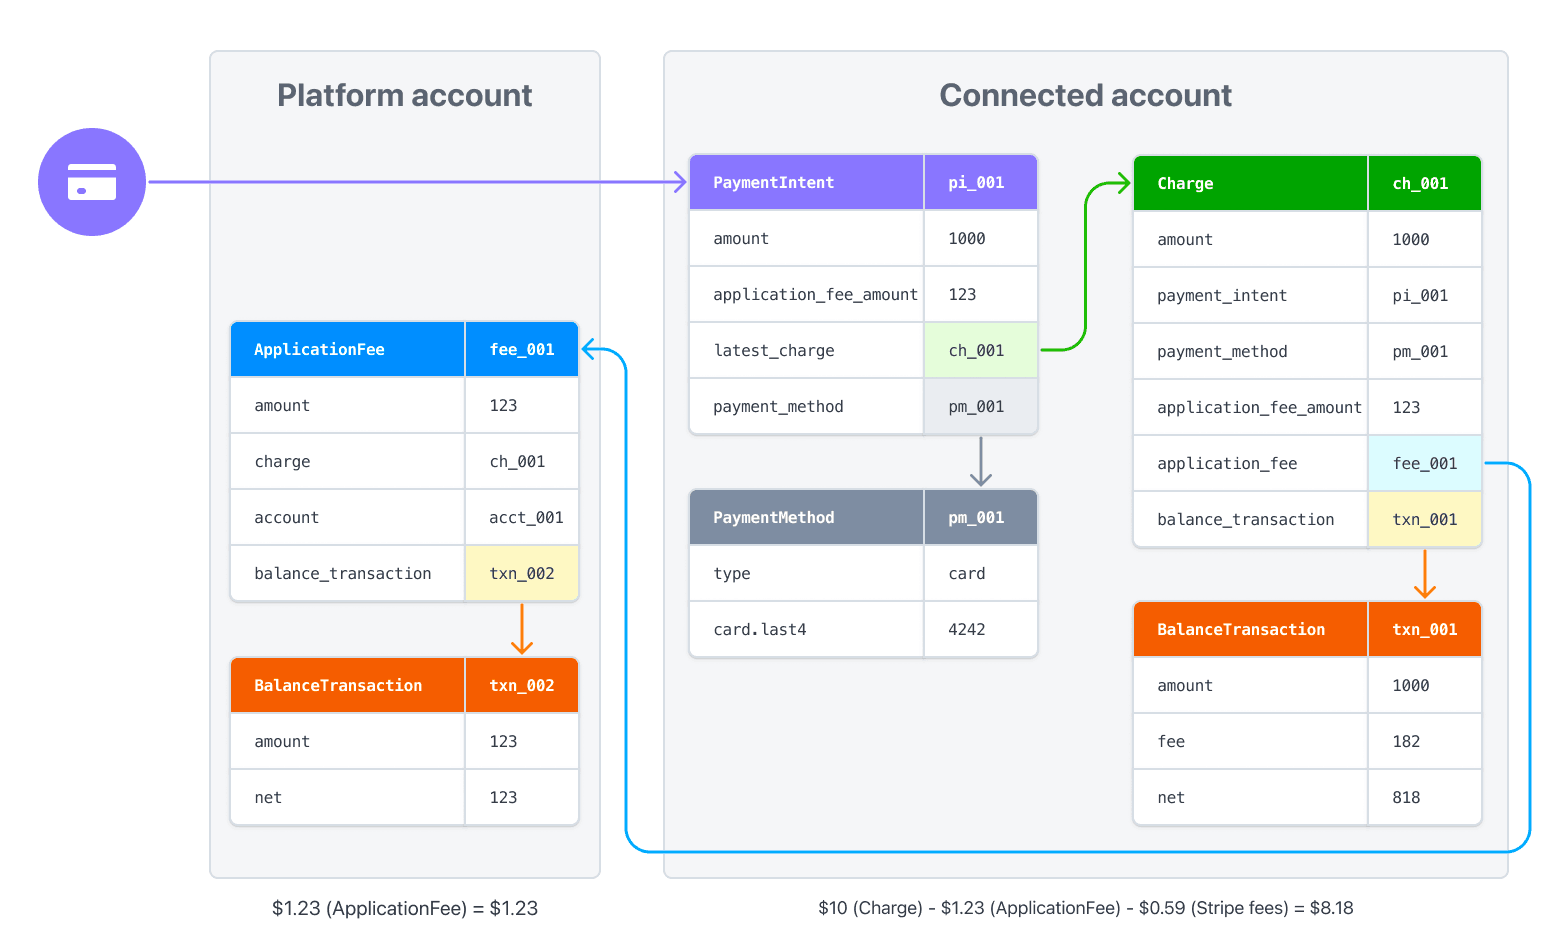
La [BalanceTransaction](https://docs.stripe.com/api.md#balance_transaction_retrieve) del cargo resultante incluye un desglose detallado de las comisiones tanto de Stripe como de la solicitud. Para ofrecer una mejor experiencia de elaboración de informes, el cobro de una comisión genera un objeto [ApplicationFee](https://docs.stripe.com/api/application_fees/object.md). Utiliza la propiedad `amount` del objeto `ApplicationFee` para la elaboración de informes.
Puedes ver las comisiones de solicitud en la sección [Comisiones cobradas](https://dashboard.stripe.com/connect/application_fees) del Dashboard.
> De manera predeterminada, las comisiones de la plataforma para cargos directos se crean de forma asincrónica. Si expandes el objeto `application_fee` en una solicitud de creación de cargo, la comisión de la plataforma se crea sincrónicamente como parte de esa solicitud. Solo expande el objeto `application_fee` si es necesario, ya que aumenta la latencia de la solicitud.
>
> Para recibir notificaciones de los objetos `ApplicationFee` creados de forma asincrónica, escucha el evento webhook [application_fee.created](https://docs.stripe.com/api/events/types.md#event_types-application_fee.created).
### Flujo de fondos con comisiones
Cuando especificas una comisión de la plataforma en un cargo, el monto de la comisión se transfiere a la cuenta de Stripe de tu plataforma. Al procesar un cargo directamente en la cuenta conectada, el monto del cargo, menos las comisiones de Stripe y la comisión de la plataforma, se deposita en la cuenta conectada.
Por ejemplo, si efectúas un cargo de USD 10 con una comisión de la plataforma de USD 1.23 (como en el ejemplo anterior), se transfieren USD 1.23 a la cuenta de la plataforma. La cuenta conectada obtiene un importe neto de USD 8.18 (USD 10 - USD 0.59 - USD 1.23) (con las comisiones estándar de Stripe en Estados Unidos).
Si procesas pagos en varias monedas, lee [cómo se administran las monedas](https://docs.stripe.com/connect/currencies.md) en Connect.
## Personaliza la imagen de marca
Tu plataforma y las cuentas conectadas pueden usar la [Configuración de imagen de marca](https://dashboard.stripe.com/account/branding) en el Dashboard para personalizar la imagen de marca en la página de pagos. Para los cargos directos, Checkout utiliza la configuración de imagen de marca de la cuenta conectada.
También puedes usar la API para [actualizar la configuración de imagen de marca](https://docs.stripe.com/api/accounts/update.md#update_account-settings-branding):
- `icon`: aparece junto al nombre de la empresa en el encabezado de la página de Checkout.
- `logo`: se utiliza en lugar del ícono y el nombre de la empresa en el encabezado de la página de Checkout.
- `primary_color`: se utiliza como color de fondo en la página de Checkout.
- `secondary_color`: se utiliza como color del botón en la página de Checkout.
```curl
curl https://api.stripe.com/v1/accounts/{{CONNECTEDACCOUNT_ID}} \
-u "<>:" \
-d "settings[branding][icon]={{FILE_ID}}" \
-d "settings[branding][logo]={{FILE_ID}}" \
--data-urlencode "settings[branding][primary_color]=#663399" \
--data-urlencode "settings[branding][secondary_color]=#4BB543"
```
Integra un formulario de pago prediseñado en tu sitio con [Stripe Checkout](https://docs.stripe.com/payments/checkout.md). Comprueba cómo esta integración [se compara con los otros tipos de integración de Stripe](https://docs.stripe.com/payments/online-payments.md#compare-features-and-availability).
#### Esfuerzo de integración
Complexity: 2/5
#### Tipo de integración
Integra un formulario de pago prediseñado en tu sitio
#### Personalización de la interfaz de usuario
Personalización limitada
- 20 fuentes preestablecidas
- 3 radios de borde preestablecidos
- Fondo y color de borde personalizados
- Logotipo personalizado
Primero, [inscríbete](https://dashboard.stripe.com/register) para obtener una cuenta de Stripe.
Usa nuestras bibliotecas oficiales para acceder a la API de Stripe desde tu aplicación:
#### Ruby
```bash
# Available as a gem
sudo gem install stripe
```
```ruby
# If you use bundler, you can add this line to your Gemfile
gem 'stripe'
```
## Crear una sesión de Checkout [Lado del servidor]
Una [sesión de Checkout](https://docs.stripe.com/api/checkout/sessions.md) controla lo que tu cliente puede ver en el formulario de pago insertable, como las partidas, el importe del pedido y la moneda. Crea una sesión de Checkout en un punto de conexión del lado del servidor (por ejemplo, `/create-checkout-session`). La respuesta incluye un `client_secret` que usarás en el siguiente paso para montar Checkout.
```curl
curl https://api.stripe.com/v1/checkout/sessions \
-u "<>:" \
-H "Stripe-Account: {{CONNECTEDACCOUNT_ID}}" \
-d "line_items[0][price_data][currency]=usd" \
-d "line_items[0][price_data][product_data][name]=T-shirt" \
-d "line_items[0][price_data][unit_amount]=1000" \
-d "line_items[0][quantity]=1" \
-d "payment_intent_data[application_fee_amount]=123" \
-d mode=payment \
-d ui_mode=embedded_page \
--data-urlencode "return_url=https://example.com/checkout/return?session_id={CHECKOUT_SESSION_ID}"
```
- `Stripe-Account`: este encabezado indica un cargo Direct para tu cuenta conectada. La [imagen de marca](https://docs.stripe.com/connect/direct-charges.md#branding) de la cuenta conectada se utiliza en el proceso de compra, lo que permite a tus clientes sentir que están interactuando directamente con la cuenta conectada en lugar de con tu plataforma.
- `line_items`: Este atributo representa los artículos que tu cliente está comprando y aparece en el formulario de pago integrado.
- `payment_intent_data[application_fee_amount]`: este atributo especifica el importe que tu plataforma deduce de la transacción como comisión de la plataforma. Después de que se procesa el pago en la cuenta conectada, se transfiere el `application_fee_amount` a la plataforma. Consulta [Cobra comisiones](https://docs.stripe.com/connect/direct-charges.md#collect-fees) para obtener más información.
- `return_url`: Stripe redirige al cliente a la URL de retorno después de que complete un intento de pago y sustituye la cadena `{CHECKOUT_SESSION_ID}` por el ID de la sesión de proceso de compra. Utilízalo a fin de recuperar la Sesión Checkout e inspeccionar el estado para decidir qué mostrar a tu cliente. Asegúrate de que la URL de retorno corresponda a una página de tu sitio web que proporcione el estado del pago. También puedes añadir tus propios parámetros de consulta, que persisten durante el proceso de redirección. Consulta [personalizar el comportamiento de redirección con un formulario integrado](https://docs.stripe.com/payments/checkout/custom-success-page.md?payment-ui=embedded-page) con el propósito de obtener más información.
Los cargos que creas directamente en la cuenta conectada se notifican solo en esa cuenta y [en tu Dashboard de Connect](https://docs.stripe.com/connect/dashboard/understand-your-connect-business.md#supported-charges). Para consultar objetos de transacción como `PaymentIntents` y `Charges` para cargos Direct, debes consultar la API de Stripe [utilizando el ID de la cuenta conectada en la cabecera Stripe-Account](https://docs.stripe.com/connect/authentication.md).
## Montar Checkout [Lado del cliente]
#### HTML + JS
Checkout está disponible como parte de [Stripe.js](https://docs.stripe.com/js.md). Para incluir el script de Stripe.js en tu página, agrégalo al encabezado de tu archivo HTML. A continuación, crea un nodo DOM vacío (contenedor) para usarlo en el montaje.
```html
```
Inicializa Stripe.js con tu clave de API publicable y el ID de la cuenta conectada. Especifica el `client_secret` del paso anterior en `options` cuando crees la instancia de Checkout:
```javascript
// Initialize Stripe.js
const stripe = Stripe('<>', {
stripeAccount: '{{CONNECTED_ACCOUNT_ID}}',
});
initialize();
// Fetch Checkout Session and retrieve the client secret
async function initialize() {
const fetchClientSecret = async () => {
const response = await fetch("/create-checkout-session", {
method: "POST",
});
const { clientSecret } = await response.json();
return clientSecret;
};
// Initialize Checkout
const checkout = await stripe.createEmbeddedCheckoutPage({
fetchClientSecret,
});
// Mount Checkout
checkout.mount('#checkout');
}
```
#### React
Instala [React Stripe.js](https://www.npmjs.com/package/@stripe/react-stripe-js) y el [cargador Stripe.js](https://www.npmjs.com/package/@stripe/stripe-js) desde el registro público de npm:
```bash
npm install --save @stripe/react-stripe-js @stripe/stripe-js
```
Para utilizar el componente Embedded Checkout, crea un `EmbeddedCheckoutProvider`. Llama a `loadStripe` con tu clave de API publicable y especifica la `Promise` devuelta en el proveedor. Usa la indicación `options` aceptada por el proveedor para especificar el `client_secret` del paso anterior.
```jsx
import * as React from 'react';
import {loadStripe} from '@stripe/stripe-js';
import {
EmbeddedCheckoutProvider,
EmbeddedCheckout
} from '@stripe/react-stripe-js';
// Make sure to call `loadStripe` outside of a component's render to avoid
// recreating the `Stripe` object on every render.
const stripePromise = loadStripe('<>', {
stripeAccount: '{{CONNECTED_ACCOUNT_ID}}',
});
const App = ({clientSecret}) => {
const options = {clientSecret};
return (
)
}
```
Checkout se muestra en un iframe que envía la información de pago a Stripe de manera segura mediante una conexión HTTPS. No coloques Checkout dentro de otro iframe porque, para algunos métodos de pago, se requiere el redireccionamiento a otra página a fin de confirmar el pago.
## Gestionar eventos posteriores al pago [Lado del servidor]
Stripe envía un evento [checkout.session.completed](https://docs.stripe.com/api/events/types.md#event_types-checkout.session.completed) cuando se completa el pago. [Utiliza un webhook para recibir estos eventos](https://docs.stripe.com/webhooks/quickstart.md) y ejecutar acciones, como enviar un correo electrónico de confirmación del pedido a tu cliente, registrar la venta en una base de datos o iniciar el flujo de tareas para un envío.
Escucha estos eventos en lugar de esperar una devolución de llamada del cliente. De su lado, el cliente puede cerrar la ventana del navegador o salir de la aplicación antes de que se ejecute la devolución de llamada. Además, algunos métodos de pago tardan entre 2 y 14 días en confirmar el pago. Si configuras tu integración para escuchar eventos asincrónicos, podrás aceptar varios [métodos de pago](https://stripe.com/payments/payment-methods-guide) con una sola integración.
Stripe recomienda administrar todos los siguientes eventos al cobrar pagos con Checkout:
| Evento | Descripción | Próximos pasos |
| -------------------------------------------------------------------------------------------------------------------------------------------- | --------------------------------------------------------------------------------------------- | ---------------------------------------------------------------------------------------------- |
| [checkout.session.completed](https://docs.stripe.com/api/events/types.md#event_types-checkout.session.completed) | Mediante el envío del formulario de Checkout, el cliente ha autorizado correctamente el pago. | Espera hasta saber si el pago se concreta o no. |
| [checkout.session.async_payment_succeeded](https://docs.stripe.com/api/events/types.md#event_types-checkout.session.async_payment_succeeded) | El pago del cliente se efectuó correctamente. | Entrega los bienes o servicios comprados. |
| [checkout.session.async_payment_failed](https://docs.stripe.com/api/events/types.md#event_types-checkout.session.async_payment_failed) | El pago se rechazó o falló por algún otro motivo. | Ponte en contacto con el cliente por correo electrónico y solicítale que haga un nuevo pedido. |
Todos estos eventos incluyen el objeto [Checkout Session](https://docs.stripe.com/api/checkout/sessions.md). Una vez que el pago se efectúa correctamente, el [estado](https://docs.stripe.com/payments/paymentintents/lifecycle.md) del *PaymentIntent* (The Payment Intents API tracks the lifecycle of a customer checkout flow and triggers additional authentication steps when required by regulatory mandates, custom Radar fraud rules, or redirect-based payment methods) subyacente cambia de `processing` a `succeeded` o a un estado de falla.
## Probar la integración
#### Tarjetas
| Número de tarjeta | Escenario | Cómo hacer la prueba |
| ------------------- | ----------------------------------------------------------------------------------------------------------------------------------------------------------------------------------------------------------------------------------------------------------------------------------------------- | -------------------------------------------------------------------------------------------------------------------------------------- |
| 4242424242424242 | El pago con tarjeta se efectúa correctamente y no requiere autenticación. | Completa el formulario de tarjeta de crédito con el número de tarjeta de crédito y la fecha de vencimiento, el CVC o el código postal. |
| 4000002500003155 | El pago con tarjeta requiere *autenticación* (Strong Customer Authentication (SCA) is a regulatory requirement in effect as of September 14, 2019, that impacts many European online payments. It requires customers to use two-factor authentication like 3D Secure to verify their purchase). | Completa el formulario de tarjeta de crédito con el número de tarjeta de crédito y la fecha de vencimiento, el CVC o el código postal. |
| 4000000000009995 | La tarjeta es rechazada con un código de rechazo `insufficient_funds`. | Completa el formulario de tarjeta de crédito con el número de tarjeta de crédito y la fecha de vencimiento, el CVC o el código postal. |
| 6205500000000000004 | La tarjeta UnionPay puede tener entre 13 y 19 dígitos. | Completa el formulario de tarjeta de crédito con el número de tarjeta de crédito y la fecha de vencimiento, el CVC o el código postal. |
#### Billeteras
| Método de pago | Escenario | Cómo hacer la prueba |
| -------------- | ----------------------------------------------------------------------------------------------------------------------------------------------------------------------------------------------------- | ---------------------------------------------------------------------------------------------------------------------------------------------------------------------------------------------------- |
| Alipay | Tu cliente realiza un pago correctamente con un método de pago basado en redireccionamiento y con [notificación inmediata](https://docs.stripe.com/payments/payment-methods.md#payment-notification). | Elige cualquier método de pago basado en redireccionamiento, completa los datos solicitados y confirma el pago. Luego, haz click en **Completar pago de prueba** en la página de redireccionamiento. |
#### Redireccionamientos bancarios
| Método de pago | Escenario | Cómo hacer la prueba |
| ----------------------------------- | -------------------------------------------------------------------------------------------------------------------------------------------------------------------------------------------------------------------- | ------------------------------------------------------------------------------------------------------------------------------------------------------------------------------------------------------ |
| Débito directo BECS | Tu cliente paga satisfactoriamente con débito directo BECS. | Completa el formulario con el número de cuenta `900123456` y BSB `000000`. El PaymentIntent confirmado pasa en un principio al estado `processing` y, 3 minutos más tarde, a `succeeded`. |
| Débito directo BECS | El pago de tu cliente falla con un código de error `account_closed`. | Completa el formulario con el número de cuenta `111111113` y BSB `000000`. |
| Bancontact, EPS, iDEAL y Przelewy24 | Tu cliente no pasa la autenticación en la página de redireccionamiento de un método de pago basado en redireccionamiento y con notificación inmediata. | Elige cualquier método de pago basado en redireccionamiento, completa los datos solicitados y confirma el pago. Luego, haz click en **Error en el pago de prueba** en la página de redireccionamiento. |
| Pay by Bank | Tu cliente paga satisfactoriamente con un método de pago basado en redireccionamiento y con [notificación diferida](https://docs.stripe.com/payments/payment-methods.md#payment-notification). | Elige el método de pago, completa los datos solicitados y confirma el pago. Luego, haz click en **Completar el pago de prueba** en la página de redireccionamiento. |
| Pay by Bank | Tu cliente no pasa la autenticación en la página de redireccionamiento de un método de pago basado en redireccionamiento y con notificación diferida. | Elige el método de pago, completa los datos solicitados y confirma el pago. Luego, haz click en **Error en el pago de prueba** en la página de redireccionamiento. |
| BLIK | Los pagos BLIK generan errores de varias maneras: errores inmediatos (por ejemplo, el código venció o no es válido), errores demorados (el banco lo rechaza) o tiempos de espera (el cliente no respondió a tiempo). | Usa patrones de correo electrónico para [simular los diferentes errores.](https://docs.stripe.com/payments/blik/accept-a-payment.md#simulate-failures) |
#### Débitos bancarios
| Método de pago | Escenario | Cómo hacer la prueba |
| ------------------- | --------------------------------------------------------------------------------------------- | -------------------------------------------------------------------------------------------------------------------------------------------------------------------------------------- |
| Débito directo SEPA | Tu cliente paga satisfactoriamente con débito directo SEPA. | Completa el formulario con el número de cuenta `AT321904300235473204`. El PaymentIntent confirmado pasa inicialmente al estado “en proceso” y, tres minutos más tarde, a “completado”. |
| Débito directo SEPA | El estado del intento de pago de tu cliente pasa de `processing` a `requires_payment_method`. | Completa el formulario con el número de cuenta `AT861904300235473202`. |
#### Vales
| Método de pago | Escenario | Cómo hacer la prueba |
| -------------- | ------------------------------------------ | -------------------------------------------------------------------------------------------------------- |
| Boleto, OXXO | Tu cliente paga con un vale Boleto u OXXO. | Selecciona Boleto u OXXO como método de pago y envía el pago. Cierra el diálogo después de que aparezca. |
Consulta [Pruebas](https://docs.stripe.com/testing.md) para obtener información adicional para probar tu integración.
## Optional: Habilitar métodos de pago adicionales
Ve a [Administrar métodos de pago para cuentas conectadas](https://dashboard.stripe.com/settings/payment_methods/connected_accounts) en el Dashboard para configurar qué métodos de pago aceptan tus cuentas conectadas. Los cambios en la configuración predeterminada se aplican a todas las cuentas conectadas nuevas y existentes.
Consulta los siguientes recursos para obtener información sobre los métodos de pago:
- [Guía de métodos de pago](https://stripe.com/payments/payment-methods-guide#choosing-the-right-payment-methods-for-your-business) para ayudarte a elegir los métodos de pago correctos para tu plataforma.
- [Funcionalidades de cuenta](https://docs.stripe.com/connect/account-capabilities.md) para asegurarte de que los métodos de pago que elegiste funcionen en tus cuentas conectadas.
- Consulta las tablas de [admisibilidad de métodos de pago y de productos](https://docs.stripe.com/payments/payment-methods/payment-method-support.md#product-support) para asegurarte de que los métodos de pago elegidos funcionen para tus productos y flujos de pago de Stripe.
Para cada método de pago, puedes seleccionar una de las siguientes opciones desplegables:
| |
| |
| **Activado de manera predeterminada** | Tus cuentas conectadas aceptan este método de pago durante el proceso de compra. Algunos métodos de pago solo pueden estar desactivados o bloqueados. Esto se debe a que tus cuentas conectadas con *acceso al Dashboard de Stripe* (Platforms can provide connected accounts with access to the full Stripe Dashboard or the Express Dashboard. Otherwise, platforms build an interface for connected accounts using embedded components or the Stripe API) deben activarlas en su página de configuración. |
| **Desactivado de manera predeterminada** | Tus cuentas conectadas no aceptan este método de pago durante el proceso de compra. Si permites que tus cuentas conectadas con *acceso al Dashboard de Stripe* (Platforms can provide connected accounts with access to the full Stripe Dashboard or the Express Dashboard. Otherwise, platforms build an interface for connected accounts using embedded components or the Stripe API) administren sus propios métodos de pago, podrán activarlo. |
| **Bloqueado** | Tus cuentas conectadas no aceptan este método de pago durante el proceso de compra. Si permites que tus cuentas conectadas con *acceso al Dashboard de Stripe* (Platforms can provide connected accounts with access to the full Stripe Dashboard or the Express Dashboard. Otherwise, platforms build an interface for connected accounts using embedded components or the Stripe API) administren sus propios métodos de pago, no tendrán la opción para activarlo. |

Opciones de métodos de pago
Si realizas un cambio en un método de pago, debes hacer clic en **Revisar cambios** en la barra inferior de la pantalla y en **Guardar y aplicar** para actualizar tus cuentas conectadas.

Cuadro de diálogo Guardar
### Permite que las cuentas conectadas gestionen los métodos de pago
Stripe recomienda permitir que tus cuentas conectadas personalicen sus propios métodos de pago. Esta opción le permite a cada cuenta conectada con *acceso al Dashboard de Stripe* (Platforms can provide connected accounts with access to the full Stripe Dashboard or the Express Dashboard. Otherwise, platforms build an interface for connected accounts using embedded components or the Stripe API) ver y actualizar página [Métodos de pago](https://dashboard.stripe.com/settings/payment_methods). Solo los propietarios de las cuentas conectadas pueden personalizar sus métodos de pago. El Dashboard de Stripe muestra el conjunto de métodos de pago predeterminados que aplicaste a todas las cuentas conectadas nuevas y existentes. Tus cuentas conectadas pueden anular estos valores predeterminados, excluyendo los métodos de pago que hayas bloqueado.
Marca la casilla de verificación **Personalización de la cuenta** para habilitar esta opción. Debes hacer clic en **Revisar cambios** en la barra inferior de la pantalla y luego seleccionar **Guardar y aplicar** para actualizar esta configuración.

Casilla de verificación de personalización de la cuenta
### Capacidades de métodos de pago
Para permitir que tus cuentas conectadas acepten métodos de pago adicionales, sus `cuentas` deben tener funcionalidades de métodos de pago activos.
Si seleccionaste la opción “Activado por defecto” para un método de pago en [Gestionar métodos de pago para tus cuentas conectadas](https://dashboard.stripe.com/settings/payment_methods/connected_accounts), Stripe solicita automáticamente la funcionalidad necesaria para las cuentas conectadas nuevas y las existentes si cumplen con los requisitos de verificación. Si la cuenta conectada no cumple con los requisitos o si quieres tener control directo, puedes solicitar de forma manual la funcionalidad en el dashboard o con la API.
La mayoría de los métodos de pago tienen los mismos requisitos de verificación que la funcionalidad `card_payments`, con algunas restricciones y excepciones. En el [cuadro](https://docs.stripe.com/connect/account-capabilities.md#payment-methods) figuran las funcionalidades de métodos de pago que requieren verificación adicional.
#### Dashboard
[Busca una cuenta conectada](https://docs.stripe.com/connect/dashboard/managing-individual-accounts.md#finding-accounts) en el dashboard para editar sus funcionalidades y ver los requisitos de verificación pendientes.
#### API
Para una cuenta conectada existente, puedes [enumerar](https://docs.stripe.com/api/capabilities/list.md) sus funcionalidades existentes para determinar si necesitas solicitar funcionalidades adicionales.
```curl
curl https://api.stripe.com/v1/accounts/{{CONNECTEDACCOUNT_ID}}/capabilities \
-u "<>:"
```
Solicita funcionalidades adicionales [actualizando](https://docs.stripe.com/api/capabilities/update.md) las funcionalidades de cada cuenta conectada.
```curl
curl https://api.stripe.com/v1/accounts/{{CONNECTEDACCOUNT_ID}}/capabilities/us_bank_account_ach_payments \
-u "<>:" \
-d requested=true
```
Puede haber un retraso antes de que la capacidad solicitada se active. Si la capacidad tiene algún requisito de activación, la respuesta lo incluye en las matrices de `requirements`.
## Cobra comisiones
Como plataforma, puedes aceptar pagos en tus cuentas conectadas por una parte de cada transacción en forma de comisiones de solicitud. Puedes establecer las comisiones de la plataforma de las siguientes maneras:
- Utiliza la [herramienta de tarifas de la plataforma](https://docs.stripe.com/connect/platform-pricing-tools.md) para establecer y probar las reglas de tarifas. Esta función que no requiere programación del Dashboard de Stripe solo está disponible actualmente para plataformas responsables de pagar las comisiones de Stripe.
- Especifica las comisiones de la solicitud directamente en un [PaymentIntent](https://docs.stripe.com/api/payment_intents/object.md). Las comisiones establecidas con este método anulan la lógica de tarifas especificada en la herramienta de tarifas de la plataforma.
Tu plataforma puede cobrar una comisión de la plataforma con las siguientes limitaciones:
- El valor del importe de la comisión de la aplicación (`application_fee_amount`) debe ser positivo e inferior al importe del cargo. El importe del cargo es el tope de la comisión de la plataforma que se puede cobrar.
- No se aplican comisiones adicionales de Stripe a la comisión de la plataforma en sí.
- En concordancia con los requisitos reglamentarios y de cumplimiento normativo de Brasil, las plataformas establecidas fuera de Brasil con cuentas conectadas brasileñas no pueden cobrar comisiones de la plataforma a través de Stripe.
- La moneda de `application_fee_amount` depende de algunos factores de [varias monedas](https://docs.stripe.com/connect/currencies.md).
La [BalanceTransaction](https://docs.stripe.com/api.md#balance_transaction_retrieve) del cargo resultante incluye un desglose detallado de las comisiones tanto de Stripe como de la solicitud. Para ofrecer una mejor experiencia de elaboración de informes, el cobro de una comisión genera un objeto [ApplicationFee](https://docs.stripe.com/api/application_fees/object.md). Utiliza la propiedad `amount` del objeto `ApplicationFee` para la elaboración de informes.
Puedes ver las comisiones de solicitud en la sección [Comisiones cobradas](https://dashboard.stripe.com/connect/application_fees) del Dashboard.
> De manera predeterminada, las comisiones de la plataforma para cargos directos se crean de forma asincrónica. Si expandes el objeto `application_fee` en una solicitud de creación de cargo, la comisión de la plataforma se crea sincrónicamente como parte de esa solicitud. Solo expande el objeto `application_fee` si es necesario, ya que aumenta la latencia de la solicitud.
>
> Para recibir notificaciones de los objetos `ApplicationFee` creados de forma asincrónica, escucha el evento webhook [application_fee.created](https://docs.stripe.com/api/events/types.md#event_types-application_fee.created).
## Personaliza la imagen de marca
Tu plataforma y las cuentas conectadas pueden usar la [Configuración de imagen de marca](https://dashboard.stripe.com/account/branding) en el Dashboard para personalizar la imagen de marca en la página de pagos. Para los cargos directos, Checkout utiliza la configuración de imagen de marca de la cuenta conectada.
También puedes usar la API para [actualizar la configuración de imagen de marca](https://docs.stripe.com/api/accounts/update.md#update_account-settings-branding):
- `icon`: aparece junto al nombre de la empresa en el encabezado de la página de Checkout.
- `logo`: se utiliza en lugar del ícono y el nombre de la empresa en el encabezado de la página de Checkout.
- `primary_color`: se utiliza como color de fondo en la página de Checkout.
- `secondary_color`: se utiliza como color del botón en la página de Checkout.
```curl
curl https://api.stripe.com/v1/accounts/{{CONNECTEDACCOUNT_ID}} \
-u "<>:" \
-d "settings[branding][icon]={{FILE_ID}}" \
-d "settings[branding][logo]={{FILE_ID}}" \
--data-urlencode "settings[branding][primary_color]=#663399" \
--data-urlencode "settings[branding][secondary_color]=#4BB543"
```
Para crear una integración de pagos personalizada, incorpora componentes de interfaz de usuario (IU) en tu sitio con [Stripe Elements](https://docs.stripe.com/payments/elements.md). El código del cliente y del servidor crea un formulario del proceso de compra que acepta varios métodos de pago. Comprueba cómo esta integración [se compara con otros tipos de integración de Stripe](https://docs.stripe.com/payments/online-payments.md#compare-features-and-availability).
#### Esfuerzo de integración
Complexity: 3/5
#### Tipo de integración
Combina componentes de la interfaz de usuario en un flujo de pago personalizado
#### Personalización de la interfaz de usuario
Personalización a nivel CSS con la [API Appearance](https://docs.stripe.com/elements/appearance-api.md)
Primero, [inscríbete](https://dashboard.stripe.com/register) para obtener una cuenta de Stripe.
Usa nuestras bibliotecas oficiales para acceder a la API de Stripe desde tu aplicación:
#### Ruby
```bash
# Available as a gem
sudo gem install stripe
```
```ruby
# If you use bundler, you can add this line to your Gemfile
gem 'stripe'
```
## Crear un PaymentIntent [Lado del servidor]
Stripe usa un objeto [PaymentIntent](https://docs.stripe.com/api/payment_intents.md) para representar tu intención de cobrarle a un cliente y hace el seguimiento de los intentos de cobro y de los cambios en el estado del pago en todo el proceso.
Un excelente resumen de la integración de pagos que se describe en este documento. (See full diagram at https://docs.stripe.com/connect/direct-charges)
Los métodos de pago que se les muestran a los clientes durante el proceso de compra también se incluyen en el PaymentIntent. Puedes permitir que Stripe extraiga automáticamente los métodos de pago de la configuración del Dashboard o puedes enumerarlos en forma manual.
A menos que tu integración requiera una opción basada en código para ofrecer métodos de pago, no los enumeres manualmente. Stripe evalúa la moneda, las restricciones de los métodos de pago y otros parámetros para determinar la lista de métodos de pago admitidos. Stripe les da prioridad a aquellos que aumentan la conversión y guardan mayor relación con la moneda y la ubicación del cliente. Los métodos de pago menos prioritarios se ocultan en un menú de contenido adicional.
#### Gestionar los métodos de pago desde el Dashboard
Crea un PaymentIntent en tu servidor con un importe y una moneda. En la última versión de la API, especificar el parámetro `automatic_payment_methods` es opcional porque Stripe habilita su funcionalidad de forma predeterminada. Puedes administrar los métodos de pago desde el [Dashboard](https://dashboard.stripe.com/settings/payment_methods). Stripe gestiona la devolución de los métodos de pago que cumplen con los requisitos en función de factores como el importe de la transacción, la moneda y el flujo de pagos.
```curl
curl https://api.stripe.com/v1/payment_intents \
-u "<>:" \
-H "Stripe-Account: {{CONNECTEDACCOUNT_ID}}" \
-d amount=1000 \
-d currency=usd \
-d "automatic_payment_methods[enabled]=true" \
-d application_fee_amount=123
```
#### Enumerar métodos de pago manualmente
```curl
curl https://api.stripe.com/v1/payment_intents \
-u "<>:" \
-H "Stripe-Account: {{CONNECTEDACCOUNT_ID}}" \
-d amount=1099 \
-d currency=eur \
-d "payment_method_types[]=bancontact" \
-d "payment_method_types[]=card" \
-d "payment_method_types[]=eps" \
-d "payment_method_types[]=ideal" \
-d "payment_method_types[]=p24" \
-d "payment_method_types[]=sepa_debit" \
-d "payment_method_types[]=sofort" \
-d application_fee_amount=123
```
Al crear un PaymentIntent, debes especificar ciertos parámetros:
- `amount`; crea un PaymentIntent en tu servidor con un importe específico. Determina siempre cuánto cobrar del lado del servidor, ya que se trata de un entorno de confianza. Este enfoque evita que clientes maliciosos puedan elegir sus propios precios.
- `currency`: la moneda que incluyes en el PaymentIntent filtra los métodos de pago que se muestran al cliente, así que elígela en función de los métodos de pago que quieras ofrecer. Por ejemplo, si especificas `eur` y tienes habilitado OXXO en el Dashboard, OXXO no aparecerá ante el cliente porque no admite pagos en `eur`. Algunos métodos de pago admiten varias monedas y países. En el código de ejemplo de esta guía se usan Bancontact, tarjetas de crédito, EPS, iDEAL, Przelewy24, débito directo SEPA y Sofort.
- `"payment_method_types[]"`: enumera manualmente todos los métodos de pago que quieres aceptar.
- (Opcional) `payment_intent_data[application_fee_amount]`: este argumento especifica el importe que tu plataforma tomará de la transacción. Si estás usando la [herramienta de precios de la plataforma](https://docs.stripe.com/connect/platform-pricing-tools.md) de Stripe para gestionar los precios de las comisiones de la plataforma desde el [Dashboard](https://dashboard.stripe.com/test/settings/connect/platform_pricing/payments), no incluyas este argumento, ya que anulará toda lógica de precios establecida por la herramienta. Una vez procesado el pago en la cuenta conectada, se transfiere el `application_fee_amount` a la plataforma, y la comisión de Stripe se deduce del saldo de la cuenta conectada.
> Cada método de pago debe admitir la moneda especificada en el PaymentIntent, y tu empresa tiene que estar establecida en uno de los países que admite cada método de pago. Consulta las [opciones de integración de métodos de pago](https://docs.stripe.com/payments/payment-methods/integration-options.md) para obtener más información sobre qué admitimos.
### Recuperar el secreto de cliente
El PaymentIntent incluye un *secreto de cliente* (The client secret is a unique key returned from Stripe as part of a PaymentIntent. This key lets the client access important fields from the PaymentIntent (status, amount, currency) while hiding sensitive ones (metadata, customer)) que el lado del cliente usa para completar el proceso de pago de forma segura. Puedes usar diferentes métodos para pasar el secreto del cliente al lado del cliente.
#### Aplicación de una sola página
Recupera el secreto de cliente de un punto de conexión de tu servidor con la funcionalidad `fetch` del navegador. Este método es más conveniente si tu lado del cliente es una aplicación de una sola página, especialmente, si fue diseñada con un marco de front-end moderno como React. Crea el punto de conexión del servidor que se usa para el secreto de cliente:
#### Ruby
```ruby
get '/secret' do
intent = # ... Create or retrieve the PaymentIntent
{client_secret: intent.client_secret}.to_json
end
```
Luego recupera el secreto de cliente con JavaScript del lado del cliente:
```javascript
(async () => {
const response = await fetch('/secret');
const {client_secret: clientSecret} = await response.json();
// Render the form using the clientSecret
})();
```
#### Renderización del lado del servidor
Especifica el secreto de cliente desde tu servidor al cliente. Este enfoque funciona mejor si tu aplicación genera contenido estático en el servidor antes de enviarlo al navegador.
Agrega [client_secret](https://docs.stripe.com/api/payment_intents/object.md#payment_intent_object-client_secret) en tu formulario de finalización de compra. En el código del lado de tu servidor, recupera el secreto de cliente de PaymentIntent:
#### Ruby
```erb
```
```ruby
get '/checkout' do
@intent = # ... Fetch or create the PaymentIntent
erb :checkout
end
```
## Recopilar datos de pago [Lado del cliente]
Recopila los datos de pago del lado del cliente con [Payment Element](https://docs.stripe.com/payments/payment-element.md). El Payment Element es un componente de interfaz de usuario prediseñado que simplifica la recopilación de datos para diversos métodos de pago.
El Payment Element contiene un iframe que envía de forma segura la información de pago a Stripe a través de una conexión HTTPS. Evita colocar el Payment Element dentro de otro iframe porque algunos métodos de pago requieren redirigir a otra página para la confirmación del pago. Si eliges usar un iframe y quieres aceptar Apple Pay o Google Pay, el iframe debe tener el atributo [allow](https://developer.mozilla.org/en-US/docs/Web/HTML/Element/iframe#attr-allowpaymentrequest) establecido en igual a `"payment *"`.
Para que la integración funcione, la dirección de la página de confirmación de compra debe empezar con `https://` en lugar de `http://`. Puedes probar tu integración sin usar HTTPS, pero recuerda [habilitarla](https://docs.stripe.com/security/guide.md#tls) cuando todo esté listo para aceptar pagos reales.
#### HTML + JS
### Configurar Stripe.js
El Payment Element se encuentra disponible automáticamente como funcionalidad de Stripe.js. Incluye el script de Stripe.js en tu página de confirmación de compra agregándolo al `head` de tu archivo HTML. Siempre debes cargar Stripe.js directamente desde js.stripe.com para cumplir con la normativa PCI. No incluyas el script en un paquete ni alojes una copia en tus sistemas.
```html
Checkout
```
Crea una instancia de `Stripe` con el siguiente JavaScript en tu página de confirmación de compra:
```javascript
// Initialize Stripe.js with the same connected account ID used when creating
// the PaymentIntent.
const stripe = Stripe('<>', {
stripeAccount: '{{CONNECTED_ACCOUNT_ID}}'
});
```
### Agrega Stripe Elements y el Payment Element a tu página de pago
El Payment Element necesita un lugar donde residir en tu página de pago. Crea un nodo DOM vacío (contenedor) con una ID única en tu formulario de pago.
```html
```
Cuando se haya cargado el formulario, crea una instancia de Payment Element y móntala en el nodo DOM del contenedor junto con el [client secret](https://docs.stripe.com/api/payment_intents/object.md#payment_intent_object-client_secret) del paso anterior. Especifica este valor como opción cuando crees la instancia [Elements](https://docs.stripe.com/js/elements_object/create).
El secreto de cliente debe gestionarse con cuidado porque sirve para completar el cargo. No lo registres, no lo insertes en direcciones URL ni se lo muestres a nadie que no sea el cliente.
```javascript
const options = {
clientSecret: '{{CLIENT_SECRET}}',
// Fully customizable with the Appearance API
appearance: {/*...*/},
};
// Set up Stripe.js and Elements to use in checkout form using the client secret
const elements = stripe.elements(options);
// Create and mount the Payment Element
const paymentElement = elements.create("payment");
paymentElement.mount("#payment-element");
```
El Payment Element procesa un formulario dinámico que le permite a tu cliente elegir un método de pago. El formulario recopila automáticamente todos los datos de pago necesarios para el método de pago que el cliente seleccionó. Al configurar el objeto `Elements`, podrás [personalizar el aspecto del Payment Element](https://docs.stripe.com/elements/appearance-api.md) para que coincida con el diseño de tu sitio.
#### React
### Configurar Stripe.js
Instala [React Stripe.js](https://www.npmjs.com/package/@stripe/react-stripe-js) y el [cargador Stripe.js](https://www.npmjs.com/package/@stripe/stripe-js) desde el registro público de npm:
```bash
npm install --save @stripe/react-stripe-js @stripe/stripe-js
```
### Agrega y configura el proveedor Elements en tu página de pago
Para usar el componente Payment Element, envuelve el componente de tu página de confirmación de compra con un [proveedor Elements](https://docs.stripe.com/sdks/stripejs-react.md#elements-provider). Llama a `loadStripe` con tu clave publicable y especifica la `Promise` devuelta junto con el [client secret](https://docs.stripe.com/api/payment_intents/object.md#payment_intent_object-client_secret) del paso anterior como `options` al proveedor `Elements`.
```jsx
import React from 'react';
import ReactDOM from 'react-dom';
import {Elements} from '@stripe/react-stripe-js';
import {loadStripe} from '@stripe/stripe-js';
import CheckoutForm from './CheckoutForm';
// Make sure to call `loadStripe` outside of a component's render to avoid
// recreating the `Stripe` object on every render.
const stripePromise = loadStripe("<>", {
stripeAccount: '{{CONNECTED_ACCOUNT_ID}}'
});
function App() {
const options = {
// pass the client secret from the previous step
clientSecret: '{{CLIENT_SECRET}}',
// Fully customizable with the Appearance API
appearance: {/*...*/},
};
return (
);
};
ReactDOM.render(, document.getElementById('root'));
```
### Agrega el componente PaymentElement
Usa el componente `PaymentElement` para crear tu formulario.
```jsx
import React from 'react';
import {PaymentElement} from '@stripe/react-stripe-js';
const CheckoutForm = () => {
return (
);
};
export default CheckoutForm;
```
El Payment Element procesa un formulario dinámico que le permite a tu cliente elegir un tipo de método de pago. El formulario recopila automáticamente todos los datos de pago necesarios para el método de pago que el cliente seleccionó. Al configurar el proveedor `Elements`, podrás [personalizar el aspecto del Payment Element](https://docs.stripe.com/elements/appearance-api.md) para que coincida con el diseño de tu sitio.
## Enviar el pago a Stripe [Lado del cliente]
Usa [stripe.confirmPayment](https://docs.stripe.com/js/payment_intents/confirm_payment) para completar el pago con los datos del Payment Element. Proporciona una [return_url](https://docs.stripe.com/api/payment_intents/create.md#create_payment_intent-return_url) a esta función para indicar a dónde Stripe debe redirigir al usuario después de completar el pago. Es posible que primero se redirija al usuario a un sitio intermedio, como una página de autorización del banco y, luego, a la`return_url`. Los pagos con tarjeta redirigen inmediatamente a la `return_url` cuando un pago se realiza correctamente.
Si no quieres realizar el redireccionamiento de pagos con tarjeta una vez que se completan los pagos, puedes configurar el [redireccionamiento](https://docs.stripe.com/js/payment_intents/confirm_payment#confirm_payment_intent-options-redirect) en `if_required`. Esto solo redirigirá a los clientes que finalizan su compra con métodos de pago basados en redireccionamiento.
#### HTML + JS
```javascript
const form = document.getElementById('payment-form');
form.addEventListener('submit', async (event) => {
event.preventDefault();
const {error} = await stripe.confirmPayment({
//`Elements` instance that was used to create the Payment Element
elements,
confirmParams: {
return_url: 'https://example.com/order/123/complete',
},
});
if (error) {
// This point will only be reached if there is an immediate error when
// confirming the payment. Show error to your customer (for example, payment
// details incomplete)
const messageContainer = document.querySelector('#error-message');
messageContainer.textContent = error.message;
} else {
// Your customer will be redirected to your `return_url`. For some payment
// methods like iDEAL, your customer will be redirected to an intermediate
// site first to authorize the payment, then redirected to the `return_url`.
}
});
```
#### React
Para llamar a [stripe.confirmPayment](https://docs.stripe.com/js/payment_intents/confirm_payment) desde el componente del formulario de pago, usa los hooks [useStripe](https://docs.stripe.com/sdks/stripejs-react.md#usestripe-hook) y [useElements](https://docs.stripe.com/sdks/stripejs-react.md#useelements-hook).
Si prefieres componentes de clase tradicionales en lugar de hooks, puedes usar un [ElementsConsumer](https://docs.stripe.com/sdks/stripejs-react.md#elements-consumer).
```jsx
import React, {useState} from 'react';
import {useStripe, useElements, PaymentElement} from '@stripe/react-stripe-js';
const CheckoutForm = () => {
const stripe = useStripe();
const elements = useElements();
const [errorMessage, setErrorMessage] = useState(null);
const handleSubmit = async (event) => {
// We don't want to let default form submission happen here,
// which would refresh the page.
event.preventDefault();
if (!stripe || !elements) {
// Stripe.js hasn't yet loaded.
// Make sure to disable form submission until Stripe.js has loaded.
return;
}
const {error} = await stripe.confirmPayment({
//`Elements` instance that was used to create the Payment Element
elements,
confirmParams: {
return_url: 'https://example.com/order/123/complete',
},
});
if (error) {
// This point will only be reached if there is an immediate error when
// confirming the payment. Show error to your customer (for example, payment
// details incomplete)
setErrorMessage(error.message);
} else {
// Your customer will be redirected to your `return_url`. For some payment
// methods like iDEAL, your customer will be redirected to an intermediate
// site first to authorize the payment, then redirected to the `return_url`.
}
};
return (
);
};
export default CheckoutForm;
```
Asegúrate de que la `return_url` corresponda a una página de tu sitio web que proporcione el estado del pago. Cuando Stripe redirige al cliente a la `return_url`, proporcionamos los siguientes parámetros de consulta de URL:
| Parámetro | Descripción |
| ------------------------------ | ---------------------------------------------------------------------------------------------------------------------------------------------- |
| `payment_intent` | El identificador único del `PaymentIntent`. |
| `payment_intent_client_secret` | El [secreto de cliente](https://docs.stripe.com/api/payment_intents/object.md#payment_intent_object-client_secret) del objeto `PaymentIntent`. |
> Si tienes herramientas que rastrean la sesión del navegador del cliente, es posible que debas agregar el dominio `stripe.com` a la lista de exclusión de referentes. Los redireccionamientos hacen que algunas herramientas creen nuevas sesiones, lo que te impide realizar un seguimiento de la sesión completa.
Usa uno de los parámetros de consulta para recuperar el PaymentIntent. Examina el [estado del PaymentIntent](https://docs.stripe.com/payments/paymentintents/lifecycle.md) para decidir qué mostrarás a tus clientes. También puedes adjuntar tus propios parámetros de consulta cuando proporciones la `return_url`, que se mantendrán durante el proceso de redireccionamiento.
#### HTML + JS
```javascript
// Initialize Stripe.js using your publishable key
const stripe = Stripe('<>');
// Retrieve the "payment_intent_client_secret" query parameter appended to
// your return_url by Stripe.js
const clientSecret = new URLSearchParams(window.location.search).get(
'payment_intent_client_secret'
);
// Retrieve the PaymentIntent
stripe.retrievePaymentIntent(clientSecret).then(({paymentIntent}) => {
const message = document.querySelector('#message')
// Inspect the PaymentIntent `status` to indicate the status of the payment
// to your customer.
//
// Some payment methods will [immediately succeed or fail][0] upon
// confirmation, while others will first enter a `processing` state.
//
// [0]: https://stripe.com/docs/payments/payment-methods#payment-notification
switch (paymentIntent.status) {
case 'succeeded':
message.innerText = 'Success! Payment received.';
break;
case 'processing':
message.innerText = "Payment processing. We'll update you when payment is received.";
break;
case 'requires_payment_method':
message.innerText = 'Payment failed. Please try another payment method.';
// Redirect your user back to your payment page to attempt collecting
// payment again
break;
default:
message.innerText = 'Something went wrong.';
break;
}
});
```
#### React
```jsx
import React, {useState, useEffect} from 'react';
import {useStripe} from '@stripe/react-stripe-js';
const PaymentStatus = () => {
const stripe = useStripe();
const [message, setMessage] = useState(null);
useEffect(() => {
if (!stripe) {
return;
}
// Retrieve the "payment_intent_client_secret" query parameter appended to
// your return_url by Stripe.js
const clientSecret = new URLSearchParams(window.location.search).get(
'payment_intent_client_secret'
);
// Retrieve the PaymentIntent
stripe
.retrievePaymentIntent(clientSecret)
.then(({paymentIntent}) => {
// Inspect the PaymentIntent `status` to indicate the status of the payment
// to your customer.
//
// Some payment methods will [immediately succeed or fail][0] upon
// confirmation, while others will first enter a `processing` state.
//
// [0]: https://stripe.com/docs/payments/payment-methods#payment-notification
switch (paymentIntent.status) {
case 'succeeded':
setMessage('Success! Payment received.');
break;
case 'processing':
setMessage("Payment processing. We'll update you when payment is received.");
break;
case 'requires_payment_method':
// Redirect your user back to your payment page to attempt collecting
// payment again
setMessage('Payment failed. Please try another payment method.');
break;
default:
setMessage('Something went wrong.');
break;
}
});
}, [stripe]);
return message;
};
export default PaymentStatus;
```
## Administrar eventos posteriores al pago [Lado del servidor]
Stripe envía un evento [payment_intent.succeeded](https://docs.stripe.com/api/events/types.md#event_types-payment_intent.succeeded) cuando se completa el pago. Usa la [herramienta de webhook del Dashboard](https://dashboard.stripe.com/webhooks) o sigue la [guía de webhooks](https://docs.stripe.com/webhooks/quickstart.md) para recibir estos eventos y ejecutar acciones como, por ejemplo, enviar un correo electrónico de confirmación del pedido a tu cliente, registrar la venta en una base de datos o iniciar un flujo de envío.
Escucha estos eventos en lugar de esperar una devolución de llamada del cliente. De su lado, el cliente puede cerrar la ventana del navegador o salir de la aplicación antes de que se ejecute la devolución de llamada, y clientes malintencionados podrían manipular la respuesta. Si configuras tu integración para escuchar eventos asincrónicos, podrás aceptar [diferentes tipos de métodos de pago](https://stripe.com/payments/payment-methods-guide) con una sola integración.
Además de administrar el evento `payment_intent.succeeded`, recomendamos administrar estos otros eventos si se cobran pagos con el Payment Element:
| Evento | Descripción | Acción |
| ------------------------------------------------------------------------------------------------------------------------------- | -------------------------------------------------------------------------------------------------------------------------------------------------------------------------------------------------------------------------------------------------------------- | ---------------------------------------------------------------------------------------------------------------------------------------------------------------------------------------------------- |
| [payment_intent.succeeded](https://docs.stripe.com/api/events/types.md?lang=php#event_types-payment_intent.succeeded) | Se envía cuando un cliente completa correctamente un pago. | Envía al cliente una confirmación del pedido y *completa* (Fulfillment is the process of providing the goods or services purchased by a customer, typically after payment is collected) el pedido. |
| [payment_intent.processing](https://docs.stripe.com/api/events/types.md?lang=php#event_types-payment_intent.processing) | Se envía cuando un cliente inicia con éxito un pago, pero éste aún no se completó. Este evento se envía normalmente cuando el cliente inicia un débito bancario. Le sigue un evento `payment_intent.succeeded` o `payment_intent.payment_failed` en el futuro. | Envía al cliente una confirmación del pedido que indique que el pago está pendiente. En caso de productos digitales, quizá te convenga completar el pedido antes de esperar que se complete el pago. |
| [payment_intent.payment_failed](https://docs.stripe.com/api/events/types.md?lang=php#event_types-payment_intent.payment_failed) | Enviado cuando un cliente intenta un pago, pero el pago falla. | Si un pago pasa de `processing` a `payment_failed`, ofrécele al cliente otro intento de pago. |
## Probar la integración
#### Tarjetas
| Número de tarjeta | Escenario | Cómo hacer la prueba |
| ------------------- | ----------------------------------------------------------------------------------------------------------------------------------------------------------------------------------------------------------------------------------------------------------------------------------------------- | -------------------------------------------------------------------------------------------------------------------------------------- |
| 4242424242424242 | El pago con tarjeta se efectúa correctamente y no requiere autenticación. | Completa el formulario de tarjeta de crédito con el número de tarjeta de crédito y la fecha de vencimiento, el CVC o el código postal. |
| 4000002500003155 | El pago con tarjeta requiere *autenticación* (Strong Customer Authentication (SCA) is a regulatory requirement in effect as of September 14, 2019, that impacts many European online payments. It requires customers to use two-factor authentication like 3D Secure to verify their purchase). | Completa el formulario de tarjeta de crédito con el número de tarjeta de crédito y la fecha de vencimiento, el CVC o el código postal. |
| 4000000000009995 | La tarjeta es rechazada con un código de rechazo `insufficient_funds`. | Completa el formulario de tarjeta de crédito con el número de tarjeta de crédito y la fecha de vencimiento, el CVC o el código postal. |
| 6205500000000000004 | La tarjeta UnionPay puede tener entre 13 y 19 dígitos. | Completa el formulario de tarjeta de crédito con el número de tarjeta de crédito y la fecha de vencimiento, el CVC o el código postal. |
#### Billeteras
| Método de pago | Escenario | Cómo hacer la prueba |
| -------------- | ----------------------------------------------------------------------------------------------------------------------------------------------------------------------------------------------------- | ---------------------------------------------------------------------------------------------------------------------------------------------------------------------------------------------------- |
| Alipay | Tu cliente realiza un pago correctamente con un método de pago basado en redireccionamiento y con [notificación inmediata](https://docs.stripe.com/payments/payment-methods.md#payment-notification). | Elige cualquier método de pago basado en redireccionamiento, completa los datos solicitados y confirma el pago. Luego, haz click en **Completar pago de prueba** en la página de redireccionamiento. |
#### Redireccionamientos bancarios
| Método de pago | Escenario | Cómo hacer la prueba |
| ----------------------------------- | -------------------------------------------------------------------------------------------------------------------------------------------------------------------------------------------------------------------- | ------------------------------------------------------------------------------------------------------------------------------------------------------------------------------------------------------ |
| Débito directo BECS | Tu cliente paga satisfactoriamente con débito directo BECS. | Completa el formulario con el número de cuenta `900123456` y BSB `000000`. El PaymentIntent confirmado pasa en un principio al estado `processing` y, 3 minutos más tarde, a `succeeded`. |
| Débito directo BECS | El pago de tu cliente falla con un código de error `account_closed`. | Completa el formulario con el número de cuenta `111111113` y BSB `000000`. |
| Bancontact, EPS, iDEAL y Przelewy24 | Tu cliente no pasa la autenticación en la página de redireccionamiento de un método de pago basado en redireccionamiento y con notificación inmediata. | Elige cualquier método de pago basado en redireccionamiento, completa los datos solicitados y confirma el pago. Luego, haz click en **Error en el pago de prueba** en la página de redireccionamiento. |
| Pay by Bank | Tu cliente paga satisfactoriamente con un método de pago basado en redireccionamiento y con [notificación diferida](https://docs.stripe.com/payments/payment-methods.md#payment-notification). | Elige el método de pago, completa los datos solicitados y confirma el pago. Luego, haz click en **Completar el pago de prueba** en la página de redireccionamiento. |
| Pay by Bank | Tu cliente no pasa la autenticación en la página de redireccionamiento de un método de pago basado en redireccionamiento y con notificación diferida. | Elige el método de pago, completa los datos solicitados y confirma el pago. Luego, haz click en **Error en el pago de prueba** en la página de redireccionamiento. |
| BLIK | Los pagos BLIK generan errores de varias maneras: errores inmediatos (por ejemplo, el código venció o no es válido), errores demorados (el banco lo rechaza) o tiempos de espera (el cliente no respondió a tiempo). | Usa patrones de correo electrónico para [simular los diferentes errores.](https://docs.stripe.com/payments/blik/accept-a-payment.md#simulate-failures) |
#### Débitos bancarios
| Método de pago | Escenario | Cómo hacer la prueba |
| ------------------- | --------------------------------------------------------------------------------------------- | -------------------------------------------------------------------------------------------------------------------------------------------------------------------------------------- |
| Débito directo SEPA | Tu cliente paga satisfactoriamente con débito directo SEPA. | Completa el formulario con el número de cuenta `AT321904300235473204`. El PaymentIntent confirmado pasa inicialmente al estado “en proceso” y, tres minutos más tarde, a “completado”. |
| Débito directo SEPA | El estado del intento de pago de tu cliente pasa de `processing` a `requires_payment_method`. | Completa el formulario con el número de cuenta `AT861904300235473202`. |
#### Vales
| Método de pago | Escenario | Cómo hacer la prueba |
| -------------- | ------------------------------------------ | -------------------------------------------------------------------------------------------------------- |
| Boleto, OXXO | Tu cliente paga con un vale Boleto u OXXO. | Selecciona Boleto u OXXO como método de pago y envía el pago. Cierra el diálogo después de que aparezca. |
Consulta [Pruebas](https://docs.stripe.com/testing.md) para obtener información adicional para probar tu integración.
## Optional: Habilitar métodos de pago adicionales
Ve a [Administrar métodos de pago para cuentas conectadas](https://dashboard.stripe.com/settings/payment_methods/connected_accounts) en el Dashboard para configurar qué métodos de pago aceptan tus cuentas conectadas. Los cambios en la configuración predeterminada se aplican a todas las cuentas conectadas nuevas y existentes.
Consulta los siguientes recursos para obtener información sobre los métodos de pago:
- [Guía de métodos de pago](https://stripe.com/payments/payment-methods-guide#choosing-the-right-payment-methods-for-your-business) para ayudarte a elegir los métodos de pago correctos para tu plataforma.
- [Funcionalidades de cuenta](https://docs.stripe.com/connect/account-capabilities.md) para asegurarte de que los métodos de pago que elegiste funcionen en tus cuentas conectadas.
- Consulta las tablas de [admisibilidad de métodos de pago y de productos](https://docs.stripe.com/payments/payment-methods/payment-method-support.md#product-support) para asegurarte de que los métodos de pago elegidos funcionen para tus productos y flujos de pago de Stripe.
Para cada método de pago, puedes seleccionar una de las siguientes opciones desplegables:
| |
| |
| **Activado de manera predeterminada** | Tus cuentas conectadas aceptan este método de pago durante el proceso de compra. Algunos métodos de pago solo pueden estar desactivados o bloqueados. Esto se debe a que tus cuentas conectadas con *acceso al Dashboard de Stripe* (Platforms can provide connected accounts with access to the full Stripe Dashboard or the Express Dashboard. Otherwise, platforms build an interface for connected accounts using embedded components or the Stripe API) deben activarlas en su página de configuración. |
| **Desactivado de manera predeterminada** | Tus cuentas conectadas no aceptan este método de pago durante el proceso de compra. Si permites que tus cuentas conectadas con *acceso al Dashboard de Stripe* (Platforms can provide connected accounts with access to the full Stripe Dashboard or the Express Dashboard. Otherwise, platforms build an interface for connected accounts using embedded components or the Stripe API) administren sus propios métodos de pago, podrán activarlo. |
| **Bloqueado** | Tus cuentas conectadas no aceptan este método de pago durante el proceso de compra. Si permites que tus cuentas conectadas con *acceso al Dashboard de Stripe* (Platforms can provide connected accounts with access to the full Stripe Dashboard or the Express Dashboard. Otherwise, platforms build an interface for connected accounts using embedded components or the Stripe API) administren sus propios métodos de pago, no tendrán la opción para activarlo. |

Opciones de métodos de pago
Si realizas un cambio en un método de pago, debes hacer clic en **Revisar cambios** en la barra inferior de la pantalla y en **Guardar y aplicar** para actualizar tus cuentas conectadas.

Cuadro de diálogo Guardar
### Permite que las cuentas conectadas gestionen los métodos de pago
Stripe recomienda permitir que tus cuentas conectadas personalicen sus propios métodos de pago. Esta opción le permite a cada cuenta conectada con *acceso al Dashboard de Stripe* (Platforms can provide connected accounts with access to the full Stripe Dashboard or the Express Dashboard. Otherwise, platforms build an interface for connected accounts using embedded components or the Stripe API) ver y actualizar página [Métodos de pago](https://dashboard.stripe.com/settings/payment_methods). Solo los propietarios de las cuentas conectadas pueden personalizar sus métodos de pago. El Dashboard de Stripe muestra el conjunto de métodos de pago predeterminados que aplicaste a todas las cuentas conectadas nuevas y existentes. Tus cuentas conectadas pueden anular estos valores predeterminados, excluyendo los métodos de pago que hayas bloqueado.
Marca la casilla de verificación **Personalización de la cuenta** para habilitar esta opción. Debes hacer clic en **Revisar cambios** en la barra inferior de la pantalla y luego seleccionar **Guardar y aplicar** para actualizar esta configuración.

Casilla de verificación de personalización de la cuenta
### Capacidades de métodos de pago
Para permitir que tus cuentas conectadas acepten métodos de pago adicionales, sus `cuentas` deben tener funcionalidades de métodos de pago activos.
Si seleccionaste la opción “Activado por defecto” para un método de pago en [Gestionar métodos de pago para tus cuentas conectadas](https://dashboard.stripe.com/settings/payment_methods/connected_accounts), Stripe solicita automáticamente la funcionalidad necesaria para las cuentas conectadas nuevas y las existentes si cumplen con los requisitos de verificación. Si la cuenta conectada no cumple con los requisitos o si quieres tener control directo, puedes solicitar de forma manual la funcionalidad en el dashboard o con la API.
La mayoría de los métodos de pago tienen los mismos requisitos de verificación que la funcionalidad `card_payments`, con algunas restricciones y excepciones. En el [cuadro](https://docs.stripe.com/connect/account-capabilities.md#payment-methods) figuran las funcionalidades de métodos de pago que requieren verificación adicional.
#### Dashboard
[Busca una cuenta conectada](https://docs.stripe.com/connect/dashboard/managing-individual-accounts.md#finding-accounts) en el dashboard para editar sus funcionalidades y ver los requisitos de verificación pendientes.
#### API
Para una cuenta conectada existente, puedes [enumerar](https://docs.stripe.com/api/capabilities/list.md) sus funcionalidades existentes para determinar si necesitas solicitar funcionalidades adicionales.
```curl
curl https://api.stripe.com/v1/accounts/{{CONNECTEDACCOUNT_ID}}/capabilities \
-u "<>:"
```
Solicita funcionalidades adicionales [actualizando](https://docs.stripe.com/api/capabilities/update.md) las funcionalidades de cada cuenta conectada.
```curl
curl https://api.stripe.com/v1/accounts/{{CONNECTEDACCOUNT_ID}}/capabilities/us_bank_account_ach_payments \
-u "<>:" \
-d requested=true
```
Puede haber un retraso antes de que la capacidad solicitada se active. Si la capacidad tiene algún requisito de activación, la respuesta lo incluye en las matrices de `requirements`.
## Cobra comisiones
Como plataforma, puedes aceptar pagos en tus cuentas conectadas por una parte de cada transacción en forma de comisiones de solicitud. Puedes establecer las comisiones de la plataforma de las siguientes maneras:
- Utiliza la [herramienta de tarifas de la plataforma](https://docs.stripe.com/connect/platform-pricing-tools.md) para establecer y probar las reglas de tarifas. Esta función que no requiere programación del Dashboard de Stripe solo está disponible actualmente para plataformas responsables de pagar las comisiones de Stripe.
- Especifica las comisiones de la solicitud directamente en un [PaymentIntent](https://docs.stripe.com/api/payment_intents/object.md). Las comisiones establecidas con este método anulan la lógica de tarifas especificada en la herramienta de tarifas de la plataforma.
Tu plataforma puede cobrar una comisión de la plataforma con las siguientes limitaciones:
- El valor del importe de la comisión de la aplicación (`application_fee_amount`) debe ser positivo e inferior al importe del cargo. El importe del cargo es el tope de la comisión de la plataforma que se puede cobrar.
- No se aplican comisiones adicionales de Stripe a la comisión de la plataforma en sí.
- En concordancia con los requisitos reglamentarios y de cumplimiento normativo de Brasil, las plataformas establecidas fuera de Brasil con cuentas conectadas brasileñas no pueden cobrar comisiones de la plataforma a través de Stripe.
- La moneda de `application_fee_amount` depende de algunos factores de [varias monedas](https://docs.stripe.com/connect/currencies.md).
La [BalanceTransaction](https://docs.stripe.com/api.md#balance_transaction_retrieve) del cargo resultante incluye un desglose detallado de las comisiones tanto de Stripe como de la solicitud. Para ofrecer una mejor experiencia de elaboración de informes, el cobro de una comisión genera un objeto [ApplicationFee](https://docs.stripe.com/api/application_fees/object.md). Utiliza la propiedad `amount` del objeto `ApplicationFee` para la elaboración de informes.
Puedes ver las comisiones de solicitud en la sección [Comisiones cobradas](https://dashboard.stripe.com/connect/application_fees) del Dashboard.
> De manera predeterminada, las comisiones de la plataforma para cargos directos se crean de forma asincrónica. Si expandes el objeto `application_fee` en una solicitud de creación de cargo, la comisión de la plataforma se crea sincrónicamente como parte de esa solicitud. Solo expande el objeto `application_fee` si es necesario, ya que aumenta la latencia de la solicitud.
>
> Para recibir notificaciones de los objetos `ApplicationFee` creados de forma asincrónica, escucha el evento webhook [application_fee.created](https://docs.stripe.com/api/events/types.md#event_types-application_fee.created).
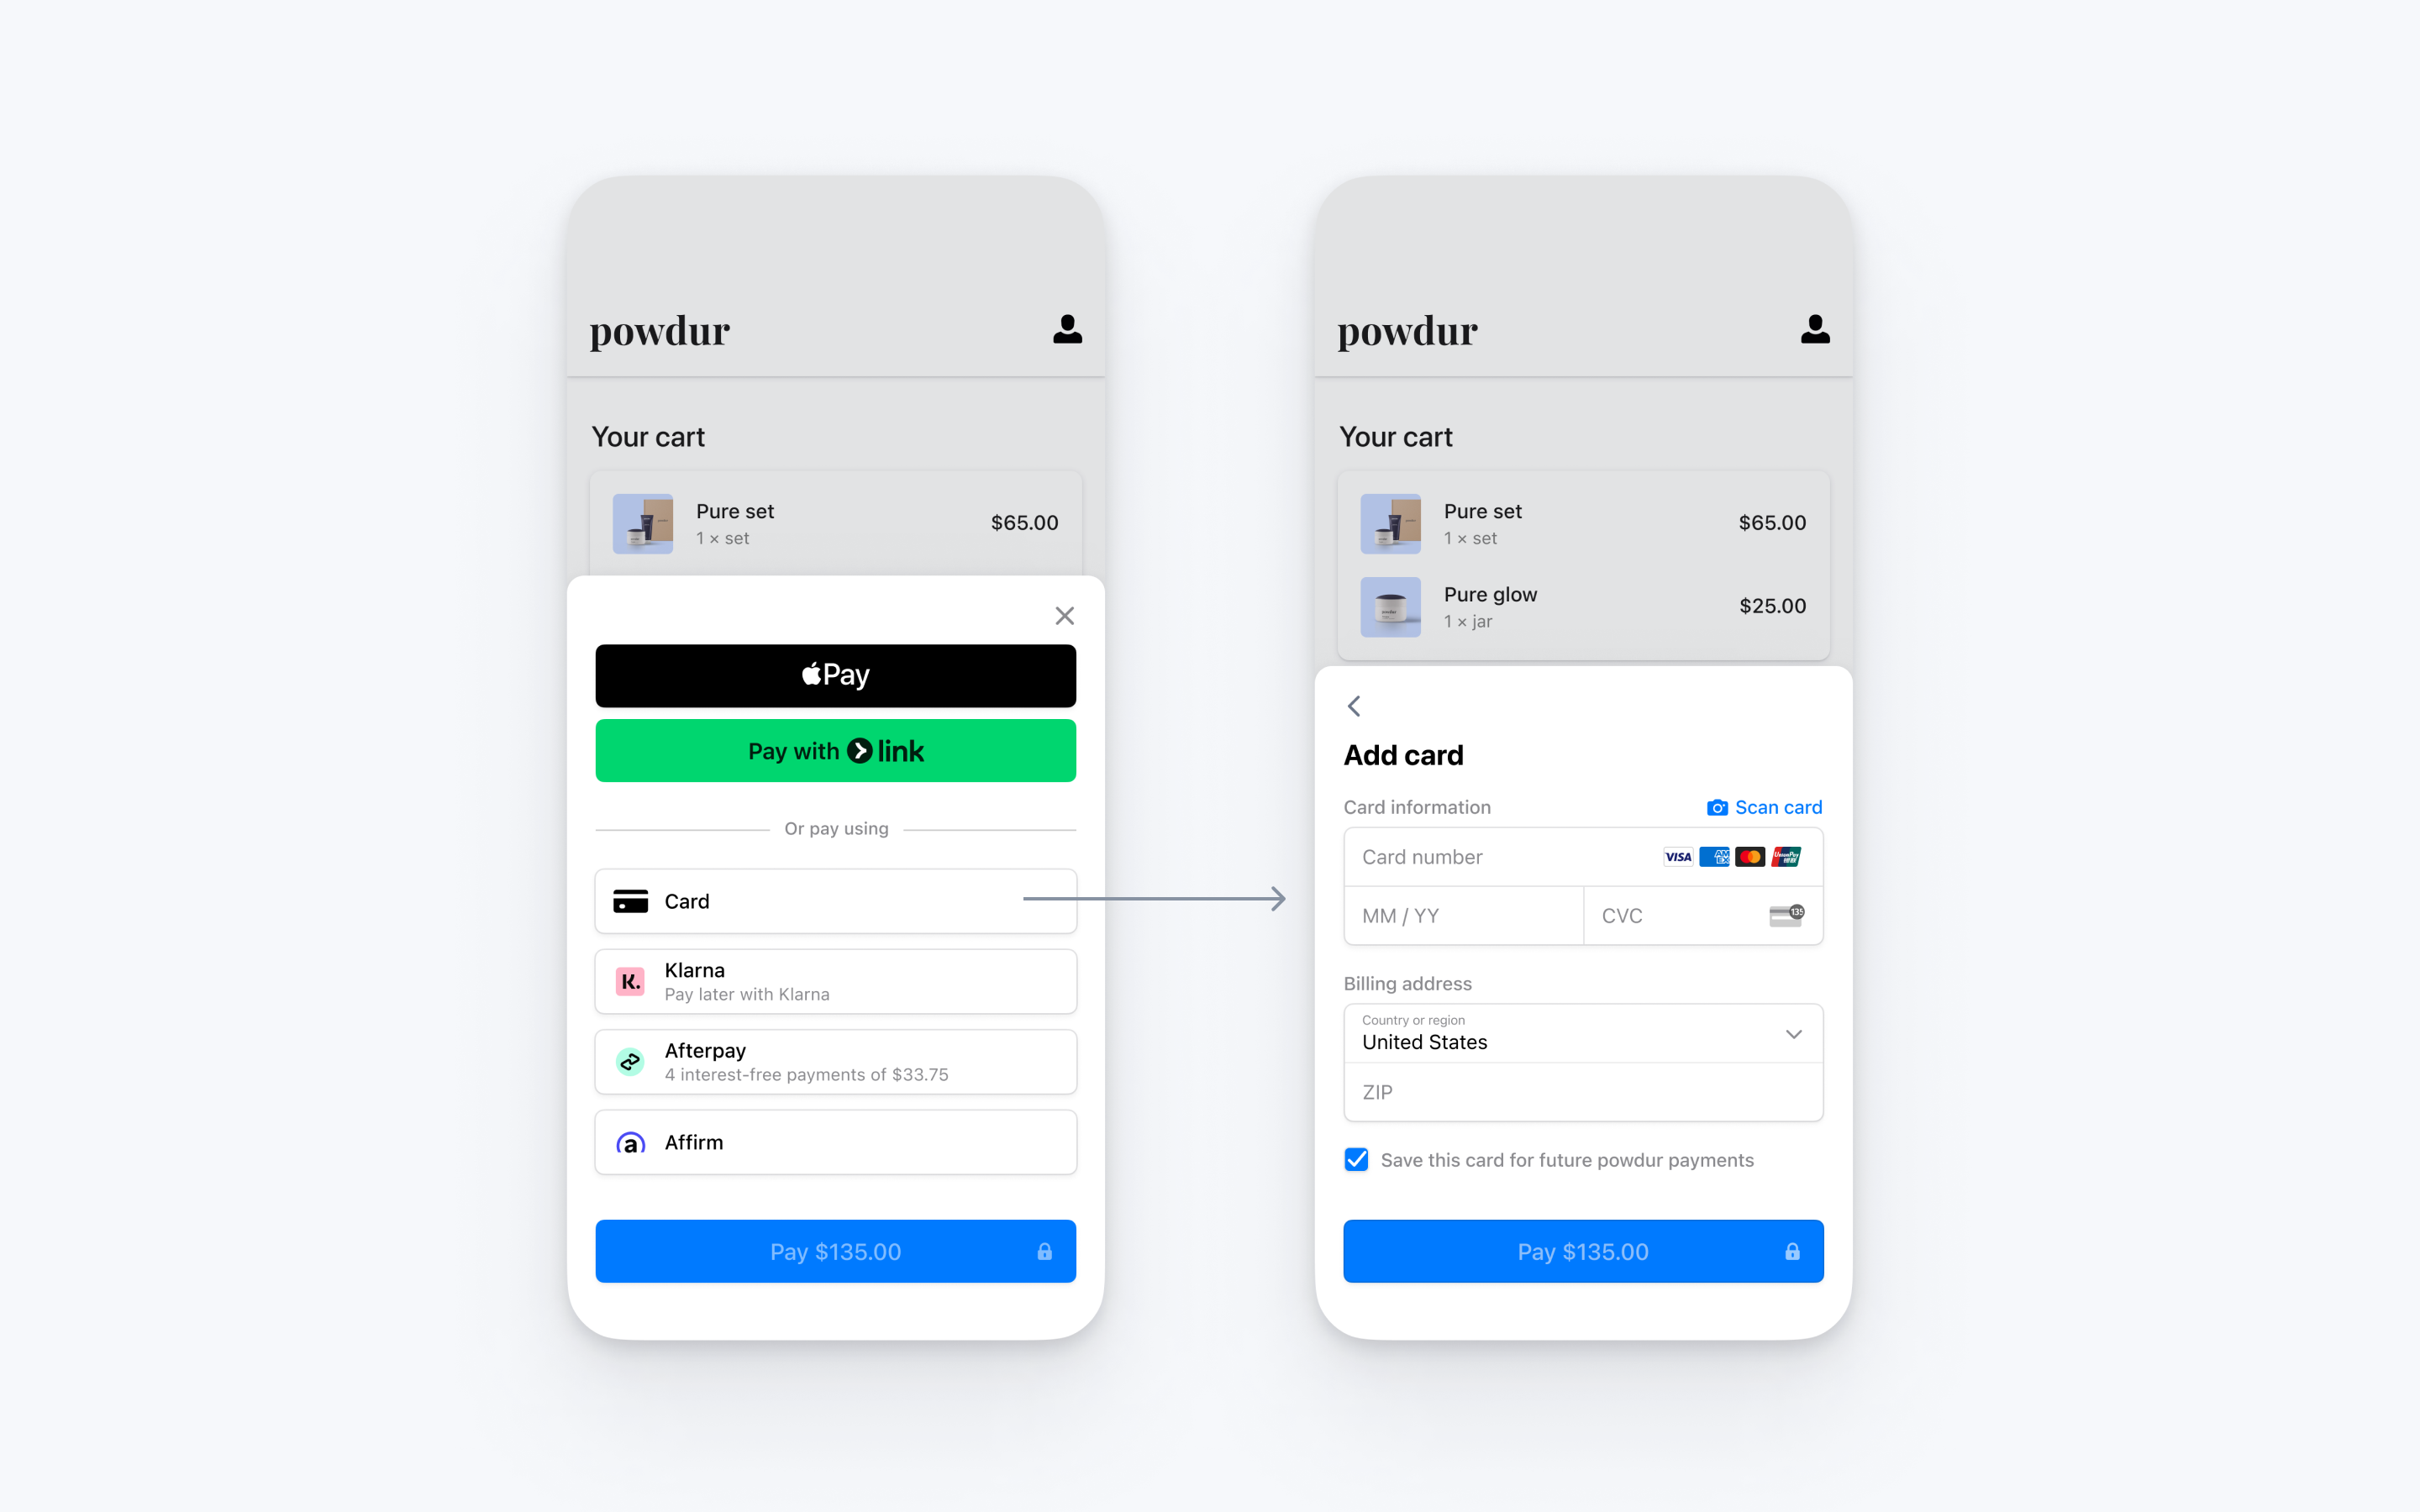
Integra la interfaz de usuario de pago prediseñada de Stripe a la confirmación de compra de tu aplicación iOS con la clase [PaymentSheet](https://stripe.dev/stripe-ios/stripe-paymentsheet/Classes/PaymentSheet.html). Consulta nuestro ejemplo de integración [en GitHub](https://github.com/stripe/stripe-ios/tree/master/Example/PaymentSheet%20Example).
> #### Soporte de API Accounts v2
>
> Payment Sheet no ofrece soporte para *cuentas configuradas por el cliente*. Solo admite objetos `Customer`.
## Configura Stripe [Lado del servidor] [Lado del cliente]
Primero, necesitas una cuenta de Stripe. [Inscríbete ahora](https://dashboard.stripe.com/register).
### Lado del servidor
Esta integración necesita puntos de conexión en tu servidor que se comuniquen con la API de Stripe. Usa nuestras bibliotecas oficiales para acceder a la API de Stripe desde tu servidor:
#### Ruby
```bash
# Available as a gem
sudo gem install stripe
```
```ruby
# If you use bundler, you can add this line to your Gemfile
gem 'stripe'
```
### Lado del cliente
El [SDK para iOS de Stripe](https://github.com/stripe/stripe-ios) es de código abierto, está [plenamente documentado](https://stripe.dev/stripe-ios/index.html) y es compatible con aplicaciones que admiten iOS 13 o posterior.
#### Swift Package Manager
Para instalar el SDK, sigue estos pasos:
1. En Xcode, selecciona **Archivo** > **Agregar dependencias de paquetes…** e introduce `https://github.com/stripe/stripe-ios-spm` como URL del repositorio.
1. Selecciona el número de versión más reciente en nuestra [página de versiones](https://github.com/stripe/stripe-ios/releases).
1. Agrega el producto **StripePaymentSheet** al [objetivo de tu aplicación](https://developer.apple.com/documentation/swift_packages/adding_package_dependencies_to_your_app).
#### CocoaPods
1. Si aún no lo has hecho, instala la última versión de [CocoaPods](https://guides.cocoapods.org/using/getting-started.html).
1. Si no tienes un [Podfile](https://guides.cocoapods.org/syntax/podfile.html), crea uno al ejecutar el siguiente comando:
```bash
pod init
```
1. Agrega esta línea a tu `Podfile`:
```podfile
pod 'StripePaymentSheet'
```
1. Ejecuta el siguiente comando:
```bash
pod install
```
1. De ahora en adelante, no olvides usar el archivo `.xcworkspace` en lugar del archivo `.xcodeproj` para abrir tu proyecto en Xcode.
1. En el futuro, para actualizar a la última versión del SDK, ejecuta lo siguiente:
```bash
pod update StripePaymentSheet
```
#### Carthage
1. Si aún no lo has hecho, instala la última versión de [Carthage](https://github.com/Carthage/Carthage#installing-carthage).
1. Agrega esta línea a tu `Cartfile`:
```cartfile
github "stripe/stripe-ios"
```
1. Sigue las [instrucciones de instalación de Carthage](https://github.com/Carthage/Carthage#if-youre-building-for-ios-tvos-or-watchos). Asegúrate de incrustar todos los frameworks obligatorios enumerados [aquí](https://github.com/stripe/stripe-ios/tree/master/StripePaymentSheet/README.md#manual-linking).
1. En el futuro, para actualizar a la última versión del SDK, ejecuta el siguiente comando:
```bash
carthage update stripe-ios --platform ios
```
#### Framework manual
1. Ve a nuestra [página de versiones de GitHub](https://github.com/stripe/stripe-ios/releases/latest) y descarga y descomprime **Stripe.xcframework.zip**.
1. Arrastra **StripePaymentSheet.xcframework** a la sección **Binarios incrustados** de la configuración **General** de tu proyecto en Xcode. Asegúrate de seleccionar **Copiar elementos si es necesario**.
1. Repite el paso 2 para todos los frameworks obligatorios enumerados [aquí](https://github.com/stripe/stripe-ios/tree/master/StripePaymentSheet/README.md#manual-linking).
1. En el futuro, para actualizar a la última versión de nuestro SDK, repite los pasos 1 a 3.
> Para obtener más detalles sobre la última versión del SDK y las versiones anteriores, consulta la página [Versiones](https://github.com/stripe/stripe-ios/releases) en GitHub. Para recibir notificaciones cuando se publique una nueva versión, [mira las versiones](https://help.github.com/en/articles/watching-and-unwatching-releases-for-a-repository#watching-releases-for-a-repository) del repositorio.
Configura el SDK con tu [clave publicable](https://dashboard.stripe.com/test/apikeys) de Stripe al iniciar la aplicación. Esto permite que tu aplicación haga solicitudes a la API de Stripe.
#### Swift
```swift
import UIKitimportStripePaymentSheet
@main
class AppDelegate: UIResponder, UIApplicationDelegate {
func application(_ application: UIApplication, didFinishLaunchingWithOptions launchOptions: [UIApplication.LaunchOptionsKey: Any]?) -> Bool {StripeAPI.defaultPublishableKey = "<>"
// do any other necessary launch configuration
return true
}
}
```
> Usa las [claves de prueba](https://docs.stripe.com/keys.md#obtain-api-keys) durante las pruebas y el desarrollo, y tus claves para [modo activo](https://docs.stripe.com/keys.md#test-live-modes) cuando publiques tu aplicación.
## Agregar un punto de conexión [Lado del servidor]
> #### Nota
>
> Para mostrar la PaymentSheet antes de crear un PaymentIntent, consulta [Recopila datos de pago antes de crear un Intent](https://docs.stripe.com/payments/accept-a-payment-deferred.md?type=payment).
Esta integración usa tres objetos de la API de Stripe:
1. [PaymentIntent](https://docs.stripe.com/api/payment_intents.md): Stripe lo utiliza para representar tu intención de cobrarle a un cliente, haciendo el seguimiento de los intentos de cobro y de los cambios en el estado del pago a lo largo del proceso.
1. (Opcional) Una [Account configurada por el cliente](https://docs.stripe.com/api/v2/core/accounts/object.md#v2_account_object-applied_configurations) o un [Customer](https://docs.stripe.com/api/customers.md) Object: para configurar un método de pago para pagos futuros, debes asociarlo a un cliente. Crea un objeto que represente a tu cliente cuando cree una cuenta en tu negocio. Si tu cliente realiza un pago como invitado, puedes crear una `Account` o `Customer` Object antes del pago y asociarlo más adelante con tu propia representación interna de la cuenta del cliente.
1. (Opcional) [CustomerSession](https://docs.stripe.com/api/customer_sessions.md): la información del objeto que representa a tu cliente es sensible y no se puede recuperar directamente desde una app. Una `CustomerSession` le otorga al SDK acceso temporal con alcance limitado a la `Account` o `Customer` y proporciona opciones de configuración adicionales. Consulta la lista completa de [opciones de configuración](https://docs.stripe.com/api/customer_sessions/create.md#create_customer_session-components).
> Si nunca guardas tarjetas de tus clientes ni permites que vuelvan a usar tarjetas guardadas, puedes omitir el `Account` o `Customer` Object y el objeto `CustomerSession` en tu integración.
Por motivos de seguridad, tu aplicación no puede crear estos objetos. En su lugar, agrega un punto de conexión en tu servidor que haga lo siguiente:
1. Recupera el objeto `Account` o `Customer`, o crea uno nuevo.
1. Crea una [CustomerSession](https://docs.stripe.com/api/customer_sessions.md) para el objeto `Account` o `Customer`.
1. Crea un `PaymentIntent` con el [importe](https://docs.stripe.com/api/payment_intents/create.md#create_payment_intent-amount), la [moneda](https://docs.stripe.com/api/payment_intents/create.md#create_payment_intent-currency), y el [customer_account](https://docs.stripe.com/api/payment_intents/create.md#create_payment_intent-customer_account) o el [customer](https://docs.stripe.com/api/payment_intents/create.md#create_payment_intent-customer).
1. Devuelve el *client secret* (The client secret is a unique key returned from Stripe as part of a PaymentIntent. This key lets the client access important fields from the PaymentIntent (status, amount, currency) while hiding sensitive ones (metadata, customer)) del `PaymentIntent`, el `client_secret` de la `CustomerSession`, el ID del `Account` o `Customer` y tu [clave publicable](https://dashboard.stripe.com/apikeys) a tu app.
Los métodos de pago que se muestran a los clientes durante el proceso de compra también se incluyen en el PaymentIntent. Puedes permitir que Stripe extraiga los métodos de pago de tu configuración del Dashboard o puedes enumerarlos manualmente. Independientemente de la opción que elijas, debes saber que la moneda especificada en el PaymentIntent filtra los métodos de pago que se muestran al cliente. Por ejemplo, si especificas `eur` en el PaymentIntent y tienes habilitado OXXO en el Dashboard, OXXO no se mostrará al cliente porque OXXO no admite pagos en `eur`.
A menos que tu integración requiera una opción basada en código para ofrecer métodos de pago, Stripe recomienda usar la opción automatizada. Esto se debe a que Stripe evalúa la moneda, las restricciones de los métodos de pago y otros parámetros para determinar la lista de métodos de pago admitidos. Se les da prioridad a los métodos de pago que aumentan la conversión y guardan mayor relación con la moneda y la ubicación del cliente.
#### Gestionar los métodos de pago desde el Dashboard
Puedes administrar los métodos de pago desde el [Dashboard](https://dashboard.stripe.com/settings/payment_methods). Stripe maneja la devolución de métodos de pago elegibles según factores como el monto de la transacción, la moneda y el flujo de pago. El PaymentIntent se crea según los métodos de pago que configuraste en el Dashboard. Si no quieres usar el Dashboard o si quieres especificar métodos de pago manualmente, puedes enumerarlos usando el atributo `payment_method_types`.
#### curl
```bash
# Create a Customer (use an existing Customer ID if this is a returning customer)
curl https://api.stripe.com/v1/customers \
-u <>: \
-X "POST" \
-H "Stripe-Account: {{CONNECTED_ACCOUNT_ID}}"
# Create an CustomerSession for the Customer
curl https://api.stripe.com/v1/customer_sessions \
-u <>: \
-X "POST" \
-d "customer"="{{CUSTOMER_ID}}" \
-d "components[mobile_payment_element][enabled]"=true \
-d "components[mobile_payment_element][features][payment_method_save]"=enabled \
-d "components[mobile_payment_element][features][payment_method_redisplay]"=enabled \
-d "components[mobile_payment_element][features][payment_method_remove]"=enabled
# Create a PaymentIntent
curl https://api.stripe.com/v1/payment_intents \
-u <>: \
-H "Stripe-Account: {{CONNECTED_ACCOUNT_ID}}"
-X "POST" \
-d "customer"="{{CUSTOMER_ID}}" \
-d "amount"=1099 \
-d "currency"="eur" \
-d "automatic_payment_methods[enabled]"=true \
-d application_fee_amount="123" \
```
#### Cómo enumerar métodos de pago manualmente
#### curl
```bash
# Create a Customer (use an existing Customer ID if this is a returning customer)
curl https://api.stripe.com/v1/customers \
-u <>: \
-X "POST" \
-H "Stripe-Account: {{CONNECTED_ACCOUNT_ID}}"
# Create an CustomerSession for the Customer
curl https://api.stripe.com/v1/customer_sessions \
-u <>: \
-X "POST" \
-d "customer"="{{CUSTOMER_ID}}" \
-d "components[mobile_payment_element][enabled]"=true \
-d "components[mobile_payment_element][features][payment_method_save]"=enabled \
-d "components[mobile_payment_element][features][payment_method_redisplay]"=enabled \
-d "components[mobile_payment_element][features][payment_method_remove]"=enabled
# Create a PaymentIntent
curl https://api.stripe.com/v1/payment_intents \
-u <>: \
-H "Stripe-Account: {{CONNECTED_ACCOUNT_ID}}"
-X "POST" \
-d "customer"="{{CUSTOMER_ID}}" \
-d "amount"=1099 \
-d "currency"="eur" \
-d "payment_method_types[]"="bancontact" \
-d "payment_method_types[]"="card" \
-d "payment_method_types[]"="ideal" \
-d "payment_method_types[]"="klarna" \
-d "payment_method_types[]"="sepa_debit" \
-d application_fee_amount="123" \
```
> Cada método de pago debe admitir la moneda especificada en el PaymentIntent, y tu empresa tiene que estar establecida en uno de los países que admite cada método de pago. Consulta la página de [opciones de integración de métodos de pago](https://docs.stripe.com/payments/payment-methods/integration-options.md) para obtener más información sobre qué admitimos.
## Integrar la hoja de pago [Lado del cliente]
Para mostrar el Payment Element móvil en la pantalla de confirmación de compra:
- Muestra los productos que compra el cliente junto con el importe total
- Usa el [Address Element](https://docs.stripe.com/elements/address-element.md?platform=ios) para recopilar la información de envío necesaria del cliente
- Agrega un botón de confirmación de compra para mostrar la interfaz de usuario (IU) de Stripe
#### UIKit
#### Accounts v2
En la pantalla de confirmación de compra de tu aplicación, obtén el secreto de cliente PaymentIntent, el secreto de cliente `CustomerSession`, el ID de la `cuenta`configurada por el cliente y la clave publicable del punto de conexión que creaste en el paso anterior. Usa `STPAPIClient.shared` para establecer tu clave publicable e iniciar la [PaymentSheet](https://stripe.dev/stripe-ios/stripe-paymentsheet/Classes/PaymentSheet.html).
Luego, establece `STPAPIClient.shared.stripeAccount` en el ID de cuenta conectada.
#### iOS (Swift)
```swift
import UIKit@_spi(CustomerSessionBetaAccess) import StripePaymentSheet
class CheckoutViewController: UIViewController {
@IBOutlet weak var checkoutButton: UIButton!
var paymentSheet: PaymentSheet?
let backendCheckoutUrl = URL(string: "Your back-end endpoint/payment-sheet")! // Your back-end endpoint
override func viewDidLoad() {
super.viewDidLoad()
checkoutButton.addTarget(self, action: #selector(didTapCheckoutButton), for: .touchUpInside)
checkoutButton.isEnabled = false
// MARK: Fetch the PaymentIntent client secret, CustomerSession client secret, customer-configured Account ID, and publishable key
var request = URLRequest(url: backendCheckoutUrl)
request.httpMethod = "POST"
let task = URLSession.shared.dataTask(with: request, completionHandler: { [weak self] (data, response, error) in
guard let data = data,
let json = try? JSONSerialization.jsonObject(with: data, options: []) as? [String : Any],
let customerAccountId = json["customerAccount"] as? String,
let customerSessionClientSecret = json["customerSessionClientSecret"] as? String,
let paymentIntentClientSecret = json["paymentIntent"] as? String,
let publishableKey = json["publishableKey"] as? String,
let self = self else {
// Handle error
return
}
STPAPIClient.shared.publishableKey = publishableKeySTPAPIClient.shared.stripeAccount = ""{{CONNECTED_ACCOUNT_ID}}""// MARK: Create a PaymentSheet instance
var configuration = PaymentSheet.Configuration()
configuration.merchantDisplayName = "Example, Inc."
configuration.customerAccount = .init(id: customerAccountId, customerSessionClientSecret: customerSessionClientSecret)
// Set `allowsDelayedPaymentMethods` to true if your business handles
// delayed notification payment methods like US bank accounts.
configuration.allowsDelayedPaymentMethods = true
self.paymentSheet = PaymentSheet(paymentIntentClientSecret:paymentIntentClientSecret, configuration: configuration)
DispatchQueue.main.async {
self.checkoutButton.isEnabled = true
}
})
task.resume()
}
}
```
#### Customers v1
En la pantalla de confirmación de compra de tu aplicación, obtén el secreto de cliente PaymentIntent, el secreto de cliente `CustomerSession`, el ID del `cliente` y la clave publicable del punto de conexión que creaste en el paso anterior. Usa `STPAPIClient.shared` para establecer tu clave publicable e iniciar la [PaymentSheet](https://stripe.dev/stripe-ios/stripe-paymentsheet/Classes/PaymentSheet.html).
Luego, establece `STPAPIClient.shared.stripeAccount` en el ID de cuenta conectada.
#### iOS (Swift)
```swift
import UIKit@_spi(CustomerSessionBetaAccess) import StripePaymentSheet
class CheckoutViewController: UIViewController {
@IBOutlet weak var checkoutButton: UIButton!
var paymentSheet: PaymentSheet?
let backendCheckoutUrl = URL(string: "Your backend endpoint/payment-sheet")! // Your backend endpoint
override func viewDidLoad() {
super.viewDidLoad()
checkoutButton.addTarget(self, action: #selector(didTapCheckoutButton), for: .touchUpInside)
checkoutButton.isEnabled = false
// MARK: Fetch the PaymentIntent client secret, CustomerSession client secret, Customer ID, and publishable key
var request = URLRequest(url: backendCheckoutUrl)
request.httpMethod = "POST"
let task = URLSession.shared.dataTask(with: request, completionHandler: { [weak self] (data, response, error) in
guard let data = data,
let json = try? JSONSerialization.jsonObject(with: data, options: []) as? [String : Any],
let customerId = json["customer"] as? String,
let customerSessionClientSecret = json["customerSessionClientSecret"] as? String,
let paymentIntentClientSecret = json["paymentIntent"] as? String,
let publishableKey = json["publishableKey"] as? String,
let self = self else {
// Handle error
return
}
STPAPIClient.shared.publishableKey = publishableKeySTPAPIClient.shared.stripeAccount = ""{{CONNECTED_ACCOUNT_ID}}""// MARK: Create a PaymentSheet instance
var configuration = PaymentSheet.Configuration()
configuration.merchantDisplayName = "Example, Inc."
configuration.customer = .init(id: customerId, customerSessionClientSecret: customerSessionClientSecret)
// Set `allowsDelayedPaymentMethods` to true if your business handles
// delayed notification payment methods like US bank accounts.
configuration.allowsDelayedPaymentMethods = true
self.paymentSheet = PaymentSheet(paymentIntentClientSecret:paymentIntentClientSecret, configuration: configuration)
DispatchQueue.main.async {
self.checkoutButton.isEnabled = true
}
})
task.resume()
}
}
```
Cuando el cliente toca el botón **Checkout**, llama a `present` para presentar la PaymentSheet. Después de que el cliente complete el pago, Stripe descarta la PaymentSheet y llama al bloque de finalización con [PaymentSheetResult](https://stripe.dev/stripe-ios/stripe-paymentsheet/Enums/PaymentSheetResult.html).
#### iOS (Swift)
```swift
@objc
func didTapCheckoutButton() {
// MARK: Start the checkout process
paymentSheet?.present(from: self) { paymentResult in
// MARK: Handle the payment result
switch paymentResult {
case .completed:
print("Your order is confirmed")
case .canceled:
print("Canceled!")
case .failed(let error):
print("Payment failed: \(error)")
}
}
}
```
#### SwiftUI
#### Accounts v2
Crea un modelo `ObservableObject` para tu pantalla de confirmación de compra. Este modelo publica una [PaymentSheet](https://stripe.dev/stripe-ios/stripe-paymentsheet/Classes/PaymentSheet.html) y un [PaymentSheetResult](https://stripe.dev/stripe-ios/stripe-paymentsheet/Enums/PaymentSheetResult.html).
```swift
import StripePaymentSheet
import SwiftUI
class CheckoutViewModel: ObservableObject {
let backendCheckoutUrl = URL(string: "Your back-end endpoint/payment-sheet")! // Your back-end endpoint
@Published var paymentSheet: PaymentSheet?
@Published var paymentResult: PaymentSheetResult?
}
```
Obtén el secreto de cliente PaymentIntent, el secreto de cliente `CustomerSession`, el ID de la `cuenta` configurada por el cliente y la clave publicable del punto de conexión que creaste en el paso anterior. Usa `STPAPIClient.shared` para establecer tu clave publicable e iniciar la [PaymentSheet](https://stripe.dev/stripe-ios/stripe-paymentsheet/Classes/PaymentSheet.html).
Luego, establece `STPAPIClient.shared.stripeAccount` en el ID de cuenta conectada.
```swift
@_spi(CustomerSessionBetaAccess) import StripePaymentSheet
import SwiftUI
class CheckoutViewModel: ObservableObject {
let backendCheckoutUrl = URL(string: "Your back-end endpoint/payment-sheet")! // Your back-end endpoint
@Published var paymentSheet: PaymentSheet?
@Published var paymentResult: PaymentSheetResult?
func preparePaymentSheet() {
// MARK: Fetch thePaymentIntent and customer information from the back end
var request = URLRequest(url: backendCheckoutUrl)
request.httpMethod = "POST"
let task = URLSession.shared.dataTask(with: request, completionHandler: { [weak self] (data, response, error) in
guard let data = data,
let json = try? JSONSerialization.jsonObject(with: data, options: []) as? [String : Any],
let customerAccountId = json["customerAccount"] as? String,
let customerSessionClientSecret = json["customerSessionClientSecret"] as? String,
letpaymentIntentClientSecret = json["paymentIntent"] as? String,
let publishableKey = json["publishableKey"] as? String,
let self = self else {
// Handle error
return
}
STPAPIClient.shared.publishableKey = publishableKeySTPAPIClient.shared.stripeAccount = ""{{CONNECTED_ACCOUNT_ID}}""// MARK: Create a PaymentSheet instance
var configuration = PaymentSheet.Configuration()
configuration.merchantDisplayName = "Example, Inc."
configuration.customerAccount = .init(id: customerAccountId, customerSessionClientSecret: customerSessionClientSecret)
// Set `allowsDelayedPaymentMethods` to true if your business handles
// delayed notification payment methods like US bank accounts.
configuration.allowsDelayedPaymentMethods = true
DispatchQueue.main.async {
self.paymentSheet = PaymentSheet(paymentIntentClientSecret:paymentIntentClientSecret, configuration: configuration)
}
})
task.resume()
}
}
struct CheckoutView: View {
@ObservedObject var model = CheckoutViewModel()
var body: some View {
VStack {
if model.paymentSheet != nil {
Text("Ready to pay.")
} else {
Text("Loading…")
}
}.onAppear { model.preparePaymentSheet() }
}
}
```
Agrega un [PaymentSheet.PaymentButton](https://stripe.dev/stripe-ios/stripe-paymentsheet/Classes/PaymentSheet/PaymentButton.html) a tu `View`. Esto se comporta de manera similar a un `Button` de SwiftUI, que te permite personalizarlo agregando una `View`. Cuando tocas el botón, se muestra la PaymentSheet. Después de completar el pago, Stripe cierra la PaymentSheet y llama al controlador `onCompletion` con un objeto [PaymentSheetResult](https://stripe.dev/stripe-ios/stripe-paymentsheet/Enums/PaymentSheetResult.html).
```swift
@_spi(CustomerSessionBetaAccess) import StripePaymentSheet
import SwiftUI
class CheckoutViewModel: ObservableObject {
let backendCheckoutUrl = URL(string: "Your back-end endpoint/payment-sheet")! // Your back-end endpoint
@Published var paymentSheet: PaymentSheet?
@Published var paymentResult: PaymentSheetResult?
func preparePaymentSheet() {
// MARK: Fetch the PaymentIntent and customer information from the back end
var request = URLRequest(url: backendCheckoutUrl)
request.httpMethod = "POST"
let task = URLSession.shared.dataTask(with: request, completionHandler: { [weak self] (data, response, error) in
guard let data = data,
let json = try? JSONSerialization.jsonObject(with: data, options: []) as? [String : Any],
let customerAccountId = json["customerAccount"] as? String,
let customerSessionClientSecret = json["customerSessionClientSecret"] as? String,
let paymentIntentClientSecret = json["paymentIntent"] as? String,
let publishableKey = json["publishableKey"] as? String,
let self = self else {
// Handle error
return
}
STPAPIClient.shared.publishableKey = publishableKey
STPAPIClient.shared.stripeAccount = ""{{CONNECTED_ACCOUNT_ID}}""
// MARK: Create a PaymentSheet instance
var configuration = PaymentSheet.Configuration()
configuration.merchantDisplayName = "Example, Inc."
configuration.customerAccount = .init(id: customerAccountId, customerSessionClientSecret: customerSessionClientSecret)
// Set `allowsDelayedPaymentMethods` to true if your business can handle payment methods
// that complete payment after a delay, like SEPA Debit and Sofort.
configuration.allowsDelayedPaymentMethods = true
DispatchQueue.main.async {
self.paymentSheet = PaymentSheet(paymentIntentClientSecret: paymentIntentClientSecret, configuration: configuration)
}
})
task.resume()
}
func onPaymentCompletion(result: PaymentSheetResult) {
self.paymentResult = result
}
}
struct CheckoutView: View {
@ObservedObject var model = CheckoutViewModel()
var body: some View {
VStack {if let paymentSheet = model.paymentSheet {
PaymentSheet.PaymentButton(
paymentSheet: paymentSheet,
onCompletion: model.onPaymentCompletion
) {
Text("Buy")
}
} else {
Text("Loading…")
}if let result = model.paymentResult {
switch result {
case .completed:
Text("Payment complete")
case .failed(let error):
Text("Payment failed: \(error.localizedDescription)")
case .canceled:
Text("Payment canceled.")
}
}
}.onAppear { model.preparePaymentSheet() }
}
}
```
#### Customers v1
Crea un modelo `ObservableObject` para tu pantalla de confirmación de compra. Este modelo publica una [PaymentSheet](https://stripe.dev/stripe-ios/stripe-paymentsheet/Classes/PaymentSheet.html) y un [PaymentSheetResult](https://stripe.dev/stripe-ios/stripe-paymentsheet/Enums/PaymentSheetResult.html).
```swift
import StripePaymentSheet
import SwiftUI
class CheckoutViewModel: ObservableObject {
let backendCheckoutUrl = URL(string: "Your back-end endpoint/payment-sheet")! // Your back-end endpoint
@Published var paymentSheet: PaymentSheet?
@Published var paymentResult: PaymentSheetResult?
}
```
Obtén el secreto de cliente PaymentIntent, el secreto de cliente CustomerSession, el ID del `cliente` y la clave publicable del punto de conexión que creaste en el paso anterior. Usa `STPAPIClient.shared` para establecer tu clave publicable e iniciar la [PaymentSheet](https://stripe.dev/stripe-ios/stripe-paymentsheet/Classes/PaymentSheet.html).
Luego, establece `STPAPIClient.shared.stripeAccount` en el ID de cuenta conectada.
```swift
@_spi(CustomerSessionBetaAccess) import StripePaymentSheet
import SwiftUI
class CheckoutViewModel: ObservableObject {
let backendCheckoutUrl = URL(string: "Your back-end endpoint/payment-sheet")! // Your back-end endpoint
@Published var paymentSheet: PaymentSheet?
@Published var paymentResult: PaymentSheetResult?
func preparePaymentSheet() {
// MARK: Fetch thePaymentIntent and Customer information from the back end
var request = URLRequest(url: backendCheckoutUrl)
request.httpMethod = "POST"
let task = URLSession.shared.dataTask(with: request, completionHandler: { [weak self] (data, response, error) in
guard let data = data,
let json = try? JSONSerialization.jsonObject(with: data, options: []) as? [String : Any],
let customerId = json["customer"] as? String,
let customerSessionClientSecret = json["customerSessionClientSecret"] as? String,
letpaymentIntentClientSecret = json["paymentIntent"] as? String,
let publishableKey = json["publishableKey"] as? String,
let self = self else {
// Handle error
return
}
STPAPIClient.shared.publishableKey = publishableKeySTPAPIClient.shared.stripeAccount = ""{{CONNECTED_ACCOUNT_ID}}""// MARK: Create a PaymentSheet instance
var configuration = PaymentSheet.Configuration()
configuration.merchantDisplayName = "Example, Inc."
configuration.customer = .init(id: customerId, customerSessionClientSecret: customerSessionClientSecret)
// Set `allowsDelayedPaymentMethods` to true if your business handles
// delayed notification payment methods like US bank accounts.
configuration.allowsDelayedPaymentMethods = true
DispatchQueue.main.async {
self.paymentSheet = PaymentSheet(paymentIntentClientSecret:paymentIntentClientSecret, configuration: configuration)
}
})
task.resume()
}
}
struct CheckoutView: View {
@ObservedObject var model = CheckoutViewModel()
var body: some View {
VStack {
if model.paymentSheet != nil {
Text("Ready to pay.")
} else {
Text("Loading…")
}
}.onAppear { model.preparePaymentSheet() }
}
}
```
Agrega un [PaymentSheet.PaymentButton](https://stripe.dev/stripe-ios/stripe-paymentsheet/Classes/PaymentSheet/PaymentButton.html) a tu `View`. Esto se comporta de manera similar a un `Button` de SwiftUI, que te permite personalizarlo agregando una `View`. Cuando tocas el botón, se muestra la PaymentSheet. Después de completar el pago, Stripe cierra la PaymentSheet y llama al controlador `onCompletion` con un objeto [PaymentSheetResult](https://stripe.dev/stripe-ios/stripe-paymentsheet/Enums/PaymentSheetResult.html).
```swift
@_spi(CustomerSessionBetaAccess) import StripePaymentSheet
import SwiftUI
class CheckoutViewModel: ObservableObject {
let backendCheckoutUrl = URL(string: "Your back-end endpoint/payment-sheet")! // Your back-end endpoint
@Published var paymentSheet: PaymentSheet?
@Published var paymentResult: PaymentSheetResult?
func preparePaymentSheet() {
// MARK: Fetch the PaymentIntent and Customer information from the back end
var request = URLRequest(url: backendCheckoutUrl)
request.httpMethod = "POST"
let task = URLSession.shared.dataTask(with: request, completionHandler: { [weak self] (data, response, error) in
guard let data = data,
let json = try? JSONSerialization.jsonObject(with: data, options: []) as? [String : Any],
let customerId = json["customer"] as? String,
let customerSessionClientSecret = json["customerSessionClientSecret"] as? String,
let paymentIntentClientSecret = json["paymentIntent"] as? String,
let publishableKey = json["publishableKey"] as? String,
let self = self else {
// Handle error
return
}
STPAPIClient.shared.publishableKey = publishableKey
STPAPIClient.shared.stripeAccount = ""{{CONNECTED_ACCOUNT_ID}}""
// MARK: Create a PaymentSheet instance
var configuration = PaymentSheet.Configuration()
configuration.merchantDisplayName = "Example, Inc."
configuration.customer = .init(id: customerId, customerSessionClientSecret: customerSessionClientSecret)
// Set `allowsDelayedPaymentMethods` to true if your business can handle payment methods
// that complete payment after a delay, like SEPA Debit and Sofort.
configuration.allowsDelayedPaymentMethods = true
DispatchQueue.main.async {
self.paymentSheet = PaymentSheet(paymentIntentClientSecret: paymentIntentClientSecret, configuration: configuration)
}
})
task.resume()
}
func onPaymentCompletion(result: PaymentSheetResult) {
self.paymentResult = result
}
}
struct CheckoutView: View {
@ObservedObject var model = CheckoutViewModel()
var body: some View {
VStack {if let paymentSheet = model.paymentSheet {
PaymentSheet.PaymentButton(
paymentSheet: paymentSheet,
onCompletion: model.onPaymentCompletion
) {
Text("Buy")
}
} else {
Text("Loading…")
}if let result = model.paymentResult {
switch result {
case .completed:
Text("Payment complete")
case .failed(let error):
Text("Payment failed: \(error.localizedDescription)")
case .canceled:
Text("Payment canceled.")
}
}
}.onAppear { model.preparePaymentSheet() }
}
}
```
Si el `PaymentSheetResult` es `.completed`, infórmale al cliente (por ejemplo, mostrándole una pantalla de confirmación del pedido).
Establecer `allowsDelayedPaymentMethods` en true permite aceptar métodos de pago de [notificación diferida](https://docs.stripe.com/payments/payment-methods.md#payment-notification) como cuentas bancarias en EE. UU. Para estos métodos de pago, el estado final del pago no se conoce cuando se completa el `PaymentSheet`, sino que se efectúa con éxito o falla más tarde. Si aceptas este tipo de métodos de pago, infórmale al cliente que su pedido está confirmado y solo finalízalo (por ejemplo, envía el producto) cuando el pago se realice correctamente.
## Configurar una URL de retorno [Lado del cliente]
El cliente puede salir de tu aplicación para autenticarse (por ejemplo, en Safari o en su aplicación bancaria). Para permitirles que regresen automáticamente a tu aplicación después de autenticarse, [configura un esquema de URL personalizado](https://developer.apple.com/documentation/xcode/defining-a-custom-url-scheme-for-your-app) y define el delegado de la aplicación para que envíe la URL al SDK. Stripe no admite [enlaces universales](https://developer.apple.com/documentation/xcode/allowing-apps-and-websites-to-link-to-your-content).
#### SceneDelegate
#### Swift
```swift
// This method handles opening custom URL schemes (for example, "your-app://stripe-redirect")
func scene(_ scene: UIScene, openURLContexts URLContexts: Set) {
guard let url = URLContexts.first?.url else {
return
}
let stripeHandled = StripeAPI.handleURLCallback(with: url)
if (!stripeHandled) {
// This was not a Stripe url – handle the URL normally as you would
}
}
```
#### AppDelegate
#### Swift
```swift
// This method handles opening custom URL schemes (for example, "your-app://stripe-redirect")
func application(_ app: UIApplication, open url: URL, options: [UIApplication.OpenURLOptionsKey: Any] = [:]) -> Bool {
let stripeHandled = StripeAPI.handleURLCallback(with: url)
if (stripeHandled) {
return true
} else {
// This was not a Stripe url – handle the URL normally as you would
}
return false
}
```
#### SwiftUI
#### Swift
```swift
@main
struct MyApp: App {
var body: some Scene {
WindowGroup {
Text("Hello, world!").onOpenURL { incomingURL in
let stripeHandled = StripeAPI.handleURLCallback(with: incomingURL)
if (!stripeHandled) {
// This was not a Stripe url – handle the URL normally as you would
}
}
}
}
}
```
## Administrar eventos posteriores al pago [Lado del servidor]
Stripe envía un evento [payment_intent.succeeded](https://docs.stripe.com/api/events/types.md#event_types-payment_intent.succeeded) cuando se completa el pago. Usa la [herramienta de webhook del Dashboard](https://dashboard.stripe.com/webhooks) o sigue la [guía de webhooks](https://docs.stripe.com/webhooks/quickstart.md) para recibir estos eventos y ejecutar acciones como, por ejemplo, enviar un correo electrónico de confirmación del pedido a tu cliente, registrar la venta en una base de datos o iniciar un flujo de envío.
Escucha estos eventos en lugar de esperar una devolución de llamada del cliente. De su lado, el cliente puede cerrar la ventana del navegador o salir de la aplicación antes de que se ejecute la devolución de llamada, y clientes malintencionados podrían manipular la respuesta. Si configuras tu integración para escuchar eventos asincrónicos, podrás aceptar [diferentes tipos de métodos de pago](https://stripe.com/payments/payment-methods-guide) con una sola integración.
Además de administrar el evento `payment_intent.succeeded`, recomendamos administrar estos otros eventos si se cobran pagos con el Payment Element:
| Evento | Descripción | Acción |
| ------------------------------------------------------------------------------------------------------------------------------- | -------------------------------------------------------------------------------------------------------------------------------------------------------------------------------------------------------------------------------------------------------------- | ---------------------------------------------------------------------------------------------------------------------------------------------------------------------------------------------------- |
| [payment_intent.succeeded](https://docs.stripe.com/api/events/types.md?lang=php#event_types-payment_intent.succeeded) | Se envía cuando un cliente completa correctamente un pago. | Envía al cliente una confirmación del pedido y *completa* (Fulfillment is the process of providing the goods or services purchased by a customer, typically after payment is collected) el pedido. |
| [payment_intent.processing](https://docs.stripe.com/api/events/types.md?lang=php#event_types-payment_intent.processing) | Se envía cuando un cliente inicia con éxito un pago, pero éste aún no se completó. Este evento se envía normalmente cuando el cliente inicia un débito bancario. Le sigue un evento `payment_intent.succeeded` o `payment_intent.payment_failed` en el futuro. | Envía al cliente una confirmación del pedido que indique que el pago está pendiente. En caso de productos digitales, quizá te convenga completar el pedido antes de esperar que se complete el pago. |
| [payment_intent.payment_failed](https://docs.stripe.com/api/events/types.md?lang=php#event_types-payment_intent.payment_failed) | Enviado cuando un cliente intenta un pago, pero el pago falla. | Si un pago pasa de `processing` a `payment_failed`, ofrécele al cliente otro intento de pago. |
## Probar la integración
#### Tarjetas
| Número de tarjeta | Escenario | Cómo hacer la prueba |
| ------------------- | ----------------------------------------------------------------------------------------------------------------------------------------------------------------------------------------------------------------------------------------------------------------------------------------------- | -------------------------------------------------------------------------------------------------------------------------------------- |
| 4242424242424242 | El pago con tarjeta se efectúa correctamente y no requiere autenticación. | Completa el formulario de tarjeta de crédito con el número de tarjeta de crédito y la fecha de vencimiento, el CVC o el código postal. |
| 4000002500003155 | El pago con tarjeta requiere *autenticación* (Strong Customer Authentication (SCA) is a regulatory requirement in effect as of September 14, 2019, that impacts many European online payments. It requires customers to use two-factor authentication like 3D Secure to verify their purchase). | Completa el formulario de tarjeta de crédito con el número de tarjeta de crédito y la fecha de vencimiento, el CVC o el código postal. |
| 4000000000009995 | La tarjeta es rechazada con un código de rechazo `insufficient_funds`. | Completa el formulario de tarjeta de crédito con el número de tarjeta de crédito y la fecha de vencimiento, el CVC o el código postal. |
| 6205500000000000004 | La tarjeta UnionPay puede tener entre 13 y 19 dígitos. | Completa el formulario de tarjeta de crédito con el número de tarjeta de crédito y la fecha de vencimiento, el CVC o el código postal. |
#### Redireccionamientos bancarios
| Método de pago | Escenario | Cómo hacer la prueba |
| ----------------- | -------------------------------------------------------------------------------------------------------------------------------------------------------------------------------------------------------------------- | ------------------------------------------------------------------------------------------------------------------------------------------------------------------------------------------------------ |
| Bancontact, iDEAL | Tu cliente no pasa la autenticación en la página de redireccionamiento de un método de pago basado en redireccionamiento y con notificación inmediata. | Elige cualquier método de pago basado en redireccionamiento, completa los datos solicitados y confirma el pago. Luego, haz click en **Error en el pago de prueba** en la página de redireccionamiento. |
| Pay by Bank | Tu cliente paga satisfactoriamente con un método de pago basado en redireccionamiento y con [notificación diferida](https://docs.stripe.com/payments/payment-methods.md#payment-notification). | Elige el método de pago, completa los datos solicitados y confirma el pago. Luego, haz click en **Completar el pago de prueba** en la página de redireccionamiento. |
| Pay by Bank | Tu cliente no pasa la autenticación en la página de redireccionamiento de un método de pago basado en redireccionamiento y con notificación diferida. | Elige el método de pago, completa los datos solicitados y confirma el pago. Luego, haz click en **Error en el pago de prueba** en la página de redireccionamiento. |
| BLIK | Los pagos BLIK generan errores de varias maneras: errores inmediatos (por ejemplo, el código venció o no es válido), errores demorados (el banco lo rechaza) o tiempos de espera (el cliente no respondió a tiempo). | Usa patrones de correo electrónico para [simular los diferentes errores.](https://docs.stripe.com/payments/blik/accept-a-payment.md#simulate-failures) |
#### Débitos bancarios
| Método de pago | Escenario | Cómo hacer la prueba |
| ------------------- | --------------------------------------------------------------------------------------------- | -------------------------------------------------------------------------------------------------------------------------------------------------------------------------------------- |
| Débito directo SEPA | Tu cliente paga satisfactoriamente con débito directo SEPA. | Completa el formulario con el número de cuenta `AT321904300235473204`. El PaymentIntent confirmado pasa inicialmente al estado “en proceso” y, tres minutos más tarde, a “completado”. |
| Débito directo SEPA | El estado del intento de pago de tu cliente pasa de `processing` a `requires_payment_method`. | Completa el formulario con el número de cuenta `AT861904300235473202`. |
Consulta [Pruebas](https://docs.stripe.com/testing.md) para obtener información adicional para probar tu integración.
## Habilitar escaneo de tarjeta
A fin de habilitar el soporte para escaneo de tarjetas para iOS, establece `NSCameraUsageDescription` (**Privacidad: descripción del uso de la cámara**) en el `Info.plist` de tu aplicación y especifica el motivo por el que se necesita acceder a la cámara (por ejemplo, «Para escanear tarjetas»).
## Optional: Habilitar Apple Pay
> Si tu pantalla de confirmación de compra tiene un **botón de Apple Pay** exclusivo, sigue la [Guía de Apple Pay](https://docs.stripe.com/apple-pay.md#present-payment-sheet) y utiliza `ApplePayContext` para cobrar el pago desde ese botón. Puedes usar `PaymentSheet` para gestionar otros tipos de métodos de pago.
### Inscribirse para obtener un ID de comerciante Apple
Obtén un ID de comerciante Apple [solicitando un nuevo identificador](https://developer.apple.com/account/resources/identifiers/add/merchant) en el sitio web de desarrolladores de Apple.
Completa el formulario con una descripción y el identificador. La descripción es para tus registros y se puede modificar en el futuro. Stripe recomienda usar el nombre de tu aplicación como identificador (por ejemplo, `merchant.com.{{YOUR_APP_NAME}}`).
### Crear un nuevo certificado de Apple Pay
Crea un certificado para que tu aplicación cifre los datos de pago.
Ve a [Configuración de certificados de iOS](https://dashboard.stripe.com/settings/ios_certificates) en el Dashboard, haz clic en **Agregar nueva aplicación** y sigue la guía.
Descarga un archivo de solicitud de firma de certificado (CSR) para obtener un certificado seguro de Apple que te permita utilizar Apple Pay.
Se debe usar un archivo CSR para emitir exactamente un certificado. Si cambias tu ID de comerciante de Apple, debes ir a la [Configuración de certificados de iOS](https://dashboard.stripe.com/settings/ios_certificates) en el Dashboard para obtener una nueva CSR y un nuevo certificado.
### Integrarse con Xcode
Agrega la funcionalidad Apple Pay a tu aplicación. En Xcode, abre la configuración del proyecto, selecciona la pestaña **Firma y funcionalidades** y agrega la funcionalidad **Apple Pay**. En este paso, quizá se te solicite iniciar sesión en tu cuenta de desarrollador. Selecciona el ID de comerciante que creaste antes, y tu aplicación estará lista para aceptar Apple Pay.
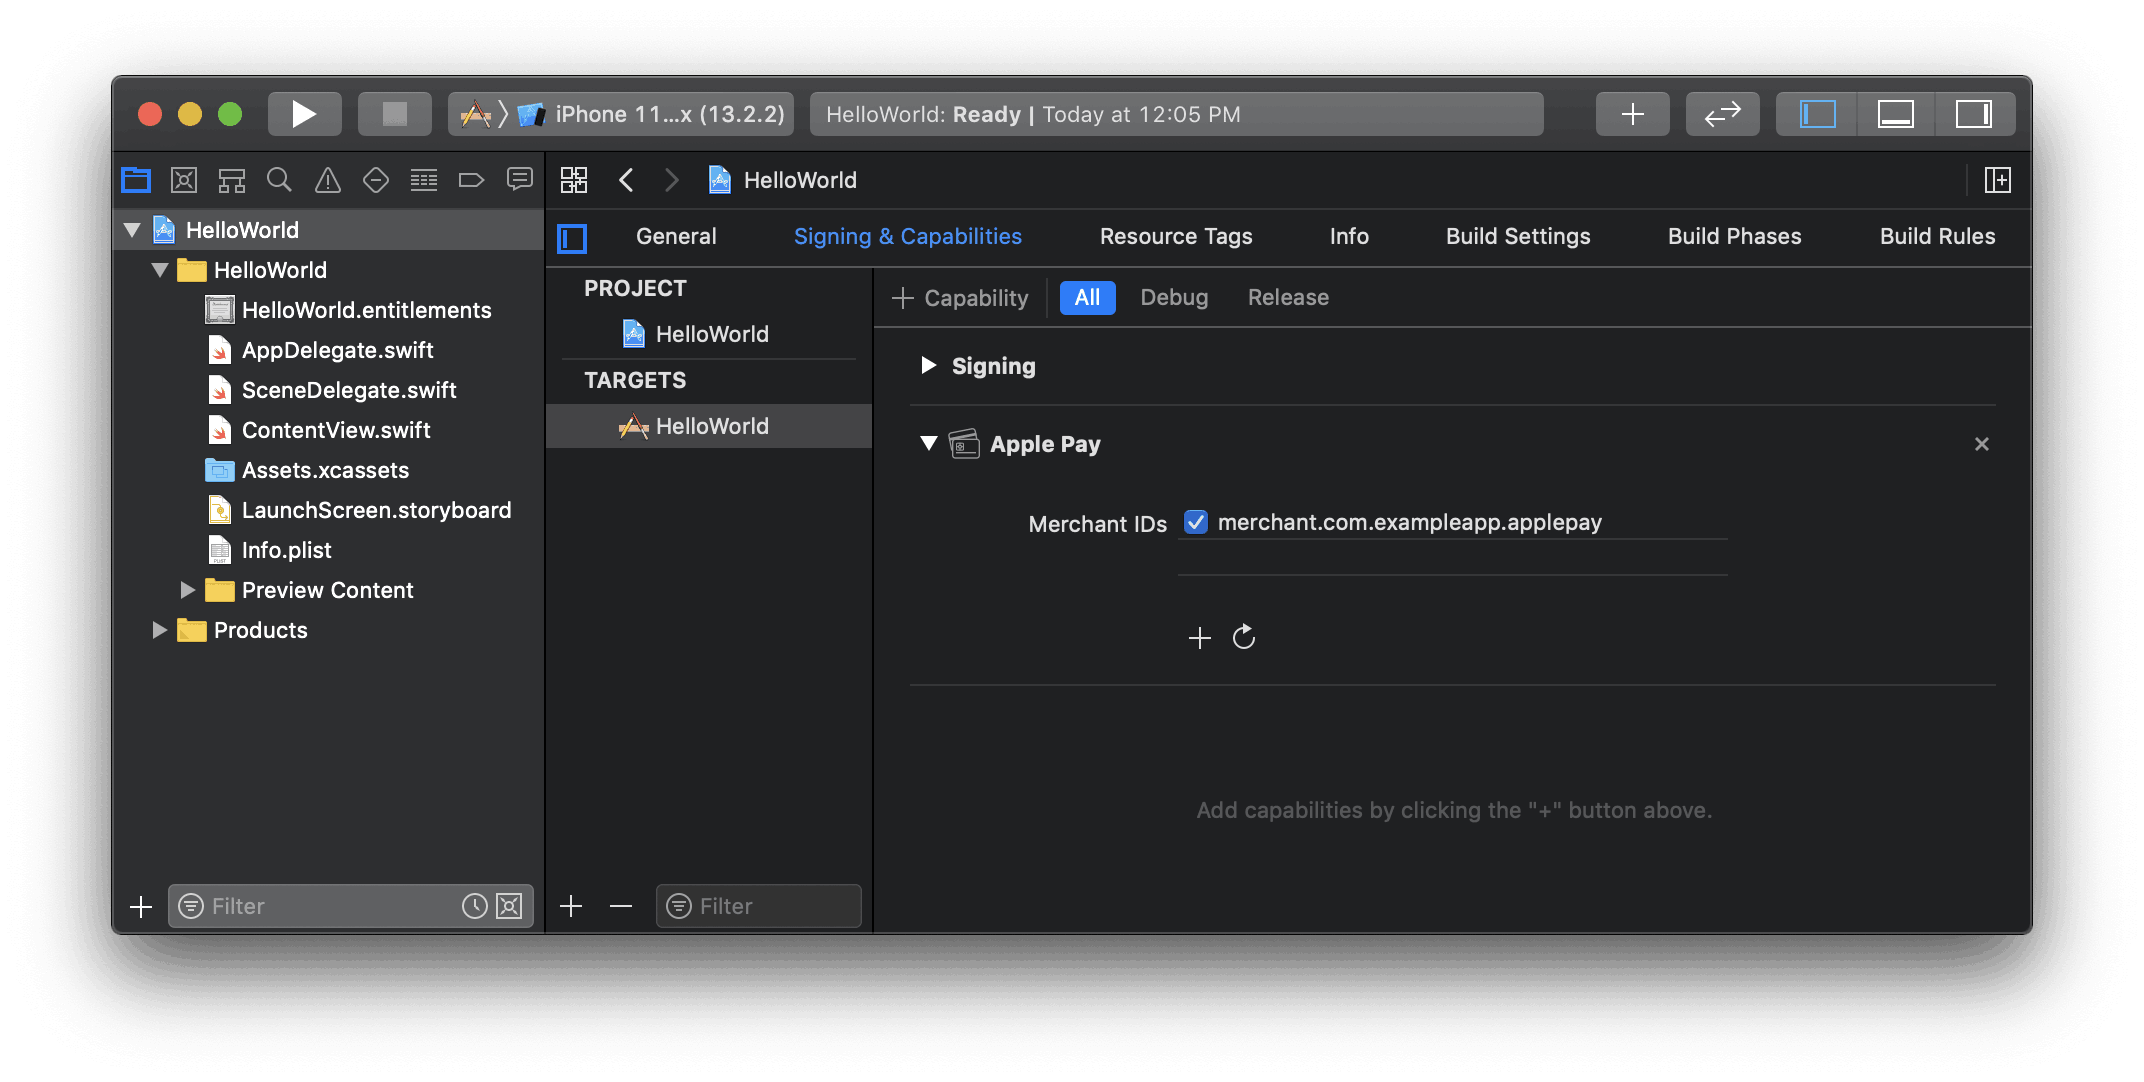
Habilitar la funcionalidad Apple Pay en Xcode
### Agregar Apple Pay
#### Pago único
Para agregar Apple Pay a PaymentSheet, establece [applePay](https://stripe.dev/stripe-ios/stripe-paymentsheet/Classes/PaymentSheet/Configuration.html#/s:6Stripe12PaymentSheetC13ConfigurationV8applePayAC05ApplefD0VSgvp) después de inicializar `PaymentSheet.Configuration` con tu ID de comerciante Apple y el [código de país de tu empresa](https://dashboard.stripe.com/settings/account).
#### iOS (Swift)
```swift
var configuration = PaymentSheet.Configuration()
configuration.applePay = .init(
merchantId: "merchant.com.your_app_name",
merchantCountryCode: "US"
)
```
#### Pagos recurrentes
Para agregar Apple Pay a PaymentSheet, establece [applePay](https://stripe.dev/stripe-ios/stripe-paymentsheet/Classes/PaymentSheet/Configuration.html#/s:6Stripe12PaymentSheetC13ConfigurationV8applePayAC05ApplefD0VSgvp) después de inicializar `PaymentSheet.Configuration` con tu ID de comerciante Apple y el [código de país de tu empresa](https://dashboard.stripe.com/settings/account).
Conforme a las [directrices de Apple](https://developer.apple.com/design/human-interface-guidelines/apple-pay#Supporting-subscriptions) para pagos recurrentes, también debes establecer otros atributos en `PKPaymentRequest`. Agrega un controlador en [ApplePayConfiguration.paymentRequestHandlers](https://stripe.dev/stripe-ios/stripepaymentsheet/documentation/stripepaymentsheet/paymentsheet/applepayconfiguration/handlers/paymentrequesthandler) para configurar [PKPaymentRequest.paymentSummaryItems](https://developer.apple.com/documentation/passkit/pkpaymentrequest/1619231-paymentsummaryitems) con la cantidad que pretendes cobrar (por ejemplo, USD 9.95 al mes).
También puedes adoptar [tokens de comerciante](https://developer.apple.com/apple-pay/merchant-tokens/) estableciendo las propiedades `recurringPaymentRequest` o `automaticReloadPaymentRequest` en la `PKPaymentRequest`.
Para obtener más información sobre cómo usar los pagos recurrentes con Apple Pay, consulta la [Documentación de Apple sobre PassKit](https://developer.apple.com/documentation/passkit/pkpaymentrequest).
#### iOS (Swift)
```swift
let customHandlers = PaymentSheet.ApplePayConfiguration.Handlers(
paymentRequestHandler: { request in
// PKRecurringPaymentSummaryItem is available on iOS 15 or later
if #available(iOS 15.0, *) {
let billing = PKRecurringPaymentSummaryItem(label: "My Subscription", amount: NSDecimalNumber(string: "59.99"))
// Payment starts today
billing.startDate = Date()
// Payment ends in one year
billing.endDate = Date().addingTimeInterval(60 * 60 * 24 * 365)
// Pay once a month.
billing.intervalUnit = .month
billing.intervalCount = 1
// recurringPaymentRequest is only available on iOS 16 or later
if #available(iOS 16.0, *) {
request.recurringPaymentRequest = PKRecurringPaymentRequest(paymentDescription: "Recurring",
regularBilling: billing,
managementURL: URL(string: "https://my-backend.example.com/customer-portal")!)
request.recurringPaymentRequest?.billingAgreement = "You'll be billed $59.99 every month for the next 12 months. To cancel at any time, go to Account and click 'Cancel Membership.'"
}
request.paymentSummaryItems = [billing]
request.currencyCode = "USD"
} else {
// On older iOS versions, set alternative summary items.
request.paymentSummaryItems = [PKPaymentSummaryItem(label: "Monthly plan starting July 1, 2022", amount: NSDecimalNumber(string: "59.99"), type: .final)]
}
return request
}
)
var configuration = PaymentSheet.Configuration()
configuration.applePay = .init(merchantId: "merchant.com.your_app_name",
merchantCountryCode: "US",
customHandlers: customHandlers)
```
### Seguimiento de pedidos
Para agregar información de [seguimiento de pedidos](https://developer.apple.com/design/human-interface-guidelines/technologies/wallet/designing-order-tracking) en iOS 16 o posterior, configura un [authorizationResultHandler](https://stripe.dev/stripe-ios/stripepaymentsheet/documentation/stripepaymentsheet/paymentsheet/applepayconfiguration/handlers/authorizationresulthandler) en tu `PaymentSheet.ApplePayConfiguration.Handlers`. Stripe llamará a tu implementación después de que se efectivice el pago, pero antes de que iOS descarte la hoja de Apple Pay.
En tu implementación de `authorizationResultHandler`, obtén los datos del pedido de tu servidor para el pedido completado. Agrega los datos al [PKPaymentAuthorizationResult](https://developer.apple.com/documentation/passkit/pkpaymentauthorizationresult) proporcionado y devuelve el resultado modificado.
Para obtener más información sobre el seguimiento de pedidos, consulta la [Documentación sobre los pedidos por billetera de Apple](https://developer.apple.com/documentation/walletorders).
#### iOS (Swift)
```swift
let customHandlers = PaymentSheet.ApplePayConfiguration.Handlers(
authorizationResultHandler: { result in
do {
// Fetch the order details from your service
let myOrderDetails = try await MyAPIClient.shared.fetchOrderDetails(orderID: orderID)
result.orderDetails = PKPaymentOrderDetails(
orderTypeIdentifier: myOrderDetails.orderTypeIdentifier, // "com.myapp.order"
orderIdentifier: myOrderDetails.orderIdentifier, // "ABC123-AAAA-1111"
webServiceURL: myOrderDetails.webServiceURL, // "https://my-backend.example.com/apple-order-tracking-backend"
authenticationToken: myOrderDetails.authenticationToken) // "abc123"
// Return your modified PKPaymentAuthorizationResult
return result
} catch {
return PKPaymentAuthorizationResult(status: .failure, errors: [error])
}
}
)
var configuration = PaymentSheet.Configuration()
configuration.applePay = .init(merchantId: "merchant.com.your_app_name",
merchantCountryCode: "US",
customHandlers: customHandlers)
```
## Optional: Personalizar la hoja
Todo lo que se quiera personalizar se configura usando el objeto [PaymentSheet.Configuration](https://stripe.dev/stripe-ios/stripe-paymentsheet/Classes/PaymentSheet/Configuration.html).
### Appearance
Personaliza los colores y las fuentes, entre otros elementos, para que combinen con tu aplicación con la [API Appearance](https://docs.stripe.com/elements/appearance-api/mobile.md?platform=ios).
### Diseño del método de pago
Configura el diseño de los métodos de pago en la hoja usando [paymentMethodLayout](https://stripe.dev/stripe-ios/stripepaymentsheet/documentation/stripepaymentsheet/paymentsheet/configuration-swift.struct/paymentmethodlayout). Puedes mostrarlos horizontalmente, verticalmente o dejar que Stripe optimice el diseño de manera automática.

#### Swift
```swift
var configuration = PaymentSheet.Configuration()
configuration.paymentMethodLayout = .automatic
```
### Recopilar las direcciones de los usuarios
Recopila las direcciones de envío o facturación locales e internacionales de tus clientes usando el [Address Element](https://docs.stripe.com/elements/address-element.md?platform=ios).
### Nombre de pantalla para el comerciante
Especifica un nombre de empresa que vea el cliente configurando [merchantDisplayName](https://stripe.dev/stripe-ios/stripe-paymentsheet/Classes/PaymentSheet/Configuration.html#/s:18StripePaymentSheet0bC0C13ConfigurationV19merchantDisplayNameSSvp). De manera predeterminada, este es el nombre de tu aplicación.
#### Swift
```swift
var configuration = PaymentSheet.Configuration()
configuration.merchantDisplayName = "My app, Inc."
```
### Modo oscuro
`PaymentSheet` se adapta automáticamente a la configuración de aspecto de todo el sistema del usuario (modo claro y modo oscuro). Si tu aplicación no admite el modo oscuro, puedes definir el [estilo](https://stripe.dev/stripe-ios/stripe-paymentsheet/Classes/PaymentSheet/Configuration.html#/s:18StripePaymentSheet0bC0C13ConfigurationV5styleAC18UserInterfaceStyleOvp) en modo `alwaysLight` o `alwaysDark`.
```swift
var configuration = PaymentSheet.Configuration()
configuration.style = .alwaysLight
```
### Datos de facturación predeterminados
Para establecer los valores predeterminados para los datos de facturación recopilados en la hoja de pago, configura la propiedad `defaultBillingDetails`. Los campos de la `PaymentSheet` se rellenan automáticamente con los valores que proporcionas.
```swift
var configuration = PaymentSheet.Configuration()
configuration.defaultBillingDetails.address.country = "US"
configuration.defaultBillingDetails.email = "foo@bar.com"
```
### Recopilación de los datos de facturación
Usa `billingDetailsCollectionConfiguration` para especificar cómo deseas recopilar los datos de facturación en la hoja de pago.
Puedes recopilar el nombre, el correo electrónico, el número de teléfono y la dirección del cliente.
Si solo quieres los datos de facturación requeridos por el método de pago, establece `billingDetailsCollectionConfiguration.attachDefaultsToPaymentMethod` en true. En ese caso, `PaymentSheet.Configuration.defaultBillingDetails` se establece como los [datos de facturación](https://docs.stripe.com/api/payment_methods/object.md?lang=node#payment_method_object-billing_details) del método de pago.
Si quieres recopilar datos de facturación adicionales que no son necesariamente requeridos por el método de pago, establece `billingDetailsCollectionConfiguration.attachDefaultsToPaymentMethod` en false. En ese caso, los datos de facturación recopilados mediante la `PaymentSheet` se establecen como los datos de facturación del método de pago.
```swift
var configuration = PaymentSheet.Configuration()
configuration.defaultBillingDetails.email = "foo@bar.com"
configuration.billingDetailsCollectionConfiguration.name = .always
configuration.billingDetailsCollectionConfiguration.email = .never
configuration.billingDetailsCollectionConfiguration.address = .full
configuration.billingDetailsCollectionConfiguration.attachDefaultsToPaymentMethod = true
```
> Pregúntale a tu asesor legal sobre las leyes que se aplican a la recopilación de información. Solicita los números de teléfono solo si los necesitas para la transacción.
## Optional: Completa el pago en tu interfaz de usuario
Puedes presentar la hoja de pago para recopilar solo los datos del método de pago y luego llamar al método `confirm` para completar el pago en la interfaz de usuario de tu aplicación. Esto resulta útil si tienes un botón de compra personalizado o solicitas pasos adicionales después de recopilar los datos del pago.

Completa el pago en la interfaz de usuario de tu aplicación
#### UIKit
Los siguientes pasos te explican cómo completar el pago en la interfaz de usuario de tu aplicación. Consulta nuestro ejemplo de integración en [GitHub](https://github.com/stripe/stripe-ios/blob/master/Example/PaymentSheet%20Example/PaymentSheet%20Example/ExampleCustomCheckoutViewController.swift).
1. Primero, inicializa [PaymentSheet.FlowController](https://stripe.dev/stripe-ios/stripepaymentsheet/documentation/stripepaymentsheet/paymentsheet/flowcontroller) en lugar de `PaymentSheet` y actualiza tu interfaz de usuario con su propiedad `paymentOption`. Esta propiedad contiene una imagen y una etiqueta que representan el método de pago predeterminado que el cliente seleccionó inicialmente.
```swift
PaymentSheet.FlowController.create(paymentIntentClientSecret: paymentIntentClientSecret, configuration: configuration) { [weak self] result in
switch result {
case .failure(let error):
print(error)
case .success(let paymentSheetFlowController):
self?.paymentSheetFlowController = paymentSheetFlowController
// Update your UI using paymentSheetFlowController.paymentOption
}
}
```
1. A continuación, llama a `presentPaymentOptions` para recopilar los datos del pago. Cuando se complete, actualiza nuevamente tu interfaz de usuario con la propiedad `paymentOption`.
```swift
paymentSheetFlowController.presentPaymentOptions(from: self) {
// Update your UI using paymentSheetFlowController.paymentOption
}
```
1. Por último, llama a `confirm`.
```swift
paymentSheetFlowController.confirm(from: self) { paymentResult in
// MARK: Handle the payment result
switch paymentResult {
case .completed:
print("Payment complete!")
case .canceled:
print("Canceled!")
case .failed(let error):
print(error)
}
}
```
#### SwiftUI
Los siguientes pasos te explican cómo completar el pago en la interfaz de usuario de tu aplicación. Consulta nuestro ejemplo de integración en [GitHub](https://github.com/stripe/stripe-ios/blob/master/Example/PaymentSheet%20Example/PaymentSheet%20Example/ExampleSwiftUICustomPaymentFlow.swift).
1. Primero, inicializa [PaymentSheet.FlowController](https://stripe.dev/stripe-ios/stripepaymentsheet/documentation/stripepaymentsheet/paymentsheet/flowcontroller) en lugar de `PaymentSheet`. Su propiedad `paymentOption` contiene una imagen y una etiqueta que representan el método de pago que el cliente tiene seleccionado actualmente, que puedes usar en tu interfaz de usuario.
```swift
PaymentSheet.FlowController.create(paymentIntentClientSecret: paymentIntentClientSecret, configuration: configuration) { [weak self] result in
switch result {
case .failure(let error):
print(error)
case .success(let paymentSheetFlowController):
self?.paymentSheetFlowController = paymentSheetFlowController
// Use the paymentSheetFlowController.paymentOption properties in your UI
myPaymentMethodLabel = paymentSheetFlowController.paymentOption?.label ?? "Select a payment method"
myPaymentMethodImage = paymentSheetFlowController.paymentOption?.image ?? UIImage(systemName: "square.and.pencil")!
}
}
```
1. Usa [PaymentSheet.FlowController.PaymentOptionsButton](https://stripe.dev/stripe-ios/stripepaymentsheet/documentation/stripepaymentsheet/paymentsheet/flowcontroller/paymentoptionsbutton) para integrar el botón que presenta la hoja para recopilar los datos de pago. Cuando `PaymentSheet.FlowController` llama al argumento `onSheetDismissed`, la `paymentOption` de la instancia `PaymentSheet.FlowController` refleja el método de pago seleccionado actualmente.
```swift
PaymentSheet.FlowController.PaymentOptionsButton(
paymentSheetFlowController: paymentSheetFlowController,
onSheetDismissed: {
myPaymentMethodLabel = paymentSheetFlowController.paymentOption?.label ?? "Select a payment method"
myPaymentMethodImage = paymentSheetFlowController.paymentOption?.image ?? UIImage(systemName: "square.and.pencil")!
},
content: {
/* An example button */
HStack {
Text(myPaymentMethodLabel)
Image(uiImage: myPaymentMethodImage)
}
}
)
```
1. Usa [PaymentSheet.FlowController.PaymentOptionsButton](https://stripe.dev/stripe-ios/stripepaymentsheet/documentation/stripepaymentsheet/paymentsheet/flowcontroller/paymentoptionsbutton) para integrar el botón que confirma el pago.
```swift
PaymentSheet.FlowController.ConfirmButton(
paymentSheetFlowController: paymentSheetFlowController,
onCompletion: { result in
// MARK: Handle the payment result
switch result {
case .completed:
print("Payment complete!")
case .canceled:
print("Canceled!")
case .failed(let error):
print(error)
}
},
content: {
/* An example button */
Text("Pay")
}
)
```
Si el `PaymentSheetResult` es `.completed`, infórmale al cliente (por ejemplo, mostrándole una pantalla de confirmación del pedido).
Establecer `allowsDelayedPaymentMethods` en true permite aceptar métodos de pago de [notificación diferida](https://docs.stripe.com/payments/payment-methods.md#payment-notification) como cuentas bancarias en EE. UU. Para estos métodos de pago, el estado final del pago no se conoce cuando se completa el `PaymentSheet`, sino que se efectúa con éxito o falla más tarde. Si aceptas este tipo de métodos de pago, infórmale al cliente que su pedido está confirmado y solo finalízalo (por ejemplo, envía el producto) cuando el pago se realice correctamente.
## Optional: Habilitar métodos de pago adicionales
Ve a [Administrar métodos de pago para cuentas conectadas](https://dashboard.stripe.com/settings/payment_methods/connected_accounts) en el Dashboard para configurar qué métodos de pago aceptan tus cuentas conectadas. Los cambios en la configuración predeterminada se aplican a todas las cuentas conectadas nuevas y existentes.
Consulta los siguientes recursos para obtener información sobre los métodos de pago:
- [Guía de métodos de pago](https://stripe.com/payments/payment-methods-guide#choosing-the-right-payment-methods-for-your-business) para ayudarte a elegir los métodos de pago correctos para tu plataforma.
- [Funcionalidades de cuenta](https://docs.stripe.com/connect/account-capabilities.md) para asegurarte de que los métodos de pago que elegiste funcionen en tus cuentas conectadas.
- Consulta las tablas de [admisibilidad de métodos de pago y de productos](https://docs.stripe.com/payments/payment-methods/payment-method-support.md#product-support) para asegurarte de que los métodos de pago elegidos funcionen para tus productos y flujos de pago de Stripe.
Para cada método de pago, puedes seleccionar una de las siguientes opciones desplegables:
| |
| |
| **Activado de manera predeterminada** | Tus cuentas conectadas aceptan este método de pago durante el proceso de compra. Algunos métodos de pago solo pueden estar desactivados o bloqueados. Esto se debe a que tus cuentas conectadas con *acceso al Dashboard de Stripe* (Platforms can provide connected accounts with access to the full Stripe Dashboard or the Express Dashboard. Otherwise, platforms build an interface for connected accounts using embedded components or the Stripe API) deben activarlas en su página de configuración. |
| **Desactivado de manera predeterminada** | Tus cuentas conectadas no aceptan este método de pago durante el proceso de compra. Si permites que tus cuentas conectadas con *acceso al Dashboard de Stripe* (Platforms can provide connected accounts with access to the full Stripe Dashboard or the Express Dashboard. Otherwise, platforms build an interface for connected accounts using embedded components or the Stripe API) administren sus propios métodos de pago, podrán activarlo. |
| **Bloqueado** | Tus cuentas conectadas no aceptan este método de pago durante el proceso de compra. Si permites que tus cuentas conectadas con *acceso al Dashboard de Stripe* (Platforms can provide connected accounts with access to the full Stripe Dashboard or the Express Dashboard. Otherwise, platforms build an interface for connected accounts using embedded components or the Stripe API) administren sus propios métodos de pago, no tendrán la opción para activarlo. |

Opciones de métodos de pago
Si realizas un cambio en un método de pago, debes hacer clic en **Revisar cambios** en la barra inferior de la pantalla y en **Guardar y aplicar** para actualizar tus cuentas conectadas.

Cuadro de diálogo Guardar
### Permite que las cuentas conectadas gestionen los métodos de pago
Stripe recomienda permitir que tus cuentas conectadas personalicen sus propios métodos de pago. Esta opción le permite a cada cuenta conectada con *acceso al Dashboard de Stripe* (Platforms can provide connected accounts with access to the full Stripe Dashboard or the Express Dashboard. Otherwise, platforms build an interface for connected accounts using embedded components or the Stripe API) ver y actualizar página [Métodos de pago](https://dashboard.stripe.com/settings/payment_methods). Solo los propietarios de las cuentas conectadas pueden personalizar sus métodos de pago. El Dashboard de Stripe muestra el conjunto de métodos de pago predeterminados que aplicaste a todas las cuentas conectadas nuevas y existentes. Tus cuentas conectadas pueden anular estos valores predeterminados, excluyendo los métodos de pago que hayas bloqueado.
Marca la casilla de verificación **Personalización de la cuenta** para habilitar esta opción. Debes hacer clic en **Revisar cambios** en la barra inferior de la pantalla y luego seleccionar **Guardar y aplicar** para actualizar esta configuración.

Casilla de verificación de personalización de la cuenta
### Capacidades de métodos de pago
Para permitir que tus cuentas conectadas acepten métodos de pago adicionales, sus `cuentas` deben tener funcionalidades de métodos de pago activos.
Si seleccionaste la opción “Activado por defecto” para un método de pago en [Gestionar métodos de pago para tus cuentas conectadas](https://dashboard.stripe.com/settings/payment_methods/connected_accounts), Stripe solicita automáticamente la funcionalidad necesaria para las cuentas conectadas nuevas y las existentes si cumplen con los requisitos de verificación. Si la cuenta conectada no cumple con los requisitos o si quieres tener control directo, puedes solicitar de forma manual la funcionalidad en el dashboard o con la API.
La mayoría de los métodos de pago tienen los mismos requisitos de verificación que la funcionalidad `card_payments`, con algunas restricciones y excepciones. En el [cuadro](https://docs.stripe.com/connect/account-capabilities.md#payment-methods) figuran las funcionalidades de métodos de pago que requieren verificación adicional.
#### Dashboard
[Busca una cuenta conectada](https://docs.stripe.com/connect/dashboard/managing-individual-accounts.md#finding-accounts) en el dashboard para editar sus funcionalidades y ver los requisitos de verificación pendientes.
#### API
Para una cuenta conectada existente, puedes [enumerar](https://docs.stripe.com/api/capabilities/list.md) sus funcionalidades existentes para determinar si necesitas solicitar funcionalidades adicionales.
```curl
curl https://api.stripe.com/v1/accounts/{{CONNECTEDACCOUNT_ID}}/capabilities \
-u "<>:"
```
Solicita funcionalidades adicionales [actualizando](https://docs.stripe.com/api/capabilities/update.md) las funcionalidades de cada cuenta conectada.
```curl
curl https://api.stripe.com/v1/accounts/{{CONNECTEDACCOUNT_ID}}/capabilities/us_bank_account_ach_payments \
-u "<>:" \
-d requested=true
```
Puede haber un retraso antes de que la capacidad solicitada se active. Si la capacidad tiene algún requisito de activación, la respuesta lo incluye en las matrices de `requirements`.
## Cobra comisiones
Como plataforma, puedes aceptar pagos en tus cuentas conectadas por una parte de cada transacción en forma de comisiones de solicitud. Puedes establecer las comisiones de la plataforma de las siguientes maneras:
- Utiliza la [herramienta de tarifas de la plataforma](https://docs.stripe.com/connect/platform-pricing-tools.md) para establecer y probar las reglas de tarifas. Esta función que no requiere programación del Dashboard de Stripe solo está disponible actualmente para plataformas responsables de pagar las comisiones de Stripe.
- Especifica las comisiones de la solicitud directamente en un [PaymentIntent](https://docs.stripe.com/api/payment_intents/object.md). Las comisiones establecidas con este método anulan la lógica de tarifas especificada en la herramienta de tarifas de la plataforma.
Tu plataforma puede cobrar una comisión de la plataforma con las siguientes limitaciones:
- El valor del importe de la comisión de la aplicación (`application_fee_amount`) debe ser positivo e inferior al importe del cargo. El importe del cargo es el tope de la comisión de la plataforma que se puede cobrar.
- No se aplican comisiones adicionales de Stripe a la comisión de la plataforma en sí.
- En concordancia con los requisitos reglamentarios y de cumplimiento normativo de Brasil, las plataformas establecidas fuera de Brasil con cuentas conectadas brasileñas no pueden cobrar comisiones de la plataforma a través de Stripe.
- La moneda de `application_fee_amount` depende de algunos factores de [varias monedas](https://docs.stripe.com/connect/currencies.md).
La [BalanceTransaction](https://docs.stripe.com/api.md#balance_transaction_retrieve) del cargo resultante incluye un desglose detallado de las comisiones tanto de Stripe como de la solicitud. Para ofrecer una mejor experiencia de elaboración de informes, el cobro de una comisión genera un objeto [ApplicationFee](https://docs.stripe.com/api/application_fees/object.md). Utiliza la propiedad `amount` del objeto `ApplicationFee` para la elaboración de informes.
Puedes ver las comisiones de solicitud en la sección [Comisiones cobradas](https://dashboard.stripe.com/connect/application_fees) del Dashboard.
> De manera predeterminada, las comisiones de la plataforma para cargos directos se crean de forma asincrónica. Si expandes el objeto `application_fee` en una solicitud de creación de cargo, la comisión de la plataforma se crea sincrónicamente como parte de esa solicitud. Solo expande el objeto `application_fee` si es necesario, ya que aumenta la latencia de la solicitud.
>
> Para recibir notificaciones de los objetos `ApplicationFee` creados de forma asincrónica, escucha el evento webhook [application_fee.created](https://docs.stripe.com/api/events/types.md#event_types-application_fee.created).

Integra la interfaz de usuario de pago prediseñada de Stripe a la confirmación de compra de tu aplicación Android con la clase [PaymentSheet](https://stripe.dev/stripe-android/paymentsheet/com.stripe.android.paymentsheet/-payment-sheet/index.html).
> #### Soporte de API Accounts v2
>
> Payment Sheet no ofrece soporte para *cuentas configuradas por el cliente*. Solo admite objetos `Customer`.
## Configura Stripe [Lado del servidor] [Lado del cliente]
Primero, necesitas una cuenta de Stripe. [Inscríbete ahora](https://dashboard.stripe.com/register).
### Lado del servidor
Esta integración necesita puntos de conexión en tu servidor que se comuniquen con la API de Stripe. Usa las bibliotecas oficiales para acceder a la API de Stripe desde tu servidor:
#### Ruby
```bash
# Available as a gem
sudo gem install stripe
```
```ruby
# If you use bundler, you can add this line to your Gemfile
gem 'stripe'
```
### Lado del cliente
El [SDK para Android de Stripe](https://github.com/stripe/stripe-android) es de código abierto y está [completamente documentado](https://stripe.dev/stripe-android/).
Para instalar el SDK, agrega `stripe-android` al bloque `dependencies` de tu archivo [app/build.gradle](https://developer.android.com/studio/build/dependencies):
#### Kotlin
```kotlin
plugins {
id("com.android.application")
}
android { ... }
dependencies {
// ...
// Stripe Android SDK
implementation("com.stripe:stripe-android:23.7.0")
// Include the financial connections SDK to support US bank account as a payment method
implementation("com.stripe:financial-connections:23.7.0")
}
```
> Para conocer detalles de la última versión y de versiones anteriores del SDK, consulta la página [Versiones](https://github.com/stripe/stripe-android/releases) en GitHub. Para recibir una notificación cuando se publique una nueva versión, [mira las versiones del repositorio](https://docs.github.com/en/github/managing-subscriptions-and-notifications-on-github/configuring-notifications#configuring-your-watch-settings-for-an-individual-repository).
Configura el SDK con tu [clave publicable](https://dashboard.stripe.com/apikeys) de Stripe para que pueda hacer solicitudes a la API de Stripe, así como en tu subclase `Application`:
#### Kotlin
```kotlin
import com.stripe.android.PaymentConfiguration
class MyApp : Application() {
override fun onCreate() {
super.onCreate()
PaymentConfiguration.init(
applicationContext,
"<>"
)
}
}
```
> Usa las [claves de prueba](https://docs.stripe.com/keys.md#obtain-api-keys) durante las pruebas y el desarrollo, y tus claves para [modo activo](https://docs.stripe.com/keys.md#test-live-modes) cuando publiques tu aplicación.
## Agregar un punto de conexión [Lado del servidor]
> #### Nota
>
> Para mostrar la PaymentSheet antes de crear un PaymentIntent, consulta [Recopila datos de pago antes de crear un Intent](https://docs.stripe.com/payments/accept-a-payment-deferred.md?type=payment).
Esta integración usa tres objetos de la API de Stripe:
1. [PaymentIntent](https://docs.stripe.com/api/payment_intents.md): Stripe lo utiliza para representar tu intención de cobrarle a un cliente, haciendo el seguimiento de los intentos de cobro y de los cambios en el estado del pago a lo largo del proceso.
1. (Opcional) Una [Account configurada por el cliente](https://docs.stripe.com/api/v2/core/accounts/object.md#v2_account_object-applied_configurations) o un [Customer](https://docs.stripe.com/api/customers.md) Object: para configurar un método de pago para pagos futuros, debes asociarlo a un cliente. Crea un objeto que represente a tu cliente cuando cree una cuenta en tu negocio. Si tu cliente realiza un pago como invitado, puedes crear una `Account` o `Customer` Object antes del pago y asociarlo más adelante con tu propia representación interna de la cuenta del cliente.
1. (Opcional) [CustomerSession](https://docs.stripe.com/api/customer_sessions.md): la información del objeto que representa a tu cliente es sensible y no se puede recuperar directamente desde una app. Una `CustomerSession` le otorga al SDK acceso temporal con alcance limitado a la `Account` o `Customer` y proporciona opciones de configuración adicionales. Consulta la lista completa de [opciones de configuración](https://docs.stripe.com/api/customer_sessions/create.md#create_customer_session-components).
> Si nunca guardas tarjetas de tus clientes ni permites que vuelvan a usar tarjetas guardadas, puedes omitir el `Account` o `Customer` Object y el objeto `CustomerSession` en tu integración.
Por motivos de seguridad, tu aplicación no puede crear estos objetos. En su lugar, agrega un punto de conexión en tu servidor que haga lo siguiente:
1. Recupera el objeto `Account` o `Customer`, o crea uno nuevo.
1. Crea una [CustomerSession](https://docs.stripe.com/api/customer_sessions.md) para el objeto `Account` o `Customer`.
1. Crea un `PaymentIntent` con el [importe](https://docs.stripe.com/api/payment_intents/create.md#create_payment_intent-amount), la [moneda](https://docs.stripe.com/api/payment_intents/create.md#create_payment_intent-currency), y el [customer_account](https://docs.stripe.com/api/payment_intents/create.md#create_payment_intent-customer_account) o el [customer](https://docs.stripe.com/api/payment_intents/create.md#create_payment_intent-customer).
1. Devuelve el *client secret* (The client secret is a unique key returned from Stripe as part of a PaymentIntent. This key lets the client access important fields from the PaymentIntent (status, amount, currency) while hiding sensitive ones (metadata, customer)) del `PaymentIntent`, el `client_secret` de la `CustomerSession`, el ID del `Account` o `Customer` y tu [clave publicable](https://dashboard.stripe.com/apikeys) a tu app.
Los métodos de pago que se muestran a los clientes durante el proceso de compra también se incluyen en el PaymentIntent. Puedes permitir que Stripe extraiga los métodos de pago de tu configuración del Dashboard o puedes enumerarlos manualmente. Independientemente de la opción que elijas, debes saber que la moneda especificada en el PaymentIntent filtra los métodos de pago que se muestran al cliente. Por ejemplo, si especificas `eur` en el PaymentIntent y tienes habilitado OXXO en el Dashboard, OXXO no se mostrará al cliente porque OXXO no admite pagos en `eur`.
A menos que tu integración requiera una opción basada en código para ofrecer métodos de pago, Stripe recomienda usar la opción automatizada. Esto se debe a que Stripe evalúa la moneda, las restricciones de los métodos de pago y otros parámetros para determinar la lista de métodos de pago admitidos. Se les da prioridad a los métodos de pago que aumentan la conversión y guardan mayor relación con la moneda y la ubicación del cliente.
#### Gestionar los métodos de pago desde el Dashboard
Puedes administrar los métodos de pago desde el [Dashboard](https://dashboard.stripe.com/settings/payment_methods). Stripe maneja la devolución de métodos de pago elegibles según factores como el monto de la transacción, la moneda y el flujo de pago. El PaymentIntent se crea según los métodos de pago que configuraste en el Dashboard. Si no quieres usar el Dashboard o si quieres especificar métodos de pago manualmente, puedes enumerarlos usando el atributo `payment_method_types`.
#### curl
```bash
# Create a Customer (use an existing Customer ID if this is a returning customer)
curl https://api.stripe.com/v1/customers \
-u <>: \
-X "POST" \
-H "Stripe-Account: {{CONNECTED_ACCOUNT_ID}}"
# Create an CustomerSession for the Customer
curl https://api.stripe.com/v1/customer_sessions \
-u <>: \
-X "POST" \
-d "customer"="{{CUSTOMER_ID}}" \
-d "components[mobile_payment_element][enabled]"=true \
-d "components[mobile_payment_element][features][payment_method_save]"=enabled \
-d "components[mobile_payment_element][features][payment_method_redisplay]"=enabled \
-d "components[mobile_payment_element][features][payment_method_remove]"=enabled
# Create a PaymentIntent
curl https://api.stripe.com/v1/payment_intents \
-u <>: \
-H "Stripe-Account: {{CONNECTED_ACCOUNT_ID}}"
-X "POST" \
-d "customer"="{{CUSTOMER_ID}}" \
-d "amount"=1099 \
-d "currency"="eur" \
-d "automatic_payment_methods[enabled]"=true \
-d application_fee_amount="123" \
```
#### Cómo enumerar métodos de pago manualmente
#### curl
```bash
# Create a Customer (use an existing Customer ID if this is a returning customer)
curl https://api.stripe.com/v1/customers \
-u <>: \
-X "POST" \
-H "Stripe-Account: {{CONNECTED_ACCOUNT_ID}}"
# Create an CustomerSession for the Customer
curl https://api.stripe.com/v1/customer_sessions \
-u <>: \
-X "POST" \
-d "customer"="{{CUSTOMER_ID}}" \
-d "components[mobile_payment_element][enabled]"=true \
-d "components[mobile_payment_element][features][payment_method_save]"=enabled \
-d "components[mobile_payment_element][features][payment_method_redisplay]"=enabled \
-d "components[mobile_payment_element][features][payment_method_remove]"=enabled
# Create a PaymentIntent
curl https://api.stripe.com/v1/payment_intents \
-u <>: \
-H "Stripe-Account: {{CONNECTED_ACCOUNT_ID}}"
-X "POST" \
-d "customer"="{{CUSTOMER_ID}}" \
-d "amount"=1099 \
-d "currency"="eur" \
-d "payment_method_types[]"="bancontact" \
-d "payment_method_types[]"="card" \
-d "payment_method_types[]"="ideal" \
-d "payment_method_types[]"="klarna" \
-d "payment_method_types[]"="sepa_debit" \
-d application_fee_amount="123" \
```
> Cada método de pago debe admitir la moneda especificada en el PaymentIntent, y tu empresa tiene que estar establecida en uno de los países que admite cada método de pago. Consulta la página de [opciones de integración de métodos de pago](https://docs.stripe.com/payments/payment-methods/integration-options.md) para obtener más información sobre qué admitimos.
## Integrar la hoja de pago [Lado del cliente]
Antes de mostrar el Payment Element móvil, tu página de finalización de compra debe cumplir con los siguientes requisitos:
- Mostrar los productos de la compra y el importe total
- Recopilar cualquier dato de envío requerido usando el [Address Element](https://docs.stripe.com/elements/address-element.md?platform=android)
- Incluye un botón de confirmación de compra para presentar la interfaz de usuario de Stripe
#### Jetpack Compose
[Inicializa](https://stripe.dev/stripe-android/paymentsheet/com.stripe.android.paymentsheet/-payment-sheet/-builder/index.html) una instancia de `PaymentSheet` dentro de `onCreate` de tu actividad de finalización de compra, especificando un método para administrar el resultado.
```kotlin
import androidx.compose.runtime.Composable
import androidx.compose.runtime.remember
import com.stripe.android.paymentsheet.PaymentSheet
import com.stripe.android.paymentsheet.PaymentSheetResult
@Composable
fun App() {
val paymentSheet = remember { PaymentSheet.Builder(::onPaymentSheetResult) }.build()
}
private fun onPaymentSheetResult(paymentSheetResult: PaymentSheetResult) {
// implemented in the next steps
}
```
A continuación, alcanza el secreto de cliente del PaymentIntent, el secreto de cliente de la sesión de este, el ID del cliente y la clave publicable del punto de conexión que creaste en el paso anterior. Define tu clave publicable usando `PaymentConfiguration` y guarda las otras para usarlas cuando presentes la PaymentSheet.
```kotlin
import androidx.compose.runtime.Composable
import androidx.compose.runtime.rememberimport androidx.compose.runtime.LaunchedEffect
import androidx.compose.runtime.getValue
import androidx.compose.runtime.mutableStateOf
import androidx.compose.runtime.setValue
import androidx.compose.ui.platform.LocalContext
import com.stripe.android.PaymentConfiguration
import com.stripe.android.paymentsheet.PaymentSheet
import com.stripe.android.paymentsheet.PaymentSheetResult
@Composable
fun App() {
val paymentSheet = remember { PaymentSheet.Builder(::onPaymentSheetResult) }.build()val context = LocalContext.current
var customerConfig by remember { mutableStateOf(null) }
varpaymentIntentClientSecret by remember { mutableStateOf(null) }
LaunchedEffect(context) {
// Make a request to your own server and retrieve payment configurations
val networkResult = ...
if (networkResult.isSuccess) {paymentIntentClientSecret = networkResult.paymentIntent
customerConfig = PaymentSheet.CustomerConfiguration.createWithCustomerSession(
id = networkResult.customer,
clientSecret = networkResult.customerSessionClientSecret
)PaymentConfiguration.init(context, networkResult.publishableKey, ""{{CONNECTED_ACCOUNT_ID}}"")}
}
}
private fun onPaymentSheetResult(paymentSheetResult: PaymentSheetResult) {
// implemented in the next steps
}
```
Cuando el cliente toca tu botón de confirmación de compra, llama a [presentWithPaymentIntent](https://stripe.dev/stripe-android/paymentsheet/com.stripe.android.paymentsheet/-payment-sheet/index.html#1814490530%2FFunctions%2F2002900378) para presentar la hoja de pago. Una vez que el cliente completa el pago, la hoja se cierra y se llama al [PaymentSheetResultCallback](https://stripe.dev/stripe-android/paymentsheet/com.stripe.android.paymentsheet/-payment-sheet-result-callback/index.html) con un [PaymentSheetResult](https://stripe.dev/stripe-android/paymentsheet/com.stripe.android.paymentsheet/-payment-sheet-result/index.html).
```kotlin
import androidx.compose.material.Button
import androidx.compose.material.Text
import androidx.compose.runtime.Composable
import androidx.compose.runtime.LaunchedEffect
import androidx.compose.runtime.getValue
import androidx.compose.runtime.mutableStateOf
import androidx.compose.runtime.remember
import androidx.compose.runtime.setValue
import androidx.compose.ui.platform.LocalContext
import com.stripe.android.PaymentConfiguration
import com.stripe.android.paymentsheet.PaymentSheet
import com.stripe.android.paymentsheet.PaymentSheetResult
@Composable
fun App() {
val paymentSheet = remember { PaymentSheet.Builder(::onPaymentSheetResult) }.build()
val context = LocalContext.current
var customerConfig by remember { mutableStateOf(null) }
var paymentIntentClientSecret by remember { mutableStateOf(null) }
LaunchedEffect(context) {
// Make a request to your own server and retrieve payment configurations
val networkResult = ...
if (networkResult.isSuccess) {
paymentIntentClientSecret = networkResult.paymentIntent
customerConfig = PaymentSheet.CustomerConfiguration.createWithCustomerSession(
id = networkResult.customer,
clientSecret = networkResult.customerSessionClientSecret
)
PaymentConfiguration.init(context, networkResult.publishableKey, ""{{CONNECTED_ACCOUNT_ID}}"")
}
}Button(
onClick = {
val currentConfig = customerConfig
val currentClientSecret =paymentIntentClientSecret
if (currentConfig != null && currentClientSecret != null) {
presentPaymentSheet(paymentSheet, currentConfig, currentClientSecret)
}
}
) {
Text("Checkout")
}
}private fun presentPaymentSheet(
paymentSheet: PaymentSheet,
customerConfig: PaymentSheet.CustomerConfiguration,paymentIntentClientSecret: String
) {
paymentSheet.presentWithPaymentIntent(paymentIntentClientSecret,
PaymentSheet.Configuration.Builder(merchantDisplayName = "My merchant name")
.customer(customerConfig)
// Set `allowsDelayedPaymentMethods` to true if your business handles
// delayed notification payment methods like US bank accounts.
.allowsDelayedPaymentMethods(true)
.build()
)
}
private fun onPaymentSheetResult(paymentSheetResult: PaymentSheetResult) {when(paymentSheetResult) {
is PaymentSheetResult.Canceled -> {
print("Canceled")
}
is PaymentSheetResult.Failed -> {
print("Error: ${paymentSheetResult.error}")
}
is PaymentSheetResult.Completed -> {
// Display for example, an order confirmation screen
print("Completed")
}
}
}
```
#### Vistas (clásicas)
[Inicializa](https://stripe.dev/stripe-android/paymentsheet/com.stripe.android.paymentsheet/-payment-sheet/index.html#-394860221%2FConstructors%2F2002900378) una instancia de `PaymentSheet` dentro de `onCreate` de tu actividad de finalización de compra y especifica un método para administrar el resultado.
#### Kotlin
```kotlin
import com.stripe.android.paymentsheet.PaymentSheet
class CheckoutActivity : AppCompatActivity() {
lateinit var paymentSheet: PaymentSheet
override fun onCreate(savedInstanceState: Bundle?) {
super.onCreate(savedInstanceState)
paymentSheet = PaymentSheet.Builder(::onPaymentSheetResult).build(this)
}
fun onPaymentSheetResult(paymentSheetResult: PaymentSheetResult) {
// implemented in the next steps
}
}
```
A continuación, alcanza el secreto de cliente del PaymentIntent, el secreto de cliente de la sesión de este, el ID del cliente y la clave publicable del punto de conexión que creaste en el paso anterior. Define tu clave publicable usando `PaymentConfiguration` y guarda las otras para usarlas cuando presentes la PaymentSheet.
#### Kotlin
```kotlin
import com.stripe.android.paymentsheet.PaymentSheet
class CheckoutActivity : AppCompatActivity() {
lateinit var paymentSheet: PaymentSheetlateinit var customerConfig: PaymentSheet.CustomerConfiguration
lateinit varpaymentIntentClientSecret: String
override fun onCreate(savedInstanceState: Bundle?) {
super.onCreate(savedInstanceState)
paymentSheet = PaymentSheet.Builder(::onPaymentSheetResult).build(this)lifecycleScope.launch {
// Make a request to your own server and retrieve payment configurations
val networkResult = MyBackend.getPaymentConfig()
if (networkResult.isSuccess) {paymentIntentClientSecret = networkResult.paymentIntent
customerConfig = PaymentSheet.CustomerConfiguration.createWithCustomerSession(
id = networkResult.customer,
clientSecret = networkResult.customerSessionClientSecret
)PaymentConfiguration.init(context, networkResult.publishableKey, ""{{CONNECTED_ACCOUNT_ID}}"")}
}
}
fun onPaymentSheetResult(paymentSheetResult: PaymentSheetResult) {
// implemented in the next steps
}
}
```
Cuando el cliente toca tu botón de confirmación de compra, llama a [presentWithPaymentIntent](https://stripe.dev/stripe-android/paymentsheet/com.stripe.android.paymentsheet/-payment-sheet/index.html#1814490530%2FFunctions%2F2002900378) para presentar la hoja de pago. Una vez que el cliente completa el pago, la hoja se cierra y se llama al [PaymentSheetResultCallback](https://stripe.dev/stripe-android/paymentsheet/com.stripe.android.paymentsheet/-payment-sheet-result-callback/index.html) con un [PaymentSheetResult](https://stripe.dev/stripe-android/paymentsheet/com.stripe.android.paymentsheet/-payment-sheet-result/index.html).
#### Kotlin
```kotlin
// ...
class CheckoutActivity : AppCompatActivity() {
lateinit var paymentSheet: PaymentSheet
lateinit var customerConfig: PaymentSheet.CustomerConfiguration
lateinit var paymentIntentClientSecret: String
// ...fun presentPaymentSheet() {
paymentSheet.presentWithPaymentIntent(paymentIntentClientSecret,
PaymentSheet.Configuration.Builder(merchantDisplayName = "My merchant name")
.customer(customerConfig)
// Set `allowsDelayedPaymentMethods` to true if your business handles
// delayed notification payment methods like US bank accounts.
.allowsDelayedPaymentMethods(true)
.build()
)
}
fun onPaymentSheetResult(paymentSheetResult: PaymentSheetResult) {when(paymentSheetResult) {
is PaymentSheetResult.Canceled -> {
print("Canceled")
}
is PaymentSheetResult.Failed -> {
print("Error: ${paymentSheetResult.error}")
}
is PaymentSheetResult.Completed -> {
// Display for example, an order confirmation screen
print("Completed")
}
}
}
}
```
Establecer `allowsDelayedPaymentMethods` en true permite aceptar métodos de pago de [notificación diferida](https://docs.stripe.com/payments/payment-methods.md#payment-notification) como cuentas bancarias en EE. UU. Para estos métodos de pago, el estado final del pago no se conoce cuando se completa el `PaymentSheet`, sino que se efectúa con éxito o falla más tarde. Si aceptas este tipo de métodos de pago, infórmale al cliente que su pedido está confirmado y solo finalízalo (por ejemplo, envía el producto) cuando el pago se realice correctamente.
## Administrar eventos posteriores al pago [Lado del servidor]
Stripe envía un evento [payment_intent.succeeded](https://docs.stripe.com/api/events/types.md#event_types-payment_intent.succeeded) cuando se completa el pago. Usa la [herramienta de webhook del Dashboard](https://dashboard.stripe.com/webhooks) o sigue la [guía de webhooks](https://docs.stripe.com/webhooks/quickstart.md) para recibir estos eventos y ejecutar acciones como, por ejemplo, enviar un correo electrónico de confirmación del pedido a tu cliente, registrar la venta en una base de datos o iniciar un flujo de envío.
Escucha estos eventos en lugar de esperar una devolución de llamada del cliente. De su lado, el cliente puede cerrar la ventana del navegador o salir de la aplicación antes de que se ejecute la devolución de llamada, y clientes malintencionados podrían manipular la respuesta. Si configuras tu integración para escuchar eventos asincrónicos, podrás aceptar [diferentes tipos de métodos de pago](https://stripe.com/payments/payment-methods-guide) con una sola integración.
Además de administrar el evento `payment_intent.succeeded`, recomendamos administrar estos otros eventos si se cobran pagos con el Payment Element:
| Evento | Descripción | Acción |
| ------------------------------------------------------------------------------------------------------------------------------- | -------------------------------------------------------------------------------------------------------------------------------------------------------------------------------------------------------------------------------------------------------------- | ---------------------------------------------------------------------------------------------------------------------------------------------------------------------------------------------------- |
| [payment_intent.succeeded](https://docs.stripe.com/api/events/types.md?lang=php#event_types-payment_intent.succeeded) | Se envía cuando un cliente completa correctamente un pago. | Envía al cliente una confirmación del pedido y *completa* (Fulfillment is the process of providing the goods or services purchased by a customer, typically after payment is collected) el pedido. |
| [payment_intent.processing](https://docs.stripe.com/api/events/types.md?lang=php#event_types-payment_intent.processing) | Se envía cuando un cliente inicia con éxito un pago, pero éste aún no se completó. Este evento se envía normalmente cuando el cliente inicia un débito bancario. Le sigue un evento `payment_intent.succeeded` o `payment_intent.payment_failed` en el futuro. | Envía al cliente una confirmación del pedido que indique que el pago está pendiente. En caso de productos digitales, quizá te convenga completar el pedido antes de esperar que se complete el pago. |
| [payment_intent.payment_failed](https://docs.stripe.com/api/events/types.md?lang=php#event_types-payment_intent.payment_failed) | Enviado cuando un cliente intenta un pago, pero el pago falla. | Si un pago pasa de `processing` a `payment_failed`, ofrécele al cliente otro intento de pago. |
## Probar la integración
#### Tarjetas
| Número de tarjeta | Escenario | Cómo hacer la prueba |
| ------------------- | ----------------------------------------------------------------------------------------------------------------------------------------------------------------------------------------------------------------------------------------------------------------------------------------------- | -------------------------------------------------------------------------------------------------------------------------------------- |
| 4242424242424242 | El pago con tarjeta se efectúa correctamente y no requiere autenticación. | Completa el formulario de tarjeta de crédito con el número de tarjeta de crédito y la fecha de vencimiento, el CVC o el código postal. |
| 4000002500003155 | El pago con tarjeta requiere *autenticación* (Strong Customer Authentication (SCA) is a regulatory requirement in effect as of September 14, 2019, that impacts many European online payments. It requires customers to use two-factor authentication like 3D Secure to verify their purchase). | Completa el formulario de tarjeta de crédito con el número de tarjeta de crédito y la fecha de vencimiento, el CVC o el código postal. |
| 4000000000009995 | La tarjeta es rechazada con un código de rechazo `insufficient_funds`. | Completa el formulario de tarjeta de crédito con el número de tarjeta de crédito y la fecha de vencimiento, el CVC o el código postal. |
| 6205500000000000004 | La tarjeta UnionPay puede tener entre 13 y 19 dígitos. | Completa el formulario de tarjeta de crédito con el número de tarjeta de crédito y la fecha de vencimiento, el CVC o el código postal. |
#### Redireccionamientos bancarios
| Método de pago | Escenario | Cómo hacer la prueba |
| ----------------- | -------------------------------------------------------------------------------------------------------------------------------------------------------------------------------------------------------------------- | ------------------------------------------------------------------------------------------------------------------------------------------------------------------------------------------------------ |
| Bancontact, iDEAL | Tu cliente no pasa la autenticación en la página de redireccionamiento de un método de pago basado en redireccionamiento y con notificación inmediata. | Elige cualquier método de pago basado en redireccionamiento, completa los datos solicitados y confirma el pago. Luego, haz click en **Error en el pago de prueba** en la página de redireccionamiento. |
| Pay by Bank | Tu cliente paga satisfactoriamente con un método de pago basado en redireccionamiento y con [notificación diferida](https://docs.stripe.com/payments/payment-methods.md#payment-notification). | Elige el método de pago, completa los datos solicitados y confirma el pago. Luego, haz click en **Completar el pago de prueba** en la página de redireccionamiento. |
| Pay by Bank | Tu cliente no pasa la autenticación en la página de redireccionamiento de un método de pago basado en redireccionamiento y con notificación diferida. | Elige el método de pago, completa los datos solicitados y confirma el pago. Luego, haz click en **Error en el pago de prueba** en la página de redireccionamiento. |
| BLIK | Los pagos BLIK generan errores de varias maneras: errores inmediatos (por ejemplo, el código venció o no es válido), errores demorados (el banco lo rechaza) o tiempos de espera (el cliente no respondió a tiempo). | Usa patrones de correo electrónico para [simular los diferentes errores.](https://docs.stripe.com/payments/blik/accept-a-payment.md#simulate-failures) |
#### Débitos bancarios
| Método de pago | Escenario | Cómo hacer la prueba |
| ------------------- | --------------------------------------------------------------------------------------------- | -------------------------------------------------------------------------------------------------------------------------------------------------------------------------------------- |
| Débito directo SEPA | Tu cliente paga satisfactoriamente con débito directo SEPA. | Completa el formulario con el número de cuenta `AT321904300235473204`. El PaymentIntent confirmado pasa inicialmente al estado “en proceso” y, tres minutos más tarde, a “completado”. |
| Débito directo SEPA | El estado del intento de pago de tu cliente pasa de `processing` a `requires_payment_method`. | Completa el formulario con el número de cuenta `AT861904300235473202`. |
Consulta [Pruebas](https://docs.stripe.com/testing.md) para obtener información adicional para probar tu integración.
## Optional: Activar Google Pay
### Configura tu integración
Para usar Google Pay, primero habilita la API de Google Pay agregando lo siguiente a la etiqueta `` de tu **AndroidManifest.xml**:
```xml
...
```
Para obtener más detalles, consulta cómo [configurar la API de Google Pay](https://developers.google.com/pay/api/android/guides/setup) para Android en Google Pay.
### Agregar Google Pay
Para agregar Google Pay a tu integración, especifica un [PaymentSheet.GooglePayConfiguration](https://stripe.dev/stripe-android/paymentsheet/com.stripe.android.paymentsheet/-payment-sheet/-google-pay-configuration/index.html) con tu entorno de Google Pay (de producción o de prueba) y el [código de país de tu empresa](https://dashboard.stripe.com/settings/account) al inicializar [PaymentSheet.Configuration](https://stripe.dev/stripe-android/paymentsheet/com.stripe.android.paymentsheet/-payment-sheet/-configuration/index.html).
#### Kotlin
```kotlin
val googlePayConfiguration = PaymentSheet.GooglePayConfiguration(
environment = PaymentSheet.GooglePayConfiguration.Environment.Test,
countryCode = "US",
currencyCode = "USD" // Required for Setup Intents, optional for Payment Intents
)
val configuration = PaymentSheet.Configuration.Builder(merchantDisplayName = "My merchant name")
.googlePay(googlePayConfiguration)
.build()
```
### Prueba Google Pay
Google te permite realizar pagos de prueba a través de su tarjeta [Test card suite](https://developers.google.com/pay/api/android/guides/resources/test-card-suite). El conjunto de pruebas admite el uso de [tarjetas de prueba](https://docs.stripe.com/testing.md) de Stripe.
Debes probar Google Pay usando un dispositivo Android físico en lugar de un dispositivo simulado, en un país donde se admite Google Pay. Inicia sesión en una cuenta Google en tu dispositivo de prueba con una tarjeta real guardada en Google Wallet.
## Optional: Personalizar la hoja
Todo lo que se quiera personalizar se configura usando el objeto [PaymentSheet.Configuration](https://stripe.dev/stripe-android/paymentsheet/com.stripe.android.paymentsheet/-payment-sheet/-configuration/index.html).
### Appearance
Personaliza los colores y las fuentes, entre otros elementos, para que combinen con tu aplicación usando la [API Appearance](https://docs.stripe.com/elements/appearance-api/mobile.md?platform=android).
### Diseño del método de pago
Configura el diseño de los métodos de pago en la hoja con [paymentMethodLayout](https://stripe.dev/stripe-android/paymentsheet/com.stripe.android.paymentsheet/-payment-sheet/-configuration/-builder/index.html#2123253356%2FFunctions%2F2002900378). Puedes mostrarlos horizontalmente, verticalmente o dejar que Stripe optimice el diseño de manera automática.

#### Kotlin
```kotlin
PaymentSheet.Configuration.Builder("Example, Inc.")
.paymentMethodLayout(PaymentSheet.PaymentMethodLayout.Automatic)
.build()
```
### Recopilar las direcciones de los usuarios
Recopila las direcciones de envío o facturación locales e internacionales de tus clientes usando el [Address Element](https://docs.stripe.com/elements/address-element.md?platform=android).
### Nombre con el que aparecerá la empresa
Especifica el nombre que quieres que el cliente vea para tu empresa configurando [merchantDisplayName](https://stripe.dev/stripe-android/paymentsheet/com.stripe.android.paymentsheet/-payment-sheet/-configuration/index.html#-191101533%2FProperties%2F2002900378). De manera predeterminada, este es el nombre de tu aplicación.
#### Kotlin
```kotlin
PaymentSheet.Configuration.Builder(
merchantDisplayName = "My app, Inc."
).build()
```
### Modo oscuro
De forma predeterminada, `PaymentSheet` se adapta automáticamente a la configuración de aspecto de todo el sistema del usuario (modo claro y modo oscuro). Puedes cambiarla definiendo modo claro o modo oscuro en tu aplicación:
#### Kotlin
```kotlin
// force dark
AppCompatDelegate.setDefaultNightMode(AppCompatDelegate.MODE_NIGHT_YES)
// force light
AppCompatDelegate.setDefaultNightMode(AppCompatDelegate.MODE_NIGHT_NO)
```
### Datos de facturación predeterminados
Para establecer los valores predeterminados para los datos de facturación recopilados en la hoja de pago, configura la propiedad `defaultBillingDetails`. Los campos de la `PaymentSheet` se rellenan automáticamente con los valores que proporcionas.
#### Kotlin
```kotlin
val address = PaymentSheet.Address(country = "US")
val billingDetails = PaymentSheet.BillingDetails(
address = address,
email = "foo@bar.com"
)
val configuration = PaymentSheet.Configuration.Builder(merchantDisplayName = "Merchant, Inc.")
.defaultBillingDetails(billingDetails)
.build()
```
### Configura la recopilación de datos de facturación
Usa `BillingDetailsCollectionConfiguration` para especificar cómo deseas recopilar los datos de facturación en la PaymentSheet.
Puedes recopilar el nombre, el correo electrónico, el número de teléfono y la dirección del cliente.
Si quieres adjuntar datos de facturación predeterminados al objeto PaymentMethod aun cuando esos campos no se hayan recopilado en la interfaz de usuario, establece `billingDetailsCollectionConfiguration.attachDefaultsToPaymentMethod` en `true`.
#### Kotlin
```kotlin
val billingDetails = PaymentSheet.BillingDetails(
email = "foo@bar.com"
)
val billingDetailsCollectionConfiguration = BillingDetailsCollectionConfiguration(
attachDefaultsToPaymentMethod = true,
name = BillingDetailsCollectionConfiguration.CollectionMode.Always,
email = BillingDetailsCollectionConfiguration.CollectionMode.Never,
address = BillingDetailsCollectionConfiguration.AddressCollectionMode.Full,
)
val configuration = PaymentSheet.Configuration.Builder(merchantDisplayName = "Merchant, Inc.")
.defaultBillingDetails(billingDetails)
.billingDetailsCollectionConfiguration(billingDetailsCollectionConfiguration)
.build()
```
> Pregúntale a tu asesor legal sobre las leyes que se aplican a la recopilación de información. Solicita los números de teléfono solo si los necesitas para la transacción.
## Optional: Completa el pago en tu interfaz de usuario
Puedes presentar una hoja de pago para recopilar solo los datos del método de pago y completar el pago en la interfaz de usuario de tu aplicación. Esto resulta útil si tienes un botón de compra personalizado o solicitas pasos adicionales después de recopilar los datos del pago.

> Una integración de ejemplo está [disponible en nuestro GitHub](https://github.com/stripe/stripe-android/blob/master/paymentsheet-example/src/main/java/com/stripe/android/paymentsheet/example/samples/ui/paymentsheet/custom_flow/CustomFlowActivity.kt).
1. Primero, inicializa [PaymentSheet.FlowController](https://stripe.dev/stripe-android/paymentsheet/com.stripe.android.paymentsheet/-payment-sheet/-flow-controller/index.html) en lugar de `PaymentSheet` usando uno de los métodos [Builder](https://stripe.dev/stripe-android/paymentsheet/com.stripe.android.paymentsheet/-payment-sheet/-flow-controller/-builder/index.html).
#### Android (Kotlin)
```kotlin
class CheckoutActivity : AppCompatActivity() {
private lateinit var flowController: PaymentSheet.FlowController
override fun onCreate(savedInstanceState: Bundle?) {
super.onCreate(savedInstanceState)
val flowController = PaymentSheet.FlowController.Builder(
resultCallback = ::onPaymentSheetResult,
paymentOptionResultCallback = ::onPaymentOption,
).build(this)
}
}
```
1. A continuación, llama a `configureWithPaymentIntent` con las claves de objeto de Stripe recuperadas del backend y actualiza tu interfaz de usuario en la devolución de llamada usando [getPaymentOption()](https://stripe.dev/stripe-android/paymentsheet/com.stripe.android.paymentsheet/-payment-sheet/-flow-controller/index.html#-2091462043%2FFunctions%2F2002900378). Contiene una imagen y una etiqueta que representan el método de pago seleccionado actualmente por el cliente.
#### Android (Kotlin)
```kotlin
flowController.configureWithPaymentIntent(
paymentIntentClientSecret = paymentIntentClientSecret,
configuration = PaymentSheet.Configuration.Builder("Example, Inc.")
.customer(PaymentSheet.CustomerConfiguration(
id = customerId,
ephemeralKeySecret = ephemeralKeySecret
))
.build()
) { isReady, error ->
if (isReady) {
// Update your UI using `flowController.getPaymentOption()`
} else {
// handle FlowController configuration failure
}
}
```
1. A continuación, llama a [presentPaymentOptions](https://stripe.dev/stripe-android/paymentsheet/com.stripe.android.paymentsheet/-payment-sheet/-flow-controller/index.html#449924733%2FFunctions%2F2002900378) para recopilar los datos del pago. Cuando el cliente termina, la hoja se cierra y llama al [paymentResultCallback](https://stripe.dev/stripe-android/paymentsheet/com.stripe.android.paymentsheet/-payment-option-callback/index.html) especificado anteriormente en `create`. Implementa este método para actualizar tu interfaz de usuario con la `paymentOption` devuelta.
#### Android (Kotlin)
```kotlin
// ...
flowController.presentPaymentOptions()
// ...
private fun onPaymentOption(paymentOptionResult: PaymentOptionResult) {
val paymentOption = paymentOptionResult.paymentOption
if (paymentOption != null) {
paymentMethodButton.text = paymentOption.label
paymentMethodButton.setCompoundDrawablesRelativeWithIntrinsicBounds(
paymentOption.drawableResourceId,
0,
0,
0
)
} else {
paymentMethodButton.text = "Select"
paymentMethodButton.setCompoundDrawablesRelativeWithIntrinsicBounds(
null,
null,
null,
null
)
}
}
```
1. Finalmente, llama a [confirm](https://stripe.dev/stripe-android/paymentsheet/com.stripe.android.paymentsheet/-payment-sheet/-flow-controller/index.html#-479056656%2FFunctions%2F2002900378) para completar el pago. Cuando el cliente termina, la hoja se cierra y llama al [paymentResultCallback](https://stripe.dev/stripe-android/paymentsheet/com.stripe.android.paymentsheet/-payment-sheet-result-callback/index.html#237248767%2FFunctions%2F2002900378) especificado anteriormente en `create`.
#### Android (Kotlin)
```kotlin
// ...
flowController.confirmPayment()
// ...
private fun onPaymentSheetResult(
paymentSheetResult: PaymentSheetResult
) {
when (paymentSheetResult) {
is PaymentSheetResult.Canceled -> {
// Payment canceled
}
is PaymentSheetResult.Failed -> {
// Payment Failed. See logcat for details or inspect paymentSheetResult.error
}
is PaymentSheetResult.Completed -> {
// Payment Complete
}
}
}
```
Establecer `allowsDelayedPaymentMethods` en true permite aceptar métodos de pago de [notificación diferida](https://docs.stripe.com/payments/payment-methods.md#payment-notification) como cuentas bancarias en EE. UU. Para estos métodos de pago, el estado final del pago no se conoce cuando se completa el `PaymentSheet`, sino que se efectúa con éxito o falla más tarde. Si aceptas este tipo de métodos de pago, infórmale al cliente que su pedido está confirmado y solo finalízalo (por ejemplo, envía el producto) cuando el pago se realice correctamente.
## Optional: Habilitar métodos de pago adicionales
Ve a [Administrar métodos de pago para cuentas conectadas](https://dashboard.stripe.com/settings/payment_methods/connected_accounts) en el Dashboard para configurar qué métodos de pago aceptan tus cuentas conectadas. Los cambios en la configuración predeterminada se aplican a todas las cuentas conectadas nuevas y existentes.
Consulta los siguientes recursos para obtener información sobre los métodos de pago:
- [Guía de métodos de pago](https://stripe.com/payments/payment-methods-guide#choosing-the-right-payment-methods-for-your-business) para ayudarte a elegir los métodos de pago correctos para tu plataforma.
- [Funcionalidades de cuenta](https://docs.stripe.com/connect/account-capabilities.md) para asegurarte de que los métodos de pago que elegiste funcionen en tus cuentas conectadas.
- Consulta las tablas de [admisibilidad de métodos de pago y de productos](https://docs.stripe.com/payments/payment-methods/payment-method-support.md#product-support) para asegurarte de que los métodos de pago elegidos funcionen para tus productos y flujos de pago de Stripe.
Para cada método de pago, puedes seleccionar una de las siguientes opciones desplegables:
| |
| |
| **Activado de manera predeterminada** | Tus cuentas conectadas aceptan este método de pago durante el proceso de compra. Algunos métodos de pago solo pueden estar desactivados o bloqueados. Esto se debe a que tus cuentas conectadas con *acceso al Dashboard de Stripe* (Platforms can provide connected accounts with access to the full Stripe Dashboard or the Express Dashboard. Otherwise, platforms build an interface for connected accounts using embedded components or the Stripe API) deben activarlas en su página de configuración. |
| **Desactivado de manera predeterminada** | Tus cuentas conectadas no aceptan este método de pago durante el proceso de compra. Si permites que tus cuentas conectadas con *acceso al Dashboard de Stripe* (Platforms can provide connected accounts with access to the full Stripe Dashboard or the Express Dashboard. Otherwise, platforms build an interface for connected accounts using embedded components or the Stripe API) administren sus propios métodos de pago, podrán activarlo. |
| **Bloqueado** | Tus cuentas conectadas no aceptan este método de pago durante el proceso de compra. Si permites que tus cuentas conectadas con *acceso al Dashboard de Stripe* (Platforms can provide connected accounts with access to the full Stripe Dashboard or the Express Dashboard. Otherwise, platforms build an interface for connected accounts using embedded components or the Stripe API) administren sus propios métodos de pago, no tendrán la opción para activarlo. |

Opciones de métodos de pago
Si realizas un cambio en un método de pago, debes hacer clic en **Revisar cambios** en la barra inferior de la pantalla y en **Guardar y aplicar** para actualizar tus cuentas conectadas.

Cuadro de diálogo Guardar
### Permite que las cuentas conectadas gestionen los métodos de pago
Stripe recomienda permitir que tus cuentas conectadas personalicen sus propios métodos de pago. Esta opción le permite a cada cuenta conectada con *acceso al Dashboard de Stripe* (Platforms can provide connected accounts with access to the full Stripe Dashboard or the Express Dashboard. Otherwise, platforms build an interface for connected accounts using embedded components or the Stripe API) ver y actualizar página [Métodos de pago](https://dashboard.stripe.com/settings/payment_methods). Solo los propietarios de las cuentas conectadas pueden personalizar sus métodos de pago. El Dashboard de Stripe muestra el conjunto de métodos de pago predeterminados que aplicaste a todas las cuentas conectadas nuevas y existentes. Tus cuentas conectadas pueden anular estos valores predeterminados, excluyendo los métodos de pago que hayas bloqueado.
Marca la casilla de verificación **Personalización de la cuenta** para habilitar esta opción. Debes hacer clic en **Revisar cambios** en la barra inferior de la pantalla y luego seleccionar **Guardar y aplicar** para actualizar esta configuración.

Casilla de verificación de personalización de la cuenta
### Capacidades de métodos de pago
Para permitir que tus cuentas conectadas acepten métodos de pago adicionales, sus `cuentas` deben tener funcionalidades de métodos de pago activos.
Si seleccionaste la opción “Activado por defecto” para un método de pago en [Gestionar métodos de pago para tus cuentas conectadas](https://dashboard.stripe.com/settings/payment_methods/connected_accounts), Stripe solicita automáticamente la funcionalidad necesaria para las cuentas conectadas nuevas y las existentes si cumplen con los requisitos de verificación. Si la cuenta conectada no cumple con los requisitos o si quieres tener control directo, puedes solicitar de forma manual la funcionalidad en el dashboard o con la API.
La mayoría de los métodos de pago tienen los mismos requisitos de verificación que la funcionalidad `card_payments`, con algunas restricciones y excepciones. En el [cuadro](https://docs.stripe.com/connect/account-capabilities.md#payment-methods) figuran las funcionalidades de métodos de pago que requieren verificación adicional.
#### Dashboard
[Busca una cuenta conectada](https://docs.stripe.com/connect/dashboard/managing-individual-accounts.md#finding-accounts) en el dashboard para editar sus funcionalidades y ver los requisitos de verificación pendientes.
#### API
Para una cuenta conectada existente, puedes [enumerar](https://docs.stripe.com/api/capabilities/list.md) sus funcionalidades existentes para determinar si necesitas solicitar funcionalidades adicionales.
```curl
curl https://api.stripe.com/v1/accounts/{{CONNECTEDACCOUNT_ID}}/capabilities \
-u "<>:"
```
Solicita funcionalidades adicionales [actualizando](https://docs.stripe.com/api/capabilities/update.md) las funcionalidades de cada cuenta conectada.
```curl
curl https://api.stripe.com/v1/accounts/{{CONNECTEDACCOUNT_ID}}/capabilities/us_bank_account_ach_payments \
-u "<>:" \
-d requested=true
```
Puede haber un retraso antes de que la capacidad solicitada se active. Si la capacidad tiene algún requisito de activación, la respuesta lo incluye en las matrices de `requirements`.
## Cobra comisiones
Como plataforma, puedes aceptar pagos en tus cuentas conectadas por una parte de cada transacción en forma de comisiones de solicitud. Puedes establecer las comisiones de la plataforma de las siguientes maneras:
- Utiliza la [herramienta de tarifas de la plataforma](https://docs.stripe.com/connect/platform-pricing-tools.md) para establecer y probar las reglas de tarifas. Esta función que no requiere programación del Dashboard de Stripe solo está disponible actualmente para plataformas responsables de pagar las comisiones de Stripe.
- Especifica las comisiones de la solicitud directamente en un [PaymentIntent](https://docs.stripe.com/api/payment_intents/object.md). Las comisiones establecidas con este método anulan la lógica de tarifas especificada en la herramienta de tarifas de la plataforma.
Tu plataforma puede cobrar una comisión de la plataforma con las siguientes limitaciones:
- El valor del importe de la comisión de la aplicación (`application_fee_amount`) debe ser positivo e inferior al importe del cargo. El importe del cargo es el tope de la comisión de la plataforma que se puede cobrar.
- No se aplican comisiones adicionales de Stripe a la comisión de la plataforma en sí.
- En concordancia con los requisitos reglamentarios y de cumplimiento normativo de Brasil, las plataformas establecidas fuera de Brasil con cuentas conectadas brasileñas no pueden cobrar comisiones de la plataforma a través de Stripe.
- La moneda de `application_fee_amount` depende de algunos factores de [varias monedas](https://docs.stripe.com/connect/currencies.md).
La [BalanceTransaction](https://docs.stripe.com/api.md#balance_transaction_retrieve) del cargo resultante incluye un desglose detallado de las comisiones tanto de Stripe como de la solicitud. Para ofrecer una mejor experiencia de elaboración de informes, el cobro de una comisión genera un objeto [ApplicationFee](https://docs.stripe.com/api/application_fees/object.md). Utiliza la propiedad `amount` del objeto `ApplicationFee` para la elaboración de informes.
Puedes ver las comisiones de solicitud en la sección [Comisiones cobradas](https://dashboard.stripe.com/connect/application_fees) del Dashboard.
> De manera predeterminada, las comisiones de la plataforma para cargos directos se crean de forma asincrónica. Si expandes el objeto `application_fee` en una solicitud de creación de cargo, la comisión de la plataforma se crea sincrónicamente como parte de esa solicitud. Solo expande el objeto `application_fee` si es necesario, ya que aumenta la latencia de la solicitud.
>
> Para recibir notificaciones de los objetos `ApplicationFee` creados de forma asincrónica, escucha el evento webhook [application_fee.created](https://docs.stripe.com/api/events/types.md#event_types-application_fee.created).

Esta integración combina todos los pasos necesarios para realizar el pago, incluida la recopilación de los datos de pago y la confirmación del pago, en una única hoja que se muestra en la parte superior de tu aplicación.
> #### Soporte de API Accounts v2
>
> Payment Sheet no ofrece soporte para *cuentas configuradas por el cliente*. Solo admite objetos `Customer`.
## Configura Stripe [Lado del servidor] [Lado del cliente]
Primero, necesitas una cuenta de Stripe. [Inscríbete ahora](https://dashboard.stripe.com/register).
### Lado del servidor
Esta integración necesita puntos de conexión en tu servidor que se comuniquen con la API de Stripe. Usa las bibliotecas oficiales para acceder a la API de Stripe desde tu servidor:
#### Ruby
```bash
# Available as a gem
sudo gem install stripe
```
```ruby
# If you use bundler, you can add this line to your Gemfile
gem 'stripe'
```
### Lado del cliente
El [SDK para React Native](https://github.com/stripe/stripe-react-native) es de código abierto y está plenamente documentado. Internamente, utiliza SDK para [iOS nativo](https://github.com/stripe/stripe-ios) y [Android](https://github.com/stripe/stripe-android). Para instalar el SDK para React Native de Stripe, ejecuta uno de los siguientes comandos en el directorio del proyecto (según el administrador de paquetes que utilices):
#### hilado
```bash
yarn add @stripe/stripe-react-native
```
#### npm
```bash
npm install @stripe/stripe-react-native
```
A continuación, instala algunas otras dependencias necesarias:
- Para iOS, vaya al directorio **ios** y ejecute `pod install` para asegurarse de que también instala las dependencias nativas necesarias.
- Para Android, no hay más dependencias para instalar.
### Inicialización de Stripe
Para inicializar Stripe en tu aplicación React Native, ajusta tu pantalla de pago con el componente `StripeProvider` o usa el método de inicialización `initStripe`. Solo se requiere la [clave publicable](https://docs.stripe.com/keys.md#obtain-api-keys) de la API en `publishableKey`. En el siguiente ejemplo, se muestra cómo inicializar Stripe usando el componente `StripeProvider`.
```javascript
import { StripeProvider } from '@stripe/stripe-react-native';
function App() {
return (
// Your app code here
);
}
```
> Usa tus [claves de API de prueba](https://docs.stripe.com/keys.md#obtain-api-keys) mientras realizas pruebas y desarrollas, y tus claves de [modo activo](https://docs.stripe.com/keys.md#test-live-modes) cuando publiques tu aplicación.
## Agregar un punto de conexión [Lado del servidor]
> #### Nota
>
> Para mostrar la PaymentSheet antes de crear un PaymentIntent, consulta [Recopila datos de pago antes de crear un Intent](https://docs.stripe.com/payments/accept-a-payment-deferred.md?type=payment).
Esta integración usa tres objetos de la API de Stripe:
1. [PaymentIntent](https://docs.stripe.com/api/payment_intents.md): Stripe lo utiliza para representar tu intención de cobrarle a un cliente, haciendo el seguimiento de los intentos de cobro y de los cambios en el estado del pago a lo largo del proceso.
1. (Opcional) Una [Account configurada por el cliente](https://docs.stripe.com/api/v2/core/accounts/object.md#v2_account_object-applied_configurations) o un [Customer](https://docs.stripe.com/api/customers.md) Object: para configurar un método de pago para pagos futuros, debes asociarlo a un cliente. Crea un objeto que represente a tu cliente cuando cree una cuenta en tu negocio. Si tu cliente realiza un pago como invitado, puedes crear una `Account` o `Customer` Object antes del pago y asociarlo más adelante con tu propia representación interna de la cuenta del cliente.
1. (Opcional) [CustomerSession](https://docs.stripe.com/api/customer_sessions.md): la información del objeto que representa a tu cliente es sensible y no se puede recuperar directamente desde una app. Una `CustomerSession` le otorga al SDK acceso temporal con alcance limitado a la `Account` o `Customer` y proporciona opciones de configuración adicionales. Consulta la lista completa de [opciones de configuración](https://docs.stripe.com/api/customer_sessions/create.md#create_customer_session-components).
> Si nunca guardas tarjetas de tus clientes ni permites que vuelvan a usar tarjetas guardadas, puedes omitir el `Account` o `Customer` Object y el objeto `CustomerSession` en tu integración.
Por motivos de seguridad, tu aplicación no puede crear estos objetos. En su lugar, agrega un punto de conexión en tu servidor que haga lo siguiente:
1. Recupera el objeto `Account` o `Customer`, o crea uno nuevo.
1. Crea una [CustomerSession](https://docs.stripe.com/api/customer_sessions.md) para el objeto `Account` o `Customer`.
1. Crea un `PaymentIntent` con el [importe](https://docs.stripe.com/api/payment_intents/create.md#create_payment_intent-amount), la [moneda](https://docs.stripe.com/api/payment_intents/create.md#create_payment_intent-currency), y el [customer_account](https://docs.stripe.com/api/payment_intents/create.md#create_payment_intent-customer_account) o el [customer](https://docs.stripe.com/api/payment_intents/create.md#create_payment_intent-customer).
1. Devuelve el *client secret* (The client secret is a unique key returned from Stripe as part of a PaymentIntent. This key lets the client access important fields from the PaymentIntent (status, amount, currency) while hiding sensitive ones (metadata, customer)) del `PaymentIntent`, el `client_secret` de la `CustomerSession`, el ID del `Account` o `Customer` y tu [clave publicable](https://dashboard.stripe.com/apikeys) a tu app.
Los métodos de pago que se muestran a los clientes durante el proceso de compra también se incluyen en el PaymentIntent. Puedes permitir que Stripe extraiga los métodos de pago de tu configuración del Dashboard o puedes enumerarlos manualmente. Independientemente de la opción que elijas, debes saber que la moneda especificada en el PaymentIntent filtra los métodos de pago que se muestran al cliente. Por ejemplo, si especificas `eur` en el PaymentIntent y tienes habilitado OXXO en el Dashboard, OXXO no se mostrará al cliente porque OXXO no admite pagos en `eur`.
A menos que tu integración requiera una opción basada en código para ofrecer métodos de pago, Stripe recomienda usar la opción automatizada. Esto se debe a que Stripe evalúa la moneda, las restricciones de los métodos de pago y otros parámetros para determinar la lista de métodos de pago admitidos. Se les da prioridad a los métodos de pago que aumentan la conversión y guardan mayor relación con la moneda y la ubicación del cliente.
#### Gestionar los métodos de pago desde el Dashboard
Puedes administrar los métodos de pago desde el [Dashboard](https://dashboard.stripe.com/settings/payment_methods). Stripe maneja la devolución de métodos de pago elegibles según factores como el monto de la transacción, la moneda y el flujo de pago. El PaymentIntent se crea según los métodos de pago que configuraste en el Dashboard. Si no quieres usar el Dashboard o si quieres especificar métodos de pago manualmente, puedes enumerarlos usando el atributo `payment_method_types`.
#### curl
```bash
# Create a Customer (use an existing Customer ID if this is a returning customer)
curl https://api.stripe.com/v1/customers \
-u <>: \
-X "POST" \
-H "Stripe-Account: {{CONNECTED_ACCOUNT_ID}}"
# Create an CustomerSession for the Customer
curl https://api.stripe.com/v1/customer_sessions \
-u <>: \
-X "POST" \
-d "customer"="{{CUSTOMER_ID}}" \
-d "components[mobile_payment_element][enabled]"=true \
-d "components[mobile_payment_element][features][payment_method_save]"=enabled \
-d "components[mobile_payment_element][features][payment_method_redisplay]"=enabled \
-d "components[mobile_payment_element][features][payment_method_remove]"=enabled
# Create a PaymentIntent
curl https://api.stripe.com/v1/payment_intents \
-u <>: \
-H "Stripe-Account: {{CONNECTED_ACCOUNT_ID}}"
-X "POST" \
-d "customer"="{{CUSTOMER_ID}}" \
-d "amount"=1099 \
-d "currency"="eur" \
-d "automatic_payment_methods[enabled]"=true \
-d application_fee_amount="123" \
```
#### Cómo enumerar métodos de pago manualmente
#### curl
```bash
# Create a Customer (use an existing Customer ID if this is a returning customer)
curl https://api.stripe.com/v1/customers \
-u <>: \
-X "POST" \
-H "Stripe-Account: {{CONNECTED_ACCOUNT_ID}}"
# Create an CustomerSession for the Customer
curl https://api.stripe.com/v1/customer_sessions \
-u <>: \
-X "POST" \
-d "customer"="{{CUSTOMER_ID}}" \
-d "components[mobile_payment_element][enabled]"=true \
-d "components[mobile_payment_element][features][payment_method_save]"=enabled \
-d "components[mobile_payment_element][features][payment_method_redisplay]"=enabled \
-d "components[mobile_payment_element][features][payment_method_remove]"=enabled
# Create a PaymentIntent
curl https://api.stripe.com/v1/payment_intents \
-u <>: \
-H "Stripe-Account: {{CONNECTED_ACCOUNT_ID}}"
-X "POST" \
-d "customer"="{{CUSTOMER_ID}}" \
-d "amount"=1099 \
-d "currency"="eur" \
-d "payment_method_types[]"="bancontact" \
-d "payment_method_types[]"="card" \
-d "payment_method_types[]"="ideal" \
-d "payment_method_types[]"="klarna" \
-d "payment_method_types[]"="sepa_debit" \
-d application_fee_amount="123" \
```
> Cada método de pago debe admitir la moneda especificada en el PaymentIntent, y tu empresa tiene que estar establecida en uno de los países que admite cada método de pago. Consulta la página de [opciones de integración de métodos de pago](https://docs.stripe.com/payments/payment-methods/integration-options.md) para obtener más información sobre qué admitimos.
## Integrar la hoja de pago [Lado del cliente]
Antes de mostrar el Payment Element móvil, tu página de finalización de compra debe cumplir con los siguientes requisitos:
- Mostrar los productos de la compra y el importe total
- Recopilar la información de envío necesaria
- Incluir un botón de pago para presentar la interfaz de usuario de Stripe
En la finalización de compra de tu aplicación, haz una solicitud de red al punto de conexión de back-end que creaste en el paso anterior y llama a `initPaymentSheet` desde el hook `useStripe`.
#### Accounts v2
```javascript
export default function CheckoutScreen() {
const { initPaymentSheet, presentPaymentSheet } = useStripe();
const [loading, setLoading] = useState(false);
const fetchPaymentSheetParams = async () => {
const response = await fetch(`${API_URL}/payment-sheet`, {
method: 'POST',
headers: {
'Content-Type': 'application/json',
},
});
const { paymentIntent, ephemeralKey, customer_account } = await response.json();
return {
paymentIntent,
ephemeralKey,
customer_account,
};
};
const initializePaymentSheet = async () => {
const {
paymentIntent,
ephemeralKey,
customer_account,
} = await fetchPaymentSheetParams();
const { error } = await initPaymentSheet({
merchantDisplayName: "Example, Inc.",
customerAccountId: customer_account,
customerEphemeralKeySecret: ephemeralKey,
paymentIntentClientSecret: paymentIntent,
// Set `allowsDelayedPaymentMethods` to true if your business accepts payment
// methods that complete payment after a delay, like SEPA Debit and Sofort.
allowsDelayedPaymentMethods: true,
defaultBillingDetails: {
name: 'Jane Doe',
}
});
if (!error) {
setLoading(true);
}
};
const openPaymentSheet = async () => {
// see below
};
useEffect(() => {
initializePaymentSheet();
}, []);
return (
);
}
```
#### Customers v1
```javascript
export default function CheckoutScreen() {
const { initPaymentSheet, presentPaymentSheet } = useStripe();
const [loading, setLoading] = useState(false);
const fetchPaymentSheetParams = async () => {
const response = await fetch(`${API_URL}/payment-sheet`, {
method: 'POST',
headers: {
'Content-Type': 'application/json',
},
});
const { paymentIntent, ephemeralKey, customer } = await response.json();
return {
paymentIntent,
ephemeralKey,
customer,
};
};
const initializePaymentSheet = async () => {
const {
paymentIntent,
ephemeralKey,
customer,
} = await fetchPaymentSheetParams();
const { error } = await initPaymentSheet({
merchantDisplayName: "Example, Inc.",
customerId: customer,
customerEphemeralKeySecret: ephemeralKey,
paymentIntentClientSecret: paymentIntent,
// Set `allowsDelayedPaymentMethods` to true if your business can handle payment
//methods that complete payment after a delay, like SEPA Debit and Sofort.
allowsDelayedPaymentMethods: true,
defaultBillingDetails: {
name: 'Jane Doe',
}
});
if (!error) {
setLoading(true);
}
};
const openPaymentSheet = async () => {
// see below
};
useEffect(() => {
initializePaymentSheet();
}, []);
return (
);
}
```
Cuando el cliente toque el botón **Pagar**, llama a `presentPaymentSheet()` para abrir la hoja. Después de que el cliente completa el pago, la hoja se cierra y la promesa se resuelve con un `StripeError` opcional.
```javascript
export default function CheckoutScreen() {
// continued from above
const openPaymentSheet = async () => {
const { error } = await presentPaymentSheet();
if (error) {
Alert.alert(`Error code: ${error.code}`, error.message);
} else {
Alert.alert('Success', 'Your order is confirmed!');
}
};
return (
);
}
```
Si no se produjo ningún error, infórmale al cliente que el proceso terminó (por ejemplo, mostrándole una pantalla de confirmación del pedido).
Establecer `allowsDelayedPaymentMethods` en true permite aceptar métodos de pago de [notificación diferida](https://docs.stripe.com/payments/payment-methods.md#payment-notification) como cuentas bancarias en EE. UU. Para estos métodos de pago, el estado final del pago no se conoce cuando se completa el `PaymentSheet`, sino que se efectúa con éxito o falla más tarde. Si aceptas este tipo de métodos de pago, infórmale al cliente que su pedido está confirmado y solo finalízalo (por ejemplo, envía el producto) cuando el pago se realice correctamente.
## Configurar una URL de retorno (solo para iOS) [Lado del cliente]
El cliente puede salir de tu aplicación para autenticarse (por ejemplo, en Safari o en su aplicación bancaria). Para permitirles que regresen automáticamente a tu aplicación después de autenticarse, [configura un esquema de URL personalizado](https://developer.apple.com/documentation/xcode/defining-a-custom-url-scheme-for-your-app) y define el delegado de la aplicación para que envíe la URL al SDK. Stripe no admite [enlaces universales](https://developer.apple.com/documentation/xcode/allowing-apps-and-websites-to-link-to-your-content).
#### SceneDelegate
#### Swift
```swift
// This method handles opening custom URL schemes (for example, "your-app://stripe-redirect")
func scene(_ scene: UIScene, openURLContexts URLContexts: Set) {
guard let url = URLContexts.first?.url else {
return
}
let stripeHandled = StripeAPI.handleURLCallback(with: url)
if (!stripeHandled) {
// This was not a Stripe url – handle the URL normally as you would
}
}
```
#### AppDelegate
#### Swift
```swift
// This method handles opening custom URL schemes (for example, "your-app://stripe-redirect")
func application(_ app: UIApplication, open url: URL, options: [UIApplication.OpenURLOptionsKey: Any] = [:]) -> Bool {
let stripeHandled = StripeAPI.handleURLCallback(with: url)
if (stripeHandled) {
return true
} else {
// This was not a Stripe url – handle the URL normally as you would
}
return false
}
```
#### SwiftUI
#### Swift
```swift
@main
struct MyApp: App {
var body: some Scene {
WindowGroup {
Text("Hello, world!").onOpenURL { incomingURL in
let stripeHandled = StripeAPI.handleURLCallback(with: incomingURL)
if (!stripeHandled) {
// This was not a Stripe url – handle the URL normally as you would
}
}
}
}
}
```
Además, debes definir la [returnURL](https://stripe.dev/stripe-ios/stripe-paymentsheet/Classes/PaymentSheet/Configuration.html#/s:6Stripe12PaymentSheetC13ConfigurationV9returnURLSSSgvp) del objeto [PaymentSheet.Configuration](https://stripe.dev/stripe-ios/stripe-paymentsheet/Classes/PaymentSheet/Configuration.html) en la URL de tu aplicación.
```swift
var configuration = PaymentSheet.Configuration()
configuration.returnURL = "your-app://stripe-redirect"
```
## Administrar eventos posteriores al pago
Stripe envía un evento [payment_intent.succeeded](https://docs.stripe.com/api/events/types.md#event_types-payment_intent.succeeded) cuando se completa el pago. Usa la [herramienta de webhook del Dashboard](https://dashboard.stripe.com/webhooks) o sigue la [guía de webhooks](https://docs.stripe.com/webhooks/quickstart.md) para recibir estos eventos y ejecutar acciones como, por ejemplo, enviar un correo electrónico de confirmación del pedido a tu cliente, registrar la venta en una base de datos o iniciar un flujo de envío.
Escucha estos eventos en lugar de esperar una devolución de llamada del cliente. De su lado, el cliente puede cerrar la ventana del navegador o salir de la aplicación antes de que se ejecute la devolución de llamada, y clientes malintencionados podrían manipular la respuesta. Si configuras tu integración para escuchar eventos asincrónicos, podrás aceptar [diferentes tipos de métodos de pago](https://stripe.com/payments/payment-methods-guide) con una sola integración.
Además de administrar el evento `payment_intent.succeeded`, recomendamos administrar estos otros eventos si se cobran pagos con el Payment Element:
| Evento | Descripción | Acción |
| ------------------------------------------------------------------------------------------------------------------------------- | -------------------------------------------------------------------------------------------------------------------------------------------------------------------------------------------------------------------------------------------------------------- | ---------------------------------------------------------------------------------------------------------------------------------------------------------------------------------------------------- |
| [payment_intent.succeeded](https://docs.stripe.com/api/events/types.md?lang=php#event_types-payment_intent.succeeded) | Se envía cuando un cliente completa correctamente un pago. | Envía al cliente una confirmación del pedido y *completa* (Fulfillment is the process of providing the goods or services purchased by a customer, typically after payment is collected) el pedido. |
| [payment_intent.processing](https://docs.stripe.com/api/events/types.md?lang=php#event_types-payment_intent.processing) | Se envía cuando un cliente inicia con éxito un pago, pero éste aún no se completó. Este evento se envía normalmente cuando el cliente inicia un débito bancario. Le sigue un evento `payment_intent.succeeded` o `payment_intent.payment_failed` en el futuro. | Envía al cliente una confirmación del pedido que indique que el pago está pendiente. En caso de productos digitales, quizá te convenga completar el pedido antes de esperar que se complete el pago. |
| [payment_intent.payment_failed](https://docs.stripe.com/api/events/types.md?lang=php#event_types-payment_intent.payment_failed) | Enviado cuando un cliente intenta un pago, pero el pago falla. | Si un pago pasa de `processing` a `payment_failed`, ofrécele al cliente otro intento de pago. |
## Probar la integración
#### Tarjetas
| Número de tarjeta | Escenario | Cómo hacer la prueba |
| ------------------- | ----------------------------------------------------------------------------------------------------------------------------------------------------------------------------------------------------------------------------------------------------------------------------------------------- | -------------------------------------------------------------------------------------------------------------------------------------- |
| 4242424242424242 | El pago con tarjeta se efectúa correctamente y no requiere autenticación. | Completa el formulario de tarjeta de crédito con el número de tarjeta de crédito y la fecha de vencimiento, el CVC o el código postal. |
| 4000002500003155 | El pago con tarjeta requiere *autenticación* (Strong Customer Authentication (SCA) is a regulatory requirement in effect as of September 14, 2019, that impacts many European online payments. It requires customers to use two-factor authentication like 3D Secure to verify their purchase). | Completa el formulario de tarjeta de crédito con el número de tarjeta de crédito y la fecha de vencimiento, el CVC o el código postal. |
| 4000000000009995 | La tarjeta es rechazada con un código de rechazo `insufficient_funds`. | Completa el formulario de tarjeta de crédito con el número de tarjeta de crédito y la fecha de vencimiento, el CVC o el código postal. |
| 6205500000000000004 | La tarjeta UnionPay puede tener entre 13 y 19 dígitos. | Completa el formulario de tarjeta de crédito con el número de tarjeta de crédito y la fecha de vencimiento, el CVC o el código postal. |
#### Redireccionamientos bancarios
| Método de pago | Escenario | Cómo hacer la prueba |
| ----------------- | -------------------------------------------------------------------------------------------------------------------------------------------------------------------------------------------------------------------- | ------------------------------------------------------------------------------------------------------------------------------------------------------------------------------------------------------ |
| Bancontact, iDEAL | Tu cliente no pasa la autenticación en la página de redireccionamiento de un método de pago basado en redireccionamiento y con notificación inmediata. | Elige cualquier método de pago basado en redireccionamiento, completa los datos solicitados y confirma el pago. Luego, haz click en **Error en el pago de prueba** en la página de redireccionamiento. |
| Pay by Bank | Tu cliente paga satisfactoriamente con un método de pago basado en redireccionamiento y con [notificación diferida](https://docs.stripe.com/payments/payment-methods.md#payment-notification). | Elige el método de pago, completa los datos solicitados y confirma el pago. Luego, haz click en **Completar el pago de prueba** en la página de redireccionamiento. |
| Pay by Bank | Tu cliente no pasa la autenticación en la página de redireccionamiento de un método de pago basado en redireccionamiento y con notificación diferida. | Elige el método de pago, completa los datos solicitados y confirma el pago. Luego, haz click en **Error en el pago de prueba** en la página de redireccionamiento. |
| BLIK | Los pagos BLIK generan errores de varias maneras: errores inmediatos (por ejemplo, el código venció o no es válido), errores demorados (el banco lo rechaza) o tiempos de espera (el cliente no respondió a tiempo). | Usa patrones de correo electrónico para [simular los diferentes errores.](https://docs.stripe.com/payments/blik/accept-a-payment.md#simulate-failures) |
#### Débitos bancarios
| Método de pago | Escenario | Cómo hacer la prueba |
| ------------------- | --------------------------------------------------------------------------------------------- | -------------------------------------------------------------------------------------------------------------------------------------------------------------------------------------- |
| Débito directo SEPA | Tu cliente paga satisfactoriamente con débito directo SEPA. | Completa el formulario con el número de cuenta `AT321904300235473204`. El PaymentIntent confirmado pasa inicialmente al estado “en proceso” y, tres minutos más tarde, a “completado”. |
| Débito directo SEPA | El estado del intento de pago de tu cliente pasa de `processing` a `requires_payment_method`. | Completa el formulario con el número de cuenta `AT861904300235473202`. |
Consulta [Pruebas](https://docs.stripe.com/testing.md) para obtener información adicional para probar tu integración.
## Habilitar escaneo de tarjeta [Lado del cliente]
> Se requiere habilitar el escaneo de tarjetas para el proceso de revisión de aplicaciones iOS de Apple. El escaneo de tarjetas no es necesario para el proceso de revisión de aplicaciones Android, pero recomendamos habilitarlo.
### iOS
A fin de habilitar el soporte para escaneo de tarjetas para iOS, establece `NSCameraUsageDescription` (**Privacidad: descripción del uso de la cámara**) en el `Info.plist` de tu aplicación y especifica el motivo por el que se necesita acceder a la cámara (por ejemplo, «Para escanear tarjetas»).
### (Optional) Android
Para obtener soporte al escanear tarjetas, [solicita el acceso de producción](https://developers.google.com/pay/api/android/guides/test-and-deploy/request-prod-access) a la API de Google Pay desde [Google Pay and Wallet Console](https://pay.google.com/business/console?utm_source=devsite&utm_medium=devsite&utm_campaign=devsite).
- Si habilitaste Google Pay, la funcionalidad para escanear tarjetas está disponible de forma automática en nuestra interfaz de usuario (IU) en los dispositivos compatibles. Para obtener más información sobre los dispositivos compatibles, consulta las [restricciones de la API de Google Pay](https://developers.google.com/pay/payment-card-recognition/debit-credit-card-recognition).
- **Importante:** La funcionalidad para escanear tarjetas solo aparece en compilaciones firmadas con la misma clave de firma registrada en [Google Pay & Wallet Console](https://pay.google.com/business/console). Las compilaciones de prueba o depuración que usen claves de firma diferentes (por ejemplo, compilaciones distribuidas a través de Firebase App Tester) no mostrarán la opción **Escanear tarjeta**. Para probar el escaneo de tarjetas en compilaciones previas al lanzamiento, debes realizar lo siguiente:
- Firma tus compilaciones de prueba con tu clave de firma de producción
- Agrega la huella digital de tu clave de firma de prueba a Google Pay and Wallet Console
Si tu aplicación no admite Google Pay, puedes usar el escáner de tarjetas de Stripe.
> El escáner de tarjetas de Stripe está en versión preliminar pública.
Para habilitar soporte para escanear tarjetas, agrega `stripecardscan` al bloque `de dependencias` de tu archivo [app/build.gradle](https://developer.android.com/studio/build/dependencies):
#### Groovy
```groovy
implementation 'com.stripe:stripecardscan:23.7.0'
```
## Optional: Habilitar Apple Pay
### Inscribirse para obtener un ID de comerciante Apple
Obtén un ID de comerciante Apple [solicitando un nuevo identificador](https://developer.apple.com/account/resources/identifiers/add/merchant) en el sitio web de desarrolladores de Apple.
Completa el formulario con una descripción y el identificador. La descripción es para tus registros y se puede modificar en el futuro. Stripe recomienda usar el nombre de tu aplicación como identificador (por ejemplo, `merchant.com.{{YOUR_APP_NAME}}`).
### Crear un nuevo certificado de Apple Pay
Crea un certificado para que tu aplicación cifre los datos de pago.
Ve a [Configuración de certificados de iOS](https://dashboard.stripe.com/settings/ios_certificates) en el Dashboard, haz clic en **Agregar nueva aplicación** y sigue la guía.
Descarga un archivo de solicitud de firma de certificado (CSR) para obtener un certificado seguro de Apple que te permita utilizar Apple Pay.
Se debe usar un archivo CSR para emitir exactamente un certificado. Si cambias tu ID de comerciante de Apple, debes ir a la [Configuración de certificados de iOS](https://dashboard.stripe.com/settings/ios_certificates) en el Dashboard para obtener una nueva CSR y un nuevo certificado.
### Integrarse con Xcode
Agrega la funcionalidad Apple Pay a tu aplicación. En Xcode, abre la configuración del proyecto, selecciona la pestaña **Firma y funcionalidades** y agrega la funcionalidad **Apple Pay**. En este paso, quizá se te solicite iniciar sesión en tu cuenta de desarrollador. Selecciona el ID de comerciante que creaste antes, y tu aplicación estará lista para aceptar Apple Pay.

Habilitar la funcionalidad Apple Pay en Xcode
### Agregar Apple Pay
#### Pago único
Especifica tu ID de comerciante al crear `StripeProvider`:
```javascript
import { StripeProvider } from '@stripe/stripe-react-native';
function App() {
return (
{/* Your app code here */}
);
}
```
Cuando accedes a `initPaymentSheet`, ingresa tus [parámetros de Apple Pay](https://stripe.dev/stripe-react-native/api-reference/modules/PaymentSheet.html#ApplePayParams):
```javascript
await initPaymentSheet({
// ...
applePay: {
merchantCountryCode: 'US',
},
});
```
#### Pagos recurrentes
Cuando accedes a `initPaymentSheet`, introduce los [parámetros de Apple Pay](https://stripe.dev/stripe-react-native/api-reference/modules/PaymentSheet.html#ApplePayParams) con `merchantCountryCode` establecido en el código de país de tu empresa.
De acuerdo con las [pautas de Apple](https://developer.apple.com/design/human-interface-guidelines/apple-pay#Supporting-subscriptions) para pagos recurrentes, también debes establecer un `cardItem` que incluya un [RecurringCartSummaryItem](https://stripe.dev/stripe-react-native/api-reference/modules/ApplePay.html#RecurringCartSummaryItem) con el importe que pretendes cobrar (por ejemplo, “USD 59.95 al mes”).
También puedes adoptar [tokens de comerciante](https://developer.apple.com/apple-pay/merchant-tokens/) estableciendo la `request` con su `type` establecido en `PaymentRequestType.Recurring`
Para obtener más información sobre cómo usar pagos recurrentes con Apple Pay, consulta la [documentación de PassKit de Apple](https://developer.apple.com/documentation/passkit/pkpaymentrequest).
#### iOS (React Native)
```javascript
const initializePaymentSheet = async () => {
const recurringSummaryItem = {
label: 'My Subscription',
amount: '59.99',
paymentType: 'Recurring',
intervalCount: 1,
intervalUnit: 'month',
// Payment starts today
startDate: new Date().getTime() / 1000,
// Payment ends in one year
endDate: new Date().getTime() / 1000 + 60 * 60 * 24 * 365,
};
const {error} = await initPaymentSheet({
// ...
applePay: {
merchantCountryCode: 'US',
cartItems: [recurringSummaryItem],
request: {
type: PaymentRequestType.Recurring,
description: 'Recurring',
managementUrl: 'https://my-backend.example.com/customer-portal',
billing: recurringSummaryItem,
billingAgreement:
"You'll be billed $59.99 every month for the next 12 months. To cancel at any time, go to Account and click 'Cancel Membership.'",
},
},
});
};
```
### Seguimiento de pedidos
Para agregar información [de seguimiento de pedidos](https://developer.apple.com/design/human-interface-guidelines/technologies/wallet/designing-order-tracking) en iOS 16 o posterior, configura una función de de llamada`setOrderTracking`. Stripe llama a tu implementación después de que se complete el pago, pero antes de que iOS descarte la hoja de Apple Pay.
En su implementación de la función de devolución de llamada `setOrderTracking`, obtén los detalles del pedido de tu servidor para el pedido completado y transfiere los datos a la función de `completion` proporcionada.
Para obtener más información sobre el seguimiento de pedidos, consulta la [documentación sobre pedidos de billetera de Apple](https://developer.apple.com/documentation/walletorders).
#### iOS (React Native)
```javascript
await initPaymentSheet({
// ...
applePay: {
// ...
setOrderTracking: async complete => {
const apiEndpoint =
Platform.OS === 'ios'
? 'http://localhost:4242'
: 'http://10.0.2.2:4567';
const response = await fetch(
`${apiEndpoint}/retrieve-order?orderId=${orderId}`,
{
method: 'GET',
headers: {
'Content-Type': 'application/json',
},
},
);
if (response.status === 200) {
const orderDetails = await response.json();
// orderDetails should include orderIdentifier, orderTypeIdentifier,
// authenticationToken and webServiceUrl
complete(orderDetails);
}
},
},
});
```
## Optional: Activar Google Pay
### Configura tu integración
Para usar Google Pay, primero habilita la API de Google Pay agregando lo siguiente a la etiqueta `` de tu **AndroidManifest.xml**:
```xml
...
```
Para obtener más detalles, consulta cómo [configurar la API de Google Pay](https://developers.google.com/pay/api/android/guides/setup) para Android en Google Pay.
### Agregar Google Pay
Al inicializar `PaymentSheet`. establece `merchantCountryCode` en el código de país de tu empresa y establece `googlePay` en verdadero.
También puedes usar el entorno de prueba especificando el parámetro `testEnv`. Solo puedes probar Google Pay en un dispositivo Android físico. Sigue la [documentación de React Native](https://reactnative.dev/docs/running-on-device) para probar tu aplicación en un dispositivo físico.
```javascript
const { error, paymentOption } = await initPaymentSheet({
// ...
googlePay: {
merchantCountryCode: 'US',
testEnv: true, // use test environment
},
});
```
## Optional: Personalizar la hoja
Todo lo que se quiera personalizar se configura usando `initPaymentSheet`.
### Aspecto
Personaliza los colores y las fuentes, entre otros elementos, para que combinen con tu aplicación con la [API Appearance](https://docs.stripe.com/elements/appearance-api/mobile.md?platform=react-native).
### Nombre de pantalla para el comerciante
Especifica el nombre que quieres que el cliente vea para tu empresa configurando `merchantDisplayName`. El valor predeterminado es el nombre de tu aplicación.
```javascript
await initPaymentSheet({
// ...
merchantDisplayName: 'Example Inc.',
});
```
### Modo oscuro
De forma predeterminada, `PaymentSheet` se adapta automáticamente a la configuración de aspecto de todo el sistema del usuario (modo claro y modo oscuro). Puedes cambiarla definiendo la propiedad `style` en `alwaysLight` o `alwaysDark` en iOS.
```javascript
await initPaymentSheet({
// ...
style: 'alwaysDark',
});
```
En Android, debes definir modo claro u oscuro en tu aplicación:
```
// force dark
AppCompatDelegate.setDefaultNightMode(AppCompatDelegate.MODE_NIGHT_YES)
// force light
AppCompatDelegate.setDefaultNightMode(AppCompatDelegate.MODE_NIGHT_NO)
```
### Datos de facturación predeterminados
Para establecer los valores predeterminados para los datos de facturación recopilados en PaymentSheet, configura la propiedad `defaultBillingDetails`. Los campos de `PaymentSheet` se completan automáticamente con los valores que proporcionas.
```javascript
await initPaymentSheet({
// ...
defaultBillingDetails: {
email: 'foo@bar.com',
address: {
country: 'US',
},
},
});
```
### Recopila datos de facturación
Usa`billingDetailsCollectionConfiguration` para especificar cómo deseas recopilar los datos de facturación en PaymentSheet.
Puedes recopilar el nombre, el correo electrónico, el número de teléfono y la dirección del cliente.
Si no tienes intención de recopilar los valores que exige el método de pago, debes hacer lo siguiente:
1. Adjunta los valores no recopilados por `PaymentSheet` a la propiedad `defaultBillingDetails`.
1. Configura `billingDetailsCollectionConfiguration.attachDefaultsToPaymentMethod` en `true`.
```javascript
await initPaymentSheet({
// ...
defaultBillingDetails: {
email: 'foo@bar.com',
},
billingDetailsCollectionConfiguration: {
name: PaymentSheet.CollectionMode.ALWAYS,
email: PaymentSheet.CollectionMode.NEVER,
address: PaymentSheet.AddressCollectionMode.FULL,
attachDefaultsToPaymentMethod: true
},
});
```
> Pregúntale a tu asesor legal sobre las leyes que se aplican a la recopilación de información. Solicita los números de teléfono solo si los necesitas para la transacción.
## Optional: Completa el pago en tu interfaz de usuario
Puedes presentar una hoja de pago para recopilar solo los datos del método de pago y luego llamar al método `confirm` para completar el pago en la interfaz de usuario de tu aplicación. Esto resulta útil si tienes un botón de compra personalizado o solicitas pasos adicionales después de recopilar los datos del pago.

> Un ejemplo de integración [está a tu disposición en nuestro GitHub](https://github.com/stripe/stripe-react-native/blob/master/example/src/screens/PaymentsUICustomScreen.tsx).
1. Primero, llama a `initPaymentSheet` y especifica `customFlow: true`. `initPaymentSheet` se resuelve con una opción de pago inicial que contiene una imagen y una etiqueta que representan el método de pago del cliente. Actualiza tu interfaz de usuario con estos datos.
```javascript
const {
initPaymentSheet,
presentPaymentSheet,
confirmPaymentSheetPayment,
} = useStripe()
const { error, paymentOption } = await initPaymentSheet({
customerId: customer,
customerEphemeralKeySecret: ephemeralKey,
paymentIntentClientSecret: paymentIntent,
customFlow: true,
merchantDisplayName: 'Example Inc.',
});
// Update your UI with paymentOption
```
1. Usa `presentPaymentSheet` para recopilar datos del pago. Una vez que el cliente termina, la hoja se cierra y se resuelve la promesa. Actualiza la interfaz de usuario (IU) con los datos del método de pago elegido.
```javascript
const { error, paymentOption } = await presentPaymentSheet();
```
1. Usa `confirmPaymentSheetPayment` para confirmar el pago. Esto se resuelve con el resultado del pago.
```javascript
const { error } = await confirmPaymentSheetPayment();
if (error) {
Alert.alert(`Error code: ${error.code}`, error.message);
} else {
Alert.alert(
'Success',
'Your order is confirmed!'
);
}
```
Establecer `allowsDelayedPaymentMethods` en true permite aceptar métodos de pago de [notificación diferida](https://docs.stripe.com/payments/payment-methods.md#payment-notification) como cuentas bancarias en EE. UU. Para estos métodos de pago, el estado final del pago no se conoce cuando se completa el `PaymentSheet`, sino que se efectúa con éxito o falla más tarde. Si aceptas este tipo de métodos de pago, infórmale al cliente que su pedido está confirmado y solo finalízalo (por ejemplo, envía el producto) cuando el pago se realice correctamente.
## Optional: Habilitar métodos de pago adicionales
Ve a [Administrar métodos de pago para cuentas conectadas](https://dashboard.stripe.com/settings/payment_methods/connected_accounts) en el Dashboard para configurar qué métodos de pago aceptan tus cuentas conectadas. Los cambios en la configuración predeterminada se aplican a todas las cuentas conectadas nuevas y existentes.
Consulta los siguientes recursos para obtener información sobre los métodos de pago:
- [Guía de métodos de pago](https://stripe.com/payments/payment-methods-guide#choosing-the-right-payment-methods-for-your-business) para ayudarte a elegir los métodos de pago correctos para tu plataforma.
- [Funcionalidades de cuenta](https://docs.stripe.com/connect/account-capabilities.md) para asegurarte de que los métodos de pago que elegiste funcionen en tus cuentas conectadas.
- Consulta las tablas de [admisibilidad de métodos de pago y de productos](https://docs.stripe.com/payments/payment-methods/payment-method-support.md#product-support) para asegurarte de que los métodos de pago elegidos funcionen para tus productos y flujos de pago de Stripe.
Para cada método de pago, puedes seleccionar una de las siguientes opciones desplegables:
| |
| |
| **Activado de manera predeterminada** | Tus cuentas conectadas aceptan este método de pago durante el proceso de compra. Algunos métodos de pago solo pueden estar desactivados o bloqueados. Esto se debe a que tus cuentas conectadas con *acceso al Dashboard de Stripe* (Platforms can provide connected accounts with access to the full Stripe Dashboard or the Express Dashboard. Otherwise, platforms build an interface for connected accounts using embedded components or the Stripe API) deben activarlas en su página de configuración. |
| **Desactivado de manera predeterminada** | Tus cuentas conectadas no aceptan este método de pago durante el proceso de compra. Si permites que tus cuentas conectadas con *acceso al Dashboard de Stripe* (Platforms can provide connected accounts with access to the full Stripe Dashboard or the Express Dashboard. Otherwise, platforms build an interface for connected accounts using embedded components or the Stripe API) administren sus propios métodos de pago, podrán activarlo. |
| **Bloqueado** | Tus cuentas conectadas no aceptan este método de pago durante el proceso de compra. Si permites que tus cuentas conectadas con *acceso al Dashboard de Stripe* (Platforms can provide connected accounts with access to the full Stripe Dashboard or the Express Dashboard. Otherwise, platforms build an interface for connected accounts using embedded components or the Stripe API) administren sus propios métodos de pago, no tendrán la opción para activarlo. |

Opciones de métodos de pago
Si realizas un cambio en un método de pago, debes hacer clic en **Revisar cambios** en la barra inferior de la pantalla y en **Guardar y aplicar** para actualizar tus cuentas conectadas.

Cuadro de diálogo Guardar
### Permite que las cuentas conectadas gestionen los métodos de pago
Stripe recomienda permitir que tus cuentas conectadas personalicen sus propios métodos de pago. Esta opción le permite a cada cuenta conectada con *acceso al Dashboard de Stripe* (Platforms can provide connected accounts with access to the full Stripe Dashboard or the Express Dashboard. Otherwise, platforms build an interface for connected accounts using embedded components or the Stripe API) ver y actualizar página [Métodos de pago](https://dashboard.stripe.com/settings/payment_methods). Solo los propietarios de las cuentas conectadas pueden personalizar sus métodos de pago. El Dashboard de Stripe muestra el conjunto de métodos de pago predeterminados que aplicaste a todas las cuentas conectadas nuevas y existentes. Tus cuentas conectadas pueden anular estos valores predeterminados, excluyendo los métodos de pago que hayas bloqueado.
Marca la casilla de verificación **Personalización de la cuenta** para habilitar esta opción. Debes hacer clic en **Revisar cambios** en la barra inferior de la pantalla y luego seleccionar **Guardar y aplicar** para actualizar esta configuración.

Casilla de verificación de personalización de la cuenta
### Capacidades de métodos de pago
Para permitir que tus cuentas conectadas acepten métodos de pago adicionales, sus `cuentas` deben tener funcionalidades de métodos de pago activos.
Si seleccionaste la opción “Activado por defecto” para un método de pago en [Gestionar métodos de pago para tus cuentas conectadas](https://dashboard.stripe.com/settings/payment_methods/connected_accounts), Stripe solicita automáticamente la funcionalidad necesaria para las cuentas conectadas nuevas y las existentes si cumplen con los requisitos de verificación. Si la cuenta conectada no cumple con los requisitos o si quieres tener control directo, puedes solicitar de forma manual la funcionalidad en el dashboard o con la API.
La mayoría de los métodos de pago tienen los mismos requisitos de verificación que la funcionalidad `card_payments`, con algunas restricciones y excepciones. En el [cuadro](https://docs.stripe.com/connect/account-capabilities.md#payment-methods) figuran las funcionalidades de métodos de pago que requieren verificación adicional.
#### Dashboard
[Busca una cuenta conectada](https://docs.stripe.com/connect/dashboard/managing-individual-accounts.md#finding-accounts) en el dashboard para editar sus funcionalidades y ver los requisitos de verificación pendientes.
#### API
Para una cuenta conectada existente, puedes [enumerar](https://docs.stripe.com/api/capabilities/list.md) sus funcionalidades existentes para determinar si necesitas solicitar funcionalidades adicionales.
```curl
curl https://api.stripe.com/v1/accounts/{{CONNECTEDACCOUNT_ID}}/capabilities \
-u "<>:"
```
Solicita funcionalidades adicionales [actualizando](https://docs.stripe.com/api/capabilities/update.md) las funcionalidades de cada cuenta conectada.
```curl
curl https://api.stripe.com/v1/accounts/{{CONNECTEDACCOUNT_ID}}/capabilities/us_bank_account_ach_payments \
-u "<>:" \
-d requested=true
```
Puede haber un retraso antes de que la capacidad solicitada se active. Si la capacidad tiene algún requisito de activación, la respuesta lo incluye en las matrices de `requirements`.
## Cobra comisiones
Como plataforma, puedes aceptar pagos en tus cuentas conectadas por una parte de cada transacción en forma de comisiones de solicitud. Puedes establecer las comisiones de la plataforma de las siguientes maneras:
- Utiliza la [herramienta de tarifas de la plataforma](https://docs.stripe.com/connect/platform-pricing-tools.md) para establecer y probar las reglas de tarifas. Esta función que no requiere programación del Dashboard de Stripe solo está disponible actualmente para plataformas responsables de pagar las comisiones de Stripe.
- Especifica las comisiones de la solicitud directamente en un [PaymentIntent](https://docs.stripe.com/api/payment_intents/object.md). Las comisiones establecidas con este método anulan la lógica de tarifas especificada en la herramienta de tarifas de la plataforma.
Tu plataforma puede cobrar una comisión de la plataforma con las siguientes limitaciones:
- El valor del importe de la comisión de la aplicación (`application_fee_amount`) debe ser positivo e inferior al importe del cargo. El importe del cargo es el tope de la comisión de la plataforma que se puede cobrar.
- No se aplican comisiones adicionales de Stripe a la comisión de la plataforma en sí.
- En concordancia con los requisitos reglamentarios y de cumplimiento normativo de Brasil, las plataformas establecidas fuera de Brasil con cuentas conectadas brasileñas no pueden cobrar comisiones de la plataforma a través de Stripe.
- La moneda de `application_fee_amount` depende de algunos factores de [varias monedas](https://docs.stripe.com/connect/currencies.md).
La [BalanceTransaction](https://docs.stripe.com/api.md#balance_transaction_retrieve) del cargo resultante incluye un desglose detallado de las comisiones tanto de Stripe como de la solicitud. Para ofrecer una mejor experiencia de elaboración de informes, el cobro de una comisión genera un objeto [ApplicationFee](https://docs.stripe.com/api/application_fees/object.md). Utiliza la propiedad `amount` del objeto `ApplicationFee` para la elaboración de informes.
Puedes ver las comisiones de solicitud en la sección [Comisiones cobradas](https://dashboard.stripe.com/connect/application_fees) del Dashboard.
> De manera predeterminada, las comisiones de la plataforma para cargos directos se crean de forma asincrónica. Si expandes el objeto `application_fee` en una solicitud de creación de cargo, la comisión de la plataforma se crea sincrónicamente como parte de esa solicitud. Solo expande el objeto `application_fee` si es necesario, ya que aumenta la latencia de la solicitud.
>
> Para recibir notificaciones de los objetos `ApplicationFee` creados de forma asincrónica, escucha el evento webhook [application_fee.created](https://docs.stripe.com/api/events/types.md#event_types-application_fee.created).
## Emitir rembolsos
De la misma manera que las plataformas pueden crear cargos en las cuentas conectadas, también pueden crear reembolsos de cargos en las cuentas conectadas. [Crea un reembolso](https://docs.stripe.com/api.md#create_refund) con la clave secreta de tu plataforma estando [autenticado](https://docs.stripe.com/connect/authentication.md#stripe-account-header) como cuenta conectada.
Las comisiones de la aplicación no se reembolsan automáticamente al emitir el reembolso. Tu plataforma debe reembolsar expresamente la comisión de la aplicación, o la cuenta conectada (la cuenta en la que se creó el cargo) perderá ese importe. Puedes reembolsar la comisión de la aplicación pasando el valor `refund_application_fee` de **true** en la solicitud de reembolso:
```curl
curl https://api.stripe.com/v1/refunds \
-u "<>:" \
-H "Stripe-Account: {{CONNECTEDACCOUNT_ID}}" \
-d "charge={{CHARGE_ID}}" \
-d refund_application_fee=true
```
De forma predeterminada, se reembolsa el total del cargo, pero puedes crear un reembolso parcial estableciendo un valor de `amount` como un número entero positivo. Si el reembolso implica que se reembolsa el total del cargo, se reembolsa el total de la comisión de la plataforma. De lo contrario, se reembolsa un importe proporcional de la comisión de la plataforma. Como alternativa, puedes proporcionar un valor de `refund_application_fee` de **false** y [reembolsar la comisión de la plataforma](https://docs.stripe.com/api.md#create_fee_refund) por separado.
## Componentes integrados de Connect
Los [componentes integrados de Connect](https://docs.stripe.com/connect/get-started-connect-embedded-components.md) admiten cargos directos. Cuando usas el [componente integrado de pagos](https://docs.stripe.com/connect/supported-embedded-components/payments.md), puedes permitir que tus cuentas conectadas vean la información de pago, capturen cargos y gestionen disputas desde tu sitio.
Note: The following is a preview/demo component that behaves differently than live mode usage with real connected accounts. The actual component has more functionality than what might appear in this demo component. For example, for connected accounts without Stripe dashboard access (custom accounts), no user authentication is required in production.
Los siguientes componentes muestran información para cargos directos:
- [Componente de pago](https://docs.stripe.com/connect/supported-embedded-components/payments.md): muestra todos los pagos y las disputas de una cuenta.
- [Detalles de pagos](https://docs.stripe.com/connect/supported-embedded-components/payment-details.md): Muestra información para un pago específico.
- [Componente de lista de disputas](https://docs.stripe.com/connect/supported-embedded-components/disputes-list.md): muestra todas las disputas de una cuenta.
- [Disputas para un componente de pago](https://docs.stripe.com/connect/supported-embedded-components/disputes-for-a-payment.md): muestra las disputas para un solo pago especificado. Puedes usarlo para incluir funcionalidades para gestionar disputas en una página con tu interfaz de usuario (IU) de pagos.
## See also
- [Cómo trabajar con varias monedas](https://docs.stripe.com/connect/currencies.md)
- [Descripción del cargo en el extracto bancario con Connect](https://docs.stripe.com/connect/statement-descriptors.md)