Crea cargos Direct
Crea cargos directamente en la cuenta conectada y cobra una comisión.
Crea cargos directos cuando los clientes realicen la transacción directamente con una cuenta conectada, a menudo sin saber que existe tu plataforma. Con cargos directos:
- El pago aparece como cargo en la cuenta conectada, no en la cuenta de tu plataforma.
- El saldo de la cuenta conectada aumenta con cada pago.
- El saldo de tu cuenta aumenta con las comisiones de la aplicación recibidas de cada pago.
Este tipo de cargo es el más adecuado para las plataformas que proporcionan software como servicio. Por ejemplo, Shopify proporciona herramientas para crear tiendas en línea, y Thinkific permite a quienes ofrecen cursos de educación venderlos en línea.
Limitaciones de visibilidad de la plataforma
Los cargos Direct tienen una visibilidad limitada a nivel de plataforma. Cuando creas cargos Direct, sucede lo siguiente:
- Los objetos de transacción como
PaymentIntentsyChargesexisten en la cuenta conectada, no en la plataforma. - Para acceder a los datos de cargos Direct, debes realizar una consulta a la API de Stripe utilizando el ID de la cuenta conectada en la cabecera Stripe-Account.
Este comportamiento de alcance afecta a servicios de sincronización de datos como Fivetran, así como a otras integraciones de terceros que dependen de consultas a la API a nivel de plataforma. Para recuperar datos de cargos Direct, deben consultar la cuenta conectada, no la plataforma.
Nota
Recomendamos usar cargos directos para las cuentas conectadas que tienen acceso al Dashboard completo de Stripe.

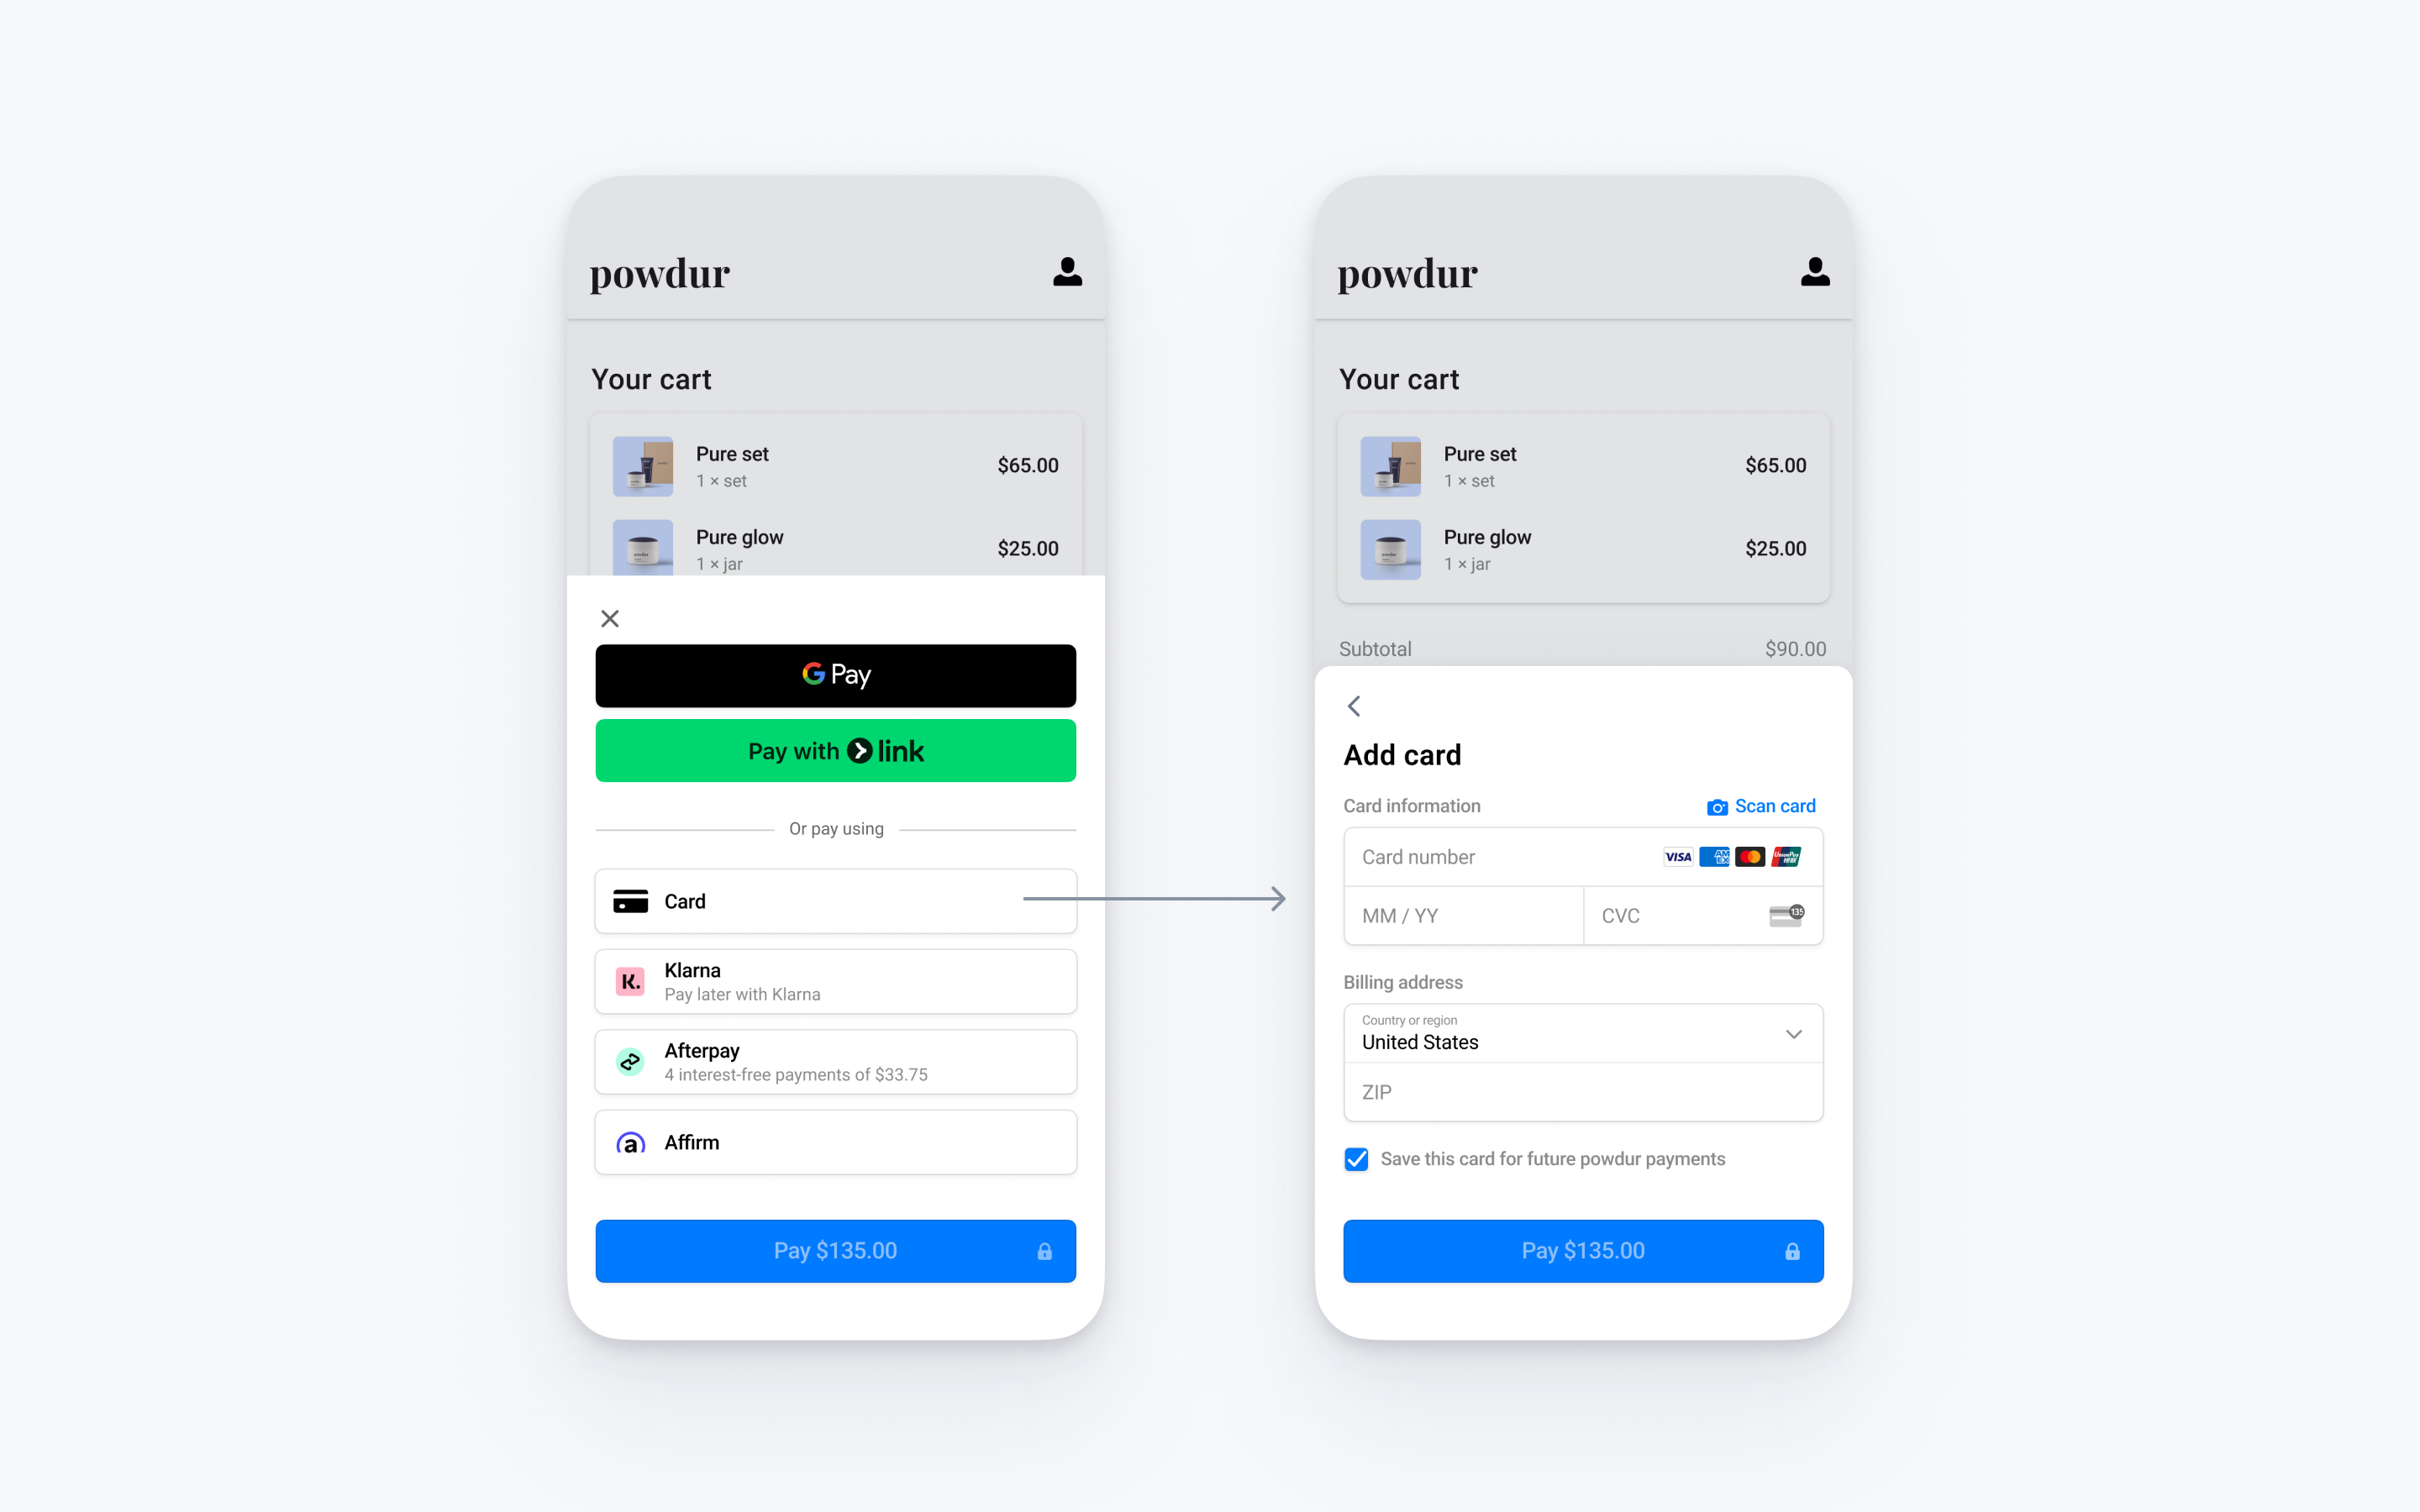
Integra la interfaz de usuario de pago prediseñada de Stripe a la confirmación de compra de tu aplicación Android con la clase PaymentSheet.
Configura StripeLado del servidorLado del cliente
Primero, necesitas una cuenta de Stripe. Inscríbete ahora.
Lado del servidor
Esta integración necesita puntos de conexión en tu servidor que se comuniquen con la API de Stripe. Usa las bibliotecas oficiales para acceder a la API de Stripe desde tu servidor:
Lado del cliente
El SDK para Android de Stripe es de código abierto y está completamente documentado.
Para instalar el SDK, agrega stripe-android al bloque dependencies de tu archivo app/build.gradle:
Nota
Para conocer detalles de la última versión y de versiones anteriores del SDK, consulta la página Versiones en GitHub. Para recibir una notificación cuando se publique una nueva versión, mira las versiones del repositorio.
Configura el SDK con tu clave publicable de Stripe para que pueda hacer solicitudes a la API de Stripe, así como en tu subclase Application:
Nota
Usa las claves de prueba durante las pruebas y el desarrollo, y tus claves para modo activo cuando publiques tu aplicación.
Agregar un punto de conexiónLado del servidor
Nota
Para mostrar la PaymentSheet antes de crear un PaymentIntent, consulta Recopila datos de pago antes de crear un Intent.
Esta integración usa tres objetos de la API de Stripe:
PaymentIntent: Stripe lo utiliza para representar tu intención de cobrarle a un cliente, haciendo el seguimiento de los intentos de cobro y de los cambios en el estado del pago a lo largo del proceso.
(Opcional) Cliente: Para configurar un método de pago para pagos futuros, debes adjuntarlo a un Cliente. Crea el “Customer Object” cuando tu cliente cree una cuenta en tu empresa. Si tu cliente hace un pago como invitado, puedes crear un “Customer Object” antes del pago y asociarlo con tu propia representación interna de la cuenta del cliente más adelante.
(Opcional) CustomerSession: La información que contiene el “Customer Object” es confidencial y no se puede recuperar directamente desde una aplicación. Una CustomerSession otorga al SDK acceso temporal al objeto Customer y proporciona más opciones de configuración. Consulta una lista completa de opciones de configuración.
Nota
Si nunca guardas tarjetas para un cliente y no permites que los clientes frecuentes vuelvan a usar tarjetas guardadas, puedes omitir los objetos Customer y CustomerSession en tu integración.
Por motivos de seguridad, tu aplicación no puede crear estos objetos. En su lugar, agrega un punto de conexión en tu servidor que haga lo siguiente:
- Recupere el objeto Customer o cree uno nuevo.
- Crea una CustomerSession para el cliente.
- Crea un PaymentIntent con el importe, la moneda y el cliente.
- Devuelve a tu aplicación el secreto de cliente del Payment Intent, el
client_de CustomerSession, la ID del cliente y tu clave publicable.secret
Los métodos de pago que se muestran a los clientes durante el proceso de compra también se incluyen en el PaymentIntent. Puedes permitir que Stripe extraiga los métodos de pago de tu configuración del Dashboard o puedes enumerarlos manualmente. Independientemente de la opción que elijas, debes saber que la moneda especificada en el PaymentIntent filtra los métodos de pago que se muestran al cliente. Por ejemplo, si especificas eur en el PaymentIntent y tienes habilitado OXXO en el Dashboard, OXXO no se mostrará al cliente porque OXXO no admite pagos en eur.
A menos que tu integración requiera una opción basada en código para ofrecer métodos de pago, Stripe recomienda usar la opción automatizada. Esto se debe a que Stripe evalúa la moneda, las restricciones de los métodos de pago y otros parámetros para determinar la lista de métodos de pago admitidos. Se les da prioridad a los métodos de pago que aumentan la conversión y guardan mayor relación con la moneda y la ubicación del cliente.
Integrar la hoja de pagoLado del cliente
Antes de mostrar el Payment Element móvil, tu página de finalización de compra debe cumplir con los siguientes requisitos:
- Mostrar los productos de la compra y el importe total
- Recopilar cualquier dato de envío requerido usando el Address Element
- Incluye un botón de confirmación de compra para presentar la interfaz de usuario de Stripe
Establecer allowsDelayedPaymentMethods en true permite aceptar métodos de pago de notificación diferida como cuentas bancarias en EE. UU. Para estos métodos de pago, el estado final del pago no se conoce cuando se completa el PaymentSheet, sino que se efectúa con éxito o falla más tarde. Si aceptas este tipo de métodos de pago, infórmale al cliente que su pedido está confirmado y solo finalízalo (por ejemplo, envía el producto) cuando el pago se realice correctamente.
Administrar eventos posteriores al pagoLado del servidor
Stripe envía un evento payment_intent.succeeded cuando se completa el pago. Usa la herramienta de webhook del Dashboard o sigue la guía de webhooks para recibir estos eventos y ejecutar acciones como, por ejemplo, enviar un correo electrónico de confirmación del pedido a tu cliente, registrar la venta en una base de datos o iniciar un flujo de envío.
Escucha estos eventos en lugar de esperar una devolución de llamada del cliente. De su lado, el cliente puede cerrar la ventana del navegador o salir de la aplicación antes de que se ejecute la devolución de llamada, y clientes malintencionados podrían manipular la respuesta. Si configuras tu integración para escuchar eventos asincrónicos, podrás aceptar diferentes tipos de métodos de pago con una sola integración.
Además de administrar el evento payment_, recomendamos administrar estos otros eventos si se cobran pagos con el Payment Element:
| Evento | Descripción | Acción |
|---|---|---|
| payment_intent.succeeded | Se envía cuando un cliente completa correctamente un pago. | Envía al cliente una confirmación del pedido y completa el pedido. |
| payment_intent.processing | Se envía cuando un cliente inicia con éxito un pago, pero éste aún no se completó. Este evento se envía normalmente cuando el cliente inicia un débito bancario. Le sigue un evento payment_ o payment_ en el futuro. | Envía al cliente una confirmación del pedido que indique que el pago está pendiente. En caso de productos digitales, quizá te convenga completar el pedido antes de esperar que se complete el pago. |
| payment_intent.payment_failed | Enviado cuando un cliente intenta un pago, pero el pago falla. | Si un pago pasa de processing a payment_, ofrécele al cliente otro intento de pago. |
Probar la integración
Consulta Pruebas para obtener información adicional para probar tu integración.
OpcionalActivar Google Pay
Configura tu integración
Para usar Google Pay, primero habilita la API de Google Pay agregando lo siguiente a la etiqueta <application> de tu AndroidManifest.xml:
<application>
  ...
  <meta-data
    android:name="com.google.android.gms.wallet.api.enabled"
    android:value="true" />
</application>
Para obtener más detalles, consulta cómo configurar la API de Google Pay para Android en Google Pay.
Agregar Google Pay
Para agregar Google Pay a tu integración, especifica un PaymentSheet.GooglePayConfiguration con tu entorno de Google Pay (de producción o de prueba) y el código de país de tu empresa al inicializar PaymentSheet.Configuration.
Prueba Google Pay
Google te permite realizar pagos de prueba a través de su tarjeta Test card suite. El conjunto de pruebas admite el uso de tarjetas de prueba de Stripe.
Debes probar Google Pay usando un dispositivo Android físico en lugar de un dispositivo simulado, en un país donde se admite Google Pay. Inicia sesión en una cuenta Google en tu dispositivo de prueba con una tarjeta real guardada en Google Wallet.
OpcionalPersonalizar la hoja
Todo lo que se quiera personalizar se configura usando el objeto PaymentSheet.Configuration.
Appearance
Personaliza los colores y las fuentes, entre otros elementos, para que combinen con tu aplicación usando la API Appearance.
Diseño del método de pago
Configura el diseño de los métodos de pago en la hoja con paymentMethodLayout. Puedes mostrarlos horizontalmente, verticalmente o dejar que Stripe optimice el diseño de manera automática.

Recopilar las direcciones de los usuarios
Recopila las direcciones de envío o facturación locales e internacionales de tus clientes usando el Address Element.
Nombre con el que aparecerá la empresa
Especifica el nombre que quieres que el cliente vea para tu empresa configurando merchantDisplayName. De manera predeterminada, este es el nombre de tu aplicación.
Modo oscuro
De forma predeterminada, PaymentSheet se adapta automáticamente a la configuración de aspecto de todo el sistema del usuario (modo claro y modo oscuro). Puedes cambiarla definiendo modo claro o modo oscuro en tu aplicación:
Datos de facturación predeterminados
Para establecer los valores predeterminados para los datos de facturación recopilados en la hoja de pago, configura la propiedad defaultBillingDetails. Los campos de la PaymentSheet se rellenan automáticamente con los valores que proporcionas.
Configura la recopilación de datos de facturación
Usa BillingDetailsCollectionConfiguration para especificar cómo deseas recopilar los datos de facturación en la PaymentSheet.
Puedes recopilar el nombre, el correo electrónico, el número de teléfono y la dirección del cliente.
Si quieres adjuntar datos de facturación predeterminados al objeto PaymentMethod aun cuando esos campos no se hayan recopilado en la interfaz de usuario, establece billingDetailsCollectionConfiguration. en true.
Nota
Pregúntale a tu asesor legal sobre las leyes que se aplican a la recopilación de información. Solicita los números de teléfono solo si los necesitas para la transacción.
OpcionalCompleta el pago en tu interfaz de usuario
Puedes presentar una hoja de pago para recopilar solo los datos del método de pago y completar el pago en la interfaz de usuario de tu aplicación. Esto resulta útil si tienes un botón de compra personalizado o solicitas pasos adicionales después de recopilar los datos del pago.

Nota
Una integración de ejemplo está disponible en nuestro GitHub.
- Primero, inicializa PaymentSheet.FlowController en lugar de
PaymentSheetusando uno de los métodos Builder.
- A continuación, llama a
configureWithPaymentIntentcon las claves de objeto de Stripe recuperadas del backend y actualiza tu interfaz de usuario en la devolución de llamada usando getPaymentOption(). Contiene una imagen y una etiqueta que representan el método de pago seleccionado actualmente por el cliente.
- A continuación, llama a presentPaymentOptions para recopilar los datos del pago. Cuando el cliente termina, la hoja se cierra y llama al paymentResultCallback especificado anteriormente en
create. Implementa este método para actualizar tu interfaz de usuario con lapaymentOptiondevuelta.
- Finalmente, llama a confirm para completar el pago. Cuando el cliente termina, la hoja se cierra y llama al paymentResultCallback especificado anteriormente en
create.
Establecer allowsDelayedPaymentMethods en true permite aceptar métodos de pago de notificación diferida como cuentas bancarias en EE. UU. Para estos métodos de pago, el estado final del pago no se conoce cuando se completa el PaymentSheet, sino que se efectúa con éxito o falla más tarde. Si aceptas este tipo de métodos de pago, infórmale al cliente que su pedido está confirmado y solo finalízalo (por ejemplo, envía el producto) cuando el pago se realice correctamente.
OpcionalHabilitar métodos de pago adicionales
Ve a Administrar métodos de pago para cuentas conectadas en el Dashboard para configurar qué métodos de pago aceptan tus cuentas conectadas. Los cambios en la configuración predeterminada se aplican a todas las cuentas conectadas nuevas y existentes.
Consulta los siguientes recursos para obtener información sobre los métodos de pago:
- Guía de métodos de pago para ayudarte a elegir los métodos de pago correctos para tu plataforma.
- Funcionalidades de cuenta para asegurarte de que los métodos de pago que elegiste funcionen en tus cuentas conectadas.
- Consulta las tablas de admisibilidad de métodos de pago y de productos para asegurarte de que los métodos de pago elegidos funcionen para tus productos y flujos de pago de Stripe.
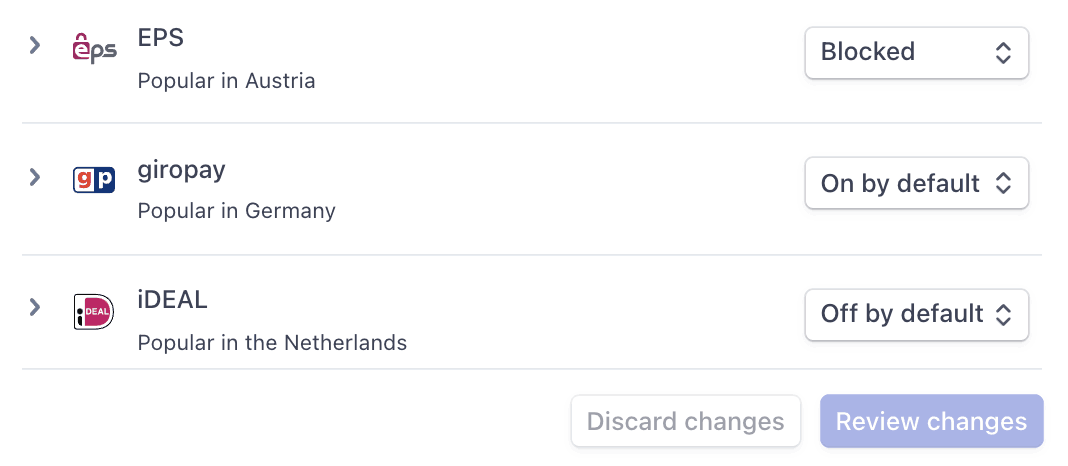
Para cada método de pago, puedes seleccionar una de las siguientes opciones desplegables:
| Activado de manera predeterminada | Tus cuentas conectadas aceptan este método de pago durante el proceso de compra. Algunos métodos de pago solo pueden estar desactivados o bloqueados. Esto se debe a que tus cuentas conectadas con acceso al Dashboard de Stripe deben activarlas en su página de configuración. |
| Desactivado de manera predeterminada | Tus cuentas conectadas no aceptan este método de pago durante el proceso de compra. Si permites que tus cuentas conectadas con acceso al Dashboard de Stripe administren sus propios métodos de pago, podrán activarlo. |
| Bloqueado | Tus cuentas conectadas no aceptan este método de pago durante el proceso de compra. Si permites que tus cuentas conectadas con acceso al Dashboard de Stripe administren sus propios métodos de pago, no tendrán la opción para activarlo. |

Opciones de métodos de pago
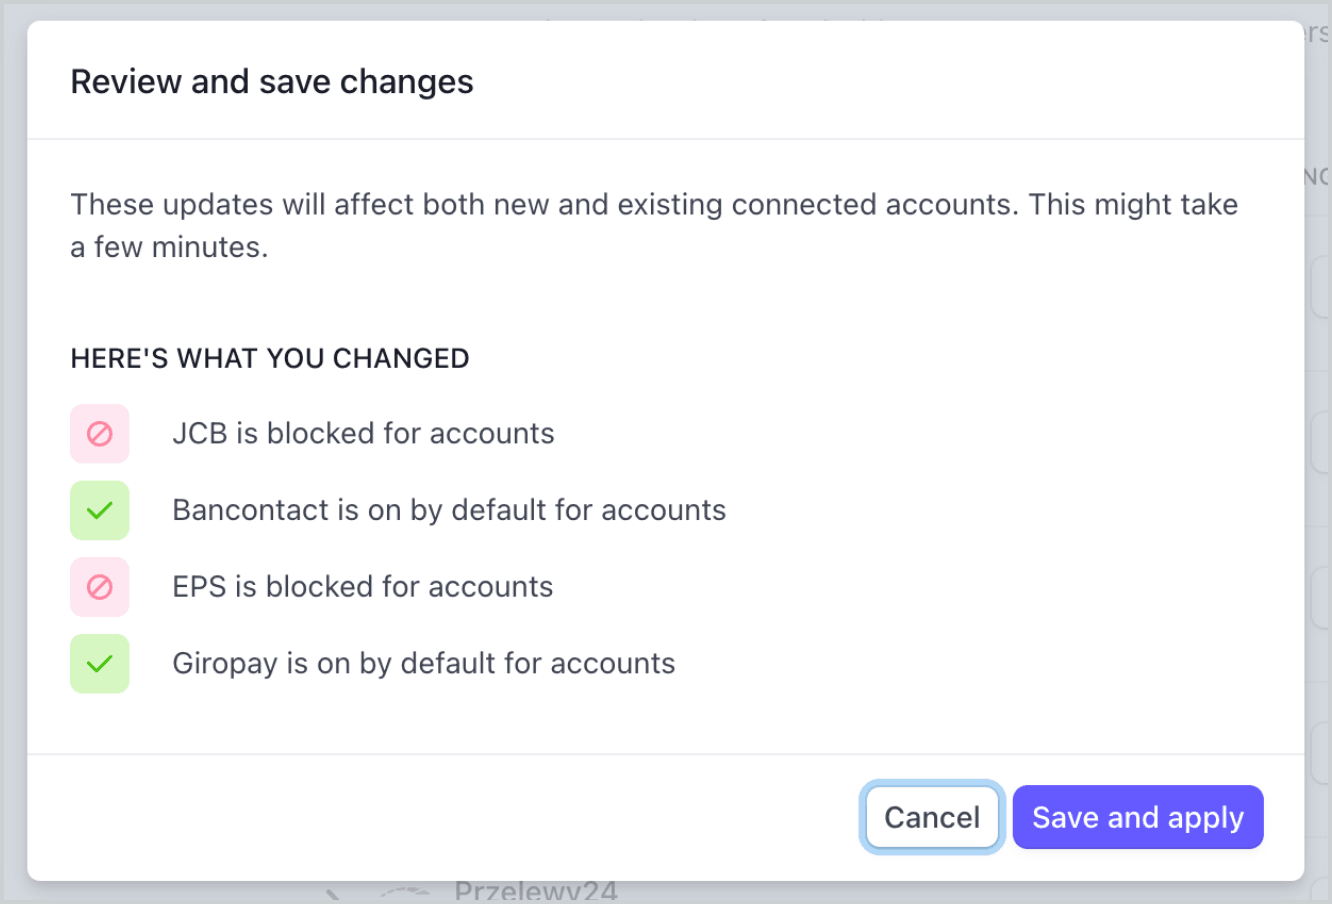
Si realizas un cambio en un método de pago, debes hacer clic en Revisar cambios en la barra inferior de la pantalla y en Guardar y aplicar para actualizar tus cuentas conectadas.

Cuadro de diálogo Guardar
Permite que las cuentas conectadas gestionen los métodos de pago
Stripe recomienda permitir que tus cuentas conectadas personalicen sus propios métodos de pago. Esta opción le permite a cada cuenta conectada con acceso al Dashboard de Stripe ver y actualizar página Métodos de pago. Solo los propietarios de las cuentas conectadas pueden personalizar sus métodos de pago. El Dashboard de Stripe muestra el conjunto de métodos de pago predeterminados que aplicaste a todas las cuentas conectadas nuevas y existentes. Tus cuentas conectadas pueden anular estos valores predeterminados, excluyendo los métodos de pago que hayas bloqueado.
Marca la casilla de verificación Personalización de la cuenta para habilitar esta opción. Debes hacer clic en Revisar cambios en la barra inferior de la pantalla y luego seleccionar Guardar y aplicar para actualizar esta configuración.

Casilla de verificación de personalización de la cuenta
Capacidades de métodos de pago
Para permitir que tus cuentas conectadas acepten métodos de pago adicionales, sus cuentas deben tener funcionalidades de métodos de pago activos.
Si seleccionaste la opción “Activado por defecto” para un método de pago en Gestionar métodos de pago para tus cuentas conectadas, Stripe solicita automáticamente la funcionalidad necesaria para las cuentas conectadas nuevas y las existentes si cumplen con los requisitos de verificación. Si la cuenta conectada no cumple con los requisitos o si quieres tener control directo, puedes solicitar de forma manual la funcionalidad en el dashboard o con la API.
La mayoría de los métodos de pago tienen los mismos requisitos de verificación que la funcionalidad card_, con algunas restricciones y excepciones. En el cuadro figuran las funcionalidades de métodos de pago que requieren verificación adicional.
Cobra comisiones
Cuando se procesa un pago, tu plataforma puede tomar una parte de la transacción en forma de comisiones de la plataforma. Puedes establecer los precios de la comisión de la plataforma de dos maneras:
- Utiliza la herramienta de tarifas de la plataforma para establecer y probar las reglas de tarifas. Esta función que no requiere programación del Dashboard de Stripe solo está disponible actualmente para plataformas responsables de pagar las comisiones de Stripe.
- Define las reglas de precios internamente, especificando las comisiones de la aplicación directamente en un PaymentIntent. Las comisiones establecidas con este método anulan la lógica de tarifas especificada en la herramienta de tarifas de la plataforma.
Tu plataforma puede cobrar una comisión de la plataforma con las siguientes limitaciones:
- El valor del importe de la comisión de la aplicación (
application_) debe ser positivo e inferior al importe del cargo. El importe del cargo es el tope de la comisión de la plataforma que se puede cobrar.fee_ amount - No se aplican comisiones adicionales de Stripe a la comisión de la plataforma en sí.
- En concordancia con los requisitos reglamentarios y de cumplimiento de la normativa de Brasil, las plataformas establecidas fuera de Brasil con cuentas conectadas brasileñas no pueden cobrar comisiones de la plataforma a través de Stripe.
- La moneda de
application_depende de algunos factores de varias monedas.fee_ amount
La transacción de saldo del cargo resultante incluye un desglose detallado de las comisiones de Stripe y de la plataforma. Para brindar una mejor experiencia a la hora de elaborar informes, se crea un objeto Application Fee después del cobro de la comisión. Utiliza la propiedad amount en el objeto Application Fee para la elaboración de informes. También puedes acceder a estos objetos usando el punto de conexión de las Comisiones de la aplicación.
Las comisiones ganadas se agregan al saldo disponible de tu cuenta según el mismo calendario que se aplica a los fondos provenientes de cargos normales de Stripe. Las comisiones de la aplicación se pueden ver en la sección Comisiones cobradas del Dashboard.
Precaución
De manera predeterminada, las comisiones de la plataforma para cargos directos se crean de forma asincrónica. Si expandes el objeto application_ en una solicitud de creación de cargo, la comisión de la plataforma se crea sincrónicamente como parte de esa solicitud. Solo expande el objeto application_ si es necesario, ya que aumenta la latencia de la solicitud.
Para acceder a los objetos Application Fee por las comisiones de la aplicación que se crearon de forma asíncrona, escucha el evento de webhook application_fee.created.
Flujo de fondos con comisiones
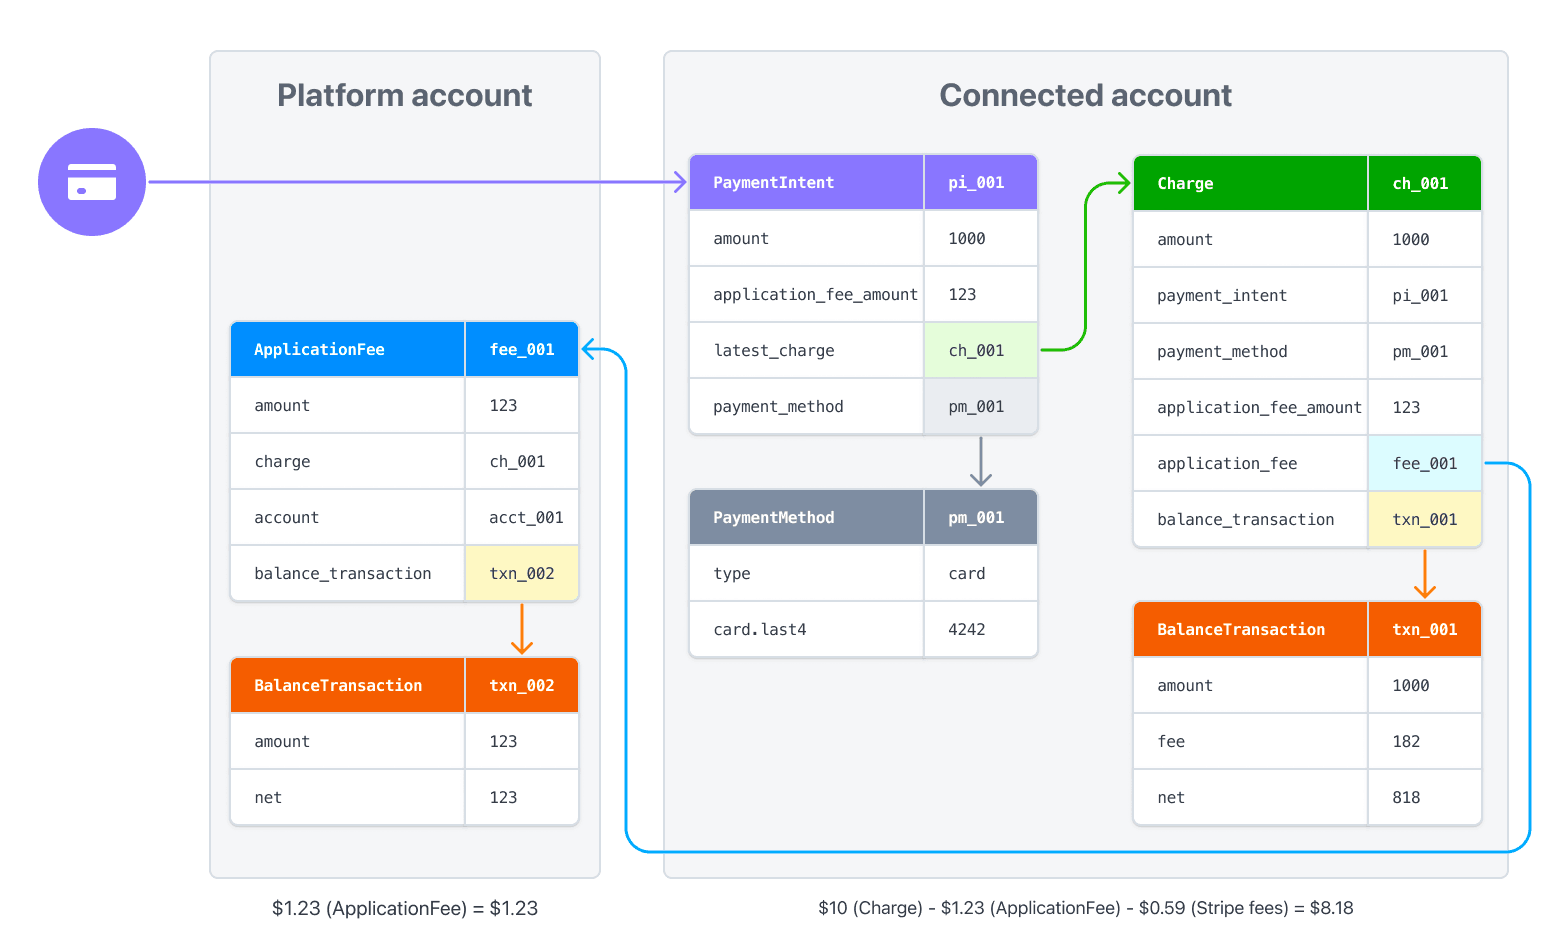
Cuando especificas una comisión de aplicación en un cargo, el monto de la comisión se transfiere a la cuenta de Stripe de tu plataforma. Al procesar un cargo directamente en la cuenta conectada, el monto del cargo, menos las comisiones de Stripe y la comisión de la aplicación, se deposita en la cuenta conectada.
Por ejemplo, si efectúas un cargo de USD 10 con una comisión de la aplicación de USD 1.23 (como en el ejemplo anterior), se transfieren USD 1.23 a la cuenta de la plataforma. La cuenta conectada obtiene un importe neto de USD 8.18 (USD 10 - USD 0.59 - USD 1.23) (con las comisiones estándar de Stripe en Estados Unidos).

Si procesas pagos en varias monedas, lee cómo se administran las monedas en Connect.
Emitir rembolsos
De la misma manera que las plataformas pueden crear cargos en las cuentas conectadas, también pueden crear reembolsos de cargos en las cuentas conectadas. Crea un reembolso con la clave secreta de tu plataforma estando autenticado como cuenta conectada.
Las comisiones de la aplicación no se reembolsan automáticamente al emitir el reembolso. Tu plataforma debe reembolsar expresamente la comisión de la aplicación, o la cuenta conectada (la cuenta en la que se creó el cargo) perderá ese importe. Puedes reembolsar la comisión de la aplicación pasando el valor refund_ de true en la solicitud de reembolso:
De forma predeterminada, se reembolsa el total del cargo, pero puedes crear un reembolso parcial estableciendo un valor de amount como un número entero positivo. Si el reembolso implica que se reembolsa el total del cargo, se reembolsa el total de la comisión de la plataforma. De lo contrario, se reembolsa un importe proporcional de la comisión de la plataforma. Como alternativa, puedes proporcionar un valor de refund_ de false y reembolsar la comisión de la plataforma por separado.
Componentes integrados de Connect
Los componentes integrados de Connect admiten cargos directos. Cuando usas el componente integrado de pagos, puedes permitir que tus cuentas conectadas vean la información de pago, capturen cargos y gestionen disputas desde tu sitio.
Los siguientes componentes muestran información para cargos directos:
Componente de pago: muestra todos los pagos y las disputas de una cuenta.
Detalles de pagos: Muestra información para un pago específico.
Componente de lista de disputas: muestra todas las disputas de una cuenta.
Disputas para un componente de pago: muestra las disputas para un solo pago especificado. Puedes usarlo para incluir funcionalidades para gestionar disputas en una página con tu interfaz de usuario (IU) de pagos.