Eingaben auf dem Bildschirm erfassen
Verwenden Sie Terminal, um Eingaben von Ihren Kundinnen/Kunden zu erfassen.
Lesegeräte: Stripe Reader S700/S710 und BBPOS WisePOS E
Mit den intelligenten Terminal-Lesegeräten können Sie Eingabeformulare anzeigen und Informationen von Ihren Kundinnen und Kunden erfassen. Sie können aus sechs Eingabetypen wählen, die in einer Vielzahl von Anwendungsfällen verwendet werden können.
- Erfassen Sie Ihre Kundenkennung für die Einlösung von Treuekontingenten mit der Eingabe von
phoneoderemailund verarbeiten Sie sie in Ihrem Backend. - Bitten Sie Ihre Kundin/Ihren Kunden, eine Verzichtserklärung oder Vereinbarung mit der Eingabe
signaturezu bestätigen. - Bitten Sie Ihren Kunden/Ihre Kundin, einen Fragebogen mit der Eingabe
selectionodertextauszufüllen.
Sie können Eingabeformulare jederzeit vor der Zahlung, nach der Zahlung und außerhalb eines Zahlungszyklus anzeigen.
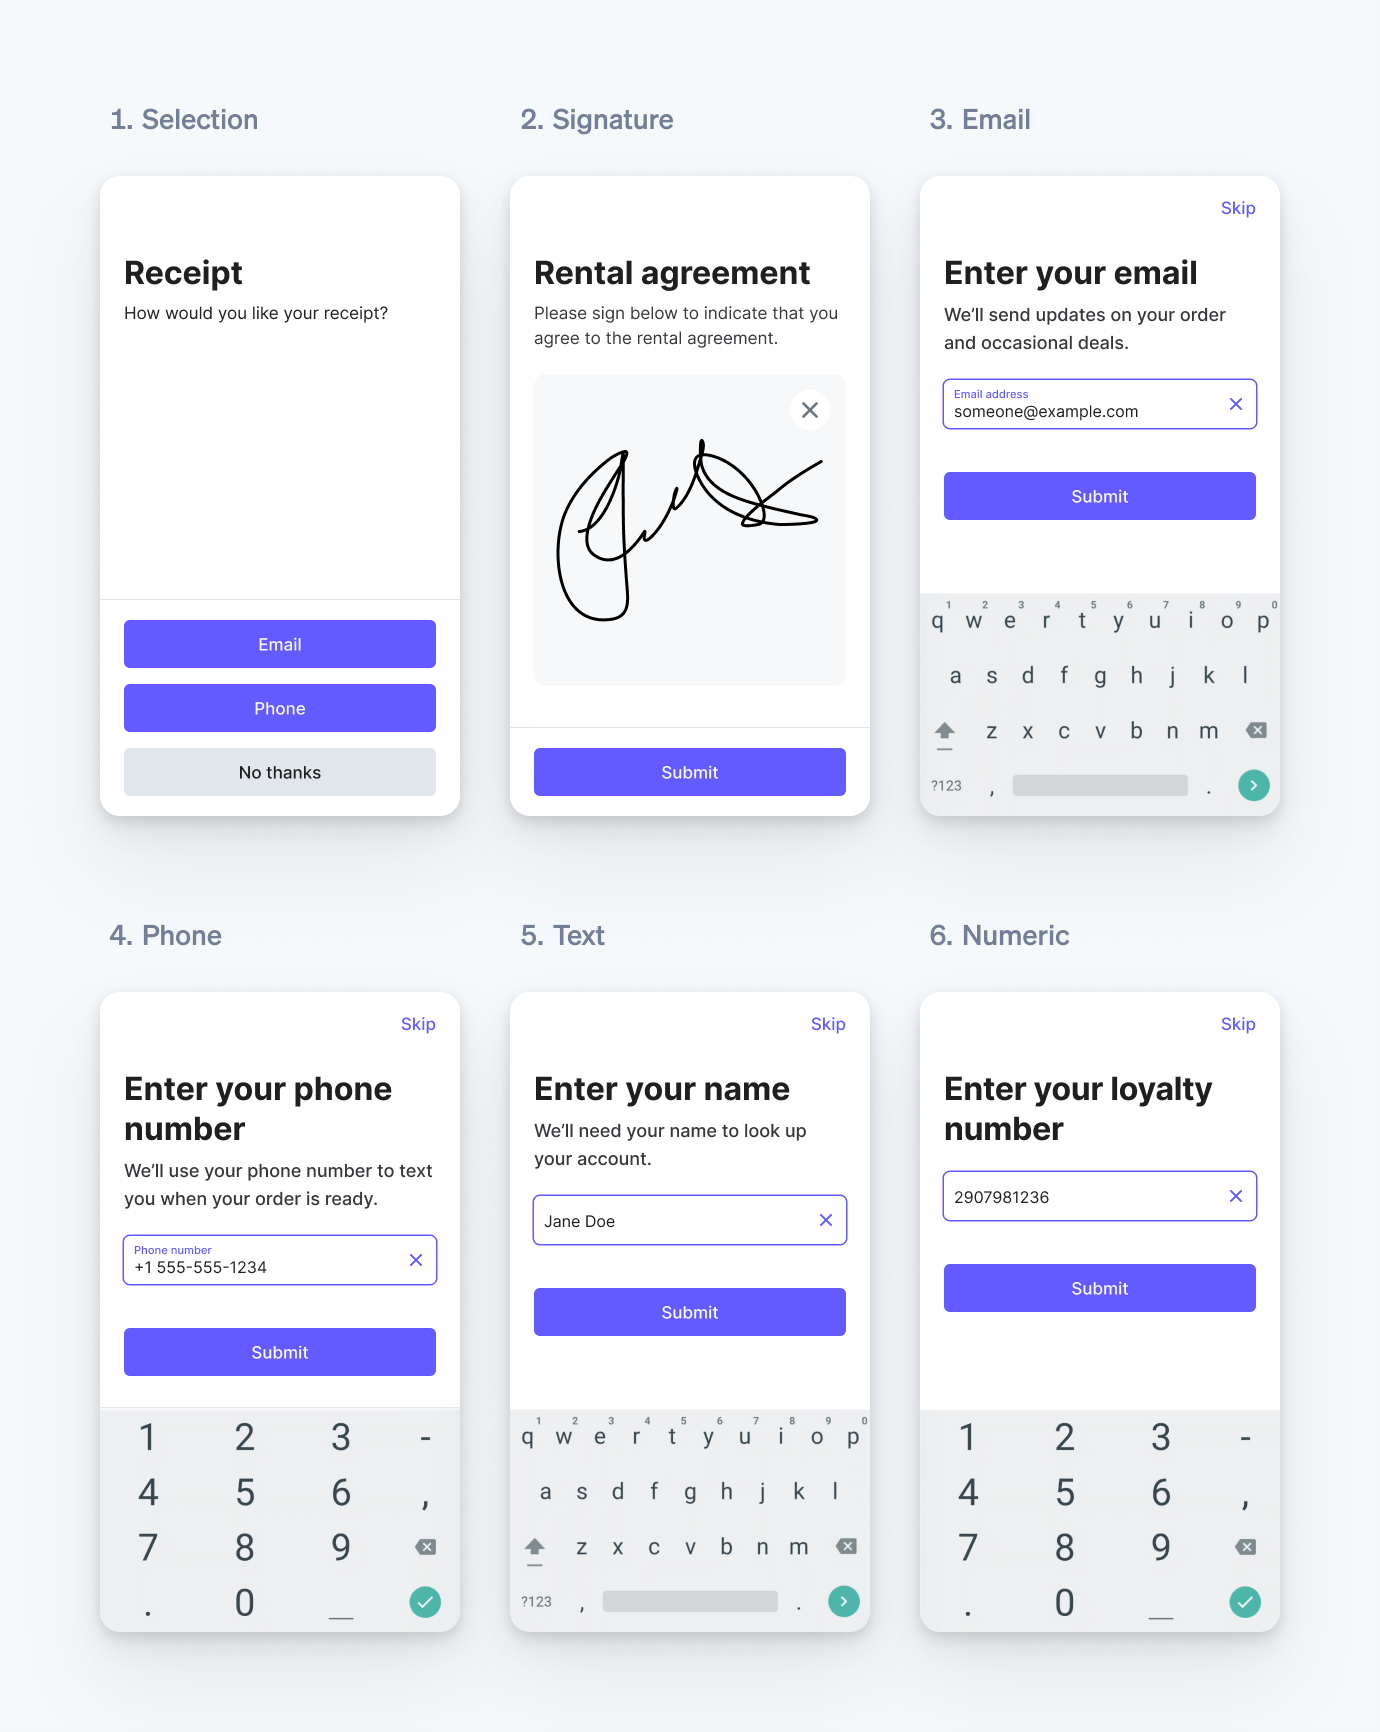
Unterstützte Eingabetypen.
Hinweis
Verwenden Sie collect_ nicht zum Erfassen vertraulicher Daten (einschließlich geschützter Gesundheitsinformationen und Informationen zu Kundenzahlungskarten) oder anderer gesetzlich eingeschränkter Informationen.
Eingaben erfassen
Sie können Kundeninformationen auch dann erfassen, wenn das intelligente Lesegerät offline ist.
Um Eingaben mit den intelligenten Lesegeräten von Terminal zu erfassen, rufen Sie collectInputs mit dem Terminal SDK auf. Das SDK kommuniziert mit dem Lesegerät, um eine vorgefertigte Nutzeroberfläche anzuzeigen. Sie können bis zu 5 Eingaben gleichzeitig angeben, die vom Lesegerät der Reihe nach erfasst werden. Nachdem der Kunde/die Kundin seine/ihre Daten eingegeben hat, gibt das SDK die gesammelten Daten mit einem Callback zurück.
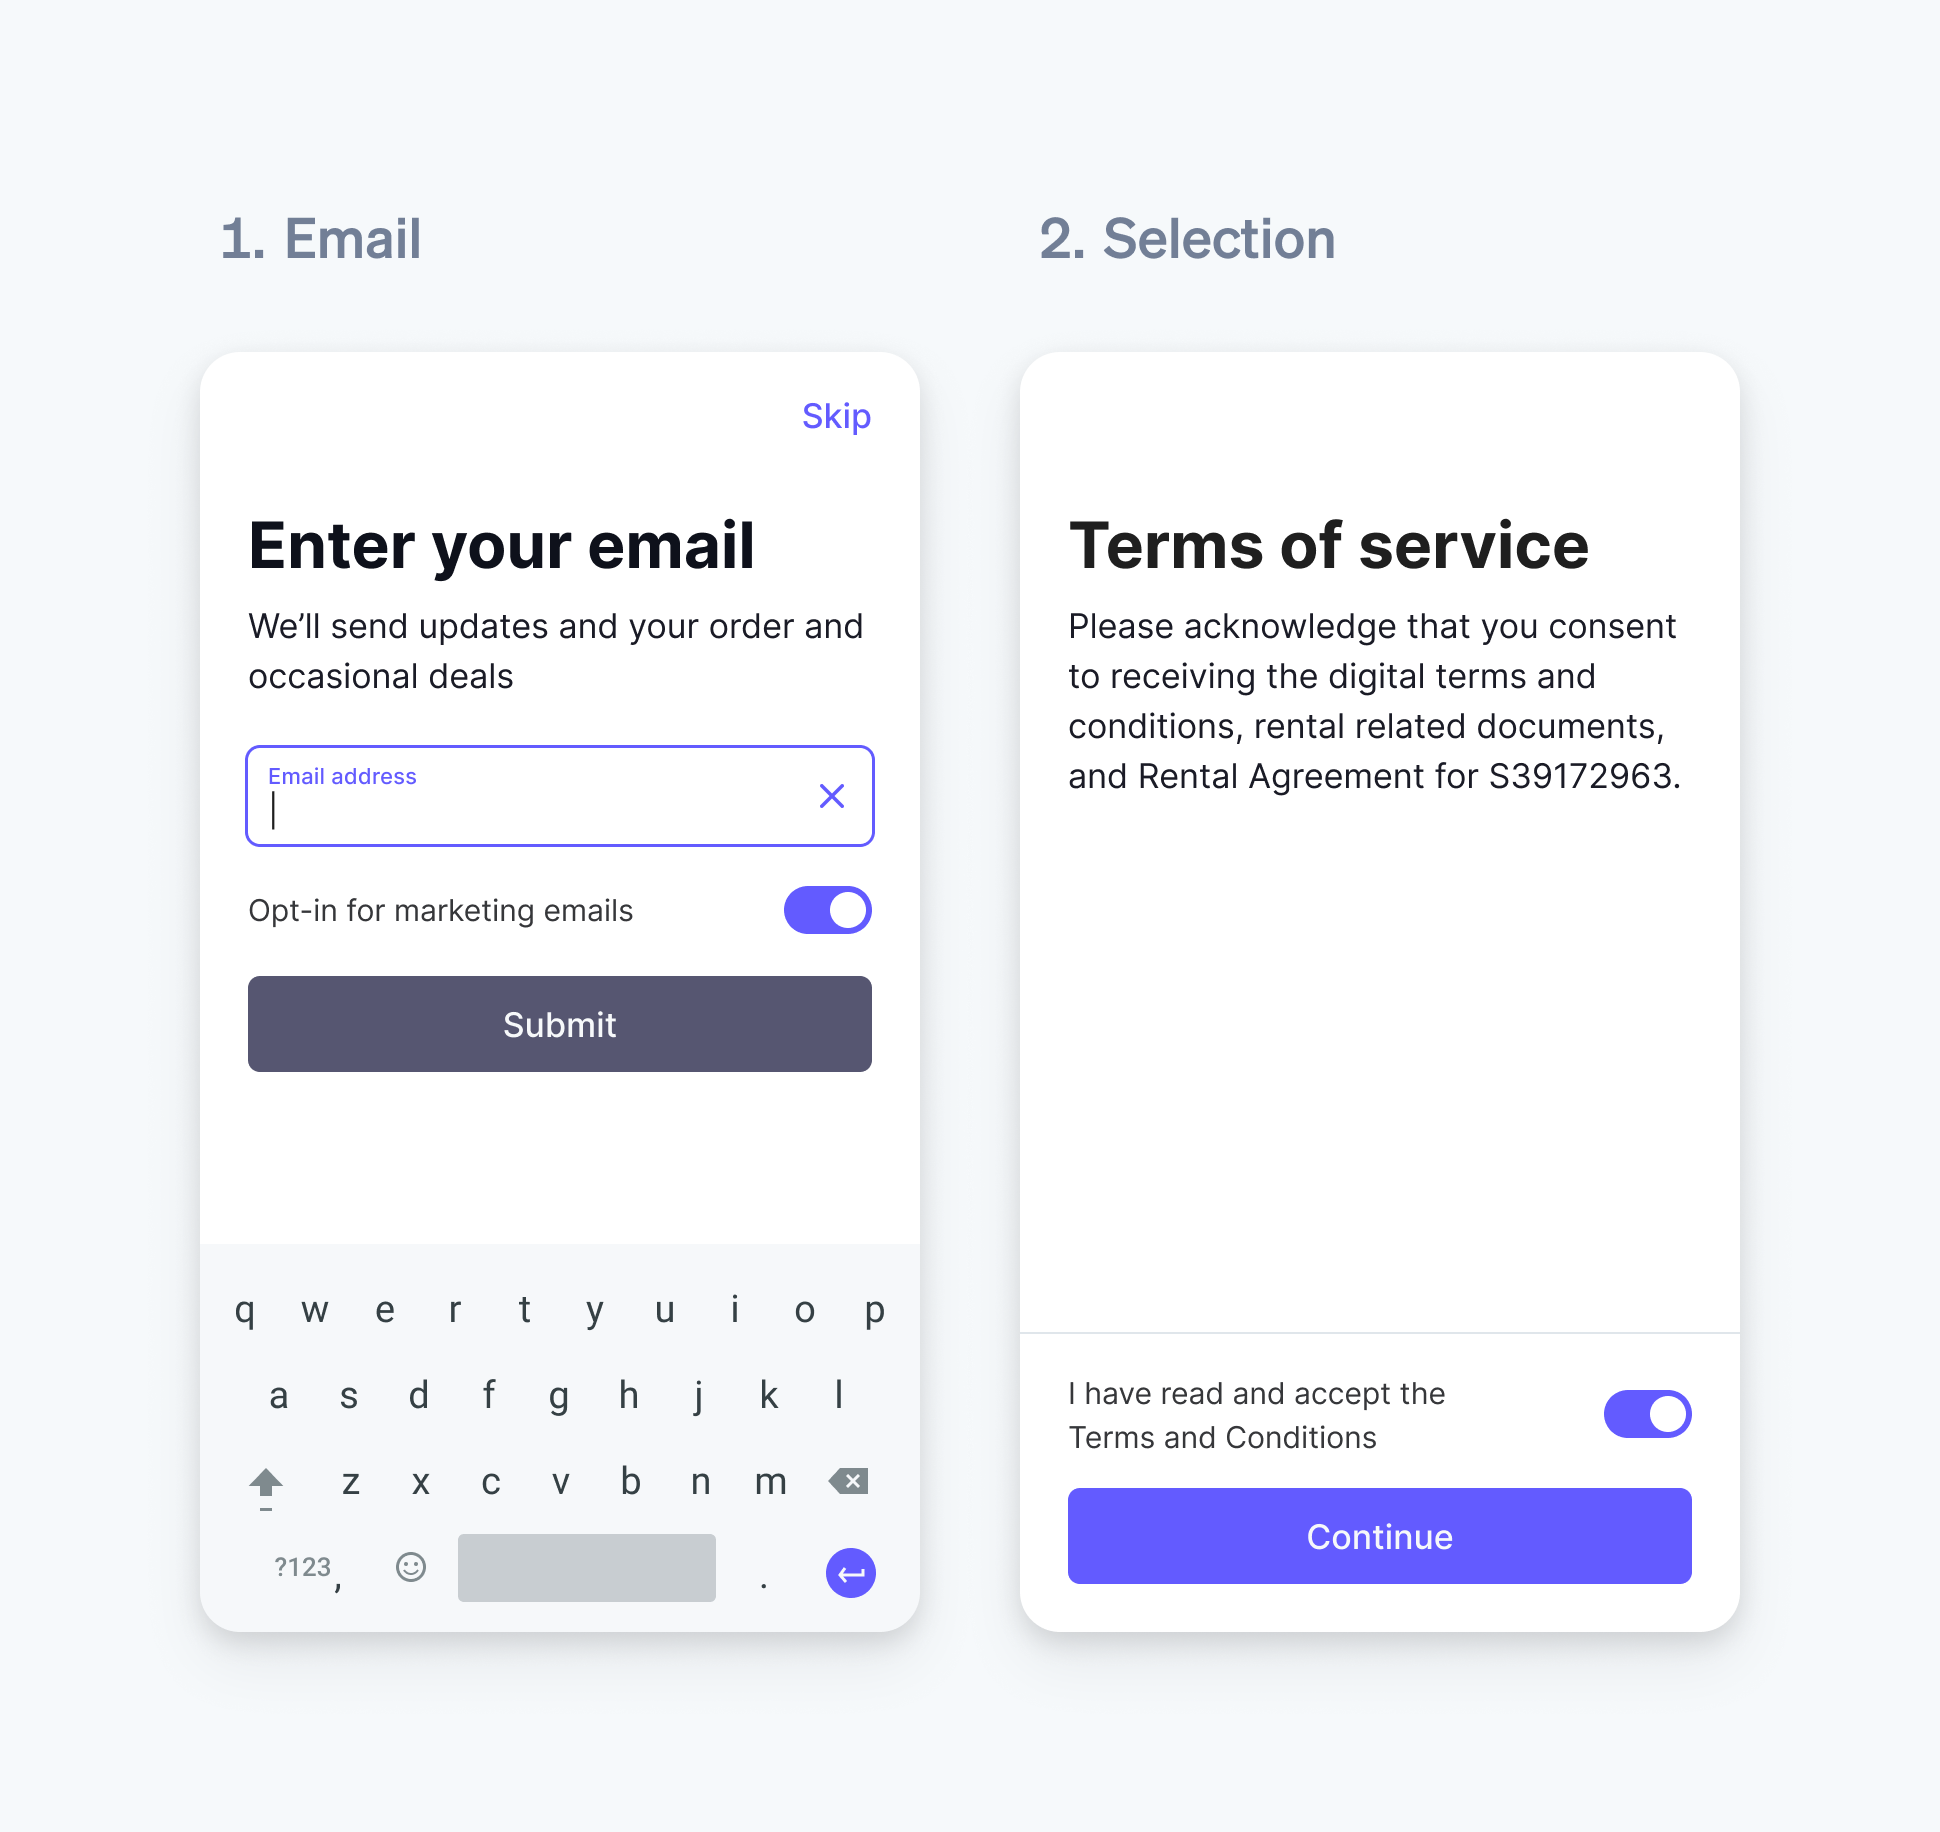
Anpassung
Sie können das Erscheinungsbild und das Verhalten aller Eingabetypen anpassen:
- Legen Sie wichtige Eingaben auf
requiredfest, um sicherzustellen, dass sie erfasst werden. Bei Pflichteingaben ist die Schaltfläche Überspringen ausgeblendet. - Stellen Sie Ihren Kundinnen/Kunden Kontext zur Verfügung, indem Sie mit
titleunddescriptionangeben, welcher Text für jede Eingabe auf dem Lesegerät angezeigt werden soll.
Feldname | Maximale Anzahl der Zeichen |
title | 40 |
description | 500 bei Verwendung mit dem selection-Formular, 100 bei Verwendung mit jedem anderen Formulartyp |
submit_ | 30 |
skip_ | 14 |
- Verwenden Sie Zeilenumbrüche
- Fügen Sie bis zu 4 Umschalter hinzu, die Kundinnen/Kunden für boolesche Optionen, Vereinbarungen oder Anmeldungen (Opt-Ins) aktivieren oder deaktivieren können.
E-Mail und Auswahlformular mit Umschalter
Feldname | Maximale Anzahl der Zeichen |
title | 50, 25 bei Verwendung mit Umschalterbeschreibung |
description | 50, 25 bei Verwendung mit Umschalttitel |
- Bei Eingaben vom Typ
selectionkönnen Siechoicesmithilfe desstyle-Parameters hervorheben oder in den Hintergrund stellen.
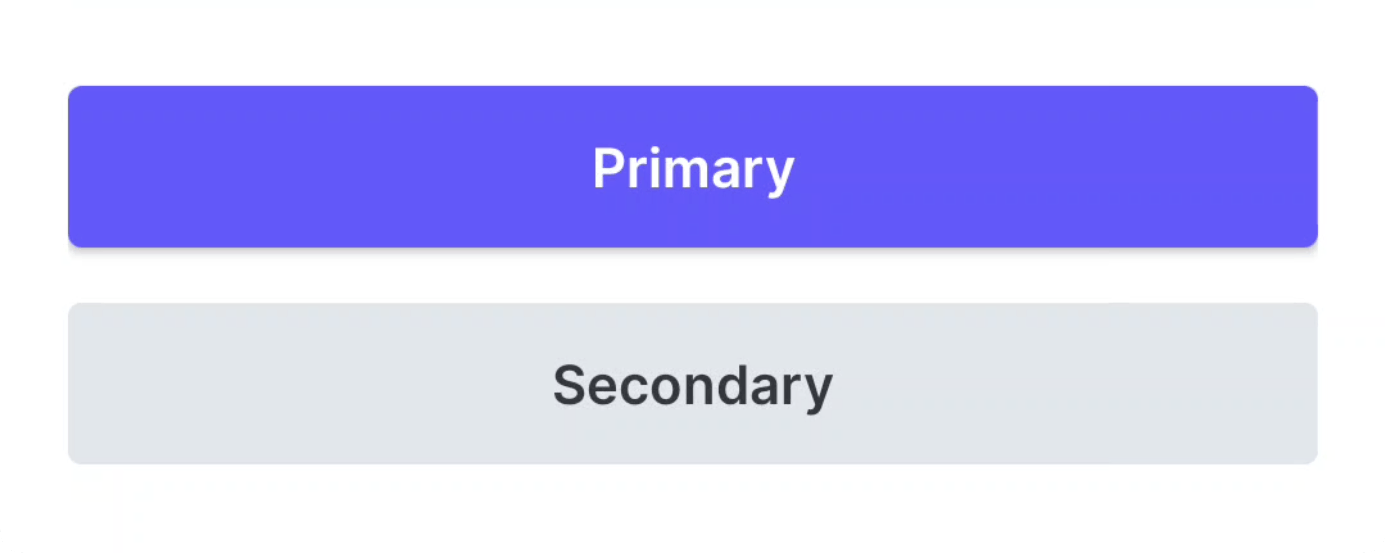
Primäre und sekundäre Auswahlstile für Designs.
Interaktion mit Kundinnen/Kunden
Wenn das Lesegerät mit der Erfassung von Eingaben beginnt, zeigt es die erste Eingabe aus der Liste an.
Nachdem der Kunde/die Kundin alle Eingaben abgeschlossen hat, wechselt das Lesegerät für 3 Sekunden in einen Übergangszustand und wartet auf eine nachfolgende Anfrage. Wenn nach 3 Sekunden keine weitere Anfrage erfolgt, wechselt das Lesegerät wieder zum Begrüßungsbildschirm.
Hinweis
Sie verpflichten sich in vollem Umfang, sich mit allen geltenden Gesetzen und Vorschriften in Bezug auf Ihre Nutzung dieser Funktion vertraut zu machen und diese einzuhalten, und müssen in Bezug auf diese Nutzung alle erforderlichen Zustimmungen, Autorisierungen, Lizenzen, Rechte und Genehmigungen einholen. Wenn Sie die von einem Terminal-Lesegerät erfassten oder angezeigten Daten verwenden, um Verträge mit Ihren Kundinnen/Kunden abzuschließen oder ihnen Nachrichten zu senden, sind Sie in vollem Umfang für die Rechtsgültigkeit und Durchsetzbarkeit solcher Verträge oder Nachrichten verantwortlich.
Eingabedaten empfangen
Wenn alle Eingaben erfasst oder übersprungen wurden, gibt das Terminal SDK die erfassten Daten zurück.
- Bei Eingaben vom Typ „Signatur“ sind die zurückgegebenen Daten eine Zeichenfolge im SVG-Format.
- Bei Eingaben vom Typ „Auswahl“ werden die Felder
textundidder ausgewählten Schaltfläche zurückgegeben. - Bei Telefon-, E-Mail-, Text- und numerischen Eingaben sind die zurückgegebenen Daten die Zeichenfolge der Kundenantwort.
- Wenn eine optionale Eingabe von der Kundin/dem Kunden übersprungen wird, wird der boolesche Wert
skippedauftruegesetzt. - Für jeden Umschalter wird entsprechend dem Index der Liste der eingegebenen Umschalter
enabled,disabledoderskippedzurückgegeben.
Das Terminal SDK gibt im Falle einer abgebrochenen Aktion, einer Zeitüberschreitung bei der Erfassung oder eines anderen Fehlers einen Fehler zurück.
Ihre Integration testen
Sie können Ihre Integration testen, indem Sie das simulierte Lesegerät des SDK verwenden. Bevor Sie die Erfassung von Eingaben testen können, müssen Sie zunächst eine Verbindung zu einem simulierten Internet-Lesegerät herstellen.
Das simulierte Lesegerät unterstützt die Simulation der folgenden Szenarien:
- Erfolgreiche Erfassung von Eingaben ohne Überspringen von Eingaben
- Erfolgreiche Erfassung von Eingaben durch Überspringen aller nicht erforderlichen Eingaben
- Die Erfassung der Eingaben ist aufgrund einer Zeitüberschreitung fehlgeschlagen.
Bei der Simulation einer erfolgreichen Eingabeerfassung gibt das SDK für jede Eingabe basierend auf dem Typ einen hartcodierten Wert zurück.