# [Deprecated] Payment Request Button
Collect payment and address information from customers who use Apple Pay, Google Pay, or Link.
The content on this page is deprecated and is superseded by:
- [Express Checkout Element](https://docs.stripe.com/elements/express-checkout-element.md)
- [Migrate to the Express Checkout Element](https://docs.stripe.com/elements/express-checkout-element/migration.md)
> #### Legacy feature
>
> The content on this page refers to a *Legacy* (Technology that's no longer recommended) *Element* (A set of UI components for building a web checkout flow. They adapt to your customer's locale, validate input, and use tokenization, keeping sensitive customer data from touching your server). Use the [Express Checkout Element](https://docs.stripe.com/elements/express-checkout-element.md) instead. If you have an existing Payment Request Button integration, use our [migration guide](https://docs.stripe.com/elements/express-checkout-element/migration.md) to switch to Express Checkout Element.
>
> The Payment Request Button has the following limitations:
>
> - Only supports card payment methods
- [Link](https://docs.stripe.com/payments/link.md) is supported, but only when card [funding sources](https://docs.stripe.com/payments/link/add-link-elements-integration.md#multiple-funding-sources) are used
- Only shows one payment option
## Demo
# React
The Payment Request Button Element dynamically displays wallet options during checkout, giving you a single integration for [Apple Pay](https://docs.stripe.com/apple-pay.md), [Google Pay](https://docs.stripe.com/google-pay.md), and [Link](https://docs.stripe.com/stripe-js/elements/payment-request-button.md#link-prb). Alternatively, you can use the [Express Checkout Element](https://docs.stripe.com/elements/express-checkout-element.md) to offer multiple one-click payment buttons to your customers.
Customers see Apple Pay or Google Pay if they enabled them on their device, and depending on the browser they use. If Link appears, it could be because customers:
- Don’t have Apple Pay or Google Pay enabled on their device.
- Use Chrome with active, authenticated Link sessions.
## Prerequisites
Before you start, you need to:
- Review the requirements for each payment button type:
- Apple Pay requires macOS 10.12.1+ or iOS 10.1+.
- Compatible devices automatically support Google Pay.
- **[Register your domain](https://docs.stripe.com/payments/payment-methods/pmd-registration.md)** in both a *sandbox* (A sandbox is an isolated test environment that allows you to test Stripe functionality in your account without affecting your live integration. Use sandboxes to safely experiment with new features and changes) and live mode.
- **[Add a payment method to your browser.](https://docs.stripe.com/stripe-js/elements/payment-request-button.md#testing)** For example, you can save a card in Chrome, add a card to your Google Pay account, or add a card to your Wallet for Safari.
- **Serve your application over HTTPS.** This is a requirement both in development and production. One way to get started is to use a service such as [ngrok](https://ngrok.com).
## Set up Stripe Elements
#### npm
npm パブリックレジストリーから [React Stripe.js](https://www.npmjs.com/package/@stripe/react-stripe-js) と [Stripe.js ローダー](https://www.npmjs.com/package/@stripe/stripe-js)をインストールします。
```bash
npm install --save @stripe/react-stripe-js @stripe/stripe-js
```
#### umd
Stripe は npm やモジュールを使用しないサイト向けに UMD ビルドも提供しています。
グローバルな `Stripe` 機能をエクスポートする Stripe.js スクリプトと、グローバルな `ReactStripe` オブジェクトをエクスポートする React Stripe.js の UMD ビルドを含めてください。常に **js.stripe.com** から Stripe.js スクリプトを直接読み込むことにより、PCI への準拠が維持されます。スクリプトをバンドルに含めたり、そのコピーを自身でホストすることがないようにしてください。
```html
```
> [CodeSandbox でのデモ](https://codesandbox.io/s/react-stripe-official-q1loc?fontsize=14&hidenavigation=1&theme=dark)を使用すると、新しいプロジェクトを作成することなく、React Stripe.js を試してみることができます。
### お客様のページへの Stripe.js および Elements の追加
Element コンポーネントを使用するには、決済ページコンポーネントを [Elements プロバイダー](https://docs.stripe.com/sdks/stripejs-react.md#elements-provider)でラップします。公開キーを使用して `loadStripe` を呼び出し、返された `Promise` を `Elements` プロバイダーに渡します。
```jsx
import React from 'react';
import ReactDOM from 'react-dom';
import {Elements} from '@stripe/react-stripe-js';
import {loadStripe} from '@stripe/stripe-js';
import CheckoutForm from './CheckoutForm';
// Make sure to call `loadStripe` outside of a component's render to avoid
// recreating the `Stripe` object on every render.
const stripePromise = loadStripe('<>');
function App() {
return (
);
};
ReactDOM.render(, document.getElementById('root'));
```
## Create a paymentRequest instance [Client-side]
In your checkout form component, create an instance of [stripe.paymentRequest](https://docs.stripe.com/js.md#stripe-payment-request) with all required options.
```jsx
import React, {useState, useEffect} from 'react';
import {PaymentRequestButtonElement, useStripe} from '@stripe/react-stripe-js';
const CheckoutForm = () => {
const stripe = useStripe();
const [paymentRequest, setPaymentRequest] = useState(null);
useEffect(() => {
if (stripe) {
const pr = stripe.paymentRequest({
country: 'US',
currency: 'usd',
total: {
label: 'Demo total',
amount: 1099,
},
requestPayerName: true,
requestPayerEmail: true,
});
}
}, [stripe]);
// Use a traditional checkout form.
return 'Insert your form or button component here.';
}
```
> Use the `requestPayerName` parameter to collect the payer’s billing address for Apple Pay. You can use the billing address to perform address verification and block fraudulent payments. All other payment methods automatically collect the billing address when one is available.
## Render the Payment Request Button Element [Client-side]
Check to make sure that your customer has an active payment method using [canMakePayment](https://docs.stripe.com/js.md#payment-request-can-make-payment). If they do, render the ``. If they don’t, you can’t render the Element, and we encourage you to show a traditional checkout form instead.
```jsx
import React, {useState, useEffect} from 'react';
import {PaymentRequestButtonElement, useStripe} from '@stripe/react-stripe-js';
const CheckoutForm = () => {
const stripe = useStripe();
const [paymentRequest, setPaymentRequest] = useState(null);
useEffect(() => {
if (stripe) {
const pr = stripe.paymentRequest({
country: 'US',
currency: 'usd',
total: {
label: 'Demo total',
amount: 1099,
},
requestPayerName: true,
requestPayerEmail: true,
});
// Check the availability of the Payment Request API.pr.canMakePayment().then(result => {
if (result) {
setPaymentRequest(pr);
}
});
}
}, [stripe]);
if (paymentRequest) {
return
}
// Use a traditional checkout form.
return 'Insert your form or button component here.';
}
```
## Create a PaymentIntent [Server-side]
Stripe は [PaymentIntent (支払いインテント)](https://docs.stripe.com/api/payment_intents.md) オブジェクトを使用して、顧客から支払いを回収する意図を示し、プロセス全体を通して請求の実施と支払い状態の変化を追跡します。
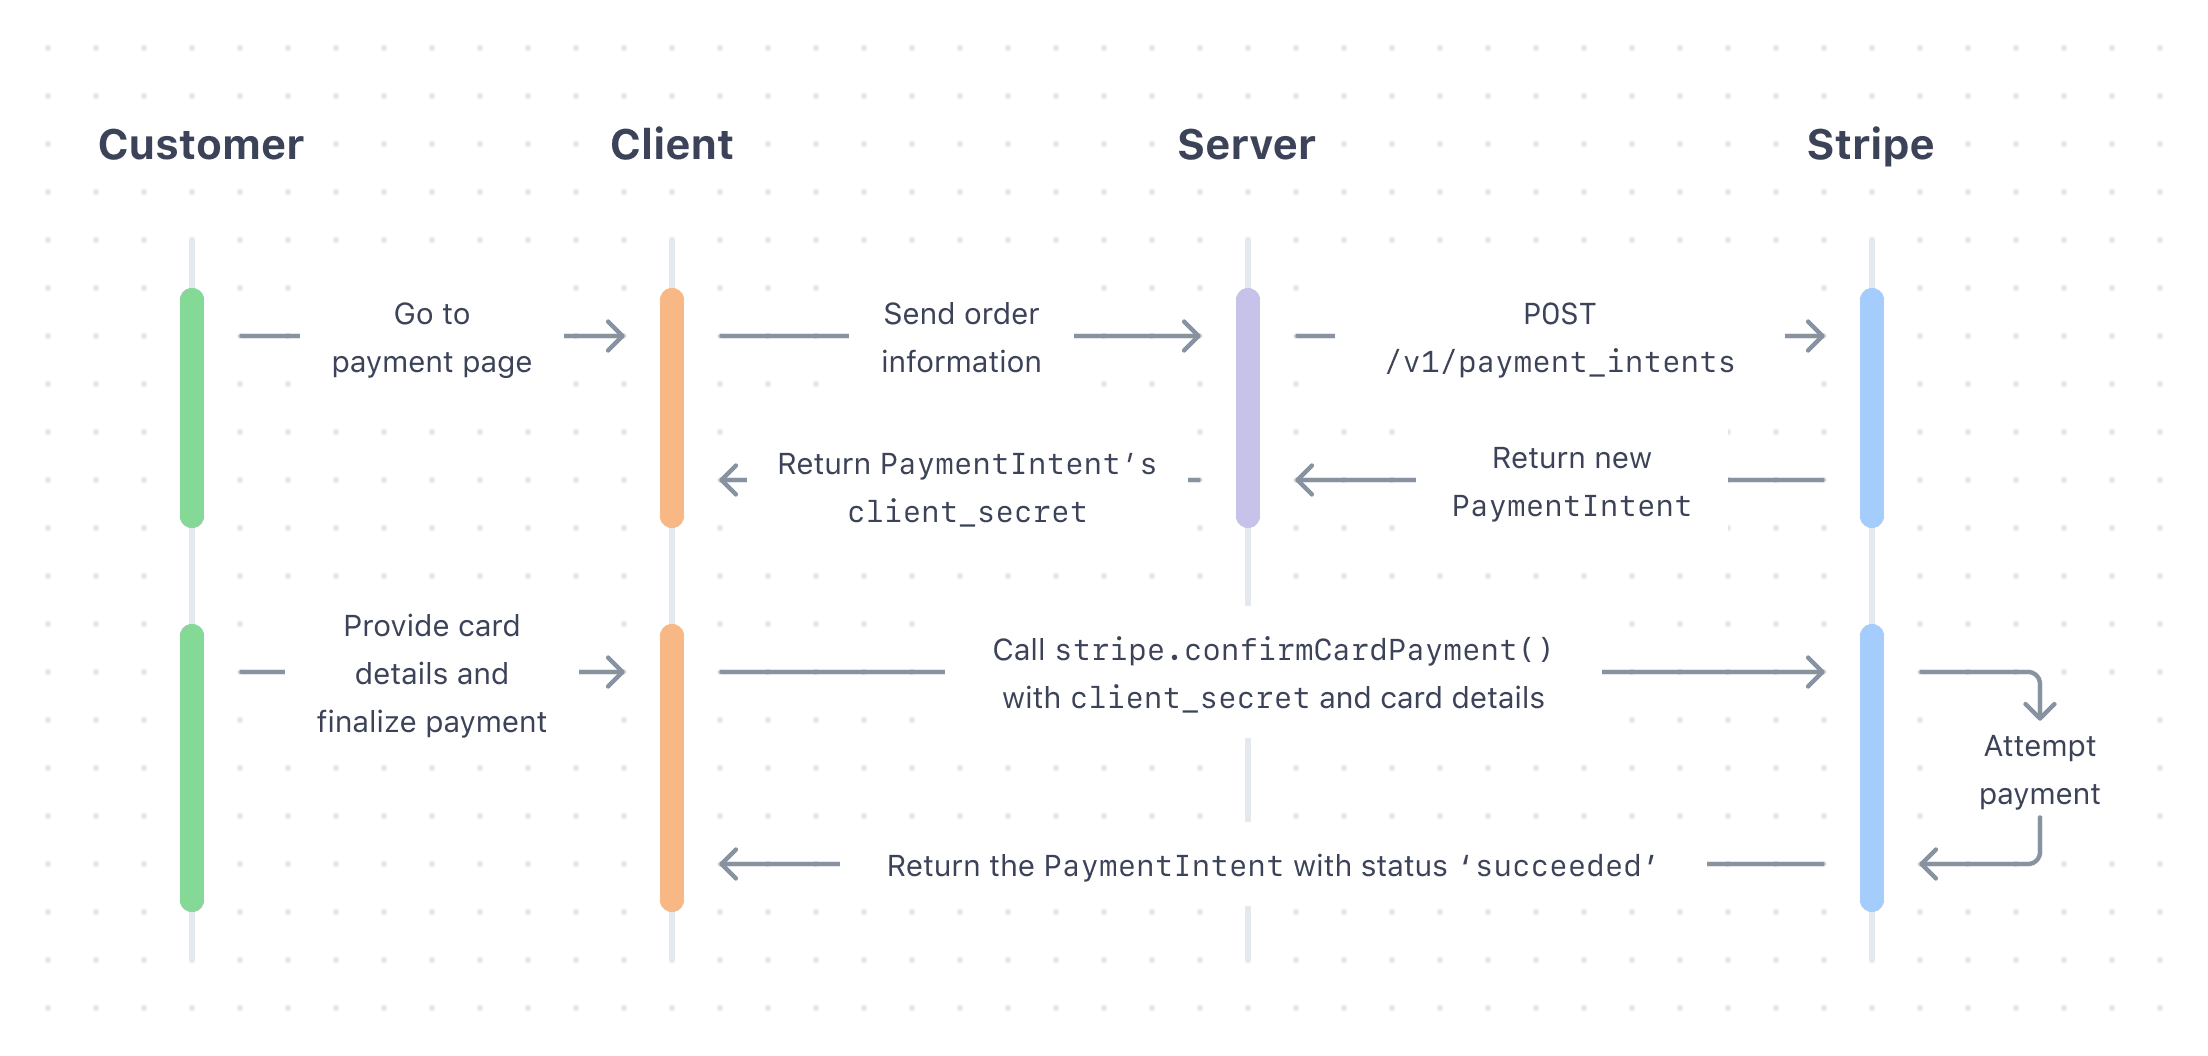
サーバーで金額および通貨を指定して `PaymentIntent` を作成します。支払い額は常に、クライアント側ではなく、信頼性の高い環境であるサーバー側で決定してください。これにより、悪意のある顧客が価格を操作できないようにすることができます。
```curl
curl https://api.stripe.com/v1/payment_intents \
-u "<>:" \
-d amount=1099 \
-d currency=usd \
-d "automatic_payment_methods[enabled]=true"
```
Included in the returned PaymentIntent is a *client secret* (The client secret is a unique key returned from Stripe as part of a PaymentIntent. This key lets the client access important fields from the PaymentIntent (status, amount, currency) while hiding sensitive ones (metadata, customer)), which you use to securely complete the payment process instead of passing the entire PaymentIntent object. Send the client secret back to the client to use in the next step.
## Complete the payment [Client-side]
Listen to the `paymentmethod` event to receive a *PaymentMethod* (PaymentMethods represent your customer's payment instruments, used with the Payment Intents or Setup Intents APIs) object. Pass the PaymentMethod ID and the PaymentIntent’s client secret to [stripe.confirmCardPayment](https://docs.stripe.com/js.md#stripe-confirm-card-payment) to complete the payment.
```javascript
paymentRequest.on('paymentmethod', async (ev) => {
// Confirm the PaymentIntent without handling potential next actions (yet).
const {paymentIntent, error: confirmError} = await stripe.confirmCardPayment(
clientSecret,
{payment_method: ev.paymentMethod.id},
{handleActions: false}
);
if (confirmError) {
// Report to the browser that the payment failed, prompting it to
// re-show the payment interface, or show an error message and close
// the payment interface.
ev.complete('fail');
} else {
// Report to the browser that the confirmation was successful, prompting
// it to close the browser payment method collection interface.
ev.complete('success');
// Check if the PaymentIntent requires any actions and, if so, let Stripe.js
// handle the flow. If using an API version older than "2019-02-11"
// instead check for: `paymentIntent.status === "requires_source_action"`.
if (paymentIntent.status === "requires_action") {
// Let Stripe.js handle the rest of the payment flow.
const {error} = await stripe.confirmCardPayment(clientSecret);
if (error) {
// The payment failed -- ask your customer for a new payment method.
} else {
// The payment has succeeded -- show a success message to your customer.
}
} else {
// The payment has succeeded -- show a success message to your customer.
}
}
});
```
> The customer can dismiss the payment interface in some browsers even after they authorize the payment. This means that you might receive a [cancel event](https://docs.stripe.com/js.md#payment-request-on) on your PaymentRequest object after receiving a `token` or `paymentmethod` event. If you use the `cancel` event as a hook for canceling the customer’s order, make sure you also refund the payment that you just created.
## Test your integration
To test your integration you must use HTTPS and a supported browser. If you use the `paymentRequestButton` Element within an iframe, the iframe must have the [allow](https://developer.mozilla.org/en-US/docs/Web/HTML/Element/iframe#attr-allowpaymentrequest) attribute set to equal “payment *”.
In addition, each payment method and browser has specific requirements:
#### Apple Pay
#### Safari
- Safari on Mac running macOS Sierra or later.
- A compatible device with a card in its Wallet paired to your Mac with Handoff, or a Mac with TouchID. You can find instructions on the [Apple Support site](https://support.apple.com/en-us/HT204681).
- A [registered domain with Apple Pay](https://docs.stripe.com/payments/payment-methods/pmd-registration.md).
- When using an iframe, its origin must match the top-level origin (except for Safari 17+ when specifying `allow="payment"` attribute). Two pages have the same origin if the protocol, host (full domain name), and port (if specified) are the same for both pages.
#### Mobile Safari
- Mobile Safari on iOS 10.1 or later.
- A card in your Wallet (go to **Settings** > **Wallet & Apple Pay**).
- A [registered domain with Apple Pay](https://docs.stripe.com/payments/payment-methods/pmd-registration.md).
- When using an iframe, its origin must match the top-level origin (except for Safari 17+ when specifying `allow="payment"` attribute). Two pages have the same origin if the protocol, host (full domain name), and port (if specified) are the same for both pages.
As of iOS 16, Apple Pay might work in some non-Safari mobile browsers with a card saved in your Wallet.
#### Google Pay
#### Chrome
- Chrome 61 or newer.
- An activated [Google Pay](https://play.google.com/store/apps/details?id=com.google.android.apps.walletnfcrel) card.
- A [registered domain](https://docs.stripe.com/payments/payment-methods/pmd-registration.md).
#### Chrome Mobile for Android
- Chrome 61 or newer.
- An activated [Google Pay](https://play.google.com/store/apps/details?id=com.google.android.apps.walletnfcrel) card.
- A [registered domain](https://docs.stripe.com/payments/payment-methods/pmd-registration.md).
When using Google Pay with a [test key](https://docs.stripe.com/keys.md#test-live-modes), you might see an “Unrecognized app” warning. This is expected and doesn’t appear in live mode.
## Collect shipping information
To collect shipping information, begin by including `requestShipping: true` when creating the payment request.
You can also provide an array of `shippingOptions` at this point, if your shipping options don’t depend on the customer’s address.
```javascript
const paymentRequest = stripe.paymentRequest({
country: 'US',
currency: 'usd',
total: {
label: 'Demo total',
amount: 1099,
},
requestShipping: true,
// `shippingOptions` is optional at this point:
shippingOptions: [
// The first shipping option in this list appears as the default
// option in the browser payment interface.
{
id: 'free-shipping',
label: 'Free shipping',
detail: 'Arrives in 5 to 7 days',
amount: 0,
},
],
});
```
Next, listen to the `shippingaddresschange` event to detect when a customer selects a shipping address. Use the address to fetch valid shipping options from your server, update the total, or perform other business logic. The address data on the `shippingaddresschange` event might be anonymized by the browser to not reveal sensitive information that isn’t necessary for shipping cost calculation.
The customer must provide valid `shippingOptions` at this point to proceed in the flow.
```javascript
paymentRequest.on('shippingaddresschange', async (ev) => {
if (ev.shippingAddress.country !== 'US') {
ev.updateWith({status: 'invalid_shipping_address'});
} else {
// Perform server-side request to fetch shipping options
const response = await fetch('/calculateShipping', {
data: JSON.stringify({
shippingAddress: ev.shippingAddress
})
});
const result = await response.json();
ev.updateWith({
status: 'success',
shippingOptions: result.supportedShippingOptions,
});
}
});
```
## Display line items
Use [displayItems](https://docs.stripe.com/js/payment_request/create#stripe_payment_request-options-displayItems) to display [PaymentItem](https://docs.stripe.com/js/appendix/payment_item_object) objects and show the price breakdown in the browser’s payment interface.
```jsx
const pr = stripe.paymentRequest({
country: 'US',
currency: 'usd',
total: {
label: 'Demo total',
amount: 2000,
},
displayItems: [
{
label: 'Sample item',
amount: 1000,
},
{
label: 'Shipping cost',
amount: 1000,
}
],
});
```
## Style the button
Use the following parameters to customize the Element:
```jsx
const options = {
paymentRequest,
style: {
paymentRequestButton: {
type: 'default',
// One of 'default', 'book', 'buy', or 'donate'
// Defaults to 'default'
theme: 'dark',
// One of 'dark', 'light', or 'light-outline'
// Defaults to 'dark'
height: '64px',
// Defaults to '40px'. The width is always '100%'.
},
}
}
```
### Using your own button
If you want to design your own button instead of using the `paymentRequestButton` Element, you can show your custom button based on the result of [paymentRequest.canMakePayment()](https://docs.stripe.com/js.md#payment-request-can-make-payment). Then, use [paymentRequest.show()](https://docs.stripe.com/js.md#payment-request-show) to display the browser interface when your button is clicked.
When building your own button, follow the Apple Pay [Human Interface Guidelines](https://developer.apple.com/design/human-interface-guidelines) and Google Pay [Brand Guidelines](https://developers.google.com/pay/api/web/guides/brand-guidelines).
## Use the Payment Request Button with Stripe Connect
*Connect* (Connect is Stripe's solution for multi-party businesses, such as marketplace or software platforms, to route payments between sellers, customers, and other recipients) platforms might need to take additional steps when using the Payment Request Button:
1. If you’re creating direct charges or adding the token to a Customer on the connected account, you must set the `stripeAccount` option on the frontend Stripe instance:
```javascript
const stripe = Stripe('<>', {
apiVersion: "2026-06-24.dahlia",
stripeAccount: 'CONNECTED_STRIPE_ACCOUNT_ID',
});
```
2. If you specified [on_behalf_of](https://docs.stripe.com/connect/charges.md#on_behalf_of) when creating the Payment or Setup intent, you must pass the same value to the [paymentRequest](https://docs.stripe.com/js.md#stripe-payment-request) instance using the [onBehalfOf](https://docs.stripe.com/js/payment_request/create#stripe_payment_request-options-onBehalfOf) option:
```javascript
const paymentRequest = stripe.paymentRequest({
country: 'US',
currency: 'usd',
total: {
label: 'Demo total',
amount: 1099,
},
requestPayerName: true,
requestPayerEmail: true,
onBehalfOf: 'CONNECTED_STRIPE_ACCOUNT_ID',
});
```
3. [Register all domains](https://docs.stripe.com/payments/payment-methods/pmd-registration.md?dashboard-or-api=api#register-your-domain-while-using-connect) where you plan to show the Payment Request Button.
## Link for the Payment Request Button
When new customers come to your site, they can use [Link in the Payment Request Button](https://docs.stripe.com/payments/link/payment-request-button-link.md) to pay with their saved payment details. With [Link](https://docs.stripe.com/payments/link.md), they don’t need to manually enter their payment information. Link requires [domain registration](https://docs.stripe.com/payments/payment-methods/pmd-registration.md).
## 顧客に Stripe を開示する
Stripe は顧客の Elements とのやり取りに関する情報を収集して、サービスを提供し、不正利用を防止し、サービスを向上します。これには、Cookie と IP アドレスを使用して、1 つの決済フローセッションで顧客に表示する Elements を特定することが含まれます。Stripe がこのような方法でデータを使用するために必要なすべての権利と同意について開示し、これらを取得することはお客様の責任です。詳細については、[プライバシーセンター](https://stripe.com/legal/privacy-center#as-a-business-user-what-notice-do-i-provide-to-my-end-customers-about-stripe)をご覧ください。
## See also
- [Learn about Apple Pay](https://docs.stripe.com/apple-pay.md)
- [Learn about Google Pay](https://docs.stripe.com/google-pay.md)