サーバーで決済を確定
PaymentIntent または SetupIntent を作成する前にモバイル決済要素をレンダリングする組み込みを構築し、サーバーからインテントを確認します。
Payment Element を使用すると、一度の導入で複数の決済手段を受け付けることができます。この実装では、Payment Element をレンダリングし、PaymentIntent を作成して、購入者のサーバーで支払いを確定するカスタム決済フローを構築します。
Stripe を設定するサーバー側クライアント側
サーバー側
この組み込みは、Stripe API と通信するサーバー上にエンドポイントを必要とします。サーバーから Stripe API にアクセスするには、次のように Stripe の公式ライブラリーを使用します。
クライアント側
Stripe iOS SDK はオープンソースです。詳細なドキュメントが提供されており、iOS 13 以降をサポートするアプリと互換性があります。
メモ
SDK の最新リリースおよび過去バージョンの詳細については、GitHub の Releases (リリース) ページをご覧ください。リポジトリのリリースをウォッチして、新しいリリースの公開時に通知を受け取ることも可能です。
また、SDK が Stripe への API コールを実行できるように、公開可能キーを設定する必要もあります。開始するには、導入中にクライアント側で公開可能キーをハードコード化できますが、本番環境ではサーバーから公開可能キーを取得します。
// Set your publishable key: remember to change this to your live publishable key in production // See your keys here: https://dashboard.stripe.com/apikeys STPAPIClient.shared.publishableKey ="pk_test_TYooMQauvdEDq54NiTphI7jx"
支払い方法を有効にする
支払い方法の設定を表示して、サポートする支払い方法を有効にします。PaymentIntent を作成するには、少なくとも 1 つは支払い方法を有効にする必要があります。
多くの顧客から決済を受け付けられるよう、Stripe では、カードやその他一般的な決済手段がデフォルトで有効になっていますが、ビジネスや顧客に適した追加の決済手段を有効にすることをお勧めします。プロダクトと決済手段のサポートについては決済手段のサポートを、手数料については料金体系ページをご覧ください。
戻り先 URL を設定するクライアント側
顧客はお客様のアプリから離れて、(Safari やバンキングアプリなどで) 認証する場合があります。ユーザーが認証後にアプリに自動的に戻れるようにするには、カスタム URL スキームを構成し、URL を SDK に転送するようにアプリのデリゲートを設定します。Stripe はユニバーサルリンクには対応していません。
さらに、PaymentSheet.Configuration オブジェクトの returnURL をアプリの URL に設定します。
var configuration = PaymentSheet.Configuration()
configuration.returnURL = "your-app://stripe-redirect"
支払いの詳細を収集するクライアント側
実装には 2 つのスタイルを利用できます。いずれかを選択して、続行してください。
| PaymentSheet | PaymentSheet.FlowController |
|---|---|
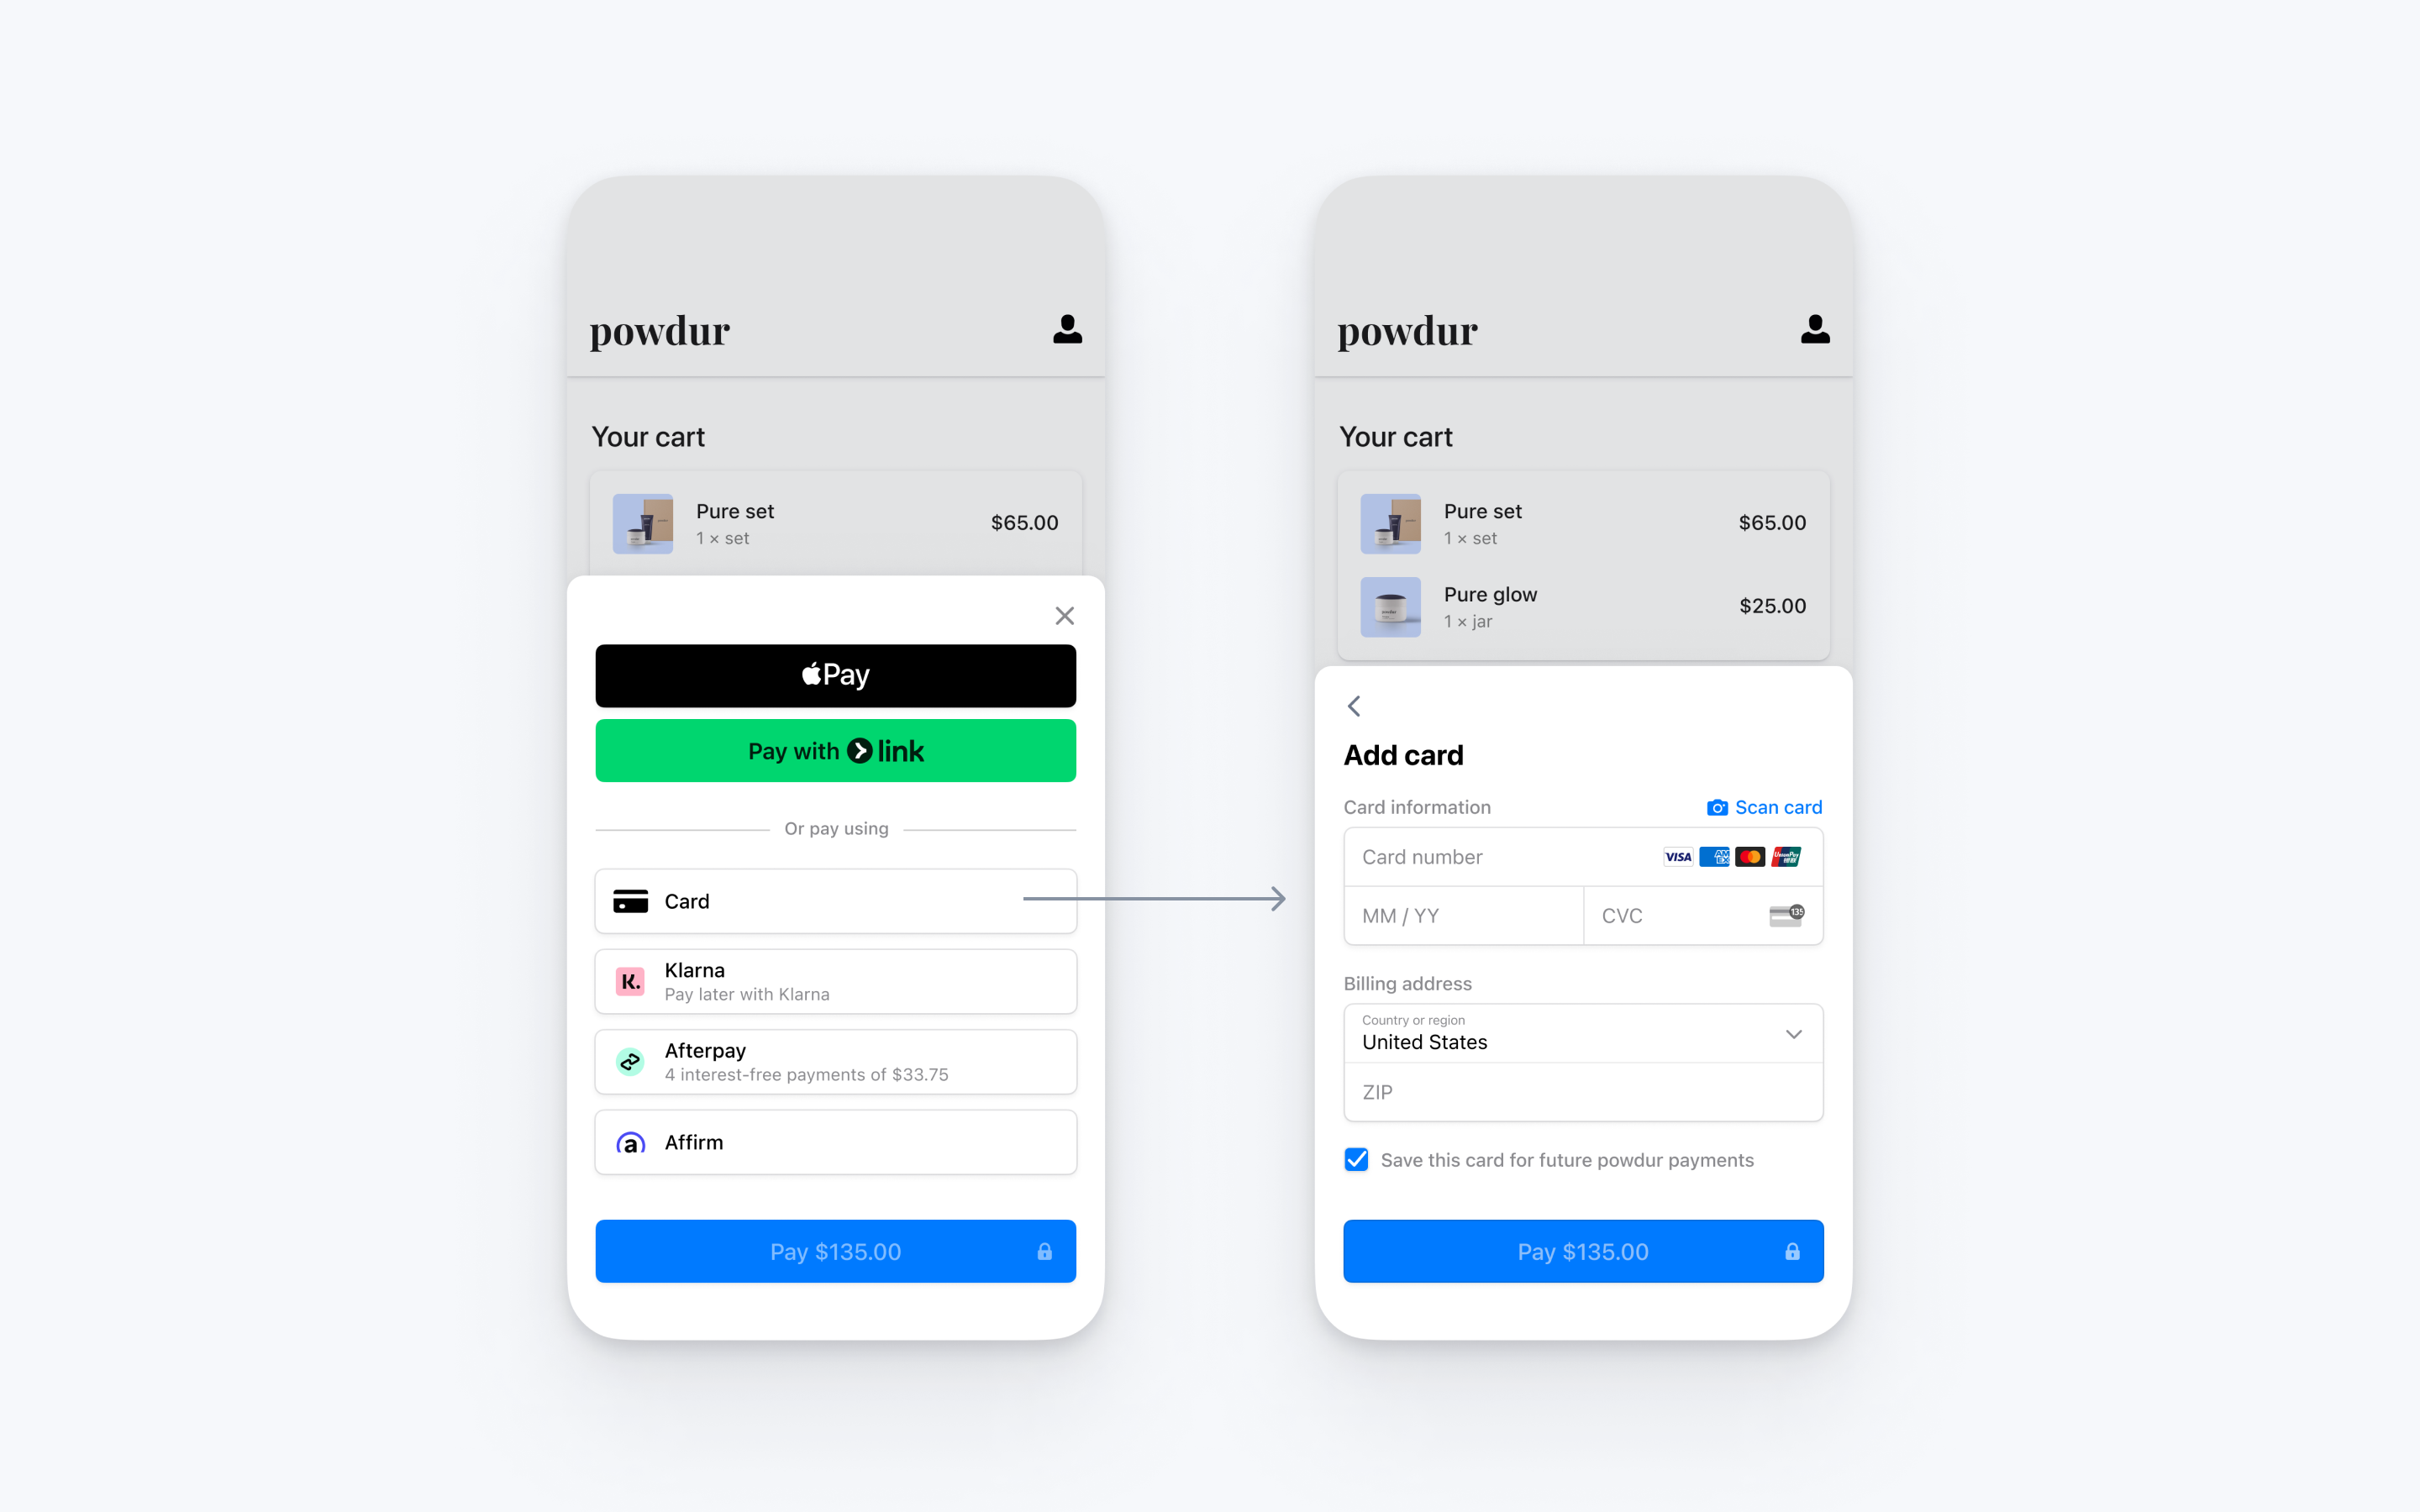 |  |
| 支払いの詳細を徴収して支払いを完了するためのシートを表示します。シートには、金額と通貨が記載された * 支払う ボタンが表示され、支払いが完了します。 | 支払い情報の収集のみを行う画面を表示します。画面に続行するというボタンが表示され、顧客はアプリに戻され、ご自身のボタンで支払いが完了されます。 |
決済を作成して Stripe に送信するサーバー側
サーバー側で、金額と通貨を指定して PaymentIntent を作成し、確定します。支払い方法はダッシュボードで管理できます。Stripe は取引額、通貨、決済フローなどの要素に基づいて、適切な支払い方法が返されるように処理します。悪意のある顧客が金額を恣意的に選択できないようにするために、請求額はクライアント側ではなく、常にサーバー側 (信頼性の高い環境) で指定してください。
コールが成功した場合は、PaymentIntent client secret を返します。コールが失敗した場合は、エラーを処理して、エラーメッセージと顧客向けの簡単な説明を返します。
メモ
すべての IntentConfiguration プロパティが PaymentIntent (setup_、amount、currency など) と一致していることを確認します。
クライアント側の引数の処理:
confirmation_: この ID を使用して ConfirmationToken オブジェクトを取得し、独自の検証またはビジネスロジックを実行できます。token_ id
支払い後のイベントを処理するサーバー側
支払いが完了すると、Stripe は payment_intent.succeeded イベントを送信します。ダッシュボードの Webhook ツールを使用するか Webhook のガイドに従ってこれらのイベントを受信し、顧客への注文確認メールの送信、データベースでの売上の記録、配送ワークフローの開始などのアクションを実行します。
クライアントからのコールバックを待つのではなく、これらのイベントをリッスンします。クライアントでは、コールバックが実行される前に顧客がブラウザーのウィンドウを閉じたり、アプリを終了する場合、また悪意を持つクライアントがレスポンスを不正操作する場合もあります。非同期型のイベントをリッスンするよう組み込みを設定すると、単一の組み込みで複数の異なるタイプの支払い方法を受け付けることができます。
Payment Element を使用して支払いを回収する場合は、payment_ イベントのほかにこれらのイベントを処理することをお勧めします。
| イベント | 説明 | アクション |
|---|---|---|
| payment_intent.succeeded | 顧客が正常に支払いを完了したときに送信されます。 | 顧客に注文の確定を送信し、顧客の注文のフルフィルメントを実行します。 |
| payment_intent.processing | 顧客が正常に支払いを開始したが、支払いがまだ完了していない場合に送信されます。このイベントは、多くの場合、顧客が口座引き落としを開始するときに送信されます。その後、payment_ イベント、また、失敗の場合は payment_ イベントが送信されます。 | 顧客に注文確認メールを送信し、支払いが保留中であることを示します。デジタル商品では、支払いの完了を待たずに注文のフルフィルメントを行うことが必要になる場合があります。 |
| payment_intent.payment_failed | 顧客が支払いを試みたが、支払いに失敗する場合に送信されます。 | 支払いが processing から payment_ に変わった場合は、顧客に再度支払いを試すように促します。 |
カードのスキャンを有効にする
iOS をサポートするカードスキャン機能を有効にするには、アプリケーションの Info. の NSCameraUsageDescription (プライバシー - カメラ利用の詳細)を設定し、カメラにアクセスする理由を入力して下さい (例:「カードをスキャンするため」)。
オプション保存済みのカードを有効にするサーバー側クライアント側
PaymentSheet では、今後の支払いのためにこのカードを保存するチェックボックスを表示して顧客のカードを保存し、保存済みのカードを表示できます。このチェックボックスを有効にするには、payment_ を enabled に設定して、サーバーで Customer (顧客) オブジェクトと、関連する CustomerSession を作成します。
Customers v1 と Accounts v2 のリファレンスを比較する
Connect プラットフォームが customer-configured Accounts を使用している場合は、Stripe の ガイドをご確認の上、コード内の Customer およびイベント参照を同等の Accounts v2 API リファレンスに置き換えてください。
const stripe = require('stripe')('sk_test_your_secret_key');

app.post('/mobile-payment-element', async (req, res) => {
  // Use an existing Customer ID if this is a returning customer.
  const customer = await stripe.customers.create();
  const customerSession = await stripe.customerSessions.create({
    customer: customer.id,
    components: {
      mobile_payment_element: {
        enabled: true,
        features: {
          payment_method_save: 'enabled',
          payment_method_redisplay: 'enabled',
          payment_method_remove: 'enabled'
        }
      },
    },
  });

  res.json({
    customerSessionClientSecret: customerSession.client_secret,
    customer: customer.id,
  });
});
次に、顧客の ID と CustomerSession の client secret を指定して PaymentSheet を設定します。
@_spi(CustomerSessionBetaAccess) import StripePaymentSheet

var configuration = PaymentSheet.Configuration()
configuration.customer = .init(id: customerId, customerSessionClientSecret: customerSessionClientSecret)

self.paymentSheet = PaymentSheet(..., configuration: configuration)
オプション遅延型の支払い方法を許可するクライアント側
遅延型の決済手段では、購入の終了時に顧客から売上を受け取ることが保証されません。これは、決済に時間がかかる (アメリカの銀行口座、SEPA デビット、iDEAL、Bancontact など) 場合や、完了に顧客の対応を必要とする (OXXO、コンビニ決済、Boleto など) 場合があるためです。
デフォルトの場合、PaymentSheet には遅延型の決済手段は表示されません。オプトインするには、PaymentSheet. で allowsDelayedPaymentMethods を true に設定します。このステップのみでは、特定の決済手段を有効にすることはできませんが、アプリがその決済手段に対応できることが示されます。たとえば、OXXO は PaymentSheet でサポートされていませんが、サポートされるようになり、最新の SDK バージョンに更新すると、実装に関する追加の変更なしで、アプリに OXXO を決済オプションとして表示でます。
var configuration = PaymentSheet.Configuration()
configuration.allowsDelayedPaymentMethods = true

self.paymentSheet = PaymentSheet(..., configuration: configuration)
顧客がいずれかの遅延型の支払い方法を PaymentSheet で正常に使用すると、. の支払い結果が返されます。
オプションApple Pay を有効にする
メモ
決済画面に専用の Apple Pay ボタンがある場合は、Apple Pay ガイドに従い、ApplePayContext を使用して Apple Pay ボタンから支払いを回収します。PaymentSheet を使用して、他のタイプの決済手段に対応することも可能です。
Apple 加盟店 ID を登録する
Apple Developer Web サイトで 新規 ID を登録 して、Apple 加盟店 ID を取得します。
フォームに説明と ID を入力します。説明はお客様の記録用であり、後で変更できます。アプリの名前を ID として使用することをお勧めします (merchant. など)。
新しい Apple Pay 証明書を作成する
支払いデータを暗号化するためのアプリの証明書を作成します。
ダッシュボードの iOS certificate settings (iOS 証明書の設定) に移動して、新規アプリケーションを追加をクリックし、表示されるガイドに従います。
証明書署名リクエスト (CSR) ファイルをダウンロードして、Apple Pay の利用を可能にする安全な証明書を Apple から取得します。
1 つの CSR ファイルを使用して証明書を 1 つだけ発行する必要があります。Apple 加盟店 ID を切り替えた場合、ダッシュボードの iOS Certificate Settings (iOS 証明書の設定) に移動して、新しい CSR と証明書を取得する必要があります。
Xcode を使用して組み込む
Apple Pay ケイパビリティをアプリに追加します。Xcode でプロジェクト設定を開き、Signing & Capabilities (署名およびケイパビリティ) タブを選択して、Apple Pay ケイパビリティを追加します。この段階で開発者アカウントへのログインを要求される場合があります。前の手順で作成した加盟店 ID を選択すると、アプリで Apple Pay を受け付けられるようになります。
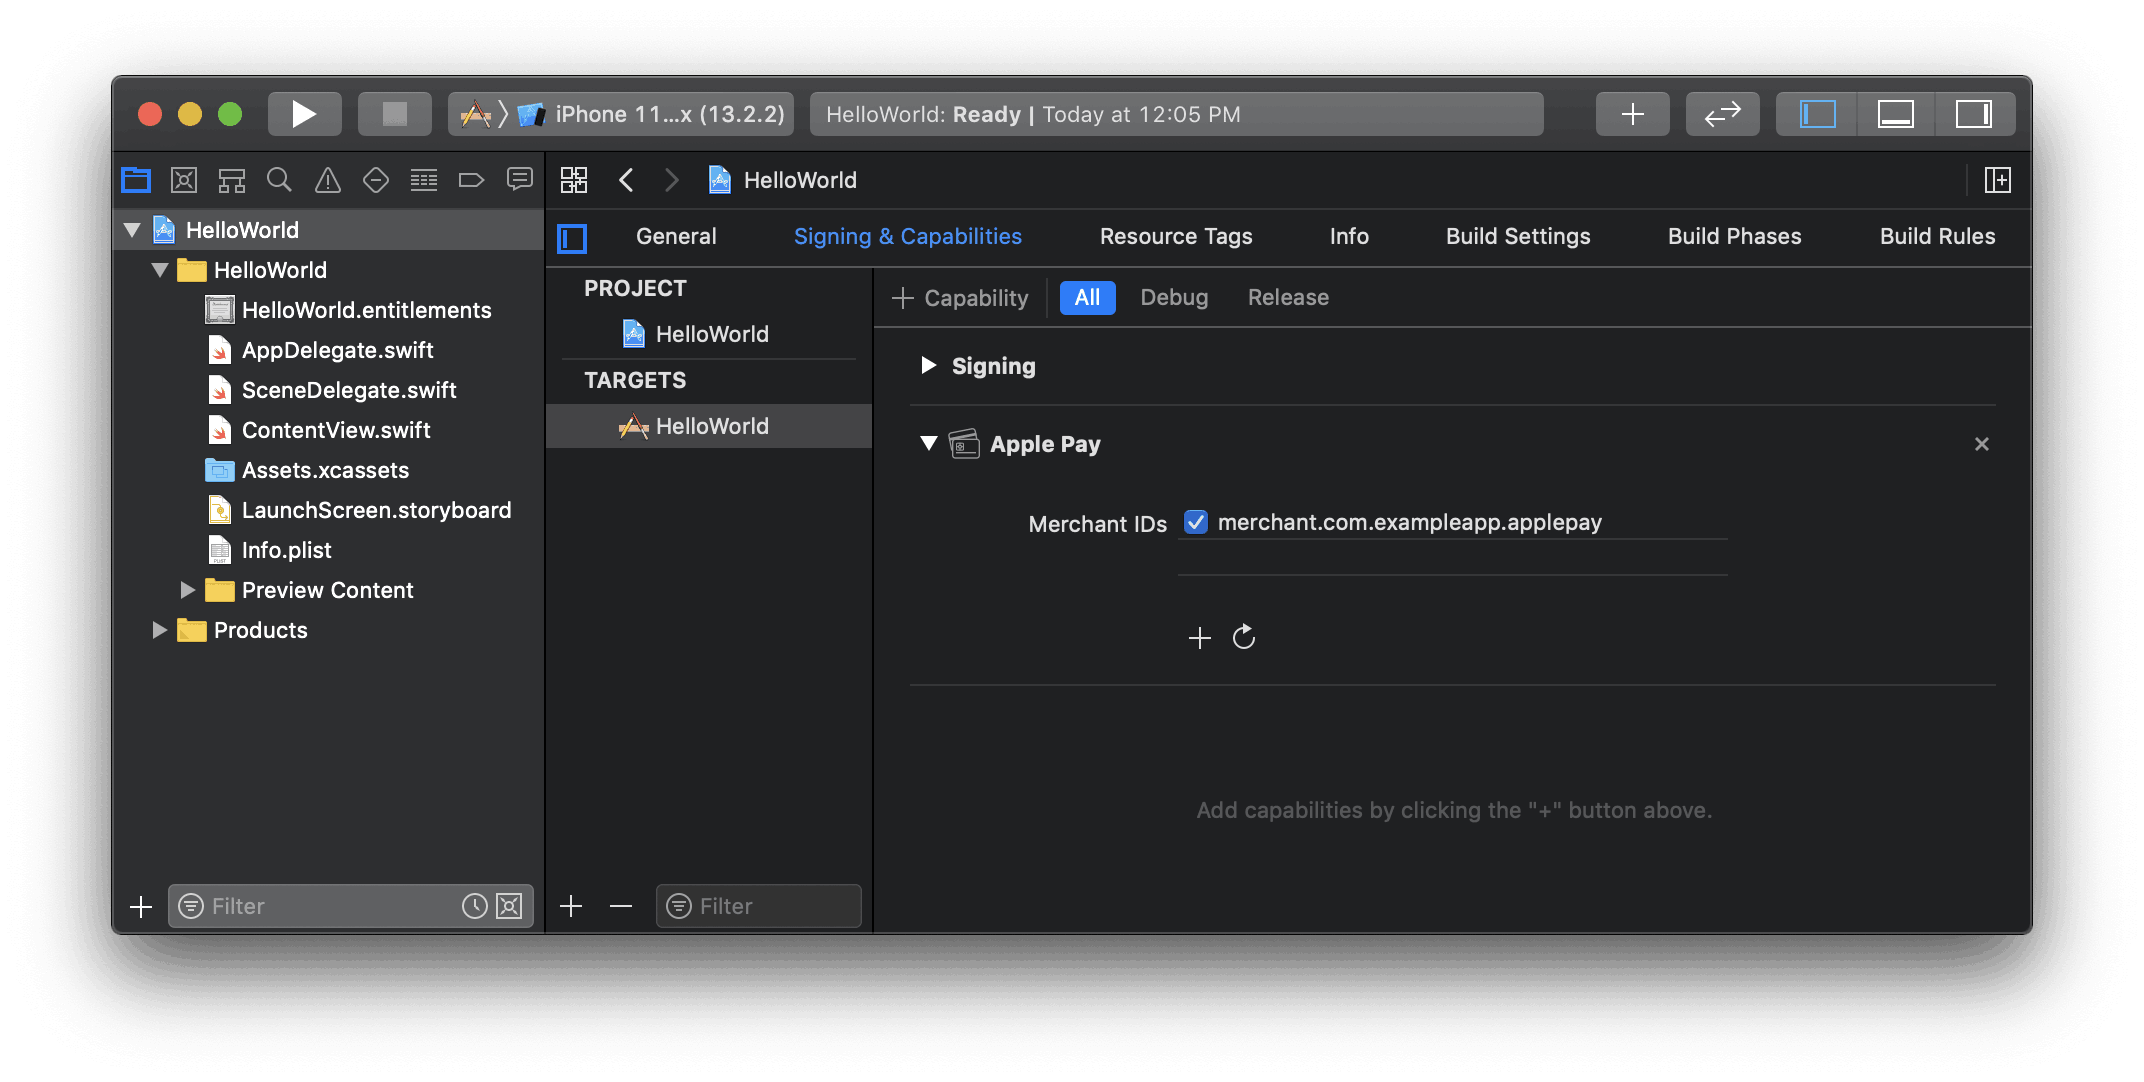
Xcode で Apple Pay ケイパビリティを有効化する
Apple Pay を追加する
注文の追跡
iOS 16 以降で注文の追跡情報を追加するには、PaymentSheet. で authorizationResultHandler を設定します。支払いの完了後、Stripe は iOS が Apple Pay の決済画面を閉じる前に実装を呼び出します。
authorizationResultHandler の実装で、完了した注文の注文の詳細をサーバーから取得します。提供された PKPaymentAuthorizationResult に詳細を追加し、変更された結果を返します。
注文の追跡の詳細については、Apple のウォレットでの注文に関するドキュメントをご覧ください。
let customHandlers = PaymentSheet.ApplePayConfiguration.Handlers(
    authorizationResultHandler: { result in
      do {
        // Fetch the order details from your service
        let myOrderDetails = try await MyAPIClient.shared.fetchOrderDetails(orderID: orderID)
        result.orderDetails = PKPaymentOrderDetails(
          orderTypeIdentifier: myOrderDetails.orderTypeIdentifier, // "com.myapp.order"
          orderIdentifier: myOrderDetails.orderIdentifier, // "ABC123-AAAA-1111"
          webServiceURL: myOrderDetails.webServiceURL, // "https://my-backend.example.com/apple-order-tracking-backend"
          authenticationToken: myOrderDetails.authenticationToken) // "abc123"
        // Return your modified PKPaymentAuthorizationResult
        return result
      } catch {
        return PKPaymentAuthorizationResult(status: .failure, errors: [error])
      }
    }
)
var configuration = PaymentSheet.Configuration()
configuration.applePay = .init(merchantId: "merchant.com.your_app_name",
                               merchantCountryCode: "US",
                               customHandlers: customHandlers)
オプション画面をカスタマイズする
カスタマイズはすべて、PaymentSheet.Configuration オブジェクトで設定されます。
デザイン
Appearance API を使用して、アプリのデザインに合うように色やフォントなどをカスタマイズします。
決済手段のレイアウト
paymentMethodLayout を使用して、画面上の決済手段のレイアウトを設定します。横や縦に表示することも、Stripe がレイアウトを自動で最適化するように設定することもできます。

var configuration = PaymentSheet.Configuration()
configuration.paymentMethodLayout = .automatic
ユーザーの住所を収集する
Address Element を使用して、顧客から国内および国外の配送先住所や請求先住所を収集します。
加盟店の表示名
merchantDisplayName を設定し、顧客に表示するビジネス名を指定します。デフォルトではアプリ名になります。
var configuration = PaymentSheet.Configuration()
configuration.merchantDisplayName = "My app, Inc."
ダークモード
PaymentSheet は、ユーザーのシステム全体の表示設定 (ライト / ダークモード) に合わせて自動的に調整されます。アプリがダークモードに対応していない場合は、style を alwaysLight または alwaysDark モードに設定できます。
var configuration = PaymentSheet.Configuration()
configuration.style = .alwaysLight
デフォルトの請求詳細
支払い画面で収集される請求詳細のデフォルト値を設定するには、defaultBillingDetails プロパティーを設定します。PaymentSheet の各フィールドに、指定したそれらの値が事前に読み込まれます。
var configuration = PaymentSheet.Configuration()
configuration.defaultBillingDetails.address.country = "US"
configuration.defaultBillingDetails.email = "foo@bar.com"
請求の詳細の収集
billingDetailsCollectionConfiguration を使用して、決済画面で請求の詳細を収集する方法を指定します。
顧客の名前、メールアドレス、電話番号、住所を収集できます。
支払い方法で必須の請求詳細のみを収集する場合は、billingDetailsCollectionConfiguration. を true に設定します。その場合、PaymentSheet. が支払い方法の請求詳細として設定されます。
支払い方法で必ずしも必須ではない追加の請求詳細を収集する場合は、billingDetailsCollectionConfiguration. を false に設定します。 その場合、PaymentSheet で収集した請求詳細が支払い方法の請求詳細として設定されます。
var configuration = PaymentSheet.Configuration()
configuration.defaultBillingDetails.email = "foo@bar.com"
configuration.billingDetailsCollectionConfiguration.name = .always
configuration.billingDetailsCollectionConfiguration.email = .never
configuration.billingDetailsCollectionConfiguration.address = .full
configuration.billingDetailsCollectionConfiguration.attachDefaultsToPaymentMethod = true
メモ
情報の収集に適用される法律については、弁護士に相談してください。電話番号は、取引に必要な場合にのみ収集してください。
オプション確定時のセキュリティコードの再収集を有効にする
PaymentIntent の確定時に保存されたカードのセキュリティコードを再徴収するには、統合で PaymentIntent を作成する前に決済詳細を徴収する必要があります。
インテントの設定を更新する
PaymentSheet. では、保存されたカードのセキュリティコードを再収集する時期を管理するオプションパラメーターを使用できます。
let intentConfig = PaymentSheet.IntentConfiguration(
  mode: .payment(amount: 1099, currency: "USD"),
  confirmHandler: { confirmationToken in
    // Handle ConfirmationToken...
  }, requireCVCRecollection: true)
インテント作成のパラメーターを更新する
支払いの確定時にセキュリティコードを再収集するには、PaymentIntent の作成時に customerId パラメーターと require_ パラメーターの両方を含めます。