Skip to content
Create account
or
Sign in
The Stripe Docs logo
/
Ask AI
Create account
Sign in
Get started
Payments
Revenue
Platforms and marketplaces
Money management
Developer resources
Overview
About Stripe payments
Upgrade your integration
Payments analytics
Online payments
OverviewFind your use caseManaged Payments
Use Payment Links
Build a checkout page
Build an advanced integration
Build an in-app integration
    Overview
    Payment Sheet
    Payment Element
      Accept in-app payments
      Customize look and feel
      Add custom payment methods
      Filter card brands
    Link out for in-app purchases
    Collect addresses
    US and Canadian cards
Payment methods
Add payment methods
Manage payment methods
Faster checkout with Link
Payment interfaces
Payment Links
Checkout
Web Elements
In-app Elements
Payment scenarios
Handle multiple currencies
Custom payment flows
Flexible acquiring
Orchestration
In-person payments
Terminal
Beyond payments
Incorporate your company
Crypto
Financial Connections
Climate
Understand fraud
Radar fraud protection
Manage disputes
Verify identities
HomePaymentsBuild an in-app integrationPayment Element

Accept in-app payments

Build a customized payments integration in your iOS, Android, or React Native app using the Payment Element.

The Payment Element is a customizable component that renders a list of payment methods that you can add into any screen in your app. When customers interact with payment methods in the list, the component opens individual bottom sheets to collect payment details.

A PaymentIntent flow allows you to create a charge in your app. In this integration, you render the Payment Element, create a PaymentIntent, and confirm a charge in your app.

Set up Stripe
Server-side
Client-side

Server-side

This integration requires endpoints on your server that talk to the Stripe API. Use our official libraries for access to the Stripe API from your server:

Command Line
Ruby
Python
PHP
Java
Node.js
Go
.NET
No results
# Available as a gem sudo gem install stripe
Gemfile
Ruby
Python
PHP
Java
Node.js
Go
.NET
No results
# If you use bundler, you can add this line to your Gemfile gem 'stripe'

Client-side

The Stripe iOS SDK is open source, fully documented, and compatible with apps supporting iOS 13 or above.

To install the SDK, follow these steps:

  1. In Xcode, select File > Add Package Dependencies… and enter https://github.com/stripe/stripe-ios-spm as the repository URL.
  2. Select the latest version number from our releases page.
  3. Add the StripePaymentSheet product to the target of your app.

Note

For details on the latest SDK release and past versions, see the Releases page on GitHub. To receive notifications when a new release is published, watch releases for the repository.

You also need to set your publishable key so that the SDK can make API calls to Stripe. To get started, you can hardcode the publishable key on the client while you’re integrating, but fetch the publishable key from your server in production.

// Set your publishable key: remember to change this to your live publishable key in production // See your keys here: https://dashboard.stripe.com/apikeys STPAPIClient.shared.publishableKey =
"pk_test_TYooMQauvdEDq54NiTphI7jx"

Enable payment methods

View your payment methods settings and enable the payment methods you want to support. You need at least one payment method enabled to create a PaymentIntent.

By default, Stripe enables cards and other prevalent payment methods that can help you reach more customers, but we recommend turning on additional payment methods that are relevant for your business and customers. See Payment method support for product and payment method support, and our pricing page for fees.

Collect payment details
Client-side

The Embedded Mobile Payment Element is designed to be placed on the checkout page of your native mobile app. The element displays a list of payment methods and you can customize it to match your app’s look and feel.

When the customer taps the Card row, it opens a sheet where they can enter their payment method details. The button in the sheet says Continue by default and dismisses the sheet when tapped, which lets your customer finish payment in your checkout.
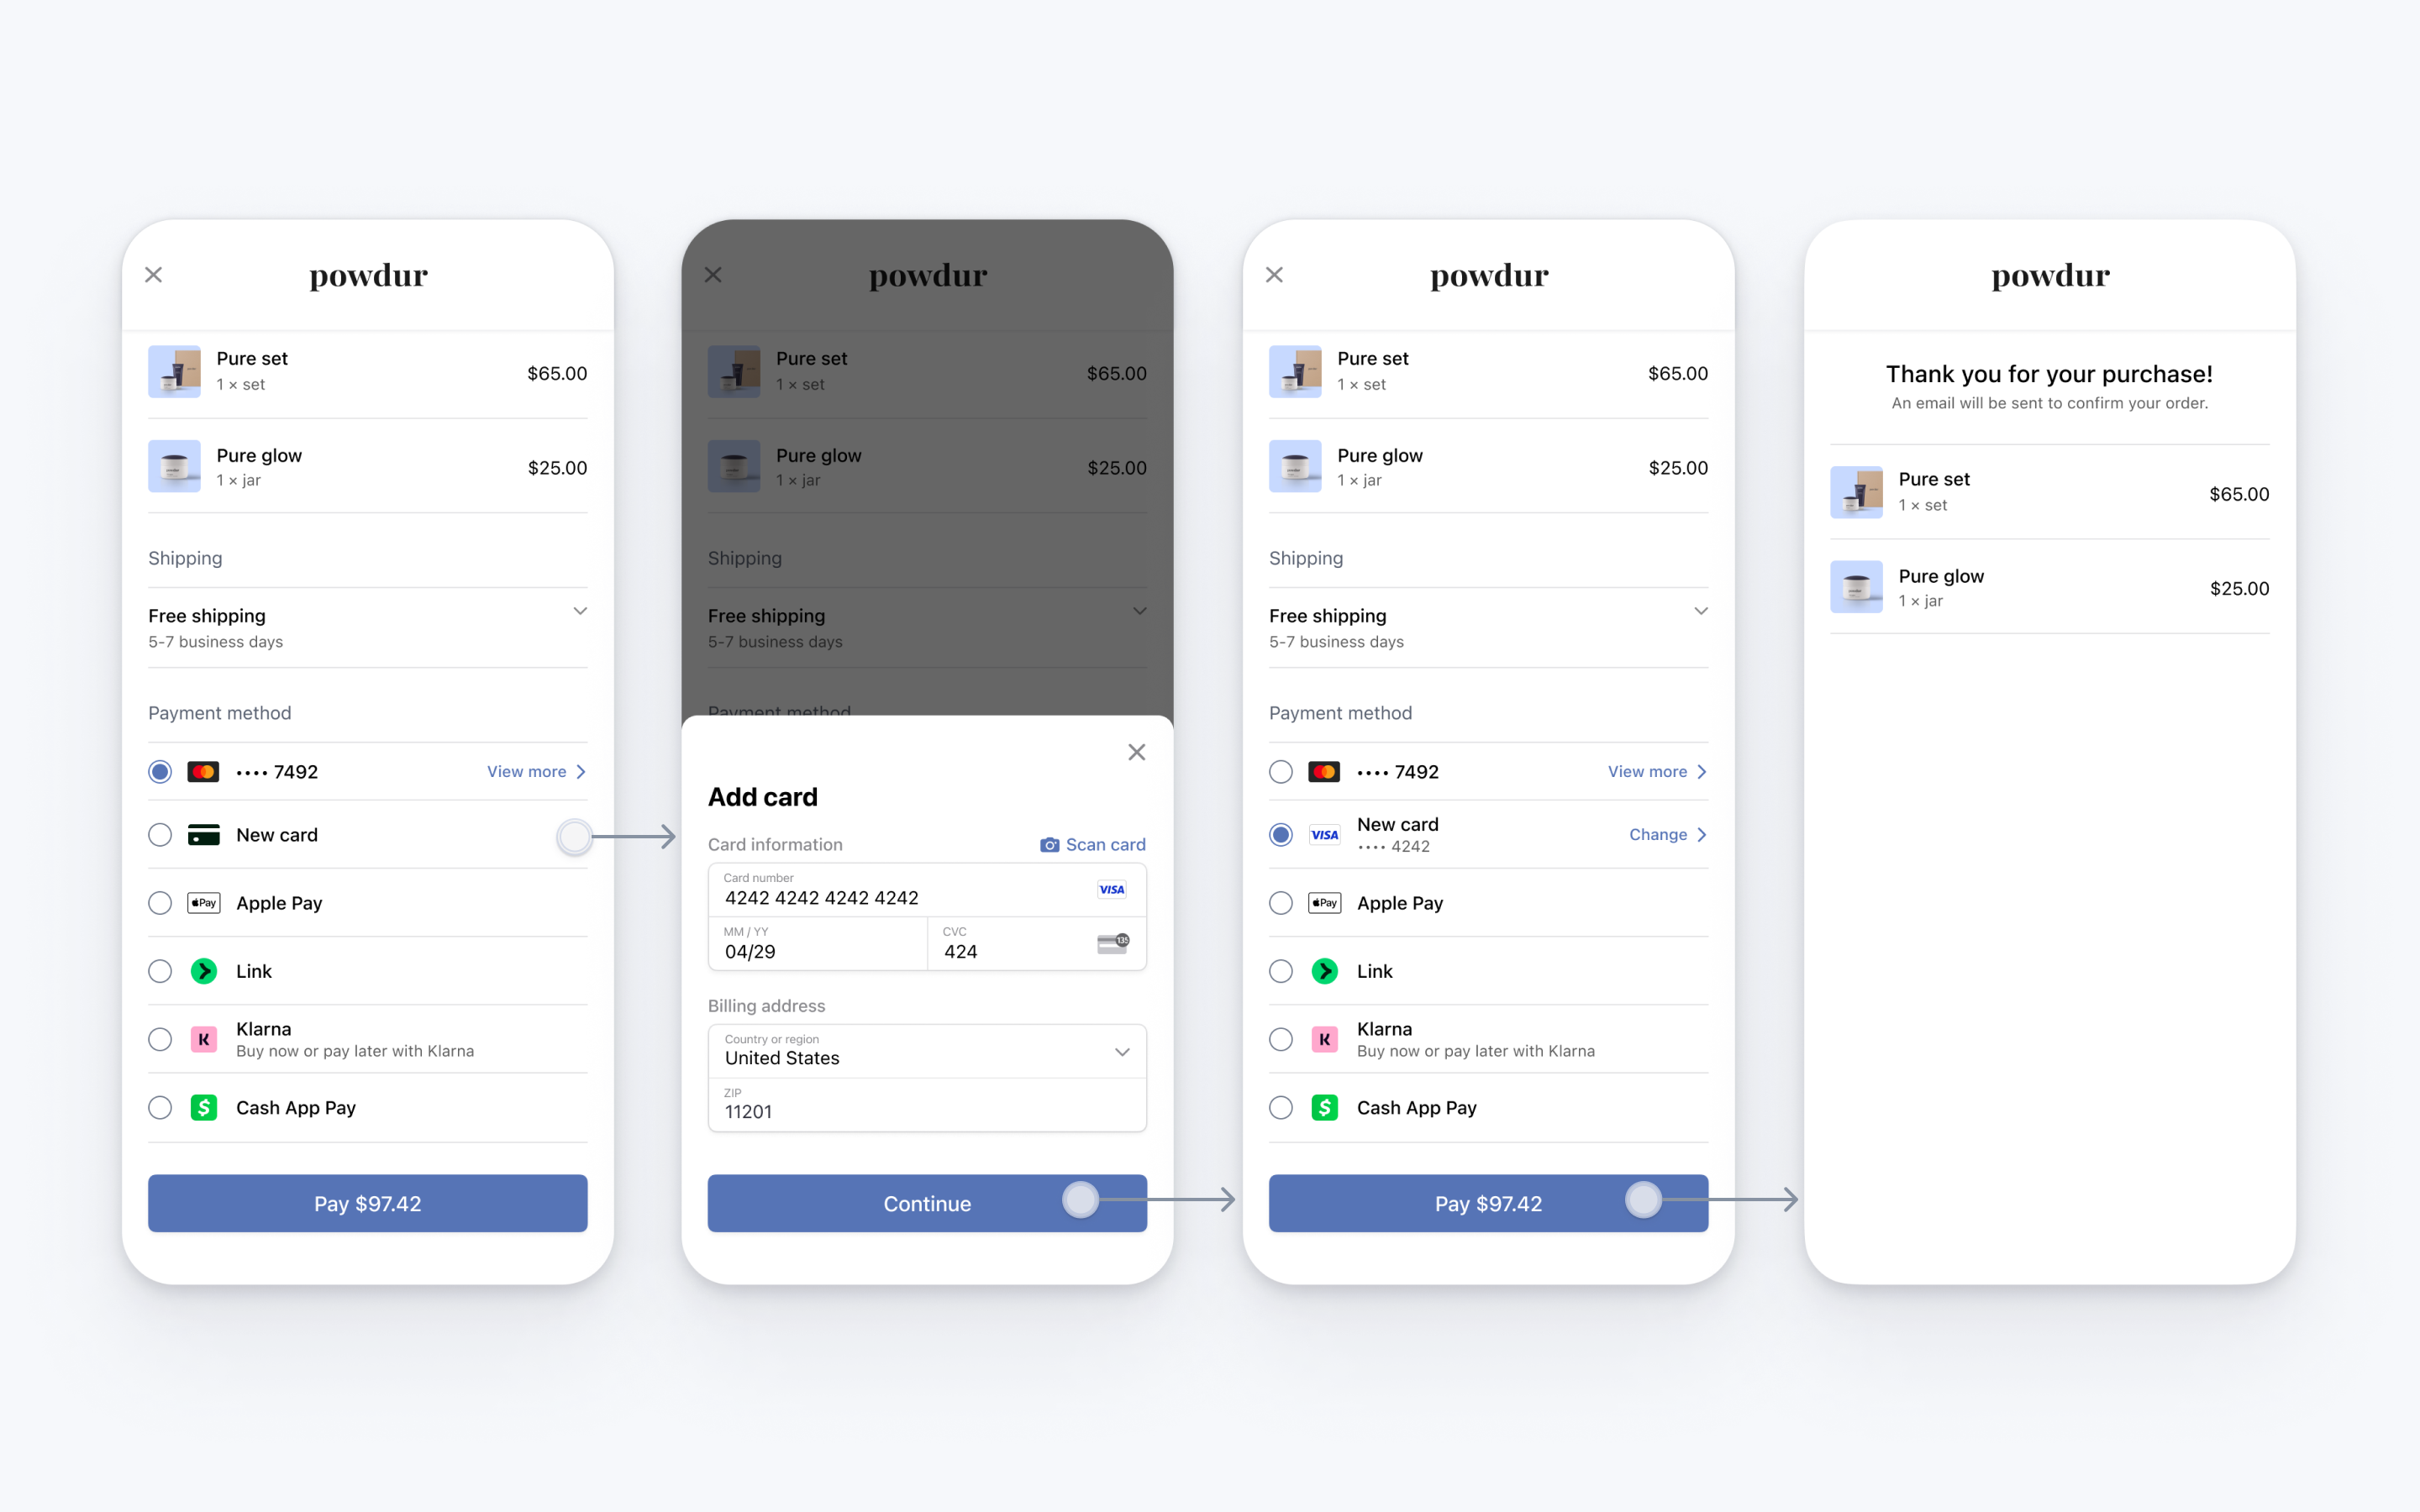
Payment Element

You can also configure the button to immediately complete payment instead of continuing. To do so, complete this step after following the guide.

Initialize the Payment Element

Call create to instantiate EmbeddedPaymentElement with a EmbeddedPaymentElement.Configuration and a PaymentSheet.IntentConfiguration.

The Configuration object contains general-purpose configuration options for EmbeddedPaymentElement that don’t change between payments, like returnURL. The IntentConfiguration object contains details about the specific payment like the amount and currency, as well as a confirmHandler callback–for now, leave its implementation empty. After it successfully initializes, set its presentingViewController and delegate properties.

import StripePaymentSheet class MyCheckoutVC: UIViewController { func createEmbeddedPaymentElement() async throws -> EmbeddedPaymentElement { let intentConfig = PaymentSheet.IntentConfiguration( mode: .payment(amount: 1099, currency: "USD") ) { [weak self] _, _, intentCreationCallback in self?.handleConfirm(intentCreationCallback) } var configuration = EmbeddedPaymentElement.Configuration() configuration.returnURL = "your-app://stripe-redirect" // Use the return url you set up in the previous step let embeddedPaymentElement = try await EmbeddedPaymentElement.create(intentConfiguration: intentConfig, configuration: configuration) embeddedPaymentElement.presentingViewController = self embeddedPaymentElement.delegate = self return embeddedPaymentElement } func handleConfirm(_ intentCreationCallback: @escaping (Result<String, Error>) -> Void) { // ...explained later } }

Add the Payment Element view

After EmbeddedPaymentElement has successfully initialized, put its view in your checkout UI.

Note

The view must be contained within a UIScrollView or some other scrollable view. This is because it doesn’t have a fixed size and can change height after it initially renders.

class MyCheckoutVC: UIViewController { // ... private(set) var embeddedPaymentElement: EmbeddedPaymentElement? private lazy var checkoutButton: UIButton = { let checkoutButton = UIButton(type: .system) checkoutButton.backgroundColor = .systemBlue checkoutButton.layer.cornerRadius = 5.0 checkoutButton.clipsToBounds = true checkoutButton.setTitle("Checkout", for: .normal) checkoutButton.setTitleColor(.white, for: .normal) checkoutButton.translatesAutoresizingMaskIntoConstraints = false checkoutButton.isEnabled = embeddedPaymentElement?.paymentOption != nil checkoutButton.addTarget(self, action: #selector(didTapConfirmButton), for: .touchUpInside) return checkoutButton }() // ... @objc func didTapConfirmButton() { // ...explained later } override func viewDidLoad() { super.viewDidLoad() Task { @MainActor in do { // Create a UIScrollView let scrollView = UIScrollView() scrollView.translatesAutoresizingMaskIntoConstraints = false self.view.addSubview(scrollView) // Create the Payment Element let embeddedPaymentElement = try await createEmbeddedPaymentElement() embeddedPaymentElement.delegate = self embeddedPaymentElement.presentingViewController = self self.embeddedPaymentElement = embeddedPaymentElement // Add its view to the scroll view scrollView.addSubview(embeddedPaymentElement.view) // Add your own checkout button to the scroll view scrollView.addSubview(checkoutButton) // Set up layout constraints embeddedPaymentElement.view.translatesAutoresizingMaskIntoConstraints = false NSLayoutConstraint.activate([ scrollView.topAnchor.constraint(equalTo: view.safeAreaLayoutGuide.topAnchor), scrollView.bottomAnchor.constraint(equalTo: view.safeAreaLayoutGuide.bottomAnchor), scrollView.leadingAnchor.constraint(equalTo: view.safeAreaLayoutGuide.leadingAnchor), scrollView.trailingAnchor.constraint(equalTo: view.safeAreaLayoutGuide.trailingAnchor), embeddedPaymentElement.view.topAnchor.constraint(equalTo: scrollView.topAnchor), embeddedPaymentElement.view.leadingAnchor.constraint(equalTo: scrollView.leadingAnchor), embeddedPaymentElement.view.trailingAnchor.constraint(equalTo: scrollView.trailingAnchor), checkoutButton.topAnchor.constraint(equalTo: embeddedPaymentElement.view.bottomAnchor, constant: 4.0), checkoutButton.leadingAnchor.constraint(equalTo: scrollView.safeAreaLayoutGuide.leadingAnchor, constant: 4.0), checkoutButton.trailingAnchor.constraint(equalTo: scrollView.safeAreaLayoutGuide.trailingAnchor, constant: -4.0), ]) } catch { // handle view not being added to view } } } }

At this point you can run your app and see the Embedded Mobile Payment Element.

Handle height changes

The EmbeddedPaymentElement’s view might grow or shrink in size which might impact the layout of the view.

Handle height changes by implementing the embeddedPaymentElementDidUpdateHeight delegate method. EmbeddedPaymentElement’s view calls this method inside an animation block that updates its height. Your implementation is expected to call setNeedsLayout() and layoutIfNeeded() on the scroll view that contains the EmbeddedPaymentElement’s view to enable a smooth animation of the height change.

extension MyCheckoutVC: EmbeddedPaymentElementDelegate { func embeddedPaymentElementDidUpdateHeight(embeddedPaymentElement: StripePaymentSheet.EmbeddedPaymentElement) { // Handle layout appropriately self.view.setNeedsLayout() self.view.layoutIfNeeded() } }

We recommend that you test that your view properly responds to changes in height. To do this, call testHeightChange() on EmbeddedPaymentElement to simulate showing and hiding a mandate within the element. Make sure that after calling testHeightChange(), your scroll view adjusts smoothly.

class MyCheckoutVC: UIViewController { override func viewDidLoad() { // This is only for testing purposes: #if DEBUG Timer.scheduledTimer(withTimeInterval: 5.0, repeats: true) { [weak self] _ in Task { @MainActor in self?.embeddedPaymentElement?.testHeightChange() } } #endif } }

Optional Display the selected payment option

If you need to access details about the customer’s selected payment option like a label (for example, “····4242”), image (for example, a VISA logo), or billing details to display in your UI, use the EmbeddedPaymentElement’s paymentOption property.

To be notified when the paymentOption changes, implement the embeddedPaymentElementDidUpdatePaymentOption delegate method.

extension MyCheckoutVC: EmbeddedPaymentElementDelegate { func embeddedPaymentElementDidUpdatePaymentOption(embeddedPaymentElement: EmbeddedPaymentElement) { print("The payment option changed: \(embeddedPaymentElement.paymentOption)") checkoutButton.isEnabled = embeddedPaymentElement.paymentOption != nil } }

Optional Update payment details

As the customer performs actions that change the payment details (for example, applying a discount code), update the EmbeddedPaymentElement instance to reflect the new values by calling the update method. Some payment methods, like Apple Pay and Google Pay, show the amount in the UI, so make sure it’s always accurate and up to date.

When the update call completes, update your UI. The update call might change the customer’s currently selected payment option.

extension MyCheckoutVC { func update() { Task { @MainActor in var updatedIntentConfig = oldIntentConfig // Update the amount to reflect the price after applying the discount code updatedIntentConfig.mode = PaymentSheet.IntentConfiguration.Mode.payment(amount: 999, currency: "USD") let result = await embeddedPaymentElement?.update(intentConfiguration: updatedIntentConfig) switch result { case .canceled, nil: // Do nothing; this happens when a subsequent `update` call cancels this one break case .failed(let error): // Display error to user in an alert, let users retry case .succeeded: // Update your UI in case the payment option changed } } } }

Confirm the payment

When the customer taps the checkout button, call embeddedPaymentElement.confirm() to complete the payment. Be sure to disable user interaction during confirmation.

extension MyCheckoutVC { @objc func didTapConfirmButton() { Task { @MainActor in guard let embeddedPaymentElement else { return } self.view.isUserInteractionEnabled = false // Disable user interaction, show a spinner, and so on before calling confirm let result = await embeddedPaymentElement.confirm() switch result { case .completed: // Payment completed - show a confirmation screen. case .failed(let error): self.view.isUserInteractionEnabled = true // Encountered an unrecoverable error. You can display the error to the user, log it, etc. case .canceled: self.view.isUserInteractionEnabled = true // Customer canceled - you should probably do nothing. break } } } }

Next, implement the confirmHandler callback you passed to PaymentSheet.IntentConfiguration earlier to send a request to your server. Your server creates a PaymentIntent and returns its client secret, explained in Create a PaymentIntent.

When the request returns, call the intentCreationCallback with your server response’s client secret or an error. The EmbeddedPaymentElement confirms the PaymentIntent using the client secret or displays the localized error message in its UI (either errorDescription or localizedDescription). After confirmation completes, EmbeddedPaymentElement isn’t usable. Instead, direct the user to a receipt screen or similar.

extension MyCheckoutVC { func handleConfirm(_ intentCreationCallback: @escaping (Result<String, Error>)-> Void) { // Make a request to your own server and receive a client secret or an error. let myServerResponse: Result<String, Error> = ... switch myServerResponse { case .success(let clientSecret): // Call the `intentCreationCallback` with the client secret intentCreationCallback(.success(clientSecret)) case .failure(let error): // Call the `intentCreationCallback` with the error intentCreationCallback(.failure(error)) } } }

OptionalClear the selected payment option

If you have payment options external to EmbeddedPaymentElement, you might need to clear the selected payment option. To do this, use the clearPaymentOption API to deselect the selected payment option.

extension MyCheckoutVC: UIViewController { func deselectPaymentMethod() { embeddedPaymentElement?.clearPaymentOption() } }

OptionalDisplay the mandate yourself

By default, the Embedded Mobile Payment Element displays mandates and legal disclaimers to ensure regulatory compliance. This text must be located close to your buy button. If necessary, disable its display in the view and display it yourself instead.

Warning

Your integration must display the mandate text to be compliant. Make sure URLs in the text can be opened by using a UITextView or something similar.

var configuration = EmbeddedPaymentElement.Configuration(...) configuration.embeddedViewDisplaysMandateText = true ... let mandateTextView = UITextView() mandateTextView.attributedText = embeddedPaymentElement.paymentOption.mandateText

OptionalLet the customer pay immediately in the sheet
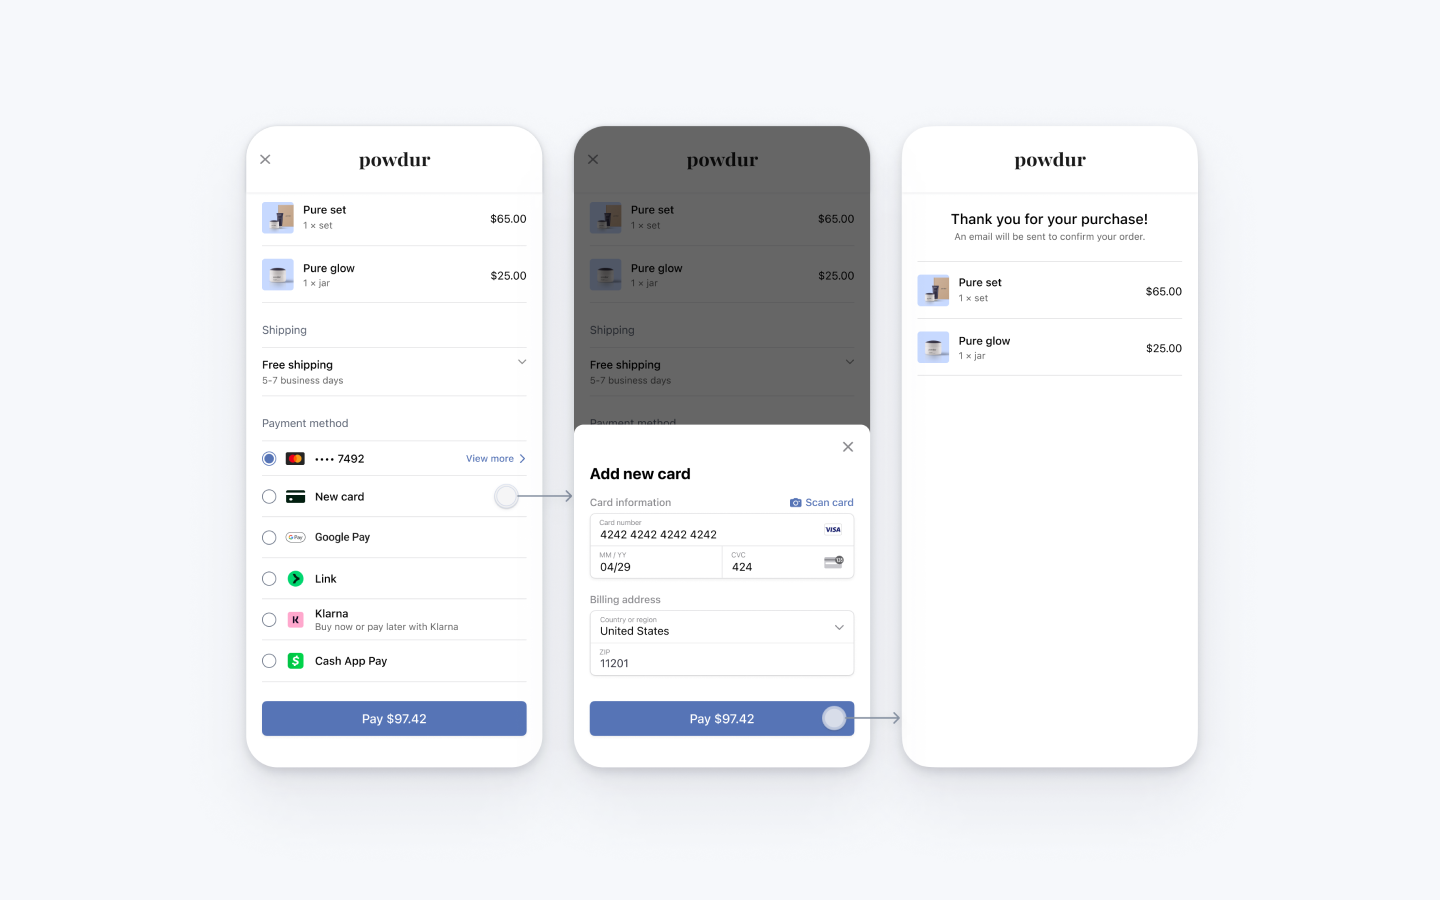
Embedded Payment Element

To configure the button in the form sheet to immediately confirm payment, set formSheetAction on your EmbeddedPaymentElement.Configuration object.

The completion block executes with the result of the payment after the sheet dismisses. The embedded UI isn’t usable after payment completes, so we recommend that your implementation directs the user to a different screen, such as a receipt screen.

var configuration = EmbeddedPaymentElement.Configuration() configuration.formSheetAction = .confirm(completion: { result in switch result { case .completed: // Payment completed. You can e.g. show a confirmation screen. print("Completed") case .failed(let error): // Encountered an unrecoverable error. You can display the error to the user, log it, etc. print(error) case .canceled: // Customer canceled - you should probably do nothing. break } })

Create a PaymentIntent
Server-side

On your server, create a PaymentIntent with an amount and currency. You can manage payment methods from the Dashboard. Stripe handles the return of eligible payment methods based on factors such as the transaction’s amount, currency, and payment flow. To prevent malicious customers from choosing their own prices, always decide how much to charge on the server-side (a trusted environment) and not the client.

If the call succeeds, return the PaymentIntent client secret. If the call fails, handle the error and return an error message with a brief explanation for your customer.

Note

Verify that all IntentConfiguration properties match your PaymentIntent (for example, setup_future_usage, amount, and currency).

main.rb
Ruby
Python
PHP
Node.js
Java
Go
.NET
No results
require 'stripe' Stripe.api_key =
'sk_test_BQokikJOvBiI2HlWgH4olfQ2'
post '/create-intent' do data = JSON.parse request.body.read params = { amount: 1099, currency: 'usd', # In the latest version of the API, specifying the `automatic_payment_methods` parameter is optional because Stripe enables its functionality by default. automatic_payment_methods: {enabled: true}, } begin intent = Stripe::PaymentIntent.create(params) {client_secret: intent.client_secret}.to_json rescue Stripe::StripeError => e {error: e.error.message}.to_json end end

Set up a return URL
Client-side

The customer might navigate away from your app to authenticate (for example, in Safari or their banking app). To allow them to automatically return to your app after authenticating, configure a custom URL scheme and set up your app delegate to forward the URL to the SDK. Stripe doesn’t support universal links.

SceneDelegate.swift
Swift
No results
// This method handles opening custom URL schemes (for example, "your-app://stripe-redirect") func scene(_ scene: UIScene, openURLContexts URLContexts: Set<UIOpenURLContext>) { guard let url = URLContexts.first?.url else { return } let stripeHandled = StripeAPI.handleURLCallback(with: url) if (!stripeHandled) { // This was not a Stripe url – handle the URL normally as you would } }

Additionally, set the returnURL on your EmbeddedPaymentElement.Configuration object to the URL for your app.

var configuration = EmbeddedPaymentElement.Configuration() configuration.returnURL = "your-app://stripe-redirect"

Handle post-payment events
Server-side

Stripe sends a payment_intent.succeeded event when the payment completes. Use the Dashboard webhook tool or follow the webhook guide to receive these events and run actions, such as sending an order confirmation email to your customer, logging the sale in a database, or starting a shipping workflow.

Listen for these events rather than waiting on a callback from the client. On the client, the customer could close the browser window or quit the app before the callback executes, and malicious clients could manipulate the response. Setting up your integration to listen for asynchronous events is what enables you to accept different types of payment methods with a single integration.

In addition to handling the payment_intent.succeeded event, we recommend handling these other events when collecting payments with the Payment Element:

EventDescriptionAction
payment_intent.succeededSent when a customer successfully completes a payment.Send the customer an order confirmation and fulfill their order.
payment_intent.processingSent when a customer successfully initiates a payment, but the payment has yet to complete. This event is most commonly sent when the customer initiates a bank debit. It’s followed by either a payment_intent.succeeded or payment_intent.payment_failed event in the future.Send the customer an order confirmation that indicates their payment is pending. For digital goods, you might want to fulfill the order before waiting for payment to complete.
payment_intent.payment_failedSent when a customer attempts a payment, but the payment fails.If a payment transitions from processing to payment_failed, offer the customer another attempt to pay.

Test the integration

Card numberScenarioHow to test
The card payment succeeds and doesn’t require authentication.Fill out the credit card form using the credit card number with any expiration, CVC, and postal code.
The card payment requires authentication.Fill out the credit card form using the credit card number with any expiration, CVC, and postal code.
The card is declined with a decline code like insufficient_funds.Fill out the credit card form using the credit card number with any expiration, CVC, and postal code.
The UnionPay card has a variable length of 13-19 digits.Fill out the credit card form using the credit card number with any expiration, CVC, and postal code.

See Testing for additional information to test your integration.

OptionalEnable saved cards
Server-side
Client-side

EmbeddedPaymentElement can display a Save this card for future use checkbox that saves the customer’s card, and display the customer’s saved cards. To enable this checkbox, create a Customer object on your server and an associated Ephemeral Key.

const stripe = require('stripe')('sk_test_your_secret_key'); app.post('/mobile-payment-element', async (req, res) => { // Use an existing Customer ID if this is a returning customer. const customer = await stripe.customers.create(); const ephemeralKey = await stripe.ephemeralKeys.create( {customer: customer.id}, {apiVersion: '2020-08-27'} ); res.json({ ephemeralKey: ephemeralKey.secret, customer: customer.id, }); });

Next, configure EmbeddedPaymentElement with the Customer’s ID and the Ephemeral Key’s client secret.

var configuration = EmbeddedPaymentElement.Configuration() configuration.customer = .init(id: customerId, ephemeralKeySecret: customerEphemeralKeySecret) self.embeddedPaymentElement = try await EmbeddedPaymentElement.create(..., configuration: configuration)

OptionalAllow delayed payment methods
Client-side

Delayed payment methods don’t guarantee that you’ll receive funds from your customer at the end of the checkout either because they take time to settle (for example, US Bank Accounts, SEPA Debit, iDEAL, and Bancontact) or because they require customer action to complete (for example, OXXO, Konbini, and Boleto).

By default, EmbeddedPaymentElement doesn’t display delayed payment methods. To opt in, set allowsDelayedPaymentMethods to true in your EmbeddedPaymentElement.Configuration. This step alone doesn’t activate any specific payment methods; rather, it indicates that your app is able to handle them. For example, although OXXO is currently not supported by EmbeddedPaymentElement, if it becomes supported and you’ve updated to the latest SDK version, your app will be able to display OXXO as a payment option without additional integration changes.

var configuration = EmbeddedPaymentElement.Configuration() configuration.allowsDelayedPaymentMethods = true self.embeddedPaymentElement = try await EmbeddedPaymentElement.create(..., configuration: configuration)

If the customer successfully uses one of these delayed payment methods in EmbeddedPaymentElement, the payment result returned is .completed.

OptionalEnable Apple Pay

Note

If your checkout screen has a dedicated Apple Pay button, follow the Apple Pay guide and use ApplePayContext to collect payment from your Apple Pay button. You can use EmbeddedPaymentElement to handle other payment method types.

Register for an Apple Merchant ID

Obtain an Apple Merchant ID by registering for a new identifier on the Apple Developer website.

Fill out the form with a description and identifier. Your description is for your own records and you can modify it in the future. Stripe recommends using the name of your app as the identifier (for example, merchant.com.{{YOUR_APP_NAME}}).

Create a new Apple Pay certificate

Create a certificate for your app to encrypt payment data.

Go to the iOS Certificate Settings in the Dashboard, click Add new application, and follow the guide.

Download a Certificate Signing Request (CSR) file to get a secure certificate from Apple that allows you to use Apple Pay.

One CSR file must be used to issue exactly one certificate. If you switch your Apple Merchant ID, you must go to the iOS Certificate Settings in the Dashboard to obtain a new CSR and certificate.

Integrate with Xcode

Add the Apple Pay capability to your app. In Xcode, open your project settings, click the Signing & Capabilities tab, and add the Apple Pay capability. You might be prompted to log in to your developer account at this point. Select the merchant ID you created earlier, and your app is ready to accept Apple Pay.
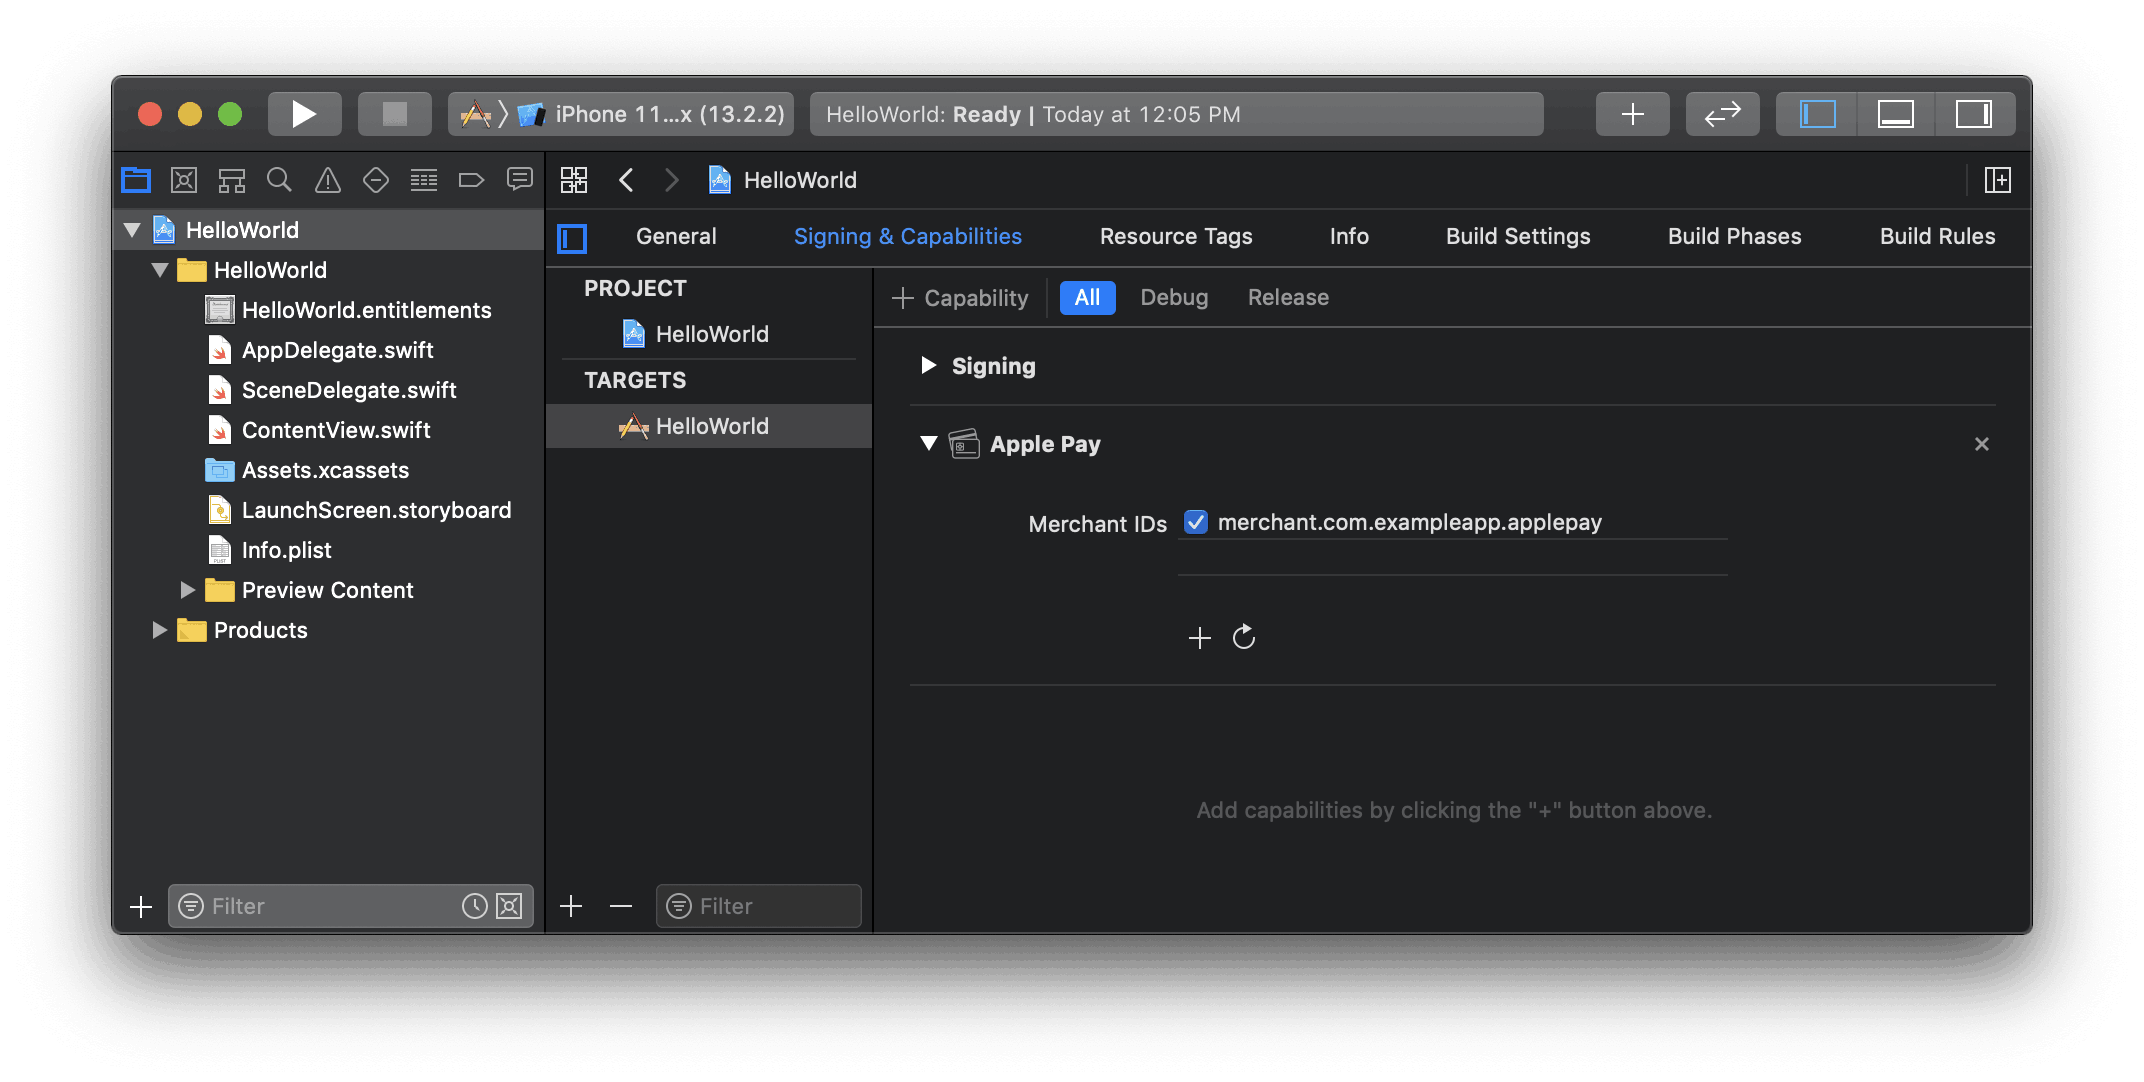
Enable the Apple Pay capability in Xcode

Add Apple Pay

To add Apple Pay to EmbeddedPaymentElement, set applePay after initializing EmbeddedPaymentElement.Configuration with your Apple merchant ID and your business’s country code.

var configuration = EmbeddedPaymentElement.Configuration() configuration.applePay = .init( merchantId: "merchant.com.your_app_name", merchantCountryCode: "US" )

Order tracking

To add order tracking information in iOS 16 or later, configure an authorizationResultHandler in your PaymentSheet.ApplePayConfiguration.Handlers. Stripe calls your implementation after the payment is complete, but before iOS dismisses the Apple Pay sheet.

In your authorizationResultHandler implementation, fetch the order details from your server for the completed order. Add the details to the provided PKPaymentAuthorizationResult and call the provided completion handler.

To learn more about order tracking, see Apple’s Wallet Orders documentation.

let customHandlers = EmbeddedPaymentElement.ApplePayConfiguration.Handlers( authorizationResultHandler: { result, completion in // Fetch the order details from your service MyAPIClient.shared.fetchOrderDetails(orderID: orderID) { myOrderDetails result.orderDetails = PKPaymentOrderDetails( orderTypeIdentifier: myOrderDetails.orderTypeIdentifier, // "com.myapp.order" orderIdentifier: myOrderDetails.orderIdentifier, // "ABC123-AAAA-1111" webServiceURL: myOrderDetails.webServiceURL, // "https://my-backend.example.com/apple-order-tracking-backend" authenticationToken: myOrderDetails.authenticationToken) // "abc123" // Call the completion block on the main queue with your modified PKPaymentAuthorizationResult completion(result) } } ) var configuration = EmbeddedPaymentElement.Configuration() configuration.applePay = .init(merchantId: "merchant.com.your_app_name", merchantCountryCode: "US", customHandlers: customHandlers)

OptionalEnable card scanning

To enable card scanning support, set the NSCameraUsageDescription (Privacy - Camera Usage Description) in the Info.plist of your application, and provide a reason for accessing the camera (for example, “To scan cards”). Devices with iOS 13 or higher support card scanning.

OptionalCustomize the element

All customization is configured through the EmbeddedPaymentElement.Configuration object.

Appearance

Customize colors, fonts, and so on to match the look and feel of your app by using the appearance API.

Collect users addresses

Collect local and international shipping or billing addresses from your customers using the Address Element.

Merchant display name

Specify a customer-facing business name by setting merchantDisplayName. By default, this is your app’s name.

var configuration = EmbeddedPaymentElement.Configuration() configuration.merchantDisplayName = "My app, Inc."

Dark mode

EmbeddedPaymentElement automatically adapts to the user’s system-wide appearance settings (light and dark mode). If your app doesn’t support dark mode, you can set style to alwaysLight or alwaysDark mode.

var configuration = EmbeddedPaymentElement.Configuration() configuration.style = .alwaysLight

OptionalEnable CVC recollection on confirmation

The following instructions for re-collecting the CVC of a saved card during PaymentIntent confirmation assume that your integration includes the following:

  • Collection of payment details before creating a PaymentIntent
  • Client-side confirmation

Update the intent configuration

PaymentSheet.IntentConfiguration accepts an optional parameter that controls when to re-collect CVC for a saved card.

import StripePaymentSheet class MyCheckoutVC: UIViewController { private func createEmbeddedPaymentElement() async throws { let intentConfig = PaymentSheet.IntentConfiguration( mode: .payment(amount: 1099, currency: "USD"), confirmHandler: { [weak self] _, _, intentCreationCallback in self?.handleConfirm(intentCreationCallback) }, requireCVCRecollection: true) var configuration = EmbeddedPaymentElement.Configuration() configuration.returnURL = "your-app://stripe-redirect" // Use the return url you set up in the previous step let embeddedPaymentElement = try await EmbeddedPaymentElement.create(intentConfiguration: intentConfig, configuration: configuration) // ... Same as before } }

Update parameters of the intent creation

To re-collect the CVC when confirming payment, include both the customerId and require_cvc_recollection parameters during the creation of the PaymentIntent.

main.rb
Ruby
Python
PHP
Node.js
Java
Go
.NET
No results
require 'stripe' Stripe.api_key =
'sk_test_BQokikJOvBiI2HlWgH4olfQ2'
post '/create-intent' do data = JSON.parse request.body.read params = { amount: 1099, currency: 'usd', # In the latest version of the API, specifying the `automatic_payment_methods` parameter is optional because Stripe enables its functionality by default. automatic_payment_methods: {enabled: true}, customer: customer.id, payment_method_options: { card: {require_cvc_recollection: true} } } begin intent = Stripe::PaymentIntent.create(params) {client_secret: intent.client_secret}.to_json rescue Stripe::StripeError => e {error: e.error.message}.to_json end end
Was this page helpful?
YesNo
  • Need help? Contact Support.
  • Join our early access program.
  • Check out our changelog.
  • Questions? Contact Sales.
  • LLM? Read llms.txt.
  • Powered by Markdoc