Lewati ke konten
Buat akun
atau
Masuk
Logo Dokumen Stripe
/
Tanya AI
Buat akun
Masuk
Mulai
Pembayaran
Pendapatan
Platform dan situs belanja online
Manajemen uang
Sumber daya pengembang
Gambaran Umum
Tentang pembayaran Stripe
Upgrade integrasi Anda
Analitik pembayaran
Pembayaran online
Gambaran umumTemukan contoh penggunaan AndaManaged Payments
Gunakan Payment Links
Buat halaman checkout
Bangun integrasi lanjutan
Bangun integrasi dalam aplikasi
Metode Pembayaran
Tambahkan metode pembayaran
Kelola metode pembayaran
Checkout lebih cepat dengan Link
    Gambaran umum
    Pembayaran Bank Instan
    Klarna di Link
    Sekilas
    Link dengan Checkout
    Link dengan Web Elements
    Link dengan Mobile Elements
    Link dengan Invoicing
    Panduan integrasi
    Integrasi pembayaran Link
    Buat halaman checkout custom yang menyertakan Link
    Siapkan pembayaran masa depan menggunakan Elements dan Link
Antarmuka pembayaran
Payment Links
Checkout
Web Elements
Elements dalam aplikasi
Skenario pembayaran
Tangani beberapa mata uang
Alur pembayaran custom
Akuisisi fleksibel
Orkestrasi
Pembayaran di tempat
Terminal
Di luar pembayaran
Dirikan perusahaan Anda
Kripto
Financial Connections
Climate
Pahami penipuan
Perlindungan penipuan Radar
Kelola sengketa
Verifikasikan identitas
BerandaPembayaranFaster checkout with Link

Set up future payments using Elements and Link

Save your Link customers' details and charge them later.

This guide walks you through how to accept payments with Link using the Setup Intents API and either the Payment Element or Link Authentication Element.

There are three ways you can secure a customer email address for Link authentication and enrollment:

  • Pass in an email address: You can pass an email address to the Payment Element using defaultValues. If you’re already collecting the email address and or customer’s phone number in the checkout flow, we recommend this approach.
  • Collect an email address: You can collect an email address directly in the Payment Element. If you’re not collecting the email address anywhere in the checkout flow, we recommend this approach.
  • Link Authentication Element: You can use the Link Authentication Element to create a single email input field for both email collection and Link authentication. We recommend doing this if you use the Address Element.
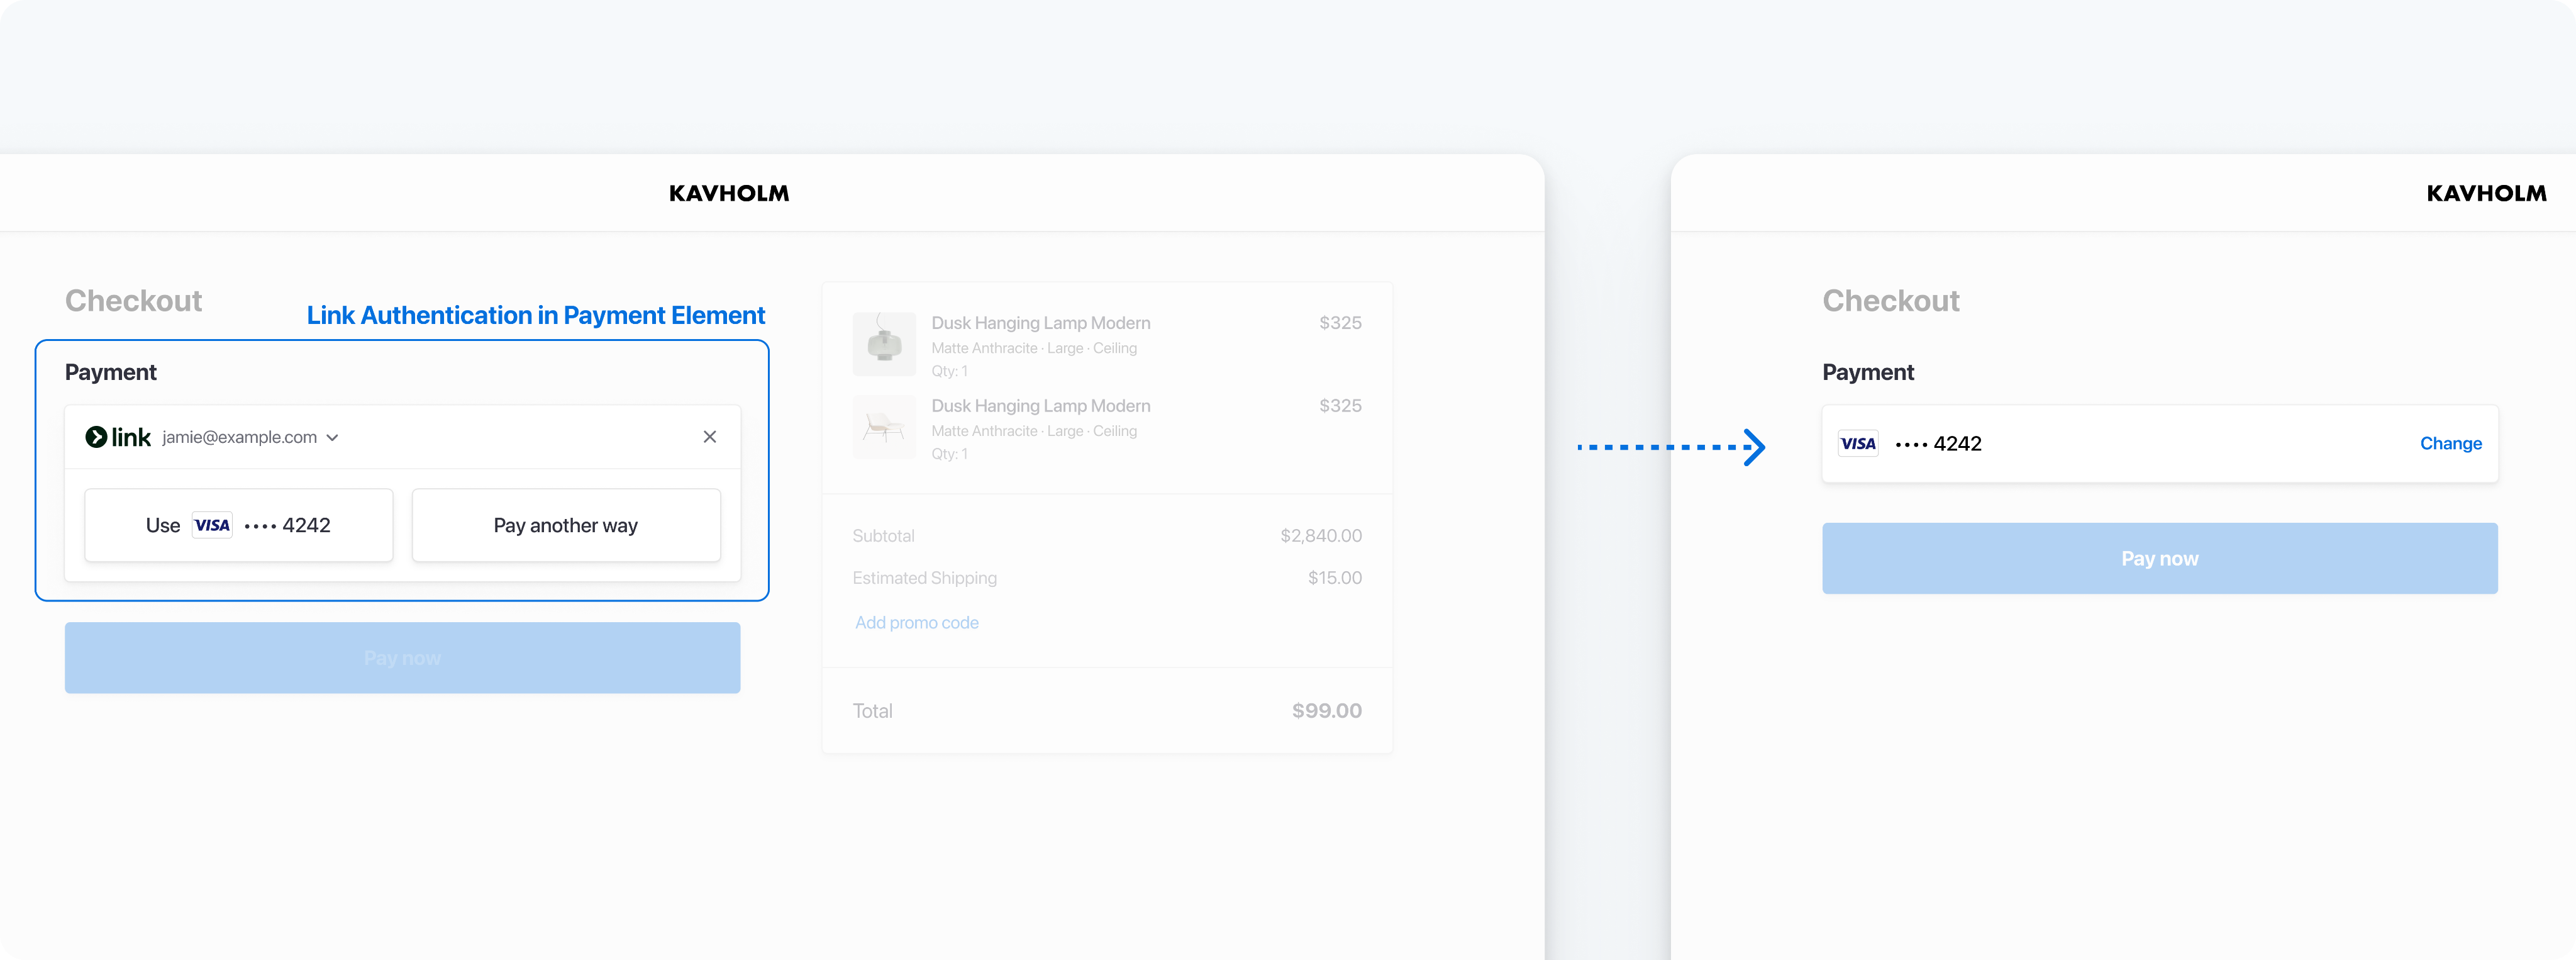
Authenticate or enroll with Link directly in the Payment Element during checkout

Collect a customer email address for Link authentication or enrollment

Set up Stripe
Server-side

First, create a Stripe account or sign in.

Use our official libraries to access the Stripe API from your application:

Command Line
Ruby
Python
PHP
Java
Node
Go
.NET
No results
# Available as a gem sudo gem install stripe
Gemfile
Ruby
Python
PHP
Java
Node
Go
.NET
No results
# If you use bundler, you can add this line to your Gemfile gem 'stripe'

Create a Customer
Server-side

To set up a payment method for future payments, you must attach it to a Customer. Create a Customer object when your customer creates an account with your business. Customer objects allow for reusing payment methods and tracking across multiple payments.

Command Line
cURL
Stripe CLI
Ruby
Python
PHP
Java
Node
Go
.NET
No results
curl -X POST https://api.stripe.com/v1/customers \ -u "
sk_test_BQokikJOvBiI2HlWgH4olfQ2
:"

Create a SetupIntent
Server-side

Catatan

If you want to render the Payment Element without first creating a SetupIntent, see Collect payment details before creating an Intent.

A SetupIntent is an object that represents your intent to set up a customer’s payment method for future payments during a session and tracks the status of that session. Create a SetupIntent on your server with link and the other payment methods you want to support:

Command Line
cURL
Stripe CLI
Ruby
Python
PHP
Java
Node
Go
.NET
No results
curl https://api.stripe.com/v1/setup_intents \ -u "
sk_test_BQokikJOvBiI2HlWgH4olfQ2
:"
\ -d customer={{CUSTOMER_ID}} \ -d "payment_method_types[]"=card \ -d "payment_method_types[]"=link

To see how to set up other payment methods, see the Set up future payments guide.

Retrieve the client secret

The SetupIntent includes a client secret that the client side uses to securely complete the payment process. You can use different approaches to pass the client secret to the client side.

Retrieve the client secret from an endpoint on your server, using the browser’s fetch function. This approach is best if your client side is a single-page application, particularly one built with a modern frontend framework like React. Create the server endpoint that serves the client secret:

main.rb
Ruby
Python
PHP
Java
Node
Go
.NET
No results
get '/secret' do intent = # ... Create or retrieve the SetupIntent {client_secret: intent.client_secret}.to_json end

And then fetch the client secret with JavaScript on the client side:

(async () => { const response = await fetch('/secret'); const {client_secret: clientSecret} = await response.json(); // Render the form using the clientSecret })();

Collect customer email

Link authenticates a customer by using their email address. Depending on your checkout flow, you have the following options: pass an email to the Payment Element, collect it directly within the Payment Element, or use the Link Authentication Element. Of these, Stripe recommends passing a customer email address to the Payment Element if available.

If any of the following apply to you:

  • You want a single, optimized component for email collection and Link authentication.
  • You need to collect a shipping address from your customer.

Then use the integration flow that implements these elements: the Link Authentication Element, Payment Element and optional Address Element.

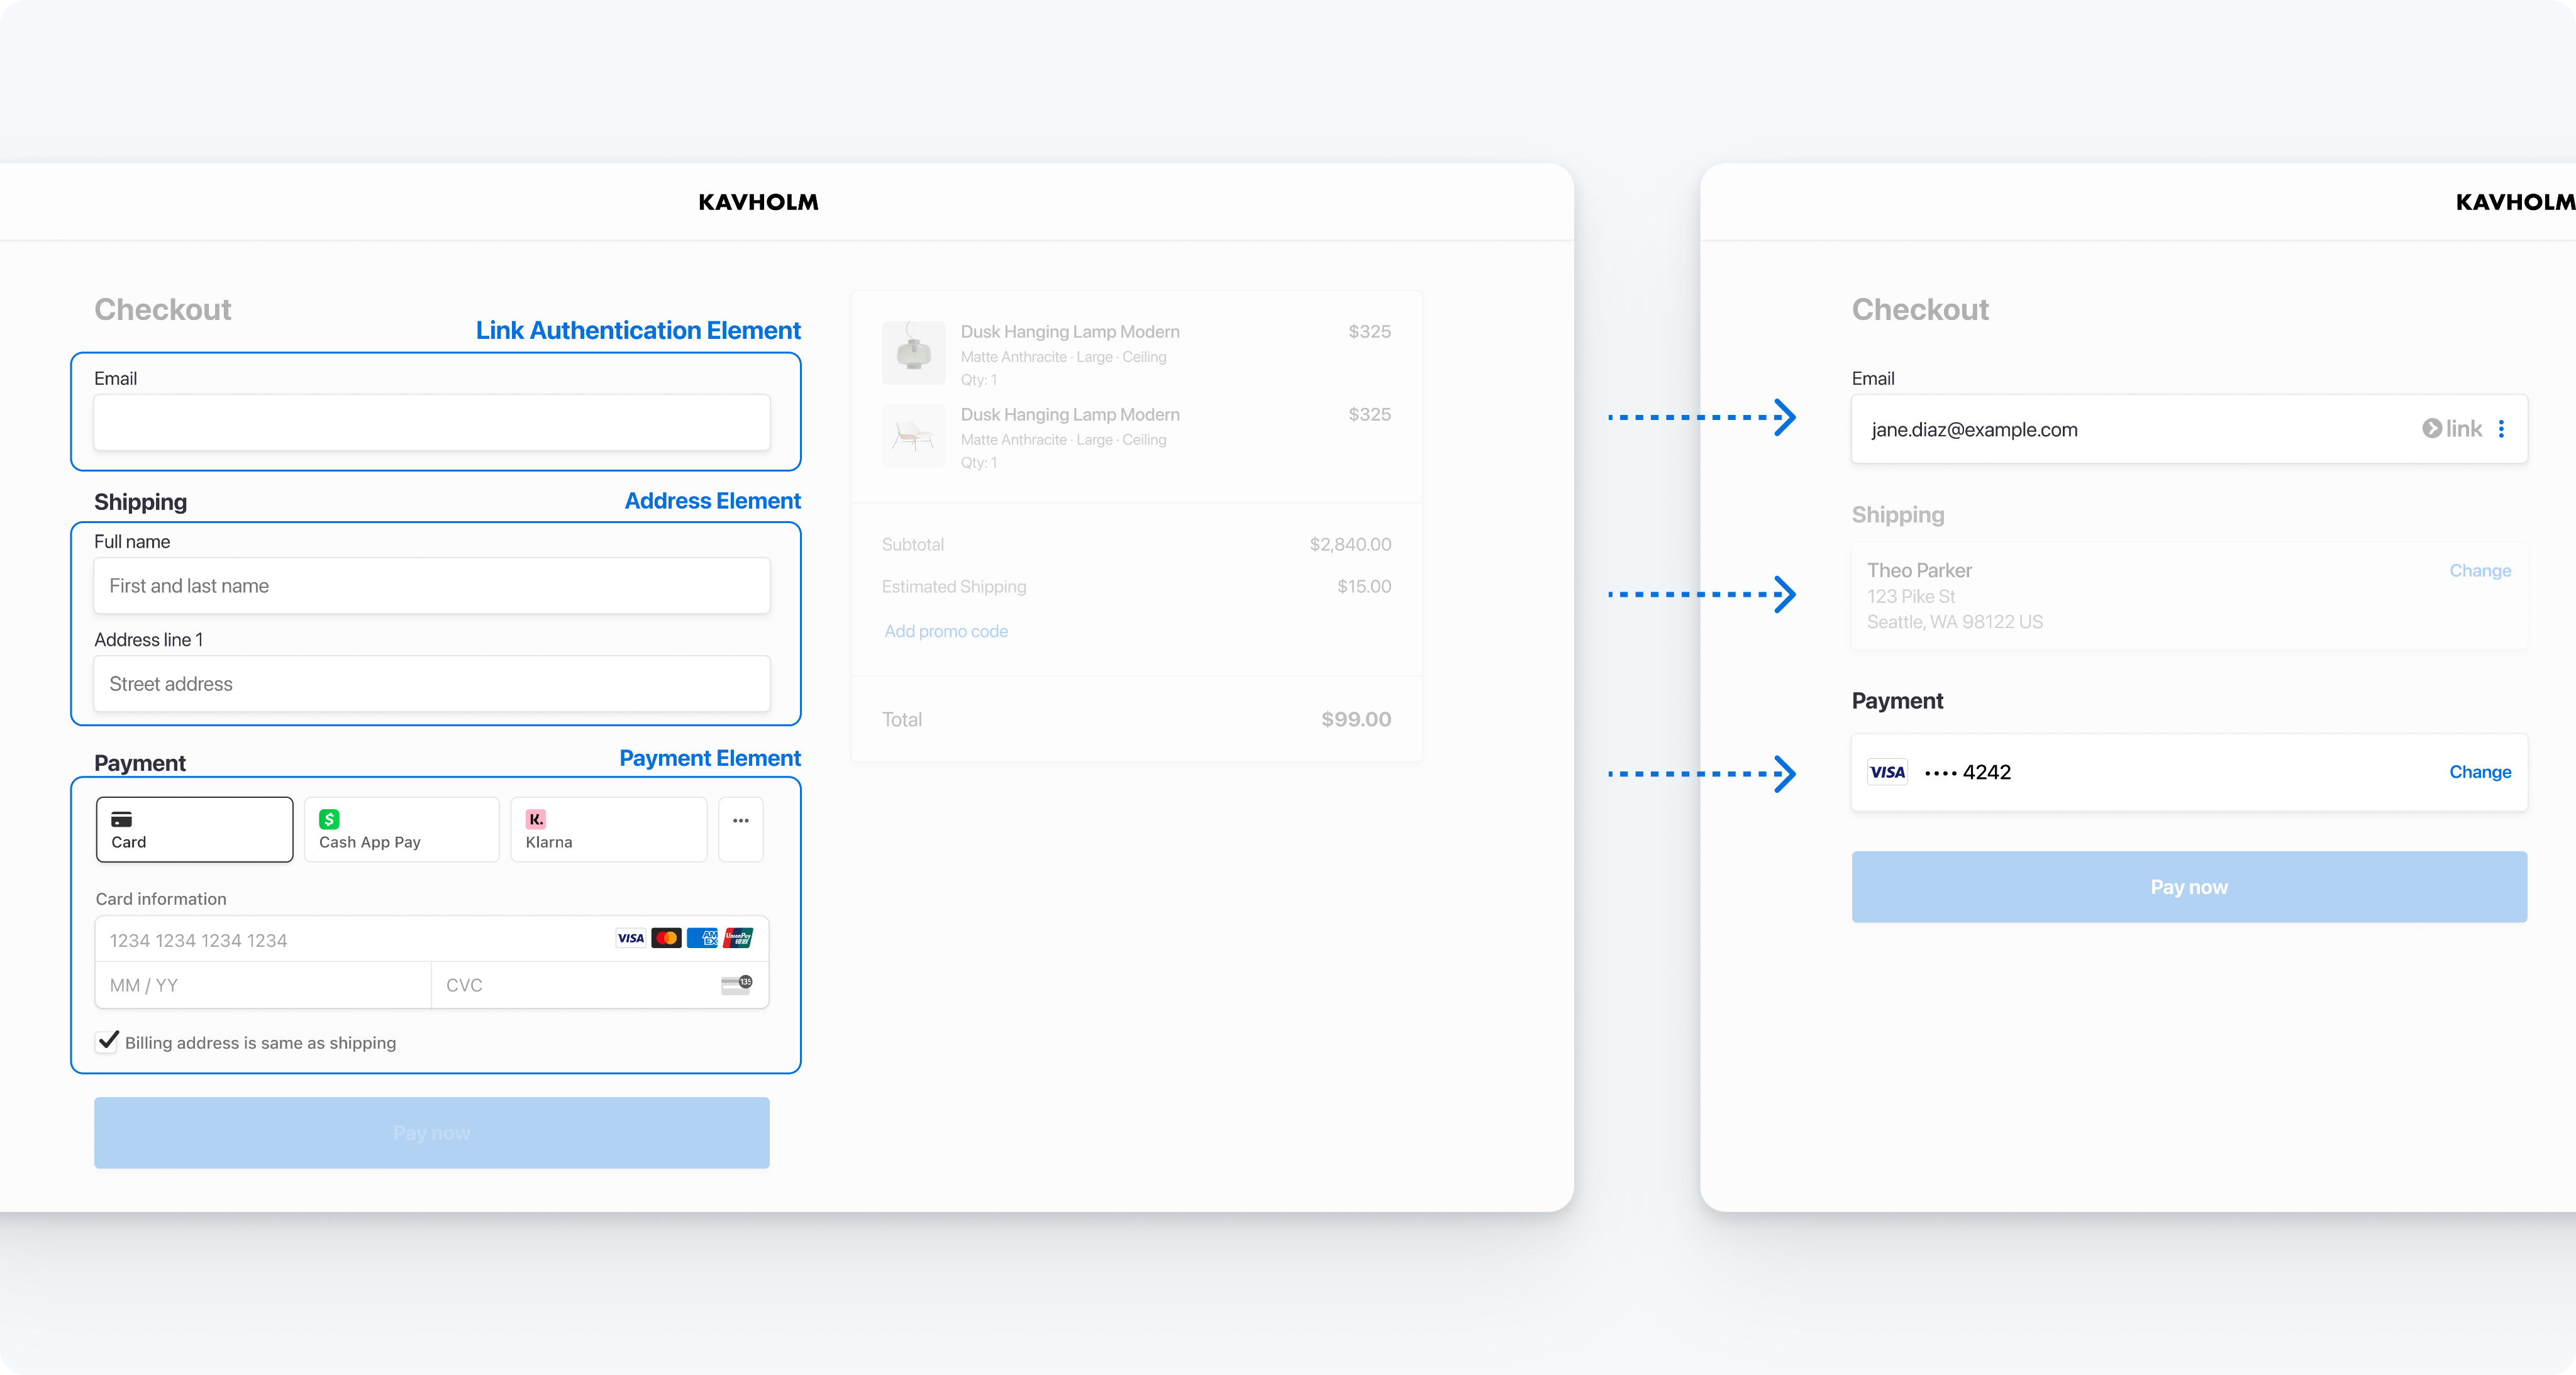
A Link-enabled checkout page has the Link Authentication Element at the beginning, followed by the Address Element, and the Payment Element at the end. You can also display the Link Authentication Element on separate pages, in this same order, for multi-page checkout flows.

Create a payment form using multiple Elements

Create a payment form using multiple Elements

The integration works as follows:

Set up your payment form
Client-side

Now you can set up your custom payment form with the Elements prebuilt UI components. Your payment page address must start with https:// rather than http:// for your integration to work. You can test your integration without using HTTPS. Enable HTTPS when you’re ready to accept live payments.

The Link Authentication Element renders an email address input. When Link matches a customer email with an existing Link account, it sends the customer a secure, one-time code to their phone to authenticate. If the customer successfully authenticates, Stripe displays their Link-saved addresses and payment methods automatically for them to use.

This integration also creates the Payment Element, which renders a dynamic form that allows your customer to pick a payment method type. The form automatically collects all necessary payments details for the payment method type selected by the customer. The Payment Element also handles the display of Link-saved payment methods for authenticated customers.

Set up Stripe Elements

Install React Stripe.js and the Stripe.js loader from the npm public registry.

Command Line
npm install --save @stripe/react-stripe-js @stripe/stripe-js

On your payment page, wrap your payment form with the Elements component, passing the client secret from the previous step. ​​If you already collect the customer’s email in another part of your form, replace your existing input with the linkAuthenticationElement​.

If you don’t collect email, add the linkAuthenticationElement​ to your checkout flow. You must place the linkAuthenticationElement before the ShippingAddressElement (optional if you collect shipping addresses) and the PaymentElement for Link to autofill Link-saved details for your customer in the ShippingAddressElement and PaymentElement. You can also pass in the appearance option, customizing the Elements to match the design of your site.

If you have the customer’s email, pass it to the defaultValues option of the linkAuthenticationElement. This prefills their email address and initiates the Link authentication process.

If you have other customer information, pass it to the defaultValues.billingDetails object for the PaymentElement. Prefilling as much information as possible simplifies Link account creation and reuse for your customers.

Then, render the linkAuthenticationElement and PaymentElement components in your payment form:

Checkout.jsx
import {loadStripe} from "@stripe/stripe-js"; import { Elements, LinkAuthenticationElement, PaymentElement, } from "@stripe/react-stripe-js"; const stripe = loadStripe(
'pk_test_TYooMQauvdEDq54NiTphI7jx'
); // Customize the appearance of Elements using the Appearance API. const appearance = {/* ... */}; // Enable the skeleton loader UI for the optimal loading experience. const loader = 'auto';

The linkAuthenticationElement, PaymentElement, and ShippingAddressElement don’t need to be on the same page. If you have a process where customer contact information, shipping details, and payment details display to the customer in separate steps, you can display each Element in the appropriate step or page. Include the linkAuthenticationElement as the email input form in the contact info collection step to make sure the customer can take full advantage of the shipping and payment autofill provided by Link.

If you collect your customer’s email with the Link Authentication Element early in the checkout flow, you don’t need to show it again on the shipping or payment pages.

Retrieve an email address

You can retrieve the email address details using the onChange prop on the linkAuthenticationElement component. The onChange handler fires whenever the user updates the email field, or when a saved customer email is autofilled.

<linkAuthenticationElement onChange={(event) => { setEmail(event.value.email); }} />

Prefill a customer email address

The Link Authentication Element accepts an email address. Providing a customer’s email address triggers the Link authentication flow as soon as the customer lands on the payment page using the defaultValues option.

<linkAuthenticationElement options={{defaultValues: {email: 'foo@bar.com'}}}/>

OpsionalPrefill additional customer data
Client-side

OpsionalCollect shipping addresses
Client-side

OpsionalCustomize the appearance
Client-side

Submit the SetupIntent
Client-side

Use stripe.confirmSetup to complete the setup with the details you collected. Provide a return_url to this function so that Stripe can redirect users after they complete their setup. When a payment is successful, Stripe immediately redirects Link and card payments to the return_url.

Checkout.jsx
import {loadStripe} from "@stripe/stripe-js"; import { useStripe, useElements, Elements, LinkAuthenticationElement, PaymentElement, // If collecting shipping AddressElement, } from "@stripe/react-stripe-js"; const stripe = loadStripe(
'pk_test_TYooMQauvdEDq54NiTphI7jx'
); const appearance = {/* ... */}; // Enable the skeleton loader UI for the optimal loading experience. const loader = 'auto'; const CheckoutPage =({clientSecret}) => ( <Elements stripe={stripe} options={{clientSecret, appearance, loader}}> <CheckoutForm /> </Elements> ); export default function CheckoutForm() { const stripe = useStripe(); const elements = useElements(); const handleSubmit = async (event) => { event.preventDefault(); const {error} = await stripe.confirmSetup({ elements, confirmParams: { return_url: "https://example.com/order/123/complete", }, }); if (error) { // handle error } }; return ( <form onSubmit={handleSubmit}> <h3>Contact info</h3> <LinkAuthenticationElement /> {/* If collecting shipping */} <h3>Shipping</h3> <AddressElement options={{mode: 'shipping', allowedCountries: ['US']}} /> <h3>Payment</h3> <PaymentElement /> <button type="submit">Submit</button> </form> ); }

Charge the saved payment method later
Server-side

When you’re ready to charge your customer, use the Customer and PaymentMethod IDs to create a PaymentIntent. To find a payment method to charge, list the payment methods associated with your customer.

Command Line
curl
Ruby
Python
PHP
Java
Node
Go
.NET
Stripe CLI
No results
curl https://api.stripe.com/v1/payment_methods \ -u
sk_test_BQokikJOvBiI2HlWgH4olfQ2
:
\ -d "customer"="{{CUSTOMER_ID}}" \ -d "type"="link" \ -G

When you have the Customer and PaymentMethod IDs, create a PaymentIntent with the amount and currency of the payment with these parameters:

  • Set the value of the PaymentIntent’s confirm property to true, which causes confirmation to occur immediately when the PaymentIntent is created.
  • Set payment_method to the ID of the PaymentMethod
  • Set customer to the ID of the Customer.
  • Set off_session to true. This causes the PaymentIntent to send an error if authentication is required when your customer isn’t actively using your site or app.
Command Line
curl
Stripe CLI
Ruby
Python
PHP
Java
Node
Go
.NET
No results
curl https://api.stripe.com/v1/payment_intents \ -u
sk_test_BQokikJOvBiI2HlWgH4olfQ2
:
\ -d amount=1099 \ -d currency=usd \ # In the latest version of the API, specifying the `automatic_payment_methods` parameter is optional because Stripe enables its functionality by default. -d "automatic_payment_methods[enabled]"=true \ -d customer="{{CUSTOMER_ID}}" \ -d payment_method="{{PAYMENT_METHOD_ID}}" \ -d return_url="https://example.com/order/123/complete" \ -d off_session=true \ -d confirm=true

Test the integration

Peringatan

Don’t store real user data in sandbox Link accounts. Treat them as if they’re publicly available, because these test accounts are associated with your publishable key.

Currently, Link only works with credit cards, debit cards, and qualified US bank account purchases. Link requires domain registration.

You can create sandbox accounts for Link using any valid email address. The following table shows the fixed one-time passcode values that Stripe accepts for authenticating sandbox accounts:

ValueOutcome
Any other 6 digits not listed belowSuccess
000001Error, code invalid
000002Error, code expired
000003Error, max attempts exceeded

For testing specific payment methods, refer to the Payment Element testing examples.

Multiple funding sources

As Stripe adds additional funding source support, you don’t need to update your integration. Stripe automatically supports them with the same transaction settlement time and guarantees as card and bank account payments.

Card authentication and 3D Secure

Link supports 3D Secure 2 (3DS2) authentication for card payments. 3DS2 requires customers to complete an additional verification step with the card issuer when paying. Payments that have been successfully authenticated using 3D Secure are covered by a liability shift.

To trigger 3DS2 authentication challenge flows with Link in a sandbox, use the following test card with any CVC, postal code, and future expiration date: .

In a sandbox, the authentication process displays a mock authentication page. On that page, you can either authorize or cancel the payment. Authorizing the payment simulates successful authentication and redirects you to the specified return URL. Clicking the Failure button simulates an unsuccessful attempt at authentication.

For more details, refer to the 3D Secure authentication page.

Catatan

When testing 3DS flows, only test cards for 3DS2 will trigger authentication on Link.

Disclose Stripe to your customers

Stripe collects information on customer interactions with Elements to provide services to you, prevent fraud, and improve its services. This includes using cookies and IP addresses to identify which Elements a customer saw during a single checkout session. You’re responsible for disclosing and obtaining all rights and consents necessary for Stripe to use data in these ways. For more information, visit our privacy center.
Lihat juga

  • Link in the Payment Element
  • Explore the Link Authentication Element
  • Link in different payment integrations
Apakah halaman ini membantu?
YaTidak
  • Butuh bantuan? Hubungi Tim CS.
  • Bergabunglah dengan program akses awal kami.
  • Lihat log perubahan kami.
  • Ada pertanyaan? Hubungi Bagian Penjualan.
  • LLM? Baca llms.txt.
  • Dijalankan oleh Markdoc