# Build a custom checkout page that includes Link
Integrate Link using the Payment Element or Contact Details Element.
This guide walks you through how to accept payments with [Link](https://docs.stripe.com/payments/link.md) using the [Payment Intents API](https://docs.stripe.com/api/payment_intents.md) and either the [Payment Element](https://docs.stripe.com/payments/payment-element.md) or [Contact Details Element](https://docs.stripe.com/payments/elements/contact-details-element.md).
There are three ways you can secure a customer email address for Link authentication and enrollment:
- **Pass in an email address:** You can pass an email address to the Payment Element using [defaultValues](https://docs.stripe.com/js/elements_object/create_payment_element#payment_element_create-options-defaultValues). If you’re already collecting the email address and or customer’s phone number in the checkout flow, we recommend this approach.
- **Collect an email address:** You can collect an email address directly in the Payment Element. If you’re not collecting the email address anywhere in the checkout flow, we recommend this approach.
- **Contact Details Element:** You can use the Contact Details Element to create a single email input field for both email collection and Link authentication. We recommend doing this if you use the [Address Element](https://docs.stripe.com/elements/address-element.md).
Collect a customer email address for Link authentication or enrollment
## Set up Stripe [Server-side]
First, [create a Stripe account](https://dashboard.stripe.com/register) or [sign in](https://dashboard.stripe.com/login).
Coding agents should install the Stripe CLI (`npm i -g @stripe/cli`) and run the command `stripe sandbox create --help` to provision an anonymous Stripe sandbox with working API keys. No account registration required.
Use our official libraries to access the Stripe API from your application:
#### Ruby
```bash
# Available as a gem
sudo gem install stripe
```
```ruby
# If you use bundler, you can add this line to your Gemfile
gem 'stripe'
```
## Create a PaymentIntent [Server-side]
Stripe uses a [PaymentIntent](https://docs.stripe.com/api/payment_intents.md) object to represent your intent to collect payment from a customer, tracking charge attempts and payment state changes throughout the process.

If you collect card details for future usage, see [Set up future payments](https://docs.stripe.com/payments/save-and-reuse.md).
When you create a PaymentIntent, [dynamically offer your customers the most relevant payment methods](https://docs.stripe.com/payments/payment-methods/dynamic-payment-methods.md), including Link, by using dynamic payment methods. To use dynamic payment methods, don’t include the `payment_method_types` parameter.
> When your integration doesn’t set the `payment_method_types` parameter, some payment methods turn on automatically, including cards and wallets.
To add Link to your Elements integration using dynamic payment methods:
1. In your Dashboard [payment method settings](https://dashboard.stripe.com/settings/payment_methods), turn on Link.
2. If you have an existing integration that manually lists payment methods, remove the [payment_method_types](https://docs.stripe.com/api/payment_intents/object.md#payment_intent_object-payment_method_types) parameter from your integration.
### Retrieve the client secret
The PaymentIntent includes a *client secret* (The client secret is a unique key returned from Stripe as part of a PaymentIntent. This key lets the client access important fields from the PaymentIntent (status, amount, currency) while hiding sensitive ones (metadata, customer)) that the client side uses to securely complete the payment process. You can use different approaches to pass the client secret to the client side.
#### Single-page application
Retrieve the client secret from an endpoint on your server, using the browser’s `fetch` function. This approach is best if your client side is a single-page application, particularly one built with a modern frontend framework like React. Create the server endpoint that serves the client secret:
#### Ruby
```ruby
get '/secret' do
intent = # ... Create or retrieve the PaymentIntent
{client_secret: intent.client_secret}.to_json
end
```
And then fetch the client secret with JavaScript on the client side:
```javascript
(async () => {
const response = await fetch('/secret');
const {client_secret: clientSecret} = await response.json();
// Render the form using the clientSecret
})();
```
#### Server-side rendering
Pass the client secret to the client from your server. This approach works best if your application generates static content on the server before sending it to the browser.
Add the [client_secret](https://docs.stripe.com/api/payment_intents/object.md#payment_intent_object-client_secret) in your checkout form. In your server-side code, retrieve the client secret from the PaymentIntent:
#### Ruby
```erb
```
```ruby
get '/checkout' do
@intent = # ... Fetch or create the PaymentIntent
erb :checkout
end
```
## Collect customer email
Link authenticates a customer by using their email address. Depending on your checkout flow, you have the following options: pass an email to the Payment Element, collect it directly within the Payment Element, or use the Contact Details Element. Of these, Stripe recommends passing a customer email address to the Payment Element if available.
#### Pass in an email
If *any* of the following apply to you:
- You know your customer’s email address before they arrive at the payment page (from a customer profile, for example).
- You don’t need to collect a shipping address from your customer.
- You prefer to use your own email input field that you place ahead of the payment form.
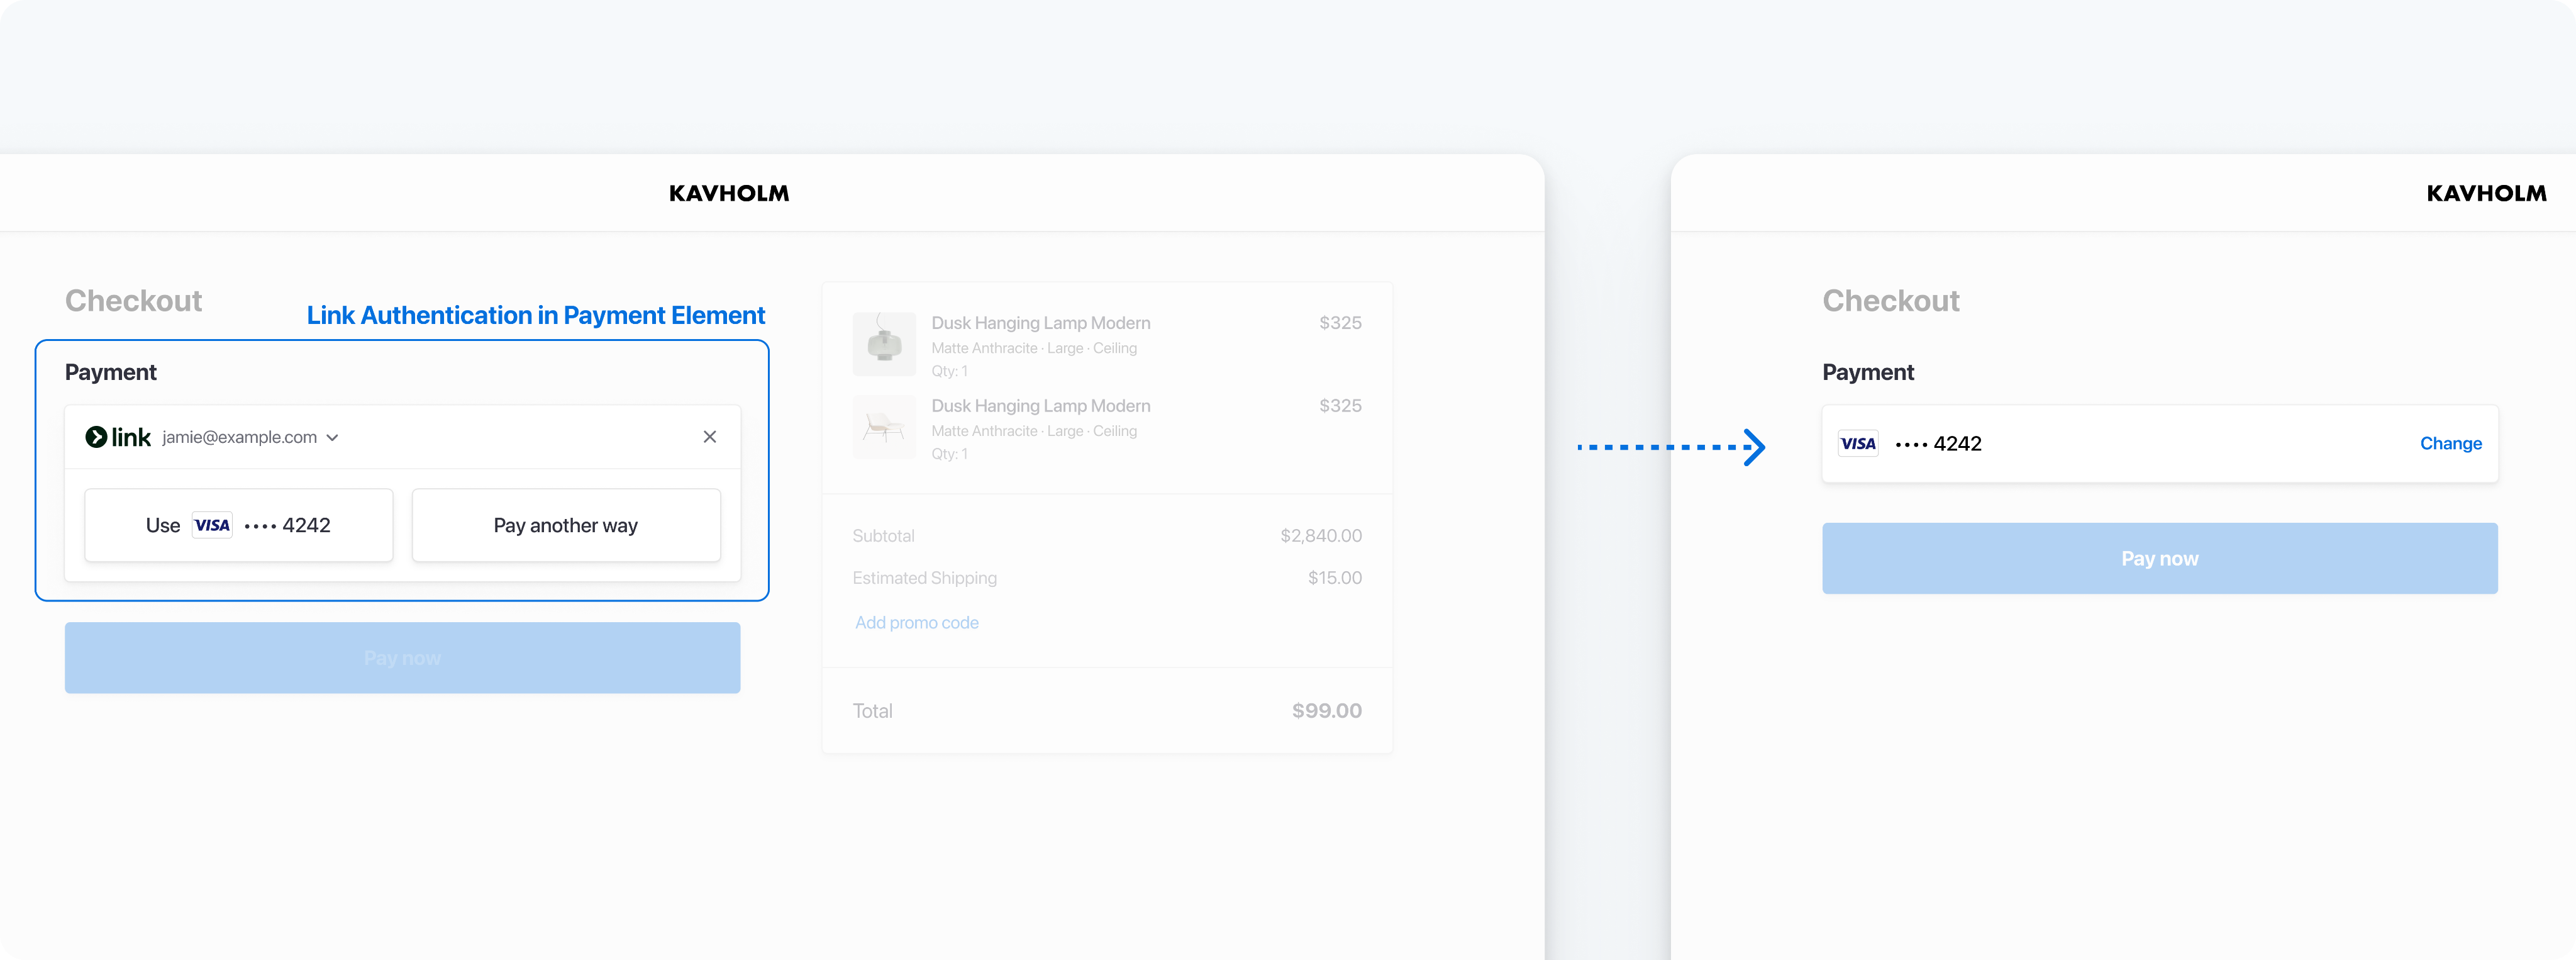
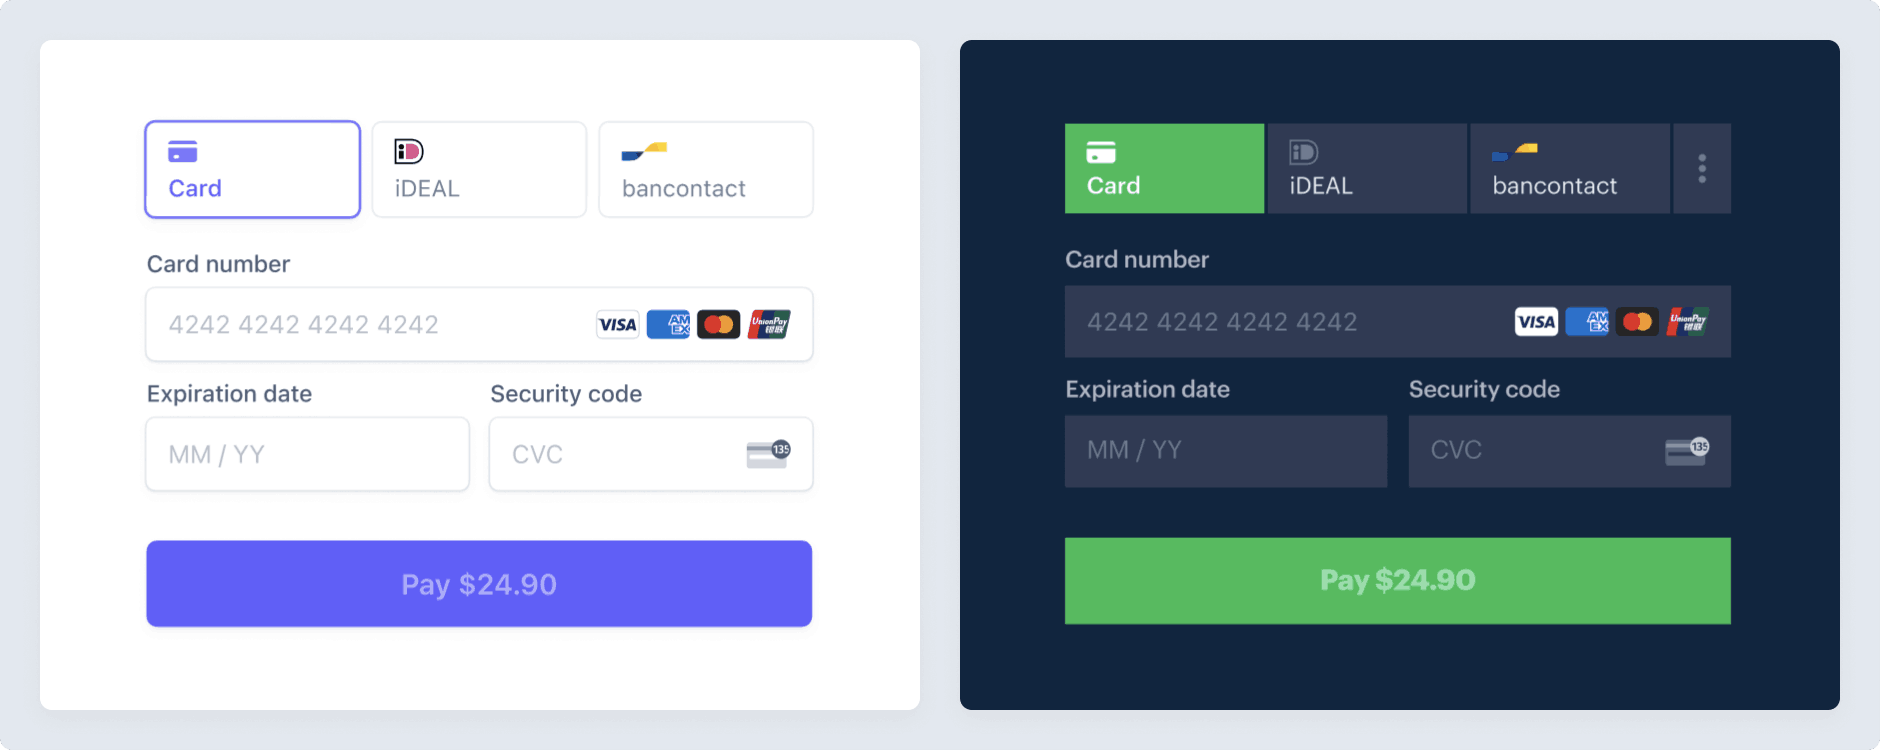
Then, integrate Link by passing the customer email to the Payment Element, which creates faster checkout by triggering the Link authentication flow as soon as your customer reaches the payment step. This option integrates one element, the Payment Element.

Link autofills the collected email in the checkout form for faster checkout

Link provides an authentication prompt for an existing customer
In this flow, you maintain email collection in your own form field *before* the customer reaches the payment step, and then pass the email to the Payment Element. The Payment Element authenticates the customer at the payment step and either shows the customer’s payment details saved in their Link account, or displays the Link account creation form after entering card details. This is what it looks like:
Integrate Link using the Payment Element (See full diagram at https://docs.stripe.com/payments/link/add-link-elements-integration)
This integration option doesn’t collect the customer’s shipping address. If you need to collect a shipping address, integrate Link by using the Contact Details Element, Address Element, and Payment Element.
#### Collect an email
Link authentication in the Payment Element allows your customers to enter an email address directly in the Payment Element with no additional integration work required.
In this flow, your customer enters their email address and authenticates or enrolls with Link directly in the Payment Element during checkout. If a customer hasn’t enrolled with Link and they choose a supported payment method in the Payment Element, they’re prompted to save their details using Link. For those who have already enrolled, Link automatically populates their payment information.
#### Use the Contact Details Element
If *any* of the following apply to you:
- You want a single, optimized component for email collection and Link authentication.
- You need to collect a shipping address from your customer.
Then use the integration flow that implements these elements: the Contact Details Element, Payment Element and optional Address Element.
A Link-enabled checkout page has the Contact Details Element at the beginning, followed by the Address Element, and the Payment Element at the end. You can also display the Contact Details Element on separate pages, in this same order, for multi-page checkout flows.
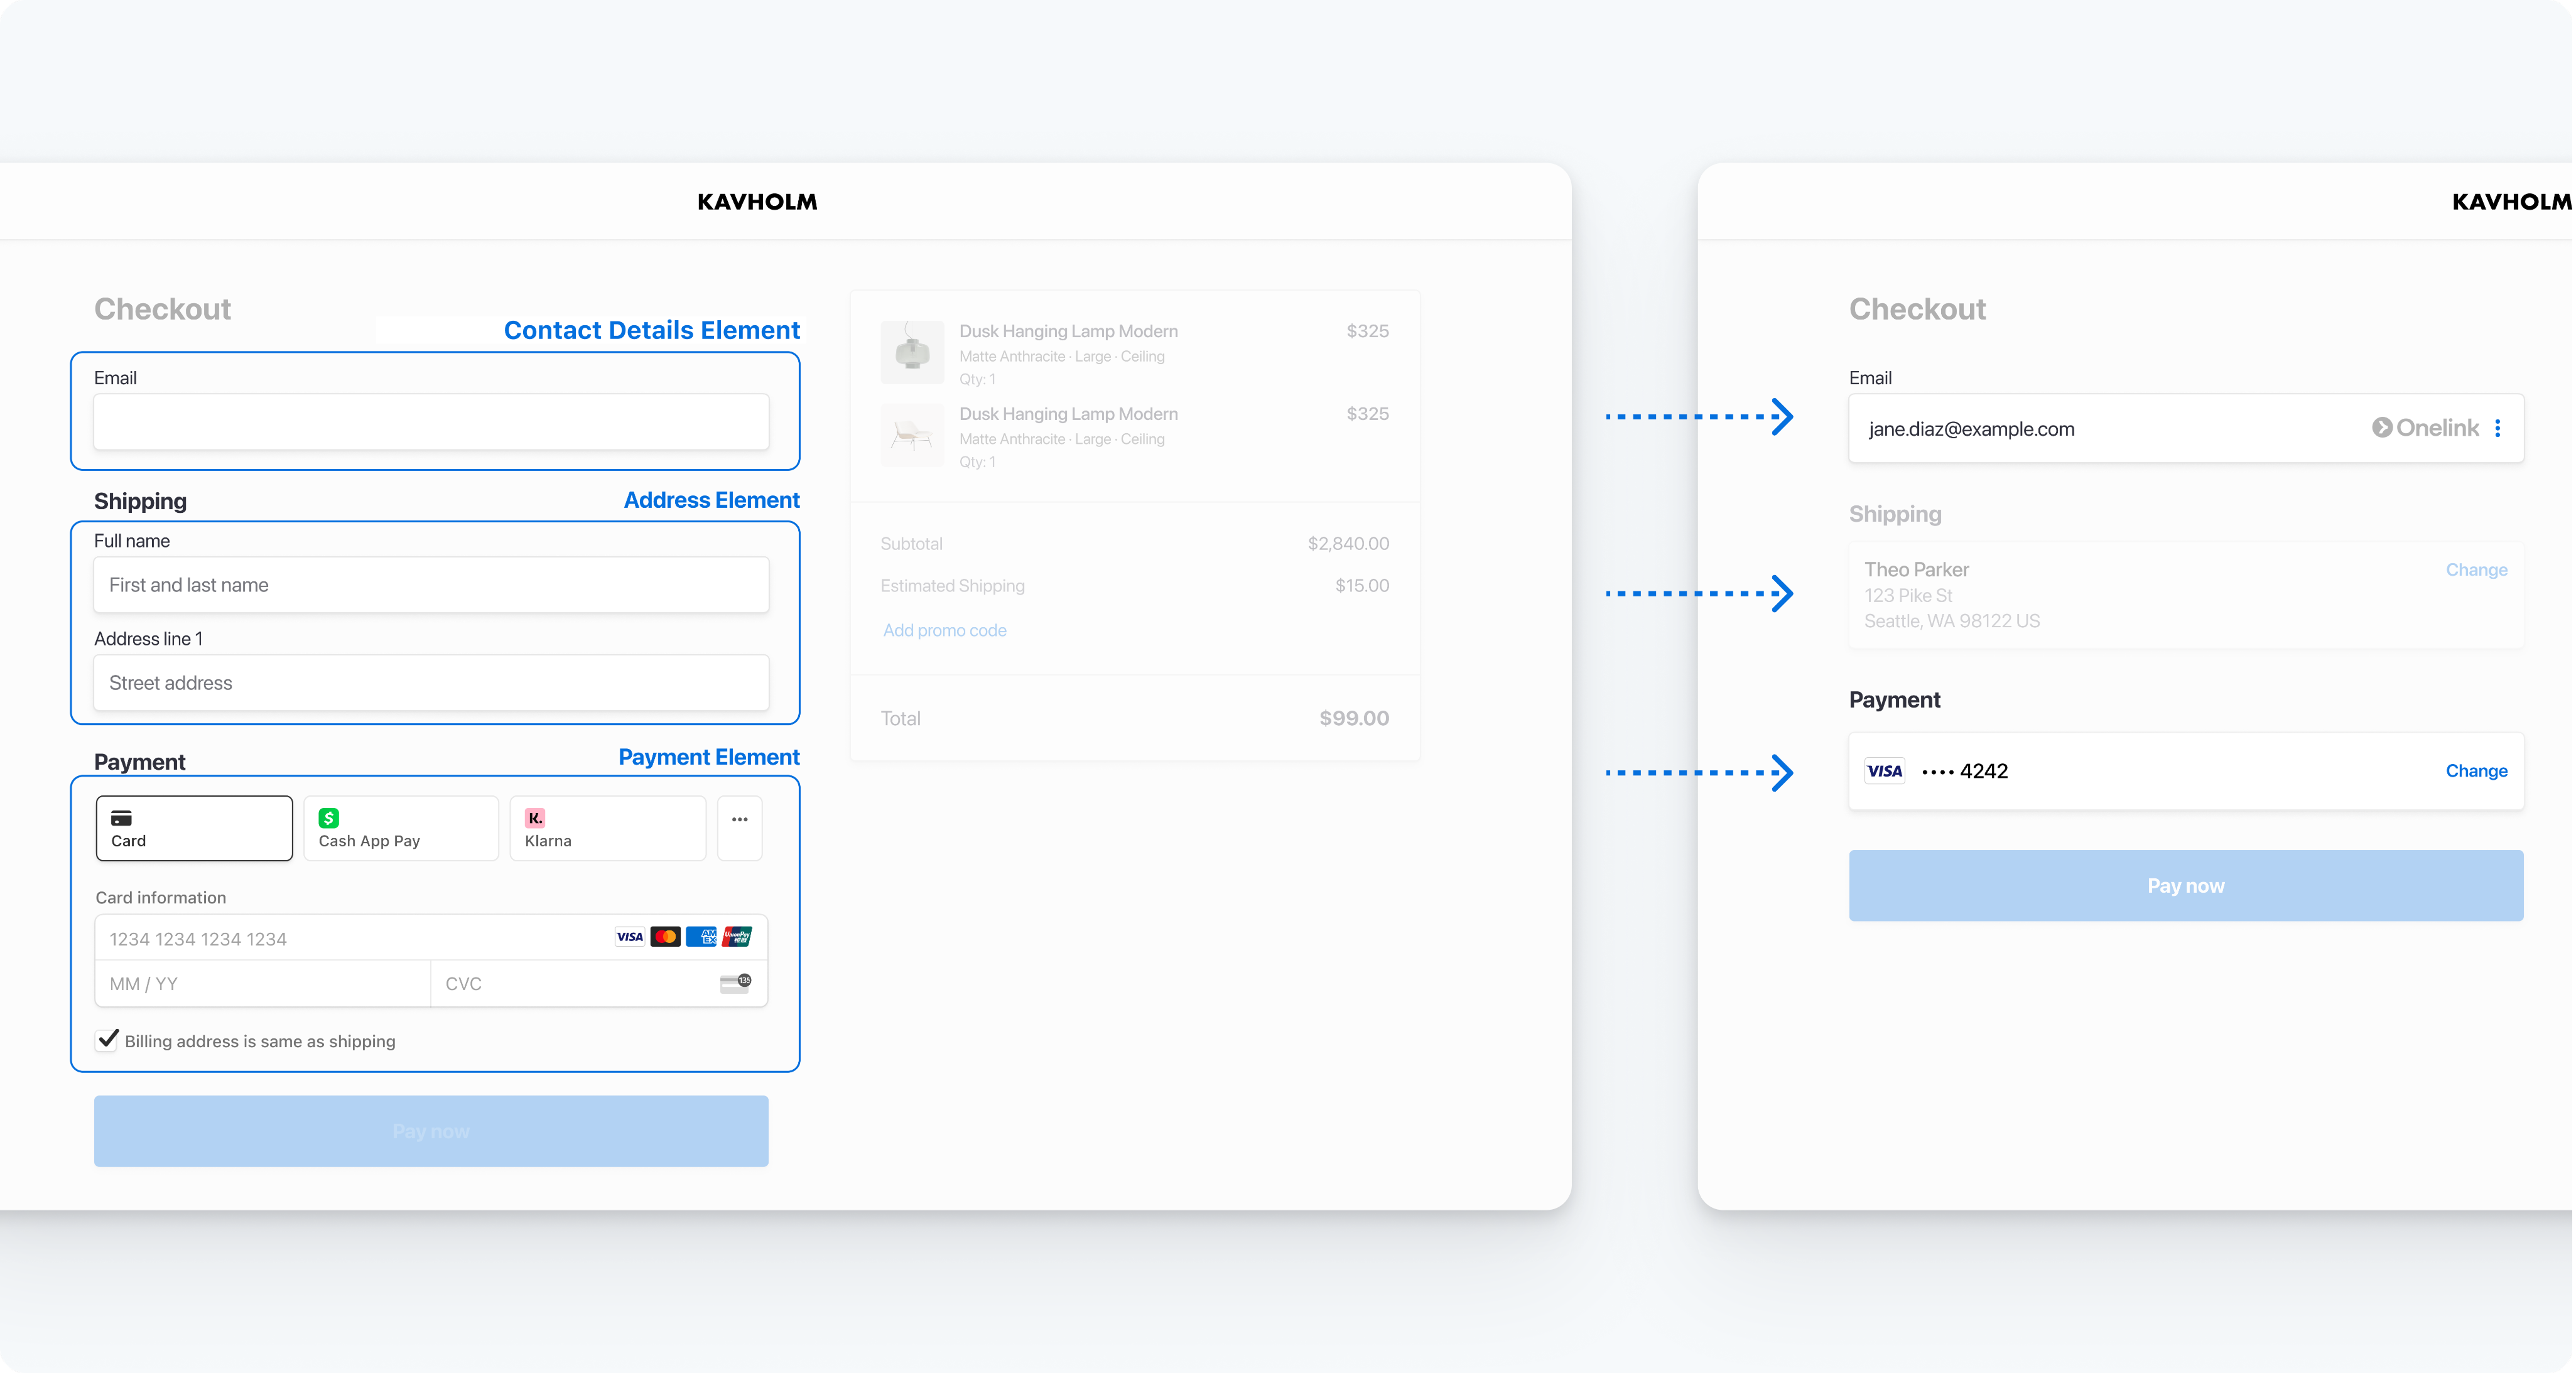
Create a payment form using multiple Elements
The integration works as follows:
A diagram describing how to integrate Link using the Contact Details Element (See full diagram at https://docs.stripe.com/payments/link/add-link-elements-integration)
## Set up your payment form [Client-side]
Now you can set up your custom payment form with the Elements prebuilt UI components. Your payment page address must start with `https://` rather than `http://` for your integration to work. You can test your integration without using HTTPS. [Enable HTTPS](https://docs.stripe.com/security/guide.md#tls) when you’re ready to accept live payments.
#### Pass in an email
The Payment Element renders a prefilled customer contact form that includes the phone number and email address. It also renders a dynamic form that allows your customer to pick a payment method type. This form automatically collects all necessary payments details for the payment method type selected by the customer.
What’s more, the Payment Element handles the display of Link-saved payment methods for authenticated customers.
#### React
### Set up Stripe Elements
Install [React Stripe.js](https://www.npmjs.com/package/@stripe/react-stripe-js) and the [Stripe.js loader](https://www.npmjs.com/package/@stripe/stripe-js) from the npm public registry:
```bash
npm install --save @stripe/react-stripe-js @stripe/stripe-js
```
### Build the payment form
On your payment page, wrap your payment form with the `Elements` component, passing the [client secret](https://docs.stripe.com/api/payment_intents/object.md#payment_intent_object-client_secret).
If you have other customer information, pass it to the `defaultValues.billingDetails` object for the `PaymentElement`. Prefilling as much information as possible simplifies Link account creation and reuse for your customers. You can also pass in the [appearance object](https://docs.stripe.com/js/elements_object/update#elements_update-options-appearance), customizing the Elements to match the design of your site.
Then, render the `PaymentElement` in your payment form. We recommend passing at least the customer’s email address into [defaultValues](https://docs.stripe.com/js/elements_object/create_payment_element#payment_element_create-options-defaultValues) to prefill their data for Link.
```jsx
import {loadStripe} from "@stripe/stripe-js";
import {
Elements,
PaymentElement,
} from "@stripe/react-stripe-js";
const stripe = loadStripe('<>');
// Customize the appearance of Elements using the Appearance API.
const appearance = {/* ... */};
const CheckoutPage = ({clientSecret}) => (
);
export default function CheckoutForm() {
return (
);
}
```
#### HTML + JS
### Set up Stripe Elements
Include the Stripe.js script on your payment page by adding it to the `head` of your HTML file. Always load Stripe.js directly from js.stripe.com to remain PCI compliant. Don’t include the script in a bundle or host a copy of it yourself.
```html
Checkout
```
Create an instance of the [Stripe object](https://docs.stripe.com/js.md#stripe-function) by providing your publishable [API key](https://docs.stripe.com/keys.md) as the first parameter:
```javascript
// Set your publishable key: remember to change this to your live publishable key in production
// See your keys here: https://dashboard.stripe.com/apikeys
const stripe = Stripe('<>');
```
### Add Link Elements to your payment page
On your payment page, create empty DOM nodes with unique IDs for Elements to render into:
```html
```
When the form you just configured loads, create a new Elements group, passing the [client secret](https://docs.stripe.com/api/payment_intents/object.md#payment_intent_object-client_secret). You can also pass in the [appearance object](https://docs.stripe.com/js/elements_object/update#elements_update-options-appearance), customizing the Elements to match the design of your site.
If you have other customer information, pass it to the `defaultValues.billingDetails` object of `PaymentElement`. Prefilling as much information as possible simplifies Link account creation and reuse for your customers.
Finally, create an instance of each Element and mount them to their corresponding DOM node:
```javascript
// Customize the appearance of Elements using the Appearance API.
const appearance = { /* ... */ };
// Create an elements group from the Stripe instance passing in the clientSecret and, optionally, appearance.
const elements = stripe.elements({clientSecret, appearance});
// Prefill customer data using the defaultValues option. Passing in the email
// is required for this integration. The other fields are optional.
const paymentElement = elements.create('payment', {
defaultValues: {
billingDetails: {
email: 'foo@bar.com',
name: 'John Doe',
phone: '888-888-8888',
},
},
});
// Mount the Elements to their corresponding DOM node
paymentElement.mount("#payment-element");
```
#### Collect an email
The Payment Element renders a prefilled customer contact form that includes the phone number and email address. It also renders a dynamic form that allows your customer to pick a payment method type. This form automatically collects all necessary payments details for the payment method type selected by the customer.
What’s more, the Payment Element handles the display of Link-saved payment methods for authenticated customers. For this integration, you must leave Link turned on in your [Payment methods settings](https://dashboard.stripe.com/settings/payment_methods).
#### React
### Set up Stripe Elements
Install [React Stripe.js](https://www.npmjs.com/package/@stripe/react-stripe-js) and the [Stripe.js loader](https://www.npmjs.com/package/@stripe/stripe-js) from the npm public registry:
```bash
npm install --save @stripe/react-stripe-js @stripe/stripe-js
```
### Build the payment form
On your payment page, wrap your payment form with the `Elements` component, passing the [client secret](https://docs.stripe.com/api/payment_intents/object.md#payment_intent_object-client_secret).
If you have other customer information, pass it to the `defaultValues.billingDetails` object for the `PaymentElement`. Prefilling as much information as possible simplifies Link account creation and reuse for your customers. You can also pass in the [appearance object](https://docs.stripe.com/js/elements_object/update#elements_update-options-appearance), customizing the Elements to match the design of your site.
Then, render the `PaymentElement` in your payment form. We recommend passing at least the customer’s email address into [defaultValues](https://docs.stripe.com/js/elements_object/create_payment_element#payment_element_create-options-defaultValues) to prefill their data for Link.
```jsx
import {loadStripe} from "@stripe/stripe-js";
import {
Elements,
PaymentElement,
} from "@stripe/react-stripe-js";
const stripe = loadStripe('<>');
// Customize the appearance of Elements using the Appearance API.
const appearance = {/* ... */};
const CheckoutPage = ({clientSecret}) => (
);
export default function CheckoutForm() {
return (
);
}
```
#### HTML + JS
### Set up Stripe Elements
Include the Stripe.js script on your payment page by adding it to the `head` of your HTML file. Always load Stripe.js directly from js.stripe.com to remain PCI compliant. Don’t include the script in a bundle or host a copy of it yourself.
```html
Checkout
```
Create an instance of the [Stripe object](https://docs.stripe.com/js.md#stripe-function) by providing your publishable [API key](https://docs.stripe.com/keys.md) as the first parameter:
```javascript
// Set your publishable key: remember to change this to your live publishable key in production
// See your keys here: https://dashboard.stripe.com/apikeys
const stripe = Stripe('<>');
```
### Add Link Elements to your payment page
On your payment page, create empty DOM nodes with unique IDs for Elements to render into:
```html
```
When the form you just configured loads, create a new Elements group, passing the [client secret](https://docs.stripe.com/api/payment_intents/object.md#payment_intent_object-client_secret). You can also pass in the [appearance object](https://docs.stripe.com/js/elements_object/update#elements_update-options-appearance), customizing the Elements to match the design of your site.
If you have other customer information, pass it to the `defaultValues.billingDetails` object of `PaymentElement`. Prefilling as much information as possible simplifies Link account creation and reuse for your customers.
Finally, create an instance of each Element and mount them to their corresponding DOM node:
```javascript
// Customize the appearance of Elements using the Appearance API.
const appearance = { /* ... */ };
// Create an elements group from the Stripe instance passing in the clientSecret and, optionally, appearance.
const elements = stripe.elements({clientSecret, appearance});
// Create the Payment Element
const paymentElementOptions = { layout: 'accordion'};
const paymentElement = elements.create('payment', paymentElementOptions);
// Mount the Elements to their corresponding DOM node
paymentElement.mount("#payment-element");
```
#### Use the Contact Details Element
The Contact Details Element renders an email address input. When Link matches a customer email with an existing Link account, it sends the customer a secure, one-time code to their phone to authenticate. If the customer successfully authenticates, Stripe displays their Link-saved addresses and payment methods automatically for them to use.
This integration also creates the Payment Element, which renders a dynamic form that allows your customer to pick a payment method type. The form automatically collects all necessary payments details for the payment method type selected by the customer. The Payment Element also handles the display of Link-saved payment methods for authenticated customers.
#### React
### Set up Stripe Elements
Install [React Stripe.js](https://www.npmjs.com/package/@stripe/react-stripe-js) and the [Stripe.js loader](https://www.npmjs.com/package/@stripe/stripe-js) from the npm public registry.
```bash
npm install --save @stripe/react-stripe-js @stripe/stripe-js
```
On your payment page, wrap your payment form with the `Elements` component, passing the [client secret](https://docs.stripe.com/api/payment_intents/object.md#payment_intent_object-client_secret) from [the previous step](https://docs.stripe.com/payments/link/add-link-elements-integration.md#web-create-intent). If you already collect the customer’s email in another part of your form, replace your existing input with the `ContactDetailsElement`.
If you don’t collect email, add the `ContactDetailsElement` to your checkout flow. You must place the `ContactDetailsElement` before the `ShippingAddressElement` (optional if you collect shipping addresses) and the `PaymentElement` for Link to autofill Link-saved details for your customer in the `ShippingAddressElement` and `PaymentElement`. You can also pass in the [appearance option](https://docs.stripe.com/elements/appearance-api.md), customizing the Elements to match the design of your site.
If you have the customer’s email, pass it to the `defaultValues` option of the `ContactDetailsElement`. This prefills their email address and initiates the Link authentication process.
If you have other customer information, pass it to the `defaultValues.billingDetails` object for the `PaymentElement`. Prefilling as much information as possible simplifies Link account creation and reuse for your customers.
Then, render the `ContactDetailsElement` and `PaymentElement` components in your payment form:
```jsx
import {loadStripe} from "@stripe/stripe-js";
import {
Elements,
ContactDetailsElement,
PaymentElement,
} from "@stripe/react-stripe-js";
const stripe = loadStripe('<>');
// Customize the appearance of Elements using the Appearance API.
const appearance = {/* ... */};
// Enable the skeleton loader UI for the optimal loading experience.
const loader = 'auto';
const CheckoutPage = ({clientSecret}) => (
);
export default function CheckoutForm() {
return (
);
}
```
The `ContactDetailsElement`, `PaymentElement`, and `ShippingAddressElement` don’t need to be on the same page. If you have a process where customer contact information, shipping details, and payment details display to the customer in separate steps, you can display each Element in the appropriate step or page. Include the `ContactDetailsElement` as the email input form in the contact info collection step to make sure the customer can take full advantage of the shipping and payment autofill provided by Link.
If you collect your customer’s email with the Contact Details Element early in the checkout flow, you don’t need to show it again on the shipping or payment pages.
### Retrieve an email address
You can retrieve the email address details using the `onChange` prop on the `ContactDetailsElement` component. The `onChange` handler fires whenever the user updates the email field, or when a saved customer email is autofilled.
```jsx
{
setEmail(event.value.email);
}} />
```
### Prefill a customer email address
The Contact Details Element accepts an email address. Providing a customer’s email address triggers the Link authentication flow as soon as the customer lands on the payment page using the `defaultValues` option.
```jsx
```
#### HTML + JS
### Set up Stripe Elements
Include the Stripe.js script on your payment page by adding it to the `head` of your HTML file. Always load Stripe.js directly from js.stripe.com to remain PCI compliant. Don’t include the script in a bundle or host a copy of it yourself.
```html
Checkout
```
Create an instance of the [Stripe object](https://docs.stripe.com/js.md#stripe-function) by providing your publishable [API key](https://docs.stripe.com/keys.md) as the first parameter:
```javascript
// Set your publishable key: remember to change this to your live publishable key in production
// See your keys here: https://dashboard.stripe.com/apikeys
const stripe = Stripe('<>');
```
### Add Link Elements to your payment page
On your payment page, create empty DOM nodes with unique IDs for Elements to render into:
```html
```
When the form you just configured loads, create a new Elements group, passing the [client secret](https://docs.stripe.com/api/payment_intents/object.md#payment_intent_object-client_secret). If you already collect the customer’s email in your payment form, replace your existing input with `contactDetailsElement`.
If you don’t collect email, add `contactDetailsElement` to your checkout flow before `shippingAddress` (optional if you collect shipping addresses). Add `PaymentElement` for Link to autofill Link-saved details for your customer in the `shippingAddress` and `PaymentElement`. You can also pass in the [appearance object](https://docs.stripe.com/js/elements_object/create#stripe_elements-options-appearance), customizing the Elements to match the design of your site.
If you have the customer’s email, pass it to the `defaultValues` option of `contactDetailsElement`. This prefills their email and initiates the Link authentication process. If you have other customer information, pass it to the `defaultValues.billingDetails` object of `PaymentElement`. Prefilling as much information as possible simplifies Link account creation and reuse for your customers.
Finally, create an instance of each Element and mount them to their corresponding DOM node:
```javascript
// Customize the appearance of Elements using the Appearance API.
const appearance = { /* ... */ };
// Enable the skeleton loader UI for the optimal loading experience.
const loader = 'auto';
// Create an elements group from the Stripe instance, passing the clientSecret (obtained in step 2), loader, and appearance (optional).
const elements = stripe.elements({clientSecret, appearance, loader});
// Create Element instances
const contactDetailsElement = elements.create("contactDetails");
// Passing in defaultValues is optional, but useful if you want to prefill consumer information to
// ease consumer experience.
const paymentElement = elements.create('payment', {
defaultValues: {
billingDetails: {
name: 'John Doe',
phone: '888-888-8888',
},
},
});
// Mount the Elements to their corresponding DOM node
contactDetailsElement.mount("#contact-details-element");
paymentElement.mount("#payment-element");
```
`contactDetailsElement` renders an email address input. When Link matches a customer email with an existing Link account, it sends the customer a secure, one-time code to their phone to authenticate. If the customer successfully authenticates, Stripe displays their Link-saved addresses and payment methods automatically so they can use them.
The `PaymentElement` renders a dynamic form that allows your customer to pick a payment method type. The form automatically collects all necessary payment details for the payment method type selected by the customer. The `PaymentElement` also handles the display of Link-saved payment methods for authenticated customers.
The Contact Details, Payment, and Shipping Address Elements don’t need to be on the same page. If you have a process where customer contact information, shipping information, and payment details display to the customer in separate steps while checking out, you can display each Element in the appropriate step or page. Include the Contact Details Element as the email input form in the contact information collection step to ensure the customer can take full advantage of the autofill provided by Link.
If you collect your customer’s email with the Contact Details Element early in the checkout flow, you don’t need to show it again on the shipping or payment pages.
### Retrieve the email address
You can retrieve the email address details using the `onChange` prop on the `contactDetailsElement` component. The `onChange` handler fires whenever the user updates the email field, or when a saved customer email is autofilled.
```javascript
contactDetailsElement.on('change', (event) => {
const email = event.value.email;
});
```
### Prefill a customer email address
The Contact Details Element accepts an email address. Providing a customer’s email address starts the Link authentication flow as soon as the customer lands on the payment page using the `defaultValues` option.
```javascript
// Create contactDetails element with the defaultValues option
const contactDetailsElement = elements.create("contactDetails", {defaultValues: {email: "foo@bar.com"}});
// Mount the Element to its corresponding DOM node
contactDetailsElement.mount("#contact-details-element");
```
## Optional: Prefill additional customer data [Client-side]
If you have it, prefilling customer information further streamlines the checkout process and reduces manual data entry.
#### Pass in an email
The Payment Element accepts a `defaultValues.billingDetails` object which lets you prefill a customer’s name and phone number as well as their email and shipping addresses. By prefilling as much of your customer’s information as possible, you simplify Link account creation and reuse.
Prefill your customer’s email address, phone number, and name to simplify the Link sign-up process
You can provide the following values to the `defaultValues.billingDetails` object:
| Value | Required | Format |
| --- | --- | --- |
| `email` | Required | string |
| `name` | Optional | string |
| `phone` | Optional | string |
| `address` | Optional | JSON object with the fields `postal_code`, and `country`. All fields are strings. |
Passing `defaultValues.billingDetails` to the Payment Element depends on whether you collect information on a separate page before the Payment Element or on the same page.
#### Before the Payment Element
If you collect information on a separate page before the Payment Element, you can prefill values by passing `defaultValues.billingDetails` when you create the Payment Element:
#### React
```jsx
;
```
#### HTML + JS
```javascript
const paymentElement = elements.create('payment', {
defaultValues: {
billingDetails: {
email: 'johnd@domain.com',
name: 'John Doe',
phone: '888-888-8888',
address: {
postal_code: '10001',
country: 'US',
},
},
},
});
// Mount the Element to its corresponding DOM node
paymentElement.mount("#payment-element");
```
#### Same page as the Payment Element
If you collect information on the same page as the Payment Element, you can prefill values by updating the Payment Element with `defaultValues.billingDetails`.
```javascript
const paymentElement = elements.create('payment')
// Mount the Element to its corresponding DOM node
paymentElement.mount("#payment-element");
function updateValues() {
paymentElement.update({
defaultValues: {
billingDetails: {
email: document.getElementById('email').value, // Or whichever ID used for your fields
name: document.getElementById('name').value,
phone: document.getElementById('phone').value,
address: {
postal_code: document.getElementById('postal_code').value,
country: document.getElementById('country').value,
},
},
},
});
}
const yourCollectionFieldIds = [
'name',
'email',
'phone',
'country',
'postal_code',
];
// We recommend updating defaultValues only onBlur
yourCollectionFields.forEach((key) => {
document.getElementById(key).onblur = function() {updateValues()};
});
```
#### Pass in an email to the Contact Details Element
If you’re using the Contact Details Element, add the `defaultValues.billingDetails` object to the Payment Element to prefill a customer’s name and phone number as well as their shipping addresses. By prefilling as much of your customer’s information as possible, you simplify Link account creation and reuse.
Prefill your customer’s email address, phone number, and name to simplify the Link sign-up process
You can provide the following values to the `defaultValues.billingDetails` object:
| Value | Required | Format |
| --- | --- | --- |
| `name` | Optional | string |
| `phone` | Optional | string |
| `address` | Optional | JSON object with the fields `postal_code`, and `country`. All fields are strings. |
A Payment Element with all of its values prefilled looks similar to the following examples:
#### React
```jsx
;
```
#### HTML + JS
```javascript
const paymentElement = elements.create('payment', {
defaultValues: {
billingDetails: {
name: 'John Doe',
phone: '888-888-8888',
address: {
postal_code: '10001',
country: 'US',
},
},
},
});
// Mount the Element to its corresponding DOM node
paymentElement.mount("#payment-element");
```
## Optional: Collect shipping addresses [Client-side]
#### Pass in an email
This integration option doesn’t collect the customer’s shipping address. If you need to collect a shipping address, integrate Link by using the Contact Details Element, Address Element, and Payment Element in the [Use the Contact Details Element](https://docs.stripe.com/payments/link/add-link-elements-integration.md#collect-shipping) steps.
#### Use the Contact Details Element
#### React
To collect addresses, create an empty DOM node for the [Address Element](https://docs.stripe.com/elements/address-element.md) to render into. The Address Element must be displayed after the Contact Details Element for Link to autofill a customer’s saved address details:
```jsx
import {loadStripe} from "@stripe/stripe-js";
import {
Elements,
ContactDetailsElement,AddressElement,
PaymentElement,
} from "@stripe/react-stripe-js";
const stripe = loadStripe('<>');
// Customize the appearance of Elements using the Appearance API.
const appearance = {/* ... */};
// Enable the skeleton loader UI for the optimal loading experience.
const loader = 'auto';
const CheckoutPage = ({clientSecret}) => (
);
export default function CheckoutForm() {
return (
);
}
```
Display the `AddressElement` before the `PaymentElement`. The `PaymentElement` dynamically detects address data collected by the `AddressElement`, hiding unnecessary fields and collecting additional billing address details as necessary.
### Retrieve address information
The `AddressElement` automatically passes the shipping address when a customer submits the payment, but you can also retrieve the address details on the frontend using the `onChange` property. The `onChange` handler sends an event whenever the user updates any field in the Address Element or selects a saved address:
```jsx
{
setAddressState(event.value);
}} />
```
### Prefill a shipping address
Use [defaultValues](https://docs.stripe.com/js/elements_object/create_address_element#address_element_create-options-defaultValues) to prefill address information, speeding checkout for your customers.
```jsx
```
#### HTML + JS
The [Address Element](https://docs.stripe.com/elements/address-element.md) lets you collect shipping or billing addresses. Create an empty DOM node for the Address Element. Display it after the Contact Details Element:
```html
```
Then, create an instance of the Address Element, and mount it to the DOM node:
```javascript
// Customize the appearance of Elements using the Appearance API.
const appearance = { /* ... */ };
// Enable the skeleton loader UI for the optimal loading experience.
const loader = 'auto';
const stripe = Stripe('<>');
// Create an elements group from the Stripe instance passing in the clientSecret and, optionally, appearance.
const elements = stripe.elements({clientSecret, appearance, loader});
// Create Element instances
const contactDetailsElement = elements.create("contactDetails");const addressElement = elements.create("address", {
mode: 'shipping',
allowedCountries: ['US']
});
const paymentElement = elements.create("payment");
// Mount the Elements to their corresponding DOM node
contactDetailsElement.mount("#contact-details-element");addressElement.mount("#address-element");
paymentElement.mount("#payment-element");
```
Display the Address Element before the Payment Element. The Payment Element dynamically detects address data collected by the Address Element, hiding unnecessary fields and collecting additional billing address details as necessary.
### Retrieve address information
The Address Element automatically passes the shipping address when a customer submits payment, but you can also retrieve the address details on the frontend using the `change` event. The `change` event sends whenever the user updates any field in the Address Element, or after selecting saved addresses:
```javascript
addressElement.on('change', (event: AddressChangeEvent) => {
const address = event.value;
})
```
### Prefill a shipping address
Use [defaultValues](https://docs.stripe.com/js/elements_object/create_address_element#address_element_create-options-defaultValues) to prefill address information, speeding checkout for your customers.
```javascript
// Create addressElement with the defaultValues option
const addressElement = elements.create("address", {
mode: 'shipping',
defaultValues: {
name: 'Jane Doe',
address: {
line1: '354 Oyster Point Blvd',
line2: '',
city: 'South San Francisco',
state: 'CA',
postal_code: '94080',
country: 'US',
}
}
});
// Mount the Element to its corresponding DOM node
addressElement.mount("#address-element");
```
## Optional: Customize the appearance [Client-side]
After you add these Elements to your page, you can customize their [appearance](https://docs.stripe.com/elements/appearance-api.md#theme) to make them fit with the rest of your design:
Customize the appearance of your Elements
## Submit the payment to Stripe [Client-side]
Use [stripe.confirmPayment](https://docs.stripe.com/js/payment_intents/confirm_payment) to complete the payment with details collected from your customer in the different Elements forms. Provide a [return_url](https://docs.stripe.com/api/payment_intents/create.md#create_payment_intent-return_url) to this function to indicate where Stripe redirects the user after they complete the payment.
Your user might be first redirected to an intermediate site, like a bank authorization page, before Stripe redirects them to the `return_url`.
By default, card and bank payments immediately redirect to the `return_url` when a payment is successful. If you don’t want to redirect to the `return_url`, you can use [if_required](https://docs.stripe.com/js/payment_intents/confirm_payment#confirm_payment_intent-options-redirect) to change the behavior.
#### React
```jsx
import {loadStripe} from "@stripe/stripe-js";
import {useStripe,
useElements,
Elements,
LinkAuthenticationElement,
PaymentElement,
// If collecting shipping
AddressElement,
} from "@stripe/react-stripe-js";
const stripe = loadStripe('<>');
const appearance = {/* ... */};
// Enable the skeleton loader UI for the optimal loading experience.
const loader = 'auto';
const CheckoutPage =({clientSecret}) => (
);
export default function CheckoutForm() {const stripe = useStripe();
const elements = useElements();
const handleSubmit = async (event) => {
event.preventDefault();
const {error} = await stripe.confirmPayment({
elements,
confirmParams: {
return_url: "https://example.com/order/123/complete",
},
});
if (error) {
// handle error
}
};
return (
);
}
```
#### HTML + JS
```javascript
const stripe = Stripe('<>');
const form = document.getElementById('payment-form');
form.addEventListener('submit', async (event) => {
event.preventDefault();
const {error} = await stripe.confirmPayment({
elements,
confirmParams: {
return_url: "https://example.com/order/123/complete",
}
});
if (error) {
// Show error to your customer (for example, payment details incomplete)
console.log(error.message);
} else {
// Your customer will be redirected to your `return_url`. For some payment
// methods like iDEAL, your customer will be redirected to an intermediate
// site first to authorize the payment, then redirected to the `return_url`.
}
});
```
The `return_url` corresponds to a page on your website that provides [the payment status](https://docs.stripe.com/payments/payment-intents/verifying-status.md) of the `PaymentIntent` when you render the return page. When Stripe redirects the customer to the `return_url`, you can use the following URL query parameters to verify payment status. You can also append your own query parameters when providing the `return_url`. These query parameters persist through the redirect process.
| Parameter | Description |
| --- | --- |
| `payment_intent` | The unique identifier for the `PaymentIntent` |
| `payment_intent_client_secret` | The [client secret](https://docs.stripe.com/api/payment_intents/object.md#payment_intent_object-client_secret) of the `PaymentIntent` object. |
## Optional: Separate authorization and capture [Server-side]
Link supports [separate authorization and capture](https://docs.stripe.com/payments/place-a-hold-on-a-payment-method.md). You must capture an authorized Link payment within 7 days of the authorization. Otherwise, the authorization is automatically canceled and you can’t capture that payment.
### Tell Stripe to authorize only
To indicate that you want separate authorization and capture, set [capture_method](https://docs.stripe.com/api/payment_intents/create.md#create_payment_intent-capture_method) to `manual` when creating the PaymentIntent. This parameter instructs Stripe to only authorize the amount on the customer’s payment method.
```curl
curl https://api.stripe.com/v1/payment_intents \
-u "<>:" \
-d "automatic_payment_methods[enabled]=true" \
-d amount=1099 \
-d currency=usd \
-d capture_method=manual
```
### Capture the funds
After the authorization succeeds, the PaymentIntent [status](https://docs.stripe.com/api/payment_intents/object.md#payment_intent_object-status) transitions to `requires_capture`. To capture the authorized funds, make a PaymentIntent [capture](https://docs.stripe.com/api/payment_intents/capture.md) request. The total authorized amount is captured by default—you can’t capture more than this, but you can capture less.
```curl
curl https://api.stripe.com/v1/payment_intents/{{PAYMENTINTENT_ID}}/capture \
-u "<>:" \
-d amount_to_capture=750
```
### (Optional) Cancel the authorization
If you need to cancel an authorization, you can [cancel the PaymentIntent](https://docs.stripe.com/refunds.md#cancel-payment).
## Handle post-payment events [Server-side]
Stripe sends a [payment_intent.succeeded](https://docs.stripe.com/api/events/types.md#event_types-payment_intent.succeeded) event when the payment completes. [Use a webhook to receive these events](https://docs.stripe.com/webhooks/quickstart.md) and run actions, like sending an order confirmation email to your customer, logging the sale in a database, or starting a shipping workflow.
Configure your integration to listen for these events rather than waiting on a callback from the client. When you wait on a callback from the client, the customer can close the browser window or quit the app before the callback executes. Setting up your integration to listen for asynchronous events enables you to accept [different types of payment methods](https://stripe.com/payments/payment-methods-guide) with a single integration.
In addition to handling the `payment_intent.succeeded` event, you can also handle two other important events when collecting payments with the Payment Element:
| Event | Description | Action |
| --- | --- | --- |
| [payment_intent.succeeded](https://docs.stripe.com/api/events/types.md?lang=php#event_types-payment_intent.succeeded) | Sent from Stripe when a customer has successfully completed a payment. | Send the customer an order confirmation and *fulfill* (Fulfillment is the process of providing the goods or services purchased by a customer, typically after payment is collected) their order. |
| [payment_intent.payment_failed](https://docs.stripe.com/api/events/types.md?lang=php#event_types-payment_intent.payment_failed) | Sent from Stripe when a customer attempted a payment, but the payment didn’t succeed. | If a payment transitioned from `processing` to `payment_failed`, offer the customer another attempt to pay. |
## Test the integration
> Don’t store real user data in *sandbox* (A sandbox is an isolated test environment that allows you to test Stripe functionality in your account without affecting your live integration. Use sandboxes to safely experiment with new features and changes) Link accounts. Treat them as if they’re publicly available, because these test accounts are associated with your publishable key.
Currently, Link only works with credit cards, debit cards, and qualified US bank account purchases. Link requires [domain registration](https://docs.stripe.com/payments/payment-methods/pmd-registration.md).
You can create sandbox accounts for Link using any valid email address. The following table shows the fixed one-time passcode values that Stripe accepts for authenticating sandbox accounts:
| Value | Outcome |
| --- | --- |
| Any other 6 digits not listed below | Success |
| 000001 | Error, code invalid |
| 000002 | Error, code expired |
| 000003 | Error, max attempts exceeded |
For testing specific payment methods, refer to the [Payment Element testing examples](https://docs.stripe.com/payments/accept-a-payment.md?platform=web#additional-testing-resources).
### Multiple funding sources
As Stripe adds additional funding source support, you don’t need to update your integration. Stripe automatically supports them with the same transaction settlement time and guarantees as card and bank account payments.
### Card authentication and 3D Secure
Link supports *3D Secure 2 (3DS2)* (3D Secure 2 (3DS2) removes friction from the authentication process and improves the purchase experience compared to 3D Secure 1. It's the main card authentication method used to meet Strong Customer Authentication (SCA) requirements in Europe and is a key mechanism for businesses to request exemptions to SCA) authentication for card payments. 3DS2 requires customers to complete an additional verification step with the card issuer when paying. Payments that have been successfully authenticated using 3D Secure are covered by a *liability shift* (With some 3D Secure transactions, the liability for fraudulent chargebacks (stolen or counterfeit cards) shifts from you to the card issuer).
To trigger 3DS2 authentication challenge flows with Link in a sandbox, use the following test card with any CVC, postal code, and future expiration date: 4000000000003220.
In a sandbox, the authentication process displays a mock authentication page. On that page, you can either authorize or cancel the payment. Authorizing the payment simulates successful authentication and redirects you to the specified return URL. Clicking the **Failure** button simulates an unsuccessful attempt at authentication.
For more details, refer to the [3D Secure authentication page](https://docs.stripe.com/payments/3d-secure.md).
> When testing 3DS flows, only test cards for 3DS2 will trigger authentication on Link.
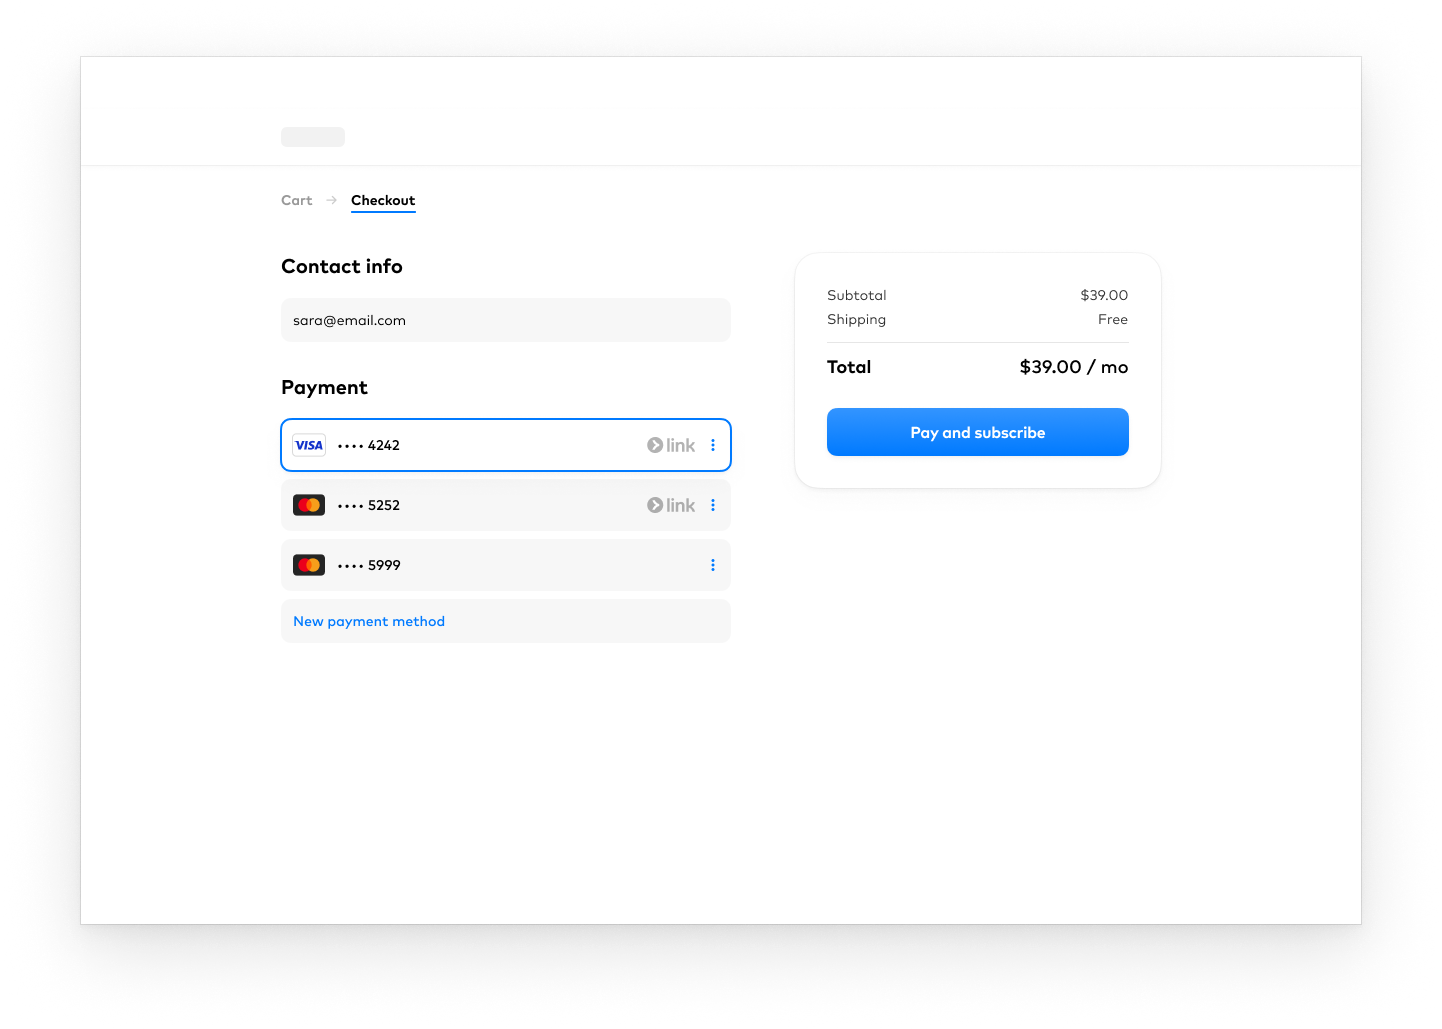
## Optional: Display customer-saved data [Server-side] [Client-side]
In addition to displaying your own saved addresses and payment methods for a customer, you can display their Link-saved data.
> #### Use the Accounts v2 API to represent customers
>
> The Accounts v2 API is generally available for Connect users, and in public preview for other Stripe users. If you’re part of the Accounts v2 preview, you need to specify a [preview version](https://docs.stripe.com/api-v2-overview.md#sdk-and-api-versioning) in your code.
>
> To join the Accounts v2 preview, go to [Account previews and features](https://dashboard.stripe.com/settings/previews) in your Dashboard and enable **Reusable payment methods for Global Payouts**.
>
> For most use cases, we recommend [modeling your customers as customer-configured Account objects](https://docs.stripe.com/accounts-v2/use-accounts-as-customers.md) instead of using [Customer](https://docs.stripe.com/api/customers.md) objects.
If a customer has more than one saved payment method, Stripe displays their three most recently used saved cards, in addition to any payment methods they have saved with Link.
To accomplish this, create an Ephemeral Key and send it to your front end along with the `Account` ID (for customers represented as customer-configured `Account` objects) or the `Customer` ID (for customers represented as `Customer` objects). Since information about the customer is sensitive, you can’t retrieve it directly within Stripe.js, but an Ephemeral Key grants temporary access to this data.
#### Accounts v2
#### curl
```bash
curl https://api.stripe.com/v1/ephemeral_keys \
-u<>: \
-H "Stripe-Version:2026-06-24.dahlia" \
-d "customer_account"="{{CUSTOMER_ACCOUNT_ID}}" \
curl https://api.stripe.com/v1/payment_intents \
-u <>: \
-d "amount"=1099 \
-d "currency"="usd" \-d "customer_account"="{{CUSTOMER_ACCOUNT_ID}}" \
-d "automatic_payment_methods[enabled]"=true
```
#### Customers v1
#### curl
```bash
curl https://api.stripe.com/v1/ephemeral_keys \
-u<>: \
-H "Stripe-Version:2026-06-24.dahlia" \
-d "customer"="{{CUSTOMER_ID}}" \
curl https://api.stripe.com/v1/payment_intents \
-u <>: \
-d "amount"=1099 \
-d "currency"="usd" \-d "customer"="{{CUSTOMER_ID}}" \
-d "automatic_payment_methods[enabled]"=true
```
On the client-side, fetch the `customerOptions` with `clientSecret`.
```jsx
(async () => {
const response = await fetch('/secret');const {clientSecret, customerOptions} = await response.json();
})
```
Then, pass the `customerOptions.ephemeralKey` and `customerOptions.customer` values to the `customerOptions` option on the [Elements group](https://docs.stripe.com/js/elements_object/create). You must also pass the `elements_customers_beta_1` beta flag when loading the Stripe instance.
#### React
```jsx
import {loadStripe} from "@stripe/stripe-js";
import {
useStripe,
useElements,
Elements,
LinkAuthenticationElement,
PaymentElement,
} from "@stripe/react-stripe-js";
const stripe = loadStripe('<>', {apiVersion: '2026-06-24.dahlia',
betas: ['elements_customers_beta_1'],
});
const appearance = {/* ... */};
const loader = 'auto';
const CheckoutPage =({
clientSecret,customerOptions,
}) => (
);
```
#### HTML + JS
```javascript
// Customize the appearance of Elements using the Appearance API.
const appearance = { /* ... */ };
// Enable the skeleton loader UI for the optimal loading experience.
const loader = 'auto';
const stripe = Stripe('<>', {betas: ['elements_customers_beta_1'],
});
// Create an elements group from the Stripe instance, passing the clientSecret (obtained in step 2) and appearance (optional).
const elements = stripe.elements({
clientSecret,
appearance,
loader,customerOptions,
});
```
## Optional: Save Link payment methods [Server-side] [Client-side]
You can save Link payment methods for future *off-session payments* (A payment is described as off-session if it occurs without the direct involvement of the customer, using previously-collected payment information) or *subscriptions* (A Subscription represents the product details associated with the plan that your customer subscribes to. Allows you to charge the customer on a recurring basis), but not for future *on-session payments* (A payment is described as on-session if it occurs while the customer is actively in your checkout flow and able to authenticate the payment method). To do so, you must attach it to a customer represented either as a customer-configured `Account` or as a `Customer` object.
> #### Use the Accounts v2 API to represent customers
>
> The Accounts v2 API is generally available for Connect users, and in public preview for other Stripe users. If you’re part of the Accounts v2 preview, you need to specify a [preview version](https://docs.stripe.com/api-v2-overview.md#sdk-and-api-versioning) in your code.
>
> To join the Accounts v2 preview, go to [Account previews and features](https://dashboard.stripe.com/settings/previews) in your Dashboard and enable **Reusable payment methods for Global Payouts**.
>
> For most use cases, we recommend [modeling your customers as customer-configured Account objects](https://docs.stripe.com/accounts-v2/use-accounts-as-customers.md) instead of using [Customer](https://docs.stripe.com/api/customers.md) objects.
#### Accounts v2
When your customer creates an account or has their first transaction with your business, create a customer-configured `Account` object to store their data for future use. Then, specify the `customer_account` when creating your `PaymentIntent`.
```curl
curl https://api.stripe.com/v1/payment_intents \
-u "<>:" \
-d amount=1099 \
-d currency=usd \
-d "automatic_payment_methods[enabled]=true" \
-d "customer_account={{CUSTOMERACCOUNT_ID}}" \
-d setup_future_usage=off_session
```
When you’re ready to charge your customer again, use the `customer_account` ID and resulting *PaymentMethod* (PaymentMethods represent your customer's payment instruments, used with the Payment Intents or Setup Intents APIs) ID to create a new `PaymentIntent`.
#### Customers v1
When your customer creates an account or has their first transaction with your business, create a `Customer` object to store their data for future use. Then, specify the `customer` when creating your `PaymentIntent`.
```curl
curl https://api.stripe.com/v1/payment_intents \
-u "<>:" \
-d amount=1099 \
-d currency=usd \
-d "automatic_payment_methods[enabled]=true" \
-d "customer={{CUSTOMER_ID}}" \
-d setup_future_usage=off_session
```
When you’re ready to charge your customer again, use the `customer` ID and resulting *PaymentMethod* (PaymentMethods represent your customer's payment instruments, used with the Payment Intents or Setup Intents APIs) ID to create a new `PaymentIntent`.
Set [off_session](https://docs.stripe.com/api/payment_intents/confirm.md#confirm_payment_intent-off_session) to `true`. This causes the `PaymentIntent` to send an error if authentication is required when your customer isn’t actively using your site or app.
#### Accounts v2
```curl
curl https://api.stripe.com/v1/payment_intents \
-u "<>:" \
-d amount=1099 \
-d currency=usd \
-d "automatic_payment_methods[enabled]=true" \
-d "customer_account={{CUSTOMERACCOUNT_ID}}" \
-d payment_method={{PAYMENT_METHOD_ID}} \
--data-urlencode "return_url=https://example.com/order/123/complete" \
-d off_session=true \
-d confirm=true
```
#### Customers v1
```curl
curl https://api.stripe.com/v1/payment_intents \
-u "<>:" \
-d amount=1099 \
-d currency=usd \
-d "automatic_payment_methods[enabled]=true" \
-d "customer={{CUSTOMER_ID}}" \
-d payment_method={{PAYMENT_METHOD_ID}} \
--data-urlencode "return_url=https://example.com/order/123/complete" \
-d off_session=true \
-d confirm=true
```
## Disclose Stripe to your customers
Stripe collects information on customer interactions with Elements to provide services to you, prevent fraud, and improve its services. This includes using cookies and IP addresses to identify which Elements a customer saw during a single checkout session. You’re responsible for disclosing and obtaining all rights and consents necessary for Stripe to use data in these ways. For more information, visit our [privacy center](https://stripe.com/legal/privacy-center#as-a-business-user-what-notice-do-i-provide-to-my-end-customers-about-stripe).
## See also
- [What’s Link](https://docs.stripe.com/payments/link.md)
- [Link with Elements](https://docs.stripe.com/payments/link/elements-link.md)
- [Link in the Payment Element](https://docs.stripe.com/payments/link/payment-element-link.md)
- [Explore the Contact Details Element](https://docs.stripe.com/payments/link/contact-details-element.md)
- [Link in different payment integrations](https://docs.stripe.com/payments/link/link-payment-integrations.md)