# サーバーで支払いを確定する
PaymentIntent や SetupIntent を作成する前に Payment Element をレンダリングする実装を構築し、サーバーから Intent を確定します。
# 決済を受け付ける
> This is a 決済を受け付ける for when platform is web and type is payment. View the full page at https://docs.stripe.com/payments/finalize-payments-on-the-server?platform=web&type=payment.
Payment Element を使用すると、一度の導入で複数の支払い方法を受け付けることができます。この実装では、Payment Element を表示し、*PaymentIntent* (The Payment Intents API tracks the lifecycle of a customer checkout flow and triggers additional authentication steps when required by regulatory mandates, custom Radar fraud rules, or redirect-based payment methods) を作成して、サーバーから決済を確定する、カスタムの決済フローを構築します。
## Stripe を設定する [サーバ側]
まず、[Stripe アカウントを作成する](https://dashboard.stripe.com/register)か[サインイン](https://dashboard.stripe.com/login)します。
アプリケーションから Stripe API にアクセスするには、Stripe の公式ライブラリを使用します。
#### Ruby
```bash
# Available as a gem
sudo gem install stripe
```
```ruby
# If you use bundler, you can add this line to your Gemfile
gem 'stripe'
```
## 支払い方法を有効にする
> この組み込みパスは、自動決済処理システム (ACSS) を使用する BLIK やプレオーソリデビットに対応していません。また、クライアント側からディファードインテントを作成する場合、PaymentIntent にはクライアント側のフローでサポートされていない顧客設定の [Account](https://docs.stripe.com/api/v2/core/accounts/object.md#v2_account_object-configuration-customer) または [Customer](https://docs.stripe.com/api/customers/object.md) オブジェクトが必要なため、動的決済手段で `customer_balance` を使用することはできません。`customer_balance` を使用するには、`Account` または `Customer` を使用してサーバー側で `PaymentIntent` を作成し、その `client_secret` をクライアントに返します。
[支払い方法の設定](https://dashboard.stripe.com/settings/payment_methods)を表示して、サポートする支払い方法を有効にします。*PaymentIntent* (The Payment Intents API tracks the lifecycle of a customer checkout flow and triggers additional authentication steps when required by regulatory mandates, custom Radar fraud rules, or redirect-based payment methods) を作成するには、少なくとも 1 つは支払い方法を有効にする必要があります。
多くの顧客から決済を受け付けられるよう、Stripe では、カードやその他一般的な決済手段がデフォルトで有効になっていますが、ビジネスや顧客に適した追加の決済手段を有効にすることをお勧めします。プロダクトと決済手段のサポートについては[決済手段のサポート](https://docs.stripe.com/payments/payment-methods/payment-method-support.md)を、手数料については[料金体系ページ](https://stripe.com/pricing/local-payment-methods)をご覧ください。
## 支払いの詳細を収集する [クライアント側]
[Payment Element](https://docs.stripe.com/payments/payment-element.md) を使用して、iFrame で収集された支払い情報を HTTPS 接続で安全に Stripe に送信します。
> #### iFrame の競合
>
> Payment Element を別の iframe 内に配置しないでください。支払い確認のために別のページにリダイレクトする必要がある支払い方法と競合します。
構築済みのシステムを機能させるには、決済ページの URL の先頭を `https://` rather ではなく `http://` for にする必要があります。HTTPS を使用しなくても導入をテストできますが、本番環境で決済を受け付ける準備が整ったら、必ず HTTPS を [有効](https://docs.stripe.com/security/guide.md#tls) にしてください。
#### HTML + JS
### Stripe.js を設定する
Payment Element は Stripe.js の機能として自動的に使用できるようになります。決済ページに Stripe.js スクリプトを含めるには、HTML ファイルの `head` にスクリプトを追加します。常に js.stripe.com から Stripe.js を直接読み込むことにより、PCI 準拠が維持されます。スクリプトをバンドルに含めたり、そのコピーを自身でホストしたりしないでください。
```html
Checkout
```
購入ページで次の JavaScript を使用して、Stripe のインスタンスを作成します。
```javascript
// Set your publishable key: remember to change this to your live publishable key in production
// See your keys here: https://dashboard.stripe.com/apikeys
const stripe = Stripe('<>');
```
### Payment Element を決済ページに追加する
Payment Element を決済ページに配置する場所が必要です。決済フォームで、一意の ID を持つ空の DOM ノード (コンテナー) を作成します。
```html
```
フォームが読み込まれたら、モード、金額、通貨を指定して Elements インスタンスを作成します。これらの値から、Element が顧客に表示する支払い方法が決定されます。
次に、Payment Element のインスタンスを作成し、コンテナーの DOM ノードにマウントします。
```javascript
const options = {mode:'payment',
amount: 1099,
currency: 'usd',paymentMethodCreation: 'manual',
// Fully customizable with appearance API.
appearance: {/*...*/},
};
// Set up Stripe.js and Elements to use in checkout formconst elements = stripe.elements(options);
// Create and mount the Payment Element
const paymentElementOptions = { layout: 'accordion'};
const paymentElement = elements.create('payment', paymentElementOptions);
paymentElement.mount('#payment-element');
```
#### React
### Stripe.js を設定する
npm パブリックレジストリーから [React Stripe.js](https://www.npmjs.com/package/@stripe/react-stripe-js) と [Stripe.js ローダー](https://www.npmjs.com/package/@stripe/stripe-js)をインストールします。
```bash
npm install --save @stripe/react-stripe-js @stripe/stripe-js
```
### Elements プロバイダーを決済ページに追加して設定する
Payment Element コンポーネントを使用するには、購入ページコンポーネントを [Elements プロバイダー](https://docs.stripe.com/sdks/stripejs-react.md#elements-provider)でラップします。公開可能キーを使用して `loadStripe` を呼び出し、返された `Promise` を `Elements` プロバイダーに渡します。
`Elements` プロバイダーは、モード、金額、通貨も受け付けます。これらの値により、顧客に表示される支払い方法が決定されます。
```jsx
import React from 'react';
import ReactDOM from 'react-dom';
import {Elements} from '@stripe/react-stripe-js';
import {loadStripe} from '@stripe/stripe-js';
import CheckoutForm from './CheckoutForm';
// Make sure to call `loadStripe` outside of a component’s render to avoid
// recreating the `Stripe` object on every render.
const stripePromise = loadStripe('<>');
function App() {
const options = {mode:'payment',
amount: 1099,
currency: 'usd',paymentMethodCreation: 'manual',
// Fully customizable with appearance API.
appearance: {/*...*/},
};
return (
);
};
ReactDOM.render(, document.getElementById('root'));
```
### Payment Element コンポーネントを追加する
`PaymentElement` コンポーネントを使用して、フォームを構築します。
```jsx
import React from 'react';
import {PaymentElement} from '@stripe/react-stripe-js';
const CheckoutForm = () => {
return (
);
};
export default CheckoutForm;
```
Payment Element によって動的なフォームが表示され、顧客はここで支払い方法を選択できます。このフォームでは、顧客が選択した支払い方法で必要な決済の詳細のすべてが自動的に収集されます。
`Elements` プロバイダーを作成する際に [Appearance (デザイン) オブジェクト](https://docs.stripe.com/elements/appearance-api.md) を `options` に渡すことで、サイトのデザインに合わせて Payment Element をカスタマイズできます。
### 住所を収集
デフォルトでは、Payment Element は必要な請求住所の詳細のみを収集します。[税金の計算](https://docs.stripe.com/api/tax/calculations/create.md)、配送先情報を入力するなどの一部の動作では、顧客の完全な住所が必要です。次のように対応できます。
- [Address Element](https://docs.stripe.com/elements/address-element.md) を使用して、オートコンプリートとローカリゼーションの機能を利用して、顧客の完全な住所を収集します。これにより、最も正確な税金計算が可能になります。
- 独自のカスタムフォームを使用して住所の詳細を収集する。
## Optional: レイアウトをカスタマイズする [クライアント側]
決済フローインターフェイスに合わせて Payment Element のレイアウト (アコーディオンまたはタブ) をカスタマイズできます。各プロパティについて、詳細は [elements.create](https://docs.stripe.com/js/elements_object/create_payment_element#payment_element_create-options) をご覧ください。
#### アコーディオン
Payment Element の作成時にレイアウトの `type` と他のオプションプロパティーを渡すと、レイアウト機能の使用を開始できます。
```javascript
const paymentElement = elements.create('payment', {
layout: {
type: 'accordion',
defaultCollapsed: false,
radios: 'always',
spacedAccordionItems: false
}
});
```
#### タブ
### レイアウトを指定する
レイアウトの値を `tabs` に設定します。以下の例のようなその他のプロパティーを指定するオプションもあります。
```javascript
const paymentElement = elements.create('payment', {
layout: {
type: 'tabs',
defaultCollapsed: false,
}
});
```
以下の画像は、異なるレイアウト設定を適用した同一 Payment Element の表示を示しています。
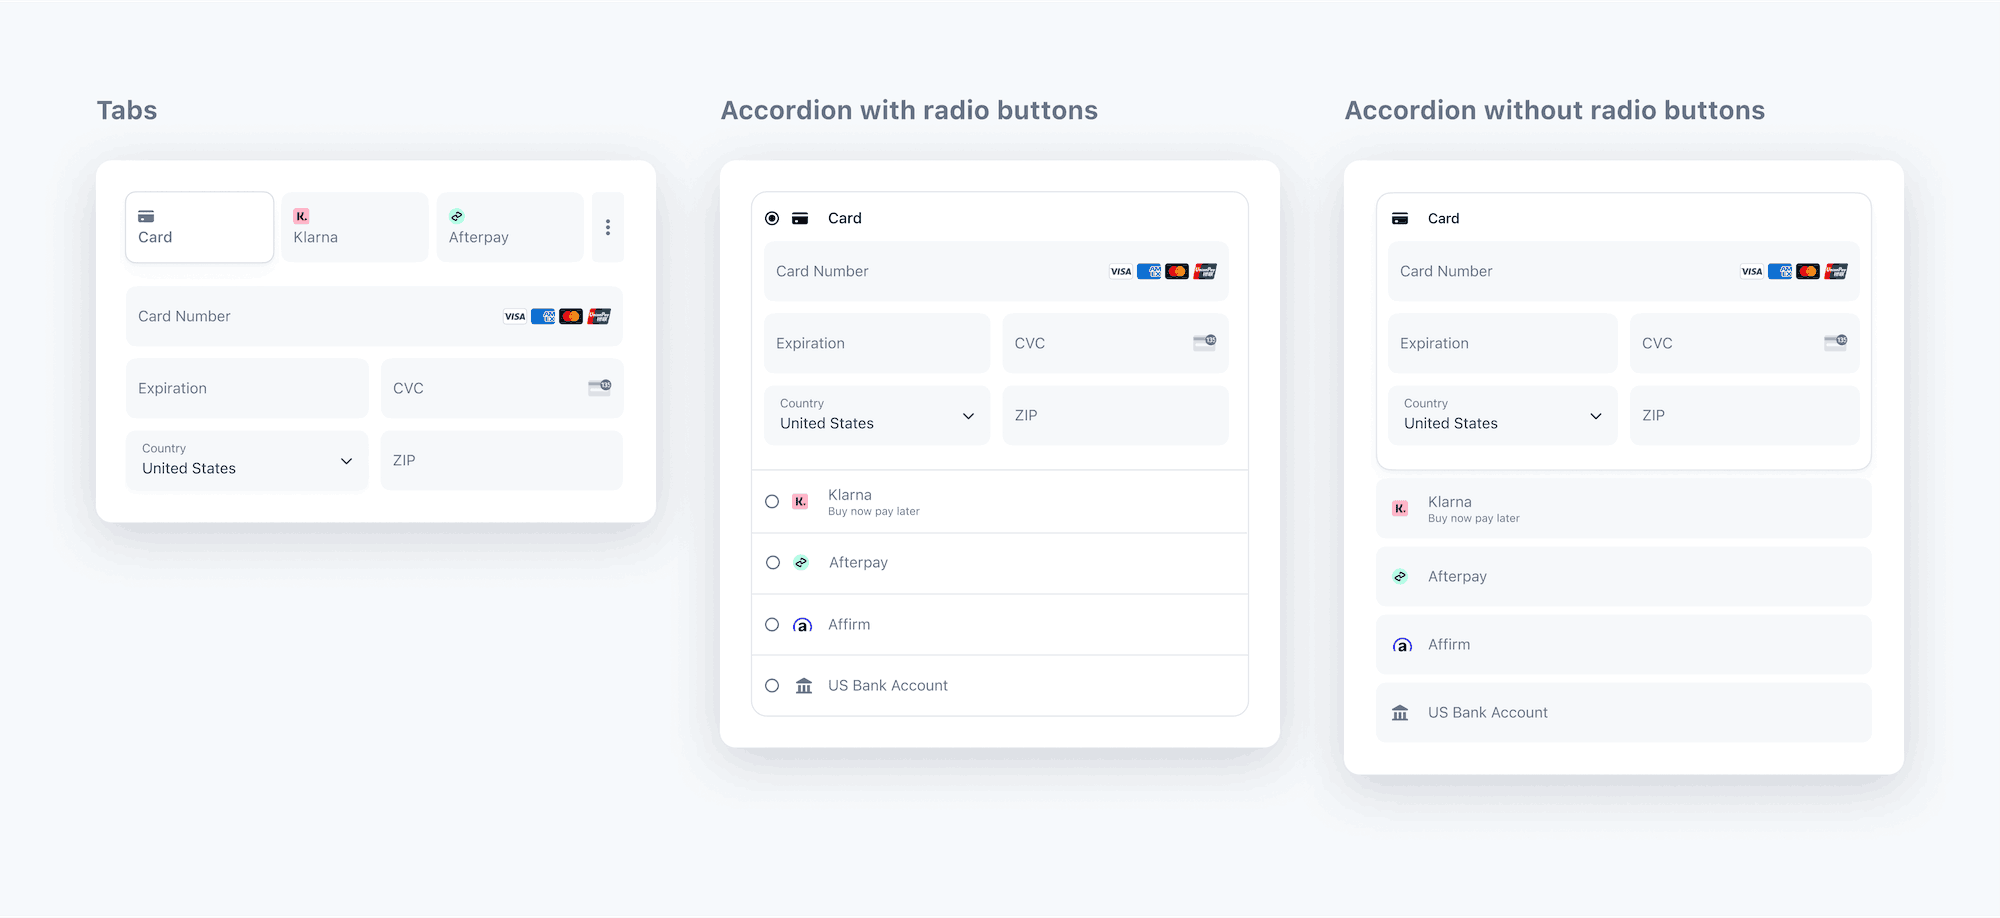
Payment Element のレイアウト
## Optional: デザインをカスタマイズする [クライアント側]
これで、Payment Element がページに追加されました。次は、デザインに合わせて外観をカスタマイズできます。Payment Element のカスタマイズについての詳細は、[Elements Appearance API](https://docs.stripe.com/elements/appearance-api.md) をご覧ください。
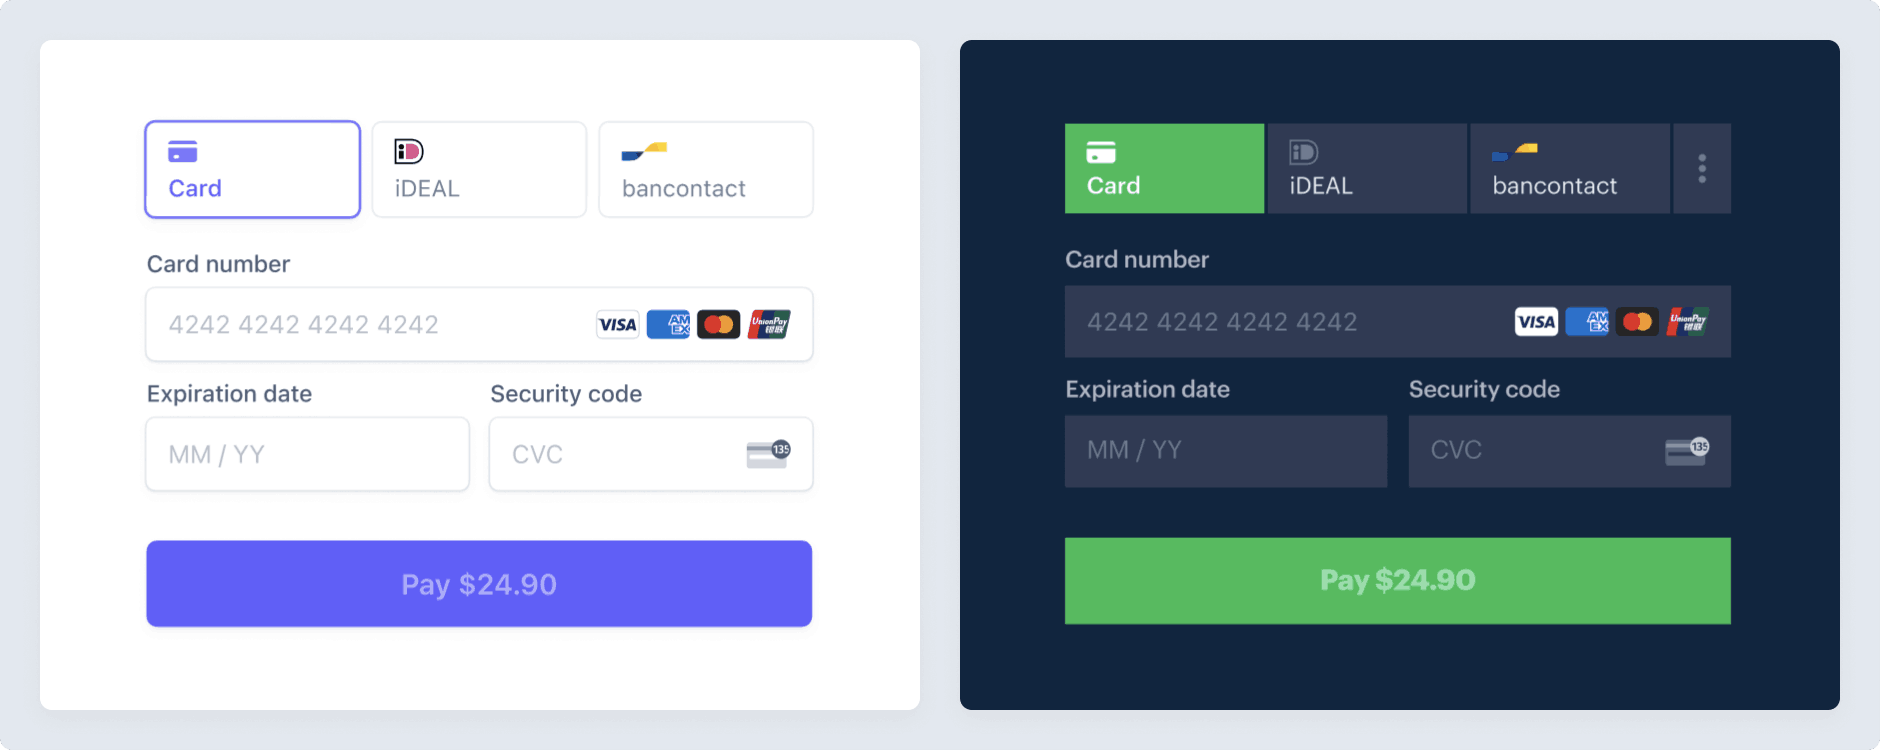
Payment Element をカスタマイズする
## Optional: 顧客の支払い方法を保存および取得する
将来の利用に備えて顧客の決済手段を保存するように Payment Element を設定できます。このセクションでは、[決済手段の保存機能](https://docs.stripe.com/payments/save-customer-payment-methods.md)を導入する方法を説明しています。Payment Element で以下を実行できます。
- 買い手に支払い方法を保存することの同意を求める
- 買い手が同意した場合に支払い方法を保存する
- 将来の購入時に保存した支払い方法を買い手に表示する
- 買い手が紛失したカードまたは期限切れのカードを交換するときに[それらのカードを自動的に更新する](https://docs.stripe.com/payments/cards/overview.md#automatic-card-updates)

決済手段を保存します。

以前に保存した支払い方法を再利用します。
### Payment Element で支払い方法の保存機能を有効にする
顧客の ID を指定し (`customer` は `Customer` オブジェクト用、`customer_account` は顧客設定の `Account` オブジェクト用)、セッションで [payment_element](https://docs.stripe.com/api/customer_sessions/object.md#customer_session_object-components-payment_element) コンポーネントを有効にして、サーバー上に [CustomerSession](https://docs.stripe.com/api/customer_sessions/.md) を作成します。有効にする保存済み決済手段の [features](https://docs.stripe.com/api/customer_sessions/create.md#create_customer_session-components-payment_element-features) を設定します。たとえば、[payment_method_save](https://docs.stripe.com/api/customer_sessions/create.md#create_customer_session-components-payment_element-features-payment_method_save) を有効にすると、顧客が決済情報を保存して今後利用できるようにするチェックボックスが表示されます。
PaymentIntent または Checkout Session で `setup_future_usage` を指定すると、決済手段の保存に関するデフォルトの動作を上書きできます。これにより、顧客が明示的に保存を選択しなくても、今後の利用に備えて決済手段が自動的に保存されます。`setup_future_usage` を指定する場合は、同じ決済取引で `payment_method_save_usage` を設定しないでください。設定すると導入エラーが発生します。
> #### Accounts v2 API を使用した顧客の表現
>
> Accounts v2 API では、Connect ユーザーには一般提供され、その他の Stripe ユーザーには公開プレビューで提供されます。Accounts v2 プレビューの一部である場合は、コードで[プレビューバージョン](https://docs.stripe.com/api-v2-overview.md#sdk-and-api-versioning)を指定する必要があります。
>
> Accounts v2 プレビューへのアクセスをリクエストするには、
>
> ほとんどのユースケースでは、[Customer](https://docs.stripe.com/api/customers.md) オブジェクトを使用するのではなく、[顧客を顧客設定済みの Account オブジェクトとしてモデル化する](https://docs.stripe.com/accounts-v2/use-accounts-as-customers.md)ことをお勧めします。
#### Accounts v2
#### Ruby
```ruby
# Don't put any keys in code. See https://docs.stripe.com/keys-best-practices.
# Find your keys at https://dashboard.stripe.com/apikeys.
client = Stripe::StripeClient.new('<>')
post '/create-customer-session' do
customer_session = client.v1.customer_sessions.create({
customer_account: {{CUSTOMER_ACCOUNT_ID}},
components: {
payment_element: {
enabled: true,
features: {
payment_method_redisplay: 'enabled',
payment_method_save: 'enabled',
payment_method_save_usage: 'off_session',
payment_method_remove: 'enabled',
},
},
},
})
{
customer_session_client_secret: customer_session.client_secret
}.to_json
end
```
#### Customers v1
#### Ruby
```ruby
# Don't put any keys in code. See https://docs.stripe.com/keys-best-practices.
# Find your keys at https://dashboard.stripe.com/apikeys.
client = Stripe::StripeClient.new('<>')
post '/create-customer-session' do
customer_session = client.v1.customer_sessions.create({
customer: {{CUSTOMER_ID}},
components: {
payment_element: {
enabled: true,
features: {
payment_method_redisplay: 'enabled',
payment_method_save: 'enabled',
payment_method_save_usage: 'off_session',
payment_method_remove: 'enabled',
},
},
},
})
{
customer_session_client_secret: customer_session.client_secret
}.to_json
end
```
Elements インスタンスはその CustomerSession の *client secret* (A client secret is used with your publishable key to authenticate a request for a single object. Each client secret is unique to the object it's associated with) を使用して、顧客が保存した支払い方法にアクセスします。CustomerSession の作成時に適切に[エラーを処理](https://docs.stripe.com/error-handling.md)します。エラーが発生した場合、CustomerSession の client secret はオプションなので、Elements インスタンスに指定する必要はありません。
CustomerSession の client secret を使用して Elements インスタンスを作成します。次に、Elements インスタンスを使用して、Payment Element を作成します。
```javascript
// Create the CustomerSession and obtain its clientSecret
const res = await fetch("/create-customer-session", {
method: "POST"
});
const {
customer_session_client_secret: customerSessionClientSecret
} = await res.json();
const elementsOptions = {
mode: 'payment',
amount: 1099,
currency: 'usd',customerSessionClientSecret,
// Fully customizable with appearance API.
appearance: {/*...*/},
};
// Set up Stripe.js and Elements to use in checkout form, passing the client secret
// and CustomerSession's client secret obtained in a previous step
const elements = stripe.elements(elementsOptions);
// Create and mount the Payment Element
const paymentElementOptions = { layout: 'accordion'};
const paymentElement = elements.create('payment', paymentElementOptions);
paymentElement.mount('#payment-element');
```
ConfirmationToken の作成時に、顧客が支払いの詳細を保存するためのボックスにチェックマークを付けたかどうかに応じて、Stripe.js が ConfirmationToken の [setup_future_usage](https://docs.stripe.com/api/confirmation_tokens/object.md#confirmation_token_object-setup_future_usage) および [allow_redisplay](https://docs.stripe.com/api/payment_methods/object.md#payment_method_object-allow_redisplay) の設定をコントロールします。
### セキュリティコードの再収集を実行する
オプションとして、[PaymentIntent の作成時](https://docs.stripe.com/api/payment_intents/create.md#create_payment_intent-payment_method_options-card-require_cvc_recollection)と [Elements の作成時](https://docs.stripe.com/js/elements_object/create_without_intent#stripe_elements_no_intent-options-paymentMethodOptions-card-require_cvc_recollection)の両方に `require_cvc_recollection` を指定して、顧客がカードで支払う場合にセキュリティコードの再収集を実行します。
### 保存した支払い方法の選択内容を検出する
保存した支払い方法を選択したときにコンテンツを動的に制御するには、Payment Element の `change` イベントをリッスンします。このイベントには、選択した支払い方法の情報が入力されています。
```javascript
paymentElement.on('change', function(event) {
if (event.value.payment_method) {
// Control dynamic content if a saved payment method is selected
}
})
```
## Optional: 支払いの詳細を動的に更新する [クライアント側]
顧客が、支払いの詳細を変更するアクション (割引コードの適用など) を実行すると、Elements インスタンスが更新され、新たな値が反映されます。Apple Pay や Google Pay などの一部の支払い方法では、UI に金額が表示されるため、常に正確で最新の状態であることを確認します。
#### HTML + JS
```js
async function handleDiscountCode(code) {
// On the server, validate that the discount code is valid and return the new amount
const {newAmount} = await fetch("/apply-discount", {
method: "POST",
headers: {"Content-Type": "application/json"},
body: JSON.stringify({code}),
});
await elements.update({amount: newAmount});
}
```
#### React
```jsx
function App() {
const [amount, setAmount] = React.useState(1099);
const handleDiscountCode = useCallback(async (code) => {
// On the server, validate that the discount code is valid and return the new amount
const {newAmount} = await fetch("/apply-discount", {
method: "POST",
headers: {"Content-Type": "application/json"},
body: JSON.stringify({code}),
});
// Trigger a state change that re-renders the Elements provider with the new amount
setAmount(newAmount);
}, []);
const options = {
mode: 'payment',
amount,
currency: 'usd',
appearance: {/*...*/},
};
return (
);
};
```
## Optional: 追加の Elements オプション [クライアント側]
[Elements オブジェクト](https://docs.stripe.com/js/elements_object/create_without_intent)は、支払いの回収に影響する追加オプションを受け入れます。指定したオプションを基に Payment Element は、有効化した決済手段の中から利用可能なものを表示します。詳しくは、[決済手段のサポート](https://docs.stripe.com/payments/payment-methods/payment-method-support.md)をご覧ください。
指定する Elements オプション ( `captureMethod`、`setupFutureUsage`、`paymentMethodOptions` など) が、Intent の作成時および確定時に渡す同等のパラメーターと一致していることを確認してください。パラメーターが一致しないと、予期しない動作やエラーが発生する可能性があります。
| プロパティー | タイプ | 説明 | 必須 |
| ---------------------------- | -------------------------------------------------- | ---------------------------------------------------------------------------------------------------------------------------------------------------------------------------------------------------------------------------------------------------------------------------------------------------------------------------------------------------------------------------------------------------------------------------------------------------------------------------------------------------------------------------------------------------------------------------------------------------------------------------------------------------------------------------------------------------------------------------------------- | ------------------------------------ |
| `mode` | - `payment`
- `setup`
- `subscription` | Payment Element が *PaymentIntent* (The Payment Intents API tracks the lifecycle of a customer checkout flow and triggers additional authentication steps when required by regulatory mandates, custom Radar fraud rules, or redirect-based payment methods)、*SetupIntent* (The Setup Intents API lets you build dynamic flows for collecting payment method details for future payments. It tracks the lifecycle of a payment setup flow and can trigger additional authentication steps if required by law or by the payment method)、または*サブスクリプション* (A Subscription represents the product details associated with the plan that your customer subscribes to. Allows you to charge the customer on a recurring basis)で使用されているかどうかを示します。 | はい |
| `currency` | `string` | 顧客に請求する金額の通貨。 | はい |
| `amount` | `number` | Apple Pay、Google Pay、または BNPL の UI で示される、顧客に請求する金額。 | `payment` および `subscription` のモードの場合 |
| `setupFutureUsage` | - `off_session`
- `on_session` | Payment Element によって収集された決済の詳細を使用して、今後の決済を行う意図を示します。 | いいえ |
| `captureMethod` | - `automatic`
- `automatic_async`
- `manual` | 顧客の口座から売上をキャプチャーするタイミングを管理します。 | いいえ |
| `onBehalfOf` | `string` | Connect のみ。取引に関する金銭的責任を負う Stripe アカウント ID。このオプションが実装に関連するかを判断するには、[ユースケース](https://docs.stripe.com/connect/charges.md)をご覧ください。 | いいえ |
| `paymentMethodTypes` | `string[]` | 表示する決済手段タイプのリスト。この属性を省略して、[Stripe ダッシュボード](https://dashboard.stripe.com/settings/payment_methods)で決済手段を管理できます。 | いいえ |
| `paymentMethodConfiguration` | `string` | [Stripe ダッシュボード](https://dashboard.stripe.com/settings/payment_methods)で決済手段を管理するときに使用する[決済手段の設定](https://docs.stripe.com/api/payment_method_configurations.md)。指定しない場合は、既定の構成が使用されます。 | いいえ |
| `paymentMethodCreation` | `manual` | [stripe.createPaymentMethod](https://docs.stripe.com/js/payment_methods/create_payment_method_elements) を使用して、Elements インスタンスから PaymentMethods が作成されるようにします。 | いいえ |
| `paymentMethodOptions` | `{us_bank_account: {verification_method: string}}` | `us_bank_account` 決済手段の確認オプション。[Payment Intents](https://docs.stripe.com/api/payment_intents/create.md#create_payment_intent-payment_method_options-us_bank_account-verification_method) と同じ確認手段を受け入れます。 | いいえ |
| `paymentMethodOptions` | `{card: {installments: {enabled: boolean}}}` | [Stripe ダッシュボード](https://dashboard.stripe.com/settings/payment_methods)で決済手段を管理していないときに、カード分割払いプランの選択 UI を手動で有効化できるようにします。`mode='payment'` を設定し、「さらに」`paymentMethodTypes` を明示的に指定する必要があります。それ以外の場合は、エラーが発生します。`paymentMethodCreation='manual'` とは互換性がありません。 | いいえ |
| `paymentMethodOptions` | `{[paymentMethod]: {setup_future_usage: string}}` | 再利用をサポートする決済手段にのみ `setup_future_usage` を指定できます。`mode` が `payment` の場合にのみ適用されます。各決済手段の値は、確定時に PaymentIntent の対応する `payment_method_options[paymentMethod][setup_future_usage]` と一致している必要があります。サポートされている決済手段と値については、[Stripe.js リファレンス](https://docs.stripe.com/js/elements_object/create_without_intent#stripe_elements_no_intent-options-paymentMethodOptions)を参照してください。 | いいえ |
## ConfirmationToken を作成する [クライアント側]
> #### レガシーの実装で createPaymentMethod を使用する
>
> レガシーの実装を使用している場合は、サーバーで支払いを確定するために `stripe.createPaymentMethod` の情報を使用することがあります。このガイドに従って [Confirmation Tokens に移行する](https://docs.stripe.com/payments/payment-element/migration-ct.md)ことをお勧めしますが、以前のドキュメントを確認して[サーバーで支払いを確定する](https://docs.stripe.com/payments/finalize-payments-on-the-server-legacy.md)こともできます。
顧客が決済フォームを送信すると、[stripe.createConfirmationToken](https://docs.stripe.com/js/confirmation_tokens/create_confirmation_token) が呼び出され *ConfirmationToken* (ConfirmationTokens help capture data from your client, such as your customer's payment instruments and shipping address, and are used to confirm a PaymentIntent or SetupIntent) を作成し、決済の確定前に追加の検証ロジックまたはビジネスロジックをサーバーに送信します。
PaymentIntent を確定すると *PaymentMethod* (PaymentMethods represent your customer's payment instruments, used with the Payment Intents or Setup Intents APIs) が生成されます。PaymentIntent 確認レスポンスから [payment_method](https://docs.stripe.com/api/payment_intents/object.md#payment_intent_object-payment_method) ID を表示できます。
> 作成された ConfirmationToken をすぐに使用して、PaymentIntent を確定する必要があります。使用しなかった場合は、12 時間後に期限切れになります。
#### HTML + JS
```javascript
const form = document.getElementById('payment-form');
const submitBtn = document.getElementById('submit');
const handleError = (error) => {
const messageContainer = document.querySelector('#error-message');
messageContainer.textContent = error.message;
submitBtn.disabled = false;
}
form.addEventListener('submit', async (event) => {
// We don't want to let default form submission happen here,
// which would refresh the page.
event.preventDefault();
// Prevent multiple form submissions
if (submitBtn.disabled) {
return;
}
// Disable form submission while loading
submitBtn.disabled = true;
// Trigger form validation and wallet collection
const {error: submitError} = await elements.submit();
if (submitError) {
handleError(submitError);
return;
}
// Create the ConfirmationToken using the details collected by the Payment Element
// and additional shipping information
const {error, confirmationToken} = await stripe.createConfirmationToken({
elements,
params: {
shipping: {
name: 'Jenny Rosen',
address: {
line1: '1234 Main Street',
city: 'San Francisco',
state: 'CA',
country: 'US',
postal_code: '94111',
},
},
return_url: 'https://example.com/order/123/complete'
}
});
if (error) {
// This point is only reached if there's an immediate error when
// creating the ConfirmationToken. Show the error to your customer (for example, payment details incomplete)
handleError(error);
return;
}
// Create the PaymentIntent
const res = await fetch("/create-confirm-intent", {
method: "POST",
headers: {"Content-Type": "application/json"},
body: JSON.stringify({
confirmationTokenId: confirmationToken.id,
}),
});
const data = await res.json();
// Handle any next actions or errors. See the Handle any next actions step for implementation.
handleServerResponse(data);
});
```
#### React
```jsx
import React, {useState} from 'react';
import {useStripe, useElements, PaymentElement} from '@stripe/react-stripe-js';
export default function CheckoutForm() {
const stripe = useStripe();
const elements = useElements();
const [errorMessage, setErrorMessage] = useState();
const [loading, setLoading] = useState(false);
const handleError = (error) => {
setLoading(false);
setErrorMessage(error.message);
}
const handleSubmit = async (event) => {
// We don't want to let default form submission happen here,
// which would refresh the page.
event.preventDefault();
if (!stripe) {
// Stripe.js hasn't yet loaded.
// Make sure to disable form submission until Stripe.js has loaded.
return;
}
setLoading(true);
// Trigger form validation and wallet collection
const {error: submitError} = await elements.submit();
if (submitError) {
handleError(submitError);
return;
}
// Create the ConfirmationToken using the details collected by the Payment Element
// and additional shipping information
const {error, confirmationToken} = await stripe.createConfirmationToken({
elements,
params: {
shipping: {
name: 'Jenny Rosen',
address: {
line1: '1234 Main Street',
city: 'San Francisco',
state: 'CA',
country: 'US',
postal_code: '94111',
},
}
}
});
if (error) {
// This point is only reached if there's an immediate error when
// creating the ConfirmationToken. Show the error to your customer (for example, payment details incomplete)
handleError(error);
return;
}
// Create the PaymentIntent
const res = await fetch("/create-confirm-intent", {
method: "POST",
headers: {"Content-Type": "application/json"},
body: JSON.stringify({
confirmationTokenId: confirmationToken.id,
}),
});
const data = await res.json();
// Handle any next actions or errors. See the Handle any next actions step for implementation.
handleServerResponse(data);
};
return (
);
}
```
## Optional: カスタムビジネスロジックを挿入する [サーバー側]
支払いを作成して確定する前に、カスタムのビジネスロジックを実行できます。顧客の支払いの詳細に関する情報は、作成した [ConfirmationToken](https://docs.stripe.com/api/confirmation_tokens.md) で確認できます。Stripe SDK を使用している場合は、ご使用の SDK が以下の最新バージョンであることを確認してください。
- `stripe-php v13.15.0`
- `stripe-go v76.22.0`
- `stripe-ruby v10.13.0`
- `stripe-java v24.21.0`
- `stripe-node v14.22.0`
- `stripe-python v8.8.0`
- `stripe-dotnet v43.20.0`
## 決済を作成して Stripe に送信する [サーバー側]
顧客が決済フォームを送信したときに、*PaymentIntent* (The Payment Intents API tracks the lifecycle of a customer checkout flow and triggers additional authentication steps when required by regulatory mandates, custom Radar fraud rules, or redirect-based payment methods) を使用して確認と決済のプロセスを円滑にします。サーバーで、`amount` と `currency` を指定して PaymentIntent を作成します。最新バージョンの API では、機能がデフォルトで有効になっているため、`automatic_payment_methods` パラメーターの指定が任意になりました。支払い方法は[ダッシュボード](https://dashboard.stripe.com/settings/payment_methods)で管理できます。Stripe は取引額、通貨、決済フローなどの要素に基づいて、適切な支払い方法が返されるように処理します。悪意のある顧客が金額を恣意的に選択できないようにするために、支払い金額はクライアント側ではなく、常に信頼できる環境であるサーバー側で指定してください。
クライアントから送信された ConfirmationToken を使用すると、1 件のリクエストで PaymentIntent を作成して確定できます。
```javascript
// Don't put any keys in code. See https://docs.stripe.com/keys-best-practices.
const stripe = require("stripe")("<>");
const express = require('express');
const app = express();
app.set('trust proxy', true);
app.use(express.json());
app.use(express.static("."));
app.post('/create-confirm-intent', async (req, res) => {
try {
const intent = await stripe.paymentIntents.create({
confirm: true,
amount: 1099,
currency: 'usd',
// In the latest version of the API, specifying the `automatic_payment_methods` parameter is optional because Stripe enables its functionality by default.
automatic_payment_methods: {enabled: true},
confirmation_token: req.body.confirmationTokenId, // the ConfirmationToken ID sent by your client
});
res.json({
client_secret: intent.client_secret,
status: intent.status
});
} catch (err) {
res.json({
error: err
})
}
});
app.listen(3000, () => {
console.log('Running on port 3000');
});
```
## 次のアクションを処理する [クライアント側]
3D セキュアによる認証や別のサイトへのリダイレクトなど、PaymentIntent で顧客による追加アクションが必要になる場合は、そのアクションを起動する必要があります。`stripe.handleNextAction` を使用して、顧客のアクションを処理して支払いを完了するための UI をトリガーします。
#### JavaScript
```javascript
const handleServerResponse = async (response) => {
if (response.error) {
// Show error from server on payment form
} else if (response.status === "requires_action") {
// Use Stripe.js to handle the required next action
const {
error,
paymentIntent
} = await stripe.handleNextAction({
clientSecret: response.clientSecret
});
if (error) {
// Show error from Stripe.js in payment form
} else {
// Actions handled, show success message
}
} else {
// No actions needed, show success message
}
}
```
## Optional: 支払い後のイベントを処理する
支払いが完了すると、Stripe は [payment_intent.succeeded](https://docs.stripe.com/api/events/types.md#event_types-payment_intent.succeeded) イベントを送信します。ダッシュボード、カスタム *Webhook* (A webhook is a real-time push notification sent to your application as a JSON payload through HTTPS requests)、またはパートナーソリューションを使用してこれらのイベントを受信し、また、顧客への注文確認メールの送信、データベースでの売上の記録、配送ワークフローの開始などのアクションを実行します。
クライアントからのコールバックを待つのではなく、これらのイベントをリッスンします。クライアント側では、コールバックが実行される前に顧客がブラウザーのウィンドウを閉じたり、アプリを終了したりする可能性があります。また、悪意を持つクライアントがレスポンスを不正操作する恐れもあります。非同期型のイベントをリッスンするよう構築済みのシステムを設定することで、これ以降はより多くの決済手段を簡単に受け付けられるようになります。[サポートされているすべての決済手段の違い](https://stripe.com/payments/payment-methods-guide)をご確認ください。
- **ダッシュボードでイベントを手動で処理する**
ダッシュボードを使用して、テスト決済を[ダッシュボードで表示](https://dashboard.stripe.com/test/payments)したり、メール領収書を送信したり、入金を処理したり、失敗した決済を再試行したりできます。
- **Custom Webhook を構築する**
[Build a custom webhook](https://docs.stripe.com/webhooks/handling-payment-events.md#build-your-own-webhook) handler to listen for events and build custom asynchronous payment flows. Test and debug your webhook integration locally with the Stripe CLI.
- **構築済みアプリを導入する**
パートナーアプリケーションを統合することで、[自動化](https://stripe.partners/?f_category=automation)や[マーケティング/セールス](https://stripe.partners/?f_category=marketing-and-sales)などの一般的なビジネスイベントを処理します。
# 支払い方法を設定する
> This is a 支払い方法を設定する for when platform is web and type is setup. View the full page at https://docs.stripe.com/payments/finalize-payments-on-the-server?platform=web&type=setup.
設定フローを使用すると、顧客にすぐに請求を行わずに、今後の決済に備えて支払い方法を設定することができます。この導入では、Payment Element を表示し、*SetupIntent* (The Setup Intents API lets you build dynamic flows for collecting payment method details for future payments. It tracks the lifecycle of a payment setup flow and can trigger additional authentication steps if required by law or by the payment method) を作成して、サーバーから設定を確定する、カスタムの決済フローを構築します。
## Stripe を設定する [サーバ側]
まず、[Stripe アカウントを作成する](https://dashboard.stripe.com/register)か[サインイン](https://dashboard.stripe.com/login)します。
アプリケーションから Stripe API にアクセスするには、Stripe の公式ライブラリを使用します。
#### Ruby
```bash
# Available as a gem
sudo gem install stripe
```
```ruby
# If you use bundler, you can add this line to your Gemfile
gem 'stripe'
```
## 支払い方法を有効にする
> この組み込みパスは、自動決済処理システム (ACSS) を使用する BLIK やプレオーソリデビットに対応していません。また、クライアント側からディファードインテントを作成する場合、PaymentIntent にはクライアント側のフローでサポートされていない顧客設定の [Account](https://docs.stripe.com/api/v2/core/accounts/object.md#v2_account_object-configuration-customer) または [Customer](https://docs.stripe.com/api/customers/object.md) オブジェクトが必要なため、動的決済手段で `customer_balance` を使用することはできません。`customer_balance` を使用するには、`Account` または `Customer` を使用してサーバー側で `PaymentIntent` を作成し、その `client_secret` をクライアントに返します。
[支払い方法の設定](https://dashboard.stripe.com/settings/payment_methods)を表示して、サポートする支払い方法を有効にします。*SetupIntent* (The Setup Intents API lets you build dynamic flows for collecting payment method details for future payments. It tracks the lifecycle of a payment setup flow and can trigger additional authentication steps if required by law or by the payment method) を作成するには、少なくとも 1 つは支払い方法を有効にする必要があります。
多くの顧客から決済を受け付けられるよう、Stripe では、カードやその他一般的な決済手段がデフォルトで有効になっていますが、ビジネスや顧客に適した追加の決済手段を有効にすることをお勧めします。プロダクトと決済手段のサポートについては[決済手段のサポート](https://docs.stripe.com/payments/payment-methods/payment-method-support.md)を、手数料については[料金体系ページ](https://stripe.com/pricing/local-payment-methods)をご覧ください。
## 支払いの詳細を収集する [クライアント側]
[Payment Element](https://docs.stripe.com/payments/payment-element.md) を使用して、iFrame で収集された支払い情報を HTTPS 接続で安全に Stripe に送信します。
> #### iFrame の競合
>
> Payment Element を別の iframe 内に配置しないでください。支払い確認のために別のページにリダイレクトする必要がある支払い方法と競合します。
構築済みのシステムを機能させるには、決済ページの URL の先頭を `https://` rather ではなく `http://` for にする必要があります。HTTPS を使用しなくても導入をテストできますが、本番環境で決済を受け付ける準備が整ったら、必ず HTTPS を [有効](https://docs.stripe.com/security/guide.md#tls) にしてください。
#### HTML + JS
### Stripe.js を設定する
Payment Element は Stripe.js の機能として自動的に使用できるようになります。決済ページに Stripe.js スクリプトを含めるには、HTML ファイルの `head` にスクリプトを追加します。常に js.stripe.com から Stripe.js を直接読み込むことにより、PCI 準拠が維持されます。スクリプトをバンドルに含めたり、そのコピーを自身でホストしたりしないでください。
```html
Checkout
```
購入ページで次の JavaScript を使用して、Stripe のインスタンスを作成します。
```javascript
// Set your publishable key: remember to change this to your live publishable key in production
// See your keys here: https://dashboard.stripe.com/apikeys
const stripe = Stripe('<>');
```
### Payment Element を決済ページに追加する
Payment Element を決済ページに配置する場所が必要です。決済フォームで、一意の ID を持つ空の DOM ノード (コンテナー) を作成します。
```html
```
フォームが読み込まれたら、モードを ‘setup’ に指定して Elements インスタンスを作成します。次に、支払い Element のインスタンスを作成し、コンテナーの DOM ノードにマウントします。
```javascript
const options = {mode: 'setup',
currency: 'usd',paymentMethodCreation: 'manual',
// Fully customizable with appearance API.
appearance: {/*...*/},
};
// Set up Stripe.js and Elements to use in checkout formconst elements = stripe.elements(options);
// Create and mount the Payment Element
const paymentElementOptions = { layout: 'accordion'};
const paymentElement = elements.create('payment', paymentElementOptions);
paymentElement.mount('#payment-element');
```
#### React
### Stripe.js を設定する
npm パブリックレジストリーから [React Stripe.js](https://www.npmjs.com/package/@stripe/react-stripe-js) と [Stripe.js ローダー](https://www.npmjs.com/package/@stripe/stripe-js)をインストールします。
```bash
npm install --save @stripe/react-stripe-js @stripe/stripe-js
```
### Elements プロバイダーを決済ページに追加して設定する
Payment Element コンポーネントを使用するには、決済ページコンポーネントを [Elements プロバイダー](https://docs.stripe.com/sdks/stripejs-react.md#elements-provider)でラップします。公開キーを使用して `loadStripe` を呼び出し、返された `Promise` と `mode: 'setup'` を `Elements` プロバイダーに渡します。
```jsx
import React from 'react';
import ReactDOM from 'react-dom';
import {Elements} from '@stripe/react-stripe-js';
import {loadStripe} from '@stripe/stripe-js';
import SetupForm from './SetupForm';
// Make sure to call `loadStripe` outside of a component’s render to avoid
// recreating the `Stripe` object on every render.
const stripePromise = loadStripe('<>');
function App() {
const options = {mode: 'setup',
currency: 'usd',paymentMethodCreation: 'manual',
// Fully customizable with appearance API.
appearance: {/*...*/},
};
return (
);
};
ReactDOM.render(, document.getElementById('root'));
```
### Payment Element コンポーネントを追加する
`PaymentElement` コンポーネントを使用して、フォームを構築します。
```jsx
import React from 'react';
import {PaymentElement} from '@stripe/react-stripe-js';
const SetupForm = () => {
return (
);
};
export default SetupForm;
```
Payment Element によって動的なフォームが表示され、顧客はここで支払い方法を選択できます。このフォームでは、顧客が選択した支払い方法で必要な決済の詳細のすべてが自動的に収集されます。
`Elements` プロバイダーを作成する際に [Appearance (デザイン) オブジェクト](https://docs.stripe.com/elements/appearance-api.md) を `options` に渡すことで、サイトのデザインに合わせて Payment Element をカスタマイズできます。
### 住所を収集
デフォルトでは、Payment Element は必要な請求住所の詳細のみを収集します。[税金の計算](https://docs.stripe.com/api/tax/calculations/create.md)、配送先情報を入力するなどの一部の動作では、顧客の完全な住所が必要です。次のように対応できます。
- [Address Element](https://docs.stripe.com/elements/address-element.md) を使用して、オートコンプリートとローカリゼーションの機能を利用して、顧客の完全な住所を収集します。これにより、最も正確な税金計算が可能になります。
- 独自のカスタムフォームを使用して住所の詳細を収集する。
## Optional: レイアウトをカスタマイズする [クライアント側]
決済フローインターフェイスに合わせて Payment Element のレイアウト (アコーディオンまたはタブ) をカスタマイズできます。各プロパティについて、詳細は [elements.create](https://docs.stripe.com/js/elements_object/create_payment_element#payment_element_create-options) をご覧ください。
#### アコーディオン
Payment Element の作成時にレイアウトの `type` と他のオプションプロパティーを渡すと、レイアウト機能の使用を開始できます。
```javascript
const paymentElement = elements.create('payment', {
layout: {
type: 'accordion',
defaultCollapsed: false,
radios: 'always',
spacedAccordionItems: false
}
});
```
#### タブ
### レイアウトを指定する
レイアウトの値を `tabs` に設定します。以下の例のようなその他のプロパティーを指定するオプションもあります。
```javascript
const paymentElement = elements.create('payment', {
layout: {
type: 'tabs',
defaultCollapsed: false,
}
});
```
以下の画像は、異なるレイアウト設定を適用した同一 Payment Element の表示を示しています。

Payment Element のレイアウト
## Optional: デザインをカスタマイズする [クライアント側]
これで、Payment Element がページに追加されました。次は、デザインに合わせて外観をカスタマイズできます。Payment Element のカスタマイズについての詳細は、[Elements Appearance API](https://docs.stripe.com/elements/appearance-api.md) をご覧ください。

Payment Element をカスタマイズする
## Optional: 顧客の支払い方法を保存および取得する
将来の利用に備えて顧客の決済手段を保存するように Payment Element を設定できます。このセクションでは、[決済手段の保存機能](https://docs.stripe.com/payments/save-customer-payment-methods.md)を導入する方法を説明しています。Payment Element で以下を実行できます。
- 買い手に支払い方法を保存することの同意を求める
- 買い手が同意した場合に支払い方法を保存する
- 将来の購入時に保存した支払い方法を買い手に表示する
- 買い手が紛失したカードまたは期限切れのカードを交換するときに[それらのカードを自動的に更新する](https://docs.stripe.com/payments/cards/overview.md#automatic-card-updates)

決済手段を保存します。

以前に保存した支払い方法を再利用します。
### Payment Element で支払い方法の保存機能を有効にする
顧客の ID を指定し (`customer` は `Customer` オブジェクト用、`customer_account` は顧客設定の `Account` オブジェクト用)、セッションで [payment_element](https://docs.stripe.com/api/customer_sessions/object.md#customer_session_object-components-payment_element) コンポーネントを有効にして、サーバー上に [CustomerSession](https://docs.stripe.com/api/customer_sessions/.md) を作成します。有効にする保存済み決済手段の [features](https://docs.stripe.com/api/customer_sessions/create.md#create_customer_session-components-payment_element-features) を設定します。たとえば、[payment_method_save](https://docs.stripe.com/api/customer_sessions/create.md#create_customer_session-components-payment_element-features-payment_method_save) を有効にすると、顧客が決済情報を保存して今後利用できるようにするチェックボックスが表示されます。
PaymentIntent または Checkout Session で `setup_future_usage` を指定すると、決済手段の保存に関するデフォルトの動作を上書きできます。これにより、顧客が明示的に保存を選択しなくても、今後の利用に備えて決済手段が自動的に保存されます。`setup_future_usage` を指定する場合は、同じ決済取引で `payment_method_save_usage` を設定しないでください。設定すると導入エラーが発生します。
> #### Accounts v2 API を使用した顧客の表現
>
> Accounts v2 API では、Connect ユーザーには一般提供され、その他の Stripe ユーザーには公開プレビューで提供されます。Accounts v2 プレビューの一部である場合は、コードで[プレビューバージョン](https://docs.stripe.com/api-v2-overview.md#sdk-and-api-versioning)を指定する必要があります。
>
> Accounts v2 プレビューへのアクセスをリクエストするには、
>
> ほとんどのユースケースでは、[Customer](https://docs.stripe.com/api/customers.md) オブジェクトを使用するのではなく、[顧客を顧客設定済みの Account オブジェクトとしてモデル化する](https://docs.stripe.com/accounts-v2/use-accounts-as-customers.md)ことをお勧めします。
#### Accounts v2
#### Ruby
```ruby
# Don't put any keys in code. See https://docs.stripe.com/keys-best-practices.
# Find your keys at https://dashboard.stripe.com/apikeys.
client = Stripe::StripeClient.new('<>')
post '/create-customer-session' do
customer_session = client.v1.customer_sessions.create({
customer_account: {{CUSTOMER_ACCOUNT_ID}},
components: {
payment_element: {
enabled: true,
features: {
payment_method_redisplay: 'enabled',
payment_method_save: 'enabled',
payment_method_save_usage: 'off_session',
payment_method_remove: 'enabled',
},
},
},
})
{
customer_session_client_secret: customer_session.client_secret
}.to_json
end
```
#### Customers v1
#### Ruby
```ruby
# Don't put any keys in code. See https://docs.stripe.com/keys-best-practices.
# Find your keys at https://dashboard.stripe.com/apikeys.
client = Stripe::StripeClient.new('<>')
post '/create-customer-session' do
customer_session = client.v1.customer_sessions.create({
customer: {{CUSTOMER_ID}},
components: {
payment_element: {
enabled: true,
features: {
payment_method_redisplay: 'enabled',
payment_method_save: 'enabled',
payment_method_save_usage: 'off_session',
payment_method_remove: 'enabled',
},
},
},
})
{
customer_session_client_secret: customer_session.client_secret
}.to_json
end
```
Elements インスタンスはその CustomerSession の *client secret* (A client secret is used with your publishable key to authenticate a request for a single object. Each client secret is unique to the object it's associated with) を使用して、顧客が保存した支払い方法にアクセスします。CustomerSession の作成時に適切に[エラーを処理](https://docs.stripe.com/error-handling.md)します。エラーが発生した場合、CustomerSession の client secret はオプションなので、Elements インスタンスに指定する必要はありません。
CustomerSession の client secret を使用して Elements インスタンスを作成します。次に、Elements インスタンスを使用して、Payment Element を作成します。
```javascript
// Create the CustomerSession and obtain its clientSecret
const res = await fetch("/create-customer-session", {
method: "POST"
});
const {
customer_session_client_secret: customerSessionClientSecret
} = await res.json();
const elementsOptions = {
mode: 'setup',
currency: 'usd',customerSessionClientSecret,
// Fully customizable with appearance API.
appearance: {/*...*/},
};
// Set up Stripe.js and Elements to use in checkout form, passing the client secret
// and CustomerSession's client secret obtained in a previous step
const elements = stripe.elements(elementsOptions);
// Create and mount the Payment Element
const paymentElementOptions = { layout: 'accordion'};
const paymentElement = elements.create('payment', paymentElementOptions);
paymentElement.mount('#payment-element');
```
ConfirmationToken の作成時に、顧客が支払いの詳細を保存するためのボックスにチェックマークを付けたかどうかに応じて、Stripe.js が ConfirmationToken の [setup_future_usage](https://docs.stripe.com/api/confirmation_tokens/object.md#confirmation_token_object-setup_future_usage) および [allow_redisplay](https://docs.stripe.com/api/payment_methods/object.md#payment_method_object-allow_redisplay) の設定をコントロールします。
### 保存した支払い方法の選択内容を検出する
保存した支払い方法を選択したときにコンテンツを動的に制御するには、Payment Element の `change` イベントをリッスンします。このイベントには、選択した支払い方法の情報が入力されています。
```javascript
paymentElement.on('change', function(event) {
if (event.value.payment_method) {
// Control dynamic content if a saved payment method is selected
}
})
```
## Optional: 追加の Elements オプション [クライアント側]
[Elements オブジェクト](https://docs.stripe.com/js/elements_object/create_without_intent)は、支払いの回収に影響する追加オプションを受け入れます。指定したオプションを基に Payment Element は、有効化した決済手段の中から利用可能なものを表示します。詳しくは、[決済手段のサポート](https://docs.stripe.com/payments/payment-methods/payment-method-support.md)をご覧ください。
指定する Elements オプション ( `captureMethod`、`setupFutureUsage`、`paymentMethodOptions` など) が、Intent の作成時および確定時に渡す同等のパラメーターと一致していることを確認してください。パラメーターが一致しないと、予期しない動作やエラーが発生する可能性があります。
| プロパティー | タイプ | 説明 | 必須 |
| ---------------------------- | -------------------------------------------------- | ---------------------------------------------------------------------------------------------------------------------------------------------------------------------------------------------------------------------------------------------------------------------------------------------------------------------------------------------------------------------------------------------------------------------------------------------------------------------------------------------------------------------------------------------------------------------------------------------------------------------------------------------------------------------------------------------------------------------------------------- | ------------------------------------ |
| `mode` | - `payment`
- `setup`
- `subscription` | Payment Element が *PaymentIntent* (The Payment Intents API tracks the lifecycle of a customer checkout flow and triggers additional authentication steps when required by regulatory mandates, custom Radar fraud rules, or redirect-based payment methods)、*SetupIntent* (The Setup Intents API lets you build dynamic flows for collecting payment method details for future payments. It tracks the lifecycle of a payment setup flow and can trigger additional authentication steps if required by law or by the payment method)、または*サブスクリプション* (A Subscription represents the product details associated with the plan that your customer subscribes to. Allows you to charge the customer on a recurring basis)で使用されているかどうかを示します。 | はい |
| `currency` | `string` | 顧客に請求する金額の通貨。 | はい |
| `amount` | `number` | Apple Pay、Google Pay、または BNPL の UI で示される、顧客に請求する金額。 | `payment` および `subscription` のモードの場合 |
| `setupFutureUsage` | - `off_session`
- `on_session` | Payment Element によって収集された決済の詳細を使用して、今後の決済を行う意図を示します。 | いいえ |
| `captureMethod` | - `automatic`
- `automatic_async`
- `manual` | 顧客の口座から売上をキャプチャーするタイミングを管理します。 | いいえ |
| `onBehalfOf` | `string` | Connect のみ。取引に関する金銭的責任を負う Stripe アカウント ID。このオプションが実装に関連するかを判断するには、[ユースケース](https://docs.stripe.com/connect/charges.md)をご覧ください。 | いいえ |
| `paymentMethodTypes` | `string[]` | 表示する決済手段タイプのリスト。この属性を省略して、[Stripe ダッシュボード](https://dashboard.stripe.com/settings/payment_methods)で決済手段を管理できます。 | いいえ |
| `paymentMethodConfiguration` | `string` | [Stripe ダッシュボード](https://dashboard.stripe.com/settings/payment_methods)で決済手段を管理するときに使用する[決済手段の設定](https://docs.stripe.com/api/payment_method_configurations.md)。指定しない場合は、既定の構成が使用されます。 | いいえ |
| `paymentMethodCreation` | `manual` | [stripe.createPaymentMethod](https://docs.stripe.com/js/payment_methods/create_payment_method_elements) を使用して、Elements インスタンスから PaymentMethods が作成されるようにします。 | いいえ |
| `paymentMethodOptions` | `{us_bank_account: {verification_method: string}}` | `us_bank_account` 決済手段の確認オプション。[Payment Intents](https://docs.stripe.com/api/payment_intents/create.md#create_payment_intent-payment_method_options-us_bank_account-verification_method) と同じ確認手段を受け入れます。 | いいえ |
| `paymentMethodOptions` | `{card: {installments: {enabled: boolean}}}` | [Stripe ダッシュボード](https://dashboard.stripe.com/settings/payment_methods)で決済手段を管理していないときに、カード分割払いプランの選択 UI を手動で有効化できるようにします。`mode='payment'` を設定し、「さらに」`paymentMethodTypes` を明示的に指定する必要があります。それ以外の場合は、エラーが発生します。`paymentMethodCreation='manual'` とは互換性がありません。 | いいえ |
| `paymentMethodOptions` | `{[paymentMethod]: {setup_future_usage: string}}` | 再利用をサポートする決済手段にのみ `setup_future_usage` を指定できます。`mode` が `payment` の場合にのみ適用されます。各決済手段の値は、確定時に PaymentIntent の対応する `payment_method_options[paymentMethod][setup_future_usage]` と一致している必要があります。サポートされている決済手段と値については、[Stripe.js リファレンス](https://docs.stripe.com/js/elements_object/create_without_intent#stripe_elements_no_intent-options-paymentMethodOptions)を参照してください。 | いいえ |
## 顧客を作成する [サーバー側]
将来の決済に備えて決済手段を設定するには、顧客を表すオブジェクトに関連付ける必要があります。顧客がアカウントを作成したとき、または初めて取引したときに、Accounts v2 API を使用して顧客設定の [Account](https://docs.stripe.com/api/v2/core/accounts/create.md) オブジェクト、または Customers API を使用して [Customer](https://docs.stripe.com/api/customers/create.md) オブジェクトを作成します。
> #### Accounts v2 API を使用した顧客の表現
>
> Accounts v2 API では、Connect ユーザーには一般提供され、その他の Stripe ユーザーには公開プレビューで提供されます。Accounts v2 プレビューの一部である場合は、コードで[プレビューバージョン](https://docs.stripe.com/api-v2-overview.md#sdk-and-api-versioning)を指定する必要があります。
>
> Accounts v2 プレビューへのアクセスをリクエストするには、
>
> ほとんどのユースケースでは、[Customer](https://docs.stripe.com/api/customers.md) オブジェクトを使用するのではなく、[顧客を顧客設定済みの Account オブジェクトとしてモデル化する](https://docs.stripe.com/accounts-v2/use-accounts-as-customers.md)ことをお勧めします。
#### Accounts v2
```curl
curl -X POST https://api.stripe.com/v2/core/accounts \
-H "Authorization: Bearer <>" \
-H "Stripe-Version: 2026-04-22.preview" \
--json '{
"contact_email": "jenny.rosen@example.com",
"display_name": "Jenny Rosen",
"identity": {
"individual": {
"given_name": "Jenny Rosen",
"address": {
"city": "San Francisco",
"country": "US",
"line1": "123 Main Street",
"postal_code": "94605",
"state": "CA"
}
}
},
"configuration": {
"customer": {
"capabilities": {
"automatic_indirect_tax": {
"requested": true
}
},
"shipping": {
"address": {
"city": "San Francisco",
"country": "US",
"line1": "123 Main Street",
"postal_code": "94605",
"state": "CA"
}
}
}
},
"include": [
"configuration.customer",
"identity"
]
}'
```
#### Customers v1
```curl
curl https://api.stripe.com/v1/customers \
-u "<>:" \
--data-urlencode "email=jenny.rosen@example.com" \
-d "name=Jenny Rosen" \
-d "shipping[address][city]=San Francisco" \
-d "shipping[address][country]=US" \
-d "shipping[address][line1]=123 Main Street" \
-d "shipping[address][postal_code]=9460" \
-d "shipping[address][state]=CA" \
-d "shipping[name]=Jenny Rosen" \
-d "address[city]=San Francisco" \
-d "address[country]=US" \
-d "address[line1]=123 Main Street" \
-d "address[postal_code]=9460" \
-d "address[state]=CA"
```
## ConfirmationToken を作成する [クライアント側]
> #### レガシーの実装で createPaymentMethod を使用する
>
> レガシーの実装を使用している場合は、サーバーで支払いを確定するために `stripe.createPaymentMethod` の情報を使用することがあります。このガイドに従って [Confirmation Tokens に移行する](https://docs.stripe.com/payments/payment-element/migration-ct.md)ことをお勧めしますが、以前のドキュメントを確認して[サーバーで支払いを確定する](https://docs.stripe.com/payments/finalize-payments-on-the-server-legacy.md)こともできます。
顧客が決済フォームを送信すると、[stripe.createConfirmationToken](https://docs.stripe.com/js/confirmation_tokens/create_confirmation_token) が呼び出され *ConfirmationToken* (ConfirmationTokens help capture data from your client, such as your customer's payment instruments and shipping address, and are used to confirm a PaymentIntent or SetupIntent) を作成し、決済の確定前に追加の検証ロジックまたはビジネスロジックをサーバーに送信します。
SetupIntent を確定すると *PaymentMethod* (PaymentMethods represent your customer's payment instruments, used with the Payment Intents or Setup Intents APIs) が生成されます。SetupIntent 確認レスポンスから [payment_method](https://docs.stripe.com/api/setup_intents/object.md#setup_intent_object-payment_method) ID を表示できます。
> 作成された ConfirmationToken をすぐに使用して、SetupIntent を確定する必要があります。使用しなかった場合は、12 時間後に期限切れになります。
#### HTML + JS
```javascript
const form = document.getElementById('payment-form');
const submitBtn = document.getElementById('submit');
const handleError = (error) => {
const messageContainer = document.querySelector('#error-message');
messageContainer.textContent = error.message;
submitBtn.disabled = false;
}
form.addEventListener('submit', async (event) => {
// We don't want to let default form submission happen here,
// which would refresh the page.
event.preventDefault();
// Prevent multiple form submissions
if (submitBtn.disabled) {
return;
}
// Disable form submission while loading
submitBtn.disabled = true;
// Trigger form validation and wallet collection
const {error: submitError} = await elements.submit();
if (submitError) {
handleError(submitError);
return;
}
// Create the ConfirmationToken using the details collected by the Payment Element
// and additional shipping information
const {error, confirmationToken} = await stripe.createConfirmationToken({
elements,
params: {
return_url: 'https://example.com/order/123/complete'
}
});
if (error) {
// This point is only reached if there's an immediate error when
// creating the ConfirmationToken. Show the error to your customer (for example, payment details incomplete)
handleError(error);
return;
}
// Create the SetupIntent
const res = await fetch("/create-confirm-intent", {
method: "POST",
headers: {"Content-Type": "application/json"},
body: JSON.stringify({
confirmationTokenId: confirmationToken.id,
}),
});
const data = await res.json();
// Handle any next actions or errors. See the Handle any next actions step for implementation.
handleServerResponse(data);
});
```
#### React
```jsx
import React, {useState} from 'react';
import {useStripe, useElements, PaymentElement} from '@stripe/react-stripe-js';
export default function CheckoutForm() {
const stripe = useStripe();
const elements = useElements();
const [errorMessage, setErrorMessage] = useState();
const [loading, setLoading] = useState(false);
const handleError = (error) => {
setLoading(false);
setErrorMessage(error.message);
}
const handleSubmit = async (event) => {
// We don't want to let default form submission happen here,
// which would refresh the page.
event.preventDefault();
if (!stripe) {
// Stripe.js hasn't yet loaded.
// Make sure to disable form submission until Stripe.js has loaded.
return;
}
setLoading(true);
// Trigger form validation and wallet collection
const {error: submitError} = await elements.submit();
if (submitError) {
handleError(submitError);
return;
}
// Create the ConfirmationToken using the details collected by the Payment Element
// and additional shipping information
const {error, confirmationToken} = await stripe.createConfirmationToken({
elements,
params: {
shipping: {
name: 'Jenny Rosen',
address: {
line1: '1234 Main Street',
city: 'San Francisco',
state: 'CA',
country: 'US',
postal_code: '94111',
},
}
}
});
if (error) {
// This point is only reached if there's an immediate error when
// creating the ConfirmationToken. Show the error to your customer (for example, payment details incomplete)
handleError(error);
return;
}
// Create the SetupIntent
const res = await fetch("/create-confirm-intent", {
method: "POST",
headers: {"Content-Type": "application/json"},
body: JSON.stringify({
confirmationTokenId: confirmationToken.id,
}),
});
const data = await res.json();
// Handle any next actions or errors. See the Handle any next actions step for implementation.
handleServerResponse(data);
};
return (
);
}
```
## Stripe に支払いの詳細を送信する [サーバー側]
顧客が決済フォームを送信したときに、サーバー側で *SetupIntent* (The Setup Intents API lets you build dynamic flows for collecting payment method details for future payments. It tracks the lifecycle of a payment setup flow and can trigger additional authentication steps if required by law or by the payment method) を作成します。支払い方法は[ダッシュボード](https://dashboard.stripe.com/settings/payment_methods)で管理できます。Stripe は取引額、通貨、決済フローなどの要素に基づいて、適切な支払い方法が返されるように処理します。
クライアントから送信された PaymentMethod を使用して、1 件のリクエストで SetupIntent を作成して確定できます。
```javascript
// Don't put any keys in code. See https://docs.stripe.com/keys-best-practices.
const stripe = require('stripe')('<>');
const express = require('express');
const app = express();
app.set('trust proxy', true);
app.use(express.json());
app.use(express.static("."));
app.post('/create-confirm-intent', async (req, res) => {
try {
const intent = await stripe.setupIntents.create({
confirm: true,
customer: req.cookies['customer'], // the Customer ID you previously created
// In the latest version of the API, specifying the `automatic_payment_methods` parameter is optional because Stripe enables its functionality by default.
automatic_payment_methods: {enabled: true},
confirmation_token: req.body.confirmationTokenId
});
res.json({
client_secret: intent.client_secret,
status: intent.status
});
} catch (err) {
res.json({
error: err
})
}
});
app.listen(3000, () => {
console.log('Running on port 3000');
});
```
## 次のアクションを処理する [クライアント側]
3D セキュアによる認証や別のサイトへのリダイレクトなど、SetupIntent で顧客による追加アクションが必要になる場合は、そのアクションを起動する必要があります。`stripe.handleNextAction` を使用して、顧客のアクションを処理して設定を完了するための UI をトリガーします。
#### JavaScript
```javascript
const handleServerResponse = async (response) => {
if (response.error) {
// Show error from server in payment setup form
} else if (response.status === "requires_action") {
// Use Stripe.js to handle the required next action
const {
error,
setupIntent
} = await stripe.handleNextAction({
clientSecret: response.clientSecret
});
if (error) {
// Show error from Stripe.js in payment setup form
} else {
// Actions handled, show success message
}
} else {
// No actions needed, show success message
}
}
```
## 保存された支払い方法に後で請求する [サーバー側]
> `bancontact` と `ideal` は、デフォルトでは 1 回限りの支払い方法です。以降も使用できるように設定すると、再利用可能な支払い方法タイプ `sepa_debit` が生成されます。このため、保存された支払い方法を照会するには `sepa_debit` を使用する必要があります。
> #### 法令遵守
>
> 顧客の支払いの詳細を保存する際、お客様は適用されるすべての法律、規制、ネットワークの規則に準拠する責任があります。将来の購入に備えて顧客に過去の決済手段を提供する際は、必ず、特定の将来の使用に備えて決済手段の詳細を保存することについての同意を顧客から収集した決済手段をリストアップします。顧客に関連付けられた決済手段のうち、将来の購入用の保存済みの決済手段として顧客に提示できるものと提示できないものを区別するには、[allow_redisplay](https://docs.stripe.com/api/payment_methods/object.md#payment_method_object-allow_redisplay) パラメーターを使用します。
請求する決済手段を見つけるには、顧客に関連付けられている決済手段を一覧表示します。この例ではカードを一覧表示していますが、サポートされている任意の [type](https://docs.stripe.com/api/payment_methods/object.md#payment_method_object-type) を一覧表示できます。
> #### Accounts v2 API を使用した顧客の表現
>
> Accounts v2 API では、Connect ユーザーには一般提供され、その他の Stripe ユーザーには公開プレビューで提供されます。Accounts v2 プレビューの一部である場合は、コードで[プレビューバージョン](https://docs.stripe.com/api-v2-overview.md#sdk-and-api-versioning)を指定する必要があります。
>
> Accounts v2 プレビューへのアクセスをリクエストするには、
>
> ほとんどのユースケースでは、[Customer](https://docs.stripe.com/api/customers.md) オブジェクトを使用するのではなく、[顧客を顧客設定済みの Account オブジェクトとしてモデル化する](https://docs.stripe.com/accounts-v2/use-accounts-as-customers.md)ことをお勧めします。
#### Accounts v2
```curl
curl -G https://api.stripe.com/v1/payment_methods \
-u "<>:" \
-d "customer_account={{CUSTOMERACCOUNT_ID}}" \
-d type=card
```
#### Customers v1
```curl
curl -G https://api.stripe.com/v1/payment_methods \
-u "<>:" \
-d "customer={{CUSTOMER_ID}}" \
-d type=card
```
顧客に *オフセッション* (A payment is described as off-session if it occurs without the direct involvement of the customer, using previously-collected payment information) で請求する準備ができたら、`Customer`または顧客設定の`Account`の ID と `PaymentMethod` ID を使用して、決済の金額と通貨を指定した `PaymentIntent` を作成します。オフセッション決済を行うには、他にもいくつかのパラメーターを設定します。
- 顧客が決済フローにおらず、カード発行会社や銀行などのパートナーからの認証リクエストに対応できないことを示すには、[off_session](https://docs.stripe.com/api/payment_intents/create.md#create_payment_intent-off_session) を true に設定します。決済フロー中にパートナー (カード発行会社や銀行など) が認証をリクエストした場合、Stripe は以前の *オンセッション* (A payment is described as on-session if it occurs while the customer is actively in your checkout flow and able to authenticate the payment method) 取引の顧客情報を使用して免除をリクエストします。免除の条件が満たされない場合、`PaymentIntent` がエラーを返すことがあります。
- [confirm](https://docs.stripe.com/api/payment_intents/create.md#create_payment_intent-confirm) を true に設定すると、`PaymentIntent` の作成時に即座に確定がトリガーされる。
- [payment_method](https://docs.stripe.com/api.md#create_payment_intent-payment_method) を `PaymentMethod` の ID に設定します。
- 導入で顧客をどのように表すかに応じて、[customer_account](https://docs.stripe.com/api/payment_intents/create.md#create_payment_intent-customer_account) を顧客設定の `Account` の ID に設定するか、[customer](https://docs.stripe.com/api.md#create_payment_intent-customer) を `Customer` の ID に設定します。
#### Accounts v2
```curl
curl https://api.stripe.com/v1/payment_intents \
-u "<>:" \
-d amount=1099 \
-d currency=usd \
-d "automatic_payment_methods[enabled]=true" \
-d "customer_account={{CUSTOMERACCOUNT_ID}}" \
-d payment_method={{PAYMENT_METHOD_ID}} \
--data-urlencode "return_url=https://example.com/order/123/complete" \
-d off_session=true \
-d confirm=true
```
#### Customers v1
```curl
curl https://api.stripe.com/v1/payment_intents \
-u "<>:" \
-d amount=1099 \
-d currency=usd \
-d "automatic_payment_methods[enabled]=true" \
-d "customer={{CUSTOMER_ID}}" \
-d payment_method={{PAYMENT_METHOD_ID}} \
--data-urlencode "return_url=https://example.com/order/123/complete" \
-d off_session=true \
-d confirm=true
```
支払いが失敗すると、リクエストも 402 HTTP ステータスコードで失敗し、PaymentIntent のステータスが *requires\_payment\_method* (This status appears as "requires_source" in API versions before 2019-02-11) になります。アプリケーションに戻って支払いを完了するよう (メールやアプリ内通知を送信するなどして) 顧客に通知する必要があります。
Stripe API ライブラリから発生した[エラー](https://docs.stripe.com/api/errors/handling.md)のコードを確認します。支払いが [authentication_required](https://docs.stripe.com/declines/codes.md) 拒否コードで失敗した場合には、拒否された PaymentIntent の client secret を confirmPayment とともに使用し、顧客が支払いを認証できるようにします。
```javascript
const form = document.getElementById('payment-form');
form.addEventListener('submit', async (event) => {
event.preventDefault();
const {error} = await stripe.confirmPayment({
// The client secret of the PaymentIntent
clientSecret,
confirmParams: {
return_url: 'https://example.com/order/123/complete',
},
});
if (error) {
// This point will only be reached if there is an immediate error when
// confirming the payment. Show error to your customer (for example, payment
// details incomplete)
const messageContainer = document.querySelector('#error-message');
messageContainer.textContent = error.message;
} else {
// Your customer will be redirected to your `return_url`. For some payment
// methods like iDEAL, your customer will be redirected to an intermediate
// site first to authorize the payment, then redirected to the `return_url`.
}
});
```
> `stripe.confirmPayment` の完了には数秒かかる場合があります。この間、フォームが再送信されないように無効化し、スピナーのような待機中のインジケーターを表示します。エラーが発生した場合は、それを顧客に表示し、フォームを再度有効化し、待機中のインジケーターを非表示にします。支払いの完了のために顧客による認証などの追加の手順が必要な場合は、Stripe.js がそのプロセスをステップごとに顧客に提示します。
利用可能額不足など、他の理由で支払いが失敗した場合、新しい支払い方法を入力する支払いページを顧客に送信します。既存の PaymentIntent を再利用し、新しい支払いの詳細を利用して支払いを再試行できます。
# サブスクリプションを作成する
> This is a サブスクリプションを作成する for when platform is web and type is subscription. View the full page at https://docs.stripe.com/payments/finalize-payments-on-the-server?platform=web&type=subscription.
*サブスクリプション*は、ユーザーが商品を利用するために継続支払いを行う料金体系モデルです。この導入ガイドでは、Payment Element をレンダリングしてサブスクリプションを作成し、サーバーからサブスクリプションを確定するカスタム決済フローの作成について説明します。
## Stripe を設定する [サーバ側]
まず、[Stripe アカウントを作成する](https://dashboard.stripe.com/register)か[サインイン](https://dashboard.stripe.com/login)します。
アプリケーションから Stripe API にアクセスするには、Stripe の公式ライブラリを使用します。
#### Ruby
```bash
# Available as a gem
sudo gem install stripe
```
```ruby
# If you use bundler, you can add this line to your Gemfile
gem 'stripe'
```
## 支払い方法を有効にする
> この組み込みパスは、自動決済処理システム (ACSS) を使用する BLIK やプレオーソリデビットに対応していません。また、クライアント側からディファードインテントを作成する場合、PaymentIntent にはクライアント側のフローでサポートされていない顧客設定の [Account](https://docs.stripe.com/api/v2/core/accounts/object.md#v2_account_object-configuration-customer) または [Customer](https://docs.stripe.com/api/customers/object.md) オブジェクトが必要なため、動的決済手段で `customer_balance` を使用することはできません。`customer_balance` を使用するには、`Account` または `Customer` を使用してサーバー側で `PaymentIntent` を作成し、その `client_secret` をクライアントに返します。
[支払い方法の設定](https://dashboard.stripe.com/settings/payment_methods)を表示して、サポートする支払い方法を有効にします。*PaymentIntent* (The Payment Intents API tracks the lifecycle of a customer checkout flow and triggers additional authentication steps when required by regulatory mandates, custom Radar fraud rules, or redirect-based payment methods) を作成するには、少なくとも 1 つは支払い方法を有効にする必要があります。
多くの顧客から決済を受け付けられるよう、Stripe では、カードやその他一般的な決済手段がデフォルトで有効になっていますが、ビジネスや顧客に適した追加の決済手段を有効にすることをお勧めします。プロダクトと決済手段のサポートについては[決済手段のサポート](https://docs.stripe.com/payments/payment-methods/payment-method-support.md)を、手数料については[料金体系ページ](https://stripe.com/pricing/local-payment-methods)をご覧ください。
サブスクリプションの場合、[請求書設定](https://dashboard.stripe.com/settings/billing/invoice)と、サポートされる支払い方法を設定します。不一致や誤りがないように、請求書設定は Payment Element 設定と一致している必要があります。
## 支払いの詳細を収集する [クライアント側]
[Payment Element](https://docs.stripe.com/payments/payment-element.md) を使用して、iFrame で収集された支払い情報を HTTPS 接続で安全に Stripe に送信します。
> #### iFrame の競合
>
> Payment Element を別の iframe 内に配置しないでください。支払い確認のために別のページにリダイレクトする必要がある支払い方法と競合します。
構築済みのシステムを機能させるには、決済ページの URL の先頭を `https://` rather ではなく `http://` for にする必要があります。HTTPS を使用しなくても導入をテストできますが、本番環境で決済を受け付ける準備が整ったら、必ず HTTPS を [有効](https://docs.stripe.com/security/guide.md#tls) にしてください。
#### HTML + JS
### Stripe.js を設定する
Payment Element は Stripe.js の機能として自動的に使用できるようになります。決済ページに Stripe.js スクリプトを含めるには、HTML ファイルの `head` にスクリプトを追加します。常に js.stripe.com から Stripe.js を直接読み込むことにより、PCI 準拠が維持されます。スクリプトをバンドルに含めたり、そのコピーを自身でホストしたりしないでください。
```html
Checkout
```
購入ページで次の JavaScript を使用して、Stripe のインスタンスを作成します。
```javascript
// Set your publishable key: remember to change this to your live publishable key in production
// See your keys here: https://dashboard.stripe.com/apikeys
const stripe = Stripe('<>');
```
### Payment Element を決済ページに追加する
Payment Element を決済ページに配置する場所が必要です。決済フォームで、一意の ID を持つ空の DOM ノード (コンテナー) を作成します。
```html
```
フォームが読み込まれたら、モード、金額、通貨を指定して Elements インスタンスを作成します。これらの値から、Element が顧客に表示する支払い方法が決定されます。
次に、Payment Element のインスタンスを作成し、コンテナーの DOM ノードにマウントします。
> Payment Element に渡される `amount` は、顧客がすぐに請求される内容を反映している必要があります。サブスクリプションの初回の分割払いのほか、サブスクリプションに[トライアル期間](https://docs.stripe.com/billing/subscriptions/trials.md)が設定されている場合には `0` が示される場合があります。
```javascript
const options = {mode:'subscription',
amount: 1099,
currency: 'usd',paymentMethodCreation: 'manual',
// Fully customizable with appearance API.
appearance: {/*...*/},
};
// Set up Stripe.js and Elements to use in checkout formconst elements = stripe.elements(options);
// Create and mount the Payment Element
const paymentElementOptions = { layout: 'accordion'};
const paymentElement = elements.create('payment', paymentElementOptions);
paymentElement.mount('#payment-element');
```
#### React
### Stripe.js を設定する
npm パブリックレジストリーから [React Stripe.js](https://www.npmjs.com/package/@stripe/react-stripe-js) と [Stripe.js ローダー](https://www.npmjs.com/package/@stripe/stripe-js)をインストールします。
```bash
npm install --save @stripe/react-stripe-js @stripe/stripe-js
```
### Elements プロバイダーを決済ページに追加して設定する
Payment Element コンポーネントを使用するには、購入ページコンポーネントを [Elements プロバイダー](https://docs.stripe.com/sdks/stripejs-react.md#elements-provider)でラップします。公開可能キーを使用して `loadStripe` を呼び出し、返された `Promise` を `Elements` プロバイダーに渡します。
`Elements` プロバイダーは、モード、金額、通貨も受け付けます。これらの値により、顧客に表示される支払い方法が決定されます。
> Payment Element に渡される `amount` は、顧客がすぐに請求される内容を反映している必要があります。サブスクリプションの初回の分割払いのほか、サブスクリプションに[トライアル期間](https://docs.stripe.com/billing/subscriptions/trials.md)が設定されている場合には `0` が示される場合があります。
```jsx
import React from 'react';
import ReactDOM from 'react-dom';
import {Elements} from '@stripe/react-stripe-js';
import {loadStripe} from '@stripe/stripe-js';
import CheckoutForm from './CheckoutForm';
// Make sure to call `loadStripe` outside of a component’s render to avoid
// recreating the `Stripe` object on every render.
const stripePromise = loadStripe('<>');
function App() {
const options = {mode:'subscription',
amount: 1099,
currency: 'usd',paymentMethodCreation: 'manual',
// Fully customizable with appearance API.
appearance: {/*...*/},
};
return (
);
};
ReactDOM.render(, document.getElementById('root'));
```
### Payment Element コンポーネントを追加する
`PaymentElement` コンポーネントを使用して、フォームを構築します。
```jsx
import React from 'react';
import {PaymentElement} from '@stripe/react-stripe-js';
const CheckoutForm = () => {
return (
);
};
export default CheckoutForm;
```
Payment Element によって動的なフォームが表示され、顧客はここで支払い方法を選択できます。このフォームでは、顧客が選択した支払い方法で必要な決済の詳細のすべてが自動的に収集されます。
`Elements` プロバイダーを作成する際に [Appearance (デザイン) オブジェクト](https://docs.stripe.com/elements/appearance-api.md) を `options` に渡すことで、サイトのデザインに合わせて Payment Element をカスタマイズできます。
### 住所を収集
デフォルトでは、Payment Element は必要な請求住所の詳細のみを収集します。[税金の計算](https://docs.stripe.com/api/tax/calculations/create.md)、配送先情報を入力するなどの一部の動作では、顧客の完全な住所が必要です。次のように対応できます。
- [Address Element](https://docs.stripe.com/elements/address-element.md) を使用して、オートコンプリートとローカリゼーションの機能を利用して、顧客の完全な住所を収集します。これにより、最も正確な税金計算が可能になります。
- 独自のカスタムフォームを使用して住所の詳細を収集する。
## Optional: レイアウトをカスタマイズする [クライアント側]
決済フローインターフェイスに合わせて Payment Element のレイアウト (アコーディオンまたはタブ) をカスタマイズできます。各プロパティについて、詳細は [elements.create](https://docs.stripe.com/js/elements_object/create_payment_element#payment_element_create-options) をご覧ください。
#### アコーディオン
Payment Element の作成時にレイアウトの `type` と他のオプションプロパティーを渡すと、レイアウト機能の使用を開始できます。
```javascript
const paymentElement = elements.create('payment', {
layout: {
type: 'accordion',
defaultCollapsed: false,
radios: 'always',
spacedAccordionItems: false
}
});
```
#### タブ
### レイアウトを指定する
レイアウトの値を `tabs` に設定します。以下の例のようなその他のプロパティーを指定するオプションもあります。
```javascript
const paymentElement = elements.create('payment', {
layout: {
type: 'tabs',
defaultCollapsed: false,
}
});
```
以下の画像は、異なるレイアウト設定を適用した同一 Payment Element の表示を示しています。

Payment Element のレイアウト
## Optional: デザインをカスタマイズする [クライアント側]
これで、Payment Element がページに追加されました。次は、デザインに合わせて外観をカスタマイズできます。Payment Element のカスタマイズについての詳細は、[Elements Appearance API](https://docs.stripe.com/elements/appearance-api.md) をご覧ください。

Payment Element をカスタマイズする
## Optional: 顧客の支払い方法を保存および取得する
将来の利用に備えて顧客の決済手段を保存するように Payment Element を設定できます。このセクションでは、[決済手段の保存機能](https://docs.stripe.com/payments/save-customer-payment-methods.md)を導入する方法を説明しています。Payment Element で以下を実行できます。
- 買い手に支払い方法を保存することの同意を求める
- 買い手が同意した場合に支払い方法を保存する
- 将来の購入時に保存した支払い方法を買い手に表示する
- 買い手が紛失したカードまたは期限切れのカードを交換するときに[それらのカードを自動的に更新する](https://docs.stripe.com/payments/cards/overview.md#automatic-card-updates)

決済手段を保存します。

以前に保存した支払い方法を再利用します。
### Payment Element で支払い方法の保存機能を有効にする
顧客の ID を指定し (`customer` は `Customer` オブジェクト用、`customer_account` は顧客設定の `Account` オブジェクト用)、セッションで [payment_element](https://docs.stripe.com/api/customer_sessions/object.md#customer_session_object-components-payment_element) コンポーネントを有効にして、サーバー上に [CustomerSession](https://docs.stripe.com/api/customer_sessions/.md) を作成します。有効にする保存済み決済手段の [features](https://docs.stripe.com/api/customer_sessions/create.md#create_customer_session-components-payment_element-features) を設定します。たとえば、[payment_method_save](https://docs.stripe.com/api/customer_sessions/create.md#create_customer_session-components-payment_element-features-payment_method_save) を有効にすると、顧客が決済情報を保存して今後利用できるようにするチェックボックスが表示されます。
PaymentIntent または Checkout Session で `setup_future_usage` を指定すると、決済手段の保存に関するデフォルトの動作を上書きできます。これにより、顧客が明示的に保存を選択しなくても、今後の利用に備えて決済手段が自動的に保存されます。`setup_future_usage` を指定する場合は、同じ決済取引で `payment_method_save_usage` を設定しないでください。設定すると導入エラーが発生します。
> #### Accounts v2 API を使用した顧客の表現
>
> Accounts v2 API では、Connect ユーザーには一般提供され、その他の Stripe ユーザーには公開プレビューで提供されます。Accounts v2 プレビューの一部である場合は、コードで[プレビューバージョン](https://docs.stripe.com/api-v2-overview.md#sdk-and-api-versioning)を指定する必要があります。
>
> Accounts v2 プレビューへのアクセスをリクエストするには、
>
> ほとんどのユースケースでは、[Customer](https://docs.stripe.com/api/customers.md) オブジェクトを使用するのではなく、[顧客を顧客設定済みの Account オブジェクトとしてモデル化する](https://docs.stripe.com/accounts-v2/use-accounts-as-customers.md)ことをお勧めします。
#### Accounts v2
#### Ruby
```ruby
# Don't put any keys in code. See https://docs.stripe.com/keys-best-practices.
# Find your keys at https://dashboard.stripe.com/apikeys.
client = Stripe::StripeClient.new('<>')
post '/create-customer-session' do
customer_session = client.v1.customer_sessions.create({
customer_account: {{CUSTOMER_ACCOUNT_ID}},
components: {
payment_element: {
enabled: true,
features: {
payment_method_redisplay: 'enabled',
payment_method_save: 'enabled',
payment_method_save_usage: 'off_session',
payment_method_remove: 'enabled',
},
},
},
})
{
customer_session_client_secret: customer_session.client_secret
}.to_json
end
```
#### Customers v1
#### Ruby
```ruby
# Don't put any keys in code. See https://docs.stripe.com/keys-best-practices.
# Find your keys at https://dashboard.stripe.com/apikeys.
client = Stripe::StripeClient.new('<>')
post '/create-customer-session' do
customer_session = client.v1.customer_sessions.create({
customer: {{CUSTOMER_ID}},
components: {
payment_element: {
enabled: true,
features: {
payment_method_redisplay: 'enabled',
payment_method_save: 'enabled',
payment_method_save_usage: 'off_session',
payment_method_remove: 'enabled',
},
},
},
})
{
customer_session_client_secret: customer_session.client_secret
}.to_json
end
```
Elements インスタンスはその CustomerSession の *client secret* (A client secret is used with your publishable key to authenticate a request for a single object. Each client secret is unique to the object it's associated with) を使用して、顧客が保存した支払い方法にアクセスします。CustomerSession の作成時に適切に[エラーを処理](https://docs.stripe.com/error-handling.md)します。エラーが発生した場合、CustomerSession の client secret はオプションなので、Elements インスタンスに指定する必要はありません。
CustomerSession の client secret を使用して Elements インスタンスを作成します。次に、Elements インスタンスを使用して、Payment Element を作成します。
```javascript
// Create the CustomerSession and obtain its clientSecret
const res = await fetch("/create-customer-session", {
method: "POST"
});
const {
customer_session_client_secret: customerSessionClientSecret
} = await res.json();
const elementsOptions = {
mode: 'payment',
amount: 1099,
currency: 'usd',customerSessionClientSecret,
// Fully customizable with appearance API.
appearance: {/*...*/},
};
// Set up Stripe.js and Elements to use in checkout form, passing the client secret
// and CustomerSession's client secret obtained in a previous step
const elements = stripe.elements(elementsOptions);
// Create and mount the Payment Element
const paymentElementOptions = { layout: 'accordion'};
const paymentElement = elements.create('payment', paymentElementOptions);
paymentElement.mount('#payment-element');
```
ConfirmationToken の作成時に、顧客が支払いの詳細を保存するためのボックスにチェックマークを付けたかどうかに応じて、Stripe.js が ConfirmationToken の [setup_future_usage](https://docs.stripe.com/api/confirmation_tokens/object.md#confirmation_token_object-setup_future_usage) および [allow_redisplay](https://docs.stripe.com/api/payment_methods/object.md#payment_method_object-allow_redisplay) の設定をコントロールします。
### セキュリティコードの再収集を実行する
オプションとして、[PaymentIntent の作成時](https://docs.stripe.com/api/payment_intents/create.md#create_payment_intent-payment_method_options-card-require_cvc_recollection)と [Elements の作成時](https://docs.stripe.com/js/elements_object/create_without_intent#stripe_elements_no_intent-options-paymentMethodOptions-card-require_cvc_recollection)の両方に `require_cvc_recollection` を指定して、顧客がカードで支払う場合にセキュリティコードの再収集を実行します。
### 保存した支払い方法の選択内容を検出する
保存した支払い方法を選択したときにコンテンツを動的に制御するには、Payment Element の `change` イベントをリッスンします。このイベントには、選択した支払い方法の情報が入力されています。
```javascript
paymentElement.on('change', function(event) {
if (event.value.payment_method) {
// Control dynamic content if a saved payment method is selected
}
})
```
## Optional: 支払いの詳細を動的に更新する [クライアント側]
顧客が、支払いの詳細を変更するアクション (割引コードの適用など) を実行すると、Elements インスタンスが更新され、新たな値が反映されます。Apple Pay や Google Pay などの一部の支払い方法では、UI に金額が表示されるため、常に正確で最新の状態であることを確認します。
#### HTML + JS
```js
async function handleDiscountCode(code) {
// On the server, validate that the discount code is valid and return the new amount
const {newAmount} = await fetch("/apply-discount", {
method: "POST",
headers: {"Content-Type": "application/json"},
body: JSON.stringify({code}),
});
await elements.update({amount: newAmount});
}
```
#### React
```jsx
function App() {
const [amount, setAmount] = React.useState(1099);
const handleDiscountCode = useCallback(async (code) => {
// On the server, validate that the discount code is valid and return the new amount
const {newAmount} = await fetch("/apply-discount", {
method: "POST",
headers: {"Content-Type": "application/json"},
body: JSON.stringify({code}),
});
// Trigger a state change that re-renders the Elements provider with the new amount
setAmount(newAmount);
}, []);
const options = {
mode: 'payment',
amount,
currency: 'usd',
appearance: {/*...*/},
};
return (
);
};
```
## Optional: 追加の Elements オプション [クライアント側]
[Elements オブジェクト](https://docs.stripe.com/js/elements_object/create_without_intent)は、支払いの回収に影響する追加オプションを受け入れます。指定したオプションを基に Payment Element は、有効化した決済手段の中から利用可能なものを表示します。詳しくは、[決済手段のサポート](https://docs.stripe.com/payments/payment-methods/payment-method-support.md)をご覧ください。
指定する Elements オプション ( `captureMethod`、`setupFutureUsage`、`paymentMethodOptions` など) が、Intent の作成時および確定時に渡す同等のパラメーターと一致していることを確認してください。パラメーターが一致しないと、予期しない動作やエラーが発生する可能性があります。
| プロパティー | タイプ | 説明 | 必須 |
| ---------------------------- | -------------------------------------------------- | ---------------------------------------------------------------------------------------------------------------------------------------------------------------------------------------------------------------------------------------------------------------------------------------------------------------------------------------------------------------------------------------------------------------------------------------------------------------------------------------------------------------------------------------------------------------------------------------------------------------------------------------------------------------------------------------------------------------------------------------- | ------------------------------------ |
| `mode` | - `payment`
- `setup`
- `subscription` | Payment Element が *PaymentIntent* (The Payment Intents API tracks the lifecycle of a customer checkout flow and triggers additional authentication steps when required by regulatory mandates, custom Radar fraud rules, or redirect-based payment methods)、*SetupIntent* (The Setup Intents API lets you build dynamic flows for collecting payment method details for future payments. It tracks the lifecycle of a payment setup flow and can trigger additional authentication steps if required by law or by the payment method)、または*サブスクリプション* (A Subscription represents the product details associated with the plan that your customer subscribes to. Allows you to charge the customer on a recurring basis)で使用されているかどうかを示します。 | はい |
| `currency` | `string` | 顧客に請求する金額の通貨。 | はい |
| `amount` | `number` | Apple Pay、Google Pay、または BNPL の UI で示される、顧客に請求する金額。 | `payment` および `subscription` のモードの場合 |
| `setupFutureUsage` | - `off_session`
- `on_session` | Payment Element によって収集された決済の詳細を使用して、今後の決済を行う意図を示します。 | いいえ |
| `captureMethod` | - `automatic`
- `automatic_async`
- `manual` | 顧客の口座から売上をキャプチャーするタイミングを管理します。 | いいえ |
| `onBehalfOf` | `string` | Connect のみ。取引に関する金銭的責任を負う Stripe アカウント ID。このオプションが実装に関連するかを判断するには、[ユースケース](https://docs.stripe.com/connect/charges.md)をご覧ください。 | いいえ |
| `paymentMethodTypes` | `string[]` | 表示する決済手段タイプのリスト。この属性を省略して、[Stripe ダッシュボード](https://dashboard.stripe.com/settings/payment_methods)で決済手段を管理できます。 | いいえ |
| `paymentMethodConfiguration` | `string` | [Stripe ダッシュボード](https://dashboard.stripe.com/settings/payment_methods)で決済手段を管理するときに使用する[決済手段の設定](https://docs.stripe.com/api/payment_method_configurations.md)。指定しない場合は、既定の構成が使用されます。 | いいえ |
| `paymentMethodCreation` | `manual` | [stripe.createPaymentMethod](https://docs.stripe.com/js/payment_methods/create_payment_method_elements) を使用して、Elements インスタンスから PaymentMethods が作成されるようにします。 | いいえ |
| `paymentMethodOptions` | `{us_bank_account: {verification_method: string}}` | `us_bank_account` 決済手段の確認オプション。[Payment Intents](https://docs.stripe.com/api/payment_intents/create.md#create_payment_intent-payment_method_options-us_bank_account-verification_method) と同じ確認手段を受け入れます。 | いいえ |
| `paymentMethodOptions` | `{card: {installments: {enabled: boolean}}}` | [Stripe ダッシュボード](https://dashboard.stripe.com/settings/payment_methods)で決済手段を管理していないときに、カード分割払いプランの選択 UI を手動で有効化できるようにします。`mode='payment'` を設定し、「さらに」`paymentMethodTypes` を明示的に指定する必要があります。それ以外の場合は、エラーが発生します。`paymentMethodCreation='manual'` とは互換性がありません。 | いいえ |
| `paymentMethodOptions` | `{[paymentMethod]: {setup_future_usage: string}}` | 再利用をサポートする決済手段にのみ `setup_future_usage` を指定できます。`mode` が `payment` の場合にのみ適用されます。各決済手段の値は、確定時に PaymentIntent の対応する `payment_method_options[paymentMethod][setup_future_usage]` と一致している必要があります。サポートされている決済手段と値については、[Stripe.js リファレンス](https://docs.stripe.com/js/elements_object/create_without_intent#stripe_elements_no_intent-options-paymentMethodOptions)を参照してください。 | いいえ |
## 料金体系モデルを作成する [Stripe CLI またはダッシュボード]
[継続的な料金体系モデル](https://docs.stripe.com/products-prices/pricing-models.md)は、お客様が販売する商品またはサービス、そのコスト、決済で受け付ける通貨、請求対象となるサービス提供期間 (サブスクリプションの場合) を表します。価格モデルを構築するには、お客様が販売する「[商品](https://docs.stripe.com/api/products.md)」と、それをいくらで、どのくらいの頻度で請求するかを示す「[価格](https://docs.stripe.com/api/prices.md)」を用います。
この例では、「基本」と「プレミアム」という 2 つのサービスレベルオプションがある固定価格のサービスを使用しています。サービスレベルオプションごとに、1 つの商品と 1 つの継続価格を作成する必要があります (セットアップ料金のような 1 回限りの支払いを追加する場合は、1 回限りの価格で 3 つ目の商品を作成します)。
各商品が月ごとに請求されます。基本商品の価格は 5 USD で、プレミアム商品の価格は 15 USD です。3 段階構成の例については、[定額料金](https://docs.stripe.com/subscriptions/pricing-models/flat-rate-pricing.md)ガイドをご覧ください。
#### ダッシュボード
[商品を追加](https://dashboard.stripe.com/test/products/create)ページに移動し、2 つの商品を作成します。商品ごとに 1 つの価格を追加し、それぞれに毎月の継続請求期間を設定します。
- プレミアム商品: 追加機能を備えたプレミアムサービス
- 価格:定額 | 15 USD
- 基本商品: 最低限の機能を備えた基本サービス
- 価格:定額 | 5 USD
価格を作成したら、価格 ID を記録しておき、他のステップで使用できるようにします。価格 ID は、`price_G0FvDp6vZvdwRZ` のように表示されます。
準備が完了したら、ページ右上の**本番環境にコピー**ボタンを使用して、[サンドボックスから本番環境に](https://docs.stripe.com/keys.md#test-live-modes)商品を複製します。
#### API
API を使用して[商品](https://docs.stripe.com/api/products.md)と[価格](https://docs.stripe.com/api/prices.md)を作成できます。
プレミアム製品を作成します。
```curl
curl https://api.stripe.com/v1/products \
-u "<>:" \
--data-urlencode "name=Billing Guide: Premium Service" \
-d "description=Premium service with extra features"
```
ベーシック製品を作成します。
```curl
curl https://api.stripe.com/v1/products \
-u "<>:" \
--data-urlencode "name=Billing Guide: Basic Service" \
-d "description=Basic service with minimum features"
```
各商品の商品 ID を記録しておきます。これは次のように表示されます。
```json
{
"id": "prod_H94k5odtwJXMtQ",
"object": "product",
"active": true,
"attributes": [
],
"created": 1587577341,
"description": "Premium service with extra features",
"images": [
],
"livemode": false,
"metadata": {
},
"name": "Billing Guide: Premium Service",
"statement_descriptor": null,
"type": "service",
"unit_label": null,
"updated": 1587577341
}
```
商品 ID を使用して各商品の価格を作成します。[unit_amount](https://docs.stripe.com/api/prices/object.md#price_object-unit_amount) の単位はセントであるため、たとえば `1500` = 15 USD です。
プレミアム価格を作成します。
```curl
curl https://api.stripe.com/v1/prices \
-u "<>:" \
-d product={{PREMIUM_PRODUCT_ID}} \
-d unit_amount=1500 \
-d currency=usd \
-d "recurring[interval]=month"
```
基本価格を作成します。
```curl
curl https://api.stripe.com/v1/prices \
-u "<>:" \
-d product={{BASIC_PRODUCT_ID}} \
-d unit_amount=500 \
-d currency=usd \
-d "recurring[interval]=month"
```
各価格の価格 ID を記録しておき、後続のステップで使用できるようにします。これは次のように表示されます。
```json
{
"id": "price_HGd7M3DV3IMXkC",
"object": "price",
"product": "prod_HGd6W1VUqqXGvr",
"type": "recurring",
"currency": "usd",
"recurring": {
"interval": "month",
"interval_count": 1,
"trial_period_days": null,
"usage_type": "licensed"
},
"active": true,
"billing_scheme": "per_unit",
"created": 1589319695,
"livemode": false,
"lookup_key": null,
"metadata": {},
"nickname": null,
"unit_amount": 1500,
"unit_amount_decimal": "1500",
"tiers": null,
"tiers_mode": null,
"transform_quantity": null
}
```
## 顧客を作成する [クライアントおよびサーバー]
Stripe では、サブスクリプションごとに顧客が必要です。アプリケーションのフロントエンドで、必要なユーザー情報を収集し、バックエンドに渡します。
住所の詳細を収集する必要がある場合、Address Element を使用すると顧客の配送先住所や請求先住所を収集できます。詳細については、[Address Element](https://docs.stripe.com/elements/address-element.md) をご覧ください。
```html
```
```javascript
const emailInput = document.querySelector('#email');
fetch('/create-customer', {
method: 'post',
headers: {
'Content-Type': 'application/json',
},
body: JSON.stringify({
email: emailInput.value,
}),
}).then(r => r.json());
```
サーバーで、Stripe の Customer オブジェクトを作成します。
#### Accounts v2
```curl
curl -X POST https://api.stripe.com/v2/core/accounts \
-H "Authorization: Bearer <>" \
-H "Stripe-Version: 2026-04-22.preview" \
--json '{
"contact_email": "jenny.rosen@example.com",
"display_name": "Jenny Rosen",
"identity": {
"individual": {
"given_name": "Jenny Rosen",
"address": {
"city": "San Francisco",
"country": "US",
"line1": "123 Main Street",
"postal_code": "94605",
"state": "CA"
}
}
},
"configuration": {
"customer": {
"capabilities": {
"automatic_indirect_tax": {
"requested": true
}
},
"shipping": {
"address": {
"city": "San Francisco",
"country": "US",
"line1": "123 Main Street",
"postal_code": "94605",
"state": "CA"
}
}
}
},
"include": [
"configuration.customer",
"identity"
]
}'
```
#### Customers v1
```curl
curl https://api.stripe.com/v1/customers \
-u "<>:" \
--data-urlencode "email=jenny.rosen@example.com" \
-d "name=Jenny Rosen" \
-d "shipping[address][city]=San Francisco" \
-d "shipping[address][country]=US" \
-d "shipping[address][line1]=123 Main Street" \
-d "shipping[address][postal_code]=9460" \
-d "shipping[address][state]=CA" \
-d "shipping[name]=Jenny Rosen" \
-d "address[city]=San Francisco" \
-d "address[country]=US" \
-d "address[line1]=123 Main Street" \
-d "address[postal_code]=9460" \
-d "address[state]=CA"
```
## ConfirmationToken を作成する [クライアント側]
> #### レガシーの実装で createPaymentMethod を使用する
>
> レガシーの実装を使用している場合は、サーバーで支払いを確定するために `stripe.createPaymentMethod` の情報を使用することがあります。このガイドに従って [Confirmation Tokens に移行する](https://docs.stripe.com/payments/payment-element/migration-ct.md)ことをお勧めしますが、以前のドキュメントを確認して[サーバーで支払いを確定する](https://docs.stripe.com/payments/finalize-payments-on-the-server-legacy.md)こともできます。
顧客が決済フォームを送信すると、[stripe.createConfirmationToken](https://docs.stripe.com/js/confirmation_tokens/create_confirmation_token) が呼び出され *ConfirmationToken* (ConfirmationTokens help capture data from your client, such as your customer's payment instruments and shipping address, and are used to confirm a PaymentIntent or SetupIntent) を作成し、決済の確定前に追加の検証ロジックまたはビジネスロジックをサーバーに送信します。
PaymentIntent を確定すると *PaymentMethod* (PaymentMethods represent your customer's payment instruments, used with the Payment Intents or Setup Intents APIs) が生成されます。PaymentIntent 確認レスポンスから [payment_method](https://docs.stripe.com/api/payment_intents/object.md#payment_intent_object-payment_method) ID を表示できます。
> 作成された ConfirmationToken をすぐに使用して、PaymentIntent を確定する必要があります。使用しなかった場合は、12 時間後に期限切れになります。
#### HTML + JS
```javascript
const form = document.getElementById('payment-form');
const submitBtn = document.getElementById('submit');
const handleError = (error) => {
const messageContainer = document.querySelector('#error-message');
messageContainer.textContent = error.message;
submitBtn.disabled = false;
}
form.addEventListener('submit', async (event) => {
// We don't want to let default form submission happen here,
// which would refresh the page.
event.preventDefault();
// Prevent multiple form submissions
if (submitBtn.disabled) {
return;
}
// Disable form submission while loading
submitBtn.disabled = true;
// Trigger form validation and wallet collection
const {error: submitError} = await elements.submit();
if (submitError) {
handleError(submitError);
return;
}
// Create the ConfirmationToken using the details collected by the Payment Element
// and additional shipping information
const {error, confirmationToken} = await stripe.createConfirmationToken({
elements,
params: {
return_url: 'https://example.com/order/123/complete'
}
});
if (error) {
// This point is only reached if there's an immediate error when
// creating the ConfirmationToken. Show the error to your customer (for example, payment details incomplete)
handleError(error);
return;
}
// Create the Subscription
const res = await fetch("/create-confirm-subscription", {
method: "POST",
headers: {"Content-Type": "application/json"},
body: JSON.stringify({
confirmationTokenId: confirmationToken.id,
}),
});
const data = await res.json();
// Handle any next actions or errors. See the Handle any next actions step for implementation.
handleServerResponse(data);
});
```
#### React
```jsx
import React, {useState} from 'react';
import {useStripe, useElements, PaymentElement} from '@stripe/react-stripe-js';
export default function CheckoutForm() {
const stripe = useStripe();
const elements = useElements();
const [errorMessage, setErrorMessage] = useState();
const [loading, setLoading] = useState(false);
const handleError = (error) => {
setLoading(false);
setErrorMessage(error.message);
}
const handleSubmit = async (event) => {
// We don't want to let default form submission happen here,
// which would refresh the page.
event.preventDefault();
if (!stripe) {
// Stripe.js hasn't yet loaded.
// Make sure to disable form submission until Stripe.js has loaded.
return;
}
setLoading(true);
// Trigger form validation and wallet collection
const {error: submitError} = await elements.submit();
if (submitError) {
handleError(submitError);
return;
}
// Create the ConfirmationToken using the details collected by the Payment Element
// and additional shipping information
const {error, confirmationToken} = await stripe.createConfirmationToken({
elements,
params: {
shipping: {
name: 'Jenny Rosen',
address: {
line1: '1234 Main Street',
city: 'San Francisco',
state: 'CA',
country: 'US',
postal_code: '94111',
},
}
}
});
if (error) {
// This point is only reached if there's an immediate error when
// creating the ConfirmationToken. Show the error to your customer (for example, payment details incomplete)
handleError(error);
return;
}
// Create the Subscription
const res = await fetch("/create-confirm-subscription", {
method: "POST",
headers: {"Content-Type": "application/json"},
body: JSON.stringify({
confirmationTokenId: confirmationToken.id,
}),
});
const data = await res.json();
// Handle any next actions or errors. See the Handle any next actions step for implementation.
handleServerResponse(data);
};
return (
);
}
```
## サブスクリプションを作成して Stripe に送信する [サーバー側]
顧客が決済フォームを送信した後に、*サブスクリプション* (A Subscription represents the product details associated with the plan that your customer subscribes to. Allows you to charge the customer on a recurring basis) を使用して確定と決済のプロセスを円滑にします。サーバーで、 顧客 ID (Cookie またはリクエストパラメーターの)、価格 ID、支払い方法 ID を使用して、サブスクリプションを作成し、確定します。
```javascript
// Don't put any keys in code. See https://docs.stripe.com/keys-best-practices.
const stripe = require("stripe")("<>");
const express = require('express');
const cookieParser = require('cookieParser');
const app = express();
app.set('trust proxy', true);
app.use(express.json());
app.use(express.static("."));
app.use(cookieParser());
app.post('/create-confirm-subscription', async (req, res) => {
const customerId = req.cookies['customer'];
const confirmationTokenId = req.body.confirmationTokenId;
// The ID of the Price that you created previously
const priceId = '{{ PRICE_ID }}';
try {
const subscription = await stripe.subscriptions.create({
customer: customerId,
items: [{
price: priceId,
}],
payment_behavior: 'default_incomplete',
payment_settings: { save_default_payment_method: 'on_subscription' },
expand: ['latest_invoice.payments']
});
// Confirm intent with collected payment method
const {status, clientSecret} = await stripe.paymentIntents.confirm(
subscription.latest_invoice.payments.data[0].payment.payment_intent,
{
confirmation_token: confirmationTokenId,
}
);
res.json({status, clientSecret});
} catch (err) {
res.json({
error: err
});
}
});
app.listen(3000, () => {
console.log('Running on port 3000');
});
```
## 次のアクションを処理する [クライアント側]
3D セキュアによる認証や別のサイトへのリダイレクトなど、PaymentIntent で顧客による追加アクションが必要になる場合は、そのアクションを起動する必要があります。`stripe.handleNextAction` を使用して、顧客のアクションを処理して支払いを完了するための UI をトリガーします。
#### JavaScript
```javascript
const handleServerResponse = async (response) => {
if (response.error) {
// Show error from server on payment form
} else if (response.status === "requires_action") {
// Use Stripe.js to handle the required next action
const {
error,
paymentIntent
} = await stripe.handleNextAction({
clientSecret: response.clientSecret
});
if (error) {
// Show error from Stripe.js in payment form
} else {
// Actions handled, show success message
}
} else {
// No actions needed, show success message
}
}
```
## サブスクリプションを管理する
導入を完了するために、Webhook を監視し、サービスへのアクセスを付与し、顧客がサブスクリプションをキャンセルできるようにすることも検討してください。詳細については、[サブスクリプション連携ガイド](https://docs.stripe.com/billing/subscriptions/build-subscriptions.md?payment-ui=elements)をご覧ください。
## 顧客に Stripe を開示する
Stripe は顧客の Elements とのやり取りに関する情報を収集して、サービスを提供し、不正利用を防止し、サービスを向上します。これには、Cookie と IP アドレスを使用して、1 つの決済フローセッションで顧客に表示する Elements を特定することが含まれます。Stripe がこのような方法でデータを使用するために必要なすべての権利と同意について開示し、これらを取得することはお客様の責任です。詳細については、[プライバシーセンター](https://stripe.com/legal/privacy-center#as-a-business-user-what-notice-do-i-provide-to-my-end-customers-about-stripe)をご覧ください。
## See also
- [導入方法の設計](https://docs.stripe.com/payments/payment-element/design-an-integration.md)
- [アプリ内決済を導入](https://docs.stripe.com/payments/mobile.md)