コンテンツにスキップ
アカウントを作成
または
サインイン
Stripe ドキュメントのロゴ
/
AI に質問する
アカウントを作成
サインイン
始める
支払い
売上
プラットフォームおよびマーケットプレイス
資金管理
開発者向けリソース
概要
Stripe Payments について
構築済みのシステムをアップグレード
支払いの分析
オンライン決済
概要ユースケースを見つけるUse Managed Payments
Payment Links を使用する
構築済みの決済ページを使用する
    概要
    クイックスタート
    デザインをカスタマイズする
    追加情報を収集する
    税金を徴収する
    決済フローを動的に更新
    商品カタログを管理する
    サブスクリプション
      サブスクリプションの実装
      無料トライアルを設定
      顧客のサブスクリプションを 1 つに制限する
      請求サイクル日を設定
    決済手段を管理
    顧客が現地通貨で支払いできるようにする
    割引、アップセル、オプション品目を追加する
    将来の支払いを設定する
    支払い中に支払い詳細を保存する
    支払い後
    従来の Checkout からの移行
    Checkout を移行して Prices を使用
Build a custom integration with Elements
アプリ内実装を構築
決済手段
決済手段を追加
決済手段を管理
Link による購入の迅速化
支払いインターフェイス
Payment Links
Checkout
Web Elements
アプリ内決済
決済シナリオ
複数の通貨を扱う
カスタムの決済フロー
柔軟なアクワイアリング
オーケストレーション
店頭支払い
端末
決済にとどまらない機能
会社を設立する
仮想通貨
Financial Connections
Climate
不正利用について
Radar の不正防止
不審請求の申請の管理
本人確認
ホーム支払いUse a prebuilt checkout pageSubscriptions

注

このページはまだ日本語ではご利用いただけません。より多くの言語で文書が閲覧できるように現在取り組んでいます。準備が整い次第、翻訳版を提供いたしますので、もう少しお待ちください。

Build a subscriptions integration with Checkout

Create and manage subscriptions to accept recurring payments with Checkout.

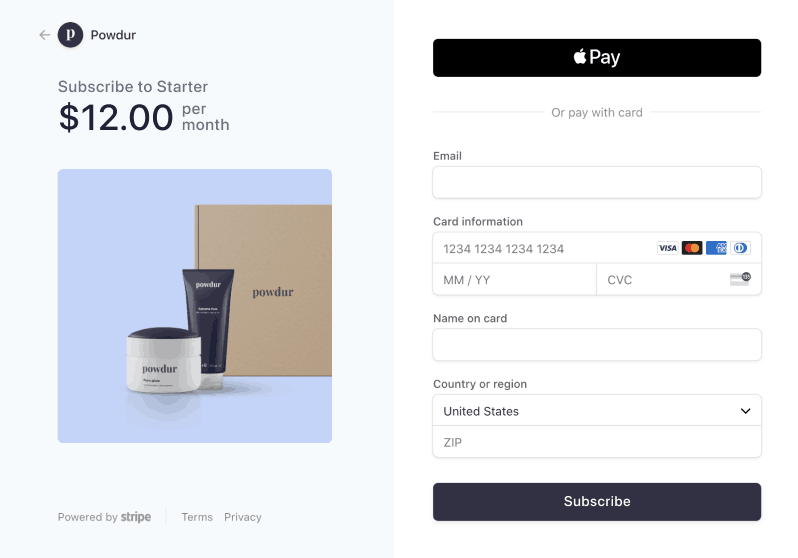
Checkout subscription page
ローコード

Customize logo, images, and colors.

Use prebuilt hosted pages to collect payments and manage your subscriptions.

Clone a sample integration from GitHub.

For an immersive version of this guide, see the Billing integration quickstart.

Explore the sample on GitHub or the demo.

What you’ll build

This guide describes how to sell fixed-price monthly subscriptions using Stripe Checkout.

This guide shows you how to:

  • Model your business by building a product catalog.
  • Add a Checkout session to your site, including a button and success and cancellation pages.
  • Monitor subscription events and provision access to your service.
  • Set up the customer portal.
  • Add a customer portal session to your site, including a button and redirect.
  • Let customers manage their subscription through the portal.
  • Learn how to use flexible billing mode to access enhanced billing behavior and additional features.

If you aren’t ready to code an integration, you can set up basic subscriptions manually in the Dashboard or use Payment Links to set up subscriptions without writing any code.

Learn more about designing an integration to understand the decisions and required resources for a full integration.

After you complete the integration, you can extend it to:

  • Display taxes
  • Apply discounts
  • Offer customers a free trial period
  • Add payment methods
  • Integrate the hosted invoice page
  • Use Checkout in setup mode
  • Set up usage-based billing, pricing tiers, and usage-based pricing
  • Manage prorations
  • Allow customers to subscribe to multiple products
  • Integrate entitlements to manage access to your product’s features

Set up Stripe

Install the Stripe client of your choice:

Command Line
Ruby
Python
PHP
Java
Node.js
Go
.NET
No results
# Available as a gem sudo gem install stripe
Gemfile
Ruby
Python
PHP
Java
Node.js
Go
.NET
No results
# If you use bundler, you can add this line to your Gemfile gem 'stripe'

Optionally, install the Stripe CLI. The CLI provides webhook testing, and you can run it to create your products and prices.

Command Line
homebrew
ソースからインストールする
No results
# Install Homebrew to run this command: https://brew.sh/ brew install stripe/stripe-cli/stripe # Connect the CLI to your dashboard stripe login

その他のインストールオプションについては、Stripe CLI を使ってみるをご覧ください。

Create the pricing model
Dashboard or Stripe CLI

ダッシュボードまたは Stripe CLI で商品とその価格を作成します。

この例では、「基本」と「プレミアム」という 2 つのサービスレベルオプションがある固定価格のサービスを使用しています。サービスレベルオプションごとに、1 つの商品と 1 つの継続価格を作成する必要があります (初期費用のような 1 回限りの支払いを追加する場合は、1 回限りの価格で 3 つ目の商品を作成します。わかりやすくするために、この例には 1 回限りの支払いを含めていません)。

この例では、各商品が 1 カ月間隔で請求されます。基本商品の価格は 5 USD で、プレミアム商品の価格は 15 USD です。

商品を追加ページに移動し、2 つの商品を作成します。商品ごとに 1 つの価格を追加し、それぞれに毎月の継続請求期間を設定します。

  • プレミアム商品: 追加機能を備えたプレミアムサービス

    • 価格:定額 | 15 USD
  • 基本商品: 最低限の機能を備えた基本サービス

    • 価格:定額 | 5 USD

価格を作成したら、価格 ID を記録しておき、他のステップで使用できるようにします。価格 ID は、price_G0FvDp6vZvdwRZ のように表示されます。

準備が完了したら、ページ右上の本番環境にコピーボタンを使用して、サンドボックスから本番環境に商品を複製します。

If you offer multiple billing periods, use Checkout to upsell customers on longer billing periods and collect more revenue upfront.

For other pricing models, see Billing examples.

Create a Checkout Session
Client and Server

Add a checkout button to your website that calls a server-side endpoint to create a Checkout Session.

index.html
サンプル全体を表示
<html> <head> <title>Checkout</title> </head> <body> <form action="/create-checkout-session" method="POST"> <!-- Note: If using PHP set the action to /create-checkout-session.php --> <input type="hidden" name="priceId" value="price_G0FvDp6vZvdwRZ" /> <button type="submit">Checkout</button> </form> </body> </html>

On the backend of your application, define an endpoint that creates the session for your frontend to call. You need these values:

  • The price ID of the subscription the customer is signing up for (your frontend passes this value)
  • Your success_url, which is a page on your website that Checkout returns your customer to after they complete the payment

You can optionally:

  • Use cancel_url to provide a page on your website where Checkout returns your customer, if they cancel the payment process.
  • Configure a billing cycle anchor to your subscription in this call.
  • Use custom text to include your subscription and cancellation terms, and a link to where your customers can update or cancel their subscription. We recommend configuring email reminders and notifications for your subscribers.

If you created a one-time price in step 2, pass that price ID as well. After creating a Checkout Session, redirect your customer to the URL returned in the response.

You can enable more accurate and predictable subscription behavior when you create a Checkout Session by setting the billing mode type to flexible. You must use the Stripe API version 2025-06-30.basil or later.

注

You can use lookup_keys to fetch prices rather than price IDs. For an example, see the sample application.

server.rb
Ruby
Python
PHP
Java
Node.js
Go
.NET
No results
サンプル全体を表示
# Set your secret key. Remember to switch to your live secret key in production. # See your keys here: https://dashboard.stripe.com/apikeys Stripe.api_key =
'sk_test_BQokikJOvBiI2HlWgH4olfQ2'
# The price ID passed from the front end. # price_id = params['priceId'] price_id = '{{PRICE_ID}}' session = Stripe::Checkout::Session.create({ success_url: 'https://example.com/success.html?session_id={CHECKOUT_SESSION_ID}', cancel_url: 'https://example.com/canceled.html', mode: 'subscription', line_items: [{ # For usage-based billing, don't pass quantity quantity: 1, price: price_id, }], subscription_data: { billing_mode: { type: 'flexible' } } }) # Redirect to the URL returned on the session # redirect session.url, 303

This example customizes the success_url by appending the session ID. Learn more about customizing your success page.

From your Dashboard, enable the payment methods you want to accept from your customers. Checkout supports several payment methods.

Provision and monitor subscriptions
Server

After the subscription signup succeeds, the customer returns to your website at the success_url, which initiates a checkout.session.completed webhook. When you receive a checkout.session.completed event, use entitlements to provision the subscription. Continue to provision each month (if billing monthly) as you receive invoice.paid events. If you receive an invoice.payment_failed event, notify your customer and send them to the customer portal to update their payment method.

To determine the next step for your system’s logic, check the event type and parse the payload of each event object, such as invoice.paid. Store the subscription.id and customer.id event objects in your database for verification.

For testing purposes, you can monitor events in the Events tab of Workbench. For production, set up a webhook endpoint and subscribe to appropriate event types. If you don’t know your STRIPE_WEBHOOK_SECRET key, go to the destination details view of the Webhooks tab in Workbench to view it.

server.rb
Ruby
Python
PHP
Java
Node.js
Go
.NET
No results
サンプル全体を表示
# Set your secret key. Remember to switch to your live secret key in production. # See your keys here: https://dashboard.stripe.com/apikeys Stripe.api_key =
'sk_test_BQokikJOvBiI2HlWgH4olfQ2'
post '/webhook' do webhook_secret =
'{{STRIPE_WEBHOOK_SECRET}}'
payload
= request.body.read if !webhook_secret.empty? # Retrieve the event by verifying the signature using the raw body and secret if webhook signing is configured. sig_header = request.env['HTTP_STRIPE_SIGNATURE'] event = nil begin event = Stripe::Webhook.construct_event( payload, sig_header, webhook_secret ) rescue JSON::ParserError => e # Invalid payload status 400 return rescue Stripe::SignatureVerificationError => e # Invalid signature puts '⚠️ Webhook signature verification failed.' status 400 return end else data = JSON.parse(payload, symbolize_names: true) event = Stripe::Event.construct_from(data) end # Get the type of webhook event sent event_type = event['type'] data = event['data'] data_object = data['object'] case event_type when 'checkout.session.completed' # Payment is successful and the subscription is created. # You should provision the subscription and save the customer ID to your database. when 'invoice.paid' # Continue to provision the subscription as payments continue to be made. # Store the status in your database and check when a user accesses your service. # This approach helps you avoid hitting rate limits. when 'invoice.payment_failed' # The payment failed or the customer doesn't have a valid payment method. # The subscription becomes past_due. Notify your customer and send them to the # customer portal to update their payment information. else puts "Unhandled event type: \#{event.type}" end status 200 end

The minimum event types to monitor:

Event nameDescription
checkout.session.completedSent when a customer successfully completes the Checkout Session, informing you of a new purchase.
invoice.paidSent each billing period when a payment succeeds.
invoice.payment_failedSent each billing period if there’s an issue with your customer’s payment method.

For even more events to monitor, see Subscription webhooks.

Configure the customer portal
Dashboard

The customer portal lets your customers directly manage their existing subscriptions and invoices.

Use the Dashboard to configure the portal. At a minimum, make sure to configure the portal so that customers can update their payment methods.

Create a portal session
Server

Define an endpoint that creates the customer portal session for your frontend to call. The CUSTOMER_ID refers to the customer ID created by a Checkout Session that you saved while processing the checkout.session.completed event. You can also set a default redirect link for the portal in the Dashboard.

Pass an optional return_url value for the page on your site to redirect your customer to after they finish managing their subscription:

server.rb
Ruby
Python
PHP
Java
Node.js
Go
.NET
No results
サンプル全体を表示
# Set your secret key. Remember to switch to your live secret key in production. # See your keys here: https://dashboard.stripe.com/apikeys Stripe.api_key =
'sk_test_BQokikJOvBiI2HlWgH4olfQ2'
# This is the URL that users are redirected to after they're done # managing their billing. return_url =
'{{DOMAIN_URL}}'
customer_id
=
'{{CUSTOMER_ID}}'
session
= Stripe::BillingPortal::Session.create({ customer: customer_id, return_url: return_url, }) # Redirect to the URL for the session # redirect session.url, 303

Send customers to the customer portal
Client

On your frontend, add a button to the page at the success_url that provides a link to the customer portal:

success.html
サンプル全体を表示
<html> <head> <title>Manage Billing</title> </head> <body> <form action="/customer-portal" method="POST"> <!-- Note: If using PHP set the action to /customer-portal.php --> <button type="submit">Manage Billing</button> </form> </body> </html>

After exiting the customer portal, the customer returns to your website at the return_url. Continue to monitor events to track the status of the customer’s subscription.

If you configure the customer portal to allow actions such as canceling a subscription, monitor additional events.

Test your integration

支払い方法をテストする

次の表を使用して、さまざまな支払い方法とシナリオをテストします。

決済手段シナリオテスト方法
BECS ダイレクトデビット顧客が BECS ダイレクトデビットによる支払いに成功します。アカウント番号900123456と BSB000000を使用して、フォームに入力します。確定された PaymentIntent のステータスは、まずprocessingに移行し、3 分後にsucceededステータスに移行します。
BECS ダイレクトデビット顧客の支払いが account_closed エラーコードで失敗します。アカウント番号 111111113と BSB 000000を使用して、フォームに入力します。
クレジットカードカード支払いは成功し、認証は必要とされません。クレジットカード番号 4242 4242 4242 4242 と、任意の有効期限、セキュリティコード、郵便番号を使用してクレジットカードフォームに入力します。
クレジットカードカード決済で認証が要求されます。クレジットカード番号 4000 0025 0000 3155 と、任意の有効期限、セキュリティコード、郵便番号を使用してクレジットカードフォームに入力します。
クレジットカードカードが insufficient_funds などの拒否コードで支払い拒否されます。クレジットカード番号 4000 0000 0000 9995 と、任意の有効期限、セキュリティコード、郵便番号を使用してクレジットカードフォームに入力します。
SEPA ダイレクトデビット顧客が SEPA ダイレクトデビットによる支払いに成功します。口座番号 AT321904300235473204 を使用して、フォームに入力します。確定された PaymentIntent のステータスはまず、processing に移行し、3 分後に succeeded ステータスに移行します。
SEPA ダイレクトデビット顧客の PaymentIntent ステータスが processing から requires_payment_method に移行します。口座番号 AT861904300235473202 を使用して、フォームに入力します。

Monitor events

Set up webhooks to listen to subscription change events, such as upgrades and cancellations. You can view subscription webhook events in the Dashboard or with the Stripe CLI.

Learn more about testing your Billing integration.

参照情報

  • Offer customers a free trial period
  • Apply discounts
  • Manage prorations
  • Integrate entitlements to manage access to your product’s features
このページはお役に立ちましたか。
はいいいえ
  • お困りのことがございましたら 、サポートにお問い合わせください。
  • 早期アクセスプログラムにご参加ください。
  • 変更ログをご覧ください。
  • ご不明な点がございましたら、お問い合わせください。
  • LLM ですか?llms.txt を読んでください。
  • Powered by Markdoc