调至内容部分
创建账户
或
登录
Stripe 文档徽标
/
询问人工智能
创建账户
登录
开始
付款
销售收入
平台和交易市场
资金管理
开发人员资源
概览
关于 Stripe 支付
    概览
    收款
    货币
    拒付
    提现
    经常性付款
    3DS 验证
    退款并取消付款
    余额和结算时间
    收据
    处理 webhook 事件
    强客户认证准备
    Older API
升级您的集成
支付分析
线上付款
概览查找您的用例Use Managed Payments
使用 Payment Link
Use a prebuilt checkout page
Build a custom integration with Elements
构建应用内集成
支付方式
添加支付方式
管理支付方式
用 Link 更快结账
支付接口
Payment Links
结账
Web Elements
应用内支付
支付场景
处理多种货币
自定义支付流程
灵活收单
编排
线下支付
Terminal
超越支付功能
成立公司
加密货币
智能体商务 (Agentic Commerce)
Financial Connections
Climate
了解欺诈
Radar 欺诈保护
管理争议
验证身份
首页付款About Stripe payments

收款

安全地在线上收款。

制作支付表单或使用预构建的结账页面来开始接收线上付款。

用PaymentSheet 类将 Stripe 的预构建支付 UI 集成到您的 iOS 应用程序的结账流程。前往 on GitHub 查看我们的集成示例。

设置 Stripe
服务器端
客户端

首先,您需要有 Stripe 账户。立即注册。

Server-side

该集成要求您的服务器上的端点与 Stripe API 通讯。请用我们的官方库从您的服务器访问 Stripe API:

Command Line
Ruby
Python
PHP
Java
Node.js
Go
.NET
No results
# Available as a gem sudo gem install stripe
Gemfile
Ruby
Python
PHP
Java
Node.js
Go
.NET
No results
# If you use bundler, you can add this line to your Gemfile gem 'stripe'

Client-side

Stripe iOS SDK 是开源的,有完整的文档,并且与支持 iOS 13 或更高版本操作系统的应用程序兼容。

要安装 SDK,按这些步骤进行:

  1. 在 Xcode 中,选择文件 > **添加工具包依赖…**并输入 https://github.com/stripe/stripe-ios-spm 作为仓库 URL。
  2. 从我们的发布页面选择最新的版本号。
  3. 将 StripePaymentSheet 产品添加到您的目标应用程序。

注意

有关最新 SDK 发布及过往版本的详细信息,请查看 GitHub 上的发布页面。要想在新版本发布时接收通知,请查看仓库的发布。

启用支付方式

查看您的支付方式设置,启用您想支持的支付方式。您至少需要启用一个支付方式才能创建 PaymentIntent。

默认情况下,Stripe 支持信用卡和其他常见的支付方式,可以帮助您获得更多客户,但建议您开启与您的业务和客户相关的其他支付方式。查看支付方式支持,了解支持的产品和支付方式,并查看我们的定价页面了解费用。

添加端点
服务器端

注意

要在创建 PaymentIntent 之前显示 PaymentSheet,请参阅收集支付详情后再创建 Intent。

该集成使用三个 Stripe API 对象:

  1. PaymentIntent:Stripe 用它来表示您从客户收款的意图,跟踪您的扣款尝试及整个过程中付款状态的变化情况。

  2. (可选)Customer:要为将来的付款设置支付方式,就必须将它绑定到 Customer。当客户在您的公司创建账户时,创建 Customer 对象。如果您的客户以访客身份付款,则可以在付款前创建个 Customer 对象,然后再将它关联到您自己内部的客户账户表示。

  3. (可选)Customer Ephemeral Key:Customer 对象的信息属于敏感信息,无法直接从应用中检索。临时密钥授予 SDK 对客户的临时访问权限。

注意

如果您从不将银行卡保存到客户,并且不允许回头客重复使用已保存的银行卡,则可以从集成中省略 Customer 和 Customer Ephemeral Key 对象。

出于安全原因,您的应用无法创建这些对象。相反,在服务器上会添加一个端点,其功能如下:

  1. 检索 Customer,或新建一个。
  2. 为 Customer 创建一个 Ephemeral Key。
  3. 创建 PaymentIntent,设置好 amount、currency 和 customer。您还可以选择包含 automatic_payment_methods 参数。默认情况下,Stripe 会在最新版的 API 中启用其功能。
  4. 将 Payment Intent 的客户端私钥、Ephemeral Key 的 secret 以及 Customer 的 id 和您的公钥返回到您的应用程序。

在结账过程中显示给客户的支付方式也包含在 PaymentIntent 中。您可以让 Stripe 从管理平台设置中提取支付方式,也可以手动列出它们。无论选择哪种方式,都要知道在 PaymentIntent 中传递的货币会过滤显示给客户的支付方式。例如,如果您在 PaymentIntent 中传递 eur,并且在管理平台中启用了 OXXO,则不会向客户显示 OXXO,因为 OXXO 不支持 eur 支付。

除非您的集成需要基于代码的选项来提供支付方式,否则 Stripe 建议使用自动选项。这是因为 Stripe 会评估货币、支付方式限制和其他参数,以确定支持的支付方式列表。优先显示可提高转化率且与货币和客户所在地最相关的支付方式。
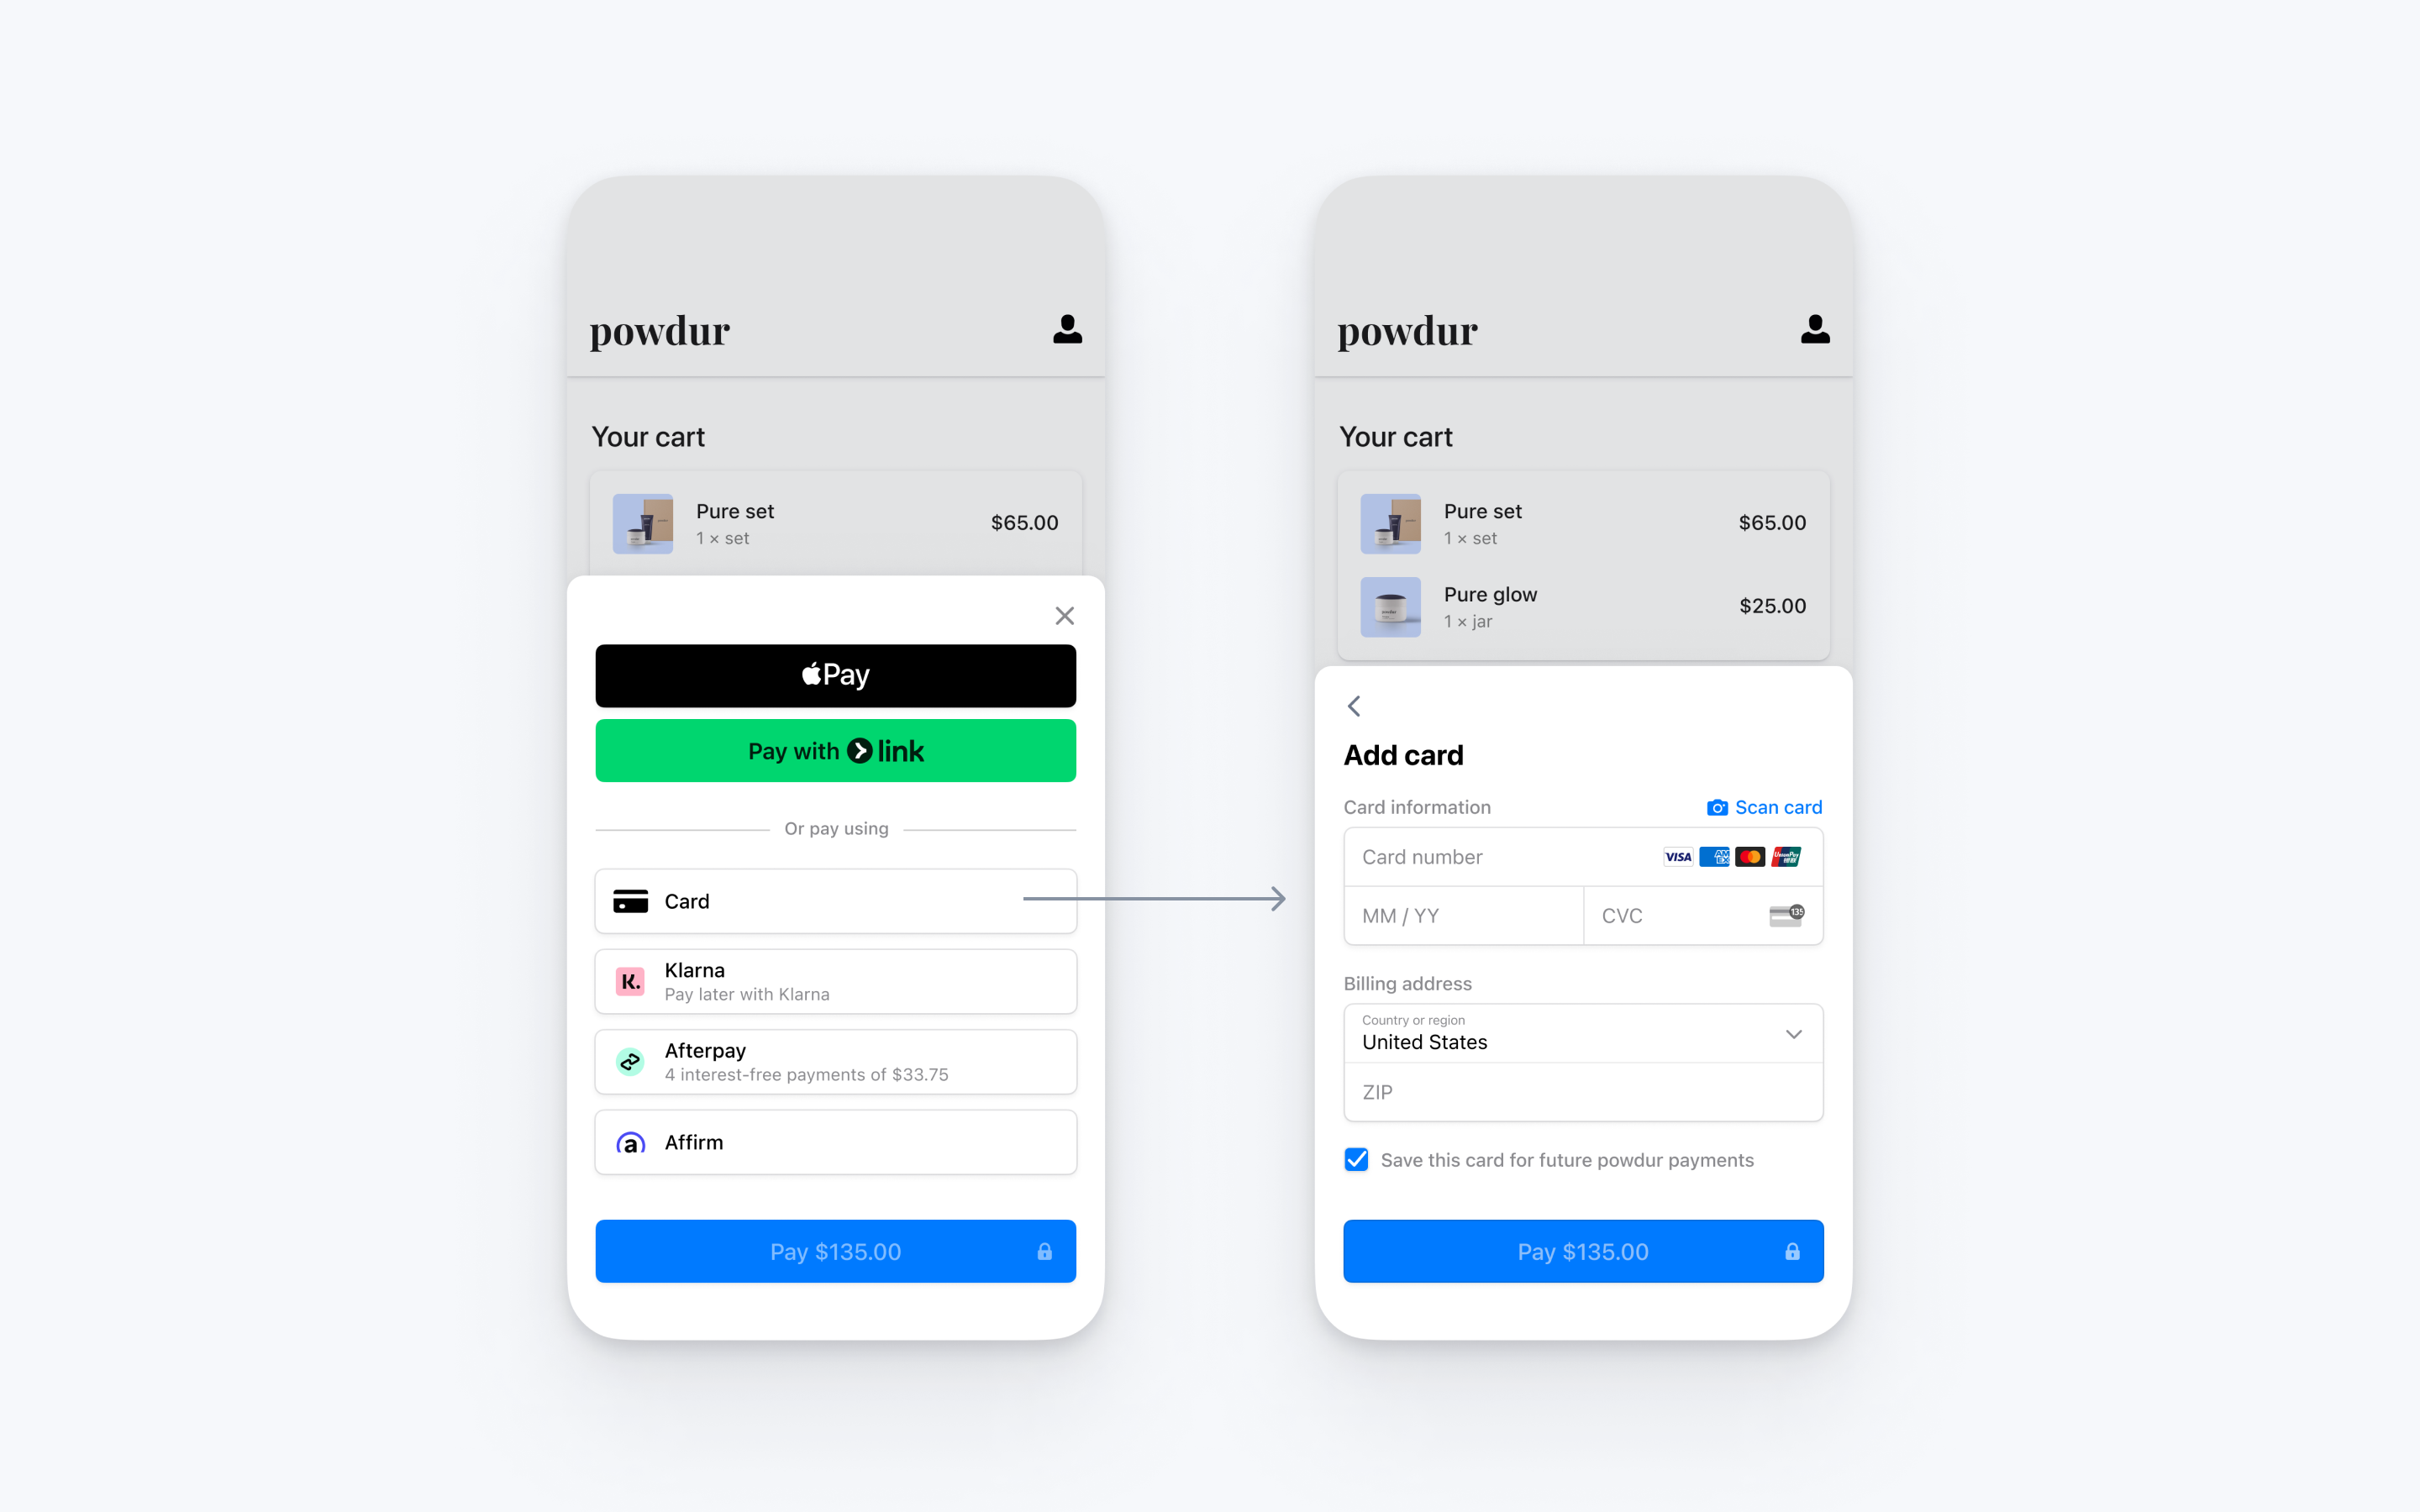
注意

您可以在 CodeSandbox 上分叉并部署此端点的实现方案进行测试。

您可以从管理平台管理支付方式。Stripe 根据交易金额、货币和支付流程等因素处理符合条件的支付方式的退货。PaymentIntent 是用您在管理平台中配置的支付方式创建的。如不想使用管理平台或想手动指定支付方式,可通过 payment_method_types 属性将其列出。

Command Line
curl
Ruby
Python
PHP
Java
Node.js
Go
.NET
No results
# Create a Customer (use an existing Customer ID if this is a returning customer) curl https://api.stripe.com/v1/customers \ -u
sk_test_BQokikJOvBiI2HlWgH4olfQ2
:
\ -X "POST" # Create an Ephemeral Key for the Customer curl https://api.stripe.com/v1/ephemeral_keys \ -u
sk_test_BQokikJOvBiI2HlWgH4olfQ2
:
\ -H "Stripe-Version: 2025-09-30.clover" \ -X "POST" \ -d "customer"="{{CUSTOMER_ID}}" \ # Create a PaymentIntent curl https://api.stripe.com/v1/payment_intents \ -u
sk_test_BQokikJOvBiI2HlWgH4olfQ2
:
\ -X "POST" \ -d "customer"="{{CUSTOMER_ID}}" \ -d "amount"=1099 \ -d "currency"="eur" \ # In the latest version of the API, specifying the `automatic_payment_methods` parameter # is optional because Stripe enables its functionality by default. -d "automatic_payment_methods[enabled]"=true \

收集付款详情
客户端

要在结账屏幕上显示移动 Payment Element,您必须确保:

  • 显示客户正在购买的产品以及总金额
  • 用 Address Element 从客户那里收集所需的配送信息
  • 添加结账按钮以显示 Stripe 的 UI

在应用的结账屏幕中,从您在上一步创建的端点获取 PaymentIntent 客户端密钥、临时密钥机密、客户 ID 和可发布密钥。使用 StripeAPI.shared 设置可发布密钥并初始化 PaymentSheet。

import UIKit import StripePaymentSheet class CheckoutViewController: UIViewController { @IBOutlet weak var checkoutButton: UIButton! var paymentSheet: PaymentSheet? let backendCheckoutUrl = URL(string: "Your backend endpoint/payment-sheet")! // Your backend endpoint override func viewDidLoad() { super.viewDidLoad() checkoutButton.addTarget(self, action: #selector(didTapCheckoutButton), for: .touchUpInside) checkoutButton.isEnabled = false // MARK: Fetch the PaymentIntent client secret, Ephemeral Key secret, Customer ID, and publishable key var request = URLRequest(url: backendCheckoutUrl) request.httpMethod = "POST" let task = URLSession.shared.dataTask(with: request, completionHandler: { [weak self] (data, response, error) in guard let data = data, let json = try? JSONSerialization.jsonObject(with: data, options: []) as? [String : Any], let customerId = json["customer"] as? String, let customerEphemeralKeySecret = json["ephemeralKey"] as? String, let paymentIntentClientSecret = json["paymentIntent"] as? String, let publishableKey = json["publishableKey"] as? String, let self = self else { // Handle error return } STPAPIClient.shared.publishableKey = publishableKey // MARK: Create a PaymentSheet instance var configuration = PaymentSheet.Configuration() configuration.merchantDisplayName = "Example, Inc." configuration.customer = .init(id: customerId, ephemeralKeySecret: customerEphemeralKeySecret) // Set `allowsDelayedPaymentMethods` to true if your business handles // delayed notification payment methods like US bank accounts. configuration.allowsDelayedPaymentMethods = true self.paymentSheet = PaymentSheet(paymentIntentClientSecret: paymentIntentClientSecret, configuration: configuration) DispatchQueue.main.async { self.checkoutButton.isEnabled = true } }) task.resume() } }

当客户点击结账按钮时,调用 present 以显示 PaymentSheet。在客户完成支付后,Stripe 会关闭 PaymentSheet,并使用 PaymentSheetResult 调用完成块。

@objc func didTapCheckoutButton() { // MARK: Start the checkout process paymentSheet?.present(from: self) { paymentResult in // MARK: Handle the payment result switch paymentResult { case .completed: print("Your order is confirmed") case .canceled: print("Canceled!") case .failed(let error): print("Payment failed: \(error)") } } }

如果 PaymentSheetResult 是 .completed,则通知用户(例如,显示订单确认界面)。

将 allowsDelayedPaymentMethods 设置为 true,以允许延迟通知型支付方式,例如美国银行账户。对于这些支付方式,只有当 PaymentSheet 完成后才能知道最终的付款状态是成功还是失败。如果您支持这些类型的支付方式,请告知客户他们的订单已被确认,并且仅在付款成功时履行订单(例如,为他们安排发货)。

设置返回页面
客户端

客户可能会离开您的应用来验证(例如,去 Safari 或他们的网银应用)。若允许他们在验证后自动返回到您的应用,配置一个自定义页面内跳转协议 (URL Scheme),并设置您的应用程序代理将 URL 转发到 SDK。Stripe 不支持通用链接。

SceneDelegate.swift
Swift
No results
// This method handles opening custom URL schemes (for example, "your-app://stripe-redirect") func scene(_ scene: UIScene, openURLContexts URLContexts: Set<UIOpenURLContext>) { guard let url = URLContexts.first?.url else { return } let stripeHandled = StripeAPI.handleURLCallback(with: url) if (!stripeHandled) { // This was not a Stripe url – handle the URL normally as you would } }

此外,将您的 PaymentSheet.Configuration 对象上的 returnURL 设置到您的应用的 URL。

var configuration = PaymentSheet.Configuration() configuration.returnURL = "your-app://stripe-redirect"

处理付款后事件
服务器端

付款完成时,Stripe 会发送一个 payment_intent.succeeded 事件。使用 管理平台 Webhook 工具、或按照 Webhook 指南来接收这些事件并运行操作,例如,向客户发送订单确认邮件、在数据库中记录订单,或启动配送流程。

侦听这些事件,而不是等待客户端回调。在客户端,客户可能会在执行回调之前关闭浏览器窗口或退出应用程序,并且恶意客户端可能会操纵响应。设置您的集成来侦听异步事件,这样才能用单一集成用用接受不同类型的支付方式。

除了处理 payment_intent.succeeded 事件外,建议在使用 Payment Element 收款时也处理其他的这些事件:

事件描述操作
payment_intent.succeeded客户成功完成付款时发送。向客户发送订单确认通知,并履行他们的订单。
payment_intent.processing当客户成功发起付款但并未完成时发送。当客户发起银行借记时,通常会发送此事件。之后将会出现 payment_intent.succeeded 或 payment_intent.payment_failed 事件。向客户发送订单确认,告知他们的付款正等待处理。对于数字商品,您可能想先履行订单,然后再等付款完成。
payment_intent.payment_failed在客户尝试付款但付款失败时发送。如果一笔付款从 processing 变为 payment_failed,则让客户再尝试一次。

测试集成

卡号场景如何测试
该卡付款成功,不需要验证。使用信用卡号以及有效期和 CVC 和邮编填写我们的信用卡表单。
该卡付款时需要验证。使用信用卡号以及有效期和 CVC 和邮编填写我们的信用卡表单。
该卡被拒绝,显示拒付代码,例如 insufficient_funds。使用信用卡号以及有效期和 CVC 和邮编填写我们的信用卡表单。
银联卡的长度为 13-19 位。使用信用卡号以及有效期和 CVC 和邮编填写我们的信用卡表单。

有关测试您的集成的更多信息,请参阅测试部分。

可选启用 Link

在您的支付方式设置中启用 Link,以允许客户使用 Link 的一键快速结账按钮安全地保存并重复使用他们的支付信息。

将客户的邮件地址传递到 Mobile Payment Element

Link 利用客户的邮件地址对客户进行验证。Stripe 建议预填充尽可能多的信息,以简化结账流程。

要预先填充客户的姓名、邮件地址和电话号码,请在初始化 PaymentSheet.Configuration 后提供包含客户信息的 defaultBillingDetails。

var configuration = PaymentSheet.Configuration() configuration.defaultBillingDetails.name = "Jenny Rosen" configuration.defaultBillingDetails.email = "jenny.rosen@example.com" configuration.defaultBillingDetails.phone = "888-888-8888"

可选启用 Apple Pay

注意

如果您的结账界面有专门的 Apple Pay 按钮,则按照 Apple Pay 指南中的说明并使用 ApplePayContext 从您的 Apple Pay 按钮收款。您可以用 PaymentSheet 来处理其他支付方式类型。

注册 Apple Merchant ID

可通过在 Apple 开发人员网站注册新的标识符来获取 Apple 商家 ID。

在表单中填写描述和标识符。描述内容仅供您自己记录之用,之后可随时更改。Stripe 建议用您的应用的名称作为标识符(例如,merchant.com.{{YOUR_APP_NAME}})。

创建新的 Apple Pay 证书

为您的应用创建证书,以加密支付数据。

转到管理平台中的 iOS 证书设置,点击添加新应用程序,然后按照说明进行操作。

下载证书签名请求 (CSR) 文件,来从 Apple 获取安全证书,以便使用 Apple Pay。

必须用一个 CSR 文件发布具体的一个证书。如果您切换您的 Apple Merchant ID,则必须前往管理平台的 iOS 证书设置中获取一个新的 CSR 和证书。

集成 Xcode

将 Apple Pay 功能添加到您的应用程序。在 Xcode 中,打开您的项目设置,点击签名和功能选项卡,然后添加 Apple Pay 功能。此时,系统可能会提示您登入您的开发人员账户。选择您之前创建的商家 ID,您的应用程序就可以接受 Apple Pay 了。

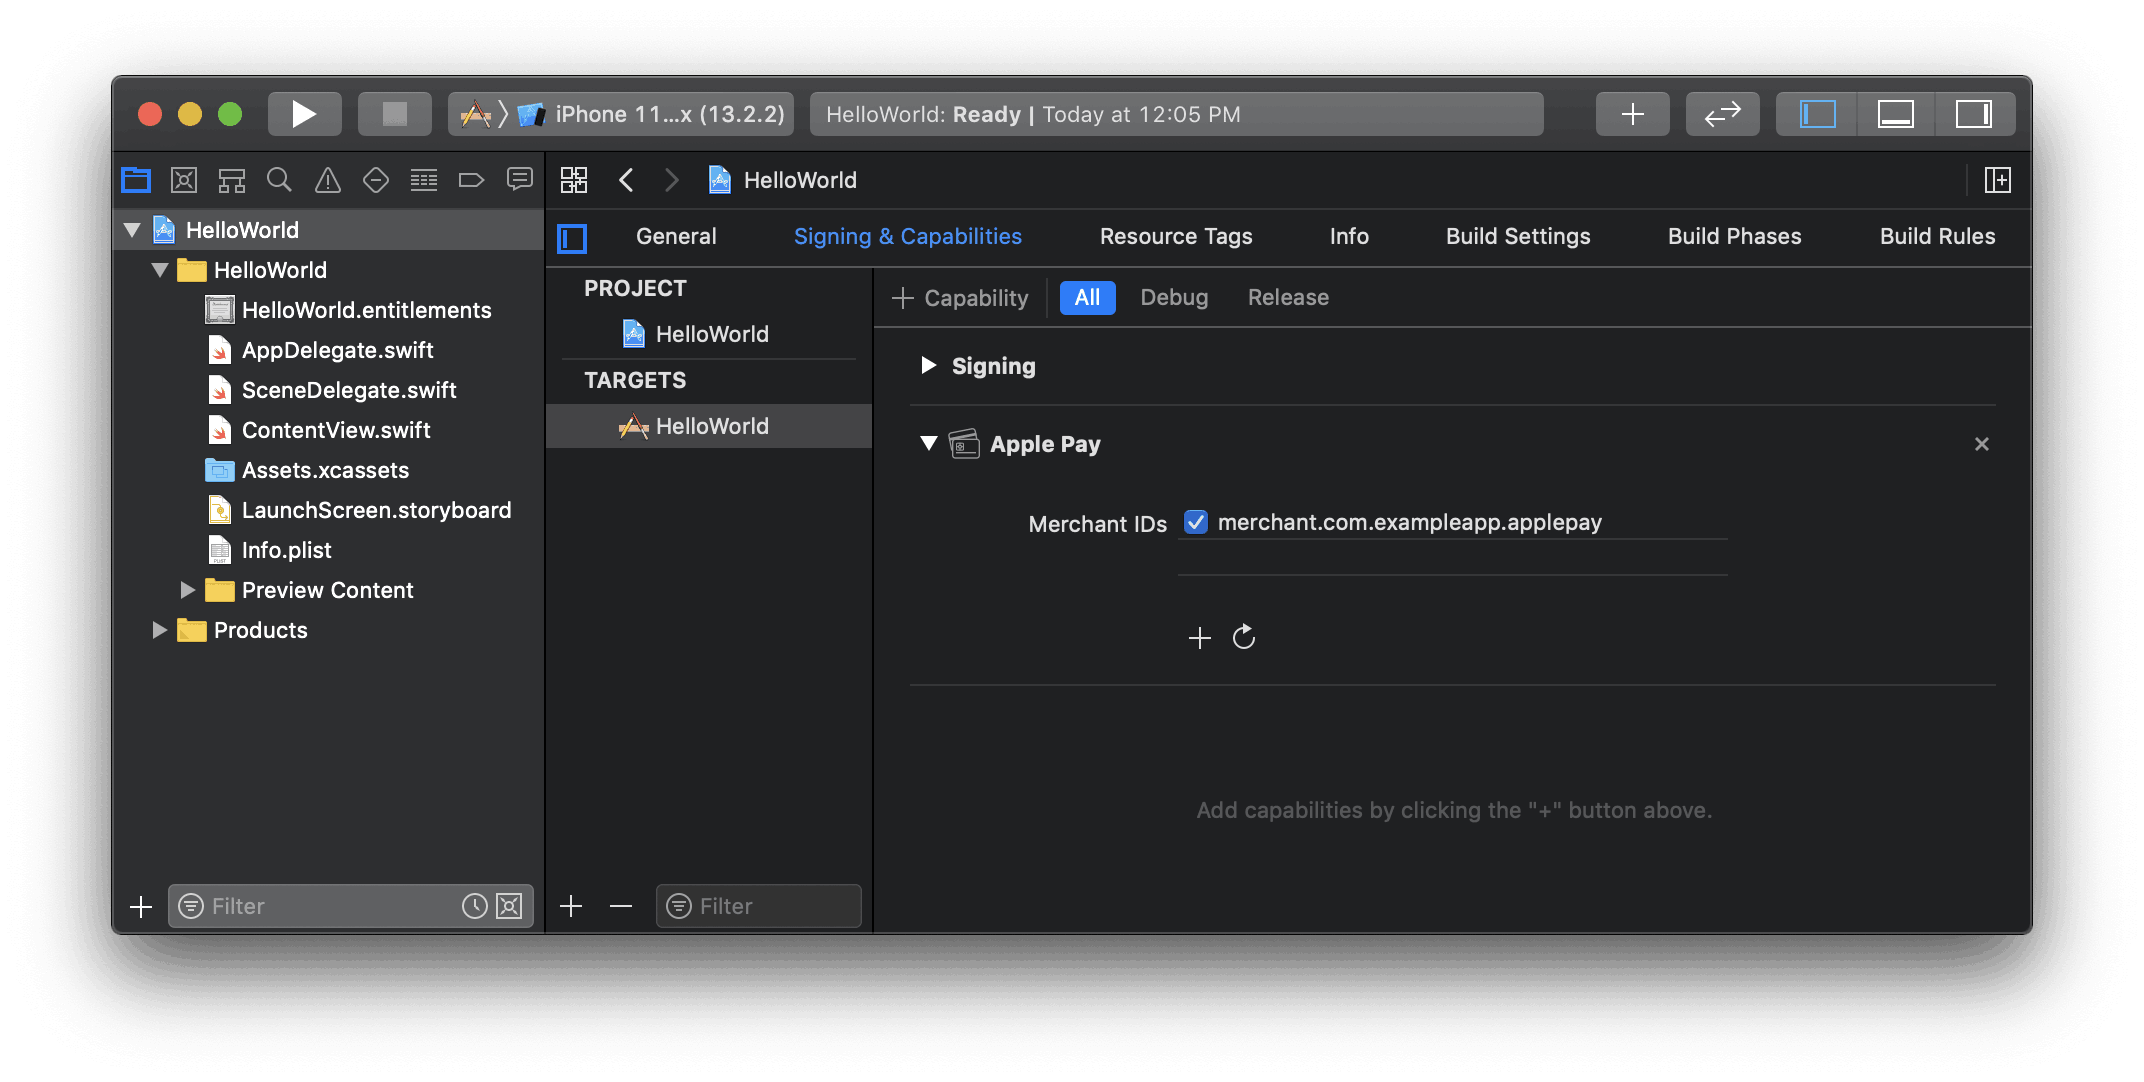
在 Xcode 中启用 Apple Pay 功能

添加 Apple Pay

要将 Apple Pay 添加到 PaymentSheet,用您的 Apple 商家 ID 和国家/地区代码初始化 PaymentSheet.Configuration 之后设置 applePay。

var configuration = PaymentSheet.Configuration() configuration.applePay = .init( merchantId: "merchant.com.your_app_name", merchantCountryCode: "US" )

订单跟踪

要在 iOS 16 或更高版本中添加订单跟踪信息,请在您的 PaymentSheet.ApplePayConfiguration.Handlers 中配置一个 authorizationResultHandler。Stripe 会在支付完成后调用您的实施的程序,但该操作在 iOS 关闭 Apple Pay 表单之前进行。

在您的 authorizationResultHandler 部署环境中,从您的服务器获取已完成订单的详情。将详情添加到提供的 PKPaymentAuthorizationResult 并调用提供的完成处理程序。

要了解有关订单跟踪的更多信息,请参阅 Apple 钱包订单文档。

let customHandlers = PaymentSheet.ApplePayConfiguration.Handlers( authorizationResultHandler: { result, completion in // Fetch the order details from your service MyAPIClient.shared.fetchOrderDetails(orderID: orderID) { myOrderDetails result.orderDetails = PKPaymentOrderDetails( orderTypeIdentifier: myOrderDetails.orderTypeIdentifier, // "com.myapp.order" orderIdentifier: myOrderDetails.orderIdentifier, // "ABC123-AAAA-1111" webServiceURL: myOrderDetails.webServiceURL, // "https://my-backend.example.com/apple-order-tracking-backend" authenticationToken: myOrderDetails.authenticationToken) // "abc123" // Call the completion block on the main queue with your modified PKPaymentAuthorizationResult completion(result) } } ) var configuration = PaymentSheet.Configuration() configuration.applePay = .init(merchantId: "merchant.com.your_app_name", merchantCountryCode: "US", customHandlers: customHandlers)

可选启用银行卡扫描

要启用银行卡扫描功能,在您的应用的 Info.plist 中设置 NSCameraUsageDescription(隐私 - 摄像头使用说明),然后提供使用摄像头的原因(例如,“要扫描银行卡”)。iOS 13 或以上版本的设备支持银行卡扫描。

可选启用 ACH 付款

要启用 ACH 借记付款,请将 StripeFinancialConnections 作为您的应用的依赖项。

Stripe iOS SDK 是开源的,有完整的文档,并且与支持 iOS 13 或更高版本操作系统的应用程序兼容。

要安装 SDK,按这些步骤进行:

  1. 在 Xcode 中,选择文件 > **添加工具包依赖…**并输入 https://github.com/stripe/stripe-ios-spm 作为仓库 URL。
  2. 从我们的发布页面选择最新的版本号。
  3. 将 StripeFinancialConnections 产品添加到您的目标应用程序。

注意

有关最新 SDK 发布及过往版本的详细信息,请查看 GitHub 上的发布页面。要想在新版本发布时接收通知,请查看仓库的发布。

可选自定义表单

所有自定义操作均通过 PaymentSheet.Configuration 对象来配置。

外观

用 Appearance API 自定义颜色、字体等,使其匹配您的应用程序的外观样式。

支付方式布局

使用 paymentMethodLayout 配置表单中支付方式的布局。可以水平、垂直显示,也可以让 Stripe 自动优化布局。

var configuration = PaymentSheet.Configuration() configuration.paymentMethodLayout = .automatic

收集用户地址

用 Address Element 收集客户的本地和国际收货地址或账单地址。

商家显示名称

通过设置 merchantDisplayName 来指定一个向客户显示的商家名称。默认情况下,使用的是您的应用的名称。

var configuration = PaymentSheet.Configuration() configuration.merchantDisplayName = "My app, Inc."

暗色模式

PaymentSheet 自动适应用户的系统范围内的外观设置(明暗模式)。如果您的应用不支持暗色模式,可将 style 设置到 alwaysLight 或 alwaysDark 模式。

var configuration = PaymentSheet.Configuration() configuration.style = .alwaysLight

默认账单详情

要为支付表单中收集的账单详情设置默认值,请配置 defaultBillingDetails 属性。paymentSheet 会用您提供的值预先填充其字段。

var configuration = PaymentSheet.Configuration() configuration.defaultBillingDetails.address.country = "US" configuration.defaultBillingDetails.email = "foo@bar.com"

收集账单详情

用 billingDetailsCollectionConfiguration 来指定您希望如何在支付表单中收集账单详情。

可以收集客户的姓名、邮件地址、电话号码和地址。

如果您只想通过支付方式获得所需的账单详情,请将 billingDetailsCollectionConfiguration.attachDefaultsToPaymentMethod 设置为 true。在这种情况下,PaymentSheet.Configuration.defaultBillingDetails 被设置为支付方式的 billing details。

如果您希望收集支付方式非必需的额外账单详情,请将 billingDetailsCollectionConfiguration.attachDefaultsToPaymentMethod 设置为 false。在这种情况下,通过 PaymentSheet 收集的账单详情被设置为支付方式的账单详情。

var configuration = PaymentSheet.Configuration() configuration.defaultBillingDetails.email = "foo@bar.com" configuration.billingDetailsCollectionConfiguration.name = .always configuration.billingDetailsCollectionConfiguration.email = .never configuration.billingDetailsCollectionConfiguration.address = .full configuration.billingDetailsCollectionConfiguration.attachDefaultsToPaymentMethod = true

注意

请咨询律师,了解与收集信息有关的法律。仅在需要收集号码来完成交易时,才收集手机号码。

可选处理用户的退出动作

PaymentSheet 在本地存储一些信息,以记住用户是否在某个应用程序内使用了 Link。要清除 PaymentSheet 的内部状态,在用户登出时调用 PaymentSheet.resetCustomer() 方法。

import UIKit import StripePaymentSheet class MyViewController: UIViewController { @objc func didTapLogoutButton() { PaymentSheet.resetCustomer() // Other logout logic required by your app } }

可选在您的用户界面完成付款

您可以在出示支付表单时仅收集支付方式详情,然后再在您的应用的用户界面上调用 confirm 方法来完成付款。如果您使用自定义购买按钮,或在收集了付款详情后需要额外的步骤,这会非常有用。

在您的应用程序的用户界面内完成付款

以下步骤将引导您在您的应用程序的用户界面内完成付款。前往 GitHub 查看我们的示例集成。

  1. 首先,初始化 PaymentSheet.FlowController,而非 PaymentSheet,并用它的 paymentOption 属性更新您的用户界面。该属性包含表示客户最初选择的默认支付方式的图片和标签。
PaymentSheet.FlowController.create(paymentIntentClientSecret: paymentIntentClientSecret, configuration: configuration) { [weak self] result in switch result { case .failure(let error): print(error) case .success(let paymentSheetFlowController): self?.paymentSheetFlowController = paymentSheetFlowController // Update your UI using paymentSheetFlowController.paymentOption } }
  1. 然后,调用 presentPaymentOptions 来收集付款详情。完成后,用 paymentOption 属性再次更新您的用户界面。
paymentSheetFlowController.presentPaymentOptions(from: self) { // Update your UI using paymentSheetFlowController.paymentOption }
  1. 最后,调用 confirm。
paymentSheetFlowController.confirm(from: self) { paymentResult in // MARK: Handle the payment result switch paymentResult { case .completed: print("Payment complete!") case .canceled: print("Canceled!") case .failed(let error): print(error) } }

将 allowsDelayedPaymentMethods 设置为 true,以允许延迟通知型支付方式,例如美国银行账户。对于这些支付方式,只有当 PaymentSheet 完成后才能知道最终的付款状态是成功还是失败。如果您支持这些类型的支付方式,请告知客户他们的订单已被确认,并且仅在付款成功时履行订单(例如,为他们安排发货)。

可选启用确认时的 CVC 重新收集流程

以下有关在确认 PaymentIntent 的过程中重新收集已保存卡的 CVC 的说明假定的是您的集成包含以下内容:

  • 在收集支付详情之前创建 PaymentIntent

更新意图创建参数

要在确认付款时重新收集 CVC,请在创建 PaymentIntent 的过程中包含 require_cvc_recollection。

Command Line
curl
Ruby
Python
PHP
Java
Node.js
Go
.NET
No results
# Create a Customer (use an existing Customer ID if this is a returning customer) curl https://api.stripe.com/v1/customers \ -u
sk_test_BQokikJOvBiI2HlWgH4olfQ2
:
\ -X "POST" # Create an Ephemeral Key for the Customer curl https://api.stripe.com/v1/ephemeral_keys \ -u
sk_test_BQokikJOvBiI2HlWgH4olfQ2
:
\ -H "Stripe-Version: 2025-09-30.clover" \ -X "POST" \ -d "customer"="{{CUSTOMER_ID}}" \ # Create a PaymentIntent curl https://api.stripe.com/v1/payment_intents \ -u
sk_test_BQokikJOvBiI2HlWgH4olfQ2
:
\ -X "POST" \ -d "customer"="{{CUSTOMER_ID}}" \ -d "amount"=1099 \ -d "currency"="eur" \ -d "payment_method_options[card][require_cvc_recollection]"=true \ # In the latest version of the API, specifying the `automatic_payment_methods` parameter # is optional because Stripe enables its functionality by default. -d "automatic_payment_methods[enabled]"=true \
此页面的内容有帮助吗?
是否
  • 需要帮助?联系支持。
  • 加入我们的早期使用计划。
  • 查看我们的更改日志。
  • 有问题?联系销售。
  • LLM? Read llms.txt.
  • Powered by Markdoc
Code quickstart
相关指南
Elements Appearance API
更多支付场景
卡的工作原理