# Payment Method Messaging Element
後払いオプションを自動的に説明します。
Payment Method Messaging Element は、利用可能な後払いプランについて顧客に伝える UI コンポーネントです。利用可能なプランと条件を自動的に特定し、各地域に合わせて説明を生成し、それをフォームのテーマで表示します。
## Payment Method Messaging Element を作成およびマウントする
#### HTML + JS
Stripe Elements を使用して、サイトに [Payment Method Messaging](https://docs.stripe.com/js/elements_object/create_element?type=paymentMethodMessaging) Element を含めます。
1. Stripe.js スクリプトをページに追加するには、このスクリプトを HTML ファイルの `head` に追加します。
```html
```
1. Payment Method Messaging Element をマウントするページに、プレースホルダーエレメントを作成します。
```html
```
1. 商品、カート、決済の各ページに次のコードを含めて、Stripe.js ([ロケールを指定](https://docs.stripe.com/js/appendix/supported_locales)) のインスタンスを作成し、Payment Method Messaging Element をマウントします。
```js
// Set your publishable key. Remember to change this to your live publishable key in production!
// See your keys here: https://dashboard.stripe.com/apikeys
const stripe = Stripe('<>');
const elements = stripe.elements();
const options = {
amount: 9900, // 99.00 USD
currency: 'USD',
// (optional) the country that the end-buyer is in
countryCode: 'US',
};
const PaymentMessageElement =
elements.create('paymentMethodMessaging', options);
PaymentMessageElement.mount('#payment-method-messaging-element');
```
#### React
Stripe Elements を使用して、サイトに [Payment Method Messaging](https://docs.stripe.com/js/elements_object/create_element?type=paymentMethodMessaging) Element を含めます。
1. npm パブリックレジストリから [React Stripe.js](https://www.npmjs.com/package/@stripe/react-stripe-js) と [Stripe.js ローダー](https://www.npmjs.com/package/@stripe/stripe-js)をインストールします。
```bash
npm install --save @stripe/react-stripe-js @stripe/stripe-js
```
1. 商品、カート、支払いの各ページに `PaymentMethodMessagingElement` コンポーネントを追加します。
```jsx
import {Elements, PaymentMethodMessagingElement} from '@stripe/react-stripe-js';
import {loadStripe} from '@stripe/stripe-js';
// Set your publishable key. Remember to change this to your live publishable key in production!
// See your keys here: https://dashboard.stripe.com/apikeys
const stripePromise = loadStripe('<>');
const ProductDetail = () => (
);
```
> 貴社で構築済みの Stripe システムで支払い方法を手動で一覧表示する必要がある場合は、[支払い方法をカスタマイズする方法](https://docs.stripe.com/elements/payment-method-messaging.md#customize-payment-methods)をご覧ください。
## Optional: Stripe Connect とともに使用する
ダイレクト支払いを作成する *Connect* (Connect is Stripe's solution for multi-party businesses, such as marketplace or software platforms, to route payments between sellers, customers, and other recipients) プラットフォームは、Payment Method Messaging Element をレンダリングする連結アカウントを識別する必要があります。フロントエンドで、`PaymentMessageElement` を作成する前に、Stripe インスタンスで `stripeAccount` オプションを設定します。
```javascript
const stripe = Stripe('<>', {
stripeAccount: '{{CONNECTED_ACCOUNT_ID}}',
});
```
## 動的な表示
Element は顧客が資格を持つ決済プランを動的に表示します。プランは顧客の場所と通貨によって変わり、またこの例のように支払い金額によっても変わります。
一部の決済手段では、「後払い」プランおよび「今すぐ支払う」プランが提供されます。 利用できるのが「今すぐ支払う」オプションのみである場合は、何も表示されません。
## 支払い方法をカスタマイズする
[動的な支払い方法](https://docs.stripe.com/payments/payment-methods/dynamic-payment-methods.md)を使用する場合、Payment Method Messaging Element では、[Stripe ダッシュボード](https://dashboard.stripe.com/settings/payment_methods)から支払い方法の設定が自動的にプルされ、最も関連性が高い支払い方法が顧客に動的に表示されます。あるいは、[`paymentMethodTypes`](https://docs.stripe.com/js/elements_object/create_element?type=paymentMethodMessaging#elements_create-options-paymentMethodTypes) を使用して、支払い方法を手動で一覧表示することができます。Payment Method Messaging Element では、引き続き、顧客の場所、通貨、支払い金額に基づいて顧客に利用する資格があるプランのみが表示されます。
#### HTML + JS
```js
// Set your publishable key. Remember to change this to your live publishable key in production!
// See your keys here: https://dashboard.stripe.com/apikeys
const stripe = Stripe('<>');
const elements = stripe.elements();
const options = {
amount: 9900, // 99.00 USD
currency: 'USD',paymentMethodTypes: ['klarna', 'afterpay_clearpay', 'affirm'],
// (optional) the country that the end-buyer is in
countryCode: 'US',
};
const PaymentMessageElement =
elements.create('paymentMethodMessaging', options);
PaymentMessageElement.mount('#payment-method-messaging-element');
```
#### React
```jsx
import {Elements, PaymentMethodMessagingElement} from '@stripe/react-stripe-js';
import {loadStripe} from '@stripe/stripe-js';
// Set your publishable key. Remember to change this to your live publishable key in production!
// See your keys here: https://dashboard.stripe.com/apikeys
const stripePromise = loadStripe('<>');
const ProductDetail = () => (
<>
{/* ... */}
);
```
デフォルトでは、Payment Element は動的な順序を使用して、各ユーザーに表示する支払い方法を最適化します。希望の注文を設定するには、[paymentMethodOrder](https://docs.stripe.com/js/elements_object/create_element?type=paymentMethodMessaging#elements_create-options-paymentMethodOrder) オプションを使用します。
## 情報モーダル
顧客がインフォメーションアイコン (ⓘ) を選択すると、Payment Method Messaging Element は、後払いプランの詳細を記したモーダルを表示します。
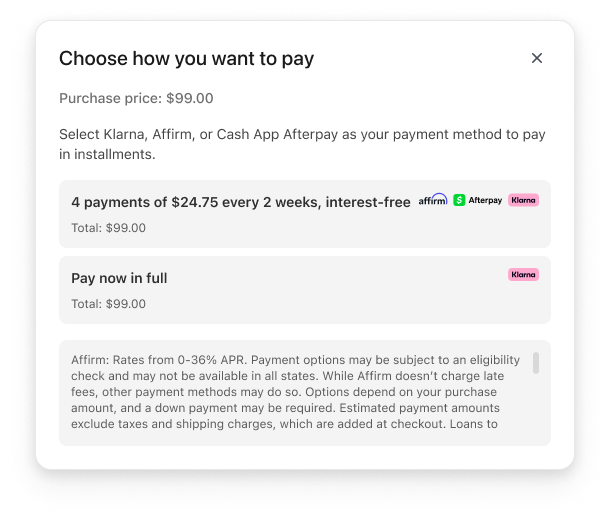
情報モーダルのプレビュー
モーダルには以下が含まれます。
- 後払い支払い方法の使用方法に関する段階的な概要
- 各支払いプランの規約概要
- 各支払いプランの規約全文へのリンク
## サポートされているプラン
Payment Method Messaging Element は、次の支払いプランをサポートしています。
- [Affirm](https://docs.stripe.com/payments/affirm.md#payment-options)
- [Afterpay / Clearpay](https://docs.stripe.com/payments/afterpay-clearpay.md#collection-schedule)
- [Klarna](https://docs.stripe.com/payments/klarna.md#payment-options) (一括払いのみ)
> 渡された[countryCode](https://docs.stripe.com/js/elements_object/create_element?type=paymentMethodMessaging#elements_create-options-countryCode)と[通貨](https://docs.stripe.com/js/elements_object/create_element?type=paymentMethodMessaging#elements_create-options-currency)の組み合わせに利用可能な決済プランがない場合には、メッセージは表示されません。
## デザイン
[Appearance API](https://docs.stripe.com/elements/appearance-api.md) を使用して、メッセージのフォントとロゴをカスタマイズします。以下の例のように、[テーマ](https://docs.stripe.com/elements/appearance-api.md?platform=web#theme)も選択できます。
[変数](https://docs.stripe.com/elements/appearance-api.md#variables)と[ルール](https://docs.stripe.com/elements/appearance-api.md#rules)を使用して、さらにカスタム設定できます。
```jsx
const appearance = {
variables: {
colorText: 'rgb(84, 51, 255)',
colorTextSecondary: 'rgb(28, 198, 255)',
fontSizeBase: '16px',
spacingUnit: '10px',
fontWeightMedium: 'bolder',
fontFamily: 'Ideal Sans, system-ui, sans-serif',
},
rules: {
'.PaymentMethodMessaging': {
textAlign: 'right',
}
}
};
const elements = stripe.elements({appearance});
const options = {
amount: 9900, // 99.00 USD
currency: 'USD',
paymentMethodTypes: ['klarna', 'afterpay_clearpay', 'affirm'],
// (optional) the country that the end-buyer is in
countryCode: 'US',
};
const PaymentMessageElement = elements.create('paymentMethodMessaging', options);
```
## 顧客に Stripe を開示する
Stripe は顧客の Elements とのやり取りに関する情報を収集して、サービスを提供し、不正利用を防止し、サービスを向上します。これには、Cookie と IP アドレスを使用して、1 つの決済フローセッションで顧客に表示する Elements を特定することが含まれます。Stripe がこのような方法でデータを使用するために必要なすべての権利と同意について開示し、これらを取得することはお客様の責任です。詳細については、[プライバシーセンター](https://stripe.com/legal/privacy-center#as-a-business-user-what-notice-do-i-provide-to-my-end-customers-about-stripe)をご覧ください。
Payment Method Messaging Element は、顧客にさまざまな後払いオプションを提供できるようにするツールです。後払いオプションのプロモーションに関して適用される法律、規則、規制に準拠する責任はお客様にあります。