# Create direct charges
Create charges directly on the connected account and collect fees.
Create *direct charges* when customers transact directly with a connected account, often unaware of your platform’s existence. With direct charges:
- The payment appears as a charge on the connected account, not your platform’s account.
- The connected account’s balance increases with every charge.
- Your account balance increases with application fees from every charge.
This charge type is best suited for platforms providing software as a service. For example, Shopify provides tools for building online storefronts, and Thinkific enables educators to sell online courses.
## Platform visibility limitations
Direct charges have limited visibility at the platform level. When you create direct charges:
- Transaction objects such as `PaymentIntents` and `Charges` exist on the connected account, not on the platform.
- To access direct charge data, you must query the Stripe API using the [connected account ID in the Stripe-Account header](https://docs.stripe.com/connect/authentication.md).
This scoping behavior affects data synchronization services like Fivetran, as well as other third-party integrations that rely on platform-level API queries. To retrieve direct charge data, they must query the connected account, not the platform.
> We recommend using direct charges for connected accounts that have access to the full Stripe Dashboard.
Redirect to a Stripe-hosted payment page using [Stripe Checkout](https://docs.stripe.com/payments/checkout.md). See how this integration [compares to Stripe’s other integration types](https://docs.stripe.com/payments/online-payments.md#compare-features-and-availability).
#### Integration effort
Complexity: 2/5
#### Integration type
Redirect to Stripe-hosted payment page
#### UI customization
Limited customization
- 20 preset fonts
- 3 preset border radius
- Custom background and border color
- Custom logo
[Try it out](https://checkout.stripe.dev/)
First, [register](https://dashboard.stripe.com/register) for a Stripe account.
Use our official libraries to access the Stripe API from your application:
#### Ruby
```bash
# Available as a gem
sudo gem install stripe
```
```ruby
# If you use bundler, you can add this line to your Gemfile
gem 'stripe'
```
## Create a Checkout Session [Client-side] [Server-side]
A [Checkout Session](https://docs.stripe.com/api/checkout/sessions.md) controls what your customer sees in the payment form such as line items, the order amount, and currency. Add a checkout button to your website that calls a server-side endpoint to create a Checkout Session.
```html
Checkout
```
On your server, create a Checkout Session and redirect your customer to the [URL](https://docs.stripe.com/api/checkout/sessions/object.md#checkout_session_object-url) returned in the response.
```curl
curl https://api.stripe.com/v1/checkout/sessions \
-u "<>:" \
-H "Stripe-Account: {{CONNECTEDACCOUNT_ID}}" \
-d "line_items[0][price_data][currency]=usd" \
-d "line_items[0][price_data][product_data][name]=T-shirt" \
-d "line_items[0][price_data][unit_amount]=1000" \
-d "line_items[0][quantity]=1" \
-d "payment_intent_data[application_fee_amount]=123" \
-d mode=payment \
--data-urlencode "success_url=https://example.com/success?session_id={CHECKOUT_SESSION_ID}"
```
- `Stripe-Account`: This header indicates a direct charge for your connected account. The connected account’s [branding](https://docs.stripe.com/connect/direct-charges.md#branding) is used in Checkout, which allows their customers to feel like they’re interacting directly with the connected account instead of your platform.
- `line_items`: This attribute represents items that your customer is purchasing and shows up in the Stripe-hosted checkout page.
- `payment_intent_data[application_fee_amount]`: This attribute specifies the amount your platform deducts from the transaction as an application fee. After the payment is processed on the connected account, the `application_fee_amount` is transferred to the platform. See [collect fees](https://docs.stripe.com/connect/direct-charges.md#collect-fees) for more information.
- `success_url`: Stripe redirects the customer to the success URL after they complete a payment and replaces the `{CHECKOUT_SESSION_ID}` string with the Checkout Session ID. Use this to retrieve the Checkout Session and inspect the status to decide what to show your customer. You can also append your own query parameters, which persist through the redirect process. See [customize redirect behavior with a Stripe-hosted page](https://docs.stripe.com/payments/checkout/custom-success-page.md) for more information.
View charges that you create on your connected account in your [payments list](https://dashboard.stripe.com/test/payments). Direct charges don’t show in exports, but you can find them in [reports](https://docs.stripe.com/stripe-reports.md), [Sigma](https://docs.stripe.com/data/sigma.md), or using the API.
## Handle post-payment events [Server-side]
Stripe sends a [checkout.session.completed](https://docs.stripe.com/api/events/types.md#event_types-checkout.session.completed) event when the payment completes. [Use a webhook to receive these events](https://docs.stripe.com/webhooks/quickstart.md) and run actions, like sending an order confirmation email to your customer, logging the sale in a database, or starting a shipping workflow.
Listen for these events rather than waiting on a callback from the client. On the client, the customer could close the browser window or quit the app before the callback executes. Some payment methods also take 2-14 days for payment confirmation. Setting up your integration to listen for asynchronous events enables you to accept multiple [payment methods](https://stripe.com/payments/payment-methods-guide) with a single integration.
Stripe recommends handling all of the following events when collecting payments with Checkout:
| Event | Description | Next steps |
| --- | --- | --- |
| [checkout.session.completed](https://docs.stripe.com/api/events/types.md#event_types-checkout.session.completed) | The customer has successfully authorized the payment by submitting the Checkout form. | Wait for the payment to succeed or fail. |
| [checkout.session.async_payment_succeeded](https://docs.stripe.com/api/events/types.md#event_types-checkout.session.async_payment_succeeded) | The customer’s payment succeeded. | Fulfill the purchased goods or services. |
| [checkout.session.async_payment_failed](https://docs.stripe.com/api/events/types.md#event_types-checkout.session.async_payment_failed) | The payment was declined, or failed for some other reason. | Contact the customer through email and request that they place a new order. |
These events all include the [Checkout Session](https://docs.stripe.com/api/checkout/sessions.md) object. After the payment succeeds, the underlying *PaymentIntent* (The Payment Intents API tracks the lifecycle of a customer checkout flow and triggers additional authentication steps when required by regulatory mandates, custom Radar fraud rules, or redirect-based payment methods) [status](https://docs.stripe.com/payments/paymentintents/lifecycle.md) changes from `processing` to `succeeded` or a failure status.
## Test the integration
#### Cards
| Card number | Scenario | How to test |
| --- | --- | --- |
| 4242424242424242 | The card payment succeeds and doesn’t require authentication. | Fill out the credit card form using the credit card number with any expiration, CVC, and postal code. |
| 4000002500003155 | The card payment requires *authentication* (Strong Customer Authentication (SCA) is a regulatory requirement in effect as of September 14, 2019, that impacts many European online payments. It requires customers to use two-factor authentication like 3D Secure to verify their purchase). | Fill out the credit card form using the credit card number with any expiration, CVC, and postal code. |
| 4000000000009995 | The card is declined with a decline code like `insufficient_funds`. | Fill out the credit card form using the credit card number with any expiration, CVC, and postal code. |
| 6205500000000000004 | The UnionPay card has a variable length of 13-19 digits. | Fill out the credit card form using the credit card number with any expiration, CVC, and postal code. |
#### Wallets
| Payment method | Scenario | How to test |
| --- | --- | --- |
| Alipay | Your customer successfully pays with a redirect-based and [immediate notification](https://docs.stripe.com/payments/payment-methods.md#payment-notification) payment method. | Choose any redirect-based payment method, fill out the required details, and confirm the payment. Then click **Complete test payment** on the redirect page. |
#### Bank redirects
| Payment method | Scenario | How to test |
| --- | --- | --- |
| Bancontact, EPS, iDEAL, and Przelewy24 | Your customer fails to authenticate on the redirect page for a redirect-based and immediate notification payment method. | Choose any redirect-based payment method, fill out the required details, and confirm the payment. Then click **Fail test payment** on the redirect page. |
| Pay by Bank | Your customer successfully pays with a redirect-based and [delayed notification](https://docs.stripe.com/payments/payment-methods.md#payment-notification) payment method. | Choose the payment method, fill out the required details, and confirm the payment. Then click **Complete test payment** on the redirect page. |
| Pay by Bank | Your customer fails to authenticate on the redirect page for a redirect-based and delayed notification payment method. | Choose the payment method, fill out the required details, and confirm the payment. Then click **Fail test payment** on the redirect page. |
| BLIK | BLIK payments fail in a variety of ways—immediate failures (for example, the code is expired or invalid), delayed errors (the bank declines) or timeouts (the customer didn’t respond in time). | Use email patterns to [simulate the different failures.](https://docs.stripe.com/payments/blik/accept-a-payment.md#simulate-failures) |
#### Bank debits
| Payment method | Scenario | How to test |
| --- | --- | --- |
| BECS Direct Debit | Your customer successfully pays with BECS Direct Debit. | Fill out the form using the account number `900123456` and BSB `000000`. The confirmed PaymentIntent initially transitions to `processing`, then transitions to the `succeeded` status 3 minutes later. |
| BECS Direct Debit | Your customer’s payment fails with an `account_closed` error code. | Fill out the form using the account number `111111113` and BSB `000000`. |
| SEPA Direct Debit | Your customer successfully pays with SEPA Direct Debit. | Fill out the form using the account number `AT321904300235473204`. The confirmed PaymentIntent initially transitions to processing, then transitions to the succeeded status three minutes later. |
| SEPA Direct Debit | Your customer’s payment intent status transitions from `processing` to `requires_payment_method`. | Fill out the form using the account number `AT861904300235473202`. |
#### Vouchers
| Payment method | Scenario | How to test |
| --- | --- | --- |
| Boleto, OXXO | Your customer pays with a Boleto or OXXO voucher. | Select Boleto or OXXO as the payment method and submit the payment. Close the dialog after it appears. |
See [Testing](https://docs.stripe.com/testing.md) for additional information to test your integration.
As a platform, you can charge your connected accounts a portion of each transaction in the form of application fees. You can set application fee pricing in the following ways:
- Use the [Platform Pricing Tool](https://docs.stripe.com/connect/platform-pricing-tools.md) to set and test pricing rules. This no-code feature in the Stripe Dashboard is currently only available for platforms responsible for paying Stripe fees.
- Specify application fees directly in a [PaymentIntent](https://docs.stripe.com/api/payment_intents/object.md). Fees set with this method override the pricing logic specified in the Platform Pricing Tool.
> #### Review fee collector settings
>
> Fee collection and reporting for direct charges differs based on your [pricing model](https://docs.stripe.com/connect/saas.md#monetization) and how you configure [fee responsibility](https://docs.stripe.com/connect/accounts-v2/connected-account-configuration.md#application-fee-behavior). Make sure your application fee aligns with this behavior.
Your platform can take an application fee with the following limitations:
- The value of `application_fee_amount` must be positive and less than the amount of the charge. The application fee collected is capped at the captured amount of the charge.
- There are no additional Stripe fees on the application fee itself.
- In line with Brazilian regulatory and compliance requirements, platforms based outside of Brazil with Brazilian connected accounts can’t collect application fees through Stripe.
- The currency of `application_fee_amount` depends upon a few [multiple currency](https://docs.stripe.com/connect/currencies.md) factors.
The resulting charge’s [BalanceTransaction](https://docs.stripe.com/api.md#balance_transaction_retrieve) includes a detailed fee breakdown of both the Stripe and application fees. To provide a better reporting experience, collecting a fee generates an [ApplicationFee](https://docs.stripe.com/api/application_fees/object.md) object. Use the `amount` property on the `ApplicationFee` object for reporting.
You can view application fees in the [Collected fees](https://dashboard.stripe.com/connect/application_fees) section of the Dashboard.
> Application fees for direct charges are created asynchronously by default. If you expand the `application_fee` object in a charge creation request, the application fee is created synchronously as part of that request. Only expand the `application_fee` object if you must, because it increases the latency of the request.
>
> To receive notifications of asynchronously created `ApplicationFee` objects, listen for the [application_fee.created](https://docs.stripe.com/api/events/types.md#event_types-application_fee.created) webhook event.
### Flow of funds with fees
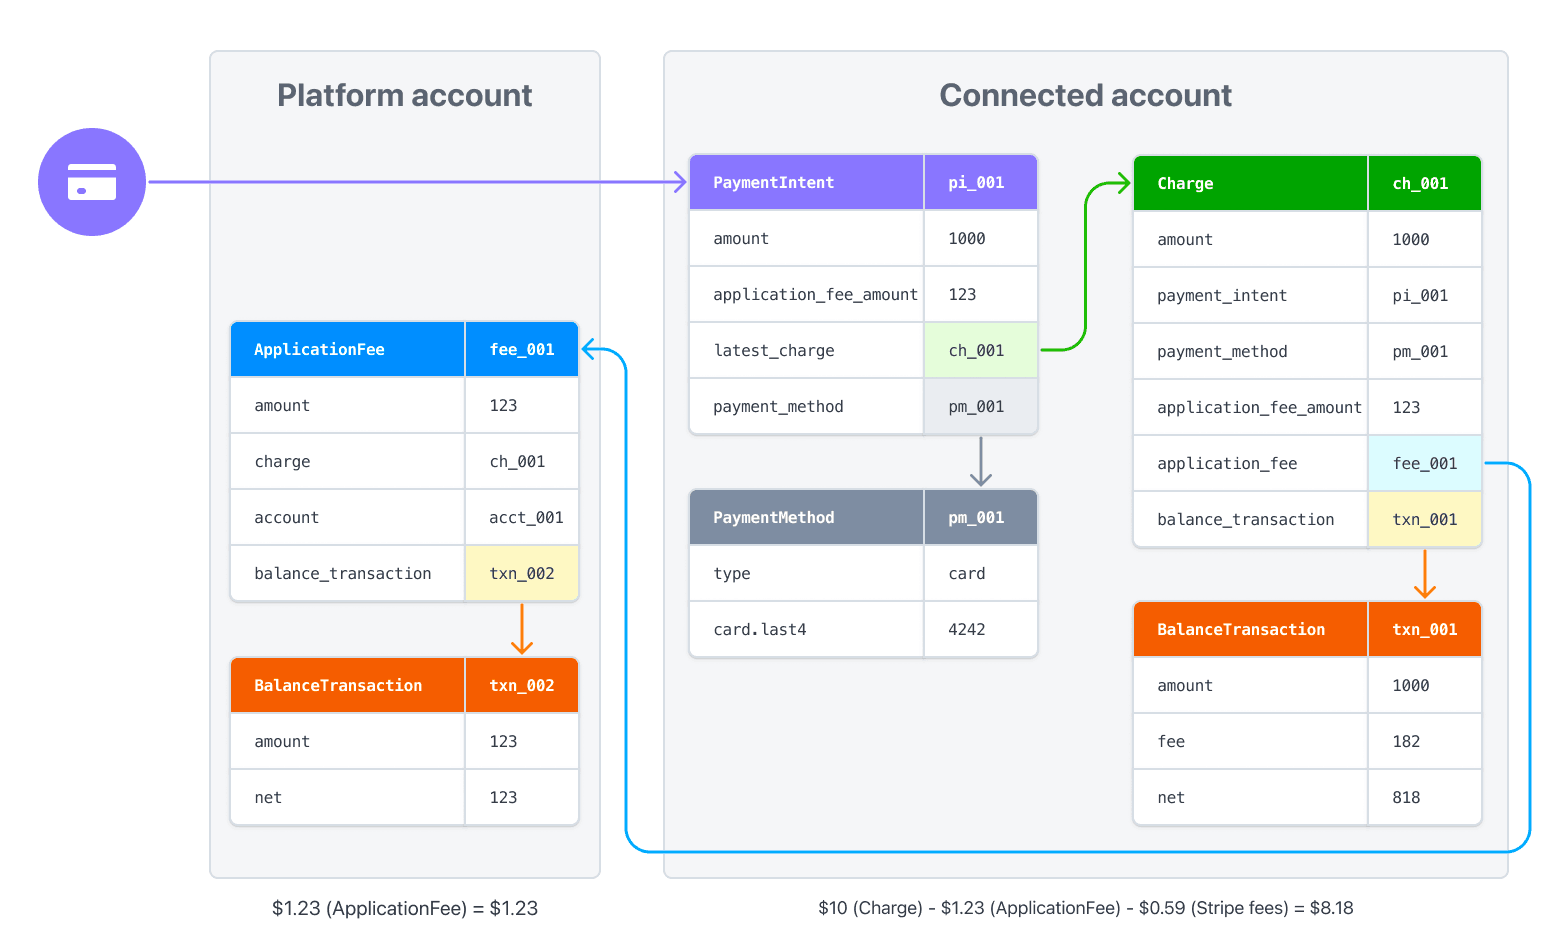
When you specify an application fee on a charge, the fee amount is transferred to your platform’s Stripe account. When processing a charge directly on the connected account, the charge amount—less the Stripe fees and application fee—is deposited into the connected account.
For example, if you make a charge of 10 USD with a 1.23 USD application fee (like in the previous example), 1.23 USD is transferred to your platform account. 8.18 USD (10 USD - 0.59 USD - 1.23 USD) is netted in the connected account (assuming standard US Stripe fees).
If you process payments in multiple currencies, read [how currencies are handled](https://docs.stripe.com/connect/currencies.md) in Connect.
## Customize branding
Your platform and connected accounts can use the [Branding settings](https://dashboard.stripe.com/account/branding) in the Dashboard to customize branding on the payments page. For direct charges, Checkout uses the brand settings of the connected account.
You can also use the API to [update branding settings](https://docs.stripe.com/api/accounts/update.md#update_account-settings-branding):
- `icon` - Displayed next to the business name in the header of the Checkout page.
- `logo` - Used in place of the icon and business name in the header of the Checkout page.
- `primary_color` - Used as the background color on the Checkout page.
- `secondary_color` - Used as the button color on the Checkout page.
```curl
curl https://api.stripe.com/v1/accounts/{{CONNECTEDACCOUNT_ID}} \
-u "<>:" \
-d "settings[branding][icon]={{FILE_ID}}" \
-d "settings[branding][logo]={{FILE_ID}}" \
--data-urlencode "settings[branding][primary_color]=#663399" \
--data-urlencode "settings[branding][secondary_color]=#4BB543"
```
## Issue refunds
Just as platforms can create charges on connected accounts, they can also create refunds of charges on connected accounts. [Create a refund](https://docs.stripe.com/api.md#create_refund) using your platform’s secret key while [authenticated](https://docs.stripe.com/connect/authentication.md#stripe-account-header) as the connected account.
Application fees aren’t automatically refunded when issuing a refund. Your platform must explicitly refund the application fee or the connected account—the account on which the charge was created—loses that amount. You can refund an application fee by passing a `refund_application_fee` value of **true** in the refund request:
```curl
curl https://api.stripe.com/v1/refunds \
-u "<>:" \
-H "Stripe-Account: {{CONNECTEDACCOUNT_ID}}" \
-d "charge={{CHARGE_ID}}" \
-d refund_application_fee=true
```
By default, the entire charge is refunded, but you can create a partial refund by setting an `amount` value as a positive integer. If the refund results in the entire charge being refunded, the entire application fee is refunded. Otherwise, a proportional amount of the application fee is refunded. Alternatively, you can provide a `refund_application_fee` value of **false** and [refund the application fee](https://docs.stripe.com/api.md#create_fee_refund) separately.
## Connect embedded components
[Connect embedded components](https://docs.stripe.com/connect/get-started-connect-embedded-components.md) support direct charges. By using the [payments embedded component](https://docs.stripe.com/connect/supported-embedded-components/payments.md), you can let your connected accounts view payment information, capture charges, and manage disputes from within your site.
Note: The following is a preview/demo component that behaves differently than live mode usage with real connected accounts. The actual component has more functionality than what might appear in this demo component. For example, for connected accounts without Stripe dashboard access (custom accounts), no user authentication is required in production.
The following components display information for direct charges:
- [Payments component](https://docs.stripe.com/connect/supported-embedded-components/payments.md): Displays all of an account’s payments and disputes.
- [Payments details](https://docs.stripe.com/connect/supported-embedded-components/payment-details.md): Displays information for a specific payment.
- [Disputes list component](https://docs.stripe.com/connect/supported-embedded-components/disputes-list.md): Displays all of an account’s disputes.
- [Disputes for a payment component](https://docs.stripe.com/connect/supported-embedded-components/disputes-for-a-payment.md): Displays the disputes for a single specified payment. You can use it to include dispute management functionality on a page with your payments UI.
## See also
- [Working with multiple currencies](https://docs.stripe.com/connect/currencies.md)
- [Statement descriptors with Connect](https://docs.stripe.com/connect/statement-descriptors.md)