# Create direct charges
Create charges directly on the connected account and collect fees.
Create *direct charges* when customers transact directly with a connected account, often unaware of your platform’s existence. With direct charges:
- The payment appears as a charge on the connected account, not your platform’s account.
- The connected account’s balance increases with every charge.
- Your account balance increases with application fees from every charge.
This charge type is best suited for platforms providing software as a service. For example, Shopify provides tools for building online storefronts, and Thinkific enables educators to sell online courses.
## Platform visibility limitations
Direct charges have limited visibility at the platform level. When you create direct charges:
- Transaction objects such as `PaymentIntents` and `Charges` exist on the connected account, not on the platform.
- To access direct charge data, you must query the Stripe API using the [connected account ID in the Stripe-Account header](https://docs.stripe.com/connect/authentication.md).
This scoping behaviour affects data synchronisation services like Fivetran, as well as other third-party integrations that rely on platform-level API queries. To retrieve direct charge data, they must query the connected account, not the platform.
> We recommend using direct charges for connected accounts that have access to the full Stripe Dashboard.
Redirect to a Stripe-hosted payment page using [Stripe Checkout](https://docs.stripe.com/payments/checkout.md). See how this integration [compares to Stripe’s other integration types](https://docs.stripe.com/payments/online-payments.md#compare-features-and-availability).
#### Integration effort
Complexity: 2/5
#### Integration type
Redirect to Stripe-hosted payment page
#### UI customisation
Limited customisation
- 20 preset fonts
- 3 preset border radii
- Custom background and border colour
- Custom logo
[Try it out](https://checkout.stripe.dev/)
First, [register](https://dashboard.stripe.com/register) for a Stripe account.
Use our official libraries to access the Stripe API from your application:
#### Ruby
```bash
# Available as a gem
sudo gem install stripe
```
```ruby
# If you use bundler, you can add this line to your Gemfile
gem 'stripe'
```
## Create a Checkout Session [Client-side] [Server-side]
A [Checkout Session](https://docs.stripe.com/api/checkout/sessions.md) controls what your customer sees in the payment form such as line items, the order amount, and currency. Add a checkout button to your website that calls a server-side endpoint to create a Checkout Session.
```html
Checkout
```
On your server, create a Checkout Session and redirect your customer to the [URL](https://docs.stripe.com/api/checkout/sessions/object.md#checkout_session_object-url) returned in the response.
```curl
curl https://api.stripe.com/v1/checkout/sessions \
-u "<>:" \
-H "Stripe-Account: {{CONNECTEDACCOUNT_ID}}" \
-d "line_items[0][price_data][currency]=usd" \
-d "line_items[0][price_data][product_data][name]=T-shirt" \
-d "line_items[0][price_data][unit_amount]=1000" \
-d "line_items[0][quantity]=1" \
-d "payment_intent_data[application_fee_amount]=123" \
-d mode=payment \
--data-urlencode "success_url=https://example.com/success?session_id={CHECKOUT_SESSION_ID}"
```
- `Stripe-Account`: This header indicates a direct charge for your connected account. The connected account’s [branding](https://docs.stripe.com/connect/direct-charges.md#branding) is used in Checkout, which allows their customers to feel like they’re interacting directly with the connected account instead of your platform.
- `line_items`: This attribute represents items that your customer is purchasing and shows up in the Stripe-hosted checkout page.
- `payment_intent_data[application_fee_amount]`: This attribute specifies the amount your platform deducts from the transaction as an application fee. After the payment is processed on the connected account, the `application_fee_amount` is transferred to the platform. See [collect fees](https://docs.stripe.com/connect/direct-charges.md#collect-fees) for more information.
- `success_url`: Stripe redirects the customer to the success URL after they complete a payment and replaces the `{CHECKOUT_SESSION_ID}` string with the Checkout Session ID. Use this to retrieve the Checkout Session and inspect the status to decide what to show your customer. You can also append your own query parameters, which persist through the redirect process. See [customize redirect behaviour with a Stripe-hosted page](https://docs.stripe.com/payments/checkout/custom-success-page.md) for more information.
View charges that you create on your connected account in your [payments list](https://dashboard.stripe.com/test/payments). Direct charges don’t show in exports, but you can find them in [reports](https://docs.stripe.com/stripe-reports.md), [Sigma](https://docs.stripe.com/data/sigma.md) or using the API.
## Handle post-payment events [Server-side]
Stripe sends a [checkout.session.completed](https://docs.stripe.com/api/events/types.md#event_types-checkout.session.completed) event when the payment completes. [Use a webhook to receive these events](https://docs.stripe.com/webhooks/quickstart.md) and run actions, such as sending an order confirmation email to your customer, logging the sale in a database, or starting a shipping workflow.
Listen for these events rather than waiting on a callback from the client. On the client, the customer could close the browser window or quit the app before the callback executes. Some payment methods also take 2-14 days for payment confirmation. Setting up your integration to listen for asynchronous events enables you to accept multiple [payment methods](https://stripe.com/payments/payment-methods-guide) with a single integration.
Stripe recommends handling all the following events when collecting payments with Checkout:
| Event | Description | Next steps |
| -------------------------------------------------------------------------------------------------------------------------------------------- | ------------------------------------------------------------------------------------- | --------------------------------------------------------------------- |
| [checkout.session.completed](https://docs.stripe.com/api/events/types.md#event_types-checkout.session.completed) | The customer has successfully authorised the payment by submitting the Checkout form. | Wait for the payment to succeed or fail. |
| [checkout.session.async_payment_succeeded](https://docs.stripe.com/api/events/types.md#event_types-checkout.session.async_payment_succeeded) | The customer’s payment succeeded. | Fulfil the purchased goods or services. |
| [checkout.session.async_payment_failed](https://docs.stripe.com/api/events/types.md#event_types-checkout.session.async_payment_failed) | The payment was declined, or failed for some other reason. | Contact the customer through email and ask them to place a new order. |
These events all include the [Checkout Session](https://docs.stripe.com/api/checkout/sessions.md) object. After the payment succeeds, the underlying *PaymentIntent* (The Payment Intents API tracks the lifecycle of a customer checkout flow and triggers additional authentication steps when required by regulatory mandates, custom Radar fraud rules, or redirect-based payment methods) [status](https://docs.stripe.com/payments/paymentintents/lifecycle.md) changes from `processing` to `succeeded` or a failure status.
## Test the integration
#### Cards
| Card number | Scenario | How to test |
| ------------------- | --------------------------------------------------------------------------------------------------------------------------------------------------------------------------------------------------------------------------------------------------------------------------------------------- | ----------------------------------------------------------------------------------------------------- |
| 4242424242424242 | The card payment succeeds and doesn’t require authentication. | Fill in the credit card form using the credit card number with any expiry date, CVC, and postal code. |
| 4000002500003155 | The card payment requires *authentication* (Strong Customer Authentication (SCA) is a regulatory requirement in effect as of September 14, 2019, that impacts many European online payments. It requires customers to use two-factor authentication like 3D Secure to verify their purchase). | Fill in the credit card form using the credit card number with any expiry date, CVC, and postal code. |
| 4000000000009995 | The card is declined with a decline code like `insufficient_funds`. | Fill in the credit card form using the credit card number with any expiry date, CVC, and postal code. |
| 6205500000000000004 | The UnionPay card has a variable length of 13-19 digits. | Fill in the credit card form using the credit card number with any expiry date, CVC, and postal code. |
#### Wallets
| Payment method | Scenario | How to test |
| -------------- | ---------------------------------------------------------------------------------------------------------------------------------------------------------------------------- | ------------------------------------------------------------------------------------------------------------------------------------------------------------ |
| Alipay | Your customer successfully pays with a redirect-based and [immediate notification](https://docs.stripe.com/payments/payment-methods.md#payment-notification) payment method. | Choose any redirect-based payment method, fill out the required details, and confirm the payment. Then click **Complete test payment** on the redirect page. |
#### Bank redirects
| Payment method | Scenario | How to test |
| -------------------------------------- | ----------------------------------------------------------------------------------------------------------------------------------------------------------------------------------------------------- | ------------------------------------------------------------------------------------------------------------------------------------------------------------------------------------------------------- |
| BECS Direct Debit | Your customer successfully pays with BECS Direct Debit. | Fill out the form using the account number `900123456` and BSB `000000`. The confirmed PaymentIntent initially transitions to `processing`, then transitions to the `succeeded` status 3 minutes later. |
| BECS Direct Debit | Your customer’s payment fails with an `account_closed` error code. | Fill out the form using the account number `111111113` and BSB `000000`. |
| Bancontact, EPS, iDEAL, and Przelewy24 | Your customer fails to authenticate on the redirect page for a redirect-based and immediate notification payment method. | Choose any redirect-based payment method, fill out the required details, and confirm the payment. Then click **Fail test payment** on the redirect page. |
| Pay by Bank | Your customer successfully pays with a redirect-based and [delayed notification](https://docs.stripe.com/payments/payment-methods.md#payment-notification) payment method. | Choose the payment method, fill out the required details, and confirm the payment. Then click **Complete test payment** on the redirect page. |
| Pay by Bank | Your customer fails to authenticate on the redirect page for a redirect-based and delayed notification payment method. | Choose the payment method, fill out the required details, and confirm the payment. Then click **Fail test payment** on the redirect page. |
| BLIK | BLIK payments fail in a variety of ways – immediate failures (for example, the code has expired or is invalid), delayed errors (the bank declines) or timeouts (the customer didn’t respond in time). | Use email patterns to [simulate the different failures.](https://docs.stripe.com/payments/blik/accept-a-payment.md#simulate-failures) |
#### Bank debits
| Payment method | Scenario | How to test |
| ----------------- | ------------------------------------------------------------------------------------------------- | ------------------------------------------------------------------------------------------------------------------------------------------------------------------------------------------------- |
| SEPA Direct Debit | Your customer successfully pays with SEPA Direct Debit. | Fill out the form using the account number `AT321904300235473204`. The confirmed PaymentIntent initially transitions to processing, then transitions to the succeeded status three minutes later. |
| SEPA Direct Debit | Your customer’s payment intent status transitions from `processing` to `requires_payment_method`. | Fill out the form using the account number `AT861904300235473202`. |
#### Vouchers
| Payment method | Scenario | How to test |
| -------------- | ------------------------------------------------- | ------------------------------------------------------------------------------------------------------ |
| Boleto, OXXO | Your customer pays with a Boleto or OXXO voucher. | Select Boleto or OXXO as the payment method and submit the payment. Close the dialog after it appears. |
See [Testing](https://docs.stripe.com/testing.md) for additional information to test your integration.
## Optional: Enable additional payment methods
Navigate to [Manage payment methods for your connected accounts](https://dashboard.stripe.com/settings/payment_methods/connected_accounts) in the Dashboard to configure which payment methods your connected accounts accept. Changes to default settings apply to all new and existing connected accounts.
Consult the following resources for payment method information:
- [A guide to payment methods](https://stripe.com/payments/payment-methods-guide#choosing-the-right-payment-methods-for-your-business) to help you choose the correct payment methods for your platform.
- [Account capabilities](https://docs.stripe.com/connect/account-capabilities.md) to make sure your chosen payment methods work for your connected accounts.
- [Payment method and product support](https://docs.stripe.com/payments/payment-methods/payment-method-support.md#product-support) tables to make sure your chosen payment methods work for your Stripe products and payments flows.
For each payment method, you can select one of the following dropdown options:
| |
| |
| **On by default** | Your connected accounts accept this payment method during checkout. Some payment methods can only be off or blocked. This is because your connected accounts with *access to the Stripe Dashboard* (Platforms can provide connected accounts with access to the full Stripe Dashboard or the Express Dashboard. Otherwise, platforms build an interface for connected accounts using embedded components or the Stripe API) must activate them in their settings page. |
| **Off by default** | Your connected accounts don’t accept this payment method during checkout. If you allow your connected accounts with *access to the Stripe Dashboard* (Platforms can provide connected accounts with access to the full Stripe Dashboard or the Express Dashboard. Otherwise, platforms build an interface for connected accounts using embedded components or the Stripe API) to manage their own payment methods, they have the ability to turn it on. |
| **Blocked** | Your connected accounts don’t accept this payment method during checkout. If you allow your connected accounts with *access to the Stripe Dashboard* (Platforms can provide connected accounts with access to the full Stripe Dashboard or the Express Dashboard. Otherwise, platforms build an interface for connected accounts using embedded components or the Stripe API) to manage their own payment methods, they don’t have the option to turn it on. |
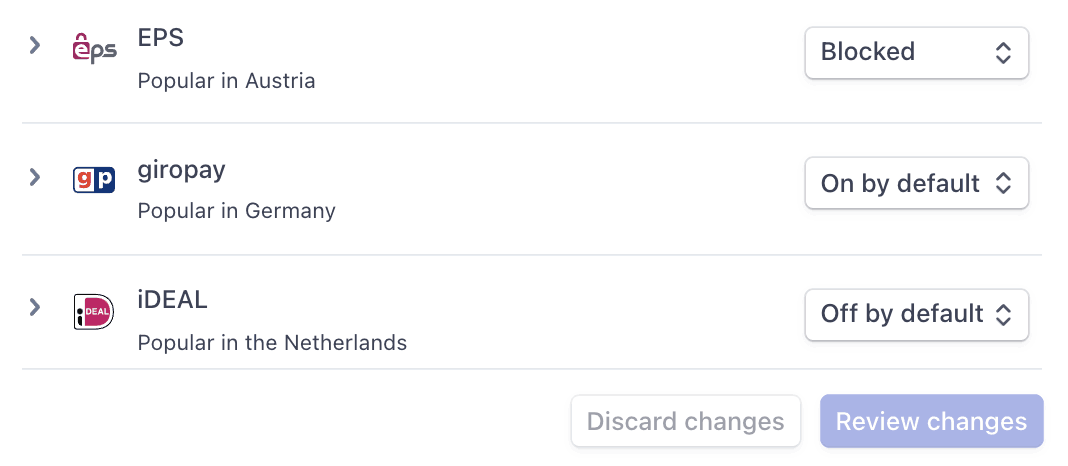
Payment method options
If you make a change to a payment method, you must click **Review changes** in the bottom bar of your screen and **Save and apply** to update your connected accounts.

Save window
### Allow connected accounts to manage payment methods
Stripe recommends allowing your connected accounts to customise their own payment methods. This option allows each connected account with *access to the Stripe Dashboard* (Platforms can provide connected accounts with access to the full Stripe Dashboard or the Express Dashboard. Otherwise, platforms build an interface for connected accounts using embedded components or the Stripe API) to view and update their [Payment methods](https://dashboard.stripe.com/settings/payment_methods) page. Only owners of the connected accounts can customise their payment methods. The Stripe Dashboard displays the set of payment method defaults you applied to all new and existing connected accounts. Your connected accounts can override these defaults, excluding payment methods you have blocked.
Tick the **Account customisation** tickbox to enable this option. You must click **Review changes** in the bottom bar of your screen and then select **Save and apply** to update this setting.

Account customisation tickbox
### Payment method capabilities
To allow your connected accounts to accept additional payment methods, their `Accounts` must have active payment method capabilities.
If you selected the “On by default” option for a payment method in [Manage payment methods for your connected accounts](https://dashboard.stripe.com/settings/payment_methods/connected_accounts), Stripe automatically requests the necessary capability for new and existing connected accounts if they meet the verification requirements. If the connected account doesn’t meet the requirements or if you want to have direct control, you can manually request the capability in the Dashboard or with the API.
Most payment methods have the same verification requirements as the `card_payments` capability, with some restrictions and exceptions. The [payment method capabilities table](https://docs.stripe.com/connect/account-capabilities.md#payment-methods) lists the payment methods that require additional verification.
#### Dashboard
[Find a connected account](https://docs.stripe.com/connect/dashboard/managing-individual-accounts.md#finding-accounts) in the Dashboard to edit its capabilities and view outstanding verification requirements.
#### API
For an existing connected account, you can [list](https://docs.stripe.com/api/capabilities/list.md) their existing capabilities to determine whether you need to request additional capabilities.
```curl
curl https://api.stripe.com/v1/accounts/{{CONNECTEDACCOUNT_ID}}/capabilities \
-u "<>:"
```
Request additional capabilities by [updating](https://docs.stripe.com/api/capabilities/update.md) each connected account’s capabilities.
```curl
curl https://api.stripe.com/v1/accounts/{{CONNECTEDACCOUNT_ID}}/capabilities/us_bank_account_ach_payments \
-u "<>:" \
-d requested=true
```
There can be a delay before the requested capability becomes active. If the capability has any activation requirements, the response includes them in the `requirements` arrays.
## Collect fees
As a platform, you can charge your connected accounts a portion of each transaction in the form of application fees. You can set application fee pricing in the following ways:
- Use the [Platform Pricing Tool](https://docs.stripe.com/connect/platform-pricing-tools.md) to set and test pricing rules. This no-code feature in the Stripe Dashboard is currently only available for platforms responsible for paying Stripe fees.
- Specify application fees directly in a [PaymentIntent](https://docs.stripe.com/api/payment_intents/object.md). Fees set with this method override the pricing logic specified in the Platform Pricing Tool.
Your platform can take an application fee with the following limitations:
- The value of `application_fee_amount` must be positive and less than the amount of the charge. The application fee collected is capped at the captured amount of the charge.
- There are no additional Stripe fees on the application fee itself.
- In line with Brazilian regulatory and compliance requirements, platforms based outside of Brazil with Brazilian connected accounts can’t collect application fees through Stripe.
- The currency of `application_fee_amount` depends upon a few [multiple currency](https://docs.stripe.com/connect/currencies.md) factors.
The resulting charge’s [BalanceTransaction](https://docs.stripe.com/api.md#balance_transaction_retrieve) includes a detailed fee breakdown of both the Stripe and application fees. To provide a better reporting experience, collecting a fee generates an [ApplicationFee](https://docs.stripe.com/api/application_fees/object.md) object. Use the `amount` property on the `ApplicationFee` object for reporting.
You can view application fees in the [Collected fees](https://dashboard.stripe.com/connect/application_fees) section of the Dashboard.
> Application fees for direct charges are created asynchronously by default. If you expand the `application_fee` object in a charge creation request, the application fee is created synchronously as part of that request. Only expand the `application_fee` object if you must, because it increases the latency of the request.
>
> To receive notifications of asynchronously created `ApplicationFee` objects, listen for the [application_fee.created](https://docs.stripe.com/api/events/types.md#event_types-application_fee.created) webhook event.
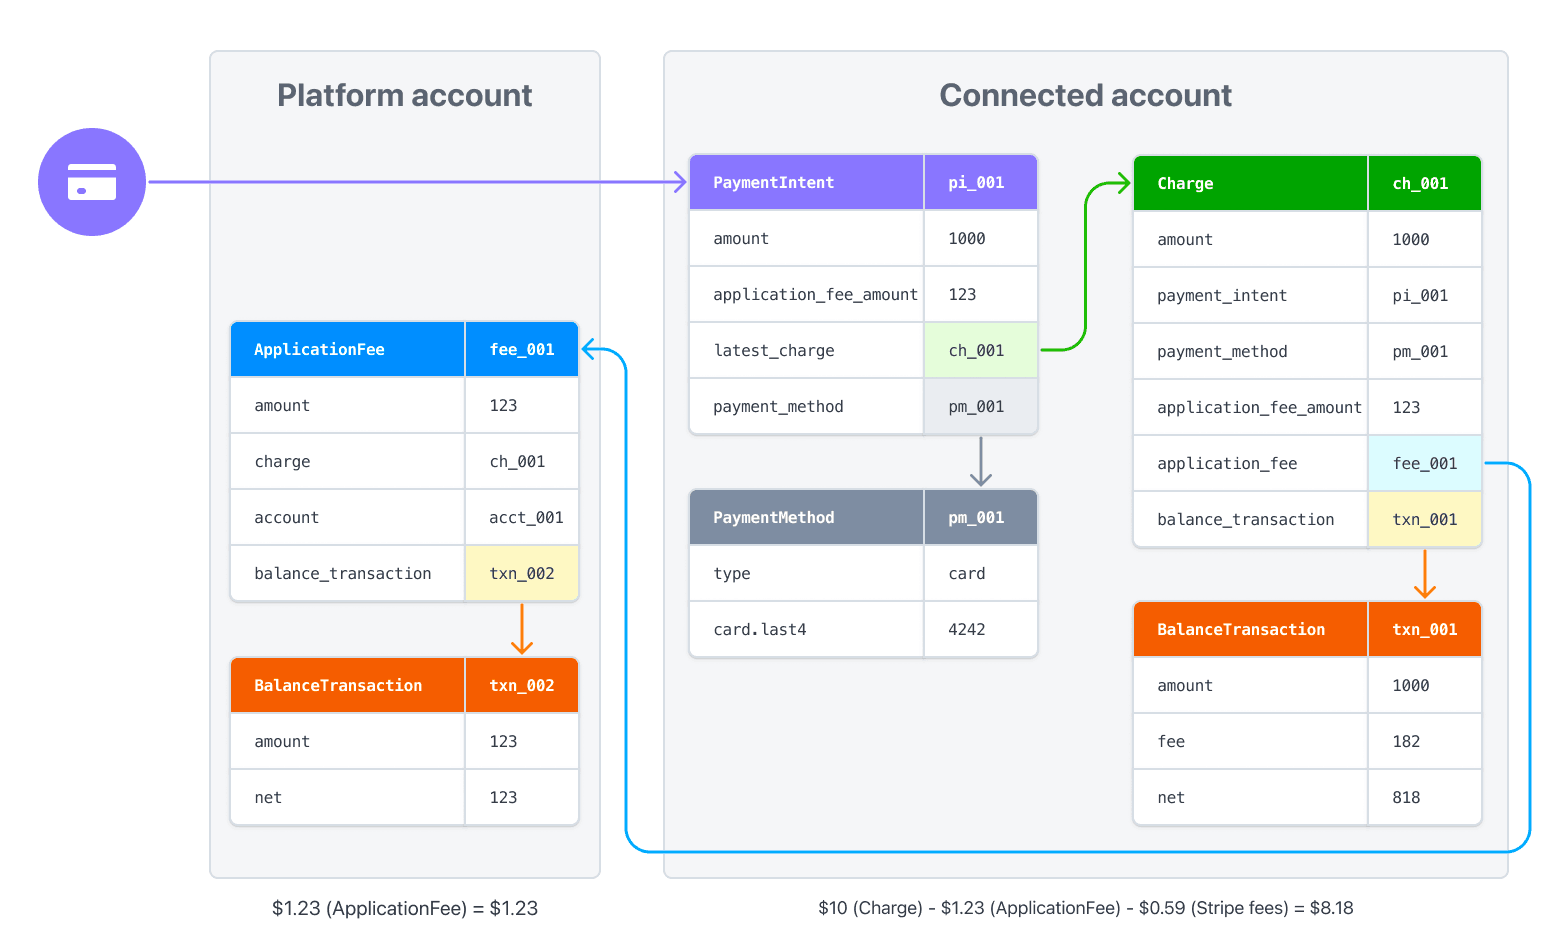
### Flow of funds with fees
When you specify an application fee on a charge, the fee amount is transferred to your platform’s Stripe account. When processing a charge directly on the connected account, the charge amount – less the Stripe fees and application fee – is deposited into the connected account.
For example, if you make a charge of US$10 with a US$1.23 application fee (like in the previous example), US$1.23 is transferred to your platform account. US$8.18 (US$10 - US$0.59 - US$1.23) is netted in the connected account (assuming standard US Stripe fees).
If you process payments in multiple currencies, read [how currencies are handled](https://docs.stripe.com/connect/currencies.md) in Connect.
## Customise branding
Your platform and connected accounts can use the [Branding settings](https://dashboard.stripe.com/account/branding) in the Dashboard to customise branding on the payments page. For direct charges, Checkout uses the brand settings of the connected account.
You can also use the API to [update branding settings](https://docs.stripe.com/api/accounts/update.md#update_account-settings-branding):
- `icon` - Displayed next to the business name in the header of the Checkout page.
- `logo` - Used in place of the icon and business name in the header of the Checkout page.
- `primary_color` - Used as the background colour on the Checkout page.
- `secondary_color` - Used as the button colour on the Checkout page.
```curl
curl https://api.stripe.com/v1/accounts/{{CONNECTEDACCOUNT_ID}} \
-u "<>:" \
-d "settings[branding][icon]={{FILE_ID}}" \
-d "settings[branding][logo]={{FILE_ID}}" \
--data-urlencode "settings[branding][primary_color]=#663399" \
--data-urlencode "settings[branding][secondary_color]=#4BB543"
```
Embed a prebuilt payment form on your site using [Stripe Checkout](https://docs.stripe.com/payments/checkout.md). See how this integration [compares to Stripe’s other integration types](https://docs.stripe.com/payments/online-payments.md#compare-features-and-availability).
#### Integration effort
Complexity: 2/5
#### Integration type
Embed pre-built payment form on your site
#### UI customisation
Limited customisation
- 20 preset fonts
- 3 preset border radii
- Custom background and border colour
- Custom logo
First, [register](https://dashboard.stripe.com/register) for a Stripe account.
Use our official libraries to access the Stripe API from your application:
#### Ruby
```bash
# Available as a gem
sudo gem install stripe
```
```ruby
# If you use bundler, you can add this line to your Gemfile
gem 'stripe'
```
## Create a Checkout Session [Server-side]
A [Checkout Session](https://docs.stripe.com/api/checkout/sessions.md) controls what your customer sees in the embeddable payment form such as line items, the order amount and currency. Create a Checkout Session in a server-side endpoint (for example, `/create-checkout-session`). The response includes a `client_secret` which you’ll use in the next step to mount Checkout.
```curl
curl https://api.stripe.com/v1/checkout/sessions \
-u "<>:" \
-H "Stripe-Account: {{CONNECTEDACCOUNT_ID}}" \
-d "line_items[0][price_data][currency]=usd" \
-d "line_items[0][price_data][product_data][name]=T-shirt" \
-d "line_items[0][price_data][unit_amount]=1000" \
-d "line_items[0][quantity]=1" \
-d "payment_intent_data[application_fee_amount]=123" \
-d mode=payment \
-d ui_mode=embedded_page \
--data-urlencode "return_url=https://example.com/checkout/return?session_id={CHECKOUT_SESSION_ID}"
```
- `Stripe-Account`: This header indicates a direct charge for your connected account. The connected account’s [branding](https://docs.stripe.com/connect/direct-charges.md#branding) is used in Checkout, which allows their customers to feel like they’re interacting directly with the connected account instead of your platform.
- `line_items`: This attribute represents items that your customer is purchasing and shows up in the embedded payment form.
- `payment_intent_data[application_fee_amount]`: This attribute specifies the amount your platform deducts from the transaction as an application fee. After the payment is processed on the connected account, the `application_fee_amount` is transferred to the platform. See [collect fees](https://docs.stripe.com/connect/direct-charges.md#collect-fees) for more information.
- `return_url`: Stripe redirects the customer to the return URL after they complete a payment attempt and replaces the `{CHECKOUT_SESSION_ID}` string with the Checkout Session ID. Use this to retrieve the Checkout Session and inspect the status to decide what to show your customer. Make sure the return URL corresponds to a page on your website that provides the status of the payment. You can also append your own query parameters, which persist through the redirect process. See [customise redirect behaviour with an embedded form](https://docs.stripe.com/payments/checkout/custom-success-page.md?payment-ui=embedded-page) for more information.
Charges that you create directly on the connected account are reported only on that account and [in your Connect Dashboard](https://docs.stripe.com/connect/dashboard/understand-your-connect-business.md#supported-charges). To query transaction objects such as `PaymentIntents` and `Charges` for direct charges, you must query the Stripe API [using the connected account ID in the Stripe-Account header](https://docs.stripe.com/connect/authentication.md).
## Mount Checkout [Client-side]
#### HTML + JS
Checkout is available as part of [Stripe.js](https://docs.stripe.com/js.md). Include the Stripe.js script on your page by adding it to the head of your HTML file. Next, create an empty DOM node (container) to use for mounting.
```html
```
Initialise Stripe.js with your publishable API key and the connected account ID. Pass the `client_secret` from the previous step into `options` when you create the Checkout instance:
```javascript
// Initialize Stripe.js
const stripe = Stripe('<>', {
stripeAccount: '{{CONNECTED_ACCOUNT_ID}}',
});
initialize();
// Fetch Checkout Session and retrieve the client secret
async function initialize() {
const fetchClientSecret = async () => {
const response = await fetch("/create-checkout-session", {
method: "POST",
});
const { clientSecret } = await response.json();
return clientSecret;
};
// Initialize Checkout
const checkout = await stripe.createEmbeddedCheckoutPage({
fetchClientSecret,
});
// Mount Checkout
checkout.mount('#checkout');
}
```
#### React
Install [React Stripe.js](https://www.npmjs.com/package/@stripe/react-stripe-js) and the [Stripe.js loader](https://www.npmjs.com/package/@stripe/stripe-js) from the npm public registry:
```bash
npm install --save @stripe/react-stripe-js @stripe/stripe-js
```
To use the Embedded Checkout component, create an `EmbeddedCheckoutProvider`. Call `loadStripe` with your publishable API key and pass the returned `Promise` to the provider. Use the `options` prop accepted by the provider to pass the `client_secret` from the previous step.
```jsx
import * as React from 'react';
import {loadStripe} from '@stripe/stripe-js';
import {
EmbeddedCheckoutProvider,
EmbeddedCheckout
} from '@stripe/react-stripe-js';
// Make sure to call `loadStripe` outside of a component's render to avoid
// recreating the `Stripe` object on every render.
const stripePromise = loadStripe('<>', {
stripeAccount: '{{CONNECTED_ACCOUNT_ID}}',
});
const App = ({clientSecret}) => {
const options = {clientSecret};
return (
)
}
```
Checkout is rendered in an iframe that securely sends payment information to Stripe over an HTTPS connection. Avoid placing Checkout within another iframe because some payment methods require redirecting to another page for payment confirmation.
## Handle post-payment events [Server-side]
Stripe sends a [checkout.session.completed](https://docs.stripe.com/api/events/types.md#event_types-checkout.session.completed) event when the payment completes. [Use a webhook to receive these events](https://docs.stripe.com/webhooks/quickstart.md) and run actions, such as sending an order confirmation email to your customer, logging the sale in a database, or starting a shipping workflow.
Listen for these events rather than waiting on a callback from the client. On the client, the customer could close the browser window or quit the app before the callback executes. Some payment methods also take 2-14 days for payment confirmation. Setting up your integration to listen for asynchronous events enables you to accept multiple [payment methods](https://stripe.com/payments/payment-methods-guide) with a single integration.
Stripe recommends handling all the following events when collecting payments with Checkout:
| Event | Description | Next steps |
| -------------------------------------------------------------------------------------------------------------------------------------------- | ------------------------------------------------------------------------------------- | --------------------------------------------------------------------- |
| [checkout.session.completed](https://docs.stripe.com/api/events/types.md#event_types-checkout.session.completed) | The customer has successfully authorised the payment by submitting the Checkout form. | Wait for the payment to succeed or fail. |
| [checkout.session.async_payment_succeeded](https://docs.stripe.com/api/events/types.md#event_types-checkout.session.async_payment_succeeded) | The customer’s payment succeeded. | Fulfil the purchased goods or services. |
| [checkout.session.async_payment_failed](https://docs.stripe.com/api/events/types.md#event_types-checkout.session.async_payment_failed) | The payment was declined, or failed for some other reason. | Contact the customer through email and ask them to place a new order. |
These events all include the [Checkout Session](https://docs.stripe.com/api/checkout/sessions.md) object. After the payment succeeds, the underlying *PaymentIntent* (The Payment Intents API tracks the lifecycle of a customer checkout flow and triggers additional authentication steps when required by regulatory mandates, custom Radar fraud rules, or redirect-based payment methods) [status](https://docs.stripe.com/payments/paymentintents/lifecycle.md) changes from `processing` to `succeeded` or a failure status.
## Test the integration
#### Cards
| Card number | Scenario | How to test |
| ------------------- | --------------------------------------------------------------------------------------------------------------------------------------------------------------------------------------------------------------------------------------------------------------------------------------------- | ----------------------------------------------------------------------------------------------------- |
| 4242424242424242 | The card payment succeeds and doesn’t require authentication. | Fill in the credit card form using the credit card number with any expiry date, CVC, and postal code. |
| 4000002500003155 | The card payment requires *authentication* (Strong Customer Authentication (SCA) is a regulatory requirement in effect as of September 14, 2019, that impacts many European online payments. It requires customers to use two-factor authentication like 3D Secure to verify their purchase). | Fill in the credit card form using the credit card number with any expiry date, CVC, and postal code. |
| 4000000000009995 | The card is declined with a decline code like `insufficient_funds`. | Fill in the credit card form using the credit card number with any expiry date, CVC, and postal code. |
| 6205500000000000004 | The UnionPay card has a variable length of 13-19 digits. | Fill in the credit card form using the credit card number with any expiry date, CVC, and postal code. |
#### Wallets
| Payment method | Scenario | How to test |
| -------------- | ---------------------------------------------------------------------------------------------------------------------------------------------------------------------------- | ------------------------------------------------------------------------------------------------------------------------------------------------------------ |
| Alipay | Your customer successfully pays with a redirect-based and [immediate notification](https://docs.stripe.com/payments/payment-methods.md#payment-notification) payment method. | Choose any redirect-based payment method, fill out the required details, and confirm the payment. Then click **Complete test payment** on the redirect page. |
#### Bank redirects
| Payment method | Scenario | How to test |
| -------------------------------------- | ----------------------------------------------------------------------------------------------------------------------------------------------------------------------------------------------------- | ------------------------------------------------------------------------------------------------------------------------------------------------------------------------------------------------------- |
| BECS Direct Debit | Your customer successfully pays with BECS Direct Debit. | Fill out the form using the account number `900123456` and BSB `000000`. The confirmed PaymentIntent initially transitions to `processing`, then transitions to the `succeeded` status 3 minutes later. |
| BECS Direct Debit | Your customer’s payment fails with an `account_closed` error code. | Fill out the form using the account number `111111113` and BSB `000000`. |
| Bancontact, EPS, iDEAL, and Przelewy24 | Your customer fails to authenticate on the redirect page for a redirect-based and immediate notification payment method. | Choose any redirect-based payment method, fill out the required details, and confirm the payment. Then click **Fail test payment** on the redirect page. |
| Pay by Bank | Your customer successfully pays with a redirect-based and [delayed notification](https://docs.stripe.com/payments/payment-methods.md#payment-notification) payment method. | Choose the payment method, fill out the required details, and confirm the payment. Then click **Complete test payment** on the redirect page. |
| Pay by Bank | Your customer fails to authenticate on the redirect page for a redirect-based and delayed notification payment method. | Choose the payment method, fill out the required details, and confirm the payment. Then click **Fail test payment** on the redirect page. |
| BLIK | BLIK payments fail in a variety of ways – immediate failures (for example, the code has expired or is invalid), delayed errors (the bank declines) or timeouts (the customer didn’t respond in time). | Use email patterns to [simulate the different failures.](https://docs.stripe.com/payments/blik/accept-a-payment.md#simulate-failures) |
#### Bank debits
| Payment method | Scenario | How to test |
| ----------------- | ------------------------------------------------------------------------------------------------- | ------------------------------------------------------------------------------------------------------------------------------------------------------------------------------------------------- |
| SEPA Direct Debit | Your customer successfully pays with SEPA Direct Debit. | Fill out the form using the account number `AT321904300235473204`. The confirmed PaymentIntent initially transitions to processing, then transitions to the succeeded status three minutes later. |
| SEPA Direct Debit | Your customer’s payment intent status transitions from `processing` to `requires_payment_method`. | Fill out the form using the account number `AT861904300235473202`. |
#### Vouchers
| Payment method | Scenario | How to test |
| -------------- | ------------------------------------------------- | ------------------------------------------------------------------------------------------------------ |
| Boleto, OXXO | Your customer pays with a Boleto or OXXO voucher. | Select Boleto or OXXO as the payment method and submit the payment. Close the dialog after it appears. |
See [Testing](https://docs.stripe.com/testing.md) for additional information to test your integration.
## Optional: Enable additional payment methods
Navigate to [Manage payment methods for your connected accounts](https://dashboard.stripe.com/settings/payment_methods/connected_accounts) in the Dashboard to configure which payment methods your connected accounts accept. Changes to default settings apply to all new and existing connected accounts.
Consult the following resources for payment method information:
- [A guide to payment methods](https://stripe.com/payments/payment-methods-guide#choosing-the-right-payment-methods-for-your-business) to help you choose the correct payment methods for your platform.
- [Account capabilities](https://docs.stripe.com/connect/account-capabilities.md) to make sure your chosen payment methods work for your connected accounts.
- [Payment method and product support](https://docs.stripe.com/payments/payment-methods/payment-method-support.md#product-support) tables to make sure your chosen payment methods work for your Stripe products and payments flows.
For each payment method, you can select one of the following dropdown options:
| |
| |
| **On by default** | Your connected accounts accept this payment method during checkout. Some payment methods can only be off or blocked. This is because your connected accounts with *access to the Stripe Dashboard* (Platforms can provide connected accounts with access to the full Stripe Dashboard or the Express Dashboard. Otherwise, platforms build an interface for connected accounts using embedded components or the Stripe API) must activate them in their settings page. |
| **Off by default** | Your connected accounts don’t accept this payment method during checkout. If you allow your connected accounts with *access to the Stripe Dashboard* (Platforms can provide connected accounts with access to the full Stripe Dashboard or the Express Dashboard. Otherwise, platforms build an interface for connected accounts using embedded components or the Stripe API) to manage their own payment methods, they have the ability to turn it on. |
| **Blocked** | Your connected accounts don’t accept this payment method during checkout. If you allow your connected accounts with *access to the Stripe Dashboard* (Platforms can provide connected accounts with access to the full Stripe Dashboard or the Express Dashboard. Otherwise, platforms build an interface for connected accounts using embedded components or the Stripe API) to manage their own payment methods, they don’t have the option to turn it on. |

Payment method options
If you make a change to a payment method, you must click **Review changes** in the bottom bar of your screen and **Save and apply** to update your connected accounts.

Save window
### Allow connected accounts to manage payment methods
Stripe recommends allowing your connected accounts to customise their own payment methods. This option allows each connected account with *access to the Stripe Dashboard* (Platforms can provide connected accounts with access to the full Stripe Dashboard or the Express Dashboard. Otherwise, platforms build an interface for connected accounts using embedded components or the Stripe API) to view and update their [Payment methods](https://dashboard.stripe.com/settings/payment_methods) page. Only owners of the connected accounts can customise their payment methods. The Stripe Dashboard displays the set of payment method defaults you applied to all new and existing connected accounts. Your connected accounts can override these defaults, excluding payment methods you have blocked.
Tick the **Account customisation** tickbox to enable this option. You must click **Review changes** in the bottom bar of your screen and then select **Save and apply** to update this setting.

Account customisation tickbox
### Payment method capabilities
To allow your connected accounts to accept additional payment methods, their `Accounts` must have active payment method capabilities.
If you selected the “On by default” option for a payment method in [Manage payment methods for your connected accounts](https://dashboard.stripe.com/settings/payment_methods/connected_accounts), Stripe automatically requests the necessary capability for new and existing connected accounts if they meet the verification requirements. If the connected account doesn’t meet the requirements or if you want to have direct control, you can manually request the capability in the Dashboard or with the API.
Most payment methods have the same verification requirements as the `card_payments` capability, with some restrictions and exceptions. The [payment method capabilities table](https://docs.stripe.com/connect/account-capabilities.md#payment-methods) lists the payment methods that require additional verification.
#### Dashboard
[Find a connected account](https://docs.stripe.com/connect/dashboard/managing-individual-accounts.md#finding-accounts) in the Dashboard to edit its capabilities and view outstanding verification requirements.
#### API
For an existing connected account, you can [list](https://docs.stripe.com/api/capabilities/list.md) their existing capabilities to determine whether you need to request additional capabilities.
```curl
curl https://api.stripe.com/v1/accounts/{{CONNECTEDACCOUNT_ID}}/capabilities \
-u "<>:"
```
Request additional capabilities by [updating](https://docs.stripe.com/api/capabilities/update.md) each connected account’s capabilities.
```curl
curl https://api.stripe.com/v1/accounts/{{CONNECTEDACCOUNT_ID}}/capabilities/us_bank_account_ach_payments \
-u "<>:" \
-d requested=true
```
There can be a delay before the requested capability becomes active. If the capability has any activation requirements, the response includes them in the `requirements` arrays.
## Collect fees
As a platform, you can charge your connected accounts a portion of each transaction in the form of application fees. You can set application fee pricing in the following ways:
- Use the [Platform Pricing Tool](https://docs.stripe.com/connect/platform-pricing-tools.md) to set and test pricing rules. This no-code feature in the Stripe Dashboard is currently only available for platforms responsible for paying Stripe fees.
- Specify application fees directly in a [PaymentIntent](https://docs.stripe.com/api/payment_intents/object.md). Fees set with this method override the pricing logic specified in the Platform Pricing Tool.
Your platform can take an application fee with the following limitations:
- The value of `application_fee_amount` must be positive and less than the amount of the charge. The application fee collected is capped at the captured amount of the charge.
- There are no additional Stripe fees on the application fee itself.
- In line with Brazilian regulatory and compliance requirements, platforms based outside of Brazil with Brazilian connected accounts can’t collect application fees through Stripe.
- The currency of `application_fee_amount` depends upon a few [multiple currency](https://docs.stripe.com/connect/currencies.md) factors.
The resulting charge’s [BalanceTransaction](https://docs.stripe.com/api.md#balance_transaction_retrieve) includes a detailed fee breakdown of both the Stripe and application fees. To provide a better reporting experience, collecting a fee generates an [ApplicationFee](https://docs.stripe.com/api/application_fees/object.md) object. Use the `amount` property on the `ApplicationFee` object for reporting.
You can view application fees in the [Collected fees](https://dashboard.stripe.com/connect/application_fees) section of the Dashboard.
> Application fees for direct charges are created asynchronously by default. If you expand the `application_fee` object in a charge creation request, the application fee is created synchronously as part of that request. Only expand the `application_fee` object if you must, because it increases the latency of the request.
>
> To receive notifications of asynchronously created `ApplicationFee` objects, listen for the [application_fee.created](https://docs.stripe.com/api/events/types.md#event_types-application_fee.created) webhook event.
## Customise branding
Your platform and connected accounts can use the [Branding settings](https://dashboard.stripe.com/account/branding) in the Dashboard to customise branding on the payments page. For direct charges, Checkout uses the brand settings of the connected account.
You can also use the API to [update branding settings](https://docs.stripe.com/api/accounts/update.md#update_account-settings-branding):
- `icon` - Displayed next to the business name in the header of the Checkout page.
- `logo` - Used in place of the icon and business name in the header of the Checkout page.
- `primary_color` - Used as the background colour on the Checkout page.
- `secondary_color` - Used as the button colour on the Checkout page.
```curl
curl https://api.stripe.com/v1/accounts/{{CONNECTEDACCOUNT_ID}} \
-u "<>:" \
-d "settings[branding][icon]={{FILE_ID}}" \
-d "settings[branding][logo]={{FILE_ID}}" \
--data-urlencode "settings[branding][primary_color]=#663399" \
--data-urlencode "settings[branding][secondary_color]=#4BB543"
```
Build a custom payments integration by embedding UI components on your site, using [Stripe Elements](https://docs.stripe.com/payments/elements.md). The client-side and server-side code builds a checkout form that accepts various payment methods. See how this integration [compares to Stripe’s other integration types](https://docs.stripe.com/payments/online-payments.md#compare-features-and-availability).
#### Integration effort
Complexity: 3/5
#### Integration type
Combine UI components into a custom payment flow
#### UI customisation
CSS-level customisation with the [Appearance API](https://docs.stripe.com/elements/appearance-api.md)
First, [register](https://dashboard.stripe.com/register) for a Stripe account.
Use our official libraries to access the Stripe API from your application:
#### Ruby
```bash
# Available as a gem
sudo gem install stripe
```
```ruby
# If you use bundler, you can add this line to your Gemfile
gem 'stripe'
```
## Create a PaymentIntent [Server-side]
Stripe uses a [PaymentIntent](https://docs.stripe.com/api/payment_intents.md) object to represent your intent to collect payment from a customer, tracking charge attempts and payment state changes throughout the process.
A high-level overview of the payments integration this document describes. (See full diagram at https://docs.stripe.com/connect/direct-charges)
The payment methods shown to customers during the checkout process are also included on the PaymentIntent. You can let Stripe automatically pull payment methods from your Dashboard settings or you can list them manually.
Unless your integration requires a code-based option for offering payment methods, don’t list payment methods manually. Stripe evaluates the currency, payment method restrictions, and other parameters to determine the list of supported payment methods. Stripe prioritises payment methods that help increase conversion and are most relevant to the currency and the customer’s location. Stripe hides lower priority payment methods in an overflow menu.
#### Manage payment methods from the Dashboard
Create a PaymentIntent on your server with an amount and currency. In the latest version of the API, specifying the `automatic_payment_methods` parameter is optional because Stripe enables its functionality by default. You can manage payment methods from the [Dashboard](https://dashboard.stripe.com/settings/payment_methods). Stripe handles the return of eligible payment methods based on factors such as the transaction’s amount, currency, and payment flow.
```curl
curl https://api.stripe.com/v1/payment_intents \
-u "<>:" \
-H "Stripe-Account: {{CONNECTEDACCOUNT_ID}}" \
-d amount=1000 \
-d currency=usd \
-d "automatic_payment_methods[enabled]=true" \
-d application_fee_amount=123
```
#### List payment methods manually
```curl
curl https://api.stripe.com/v1/payment_intents \
-u "<>:" \
-H "Stripe-Account: {{CONNECTEDACCOUNT_ID}}" \
-d amount=1099 \
-d currency=eur \
-d "payment_method_types[]=bancontact" \
-d "payment_method_types[]=card" \
-d "payment_method_types[]=eps" \
-d "payment_method_types[]=ideal" \
-d "payment_method_types[]=p24" \
-d "payment_method_types[]=sepa_debit" \
-d "payment_method_types[]=sofort" \
-d application_fee_amount=123
```
When creating a PaymentIntent, you need to specify certain parameters:
- `amount` - Create a PaymentIntent on your server with a specified amount. Always determine how much to charge on the server side, as this is a trusted environment. This approach prevents malicious customers from choosing their own prices.
- `currency` - The currency you include in the PaymentIntent filters the payment methods shown to the customer, so choose it based on the payment methods you want to offer. For example, if you pass `eur` and have OXXO enabled in the Dashboard, OXXO won’t appear to the customer because it doesn’t support `eur` payments. Some payment methods support multiple currencies and countries. This guide uses Bancontact, credit cards, EPS, iDEAL, Przelewy24, SEPA Direct Debit, and Sofort in the example code.
- `"payment_method_types[]"` - Manually list all the payment methods you want to support.
- (Optional) `payment_intent_data[application_fee_amount]` – This argument specifies the amount your platform plans to take from the transaction. If you’re using Stripe’s [Platform Pricing Tool](https://docs.stripe.com/connect/platform-pricing-tools.md) to manage application fee pricing from the [Dashboard](https://dashboard.stripe.com/test/settings/connect/platform_pricing/payments), don’t include this argument as it’ll override any pricing logic set by the tool. After processing the payment on the connected account, the `application_fee_amount` transfers to the platform, and the Stripe fee is deducted from the connected account’s balance.
> Each payment method needs to support the currency passed in the PaymentIntent and your business needs to be based in one of the countries each payment method supports. See [Payment method integration options](https://docs.stripe.com/payments/payment-methods/integration-options.md) for more details about what’s supported.
### Retrieve the client secret
The PaymentIntent includes a *client secret* (The client secret is a unique key returned from Stripe as part of a PaymentIntent. This key lets the client access important fields from the PaymentIntent (status, amount, currency) while hiding sensitive ones (metadata, customer)) that the client side uses to securely complete the payment process. You can use different approaches to pass the client secret to the client side.
#### Single-page application
Retrieve the client secret from an endpoint on your server, using the browser’s `fetch` function. This approach is best if your client side is a single-page application, particularly one built with a modern front-end framework such as React. Create the server endpoint that serves the client secret:
#### Ruby
```ruby
get '/secret' do
intent = # ... Create or retrieve the PaymentIntent
{client_secret: intent.client_secret}.to_json
end
```
And then fetch the client secret with JavaScript on the client side:
```javascript
(async () => {
const response = await fetch('/secret');
const {client_secret: clientSecret} = await response.json();
// Render the form using the clientSecret
})();
```
#### Server-side rendering
Pass the client secret to the client from your server. This approach works best if your application generates static content on the server before sending it to the browser.
Add the [client_secret](https://docs.stripe.com/api/payment_intents/object.md#payment_intent_object-client_secret) in your checkout form. In your server-side code, retrieve the client secret from the PaymentIntent:
#### Ruby
```erb
```
```ruby
get '/checkout' do
@intent = # ... Fetch or create the PaymentIntent
erb :checkout
end
```
## Collect payment details [Client-side]
Collect payment details on the client with the [Payment Element](https://docs.stripe.com/payments/payment-element.md). The Payment Element is a pre-built UI component that simplifies collecting payment details for a variety of payment methods.
The Payment Element contains an iframe that securely sends payment information to Stripe over an HTTPS connection. Avoid placing the Payment Element within another iframe because some payment methods require redirecting to another page for payment confirmation. If you do choose to use an iframe and want to accept Apple Pay or Google Pay, the iframe must have the [allow](https://developer.mozilla.org/en-US/docs/Web/HTML/Element/iframe#attr-allowpaymentrequest) attribute set to equal `"payment *"`.
The checkout page address must start with `https://` rather than `http://` for your integration to work. You can test your integration without using HTTPS, but remember to [enable it](https://docs.stripe.com/security/guide.md#tls) when you’re ready to accept live payments.
#### HTML + JS
### Set up Stripe.js
The Payment Element is automatically available as a feature of Stripe.js. Include the Stripe.js script on your checkout page by adding it to the `head` of your HTML file. Always load Stripe.js directly from js.stripe.com to remain PCI compliant. Don’t include the script in a bundle or host a copy of it yourself.
```html
Checkout
```
Create an instance of `Stripe` with the following JavaScript on your checkout page:
```javascript
// Initialize Stripe.js with the same connected account ID used when creating
// the PaymentIntent.
const stripe = Stripe('<>', {
stripeAccount: '{{CONNECTED_ACCOUNT_ID}}'
});
```
### Add Stripe Elements and the Payment Element to your payment page
The Payment Element needs a place to live on your payment page. Create an empty DOM node (container) with a unique ID in your payment form.
```html
```
When the form has loaded, create an instance of the Payment Element and mount it to the container DOM node along with the [client secret](https://docs.stripe.com/api/payment_intents/object.md#payment_intent_object-client_secret) from the previous step. Pass this value as an option when creating the [Elements](https://docs.stripe.com/js/elements_object/create) instance.
The client secret must be handled carefully because it can complete the charge. Don’t log it, embed it in URLs, or expose it to anyone but the customer.
```javascript
const options = {
clientSecret: '{{CLIENT_SECRET}}',
// Fully customizable with the Appearance API
appearance: {/*...*/},
};
// Set up Stripe.js and Elements to use in checkout form using the client secret
const elements = stripe.elements(options);
// Create and mount the Payment Element
const paymentElement = elements.create("payment");
paymentElement.mount("#payment-element");
```
The Payment Element renders a dynamic form that allows your customer to pick a payment method. The form automatically collects all necessary payments details for the payment method selected by the customer. You can [customise the appearance of the Payment Element](https://docs.stripe.com/elements/appearance-api.md) to match the design of your site when you set up the `Elements` object.
#### React
### Set up Stripe.js
Install [React Stripe.js](https://www.npmjs.com/package/@stripe/react-stripe-js) and the [Stripe.js loader](https://www.npmjs.com/package/@stripe/stripe-js) from the npm public registry:
```bash
npm install --save @stripe/react-stripe-js @stripe/stripe-js
```
### Add and configure the Elements provider to your payment page
To use the Payment Element component, wrap your checkout page component in an [Elements provider](https://docs.stripe.com/sdks/stripejs-react.md#elements-provider). Call `loadStripe` with your publishable key, and pass the returned `Promise` along with the [client secret](https://docs.stripe.com/api/payment_intents/object.md#payment_intent_object-client_secret) from the previous step as `options` in the `Elements` provider.
```jsx
import React from 'react';
import ReactDOM from 'react-dom';
import {Elements} from '@stripe/react-stripe-js';
import {loadStripe} from '@stripe/stripe-js';
import CheckoutForm from './CheckoutForm';
// Make sure to call `loadStripe` outside of a component's render to avoid
// recreating the `Stripe` object on every render.
const stripePromise = loadStripe("<>", {
stripeAccount: '{{CONNECTED_ACCOUNT_ID}}'
});
function App() {
const options = {
// pass the client secret from the previous step
clientSecret: '{{CLIENT_SECRET}}',
// Fully customizable with the Appearance API
appearance: {/*...*/},
};
return (
);
};
ReactDOM.render(, document.getElementById('root'));
```
### Add the PaymentElement component
Use the `PaymentElement` component to build your form.
```jsx
import React from 'react';
import {PaymentElement} from '@stripe/react-stripe-js';
const CheckoutForm = () => {
return (
);
};
export default CheckoutForm;
```
The Payment Element renders a dynamic form that allows your customer to pick a payment method type. The form automatically collects all necessary payments details for the payment method selected by the customer. You can [customise the appearance of the Payment Element](https://docs.stripe.com/elements/appearance-api.md) to match the design of your site when you configure the `Elements` provider.
## Submit the payment to Stripe [Client-side]
Use [stripe.confirmPayment](https://docs.stripe.com/js/payment_intents/confirm_payment) to complete the payment using details from the Payment Element. Provide a [return_url](https://docs.stripe.com/api/payment_intents/create.md#create_payment_intent-return_url) to this function to indicate where Stripe should redirect the user after they complete the payment. Your user may be first redirected to an intermediate site, such as a bank authorisation page, before being redirected to the `return_url`. Card payments immediately redirect to the `return_url` when a payment is successful.
If you don’t want to redirect for card payments after payment completion, you can set [redirect](https://docs.stripe.com/js/payment_intents/confirm_payment#confirm_payment_intent-options-redirect) to `if_required`. This only redirects customers who check out with redirect-based payment methods.
#### HTML + JS
```javascript
const form = document.getElementById('payment-form');
form.addEventListener('submit', async (event) => {
event.preventDefault();
const {error} = await stripe.confirmPayment({
//`Elements` instance that was used to create the Payment Element
elements,
confirmParams: {
return_url: 'https://example.com/order/123/complete',
},
});
if (error) {
// This point will only be reached if there is an immediate error when
// confirming the payment. Show error to your customer (for example, payment
// details incomplete)
const messageContainer = document.querySelector('#error-message');
messageContainer.textContent = error.message;
} else {
// Your customer will be redirected to your `return_url`. For some payment
// methods like iDEAL, your customer will be redirected to an intermediate
// site first to authorize the payment, then redirected to the `return_url`.
}
});
```
#### React
To call [stripe.confirmPayment](https://docs.stripe.com/js/payment_intents/confirm_payment) from your payment form component, use the [useStripe](https://docs.stripe.com/sdks/stripejs-react.md#usestripe-hook) and [useElements](https://docs.stripe.com/sdks/stripejs-react.md#useelements-hook) hooks.
If you prefer traditional class components over hooks, you can instead use an [ElementsConsumer](https://docs.stripe.com/sdks/stripejs-react.md#elements-consumer).
```jsx
import React, {useState} from 'react';
import {useStripe, useElements, PaymentElement} from '@stripe/react-stripe-js';
const CheckoutForm = () => {
const stripe = useStripe();
const elements = useElements();
const [errorMessage, setErrorMessage] = useState(null);
const handleSubmit = async (event) => {
// We don't want to let default form submission happen here,
// which would refresh the page.
event.preventDefault();
if (!stripe || !elements) {
// Stripe.js hasn't yet loaded.
// Make sure to disable form submission until Stripe.js has loaded.
return;
}
const {error} = await stripe.confirmPayment({
//`Elements` instance that was used to create the Payment Element
elements,
confirmParams: {
return_url: 'https://example.com/order/123/complete',
},
});
if (error) {
// This point will only be reached if there is an immediate error when
// confirming the payment. Show error to your customer (for example, payment
// details incomplete)
setErrorMessage(error.message);
} else {
// Your customer will be redirected to your `return_url`. For some payment
// methods like iDEAL, your customer will be redirected to an intermediate
// site first to authorize the payment, then redirected to the `return_url`.
}
};
return (
);
};
export default CheckoutForm;
```
Make sure the `return_url` corresponds to a page on your website that provides the status of the payment. When Stripe redirects the customer to the `return_url`, we provide the following URL query parameters:
| Parameter | Description |
| ------------------------------ | --------------------------------------------------------------------------------------------------------------------------------------------- |
| `payment_intent` | The unique identifier for the `PaymentIntent`. |
| `payment_intent_client_secret` | The [client secret](https://docs.stripe.com/api/payment_intents/object.md#payment_intent_object-client_secret) of the `PaymentIntent` object. |
> If you have tooling that tracks the customer’s browser session, you might need to add the `stripe.com` domain to the referrer exclude list. Redirects cause some tools to create new sessions, which prevents you from tracking the complete session.
Use one of the query parameters to retrieve the PaymentIntent. Inspect the [status of the PaymentIntent](https://docs.stripe.com/payments/paymentintents/lifecycle.md) to decide what to show your customers. You can also append your own query parameters when providing the `return_url`, which persist through the redirect process.
#### HTML + JS
```javascript
// Initialize Stripe.js using your publishable key
const stripe = Stripe('<>');
// Retrieve the "payment_intent_client_secret" query parameter appended to
// your return_url by Stripe.js
const clientSecret = new URLSearchParams(window.location.search).get(
'payment_intent_client_secret'
);
// Retrieve the PaymentIntent
stripe.retrievePaymentIntent(clientSecret).then(({paymentIntent}) => {
const message = document.querySelector('#message')
// Inspect the PaymentIntent `status` to indicate the status of the payment
// to your customer.
//
// Some payment methods will [immediately succeed or fail][0] upon
// confirmation, while others will first enter a `processing` state.
//
// [0]: https://stripe.com/docs/payments/payment-methods#payment-notification
switch (paymentIntent.status) {
case 'succeeded':
message.innerText = 'Success! Payment received.';
break;
case 'processing':
message.innerText = "Payment processing. We'll update you when payment is received.";
break;
case 'requires_payment_method':
message.innerText = 'Payment failed. Please try another payment method.';
// Redirect your user back to your payment page to attempt collecting
// payment again
break;
default:
message.innerText = 'Something went wrong.';
break;
}
});
```
#### React
```jsx
import React, {useState, useEffect} from 'react';
import {useStripe} from '@stripe/react-stripe-js';
const PaymentStatus = () => {
const stripe = useStripe();
const [message, setMessage] = useState(null);
useEffect(() => {
if (!stripe) {
return;
}
// Retrieve the "payment_intent_client_secret" query parameter appended to
// your return_url by Stripe.js
const clientSecret = new URLSearchParams(window.location.search).get(
'payment_intent_client_secret'
);
// Retrieve the PaymentIntent
stripe
.retrievePaymentIntent(clientSecret)
.then(({paymentIntent}) => {
// Inspect the PaymentIntent `status` to indicate the status of the payment
// to your customer.
//
// Some payment methods will [immediately succeed or fail][0] upon
// confirmation, while others will first enter a `processing` state.
//
// [0]: https://stripe.com/docs/payments/payment-methods#payment-notification
switch (paymentIntent.status) {
case 'succeeded':
setMessage('Success! Payment received.');
break;
case 'processing':
setMessage("Payment processing. We'll update you when payment is received.");
break;
case 'requires_payment_method':
// Redirect your user back to your payment page to attempt collecting
// payment again
setMessage('Payment failed. Please try another payment method.');
break;
default:
setMessage('Something went wrong.');
break;
}
});
}, [stripe]);
return message;
};
export default PaymentStatus;
```
## Handle post-payment events [Server-side]
Stripe sends a [payment_intent.succeeded](https://docs.stripe.com/api/events/types.md#event_types-payment_intent.succeeded) event when the payment completes. Use the [Dashboard webhook tool](https://dashboard.stripe.com/webhooks) or follow the [webhook guide](https://docs.stripe.com/webhooks/quickstart.md) to receive these events and run actions, such as sending an order confirmation email to your customer, logging the sale in a database, or starting a shipping workflow.
Listen for these events rather than waiting on a callback from the client. On the client, the customer could close the browser window or quit the app before the callback executes, and malicious clients could manipulate the response. Setting up your integration to listen for asynchronous events is what enables you to accept [different types of payment methods](https://stripe.com/payments/payment-methods-guide) with a single integration.
In addition to handling the `payment_intent.succeeded` event, we recommend handling these other events when collecting payments with the Payment Element:
| Event | Description | Action |
| ------------------------------------------------------------------------------------------------------------------------------- | ----------------------------------------------------------------------------------------------------------------------------------------------------------------------------------------------------------------------------------------------------------------------------------- | ------------------------------------------------------------------------------------------------------------------------------------------------------------------------------------------------ |
| [payment_intent.succeeded](https://docs.stripe.com/api/events/types.md?lang=php#event_types-payment_intent.succeeded) | Sent when a customer successfully completes a payment. | Send the customer an order confirmation and *fulfill* (Fulfillment is the process of providing the goods or services purchased by a customer, typically after payment is collected) their order. |
| [payment_intent.processing](https://docs.stripe.com/api/events/types.md?lang=php#event_types-payment_intent.processing) | Sent when a customer successfully initiates a payment, but the payment has yet to complete. This event is most commonly sent when the customer initiates a bank debit. It’s followed by either a `payment_intent.succeeded` or `payment_intent.payment_failed` event in the future. | Send the customer an order confirmation that indicates their payment is pending. For digital goods, you might want to fulfill the order before waiting for payment to complete. |
| [payment_intent.payment_failed](https://docs.stripe.com/api/events/types.md?lang=php#event_types-payment_intent.payment_failed) | Sent when a customer attempts a payment, but the payment fails. | If a payment transitions from `processing` to `payment_failed`, offer the customer another attempt to pay. |
## Test the integration
#### Cards
| Card number | Scenario | How to test |
| ------------------- | --------------------------------------------------------------------------------------------------------------------------------------------------------------------------------------------------------------------------------------------------------------------------------------------- | ----------------------------------------------------------------------------------------------------- |
| 4242424242424242 | The card payment succeeds and doesn’t require authentication. | Fill in the credit card form using the credit card number with any expiry date, CVC, and postal code. |
| 4000002500003155 | The card payment requires *authentication* (Strong Customer Authentication (SCA) is a regulatory requirement in effect as of September 14, 2019, that impacts many European online payments. It requires customers to use two-factor authentication like 3D Secure to verify their purchase). | Fill in the credit card form using the credit card number with any expiry date, CVC, and postal code. |
| 4000000000009995 | The card is declined with a decline code like `insufficient_funds`. | Fill in the credit card form using the credit card number with any expiry date, CVC, and postal code. |
| 6205500000000000004 | The UnionPay card has a variable length of 13-19 digits. | Fill in the credit card form using the credit card number with any expiry date, CVC, and postal code. |
#### Wallets
| Payment method | Scenario | How to test |
| -------------- | ---------------------------------------------------------------------------------------------------------------------------------------------------------------------------- | ------------------------------------------------------------------------------------------------------------------------------------------------------------ |
| Alipay | Your customer successfully pays with a redirect-based and [immediate notification](https://docs.stripe.com/payments/payment-methods.md#payment-notification) payment method. | Choose any redirect-based payment method, fill out the required details, and confirm the payment. Then click **Complete test payment** on the redirect page. |
#### Bank redirects
| Payment method | Scenario | How to test |
| -------------------------------------- | ----------------------------------------------------------------------------------------------------------------------------------------------------------------------------------------------------- | ------------------------------------------------------------------------------------------------------------------------------------------------------------------------------------------------------- |
| BECS Direct Debit | Your customer successfully pays with BECS Direct Debit. | Fill out the form using the account number `900123456` and BSB `000000`. The confirmed PaymentIntent initially transitions to `processing`, then transitions to the `succeeded` status 3 minutes later. |
| BECS Direct Debit | Your customer’s payment fails with an `account_closed` error code. | Fill out the form using the account number `111111113` and BSB `000000`. |
| Bancontact, EPS, iDEAL, and Przelewy24 | Your customer fails to authenticate on the redirect page for a redirect-based and immediate notification payment method. | Choose any redirect-based payment method, fill out the required details, and confirm the payment. Then click **Fail test payment** on the redirect page. |
| Pay by Bank | Your customer successfully pays with a redirect-based and [delayed notification](https://docs.stripe.com/payments/payment-methods.md#payment-notification) payment method. | Choose the payment method, fill out the required details, and confirm the payment. Then click **Complete test payment** on the redirect page. |
| Pay by Bank | Your customer fails to authenticate on the redirect page for a redirect-based and delayed notification payment method. | Choose the payment method, fill out the required details, and confirm the payment. Then click **Fail test payment** on the redirect page. |
| BLIK | BLIK payments fail in a variety of ways – immediate failures (for example, the code has expired or is invalid), delayed errors (the bank declines) or timeouts (the customer didn’t respond in time). | Use email patterns to [simulate the different failures.](https://docs.stripe.com/payments/blik/accept-a-payment.md#simulate-failures) |
#### Bank debits
| Payment method | Scenario | How to test |
| ----------------- | ------------------------------------------------------------------------------------------------- | ------------------------------------------------------------------------------------------------------------------------------------------------------------------------------------------------- |
| SEPA Direct Debit | Your customer successfully pays with SEPA Direct Debit. | Fill out the form using the account number `AT321904300235473204`. The confirmed PaymentIntent initially transitions to processing, then transitions to the succeeded status three minutes later. |
| SEPA Direct Debit | Your customer’s payment intent status transitions from `processing` to `requires_payment_method`. | Fill out the form using the account number `AT861904300235473202`. |
#### Vouchers
| Payment method | Scenario | How to test |
| -------------- | ------------------------------------------------- | ------------------------------------------------------------------------------------------------------ |
| Boleto, OXXO | Your customer pays with a Boleto or OXXO voucher. | Select Boleto or OXXO as the payment method and submit the payment. Close the dialog after it appears. |
See [Testing](https://docs.stripe.com/testing.md) for additional information to test your integration.
## Optional: Enable additional payment methods
Navigate to [Manage payment methods for your connected accounts](https://dashboard.stripe.com/settings/payment_methods/connected_accounts) in the Dashboard to configure which payment methods your connected accounts accept. Changes to default settings apply to all new and existing connected accounts.
Consult the following resources for payment method information:
- [A guide to payment methods](https://stripe.com/payments/payment-methods-guide#choosing-the-right-payment-methods-for-your-business) to help you choose the correct payment methods for your platform.
- [Account capabilities](https://docs.stripe.com/connect/account-capabilities.md) to make sure your chosen payment methods work for your connected accounts.
- [Payment method and product support](https://docs.stripe.com/payments/payment-methods/payment-method-support.md#product-support) tables to make sure your chosen payment methods work for your Stripe products and payments flows.
For each payment method, you can select one of the following dropdown options:
| |
| |
| **On by default** | Your connected accounts accept this payment method during checkout. Some payment methods can only be off or blocked. This is because your connected accounts with *access to the Stripe Dashboard* (Platforms can provide connected accounts with access to the full Stripe Dashboard or the Express Dashboard. Otherwise, platforms build an interface for connected accounts using embedded components or the Stripe API) must activate them in their settings page. |
| **Off by default** | Your connected accounts don’t accept this payment method during checkout. If you allow your connected accounts with *access to the Stripe Dashboard* (Platforms can provide connected accounts with access to the full Stripe Dashboard or the Express Dashboard. Otherwise, platforms build an interface for connected accounts using embedded components or the Stripe API) to manage their own payment methods, they have the ability to turn it on. |
| **Blocked** | Your connected accounts don’t accept this payment method during checkout. If you allow your connected accounts with *access to the Stripe Dashboard* (Platforms can provide connected accounts with access to the full Stripe Dashboard or the Express Dashboard. Otherwise, platforms build an interface for connected accounts using embedded components or the Stripe API) to manage their own payment methods, they don’t have the option to turn it on. |

Payment method options
If you make a change to a payment method, you must click **Review changes** in the bottom bar of your screen and **Save and apply** to update your connected accounts.

Save window
### Allow connected accounts to manage payment methods
Stripe recommends allowing your connected accounts to customise their own payment methods. This option allows each connected account with *access to the Stripe Dashboard* (Platforms can provide connected accounts with access to the full Stripe Dashboard or the Express Dashboard. Otherwise, platforms build an interface for connected accounts using embedded components or the Stripe API) to view and update their [Payment methods](https://dashboard.stripe.com/settings/payment_methods) page. Only owners of the connected accounts can customise their payment methods. The Stripe Dashboard displays the set of payment method defaults you applied to all new and existing connected accounts. Your connected accounts can override these defaults, excluding payment methods you have blocked.
Tick the **Account customisation** tickbox to enable this option. You must click **Review changes** in the bottom bar of your screen and then select **Save and apply** to update this setting.

Account customisation tickbox
### Payment method capabilities
To allow your connected accounts to accept additional payment methods, their `Accounts` must have active payment method capabilities.
If you selected the “On by default” option for a payment method in [Manage payment methods for your connected accounts](https://dashboard.stripe.com/settings/payment_methods/connected_accounts), Stripe automatically requests the necessary capability for new and existing connected accounts if they meet the verification requirements. If the connected account doesn’t meet the requirements or if you want to have direct control, you can manually request the capability in the Dashboard or with the API.
Most payment methods have the same verification requirements as the `card_payments` capability, with some restrictions and exceptions. The [payment method capabilities table](https://docs.stripe.com/connect/account-capabilities.md#payment-methods) lists the payment methods that require additional verification.
#### Dashboard
[Find a connected account](https://docs.stripe.com/connect/dashboard/managing-individual-accounts.md#finding-accounts) in the Dashboard to edit its capabilities and view outstanding verification requirements.
#### API
For an existing connected account, you can [list](https://docs.stripe.com/api/capabilities/list.md) their existing capabilities to determine whether you need to request additional capabilities.
```curl
curl https://api.stripe.com/v1/accounts/{{CONNECTEDACCOUNT_ID}}/capabilities \
-u "<>:"
```
Request additional capabilities by [updating](https://docs.stripe.com/api/capabilities/update.md) each connected account’s capabilities.
```curl
curl https://api.stripe.com/v1/accounts/{{CONNECTEDACCOUNT_ID}}/capabilities/us_bank_account_ach_payments \
-u "<>:" \
-d requested=true
```
There can be a delay before the requested capability becomes active. If the capability has any activation requirements, the response includes them in the `requirements` arrays.
## Collect fees
As a platform, you can charge your connected accounts a portion of each transaction in the form of application fees. You can set application fee pricing in the following ways:
- Use the [Platform Pricing Tool](https://docs.stripe.com/connect/platform-pricing-tools.md) to set and test pricing rules. This no-code feature in the Stripe Dashboard is currently only available for platforms responsible for paying Stripe fees.
- Specify application fees directly in a [PaymentIntent](https://docs.stripe.com/api/payment_intents/object.md). Fees set with this method override the pricing logic specified in the Platform Pricing Tool.
Your platform can take an application fee with the following limitations:
- The value of `application_fee_amount` must be positive and less than the amount of the charge. The application fee collected is capped at the captured amount of the charge.
- There are no additional Stripe fees on the application fee itself.
- In line with Brazilian regulatory and compliance requirements, platforms based outside of Brazil with Brazilian connected accounts can’t collect application fees through Stripe.
- The currency of `application_fee_amount` depends upon a few [multiple currency](https://docs.stripe.com/connect/currencies.md) factors.
The resulting charge’s [BalanceTransaction](https://docs.stripe.com/api.md#balance_transaction_retrieve) includes a detailed fee breakdown of both the Stripe and application fees. To provide a better reporting experience, collecting a fee generates an [ApplicationFee](https://docs.stripe.com/api/application_fees/object.md) object. Use the `amount` property on the `ApplicationFee` object for reporting.
You can view application fees in the [Collected fees](https://dashboard.stripe.com/connect/application_fees) section of the Dashboard.
> Application fees for direct charges are created asynchronously by default. If you expand the `application_fee` object in a charge creation request, the application fee is created synchronously as part of that request. Only expand the `application_fee` object if you must, because it increases the latency of the request.
>
> To receive notifications of asynchronously created `ApplicationFee` objects, listen for the [application_fee.created](https://docs.stripe.com/api/events/types.md#event_types-application_fee.created) webhook event.
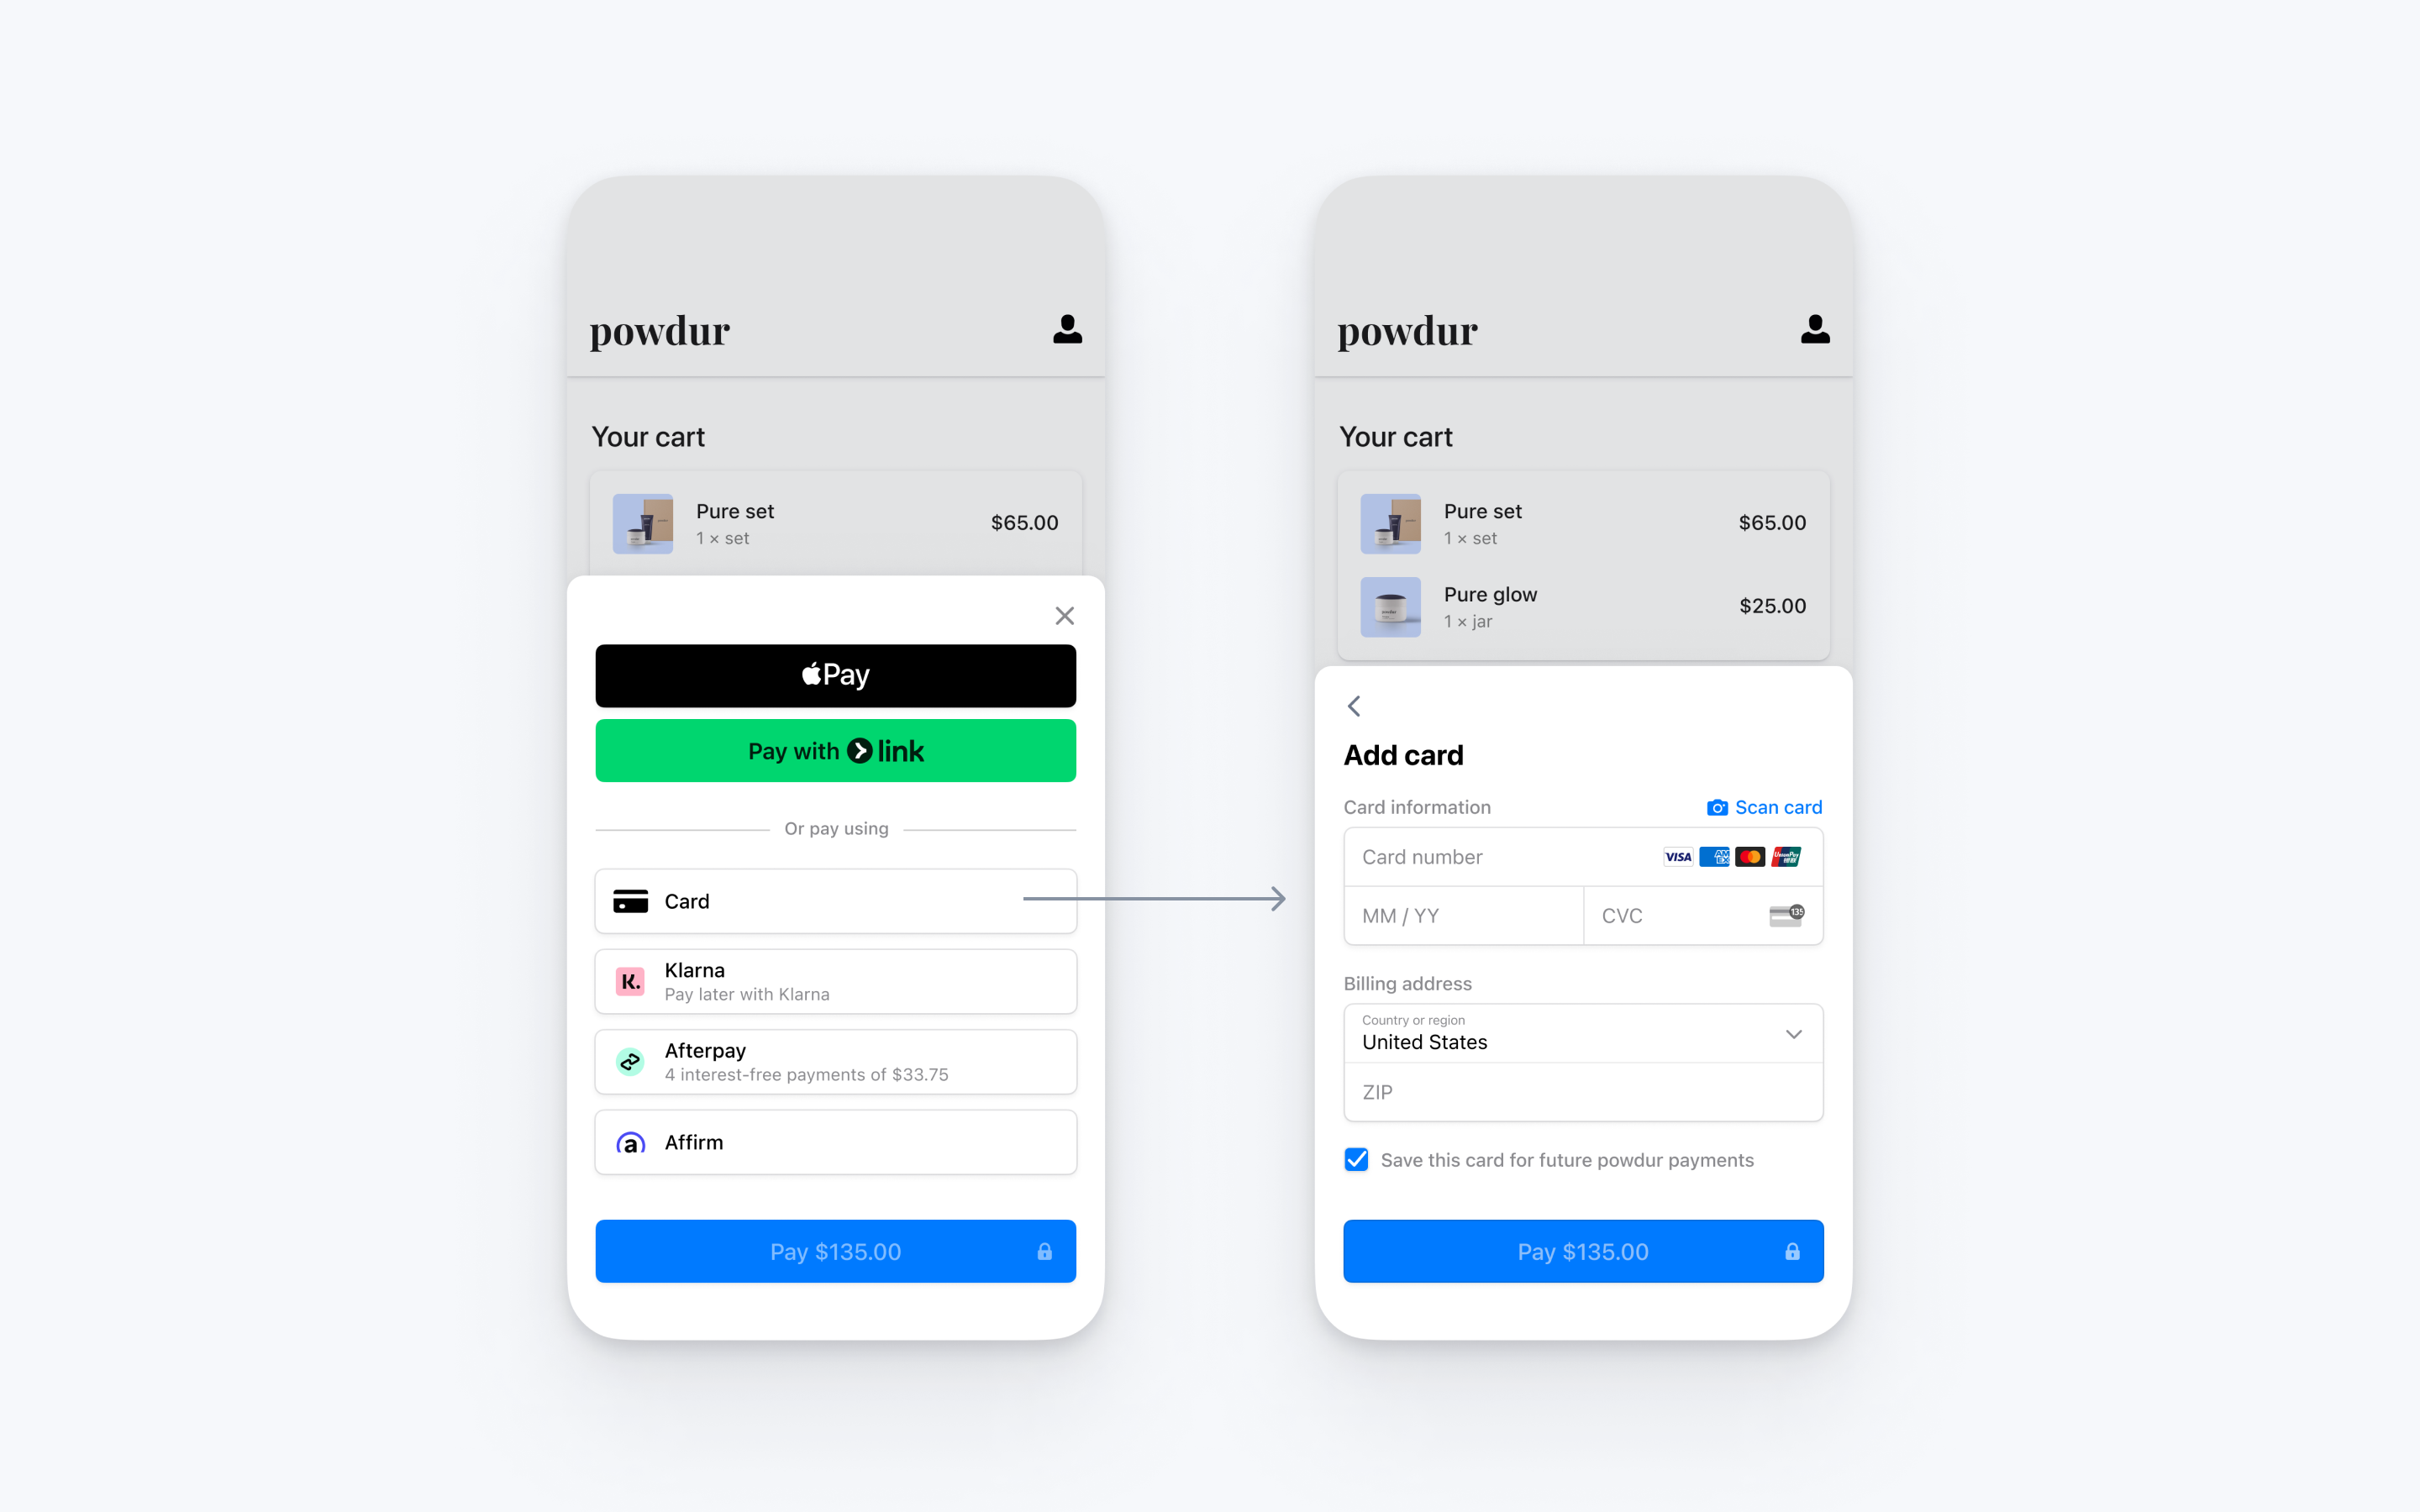
Integrate Stripe’s pre-built payment UI into the checkout of your iOS app with the [PaymentSheet](https://stripe.dev/stripe-ios/stripe-paymentsheet/Classes/PaymentSheet.html) class. See our sample integration [on GitHub](https://github.com/stripe/stripe-ios/tree/master/Example/PaymentSheet%20Example).
> #### Accounts v2 API support
>
> The Payment Sheet doesn’t support *customer-configured Accounts* (Account configurations represent role-based functionality that you can enable for accounts, such as merchant, customer, or recipient). It only supports `Customer` objects.
## Set up Stripe [Server-side] [Client-side]
First, you need a Stripe account. [Register now](https://dashboard.stripe.com/register).
### Server-side
This integration requires endpoints on your server that talk to the Stripe API. Use our official libraries for access to the Stripe API from your server:
#### Ruby
```bash
# Available as a gem
sudo gem install stripe
```
```ruby
# If you use bundler, you can add this line to your Gemfile
gem 'stripe'
```
### Client-side
The [Stripe iOS SDK](https://github.com/stripe/stripe-ios) is open source, [fully documented](https://stripe.dev/stripe-ios/index.html), and compatible with apps supporting iOS 13 or above.
#### Swift Package Manager
To install the SDK, follow these steps:
1. In Xcode, select **File** > **Add Package Dependencies…** and enter `https://github.com/stripe/stripe-ios-spm` as the repository URL.
1. Select the latest version number from our [releases page](https://github.com/stripe/stripe-ios/releases).
1. Add the **StripePaymentSheet** product to the [target of your app](https://developer.apple.com/documentation/swift_packages/adding_package_dependencies_to_your_app).
#### CocoaPods
1. If you haven’t already, install the latest version of [CocoaPods](https://guides.cocoapods.org/using/getting-started.html).
1. If you don’t have an existing [Podfile](https://guides.cocoapods.org/syntax/podfile.html), run the following command to create one:
```bash
pod init
```
1. Add this line to your `Podfile`:
```podfile
pod 'StripePaymentSheet'
```
1. Run the following command:
```bash
pod install
```
1. Don’t forget to use the `.xcworkspace` file to open your project in Xcode, instead of the `.xcodeproj` file, from here on out.
1. In the future, to update to the latest version of the SDK, run:
```bash
pod update StripePaymentSheet
```
#### Carthage
1. If you haven’t already, install the latest version of [Carthage](https://github.com/Carthage/Carthage#installing-carthage).
1. Add this line to your `Cartfile`:
```cartfile
github "stripe/stripe-ios"
```
1. Follow the [Carthage installation instructions](https://github.com/Carthage/Carthage#if-youre-building-for-ios-tvos-or-watchos). Make sure to embed all of the required frameworks listed [here](https://github.com/stripe/stripe-ios/tree/master/StripePaymentSheet/README.md#manual-linking).
1. In the future, to update to the latest version of the SDK, run the following command:
```bash
carthage update stripe-ios --platform ios
```
#### Manual Framework
1. Head to our [GitHub releases page](https://github.com/stripe/stripe-ios/releases/latest) and download and unzip **Stripe.xcframework.zip**.
1. Drag **StripePaymentSheet.xcframework** to the **Embedded Binaries** section of the **General** settings in your Xcode project. Make sure to select **Copy items if needed**.
1. Repeat step 2 for all required frameworks listed [here](https://github.com/stripe/stripe-ios/tree/master/StripePaymentSheet/README.md#manual-linking).
1. In the future, to update to the latest version of our SDK, repeat steps 1–3.
> For details on the latest SDK release and past versions, see the [Releases](https://github.com/stripe/stripe-ios/releases) page on GitHub. To receive notifications when a new release is published, [watch releases](https://help.github.com/en/articles/watching-and-unwatching-releases-for-a-repository#watching-releases-for-a-repository) for the repository.
Configure the SDK with your Stripe [publishable key](https://dashboard.stripe.com/test/apikeys) on app start. This enables your app to make requests to the Stripe API.
#### Swift
```swift
import UIKitimportStripePaymentSheet
@main
class AppDelegate: UIResponder, UIApplicationDelegate {
func application(_ application: UIApplication, didFinishLaunchingWithOptions launchOptions: [UIApplication.LaunchOptionsKey: Any]?) -> Bool {StripeAPI.defaultPublishableKey = "<>"
// do any other necessary launch configuration
return true
}
}
```
> Use your [test keys](https://docs.stripe.com/keys.md#obtain-api-keys) while you test and develop, and your [live mode](https://docs.stripe.com/keys.md#test-live-modes) keys when you publish your app.
## Add an endpoint [Server-side]
> #### Note
>
> To display the PaymentSheet before you create a PaymentIntent, see [Collect payment details before creating an Intent](https://docs.stripe.com/payments/accept-a-payment-deferred.md?type=payment).
This integration uses three Stripe API objects:
1. [PaymentIntent](https://docs.stripe.com/api/payment_intents.md): Stripe uses this to represent your intent to collect payment from a customer, tracking your charge attempts and payment state changes throughout the process.
1. (Optional) A [customer-configured Account](https://docs.stripe.com/api/v2/core/accounts/object.md#v2_account_object-applied_configurations) or a [Customer](https://docs.stripe.com/api/customers.md) object: To set up a payment method for future payments, you must attach it to a customer. Create an object to represent your customer when they create an account with your business. If your customer makes a payment as a guest, you can create an `Account` or `Customer` object before payment and associate it with your own internal representation of the customer’s account later.
1. (Optional) [CustomerSession](https://docs.stripe.com/api/customer_sessions.md): Information on the object that represents your customer is sensitive, and can’t be retrieved directly from an app. A `CustomerSession` grants the SDK temporary scoped access to the `Account` or `Customer` and provides additional configuration options. See a complete list of [configuration options](https://docs.stripe.com/api/customer_sessions/create.md#create_customer_session-components).
> If you never save cards for customers and don’t allow returning customers to reuse saved cards, you can omit the `Account` or `Customer` object and the `CustomerSession` object from your integration.
For security reasons, your app can’t create these objects. Instead, add an endpoint on your server that:
1. Retrieves the `Account` or `Customer`, or creates a new one.
1. Creates a [CustomerSession](https://docs.stripe.com/api/customer_sessions.md) for the `Account` or `Customer`.
1. Creates a `PaymentIntent` with the [amount](https://docs.stripe.com/api/payment_intents/create.md#create_payment_intent-amount), [currency](https://docs.stripe.com/api/payment_intents/create.md#create_payment_intent-currency), and either the [customer_account](https://docs.stripe.com/api/payment_intents/create.md#create_payment_intent-customer_account) or the [customer](https://docs.stripe.com/api/payment_intents/create.md#create_payment_intent-customer).
1. Returns the `PaymentIntent`’s *client secret* (The client secret is a unique key returned from Stripe as part of a PaymentIntent. This key lets the client access important fields from the PaymentIntent (status, amount, currency) while hiding sensitive ones (metadata, customer)), the `CustomerSession`’s `client_secret`, the ID of the `Account` or `Customer`, and your [publishable key](https://dashboard.stripe.com/apikeys) to your app.
The payment methods shown to customers during the checkout process are also included on the PaymentIntent. You can let Stripe pull payment methods from your Dashboard settings or you can list them manually. Regardless of the option you choose, note that the currency passed in the PaymentIntent filters the payment methods shown to the customer. For example, if you pass `eur` on the PaymentIntent and have OXXO enabled in the Dashboard, OXXO won’t be shown to the customer because OXXO doesn’t support `eur` payments.
Unless your integration requires a code-based option for offering payment methods, Stripe recommends the automated option. This is because Stripe evaluates the currency, payment method restrictions, and other parameters to determine the list of supported payment methods. Payment methods that increase conversion and that are most relevant to the currency and customer’s location are prioritised.
#### Manage payment methods from the Dashboard
You can manage payment methods from the [Dashboard](https://dashboard.stripe.com/settings/payment_methods). Stripe handles the return of eligible payment methods based on factors such as the transaction’s amount, currency, and payment flow. The PaymentIntent is created using the payment methods you configured in the Dashboard. If you don’t want to use the Dashboard or if you want to specify payment methods manually, you can list them using the `payment_method_types` attribute.
#### curl
```bash
# Create a Customer (use an existing Customer ID if this is a returning customer)
curl https://api.stripe.com/v1/customers \
-u <>: \
-X "POST" \
-H "Stripe-Account: {{CONNECTED_ACCOUNT_ID}}"
# Create an CustomerSession for the Customer
curl https://api.stripe.com/v1/customer_sessions \
-u <>: \
-X "POST" \
-d "customer"="{{CUSTOMER_ID}}" \
-d "components[mobile_payment_element][enabled]"=true \
-d "components[mobile_payment_element][features][payment_method_save]"=enabled \
-d "components[mobile_payment_element][features][payment_method_redisplay]"=enabled \
-d "components[mobile_payment_element][features][payment_method_remove]"=enabled
# Create a PaymentIntent
curl https://api.stripe.com/v1/payment_intents \
-u <>: \
-H "Stripe-Account: {{CONNECTED_ACCOUNT_ID}}"
-X "POST" \
-d "customer"="{{CUSTOMER_ID}}" \
-d "amount"=1099 \
-d "currency"="eur" \
-d "automatic_payment_methods[enabled]"=true \
-d application_fee_amount="123" \
```
#### Listing payment methods manually
#### curl
```bash
# Create a Customer (use an existing Customer ID if this is a returning customer)
curl https://api.stripe.com/v1/customers \
-u <>: \
-X "POST" \
-H "Stripe-Account: {{CONNECTED_ACCOUNT_ID}}"
# Create an CustomerSession for the Customer
curl https://api.stripe.com/v1/customer_sessions \
-u <>: \
-X "POST" \
-d "customer"="{{CUSTOMER_ID}}" \
-d "components[mobile_payment_element][enabled]"=true \
-d "components[mobile_payment_element][features][payment_method_save]"=enabled \
-d "components[mobile_payment_element][features][payment_method_redisplay]"=enabled \
-d "components[mobile_payment_element][features][payment_method_remove]"=enabled
# Create a PaymentIntent
curl https://api.stripe.com/v1/payment_intents \
-u <>: \
-H "Stripe-Account: {{CONNECTED_ACCOUNT_ID}}"
-X "POST" \
-d "customer"="{{CUSTOMER_ID}}" \
-d "amount"=1099 \
-d "currency"="eur" \
-d "payment_method_types[]"="bancontact" \
-d "payment_method_types[]"="card" \
-d "payment_method_types[]"="ideal" \
-d "payment_method_types[]"="klarna" \
-d "payment_method_types[]"="sepa_debit" \
-d application_fee_amount="123" \
```
> Each payment method needs to support the currency passed in the PaymentIntent and your business needs to be based in one of the countries each payment method supports. See the [Payment method integration options](https://docs.stripe.com/payments/payment-methods/integration-options.md) page for more details about what’s supported.
## Integrate the payment sheet [Client-side]
To display the mobile Payment Element on your checkout screen:
- Display the products the customer is purchasing along with the total amount
- Use the [Address Element](https://docs.stripe.com/elements/address-element.md?platform=ios) to collect any required shipping information from the customer
- Add a checkout button to display Stripe’s UI
#### UIKit
#### Accounts v2
In your app’s checkout screen, fetch the PaymentIntent client secret, `CustomerSession` client secret, customer-configured `Account` ID and publishable key from the endpoint you created in the previous step. Use `STPAPIClient.shared` to set your publishable key and initialise the [PaymentSheet](https://stripe.dev/stripe-ios/stripe-paymentsheet/Classes/PaymentSheet.html).
Then, set `STPAPIClient.shared.stripeAccount` to the connected account ID.
#### iOS (Swift)
```swift
import UIKit@_spi(CustomerSessionBetaAccess) import StripePaymentSheet
class CheckoutViewController: UIViewController {
@IBOutlet weak var checkoutButton: UIButton!
var paymentSheet: PaymentSheet?
let backendCheckoutUrl = URL(string: "Your back-end endpoint/payment-sheet")! // Your back-end endpoint
override func viewDidLoad() {
super.viewDidLoad()
checkoutButton.addTarget(self, action: #selector(didTapCheckoutButton), for: .touchUpInside)
checkoutButton.isEnabled = false
// MARK: Fetch the PaymentIntent client secret, CustomerSession client secret, customer-configured Account ID, and publishable key
var request = URLRequest(url: backendCheckoutUrl)
request.httpMethod = "POST"
let task = URLSession.shared.dataTask(with: request, completionHandler: { [weak self] (data, response, error) in
guard let data = data,
let json = try? JSONSerialization.jsonObject(with: data, options: []) as? [String : Any],
let customerAccountId = json["customerAccount"] as? String,
let customerSessionClientSecret = json["customerSessionClientSecret"] as? String,
let paymentIntentClientSecret = json["paymentIntent"] as? String,
let publishableKey = json["publishableKey"] as? String,
let self = self else {
// Handle error
return
}
STPAPIClient.shared.publishableKey = publishableKeySTPAPIClient.shared.stripeAccount = ""{{CONNECTED_ACCOUNT_ID}}""// MARK: Create a PaymentSheet instance
var configuration = PaymentSheet.Configuration()
configuration.merchantDisplayName = "Example, Inc."
configuration.customerAccount = .init(id: customerAccountId, customerSessionClientSecret: customerSessionClientSecret)
// Set `allowsDelayedPaymentMethods` to true if your business handles
// delayed notification payment methods like US bank accounts.
configuration.allowsDelayedPaymentMethods = true
self.paymentSheet = PaymentSheet(paymentIntentClientSecret:paymentIntentClientSecret, configuration: configuration)
DispatchQueue.main.async {
self.checkoutButton.isEnabled = true
}
})
task.resume()
}
}
```
#### Customers v1
In your app’s checkout screen, fetch the PaymentIntent client secret, `CustomerSession` client secret, `Customer` ID and publishable key from the endpoint you created in the previous step. Use `STPAPIClient.shared` to set your publishable key and initialise the [PaymentSheet](https://stripe.dev/stripe-ios/stripe-paymentsheet/Classes/PaymentSheet.html).
Then, set `STPAPIClient.shared.stripeAccount` to the connected account ID.
#### iOS (Swift)
```swift
import UIKit@_spi(CustomerSessionBetaAccess) import StripePaymentSheet
class CheckoutViewController: UIViewController {
@IBOutlet weak var checkoutButton: UIButton!
var paymentSheet: PaymentSheet?
let backendCheckoutUrl = URL(string: "Your backend endpoint/payment-sheet")! // Your backend endpoint
override func viewDidLoad() {
super.viewDidLoad()
checkoutButton.addTarget(self, action: #selector(didTapCheckoutButton), for: .touchUpInside)
checkoutButton.isEnabled = false
// MARK: Fetch the PaymentIntent client secret, CustomerSession client secret, Customer ID, and publishable key
var request = URLRequest(url: backendCheckoutUrl)
request.httpMethod = "POST"
let task = URLSession.shared.dataTask(with: request, completionHandler: { [weak self] (data, response, error) in
guard let data = data,
let json = try? JSONSerialization.jsonObject(with: data, options: []) as? [String : Any],
let customerId = json["customer"] as? String,
let customerSessionClientSecret = json["customerSessionClientSecret"] as? String,
let paymentIntentClientSecret = json["paymentIntent"] as? String,
let publishableKey = json["publishableKey"] as? String,
let self = self else {
// Handle error
return
}
STPAPIClient.shared.publishableKey = publishableKeySTPAPIClient.shared.stripeAccount = ""{{CONNECTED_ACCOUNT_ID}}""// MARK: Create a PaymentSheet instance
var configuration = PaymentSheet.Configuration()
configuration.merchantDisplayName = "Example, Inc."
configuration.customer = .init(id: customerId, customerSessionClientSecret: customerSessionClientSecret)
// Set `allowsDelayedPaymentMethods` to true if your business handles
// delayed notification payment methods like US bank accounts.
configuration.allowsDelayedPaymentMethods = true
self.paymentSheet = PaymentSheet(paymentIntentClientSecret:paymentIntentClientSecret, configuration: configuration)
DispatchQueue.main.async {
self.checkoutButton.isEnabled = true
}
})
task.resume()
}
}
```
When the customer taps the **Checkout** button, call `present` to present the PaymentSheet. After the customer completes the payment, Stripe dismisses the PaymentSheet and calls the completion block with [PaymentSheetResult](https://stripe.dev/stripe-ios/stripe-paymentsheet/Enums/PaymentSheetResult.html).
#### iOS (Swift)
```swift
@objc
func didTapCheckoutButton() {
// MARK: Start the checkout process
paymentSheet?.present(from: self) { paymentResult in
// MARK: Handle the payment result
switch paymentResult {
case .completed:
print("Your order is confirmed")
case .canceled:
print("Canceled!")
case .failed(let error):
print("Payment failed: \(error)")
}
}
}
```
#### SwiftUI
#### Accounts v2
Create an `ObservableObject` model for your checkout screen. This model publishes a [PaymentSheet](https://stripe.dev/stripe-ios/stripe-paymentsheet/Classes/PaymentSheet.html) and a [PaymentSheetResult](https://stripe.dev/stripe-ios/stripe-paymentsheet/Enums/PaymentSheetResult.html).
```swift
import StripePaymentSheet
import SwiftUI
class CheckoutViewModel: ObservableObject {
let backendCheckoutUrl = URL(string: "Your back-end endpoint/payment-sheet")! // Your back-end endpoint
@Published var paymentSheet: PaymentSheet?
@Published var paymentResult: PaymentSheetResult?
}
```
Fetch the PaymentIntent client secret, `CustomerSession` client secret, customer-configured `Account` ID and publishable key from the endpoint you created in the previous step. Use `STPAPIClient.shared` to set your publishable key and initialise the [PaymentSheet](https://stripe.dev/stripe-ios/stripe-paymentsheet/Classes/PaymentSheet.html).
Then, set `STPAPIClient.shared.stripeAccount` to the connected account ID.
```swift
@_spi(CustomerSessionBetaAccess) import StripePaymentSheet
import SwiftUI
class CheckoutViewModel: ObservableObject {
let backendCheckoutUrl = URL(string: "Your back-end endpoint/payment-sheet")! // Your back-end endpoint
@Published var paymentSheet: PaymentSheet?
@Published var paymentResult: PaymentSheetResult?
func preparePaymentSheet() {
// MARK: Fetch thePaymentIntent and customer information from the back end
var request = URLRequest(url: backendCheckoutUrl)
request.httpMethod = "POST"
let task = URLSession.shared.dataTask(with: request, completionHandler: { [weak self] (data, response, error) in
guard let data = data,
let json = try? JSONSerialization.jsonObject(with: data, options: []) as? [String : Any],
let customerAccountId = json["customerAccount"] as? String,
let customerSessionClientSecret = json["customerSessionClientSecret"] as? String,
letpaymentIntentClientSecret = json["paymentIntent"] as? String,
let publishableKey = json["publishableKey"] as? String,
let self = self else {
// Handle error
return
}
STPAPIClient.shared.publishableKey = publishableKeySTPAPIClient.shared.stripeAccount = ""{{CONNECTED_ACCOUNT_ID}}""// MARK: Create a PaymentSheet instance
var configuration = PaymentSheet.Configuration()
configuration.merchantDisplayName = "Example, Inc."
configuration.customerAccount = .init(id: customerAccountId, customerSessionClientSecret: customerSessionClientSecret)
// Set `allowsDelayedPaymentMethods` to true if your business handles
// delayed notification payment methods like US bank accounts.
configuration.allowsDelayedPaymentMethods = true
DispatchQueue.main.async {
self.paymentSheet = PaymentSheet(paymentIntentClientSecret:paymentIntentClientSecret, configuration: configuration)
}
})
task.resume()
}
}
struct CheckoutView: View {
@ObservedObject var model = CheckoutViewModel()
var body: some View {
VStack {
if model.paymentSheet != nil {
Text("Ready to pay.")
} else {
Text("Loading…")
}
}.onAppear { model.preparePaymentSheet() }
}
}
```
Add a [PaymentSheet.PaymentButton](https://stripe.dev/stripe-ios/stripe-paymentsheet/Classes/PaymentSheet/PaymentButton.html) to your `View`. This behaves similarly to a SwiftUI `Button`, which allows you to customise it by adding a `View`. When you tap the button, it displays the PaymentSheet. After you complete the payment, Stripe dismisses the PaymentSheet and calls the `onCompletion` handler with a [PaymentSheetResult](https://stripe.dev/stripe-ios/stripe-paymentsheet/Enums/PaymentSheetResult.html) object.
```swift
@_spi(CustomerSessionBetaAccess) import StripePaymentSheet
import SwiftUI
class CheckoutViewModel: ObservableObject {
let backendCheckoutUrl = URL(string: "Your back-end endpoint/payment-sheet")! // Your back-end endpoint
@Published var paymentSheet: PaymentSheet?
@Published var paymentResult: PaymentSheetResult?
func preparePaymentSheet() {
// MARK: Fetch the PaymentIntent and customer information from the back end
var request = URLRequest(url: backendCheckoutUrl)
request.httpMethod = "POST"
let task = URLSession.shared.dataTask(with: request, completionHandler: { [weak self] (data, response, error) in
guard let data = data,
let json = try? JSONSerialization.jsonObject(with: data, options: []) as? [String : Any],
let customerAccountId = json["customerAccount"] as? String,
let customerSessionClientSecret = json["customerSessionClientSecret"] as? String,
let paymentIntentClientSecret = json["paymentIntent"] as? String,
let publishableKey = json["publishableKey"] as? String,
let self = self else {
// Handle error
return
}
STPAPIClient.shared.publishableKey = publishableKey
STPAPIClient.shared.stripeAccount = ""{{CONNECTED_ACCOUNT_ID}}""
// MARK: Create a PaymentSheet instance
var configuration = PaymentSheet.Configuration()
configuration.merchantDisplayName = "Example, Inc."
configuration.customerAccount = .init(id: customerAccountId, customerSessionClientSecret: customerSessionClientSecret)
// Set `allowsDelayedPaymentMethods` to true if your business can handle payment methods
// that complete payment after a delay, like SEPA Debit and Sofort.
configuration.allowsDelayedPaymentMethods = true
DispatchQueue.main.async {
self.paymentSheet = PaymentSheet(paymentIntentClientSecret: paymentIntentClientSecret, configuration: configuration)
}
})
task.resume()
}
func onPaymentCompletion(result: PaymentSheetResult) {
self.paymentResult = result
}
}
struct CheckoutView: View {
@ObservedObject var model = CheckoutViewModel()
var body: some View {
VStack {if let paymentSheet = model.paymentSheet {
PaymentSheet.PaymentButton(
paymentSheet: paymentSheet,
onCompletion: model.onPaymentCompletion
) {
Text("Buy")
}
} else {
Text("Loading…")
}if let result = model.paymentResult {
switch result {
case .completed:
Text("Payment complete")
case .failed(let error):
Text("Payment failed: \(error.localizedDescription)")
case .canceled:
Text("Payment canceled.")
}
}
}.onAppear { model.preparePaymentSheet() }
}
}
```
#### Customers v1
Create an `ObservableObject` model for your checkout screen. This model publishes a [PaymentSheet](https://stripe.dev/stripe-ios/stripe-paymentsheet/Classes/PaymentSheet.html) and a [PaymentSheetResult](https://stripe.dev/stripe-ios/stripe-paymentsheet/Enums/PaymentSheetResult.html).
```swift
import StripePaymentSheet
import SwiftUI
class CheckoutViewModel: ObservableObject {
let backendCheckoutUrl = URL(string: "Your back-end endpoint/payment-sheet")! // Your back-end endpoint
@Published var paymentSheet: PaymentSheet?
@Published var paymentResult: PaymentSheetResult?
}
```
Fetch the PaymentIntent client secret, CustomerSession client secret, `Customer` ID and publishable key from the endpoint you created in the previous step. Use `STPAPIClient.shared` to set your publishable key and initialise the [PaymentSheet](https://stripe.dev/stripe-ios/stripe-paymentsheet/Classes/PaymentSheet.html).
Then, set `STPAPIClient.shared.stripeAccount` to the connected account ID.
```swift
@_spi(CustomerSessionBetaAccess) import StripePaymentSheet
import SwiftUI
class CheckoutViewModel: ObservableObject {
let backendCheckoutUrl = URL(string: "Your back-end endpoint/payment-sheet")! // Your back-end endpoint
@Published var paymentSheet: PaymentSheet?
@Published var paymentResult: PaymentSheetResult?
func preparePaymentSheet() {
// MARK: Fetch thePaymentIntent and Customer information from the back end
var request = URLRequest(url: backendCheckoutUrl)
request.httpMethod = "POST"
let task = URLSession.shared.dataTask(with: request, completionHandler: { [weak self] (data, response, error) in
guard let data = data,
let json = try? JSONSerialization.jsonObject(with: data, options: []) as? [String : Any],
let customerId = json["customer"] as? String,
let customerSessionClientSecret = json["customerSessionClientSecret"] as? String,
letpaymentIntentClientSecret = json["paymentIntent"] as? String,
let publishableKey = json["publishableKey"] as? String,
let self = self else {
// Handle error
return
}
STPAPIClient.shared.publishableKey = publishableKeySTPAPIClient.shared.stripeAccount = ""{{CONNECTED_ACCOUNT_ID}}""// MARK: Create a PaymentSheet instance
var configuration = PaymentSheet.Configuration()
configuration.merchantDisplayName = "Example, Inc."
configuration.customer = .init(id: customerId, customerSessionClientSecret: customerSessionClientSecret)
// Set `allowsDelayedPaymentMethods` to true if your business handles
// delayed notification payment methods like US bank accounts.
configuration.allowsDelayedPaymentMethods = true
DispatchQueue.main.async {
self.paymentSheet = PaymentSheet(paymentIntentClientSecret:paymentIntentClientSecret, configuration: configuration)
}
})
task.resume()
}
}
struct CheckoutView: View {
@ObservedObject var model = CheckoutViewModel()
var body: some View {
VStack {
if model.paymentSheet != nil {
Text("Ready to pay.")
} else {
Text("Loading…")
}
}.onAppear { model.preparePaymentSheet() }
}
}
```
Add a [PaymentSheet.PaymentButton](https://stripe.dev/stripe-ios/stripe-paymentsheet/Classes/PaymentSheet/PaymentButton.html) to your `View`. This behaves similarly to a SwiftUI `Button`, which allows you to customise it by adding a `View`. When you tap the button, it displays the PaymentSheet. After you complete the payment, Stripe dismisses the PaymentSheet and calls the `onCompletion` handler with a [PaymentSheetResult](https://stripe.dev/stripe-ios/stripe-paymentsheet/Enums/PaymentSheetResult.html) object.
```swift
@_spi(CustomerSessionBetaAccess) import StripePaymentSheet
import SwiftUI
class CheckoutViewModel: ObservableObject {
let backendCheckoutUrl = URL(string: "Your back-end endpoint/payment-sheet")! // Your back-end endpoint
@Published var paymentSheet: PaymentSheet?
@Published var paymentResult: PaymentSheetResult?
func preparePaymentSheet() {
// MARK: Fetch the PaymentIntent and Customer information from the back end
var request = URLRequest(url: backendCheckoutUrl)
request.httpMethod = "POST"
let task = URLSession.shared.dataTask(with: request, completionHandler: { [weak self] (data, response, error) in
guard let data = data,
let json = try? JSONSerialization.jsonObject(with: data, options: []) as? [String : Any],
let customerId = json["customer"] as? String,
let customerSessionClientSecret = json["customerSessionClientSecret"] as? String,
let paymentIntentClientSecret = json["paymentIntent"] as? String,
let publishableKey = json["publishableKey"] as? String,
let self = self else {
// Handle error
return
}
STPAPIClient.shared.publishableKey = publishableKey
STPAPIClient.shared.stripeAccount = ""{{CONNECTED_ACCOUNT_ID}}""
// MARK: Create a PaymentSheet instance
var configuration = PaymentSheet.Configuration()
configuration.merchantDisplayName = "Example, Inc."
configuration.customer = .init(id: customerId, customerSessionClientSecret: customerSessionClientSecret)
// Set `allowsDelayedPaymentMethods` to true if your business can handle payment methods
// that complete payment after a delay, like SEPA Debit and Sofort.
configuration.allowsDelayedPaymentMethods = true
DispatchQueue.main.async {
self.paymentSheet = PaymentSheet(paymentIntentClientSecret: paymentIntentClientSecret, configuration: configuration)
}
})
task.resume()
}
func onPaymentCompletion(result: PaymentSheetResult) {
self.paymentResult = result
}
}
struct CheckoutView: View {
@ObservedObject var model = CheckoutViewModel()
var body: some View {
VStack {if let paymentSheet = model.paymentSheet {
PaymentSheet.PaymentButton(
paymentSheet: paymentSheet,
onCompletion: model.onPaymentCompletion
) {
Text("Buy")
}
} else {
Text("Loading…")
}if let result = model.paymentResult {
switch result {
case .completed:
Text("Payment complete")
case .failed(let error):
Text("Payment failed: \(error.localizedDescription)")
case .canceled:
Text("Payment canceled.")
}
}
}.onAppear { model.preparePaymentSheet() }
}
}
```
If `PaymentSheetResult` is `.completed`, inform the customer (for example, by displaying an order confirmation screen).
Setting `allowsDelayedPaymentMethods` to true allows [delayed notification](https://docs.stripe.com/payments/payment-methods.md#payment-notification) payment methods like US bank accounts. For these payment methods, the final payment status isn’t known when the `PaymentSheet` completes, and instead succeeds or fails later. If you support these types of payment methods, inform the customer their order is confirmed and only fulfil their order (for example, ship their product) when the payment is successful.
## Set up a return URL [Client-side]
The customer might navigate away from your app to authenticate (for example, in Safari or their banking app). To allow them to automatically return to your app after authenticating, [configure a custom URL scheme](https://developer.apple.com/documentation/xcode/defining-a-custom-url-scheme-for-your-app) and set up your app delegate to forward the URL to the SDK. Stripe doesn’t support [universal links](https://developer.apple.com/documentation/xcode/allowing-apps-and-websites-to-link-to-your-content).
#### SceneDelegate
#### Swift
```swift
// This method handles opening custom URL schemes (for example, "your-app://stripe-redirect")
func scene(_ scene: UIScene, openURLContexts URLContexts: Set) {
guard let url = URLContexts.first?.url else {
return
}
let stripeHandled = StripeAPI.handleURLCallback(with: url)
if (!stripeHandled) {
// This was not a Stripe url – handle the URL normally as you would
}
}
```
#### AppDelegate
#### Swift
```swift
// This method handles opening custom URL schemes (for example, "your-app://stripe-redirect")
func application(_ app: UIApplication, open url: URL, options: [UIApplication.OpenURLOptionsKey: Any] = [:]) -> Bool {
let stripeHandled = StripeAPI.handleURLCallback(with: url)
if (stripeHandled) {
return true
} else {
// This was not a Stripe url – handle the URL normally as you would
}
return false
}
```
#### SwiftUI
#### Swift
```swift
@main
struct MyApp: App {
var body: some Scene {
WindowGroup {
Text("Hello, world!").onOpenURL { incomingURL in
let stripeHandled = StripeAPI.handleURLCallback(with: incomingURL)
if (!stripeHandled) {
// This was not a Stripe url – handle the URL normally as you would
}
}
}
}
}
```
## Handle post-payment events [Server-side]
Stripe sends a [payment_intent.succeeded](https://docs.stripe.com/api/events/types.md#event_types-payment_intent.succeeded) event when the payment completes. Use the [Dashboard webhook tool](https://dashboard.stripe.com/webhooks) or follow the [webhook guide](https://docs.stripe.com/webhooks/quickstart.md) to receive these events and run actions, such as sending an order confirmation email to your customer, logging the sale in a database, or starting a shipping workflow.
Listen for these events rather than waiting on a callback from the client. On the client, the customer could close the browser window or quit the app before the callback executes, and malicious clients could manipulate the response. Setting up your integration to listen for asynchronous events is what enables you to accept [different types of payment methods](https://stripe.com/payments/payment-methods-guide) with a single integration.
In addition to handling the `payment_intent.succeeded` event, we recommend handling these other events when collecting payments with the Payment Element:
| Event | Description | Action |
| ------------------------------------------------------------------------------------------------------------------------------- | ----------------------------------------------------------------------------------------------------------------------------------------------------------------------------------------------------------------------------------------------------------------------------------- | ------------------------------------------------------------------------------------------------------------------------------------------------------------------------------------------------ |
| [payment_intent.succeeded](https://docs.stripe.com/api/events/types.md?lang=php#event_types-payment_intent.succeeded) | Sent when a customer successfully completes a payment. | Send the customer an order confirmation and *fulfill* (Fulfillment is the process of providing the goods or services purchased by a customer, typically after payment is collected) their order. |
| [payment_intent.processing](https://docs.stripe.com/api/events/types.md?lang=php#event_types-payment_intent.processing) | Sent when a customer successfully initiates a payment, but the payment has yet to complete. This event is most commonly sent when the customer initiates a bank debit. It’s followed by either a `payment_intent.succeeded` or `payment_intent.payment_failed` event in the future. | Send the customer an order confirmation that indicates their payment is pending. For digital goods, you might want to fulfill the order before waiting for payment to complete. |
| [payment_intent.payment_failed](https://docs.stripe.com/api/events/types.md?lang=php#event_types-payment_intent.payment_failed) | Sent when a customer attempts a payment, but the payment fails. | If a payment transitions from `processing` to `payment_failed`, offer the customer another attempt to pay. |
## Test the integration
#### Cards
| Card number | Scenario | How to test |
| ------------------- | --------------------------------------------------------------------------------------------------------------------------------------------------------------------------------------------------------------------------------------------------------------------------------------------- | ----------------------------------------------------------------------------------------------------- |
| 4242424242424242 | The card payment succeeds and doesn’t require authentication. | Fill in the credit card form using the credit card number with any expiry date, CVC, and postal code. |
| 4000002500003155 | The card payment requires *authentication* (Strong Customer Authentication (SCA) is a regulatory requirement in effect as of September 14, 2019, that impacts many European online payments. It requires customers to use two-factor authentication like 3D Secure to verify their purchase). | Fill in the credit card form using the credit card number with any expiry date, CVC, and postal code. |
| 4000000000009995 | The card is declined with a decline code like `insufficient_funds`. | Fill in the credit card form using the credit card number with any expiry date, CVC, and postal code. |
| 6205500000000000004 | The UnionPay card has a variable length of 13-19 digits. | Fill in the credit card form using the credit card number with any expiry date, CVC, and postal code. |
#### Bank redirects
| Payment method | Scenario | How to test |
| ----------------- | ----------------------------------------------------------------------------------------------------------------------------------------------------------------------------------------------------- | -------------------------------------------------------------------------------------------------------------------------------------------------------- |
| Bancontact, iDEAL | Your customer fails to authenticate on the redirect page for a redirect-based and immediate notification payment method. | Choose any redirect-based payment method, fill out the required details, and confirm the payment. Then click **Fail test payment** on the redirect page. |
| Pay by Bank | Your customer successfully pays with a redirect-based and [delayed notification](https://docs.stripe.com/payments/payment-methods.md#payment-notification) payment method. | Choose the payment method, fill out the required details, and confirm the payment. Then click **Complete test payment** on the redirect page. |
| Pay by Bank | Your customer fails to authenticate on the redirect page for a redirect-based and delayed notification payment method. | Choose the payment method, fill out the required details, and confirm the payment. Then click **Fail test payment** on the redirect page. |
| BLIK | BLIK payments fail in a variety of ways – immediate failures (for example, the code has expired or is invalid), delayed errors (the bank declines) or timeouts (the customer didn’t respond in time). | Use email patterns to [simulate the different failures.](https://docs.stripe.com/payments/blik/accept-a-payment.md#simulate-failures) |
#### Bank debits
| Payment method | Scenario | How to test |
| ----------------- | ------------------------------------------------------------------------------------------------- | ------------------------------------------------------------------------------------------------------------------------------------------------------------------------------------------------- |
| SEPA Direct Debit | Your customer successfully pays with SEPA Direct Debit. | Fill out the form using the account number `AT321904300235473204`. The confirmed PaymentIntent initially transitions to processing, then transitions to the succeeded status three minutes later. |
| SEPA Direct Debit | Your customer’s payment intent status transitions from `processing` to `requires_payment_method`. | Fill out the form using the account number `AT861904300235473202`. |
See [Testing](https://docs.stripe.com/testing.md) for additional information to test your integration.
## Enable card scanning
To enable card scanning support for iOS, set the `NSCameraUsageDescription` (**Privacy - Camera Usage Description**) in the `Info.plist` of your application, and provide a reason for accessing the camera (for example, “To scan cards”).
## Optional: Enable Apple Pay
> If your checkout screen has a dedicated **Apple Pay button**, follow the [Apple Pay guide](https://docs.stripe.com/apple-pay.md#present-payment-sheet) and use `ApplePayContext` to collect payment from your Apple Pay button. You can use `PaymentSheet` to handle other payment method types.
### Register for an Apple Merchant ID
Obtain an Apple Merchant ID by [registering for a new identifier](https://developer.apple.com/account/resources/identifiers/add/merchant) on the Apple Developer website.
Fill out the form with a description and identifier. Your description is for your own records and you can modify it in the future. Stripe recommends using the name of your app as the identifier (for example, `merchant.com.{{YOUR_APP_NAME}}`).
### Create a new Apple Pay certificate
Create a certificate for your app to encrypt payment data.
Go to the [iOS Certificate Settings](https://dashboard.stripe.com/settings/ios_certificates) in the Dashboard, click **Add new application**, and follow the guide.
Download a Certificate Signing Request (CSR) file to get a secure certificate from Apple that allows you to use Apple Pay.
One CSR file must be used to issue exactly one certificate. If you switch your Apple Merchant ID, you must go to the [iOS Certificate Settings](https://dashboard.stripe.com/settings/ios_certificates) in the Dashboard to obtain a new CSR and certificate.
### Integrate with Xcode
Add the Apple Pay capability to your app. In Xcode, open your project settings, click the **Signing & Capabilities** tab, and add the **Apple Pay** capability. You might be prompted to log in to your developer account at this point. Select the merchant ID you created earlier, and your app is ready to accept Apple Pay.
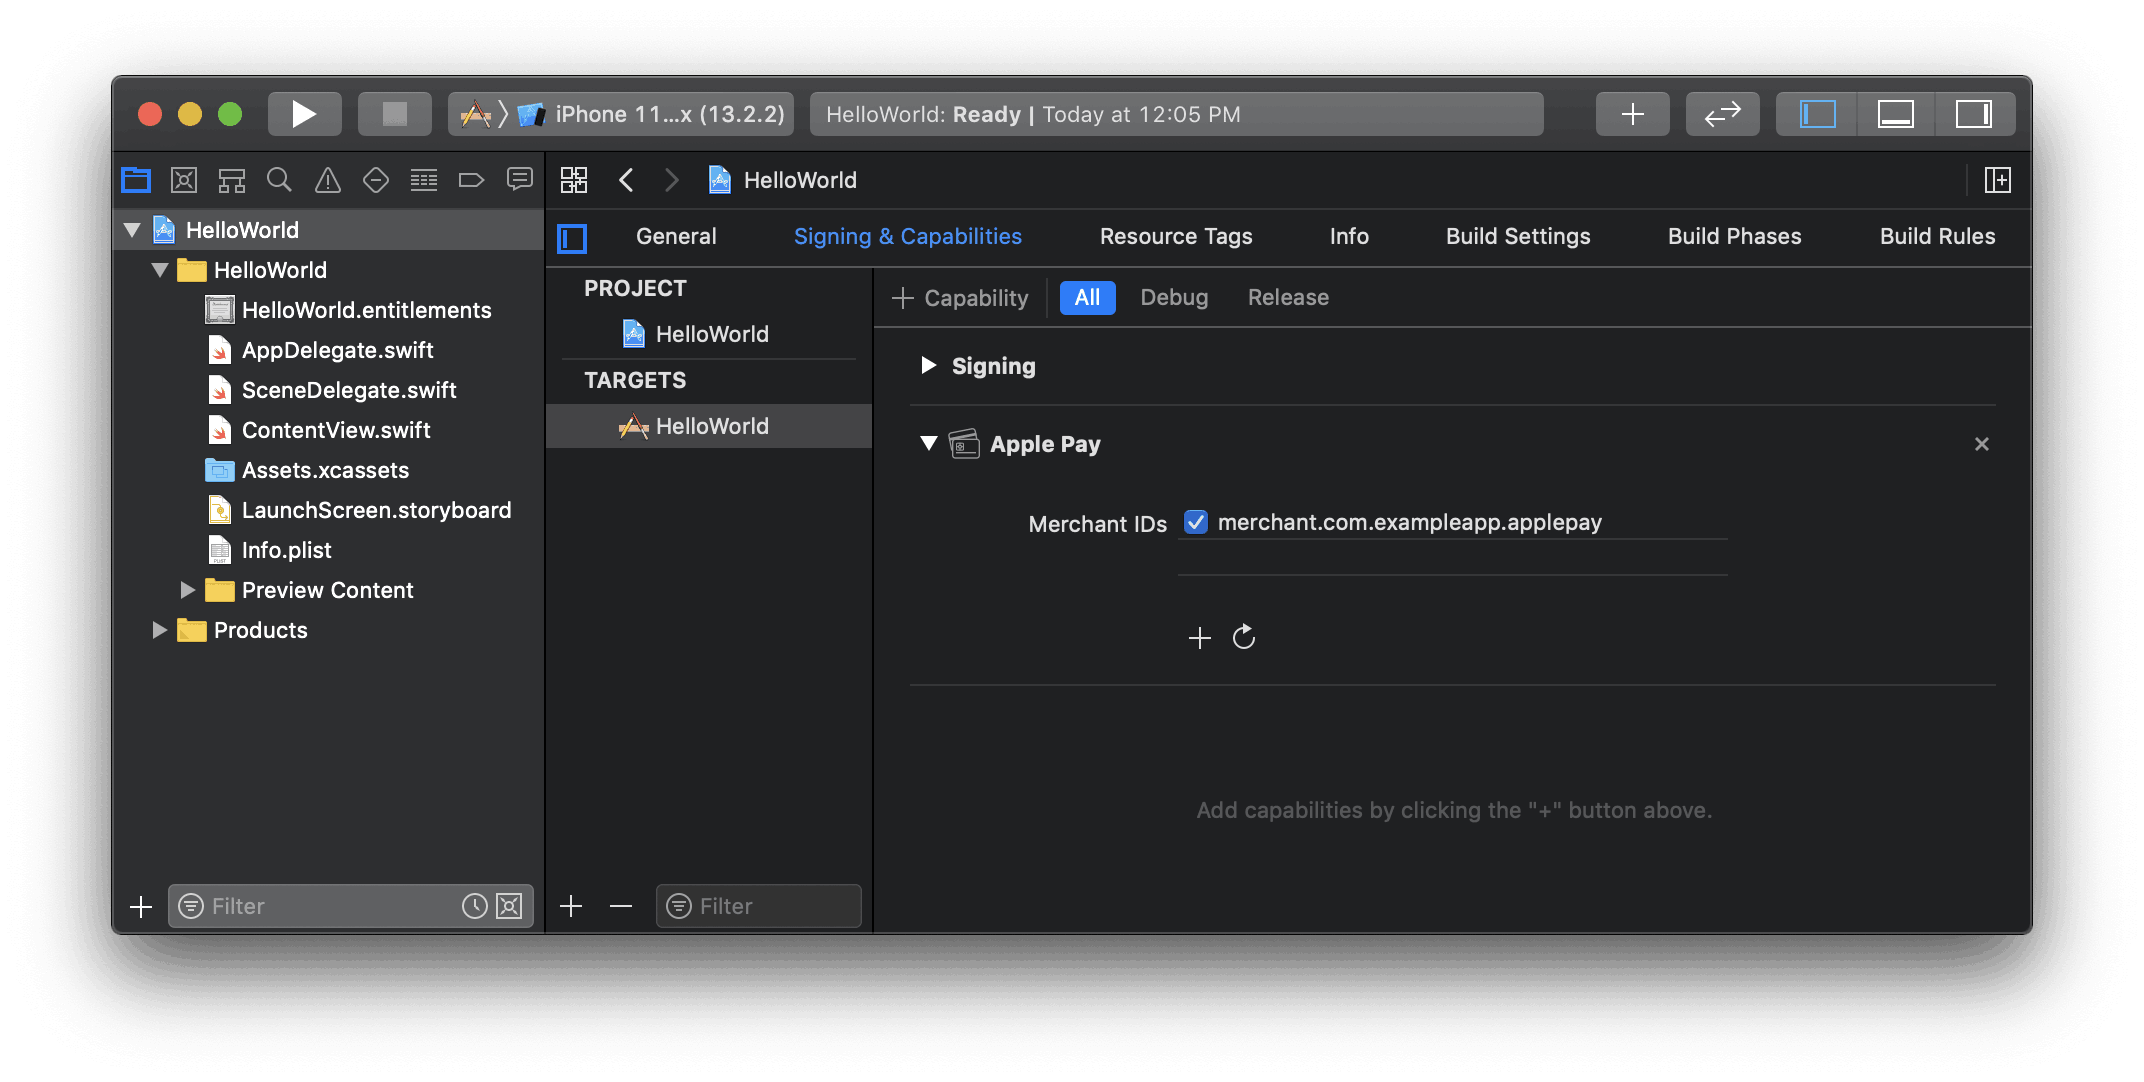
Enable the Apple Pay capability in Xcode
### Add Apple Pay
#### One-time payment
To add Apple Pay to PaymentSheet, set [applePay](https://stripe.dev/stripe-ios/stripe-paymentsheet/Classes/PaymentSheet/Configuration.html#/s:6Stripe12PaymentSheetC13ConfigurationV8applePayAC05ApplefD0VSgvp) after initialising `PaymentSheet.Configuration` with your Apple merchant ID and the [country code of your business](https://dashboard.stripe.com/settings/account).
#### iOS (Swift)
```swift
var configuration = PaymentSheet.Configuration()
configuration.applePay = .init(
merchantId: "merchant.com.your_app_name",
merchantCountryCode: "US"
)
```
#### Recurring payments
To add Apple Pay to PaymentSheet, set [applePay](https://stripe.dev/stripe-ios/stripe-paymentsheet/Classes/PaymentSheet/Configuration.html#/s:6Stripe12PaymentSheetC13ConfigurationV8applePayAC05ApplefD0VSgvp) after initialising `PaymentSheet.Configuration` with your Apple merchant ID and the [country code of your business](https://dashboard.stripe.com/settings/account).
As per [Apple’s guidelines](https://developer.apple.com/design/human-interface-guidelines/apple-pay#Supporting-subscriptions) for recurring payments, you must also set additional attributes on the `PKPaymentRequest`. Add a handler in [ApplePayConfiguration.paymentRequestHandlers](https://stripe.dev/stripe-ios/stripepaymentsheet/documentation/stripepaymentsheet/paymentsheet/applepayconfiguration/handlers/paymentrequesthandler) to configure the [PKPaymentRequest.paymentSummaryItems](https://developer.apple.com/documentation/passkit/pkpaymentrequest/1619231-paymentsummaryitems) with the amount you intend to charge (for example, 9.95 USD a month).
You can also adopt [merchant tokens](https://developer.apple.com/apple-pay/merchant-tokens/) by setting the `recurringPaymentRequest` or `automaticReloadPaymentRequest` properties on the `PKPaymentRequest`.
To learn more about how to use recurring payments with Apple Pay, see [Apple’s PassKit documentation](https://developer.apple.com/documentation/passkit/pkpaymentrequest).
#### iOS (Swift)
```swift
let customHandlers = PaymentSheet.ApplePayConfiguration.Handlers(
paymentRequestHandler: { request in
// PKRecurringPaymentSummaryItem is available on iOS 15 or later
if #available(iOS 15.0, *) {
let billing = PKRecurringPaymentSummaryItem(label: "My Subscription", amount: NSDecimalNumber(string: "59.99"))
// Payment starts today
billing.startDate = Date()
// Payment ends in one year
billing.endDate = Date().addingTimeInterval(60 * 60 * 24 * 365)
// Pay once a month.
billing.intervalUnit = .month
billing.intervalCount = 1
// recurringPaymentRequest is only available on iOS 16 or later
if #available(iOS 16.0, *) {
request.recurringPaymentRequest = PKRecurringPaymentRequest(paymentDescription: "Recurring",
regularBilling: billing,
managementURL: URL(string: "https://my-backend.example.com/customer-portal")!)
request.recurringPaymentRequest?.billingAgreement = "You'll be billed $59.99 every month for the next 12 months. To cancel at any time, go to Account and click 'Cancel Membership.'"
}
request.paymentSummaryItems = [billing]
request.currencyCode = "USD"
} else {
// On older iOS versions, set alternative summary items.
request.paymentSummaryItems = [PKPaymentSummaryItem(label: "Monthly plan starting July 1, 2022", amount: NSDecimalNumber(string: "59.99"), type: .final)]
}
return request
}
)
var configuration = PaymentSheet.Configuration()
configuration.applePay = .init(merchantId: "merchant.com.your_app_name",
merchantCountryCode: "US",
customHandlers: customHandlers)
```
### Order tracking
To add [order tracking](https://developer.apple.com/design/human-interface-guidelines/technologies/wallet/designing-order-tracking) information in iOS 16 or later, configure an [authorizationResultHandler](https://stripe.dev/stripe-ios/stripepaymentsheet/documentation/stripepaymentsheet/paymentsheet/applepayconfiguration/handlers/authorizationresulthandler) in your `PaymentSheet.ApplePayConfiguration.Handlers`. Stripe calls your implementation after the payment is complete, but before iOS dismisses the Apple Pay sheet.
In your `authorizationResultHandler` implementation, fetch the order details from your server for the completed order. Add the details to the provided [PKPaymentAuthorizationResult](https://developer.apple.com/documentation/passkit/pkpaymentauthorizationresult) and return the modified result.
To learn more about order tracking, see [Apple’s Wallet Orders documentation](https://developer.apple.com/documentation/walletorders).
#### iOS (Swift)
```swift
let customHandlers = PaymentSheet.ApplePayConfiguration.Handlers(
authorizationResultHandler: { result in
do {
// Fetch the order details from your service
let myOrderDetails = try await MyAPIClient.shared.fetchOrderDetails(orderID: orderID)
result.orderDetails = PKPaymentOrderDetails(
orderTypeIdentifier: myOrderDetails.orderTypeIdentifier, // "com.myapp.order"
orderIdentifier: myOrderDetails.orderIdentifier, // "ABC123-AAAA-1111"
webServiceURL: myOrderDetails.webServiceURL, // "https://my-backend.example.com/apple-order-tracking-backend"
authenticationToken: myOrderDetails.authenticationToken) // "abc123"
// Return your modified PKPaymentAuthorizationResult
return result
} catch {
return PKPaymentAuthorizationResult(status: .failure, errors: [error])
}
}
)
var configuration = PaymentSheet.Configuration()
configuration.applePay = .init(merchantId: "merchant.com.your_app_name",
merchantCountryCode: "US",
customHandlers: customHandlers)
```
## Optional: Customise the sheet
All customisation is configured through the [PaymentSheet.Configuration](https://stripe.dev/stripe-ios/stripe-paymentsheet/Classes/PaymentSheet/Configuration.html) object.
### Appearance
Customise colours, fonts and so on to match the look and feel of your app by using the [appearance API](https://docs.stripe.com/elements/appearance-api/mobile.md?platform=ios).
### Payment method layout
Configure the layout of payment methods in the sheet using [paymentMethodLayout](https://stripe.dev/stripe-ios/stripepaymentsheet/documentation/stripepaymentsheet/paymentsheet/configuration-swift.struct/paymentmethodlayout). You can display them horizontally, vertically, or let Stripe optimise the layout automatically.

#### Swift
```swift
var configuration = PaymentSheet.Configuration()
configuration.paymentMethodLayout = .automatic
```
### Collect users addresses
Collect local and international shipping or billing addresses from your customers using the [Address Element](https://docs.stripe.com/elements/address-element.md?platform=ios).
### Merchant display name
Specify a customer-facing business name by setting [merchantDisplayName](https://stripe.dev/stripe-ios/stripe-paymentsheet/Classes/PaymentSheet/Configuration.html#/s:18StripePaymentSheet0bC0C13ConfigurationV19merchantDisplayNameSSvp). By default, this is your app’s name.
#### Swift
```swift
var configuration = PaymentSheet.Configuration()
configuration.merchantDisplayName = "My app, Inc."
```
### Dark mode
`PaymentSheet` automatically adapts to the user’s system-wide appearance settings (light and dark mode). If your app doesn’t support dark mode, you can set [style](https://stripe.dev/stripe-ios/stripe-paymentsheet/Classes/PaymentSheet/Configuration.html#/s:18StripePaymentSheet0bC0C13ConfigurationV5styleAC18UserInterfaceStyleOvp) to `alwaysLight` or `alwaysDark` mode.
```swift
var configuration = PaymentSheet.Configuration()
configuration.style = .alwaysLight
```
### Default billing details
To set default values for billing details collected in the payment sheet, configure the `defaultBillingDetails` property. The `PaymentSheet` pre-populates its fields with the values that you provide.
```swift
var configuration = PaymentSheet.Configuration()
configuration.defaultBillingDetails.address.country = "US"
configuration.defaultBillingDetails.email = "foo@bar.com"
```
### Billing details collection
Use `billingDetailsCollectionConfiguration` to specify how you want to collect billing details in the payment sheet.
You can collect your customer’s name, email, phone number, and address.
If you only want to billing details required by the payment method, set `billingDetailsCollectionConfiguration.attachDefaultsToPaymentMethod` to true. In that case, the `PaymentSheet.Configuration.defaultBillingDetails` are set as the payment method’s [billing details](https://docs.stripe.com/api/payment_methods/object.md?lang=node#payment_method_object-billing_details).
If you want to collect additional billing details that aren’t necessarily required by the payment method, set `billingDetailsCollectionConfiguration.attachDefaultsToPaymentMethod` to false. In that case, the billing details collected through the `PaymentSheet` are set as the payment method’s billing details.
```swift
var configuration = PaymentSheet.Configuration()
configuration.defaultBillingDetails.email = "foo@bar.com"
configuration.billingDetailsCollectionConfiguration.name = .always
configuration.billingDetailsCollectionConfiguration.email = .never
configuration.billingDetailsCollectionConfiguration.address = .full
configuration.billingDetailsCollectionConfiguration.attachDefaultsToPaymentMethod = true
```
> Consult with your legal counsel regarding laws that apply to collecting information. Only collect phone numbers if you need them for the transaction.
## Optional: Complete payment in your UI
You can present the Payment Sheet to only collect payment method details and then later call a `confirm` method to complete payment in your app’s UI. This is useful if you have a custom buy button or require additional steps after you collect payment details.

Complete the payment in your app’s UI
#### UIKit
The following steps walk you through how to complete payment in your app’s UI. See our sample integration out on [GitHub](https://github.com/stripe/stripe-ios/blob/master/Example/PaymentSheet%20Example/PaymentSheet%20Example/ExampleCustomCheckoutViewController.swift).
1. First, initialise [PaymentSheet.FlowController](https://stripe.dev/stripe-ios/stripepaymentsheet/documentation/stripepaymentsheet/paymentsheet/flowcontroller) instead of `PaymentSheet` and update your UI with its `paymentOption` property. This property contains an image and label representing the customer’s initially selected, default payment method.
```swift
PaymentSheet.FlowController.create(paymentIntentClientSecret: paymentIntentClientSecret, configuration: configuration) { [weak self] result in
switch result {
case .failure(let error):
print(error)
case .success(let paymentSheetFlowController):
self?.paymentSheetFlowController = paymentSheetFlowController
// Update your UI using paymentSheetFlowController.paymentOption
}
}
```
1. Next, call `presentPaymentOptions` to collect payment details. When completed, update your UI again with the `paymentOption` property.
```swift
paymentSheetFlowController.presentPaymentOptions(from: self) {
// Update your UI using paymentSheetFlowController.paymentOption
}
```
1. Finally, call `confirm`.
```swift
paymentSheetFlowController.confirm(from: self) { paymentResult in
// MARK: Handle the payment result
switch paymentResult {
case .completed:
print("Payment complete!")
case .canceled:
print("Canceled!")
case .failed(let error):
print(error)
}
}
```
#### SwiftUI
The following steps walk you through how to complete payment in your app’s UI. See our sample integration out on [GitHub](https://github.com/stripe/stripe-ios/blob/master/Example/PaymentSheet%20Example/PaymentSheet%20Example/ExampleSwiftUICustomPaymentFlow.swift).
1. First, initialise [PaymentSheet.FlowController](https://stripe.dev/stripe-ios/stripepaymentsheet/documentation/stripepaymentsheet/paymentsheet/flowcontroller) instead of `PaymentSheet`. Its `paymentOption` property contains an image and label representing the customer’s currently selected payment method, which you can use in your UI.
```swift
PaymentSheet.FlowController.create(paymentIntentClientSecret: paymentIntentClientSecret, configuration: configuration) { [weak self] result in
switch result {
case .failure(let error):
print(error)
case .success(let paymentSheetFlowController):
self?.paymentSheetFlowController = paymentSheetFlowController
// Use the paymentSheetFlowController.paymentOption properties in your UI
myPaymentMethodLabel = paymentSheetFlowController.paymentOption?.label ?? "Select a payment method"
myPaymentMethodImage = paymentSheetFlowController.paymentOption?.image ?? UIImage(systemName: "square.and.pencil")!
}
}
```
1. Use [PaymentSheet.FlowController.PaymentOptionsButton](https://stripe.dev/stripe-ios/stripepaymentsheet/documentation/stripepaymentsheet/paymentsheet/flowcontroller/paymentoptionsbutton) to wrap the button that presents the sheet to collect payment details. When `PaymentSheet.FlowController` calls the `onSheetDismissed` argument, the `paymentOption` for the `PaymentSheet.FlowController` instance reflects the currently selected payment method.
```swift
PaymentSheet.FlowController.PaymentOptionsButton(
paymentSheetFlowController: paymentSheetFlowController,
onSheetDismissed: {
myPaymentMethodLabel = paymentSheetFlowController.paymentOption?.label ?? "Select a payment method"
myPaymentMethodImage = paymentSheetFlowController.paymentOption?.image ?? UIImage(systemName: "square.and.pencil")!
},
content: {
/* An example button */
HStack {
Text(myPaymentMethodLabel)
Image(uiImage: myPaymentMethodImage)
}
}
)
```
1. Use [PaymentSheet.FlowController.PaymentOptionsButton](https://stripe.dev/stripe-ios/stripepaymentsheet/documentation/stripepaymentsheet/paymentsheet/flowcontroller/paymentoptionsbutton) to wrap the button that confirms the payment.
```swift
PaymentSheet.FlowController.ConfirmButton(
paymentSheetFlowController: paymentSheetFlowController,
onCompletion: { result in
// MARK: Handle the payment result
switch result {
case .completed:
print("Payment complete!")
case .canceled:
print("Canceled!")
case .failed(let error):
print(error)
}
},
content: {
/* An example button */
Text("Pay")
}
)
```
If `PaymentSheetResult` is `.completed`, inform the customer (for example, by displaying an order confirmation screen).
Setting `allowsDelayedPaymentMethods` to true allows [delayed notification](https://docs.stripe.com/payments/payment-methods.md#payment-notification) payment methods like US bank accounts. For these payment methods, the final payment status isn’t known when the `PaymentSheet` completes, and instead succeeds or fails later. If you support these types of payment methods, inform the customer their order is confirmed and only fulfil their order (for example, ship their product) when the payment is successful.
## Optional: Enable additional payment methods
Navigate to [Manage payment methods for your connected accounts](https://dashboard.stripe.com/settings/payment_methods/connected_accounts) in the Dashboard to configure which payment methods your connected accounts accept. Changes to default settings apply to all new and existing connected accounts.
Consult the following resources for payment method information:
- [A guide to payment methods](https://stripe.com/payments/payment-methods-guide#choosing-the-right-payment-methods-for-your-business) to help you choose the correct payment methods for your platform.
- [Account capabilities](https://docs.stripe.com/connect/account-capabilities.md) to make sure your chosen payment methods work for your connected accounts.
- [Payment method and product support](https://docs.stripe.com/payments/payment-methods/payment-method-support.md#product-support) tables to make sure your chosen payment methods work for your Stripe products and payments flows.
For each payment method, you can select one of the following dropdown options:
| |
| |
| **On by default** | Your connected accounts accept this payment method during checkout. Some payment methods can only be off or blocked. This is because your connected accounts with *access to the Stripe Dashboard* (Platforms can provide connected accounts with access to the full Stripe Dashboard or the Express Dashboard. Otherwise, platforms build an interface for connected accounts using embedded components or the Stripe API) must activate them in their settings page. |
| **Off by default** | Your connected accounts don’t accept this payment method during checkout. If you allow your connected accounts with *access to the Stripe Dashboard* (Platforms can provide connected accounts with access to the full Stripe Dashboard or the Express Dashboard. Otherwise, platforms build an interface for connected accounts using embedded components or the Stripe API) to manage their own payment methods, they have the ability to turn it on. |
| **Blocked** | Your connected accounts don’t accept this payment method during checkout. If you allow your connected accounts with *access to the Stripe Dashboard* (Platforms can provide connected accounts with access to the full Stripe Dashboard or the Express Dashboard. Otherwise, platforms build an interface for connected accounts using embedded components or the Stripe API) to manage their own payment methods, they don’t have the option to turn it on. |

Payment method options
If you make a change to a payment method, you must click **Review changes** in the bottom bar of your screen and **Save and apply** to update your connected accounts.

Save window
### Allow connected accounts to manage payment methods
Stripe recommends allowing your connected accounts to customise their own payment methods. This option allows each connected account with *access to the Stripe Dashboard* (Platforms can provide connected accounts with access to the full Stripe Dashboard or the Express Dashboard. Otherwise, platforms build an interface for connected accounts using embedded components or the Stripe API) to view and update their [Payment methods](https://dashboard.stripe.com/settings/payment_methods) page. Only owners of the connected accounts can customise their payment methods. The Stripe Dashboard displays the set of payment method defaults you applied to all new and existing connected accounts. Your connected accounts can override these defaults, excluding payment methods you have blocked.
Tick the **Account customisation** tickbox to enable this option. You must click **Review changes** in the bottom bar of your screen and then select **Save and apply** to update this setting.

Account customisation tickbox
### Payment method capabilities
To allow your connected accounts to accept additional payment methods, their `Accounts` must have active payment method capabilities.
If you selected the “On by default” option for a payment method in [Manage payment methods for your connected accounts](https://dashboard.stripe.com/settings/payment_methods/connected_accounts), Stripe automatically requests the necessary capability for new and existing connected accounts if they meet the verification requirements. If the connected account doesn’t meet the requirements or if you want to have direct control, you can manually request the capability in the Dashboard or with the API.
Most payment methods have the same verification requirements as the `card_payments` capability, with some restrictions and exceptions. The [payment method capabilities table](https://docs.stripe.com/connect/account-capabilities.md#payment-methods) lists the payment methods that require additional verification.
#### Dashboard
[Find a connected account](https://docs.stripe.com/connect/dashboard/managing-individual-accounts.md#finding-accounts) in the Dashboard to edit its capabilities and view outstanding verification requirements.
#### API
For an existing connected account, you can [list](https://docs.stripe.com/api/capabilities/list.md) their existing capabilities to determine whether you need to request additional capabilities.
```curl
curl https://api.stripe.com/v1/accounts/{{CONNECTEDACCOUNT_ID}}/capabilities \
-u "<>:"
```
Request additional capabilities by [updating](https://docs.stripe.com/api/capabilities/update.md) each connected account’s capabilities.
```curl
curl https://api.stripe.com/v1/accounts/{{CONNECTEDACCOUNT_ID}}/capabilities/us_bank_account_ach_payments \
-u "<>:" \
-d requested=true
```
There can be a delay before the requested capability becomes active. If the capability has any activation requirements, the response includes them in the `requirements` arrays.
## Collect fees
As a platform, you can charge your connected accounts a portion of each transaction in the form of application fees. You can set application fee pricing in the following ways:
- Use the [Platform Pricing Tool](https://docs.stripe.com/connect/platform-pricing-tools.md) to set and test pricing rules. This no-code feature in the Stripe Dashboard is currently only available for platforms responsible for paying Stripe fees.
- Specify application fees directly in a [PaymentIntent](https://docs.stripe.com/api/payment_intents/object.md). Fees set with this method override the pricing logic specified in the Platform Pricing Tool.
Your platform can take an application fee with the following limitations:
- The value of `application_fee_amount` must be positive and less than the amount of the charge. The application fee collected is capped at the captured amount of the charge.
- There are no additional Stripe fees on the application fee itself.
- In line with Brazilian regulatory and compliance requirements, platforms based outside of Brazil with Brazilian connected accounts can’t collect application fees through Stripe.
- The currency of `application_fee_amount` depends upon a few [multiple currency](https://docs.stripe.com/connect/currencies.md) factors.
The resulting charge’s [BalanceTransaction](https://docs.stripe.com/api.md#balance_transaction_retrieve) includes a detailed fee breakdown of both the Stripe and application fees. To provide a better reporting experience, collecting a fee generates an [ApplicationFee](https://docs.stripe.com/api/application_fees/object.md) object. Use the `amount` property on the `ApplicationFee` object for reporting.
You can view application fees in the [Collected fees](https://dashboard.stripe.com/connect/application_fees) section of the Dashboard.
> Application fees for direct charges are created asynchronously by default. If you expand the `application_fee` object in a charge creation request, the application fee is created synchronously as part of that request. Only expand the `application_fee` object if you must, because it increases the latency of the request.
>
> To receive notifications of asynchronously created `ApplicationFee` objects, listen for the [application_fee.created](https://docs.stripe.com/api/events/types.md#event_types-application_fee.created) webhook event.

Integrate Stripe’s pre-built payment UI into the checkout of your Android app with the [PaymentSheet](https://stripe.dev/stripe-android/paymentsheet/com.stripe.android.paymentsheet/-payment-sheet/index.html) class.
> #### Accounts v2 API support
>
> The Payment Sheet doesn’t support *customer-configured Accounts* (Account configurations represent role-based functionality that you can enable for accounts, such as merchant, customer, or recipient). It only supports `Customer` objects.
## Set up Stripe [Server-side] [Client-side]
First, you need a Stripe account. [Register now](https://dashboard.stripe.com/register).
### Server-side
This integration requires endpoints on your server that talk to the Stripe API. Use the official libraries for access to the Stripe API from your server:
#### Ruby
```bash
# Available as a gem
sudo gem install stripe
```
```ruby
# If you use bundler, you can add this line to your Gemfile
gem 'stripe'
```
### Client-side
The [Stripe Android SDK](https://github.com/stripe/stripe-android) is open source and [fully documented](https://stripe.dev/stripe-android/).
To install the SDK, add `stripe-android` to the `dependencies` block of your [app/build.gradle](https://developer.android.com/studio/build/dependencies) file:
#### Kotlin
```kotlin
plugins {
id("com.android.application")
}
android { ... }
dependencies {
// ...
// Stripe Android SDK
implementation("com.stripe:stripe-android:23.9.1")
// Include the financial connections SDK to support US bank account as a payment method
implementation("com.stripe:financial-connections:23.9.1")
}
```
> For details on the latest SDK release and past versions, see the [Releases](https://github.com/stripe/stripe-android/releases) page on GitHub. To receive notifications when a new release is published, [watch releases for the repository](https://docs.github.com/en/github/managing-subscriptions-and-notifications-on-github/configuring-notifications#configuring-your-watch-settings-for-an-individual-repository).
Configure the SDK with your Stripe [publishable key](https://dashboard.stripe.com/apikeys) so that it can make requests to the Stripe API, such as in your `Application` subclass:
#### Kotlin
```kotlin
import com.stripe.android.PaymentConfiguration
class MyApp : Application() {
override fun onCreate() {
super.onCreate()
PaymentConfiguration.init(
applicationContext,
"<>"
)
}
}
```
> Use your [test keys](https://docs.stripe.com/keys.md#obtain-api-keys) while you test and develop, and your [live mode](https://docs.stripe.com/keys.md#test-live-modes) keys when you publish your app.
## Add an endpoint [Server-side]
> #### Note
>
> To display the PaymentSheet before you create a PaymentIntent, see [Collect payment details before creating an Intent](https://docs.stripe.com/payments/accept-a-payment-deferred.md?type=payment).
This integration uses three Stripe API objects:
1. [PaymentIntent](https://docs.stripe.com/api/payment_intents.md): Stripe uses this to represent your intent to collect payment from a customer, tracking your charge attempts and payment state changes throughout the process.
1. (Optional) A [customer-configured Account](https://docs.stripe.com/api/v2/core/accounts/object.md#v2_account_object-applied_configurations) or a [Customer](https://docs.stripe.com/api/customers.md) object: To set up a payment method for future payments, you must attach it to a customer. Create an object to represent your customer when they create an account with your business. If your customer makes a payment as a guest, you can create an `Account` or `Customer` object before payment and associate it with your own internal representation of the customer’s account later.
1. (Optional) [CustomerSession](https://docs.stripe.com/api/customer_sessions.md): Information on the object that represents your customer is sensitive, and can’t be retrieved directly from an app. A `CustomerSession` grants the SDK temporary scoped access to the `Account` or `Customer` and provides additional configuration options. See a complete list of [configuration options](https://docs.stripe.com/api/customer_sessions/create.md#create_customer_session-components).
> If you never save cards for customers and don’t allow returning customers to reuse saved cards, you can omit the `Account` or `Customer` object and the `CustomerSession` object from your integration.
For security reasons, your app can’t create these objects. Instead, add an endpoint on your server that:
1. Retrieves the `Account` or `Customer`, or creates a new one.
1. Creates a [CustomerSession](https://docs.stripe.com/api/customer_sessions.md) for the `Account` or `Customer`.
1. Creates a `PaymentIntent` with the [amount](https://docs.stripe.com/api/payment_intents/create.md#create_payment_intent-amount), [currency](https://docs.stripe.com/api/payment_intents/create.md#create_payment_intent-currency), and either the [customer_account](https://docs.stripe.com/api/payment_intents/create.md#create_payment_intent-customer_account) or the [customer](https://docs.stripe.com/api/payment_intents/create.md#create_payment_intent-customer).
1. Returns the `PaymentIntent`’s *client secret* (The client secret is a unique key returned from Stripe as part of a PaymentIntent. This key lets the client access important fields from the PaymentIntent (status, amount, currency) while hiding sensitive ones (metadata, customer)), the `CustomerSession`’s `client_secret`, the ID of the `Account` or `Customer`, and your [publishable key](https://dashboard.stripe.com/apikeys) to your app.
The payment methods shown to customers during the checkout process are also included on the PaymentIntent. You can let Stripe pull payment methods from your Dashboard settings or you can list them manually. Regardless of the option you choose, note that the currency passed in the PaymentIntent filters the payment methods shown to the customer. For example, if you pass `eur` on the PaymentIntent and have OXXO enabled in the Dashboard, OXXO won’t be shown to the customer because OXXO doesn’t support `eur` payments.
Unless your integration requires a code-based option for offering payment methods, Stripe recommends the automated option. This is because Stripe evaluates the currency, payment method restrictions, and other parameters to determine the list of supported payment methods. Payment methods that increase conversion and that are most relevant to the currency and customer’s location are prioritised.
#### Manage payment methods from the Dashboard
You can manage payment methods from the [Dashboard](https://dashboard.stripe.com/settings/payment_methods). Stripe handles the return of eligible payment methods based on factors such as the transaction’s amount, currency, and payment flow. The PaymentIntent is created using the payment methods you configured in the Dashboard. If you don’t want to use the Dashboard or if you want to specify payment methods manually, you can list them using the `payment_method_types` attribute.
#### curl
```bash
# Create a Customer (use an existing Customer ID if this is a returning customer)
curl https://api.stripe.com/v1/customers \
-u <>: \
-X "POST" \
-H "Stripe-Account: {{CONNECTED_ACCOUNT_ID}}"
# Create an CustomerSession for the Customer
curl https://api.stripe.com/v1/customer_sessions \
-u <>: \
-X "POST" \
-d "customer"="{{CUSTOMER_ID}}" \
-d "components[mobile_payment_element][enabled]"=true \
-d "components[mobile_payment_element][features][payment_method_save]"=enabled \
-d "components[mobile_payment_element][features][payment_method_redisplay]"=enabled \
-d "components[mobile_payment_element][features][payment_method_remove]"=enabled
# Create a PaymentIntent
curl https://api.stripe.com/v1/payment_intents \
-u <>: \
-H "Stripe-Account: {{CONNECTED_ACCOUNT_ID}}"
-X "POST" \
-d "customer"="{{CUSTOMER_ID}}" \
-d "amount"=1099 \
-d "currency"="eur" \
-d "automatic_payment_methods[enabled]"=true \
-d application_fee_amount="123" \
```
#### Listing payment methods manually
#### curl
```bash
# Create a Customer (use an existing Customer ID if this is a returning customer)
curl https://api.stripe.com/v1/customers \
-u <>: \
-X "POST" \
-H "Stripe-Account: {{CONNECTED_ACCOUNT_ID}}"
# Create an CustomerSession for the Customer
curl https://api.stripe.com/v1/customer_sessions \
-u <>: \
-X "POST" \
-d "customer"="{{CUSTOMER_ID}}" \
-d "components[mobile_payment_element][enabled]"=true \
-d "components[mobile_payment_element][features][payment_method_save]"=enabled \
-d "components[mobile_payment_element][features][payment_method_redisplay]"=enabled \
-d "components[mobile_payment_element][features][payment_method_remove]"=enabled
# Create a PaymentIntent
curl https://api.stripe.com/v1/payment_intents \
-u <>: \
-H "Stripe-Account: {{CONNECTED_ACCOUNT_ID}}"
-X "POST" \
-d "customer"="{{CUSTOMER_ID}}" \
-d "amount"=1099 \
-d "currency"="eur" \
-d "payment_method_types[]"="bancontact" \
-d "payment_method_types[]"="card" \
-d "payment_method_types[]"="ideal" \
-d "payment_method_types[]"="klarna" \
-d "payment_method_types[]"="sepa_debit" \
-d application_fee_amount="123" \
```
> Each payment method needs to support the currency passed in the PaymentIntent and your business needs to be based in one of the countries each payment method supports. See the [Payment method integration options](https://docs.stripe.com/payments/payment-methods/integration-options.md) page for more details about what’s supported.
## Integrate the payment sheet [Client-side]
Before displaying the mobile Payment Element, your checkout page should:
- Show the products being purchased and the total amount
- Collect any required shipping information using the [Address Element](https://docs.stripe.com/elements/address-element.md?platform=android)
- Include a checkout button to present Stripe’s UI
#### Jetpack Compose
[Initialise](https://stripe.dev/stripe-android/paymentsheet/com.stripe.android.paymentsheet/-payment-sheet/-builder/index.html) a `PaymentSheet` instance inside `onCreate` of your checkout Activity, passing a method to handle the result.
```kotlin
import androidx.compose.runtime.Composable
import androidx.compose.runtime.remember
import com.stripe.android.paymentsheet.PaymentSheet
import com.stripe.android.paymentsheet.PaymentSheetResult
@Composable
fun App() {
val paymentSheet = remember { PaymentSheet.Builder(::onPaymentSheetResult) }.build()
}
private fun onPaymentSheetResult(paymentSheetResult: PaymentSheetResult) {
// implemented in the next steps
}
```
Next, fetch the PaymentIntent client secret, Customer Session client secret, Customer ID, and publishable key from the endpoint you created in the previous step. Set the publishable key using `PaymentConfiguration` and store the others for use when you present the PaymentSheet.
```kotlin
import androidx.compose.runtime.Composable
import androidx.compose.runtime.rememberimport androidx.compose.runtime.LaunchedEffect
import androidx.compose.runtime.getValue
import androidx.compose.runtime.mutableStateOf
import androidx.compose.runtime.setValue
import androidx.compose.ui.platform.LocalContext
import com.stripe.android.PaymentConfiguration
import com.stripe.android.paymentsheet.PaymentSheet
import com.stripe.android.paymentsheet.PaymentSheetResult
@Composable
fun App() {
val paymentSheet = remember { PaymentSheet.Builder(::onPaymentSheetResult) }.build()val context = LocalContext.current
var customerConfig by remember { mutableStateOf(null) }
varpaymentIntentClientSecret by remember { mutableStateOf(null) }
LaunchedEffect(context) {
// Make a request to your own server and retrieve payment configurations
val networkResult = ...
if (networkResult.isSuccess) {paymentIntentClientSecret = networkResult.paymentIntent
customerConfig = PaymentSheet.CustomerConfiguration.createWithCustomerSession(
id = networkResult.customer,
clientSecret = networkResult.customerSessionClientSecret
)PaymentConfiguration.init(context, networkResult.publishableKey, ""{{CONNECTED_ACCOUNT_ID}}"")}
}
}
private fun onPaymentSheetResult(paymentSheetResult: PaymentSheetResult) {
// implemented in the next steps
}
```
When the customer taps your checkout button, call [presentWithPaymentIntent](https://stripe.dev/stripe-android/paymentsheet/com.stripe.android.paymentsheet/-payment-sheet/index.html#1814490530%2FFunctions%2F2002900378) to present the payment sheet. After the customer completes the payment, the sheet dismisses and the [PaymentSheetResultCallback](https://stripe.dev/stripe-android/paymentsheet/com.stripe.android.paymentsheet/-payment-sheet-result-callback/index.html) is called with a [PaymentSheetResult](https://stripe.dev/stripe-android/paymentsheet/com.stripe.android.paymentsheet/-payment-sheet-result/index.html).
```kotlin
import androidx.compose.material.Button
import androidx.compose.material.Text
import androidx.compose.runtime.Composable
import androidx.compose.runtime.LaunchedEffect
import androidx.compose.runtime.getValue
import androidx.compose.runtime.mutableStateOf
import androidx.compose.runtime.remember
import androidx.compose.runtime.setValue
import androidx.compose.ui.platform.LocalContext
import com.stripe.android.PaymentConfiguration
import com.stripe.android.paymentsheet.PaymentSheet
import com.stripe.android.paymentsheet.PaymentSheetResult
@Composable
fun App() {
val paymentSheet = remember { PaymentSheet.Builder(::onPaymentSheetResult) }.build()
val context = LocalContext.current
var customerConfig by remember { mutableStateOf(null) }
var paymentIntentClientSecret by remember { mutableStateOf(null) }
LaunchedEffect(context) {
// Make a request to your own server and retrieve payment configurations
val networkResult = ...
if (networkResult.isSuccess) {
paymentIntentClientSecret = networkResult.paymentIntent
customerConfig = PaymentSheet.CustomerConfiguration.createWithCustomerSession(
id = networkResult.customer,
clientSecret = networkResult.customerSessionClientSecret
)
PaymentConfiguration.init(context, networkResult.publishableKey, ""{{CONNECTED_ACCOUNT_ID}}"")
}
}Button(
onClick = {
val currentConfig = customerConfig
val currentClientSecret =paymentIntentClientSecret
if (currentConfig != null && currentClientSecret != null) {
presentPaymentSheet(paymentSheet, currentConfig, currentClientSecret)
}
}
) {
Text("Checkout")
}
}private fun presentPaymentSheet(
paymentSheet: PaymentSheet,
customerConfig: PaymentSheet.CustomerConfiguration,paymentIntentClientSecret: String
) {
paymentSheet.presentWithPaymentIntent(paymentIntentClientSecret,
PaymentSheet.Configuration.Builder(merchantDisplayName = "My merchant name")
.customer(customerConfig)
// Set `allowsDelayedPaymentMethods` to true if your business handles
// delayed notification payment methods like US bank accounts.
.allowsDelayedPaymentMethods(true)
.build()
)
}
private fun onPaymentSheetResult(paymentSheetResult: PaymentSheetResult) {when(paymentSheetResult) {
is PaymentSheetResult.Canceled -> {
print("Canceled")
}
is PaymentSheetResult.Failed -> {
print("Error: ${paymentSheetResult.error}")
}
is PaymentSheetResult.Completed -> {
// Display for example, an order confirmation screen
print("Completed")
}
}
}
```
#### Views (Classic)
[Initialise](https://stripe.dev/stripe-android/paymentsheet/com.stripe.android.paymentsheet/-payment-sheet/index.html#-394860221%2FConstructors%2F2002900378) a `PaymentSheet` instance inside `onCreate` of your checkout Activity, passing a method to handle the result.
#### Kotlin
```kotlin
import com.stripe.android.paymentsheet.PaymentSheet
class CheckoutActivity : AppCompatActivity() {
lateinit var paymentSheet: PaymentSheet
override fun onCreate(savedInstanceState: Bundle?) {
super.onCreate(savedInstanceState)
paymentSheet = PaymentSheet.Builder(::onPaymentSheetResult).build(this)
}
fun onPaymentSheetResult(paymentSheetResult: PaymentSheetResult) {
// implemented in the next steps
}
}
```
Next, fetch the PaymentIntent client secret, Customer Session client secret, Customer ID, and publishable key from the endpoint you created in the previous step. Set the publishable key using `PaymentConfiguration` and store the others for use when you present the PaymentSheet.
#### Kotlin
```kotlin
import com.stripe.android.paymentsheet.PaymentSheet
class CheckoutActivity : AppCompatActivity() {
lateinit var paymentSheet: PaymentSheetlateinit var customerConfig: PaymentSheet.CustomerConfiguration
lateinit varpaymentIntentClientSecret: String
override fun onCreate(savedInstanceState: Bundle?) {
super.onCreate(savedInstanceState)
paymentSheet = PaymentSheet.Builder(::onPaymentSheetResult).build(this)lifecycleScope.launch {
// Make a request to your own server and retrieve payment configurations
val networkResult = MyBackend.getPaymentConfig()
if (networkResult.isSuccess) {paymentIntentClientSecret = networkResult.paymentIntent
customerConfig = PaymentSheet.CustomerConfiguration.createWithCustomerSession(
id = networkResult.customer,
clientSecret = networkResult.customerSessionClientSecret
)PaymentConfiguration.init(context, networkResult.publishableKey, ""{{CONNECTED_ACCOUNT_ID}}"")}
}
}
fun onPaymentSheetResult(paymentSheetResult: PaymentSheetResult) {
// implemented in the next steps
}
}
```
When the customer taps your checkout button, call [presentWithPaymentIntent](https://stripe.dev/stripe-android/paymentsheet/com.stripe.android.paymentsheet/-payment-sheet/index.html#1814490530%2FFunctions%2F2002900378) to present the payment sheet. After the customer completes the payment, the sheet dismisses and the [PaymentSheetResultCallback](https://stripe.dev/stripe-android/paymentsheet/com.stripe.android.paymentsheet/-payment-sheet-result-callback/index.html) is called with a [PaymentSheetResult](https://stripe.dev/stripe-android/paymentsheet/com.stripe.android.paymentsheet/-payment-sheet-result/index.html).
#### Kotlin
```kotlin
// ...
class CheckoutActivity : AppCompatActivity() {
lateinit var paymentSheet: PaymentSheet
lateinit var customerConfig: PaymentSheet.CustomerConfiguration
lateinit var paymentIntentClientSecret: String
// ...fun presentPaymentSheet() {
paymentSheet.presentWithPaymentIntent(paymentIntentClientSecret,
PaymentSheet.Configuration.Builder(merchantDisplayName = "My merchant name")
.customer(customerConfig)
// Set `allowsDelayedPaymentMethods` to true if your business handles
// delayed notification payment methods like US bank accounts.
.allowsDelayedPaymentMethods(true)
.build()
)
}
fun onPaymentSheetResult(paymentSheetResult: PaymentSheetResult) {when(paymentSheetResult) {
is PaymentSheetResult.Canceled -> {
print("Canceled")
}
is PaymentSheetResult.Failed -> {
print("Error: ${paymentSheetResult.error}")
}
is PaymentSheetResult.Completed -> {
// Display for example, an order confirmation screen
print("Completed")
}
}
}
}
```
Setting `allowsDelayedPaymentMethods` to true allows [delayed notification](https://docs.stripe.com/payments/payment-methods.md#payment-notification) payment methods like US bank accounts. For these payment methods, the final payment status isn’t known when the `PaymentSheet` completes, and instead succeeds or fails later. If you support these types of payment methods, inform the customer their order is confirmed and only fulfil their order (for example, ship their product) when the payment is successful.
## Handle post-payment events [Server-side]
Stripe sends a [payment_intent.succeeded](https://docs.stripe.com/api/events/types.md#event_types-payment_intent.succeeded) event when the payment completes. Use the [Dashboard webhook tool](https://dashboard.stripe.com/webhooks) or follow the [webhook guide](https://docs.stripe.com/webhooks/quickstart.md) to receive these events and run actions, such as sending an order confirmation email to your customer, logging the sale in a database, or starting a shipping workflow.
Listen for these events rather than waiting on a callback from the client. On the client, the customer could close the browser window or quit the app before the callback executes, and malicious clients could manipulate the response. Setting up your integration to listen for asynchronous events is what enables you to accept [different types of payment methods](https://stripe.com/payments/payment-methods-guide) with a single integration.
In addition to handling the `payment_intent.succeeded` event, we recommend handling these other events when collecting payments with the Payment Element:
| Event | Description | Action |
| ------------------------------------------------------------------------------------------------------------------------------- | ----------------------------------------------------------------------------------------------------------------------------------------------------------------------------------------------------------------------------------------------------------------------------------- | ------------------------------------------------------------------------------------------------------------------------------------------------------------------------------------------------ |
| [payment_intent.succeeded](https://docs.stripe.com/api/events/types.md?lang=php#event_types-payment_intent.succeeded) | Sent when a customer successfully completes a payment. | Send the customer an order confirmation and *fulfill* (Fulfillment is the process of providing the goods or services purchased by a customer, typically after payment is collected) their order. |
| [payment_intent.processing](https://docs.stripe.com/api/events/types.md?lang=php#event_types-payment_intent.processing) | Sent when a customer successfully initiates a payment, but the payment has yet to complete. This event is most commonly sent when the customer initiates a bank debit. It’s followed by either a `payment_intent.succeeded` or `payment_intent.payment_failed` event in the future. | Send the customer an order confirmation that indicates their payment is pending. For digital goods, you might want to fulfill the order before waiting for payment to complete. |
| [payment_intent.payment_failed](https://docs.stripe.com/api/events/types.md?lang=php#event_types-payment_intent.payment_failed) | Sent when a customer attempts a payment, but the payment fails. | If a payment transitions from `processing` to `payment_failed`, offer the customer another attempt to pay. |
## Test the integration
#### Cards
| Card number | Scenario | How to test |
| ------------------- | --------------------------------------------------------------------------------------------------------------------------------------------------------------------------------------------------------------------------------------------------------------------------------------------- | ----------------------------------------------------------------------------------------------------- |
| 4242424242424242 | The card payment succeeds and doesn’t require authentication. | Fill in the credit card form using the credit card number with any expiry date, CVC, and postal code. |
| 4000002500003155 | The card payment requires *authentication* (Strong Customer Authentication (SCA) is a regulatory requirement in effect as of September 14, 2019, that impacts many European online payments. It requires customers to use two-factor authentication like 3D Secure to verify their purchase). | Fill in the credit card form using the credit card number with any expiry date, CVC, and postal code. |
| 4000000000009995 | The card is declined with a decline code like `insufficient_funds`. | Fill in the credit card form using the credit card number with any expiry date, CVC, and postal code. |
| 6205500000000000004 | The UnionPay card has a variable length of 13-19 digits. | Fill in the credit card form using the credit card number with any expiry date, CVC, and postal code. |
#### Bank redirects
| Payment method | Scenario | How to test |
| ----------------- | ----------------------------------------------------------------------------------------------------------------------------------------------------------------------------------------------------- | -------------------------------------------------------------------------------------------------------------------------------------------------------- |
| Bancontact, iDEAL | Your customer fails to authenticate on the redirect page for a redirect-based and immediate notification payment method. | Choose any redirect-based payment method, fill out the required details, and confirm the payment. Then click **Fail test payment** on the redirect page. |
| Pay by Bank | Your customer successfully pays with a redirect-based and [delayed notification](https://docs.stripe.com/payments/payment-methods.md#payment-notification) payment method. | Choose the payment method, fill out the required details, and confirm the payment. Then click **Complete test payment** on the redirect page. |
| Pay by Bank | Your customer fails to authenticate on the redirect page for a redirect-based and delayed notification payment method. | Choose the payment method, fill out the required details, and confirm the payment. Then click **Fail test payment** on the redirect page. |
| BLIK | BLIK payments fail in a variety of ways – immediate failures (for example, the code has expired or is invalid), delayed errors (the bank declines) or timeouts (the customer didn’t respond in time). | Use email patterns to [simulate the different failures.](https://docs.stripe.com/payments/blik/accept-a-payment.md#simulate-failures) |
#### Bank debits
| Payment method | Scenario | How to test |
| ----------------- | ------------------------------------------------------------------------------------------------- | ------------------------------------------------------------------------------------------------------------------------------------------------------------------------------------------------- |
| SEPA Direct Debit | Your customer successfully pays with SEPA Direct Debit. | Fill out the form using the account number `AT321904300235473204`. The confirmed PaymentIntent initially transitions to processing, then transitions to the succeeded status three minutes later. |
| SEPA Direct Debit | Your customer’s payment intent status transitions from `processing` to `requires_payment_method`. | Fill out the form using the account number `AT861904300235473202`. |
See [Testing](https://docs.stripe.com/testing.md) for additional information to test your integration.
## Optional: Enable Google Pay
### Set up your integration
To use Google Pay, first enable the Google Pay API by adding the following to the `` tag of your **AndroidManifest.xml**:
```xml
...
```
For more details, see Google Pay’s [Set up Google Pay API](https://developers.google.com/pay/api/android/guides/setup) for Android.
### Add Google Pay
To add Google Pay to your integration, pass a [PaymentSheet.GooglePayConfiguration](https://stripe.dev/stripe-android/paymentsheet/com.stripe.android.paymentsheet/-payment-sheet/-google-pay-configuration/index.html) with your Google Pay environment (production or test) and the [country code of your business](https://dashboard.stripe.com/settings/account) when initializing [PaymentSheet.Configuration](https://stripe.dev/stripe-android/paymentsheet/com.stripe.android.paymentsheet/-payment-sheet/-configuration/index.html).
#### Kotlin
```kotlin
val googlePayConfiguration = PaymentSheet.GooglePayConfiguration(
environment = PaymentSheet.GooglePayConfiguration.Environment.Test,
countryCode = "US",
currencyCode = "USD" // Required for Setup Intents, optional for Payment Intents
)
val configuration = PaymentSheet.Configuration.Builder(merchantDisplayName = "My merchant name")
.googlePay(googlePayConfiguration)
.build()
```
### Test Google Pay
Google allows you to make test payments through their [Test card suite](https://developers.google.com/pay/api/android/guides/resources/test-card-suite). The test suite supports using Stripe [test cards](https://docs.stripe.com/testing.md).
You must test Google Pay using a physical Android device instead of a simulated device, in a country where Google Pay is supported. Log in to a Google account on your test device with a real card saved to Google Wallet.
## Optional: Customise the sheet
All customisation is configured using the [PaymentSheet.Configuration](https://stripe.dev/stripe-android/paymentsheet/com.stripe.android.paymentsheet/-payment-sheet/-configuration/index.html) object.
### Appearance
Customise colours, fonts and more to match the look and feel of your app by using the [appearance API](https://docs.stripe.com/elements/appearance-api/mobile.md?platform=android).
### Payment method layout
Configure the layout of payment methods in the sheet using [paymentMethodLayout](https://stripe.dev/stripe-android/paymentsheet/com.stripe.android.paymentsheet/-payment-sheet/-configuration/-builder/index.html#2123253356%2FFunctions%2F2002900378). You can display them horizontally, vertically, or let Stripe optimise the layout automatically.

#### Kotlin
```kotlin
PaymentSheet.Configuration.Builder("Example, Inc.")
.paymentMethodLayout(PaymentSheet.PaymentMethodLayout.Automatic)
.build()
```
### Collect users addresses
Collect local and international shipping or billing addresses from your customers using the [Address Element](https://docs.stripe.com/elements/address-element.md?platform=android).
### Business display name
Specify a customer-facing business name by setting [merchantDisplayName](https://stripe.dev/stripe-android/paymentsheet/com.stripe.android.paymentsheet/-payment-sheet/-configuration/index.html#-191101533%2FProperties%2F2002900378). By default, this is your app’s name.
#### Kotlin
```kotlin
PaymentSheet.Configuration.Builder(
merchantDisplayName = "My app, Inc."
).build()
```
### Dark mode
By default, `PaymentSheet` automatically adapts to the user’s system-wide appearance settings (light and dark mode). You can change this by setting light or dark mode on your app:
#### Kotlin
```kotlin
// force dark
AppCompatDelegate.setDefaultNightMode(AppCompatDelegate.MODE_NIGHT_YES)
// force light
AppCompatDelegate.setDefaultNightMode(AppCompatDelegate.MODE_NIGHT_NO)
```
### Default billing details
To set default values for billing details collected in the payment sheet, configure the `defaultBillingDetails` property. The `PaymentSheet` pre-populates its fields with the values that you provide.
#### Kotlin
```kotlin
val address = PaymentSheet.Address(country = "US")
val billingDetails = PaymentSheet.BillingDetails(
address = address,
email = "foo@bar.com"
)
val configuration = PaymentSheet.Configuration.Builder(merchantDisplayName = "Merchant, Inc.")
.defaultBillingDetails(billingDetails)
.build()
```
### Configure collection of billing details
Use `BillingDetailsCollectionConfiguration` to specify how you want to collect billing details in the PaymentSheet.
You can collect your customer’s name, email, phone number, and address.
If you want to attach default billing details to the PaymentMethod object even when those fields aren’t collected in the UI, set `billingDetailsCollectionConfiguration.attachDefaultsToPaymentMethod` to `true`.
#### Kotlin
```kotlin
val billingDetails = PaymentSheet.BillingDetails(
email = "foo@bar.com"
)
val billingDetailsCollectionConfiguration = BillingDetailsCollectionConfiguration(
attachDefaultsToPaymentMethod = true,
name = BillingDetailsCollectionConfiguration.CollectionMode.Always,
email = BillingDetailsCollectionConfiguration.CollectionMode.Never,
address = BillingDetailsCollectionConfiguration.AddressCollectionMode.Full,
)
val configuration = PaymentSheet.Configuration.Builder(merchantDisplayName = "Merchant, Inc.")
.defaultBillingDetails(billingDetails)
.billingDetailsCollectionConfiguration(billingDetailsCollectionConfiguration)
.build()
```
> Consult with your legal counsel regarding laws that apply to collecting information. Only collect phone numbers if you need them for the transaction.
## Optional: Complete payment in your UI
You can present Payment Sheet to only collect payment method details and complete the payment back in your app’s UI. This is useful if you have a custom buy button or require additional steps after payment details are collected.

> A sample integration is[available on our GitHub](https://github.com/stripe/stripe-android/blob/master/paymentsheet-example/src/main/java/com/stripe/android/paymentsheet/example/samples/ui/paymentsheet/custom_flow/CustomFlowActivity.kt).
1. First, initialise [PaymentSheet.FlowController](https://stripe.dev/stripe-android/paymentsheet/com.stripe.android.paymentsheet/-payment-sheet/-flow-controller/index.html) instead of `PaymentSheet` using one of the [Builder](https://stripe.dev/stripe-android/paymentsheet/com.stripe.android.paymentsheet/-payment-sheet/-flow-controller/-builder/index.html) methods.
#### Android (Kotlin)
```kotlin
class CheckoutActivity : AppCompatActivity() {
private lateinit var flowController: PaymentSheet.FlowController
override fun onCreate(savedInstanceState: Bundle?) {
super.onCreate(savedInstanceState)
val flowController = PaymentSheet.FlowController.Builder(
resultCallback = ::onPaymentSheetResult,
paymentOptionResultCallback = ::onPaymentOption,
).build(this)
}
}
```
1. Next, call `configureWithPaymentIntent` with the Stripe object keys fetched from your back end and update your UI in the callback using [getPaymentOption()](https://stripe.dev/stripe-android/paymentsheet/com.stripe.android.paymentsheet/-payment-sheet/-flow-controller/index.html#-2091462043%2FFunctions%2F2002900378). This contains an image and label representing the customer’s currently selected payment method.
#### Android (Kotlin)
```kotlin
flowController.configureWithPaymentIntent(
paymentIntentClientSecret = paymentIntentClientSecret,
configuration = PaymentSheet.Configuration.Builder("Example, Inc.")
.customer(PaymentSheet.CustomerConfiguration(
id = customerId,
ephemeralKeySecret = ephemeralKeySecret
))
.build()
) { isReady, error ->
if (isReady) {
// Update your UI using `flowController.getPaymentOption()`
} else {
// handle FlowController configuration failure
}
}
```
1. Next, call [presentPaymentOptions](https://stripe.dev/stripe-android/paymentsheet/com.stripe.android.paymentsheet/-payment-sheet/-flow-controller/index.html#449924733%2FFunctions%2F2002900378) to collect payment details. When the customer finishes, the sheet is dismissed and calls the [paymentOptionCallback](https://stripe.dev/stripe-android/paymentsheet/com.stripe.android.paymentsheet/-payment-option-callback/index.html) passed earlier in `create`. Implement this method to update your UI with the returned `paymentOption`.
#### Android (Kotlin)
```kotlin
// ...
flowController.presentPaymentOptions()
// ...
private fun onPaymentOption(paymentOptionResult: PaymentOptionResult) {
val paymentOption = paymentOptionResult.paymentOption
if (paymentOption != null) {
paymentMethodButton.text = paymentOption.label
paymentMethodButton.setCompoundDrawablesRelativeWithIntrinsicBounds(
paymentOption.drawableResourceId,
0,
0,
0
)
} else {
paymentMethodButton.text = "Select"
paymentMethodButton.setCompoundDrawablesRelativeWithIntrinsicBounds(
null,
null,
null,
null
)
}
}
```
1. Finally, call [confirm](https://stripe.dev/stripe-android/paymentsheet/com.stripe.android.paymentsheet/-payment-sheet/-flow-controller/index.html#-479056656%2FFunctions%2F2002900378) to complete the payment. When the customer finishes, the sheet is dismissed and calls the [paymentResultCallback](https://stripe.dev/stripe-android/paymentsheet/com.stripe.android.paymentsheet/-payment-sheet-result-callback/index.html#237248767%2FFunctions%2F2002900378) passed earlier in `create`.
#### Android (Kotlin)
```kotlin
// ...
flowController.confirmPayment()
// ...
private fun onPaymentSheetResult(
paymentSheetResult: PaymentSheetResult
) {
when (paymentSheetResult) {
is PaymentSheetResult.Canceled -> {
// Payment canceled
}
is PaymentSheetResult.Failed -> {
// Payment Failed. See logcat for details or inspect paymentSheetResult.error
}
is PaymentSheetResult.Completed -> {
// Payment Complete
}
}
}
```
Setting `allowsDelayedPaymentMethods` to true allows [delayed notification](https://docs.stripe.com/payments/payment-methods.md#payment-notification) payment methods like US bank accounts. For these payment methods, the final payment status isn’t known when the `PaymentSheet` completes, and instead succeeds or fails later. If you support these types of payment methods, inform the customer their order is confirmed and only fulfil their order (for example, ship their product) when the payment is successful.
## Optional: Enable additional payment methods
Navigate to [Manage payment methods for your connected accounts](https://dashboard.stripe.com/settings/payment_methods/connected_accounts) in the Dashboard to configure which payment methods your connected accounts accept. Changes to default settings apply to all new and existing connected accounts.
Consult the following resources for payment method information:
- [A guide to payment methods](https://stripe.com/payments/payment-methods-guide#choosing-the-right-payment-methods-for-your-business) to help you choose the correct payment methods for your platform.
- [Account capabilities](https://docs.stripe.com/connect/account-capabilities.md) to make sure your chosen payment methods work for your connected accounts.
- [Payment method and product support](https://docs.stripe.com/payments/payment-methods/payment-method-support.md#product-support) tables to make sure your chosen payment methods work for your Stripe products and payments flows.
For each payment method, you can select one of the following dropdown options:
| |
| |
| **On by default** | Your connected accounts accept this payment method during checkout. Some payment methods can only be off or blocked. This is because your connected accounts with *access to the Stripe Dashboard* (Platforms can provide connected accounts with access to the full Stripe Dashboard or the Express Dashboard. Otherwise, platforms build an interface for connected accounts using embedded components or the Stripe API) must activate them in their settings page. |
| **Off by default** | Your connected accounts don’t accept this payment method during checkout. If you allow your connected accounts with *access to the Stripe Dashboard* (Platforms can provide connected accounts with access to the full Stripe Dashboard or the Express Dashboard. Otherwise, platforms build an interface for connected accounts using embedded components or the Stripe API) to manage their own payment methods, they have the ability to turn it on. |
| **Blocked** | Your connected accounts don’t accept this payment method during checkout. If you allow your connected accounts with *access to the Stripe Dashboard* (Platforms can provide connected accounts with access to the full Stripe Dashboard or the Express Dashboard. Otherwise, platforms build an interface for connected accounts using embedded components or the Stripe API) to manage their own payment methods, they don’t have the option to turn it on. |

Payment method options
If you make a change to a payment method, you must click **Review changes** in the bottom bar of your screen and **Save and apply** to update your connected accounts.

Save window
### Allow connected accounts to manage payment methods
Stripe recommends allowing your connected accounts to customise their own payment methods. This option allows each connected account with *access to the Stripe Dashboard* (Platforms can provide connected accounts with access to the full Stripe Dashboard or the Express Dashboard. Otherwise, platforms build an interface for connected accounts using embedded components or the Stripe API) to view and update their [Payment methods](https://dashboard.stripe.com/settings/payment_methods) page. Only owners of the connected accounts can customise their payment methods. The Stripe Dashboard displays the set of payment method defaults you applied to all new and existing connected accounts. Your connected accounts can override these defaults, excluding payment methods you have blocked.
Tick the **Account customisation** tickbox to enable this option. You must click **Review changes** in the bottom bar of your screen and then select **Save and apply** to update this setting.

Account customisation tickbox
### Payment method capabilities
To allow your connected accounts to accept additional payment methods, their `Accounts` must have active payment method capabilities.
If you selected the “On by default” option for a payment method in [Manage payment methods for your connected accounts](https://dashboard.stripe.com/settings/payment_methods/connected_accounts), Stripe automatically requests the necessary capability for new and existing connected accounts if they meet the verification requirements. If the connected account doesn’t meet the requirements or if you want to have direct control, you can manually request the capability in the Dashboard or with the API.
Most payment methods have the same verification requirements as the `card_payments` capability, with some restrictions and exceptions. The [payment method capabilities table](https://docs.stripe.com/connect/account-capabilities.md#payment-methods) lists the payment methods that require additional verification.
#### Dashboard
[Find a connected account](https://docs.stripe.com/connect/dashboard/managing-individual-accounts.md#finding-accounts) in the Dashboard to edit its capabilities and view outstanding verification requirements.
#### API
For an existing connected account, you can [list](https://docs.stripe.com/api/capabilities/list.md) their existing capabilities to determine whether you need to request additional capabilities.
```curl
curl https://api.stripe.com/v1/accounts/{{CONNECTEDACCOUNT_ID}}/capabilities \
-u "<>:"
```
Request additional capabilities by [updating](https://docs.stripe.com/api/capabilities/update.md) each connected account’s capabilities.
```curl
curl https://api.stripe.com/v1/accounts/{{CONNECTEDACCOUNT_ID}}/capabilities/us_bank_account_ach_payments \
-u "<>:" \
-d requested=true
```
There can be a delay before the requested capability becomes active. If the capability has any activation requirements, the response includes them in the `requirements` arrays.
## Collect fees
As a platform, you can charge your connected accounts a portion of each transaction in the form of application fees. You can set application fee pricing in the following ways:
- Use the [Platform Pricing Tool](https://docs.stripe.com/connect/platform-pricing-tools.md) to set and test pricing rules. This no-code feature in the Stripe Dashboard is currently only available for platforms responsible for paying Stripe fees.
- Specify application fees directly in a [PaymentIntent](https://docs.stripe.com/api/payment_intents/object.md). Fees set with this method override the pricing logic specified in the Platform Pricing Tool.
Your platform can take an application fee with the following limitations:
- The value of `application_fee_amount` must be positive and less than the amount of the charge. The application fee collected is capped at the captured amount of the charge.
- There are no additional Stripe fees on the application fee itself.
- In line with Brazilian regulatory and compliance requirements, platforms based outside of Brazil with Brazilian connected accounts can’t collect application fees through Stripe.
- The currency of `application_fee_amount` depends upon a few [multiple currency](https://docs.stripe.com/connect/currencies.md) factors.
The resulting charge’s [BalanceTransaction](https://docs.stripe.com/api.md#balance_transaction_retrieve) includes a detailed fee breakdown of both the Stripe and application fees. To provide a better reporting experience, collecting a fee generates an [ApplicationFee](https://docs.stripe.com/api/application_fees/object.md) object. Use the `amount` property on the `ApplicationFee` object for reporting.
You can view application fees in the [Collected fees](https://dashboard.stripe.com/connect/application_fees) section of the Dashboard.
> Application fees for direct charges are created asynchronously by default. If you expand the `application_fee` object in a charge creation request, the application fee is created synchronously as part of that request. Only expand the `application_fee` object if you must, because it increases the latency of the request.
>
> To receive notifications of asynchronously created `ApplicationFee` objects, listen for the [application_fee.created](https://docs.stripe.com/api/events/types.md#event_types-application_fee.created) webhook event.

This integration combines all of the steps required to pay, including collecting payment details and confirming the payment, into a single sheet that displays on top of your app.
> #### Accounts v2 API support
>
> The Payment Sheet doesn’t support *customer-configured Accounts* (Account configurations represent role-based functionality that you can enable for accounts, such as merchant, customer, or recipient). It only supports `Customer` objects.
## Set up Stripe [Server-side] [Client-side]
First, you need a Stripe account. [Register now](https://dashboard.stripe.com/register).
### Server-side
This integration requires endpoints on your server that talk to the Stripe API. Use the official libraries for access to the Stripe API from your server:
#### Ruby
```bash
# Available as a gem
sudo gem install stripe
```
```ruby
# If you use bundler, you can add this line to your Gemfile
gem 'stripe'
```
### Client-side
The [React Native SDK](https://github.com/stripe/stripe-react-native) is open source and fully documented. Internally, it uses the [native iOS](https://github.com/stripe/stripe-ios) and [Android](https://github.com/stripe/stripe-android) SDKs. To install Stripe’s React Native SDK, run one of the following commands in your project’s directory (depending on which package manager you use):
#### yarn
```bash
yarn add @stripe/stripe-react-native
```
#### npm
```bash
npm install @stripe/stripe-react-native
```
Next, install some other necessary dependencies:
- For iOS, go to the **ios** directory and run `pod install` to ensure that you also install the required native dependencies.
- For Android, there are no more dependencies to install.
### Stripe initialisation
To initialise Stripe in your React Native app, either wrap your payment screen with the `StripeProvider` component, or use the `initStripe` initialisation method. Only the API [publishable key](https://docs.stripe.com/keys.md#obtain-api-keys) in `publishableKey` is required. The following example shows how to initialise Stripe using the `StripeProvider` component.
```javascript
import { StripeProvider } from '@stripe/stripe-react-native';
function App() {
return (
// Your app code here
);
}
```
> Use your [test API keys](https://docs.stripe.com/keys.md#obtain-api-keys) while you test and develop, and your [live mode](https://docs.stripe.com/keys.md#test-live-modes) keys when you publish your app.
## Add an endpoint [Server-side]
> #### Note
>
> To display the PaymentSheet before you create a PaymentIntent, see [Collect payment details before creating an Intent](https://docs.stripe.com/payments/accept-a-payment-deferred.md?type=payment).
This integration uses three Stripe API objects:
1. [PaymentIntent](https://docs.stripe.com/api/payment_intents.md): Stripe uses this to represent your intent to collect payment from a customer, tracking your charge attempts and payment state changes throughout the process.
1. (Optional) A [customer-configured Account](https://docs.stripe.com/api/v2/core/accounts/object.md#v2_account_object-applied_configurations) or a [Customer](https://docs.stripe.com/api/customers.md) object: To set up a payment method for future payments, you must attach it to a customer. Create an object to represent your customer when they create an account with your business. If your customer makes a payment as a guest, you can create an `Account` or `Customer` object before payment and associate it with your own internal representation of the customer’s account later.
1. (Optional) [CustomerSession](https://docs.stripe.com/api/customer_sessions.md): Information on the object that represents your customer is sensitive, and can’t be retrieved directly from an app. A `CustomerSession` grants the SDK temporary scoped access to the `Account` or `Customer` and provides additional configuration options. See a complete list of [configuration options](https://docs.stripe.com/api/customer_sessions/create.md#create_customer_session-components).
> If you never save cards for customers and don’t allow returning customers to reuse saved cards, you can omit the `Account` or `Customer` object and the `CustomerSession` object from your integration.
For security reasons, your app can’t create these objects. Instead, add an endpoint on your server that:
1. Retrieves the `Account` or `Customer`, or creates a new one.
1. Creates a [CustomerSession](https://docs.stripe.com/api/customer_sessions.md) for the `Account` or `Customer`.
1. Creates a `PaymentIntent` with the [amount](https://docs.stripe.com/api/payment_intents/create.md#create_payment_intent-amount), [currency](https://docs.stripe.com/api/payment_intents/create.md#create_payment_intent-currency), and either the [customer_account](https://docs.stripe.com/api/payment_intents/create.md#create_payment_intent-customer_account) or the [customer](https://docs.stripe.com/api/payment_intents/create.md#create_payment_intent-customer).
1. Returns the `PaymentIntent`’s *client secret* (The client secret is a unique key returned from Stripe as part of a PaymentIntent. This key lets the client access important fields from the PaymentIntent (status, amount, currency) while hiding sensitive ones (metadata, customer)), the `CustomerSession`’s `client_secret`, the ID of the `Account` or `Customer`, and your [publishable key](https://dashboard.stripe.com/apikeys) to your app.
The payment methods shown to customers during the checkout process are also included on the PaymentIntent. You can let Stripe pull payment methods from your Dashboard settings or you can list them manually. Regardless of the option you choose, note that the currency passed in the PaymentIntent filters the payment methods shown to the customer. For example, if you pass `eur` on the PaymentIntent and have OXXO enabled in the Dashboard, OXXO won’t be shown to the customer because OXXO doesn’t support `eur` payments.
Unless your integration requires a code-based option for offering payment methods, Stripe recommends the automated option. This is because Stripe evaluates the currency, payment method restrictions, and other parameters to determine the list of supported payment methods. Payment methods that increase conversion and that are most relevant to the currency and customer’s location are prioritised.
#### Manage payment methods from the Dashboard
You can manage payment methods from the [Dashboard](https://dashboard.stripe.com/settings/payment_methods). Stripe handles the return of eligible payment methods based on factors such as the transaction’s amount, currency, and payment flow. The PaymentIntent is created using the payment methods you configured in the Dashboard. If you don’t want to use the Dashboard or if you want to specify payment methods manually, you can list them using the `payment_method_types` attribute.
#### curl
```bash
# Create a Customer (use an existing Customer ID if this is a returning customer)
curl https://api.stripe.com/v1/customers \
-u <>: \
-X "POST" \
-H "Stripe-Account: {{CONNECTED_ACCOUNT_ID}}"
# Create an CustomerSession for the Customer
curl https://api.stripe.com/v1/customer_sessions \
-u <>: \
-X "POST" \
-d "customer"="{{CUSTOMER_ID}}" \
-d "components[mobile_payment_element][enabled]"=true \
-d "components[mobile_payment_element][features][payment_method_save]"=enabled \
-d "components[mobile_payment_element][features][payment_method_redisplay]"=enabled \
-d "components[mobile_payment_element][features][payment_method_remove]"=enabled
# Create a PaymentIntent
curl https://api.stripe.com/v1/payment_intents \
-u <>: \
-H "Stripe-Account: {{CONNECTED_ACCOUNT_ID}}"
-X "POST" \
-d "customer"="{{CUSTOMER_ID}}" \
-d "amount"=1099 \
-d "currency"="eur" \
-d "automatic_payment_methods[enabled]"=true \
-d application_fee_amount="123" \
```
#### Listing payment methods manually
#### curl
```bash
# Create a Customer (use an existing Customer ID if this is a returning customer)
curl https://api.stripe.com/v1/customers \
-u <>: \
-X "POST" \
-H "Stripe-Account: {{CONNECTED_ACCOUNT_ID}}"
# Create an CustomerSession for the Customer
curl https://api.stripe.com/v1/customer_sessions \
-u <>: \
-X "POST" \
-d "customer"="{{CUSTOMER_ID}}" \
-d "components[mobile_payment_element][enabled]"=true \
-d "components[mobile_payment_element][features][payment_method_save]"=enabled \
-d "components[mobile_payment_element][features][payment_method_redisplay]"=enabled \
-d "components[mobile_payment_element][features][payment_method_remove]"=enabled
# Create a PaymentIntent
curl https://api.stripe.com/v1/payment_intents \
-u <>: \
-H "Stripe-Account: {{CONNECTED_ACCOUNT_ID}}"
-X "POST" \
-d "customer"="{{CUSTOMER_ID}}" \
-d "amount"=1099 \
-d "currency"="eur" \
-d "payment_method_types[]"="bancontact" \
-d "payment_method_types[]"="card" \
-d "payment_method_types[]"="ideal" \
-d "payment_method_types[]"="klarna" \
-d "payment_method_types[]"="sepa_debit" \
-d application_fee_amount="123" \
```
> Each payment method needs to support the currency passed in the PaymentIntent and your business needs to be based in one of the countries each payment method supports. See the [Payment method integration options](https://docs.stripe.com/payments/payment-methods/integration-options.md) page for more details about what’s supported.
## Integrate the payment sheet [Client-side]
Before displaying the mobile Payment Element, your checkout page should:
- Show the products being purchased and the total amount
- Collect any required shipping information
- Include a checkout button to present Stripe’s UI
In the checkout of your app, make a network request to the backend endpoint you created in the previous step and call `initPaymentSheet` from the `useStripe` hook.
#### Accounts v2
```javascript
export default function CheckoutScreen() {
const { initPaymentSheet, presentPaymentSheet } = useStripe();
const [loading, setLoading] = useState(false);
const fetchPaymentSheetParams = async () => {
const response = await fetch(`${API_URL}/payment-sheet`, {
method: 'POST',
headers: {
'Content-Type': 'application/json',
},
});
const { paymentIntent, ephemeralKey, customer_account } = await response.json();
return {
paymentIntent,
ephemeralKey,
customer_account,
};
};
const initializePaymentSheet = async () => {
const {
paymentIntent,
ephemeralKey,
customer_account,
} = await fetchPaymentSheetParams();
const { error } = await initPaymentSheet({
merchantDisplayName: "Example, Inc.",
customerAccountId: customer_account,
customerEphemeralKeySecret: ephemeralKey,
paymentIntentClientSecret: paymentIntent,
// Set `allowsDelayedPaymentMethods` to true if your business accepts payment
// methods that complete payment after a delay, like SEPA Debit and Sofort.
allowsDelayedPaymentMethods: true,
defaultBillingDetails: {
name: 'Jane Doe',
}
});
if (!error) {
setLoading(true);
}
};
const openPaymentSheet = async () => {
// see below
};
useEffect(() => {
initializePaymentSheet();
}, []);
return (
);
}
```
#### Customers v1
```javascript
export default function CheckoutScreen() {
const { initPaymentSheet, presentPaymentSheet } = useStripe();
const [loading, setLoading] = useState(false);
const fetchPaymentSheetParams = async () => {
const response = await fetch(`${API_URL}/payment-sheet`, {
method: 'POST',
headers: {
'Content-Type': 'application/json',
},
});
const { paymentIntent, ephemeralKey, customer } = await response.json();
return {
paymentIntent,
ephemeralKey,
customer,
};
};
const initializePaymentSheet = async () => {
const {
paymentIntent,
ephemeralKey,
customer,
} = await fetchPaymentSheetParams();
const { error } = await initPaymentSheet({
merchantDisplayName: "Example, Inc.",
customerId: customer,
customerEphemeralKeySecret: ephemeralKey,
paymentIntentClientSecret: paymentIntent,
// Set `allowsDelayedPaymentMethods` to true if your business can handle payment
//methods that complete payment after a delay, like SEPA Debit and Sofort.
allowsDelayedPaymentMethods: true,
defaultBillingDetails: {
name: 'Jane Doe',
}
});
if (!error) {
setLoading(true);
}
};
const openPaymentSheet = async () => {
// see below
};
useEffect(() => {
initializePaymentSheet();
}, []);
return (
);
}
```
When your customer taps the **Checkout** button, call `presentPaymentSheet()` to open the sheet. After the customer completes the payment, the sheet is dismissed and the promise resolves with an optional `StripeError`.
```javascript
export default function CheckoutScreen() {
// continued from above
const openPaymentSheet = async () => {
const { error } = await presentPaymentSheet();
if (error) {
Alert.alert(`Error code: ${error.code}`, error.message);
} else {
Alert.alert('Success', 'Your order is confirmed!');
}
};
return (
);
}
```
If there is no error, inform the customer they’re done (for example, by displaying an order confirmation screen).
Setting `allowsDelayedPaymentMethods` to true allows [delayed notification](https://docs.stripe.com/payments/payment-methods.md#payment-notification) payment methods like US bank accounts. For these payment methods, the final payment status isn’t known when the `PaymentSheet` completes, and instead succeeds or fails later. If you support these types of payment methods, inform the customer their order is confirmed and only fulfil their order (for example, ship their product) when the payment is successful.
## Set up a return URL (iOS only) [Client-side]
The customer might navigate away from your app to authenticate (for example, in Safari or their banking app). To allow them to automatically return to your app after authenticating, [configure a custom URL scheme](https://developer.apple.com/documentation/xcode/defining-a-custom-url-scheme-for-your-app) and set up your app delegate to forward the URL to the SDK. Stripe doesn’t support [universal links](https://developer.apple.com/documentation/xcode/allowing-apps-and-websites-to-link-to-your-content).
#### SceneDelegate
#### Swift
```swift
// This method handles opening custom URL schemes (for example, "your-app://stripe-redirect")
func scene(_ scene: UIScene, openURLContexts URLContexts: Set) {
guard let url = URLContexts.first?.url else {
return
}
let stripeHandled = StripeAPI.handleURLCallback(with: url)
if (!stripeHandled) {
// This was not a Stripe url – handle the URL normally as you would
}
}
```
#### AppDelegate
#### Swift
```swift
// This method handles opening custom URL schemes (for example, "your-app://stripe-redirect")
func application(_ app: UIApplication, open url: URL, options: [UIApplication.OpenURLOptionsKey: Any] = [:]) -> Bool {
let stripeHandled = StripeAPI.handleURLCallback(with: url)
if (stripeHandled) {
return true
} else {
// This was not a Stripe url – handle the URL normally as you would
}
return false
}
```
#### SwiftUI
#### Swift
```swift
@main
struct MyApp: App {
var body: some Scene {
WindowGroup {
Text("Hello, world!").onOpenURL { incomingURL in
let stripeHandled = StripeAPI.handleURLCallback(with: incomingURL)
if (!stripeHandled) {
// This was not a Stripe url – handle the URL normally as you would
}
}
}
}
}
```
Additionally, set the [returnURL](https://stripe.dev/stripe-ios/stripe-paymentsheet/Classes/PaymentSheet/Configuration.html#/s:6Stripe12PaymentSheetC13ConfigurationV9returnURLSSSgvp) on your [PaymentSheet.Configuration](https://stripe.dev/stripe-ios/stripe-paymentsheet/Classes/PaymentSheet/Configuration.html) object to the URL for your app.
```swift
var configuration = PaymentSheet.Configuration()
configuration.returnURL = "your-app://stripe-redirect"
```
## Handle post-payment events
Stripe sends a [payment_intent.succeeded](https://docs.stripe.com/api/events/types.md#event_types-payment_intent.succeeded) event when the payment completes. Use the [Dashboard webhook tool](https://dashboard.stripe.com/webhooks) or follow the [webhook guide](https://docs.stripe.com/webhooks/quickstart.md) to receive these events and run actions, such as sending an order confirmation email to your customer, logging the sale in a database, or starting a shipping workflow.
Listen for these events rather than waiting on a callback from the client. On the client, the customer could close the browser window or quit the app before the callback executes, and malicious clients could manipulate the response. Setting up your integration to listen for asynchronous events is what enables you to accept [different types of payment methods](https://stripe.com/payments/payment-methods-guide) with a single integration.
In addition to handling the `payment_intent.succeeded` event, we recommend handling these other events when collecting payments with the Payment Element:
| Event | Description | Action |
| ------------------------------------------------------------------------------------------------------------------------------- | ----------------------------------------------------------------------------------------------------------------------------------------------------------------------------------------------------------------------------------------------------------------------------------- | ------------------------------------------------------------------------------------------------------------------------------------------------------------------------------------------------ |
| [payment_intent.succeeded](https://docs.stripe.com/api/events/types.md?lang=php#event_types-payment_intent.succeeded) | Sent when a customer successfully completes a payment. | Send the customer an order confirmation and *fulfill* (Fulfillment is the process of providing the goods or services purchased by a customer, typically after payment is collected) their order. |
| [payment_intent.processing](https://docs.stripe.com/api/events/types.md?lang=php#event_types-payment_intent.processing) | Sent when a customer successfully initiates a payment, but the payment has yet to complete. This event is most commonly sent when the customer initiates a bank debit. It’s followed by either a `payment_intent.succeeded` or `payment_intent.payment_failed` event in the future. | Send the customer an order confirmation that indicates their payment is pending. For digital goods, you might want to fulfill the order before waiting for payment to complete. |
| [payment_intent.payment_failed](https://docs.stripe.com/api/events/types.md?lang=php#event_types-payment_intent.payment_failed) | Sent when a customer attempts a payment, but the payment fails. | If a payment transitions from `processing` to `payment_failed`, offer the customer another attempt to pay. |
## Test the integration
#### Cards
| Card number | Scenario | How to test |
| ------------------- | --------------------------------------------------------------------------------------------------------------------------------------------------------------------------------------------------------------------------------------------------------------------------------------------- | ----------------------------------------------------------------------------------------------------- |
| 4242424242424242 | The card payment succeeds and doesn’t require authentication. | Fill in the credit card form using the credit card number with any expiry date, CVC, and postal code. |
| 4000002500003155 | The card payment requires *authentication* (Strong Customer Authentication (SCA) is a regulatory requirement in effect as of September 14, 2019, that impacts many European online payments. It requires customers to use two-factor authentication like 3D Secure to verify their purchase). | Fill in the credit card form using the credit card number with any expiry date, CVC, and postal code. |
| 4000000000009995 | The card is declined with a decline code like `insufficient_funds`. | Fill in the credit card form using the credit card number with any expiry date, CVC, and postal code. |
| 6205500000000000004 | The UnionPay card has a variable length of 13-19 digits. | Fill in the credit card form using the credit card number with any expiry date, CVC, and postal code. |
#### Bank redirects
| Payment method | Scenario | How to test |
| ----------------- | ----------------------------------------------------------------------------------------------------------------------------------------------------------------------------------------------------- | -------------------------------------------------------------------------------------------------------------------------------------------------------- |
| Bancontact, iDEAL | Your customer fails to authenticate on the redirect page for a redirect-based and immediate notification payment method. | Choose any redirect-based payment method, fill out the required details, and confirm the payment. Then click **Fail test payment** on the redirect page. |
| Pay by Bank | Your customer successfully pays with a redirect-based and [delayed notification](https://docs.stripe.com/payments/payment-methods.md#payment-notification) payment method. | Choose the payment method, fill out the required details, and confirm the payment. Then click **Complete test payment** on the redirect page. |
| Pay by Bank | Your customer fails to authenticate on the redirect page for a redirect-based and delayed notification payment method. | Choose the payment method, fill out the required details, and confirm the payment. Then click **Fail test payment** on the redirect page. |
| BLIK | BLIK payments fail in a variety of ways – immediate failures (for example, the code has expired or is invalid), delayed errors (the bank declines) or timeouts (the customer didn’t respond in time). | Use email patterns to [simulate the different failures.](https://docs.stripe.com/payments/blik/accept-a-payment.md#simulate-failures) |
#### Bank debits
| Payment method | Scenario | How to test |
| ----------------- | ------------------------------------------------------------------------------------------------- | ------------------------------------------------------------------------------------------------------------------------------------------------------------------------------------------------- |
| SEPA Direct Debit | Your customer successfully pays with SEPA Direct Debit. | Fill out the form using the account number `AT321904300235473204`. The confirmed PaymentIntent initially transitions to processing, then transitions to the succeeded status three minutes later. |
| SEPA Direct Debit | Your customer’s payment intent status transitions from `processing` to `requires_payment_method`. | Fill out the form using the account number `AT861904300235473202`. |
See [Testing](https://docs.stripe.com/testing.md) for additional information to test your integration.
## Enable card scanning [Client-side]
> Enabling card scanning is required for Apple’s iOS app review process. Card scanning is not required for Android’s app review process, but we recommend enabling it.
### iOS
To enable card scanning support for iOS, set the `NSCameraUsageDescription` (**Privacy - Camera Usage Description**) in the `Info.plist` of your application, and provide a reason for accessing the camera (for example, “To scan cards”).
### (Optional) Android
To enable card scanning support, [request production access](https://developers.google.com/pay/api/android/guides/test-and-deploy/request-prod-access) to the Google Pay API from the [Google Pay and Wallet Console](https://pay.google.com/business/console?utm_source=devsite&utm_medium=devsite&utm_campaign=devsite).
- If you’ve enabled Google Pay, the card scanning feature is automatically available in our UI on eligible devices. To learn more about eligible devices, see the [Google Pay API constraints](https://developers.google.com/pay/payment-card-recognition/debit-credit-card-recognition)
- **Important:** The card scanning feature only appears in builds signed with the same signing key registered in the [Google Pay & Wallet Console](https://pay.google.com/business/console). Test or debug builds using different signing keys (for example, builds distributed through Firebase App Tester) won’t show the **Scan card** option. To test card scanning in pre-release builds, you must either:
- Sign your test builds with your production signing key
- Add your test signing key fingerprint to the Google Pay and Wallet Console
If your app doesn’t support Google Pay, you can use the Stripe card scanner.
> The Stripe card scanner is in public preview.
To enable card scanning support, add `stripecardscan` to the `dependencies` block of your [app/build.gradle](https://developer.android.com/studio/build/dependencies) file:
#### Groovy
```groovy
implementation 'com.stripe:stripecardscan:23.9.1'
```
## Optional: Enable Apple Pay
### Register for an Apple Merchant ID
Obtain an Apple Merchant ID by [registering for a new identifier](https://developer.apple.com/account/resources/identifiers/add/merchant) on the Apple Developer website.
Fill out the form with a description and identifier. Your description is for your own records and you can modify it in the future. Stripe recommends using the name of your app as the identifier (for example, `merchant.com.{{YOUR_APP_NAME}}`).
### Create a new Apple Pay certificate
Create a certificate for your app to encrypt payment data.
Go to the [iOS Certificate Settings](https://dashboard.stripe.com/settings/ios_certificates) in the Dashboard, click **Add new application**, and follow the guide.
Download a Certificate Signing Request (CSR) file to get a secure certificate from Apple that allows you to use Apple Pay.
One CSR file must be used to issue exactly one certificate. If you switch your Apple Merchant ID, you must go to the [iOS Certificate Settings](https://dashboard.stripe.com/settings/ios_certificates) in the Dashboard to obtain a new CSR and certificate.
### Integrate with Xcode
Add the Apple Pay capability to your app. In Xcode, open your project settings, click the **Signing & Capabilities** tab, and add the **Apple Pay** capability. You might be prompted to log in to your developer account at this point. Select the merchant ID you created earlier, and your app is ready to accept Apple Pay.

Enable the Apple Pay capability in Xcode
### Add Apple Pay
#### One-time payment
Pass your merchant ID when you create `StripeProvider`:
```javascript
import { StripeProvider } from '@stripe/stripe-react-native';
function App() {
return (
{/* Your app code here */}
);
}
```
When you call `initPaymentSheet`, pass in your [ApplePayParams](https://stripe.dev/stripe-react-native/api-reference/modules/PaymentSheet.html#ApplePayParams):
```javascript
await initPaymentSheet({
// ...
applePay: {
merchantCountryCode: 'US',
},
});
```
#### Recurring payments
When you call `initPaymentSheet`, pass in an [ApplePayParams](https://stripe.dev/stripe-react-native/api-reference/modules/PaymentSheet.html#ApplePayParams) with `merchantCountryCode` set to the country code of your business.
In accordance with [Apple’s guidelines](https://developer.apple.com/design/human-interface-guidelines/apple-pay#Supporting-subscriptions) for recurring payments, you must also set a `cardItems` that includes a [RecurringCartSummaryItem](https://stripe.dev/stripe-react-native/api-reference/modules/ApplePay.html#RecurringCartSummaryItem) with the amount you intend to charge (for example, “US$59.95 a month”).
You can also adopt [merchant tokens](https://developer.apple.com/apple-pay/merchant-tokens/) by setting the `request` with its `type` set to `PaymentRequestType.Recurring`
To learn more about how to use recurring payments with Apple Pay, see [Apple’s PassKit documentation](https://developer.apple.com/documentation/passkit/pkpaymentrequest).
#### iOS (React Native)
```javascript
const initializePaymentSheet = async () => {
const recurringSummaryItem = {
label: 'My Subscription',
amount: '59.99',
paymentType: 'Recurring',
intervalCount: 1,
intervalUnit: 'month',
// Payment starts today
startDate: new Date().getTime() / 1000,
// Payment ends in one year
endDate: new Date().getTime() / 1000 + 60 * 60 * 24 * 365,
};
const {error} = await initPaymentSheet({
// ...
applePay: {
merchantCountryCode: 'US',
cartItems: [recurringSummaryItem],
request: {
type: PaymentRequestType.Recurring,
description: 'Recurring',
managementUrl: 'https://my-backend.example.com/customer-portal',
billing: recurringSummaryItem,
billingAgreement:
"You'll be billed $59.99 every month for the next 12 months. To cancel at any time, go to Account and click 'Cancel Membership.'",
},
},
});
};
```
### Order tracking
To add [order tracking](https://developer.apple.com/design/human-interface-guidelines/technologies/wallet/designing-order-tracking) information in iOS 16 or later, configure a `setOrderTracking` callback function. Stripe calls your implementation after the payment is complete, but before iOS dismisses the Apple Pay sheet.
In your implementation of `setOrderTracking` callback function, fetch the order details from your server for the completed order, and pass the details to the provided `completion` function.
To learn more about order tracking, see [Apple’s Wallet Orders documentation](https://developer.apple.com/documentation/walletorders).
#### iOS (React Native)
```javascript
await initPaymentSheet({
// ...
applePay: {
// ...
setOrderTracking: async complete => {
const apiEndpoint =
Platform.OS === 'ios'
? 'http://localhost:4242'
: 'http://10.0.2.2:4567';
const response = await fetch(
`${apiEndpoint}/retrieve-order?orderId=${orderId}`,
{
method: 'GET',
headers: {
'Content-Type': 'application/json',
},
},
);
if (response.status === 200) {
const orderDetails = await response.json();
// orderDetails should include orderIdentifier, orderTypeIdentifier,
// authenticationToken and webServiceUrl
complete(orderDetails);
}
},
},
});
```
## Optional: Enable Google Pay
### Set up your integration
To use Google Pay, first enable the Google Pay API by adding the following to the `` tag of your **AndroidManifest.xml**:
```xml
...
```
For more details, see Google Pay’s [Set up Google Pay API](https://developers.google.com/pay/api/android/guides/setup) for Android.
### Add Google Pay
When you initialise `PaymentSheet`, set `merchantCountryCode` to the country code of your business and set `googlePay` to true.
You can also use the test environment by passing the `testEnv` parameter. You can only test Google Pay on a physical Android device. Follow the [React Native docs](https://reactnative.dev/docs/running-on-device) to test your application on a physical device.
```javascript
const { error, paymentOption } = await initPaymentSheet({
// ...
googlePay: {
merchantCountryCode: 'US',
testEnv: true, // use test environment
},
});
```
## Optional: Customise the sheet
All customization is configured using `initPaymentSheet`.
### Appearance
Customise colours, fonts and so on to match the look and feel of your app by using the [appearance API](https://docs.stripe.com/elements/appearance-api/mobile.md?platform=react-native).
### Merchant display name
Specify a customer-facing business name by setting `merchantDisplayName`. By default, this is your app’s name.
```javascript
await initPaymentSheet({
// ...
merchantDisplayName: 'Example Inc.',
});
```
### Dark mode
By default, `PaymentSheet` automatically adapts to the user’s system-wide appearance settings (light and dark mode). You can change this by setting the `style` property to `alwaysLight` or `alwaysDark` mode on iOS.
```javascript
await initPaymentSheet({
// ...
style: 'alwaysDark',
});
```
On Android, set light or dark mode on your app:
```
// force dark
AppCompatDelegate.setDefaultNightMode(AppCompatDelegate.MODE_NIGHT_YES)
// force light
AppCompatDelegate.setDefaultNightMode(AppCompatDelegate.MODE_NIGHT_NO)
```
## Optional: Complete payment in your UI
You can present Payment Sheet to only collect payment method details and then later call a `confirm` method to complete payment in your app’s UI. This is useful if you have a custom buy button or require additional steps after payment details are collected.

> A sample integration is [available on our GitHub](https://github.com/stripe/stripe-react-native/blob/master/example/src/screens/PaymentsUICustomScreen.tsx).
1. First, call `initPaymentSheet` and pass `customFlow: true`. `initPaymentSheet` resolves with an initial payment option containing an image and label representing the customer’s payment method. Update your UI with these details.
```javascript
const {
initPaymentSheet,
presentPaymentSheet,
confirmPaymentSheetPayment,
} = useStripe()
const { error, paymentOption } = await initPaymentSheet({
customerId: customer,
customerEphemeralKeySecret: ephemeralKey,
paymentIntentClientSecret: paymentIntent,
customFlow: true,
merchantDisplayName: 'Example Inc.',
});
// Update your UI with paymentOption
```
1. Use `presentPaymentSheet` to collect payment details. When the customer finishes, the sheet dismisses itself and resolves the promise. Update your UI with the selected payment method details.
```javascript
const { error, paymentOption } = await presentPaymentSheet();
```
1. Use `confirmPaymentSheetPayment` to confirm the payment. This resolves with the result of the payment.
```javascript
const { error } = await confirmPaymentSheetPayment();
if (error) {
Alert.alert(`Error code: ${error.code}`, error.message);
} else {
Alert.alert(
'Success',
'Your order is confirmed!'
);
}
```
Setting `allowsDelayedPaymentMethods` to true allows [delayed notification](https://docs.stripe.com/payments/payment-methods.md#payment-notification) payment methods like US bank accounts. For these payment methods, the final payment status isn’t known when the `PaymentSheet` completes, and instead succeeds or fails later. If you support these types of payment methods, inform the customer their order is confirmed and only fulfil their order (for example, ship their product) when the payment is successful.
## Optional: Enable additional payment methods
Navigate to [Manage payment methods for your connected accounts](https://dashboard.stripe.com/settings/payment_methods/connected_accounts) in the Dashboard to configure which payment methods your connected accounts accept. Changes to default settings apply to all new and existing connected accounts.
Consult the following resources for payment method information:
- [A guide to payment methods](https://stripe.com/payments/payment-methods-guide#choosing-the-right-payment-methods-for-your-business) to help you choose the correct payment methods for your platform.
- [Account capabilities](https://docs.stripe.com/connect/account-capabilities.md) to make sure your chosen payment methods work for your connected accounts.
- [Payment method and product support](https://docs.stripe.com/payments/payment-methods/payment-method-support.md#product-support) tables to make sure your chosen payment methods work for your Stripe products and payments flows.
For each payment method, you can select one of the following dropdown options:
| |
| |
| **On by default** | Your connected accounts accept this payment method during checkout. Some payment methods can only be off or blocked. This is because your connected accounts with *access to the Stripe Dashboard* (Platforms can provide connected accounts with access to the full Stripe Dashboard or the Express Dashboard. Otherwise, platforms build an interface for connected accounts using embedded components or the Stripe API) must activate them in their settings page. |
| **Off by default** | Your connected accounts don’t accept this payment method during checkout. If you allow your connected accounts with *access to the Stripe Dashboard* (Platforms can provide connected accounts with access to the full Stripe Dashboard or the Express Dashboard. Otherwise, platforms build an interface for connected accounts using embedded components or the Stripe API) to manage their own payment methods, they have the ability to turn it on. |
| **Blocked** | Your connected accounts don’t accept this payment method during checkout. If you allow your connected accounts with *access to the Stripe Dashboard* (Platforms can provide connected accounts with access to the full Stripe Dashboard or the Express Dashboard. Otherwise, platforms build an interface for connected accounts using embedded components or the Stripe API) to manage their own payment methods, they don’t have the option to turn it on. |

Payment method options
If you make a change to a payment method, you must click **Review changes** in the bottom bar of your screen and **Save and apply** to update your connected accounts.

Save window
### Allow connected accounts to manage payment methods
Stripe recommends allowing your connected accounts to customise their own payment methods. This option allows each connected account with *access to the Stripe Dashboard* (Platforms can provide connected accounts with access to the full Stripe Dashboard or the Express Dashboard. Otherwise, platforms build an interface for connected accounts using embedded components or the Stripe API) to view and update their [Payment methods](https://dashboard.stripe.com/settings/payment_methods) page. Only owners of the connected accounts can customise their payment methods. The Stripe Dashboard displays the set of payment method defaults you applied to all new and existing connected accounts. Your connected accounts can override these defaults, excluding payment methods you have blocked.
Tick the **Account customisation** tickbox to enable this option. You must click **Review changes** in the bottom bar of your screen and then select **Save and apply** to update this setting.

Account customisation tickbox
### Payment method capabilities
To allow your connected accounts to accept additional payment methods, their `Accounts` must have active payment method capabilities.
If you selected the “On by default” option for a payment method in [Manage payment methods for your connected accounts](https://dashboard.stripe.com/settings/payment_methods/connected_accounts), Stripe automatically requests the necessary capability for new and existing connected accounts if they meet the verification requirements. If the connected account doesn’t meet the requirements or if you want to have direct control, you can manually request the capability in the Dashboard or with the API.
Most payment methods have the same verification requirements as the `card_payments` capability, with some restrictions and exceptions. The [payment method capabilities table](https://docs.stripe.com/connect/account-capabilities.md#payment-methods) lists the payment methods that require additional verification.
#### Dashboard
[Find a connected account](https://docs.stripe.com/connect/dashboard/managing-individual-accounts.md#finding-accounts) in the Dashboard to edit its capabilities and view outstanding verification requirements.
#### API
For an existing connected account, you can [list](https://docs.stripe.com/api/capabilities/list.md) their existing capabilities to determine whether you need to request additional capabilities.
```curl
curl https://api.stripe.com/v1/accounts/{{CONNECTEDACCOUNT_ID}}/capabilities \
-u "<>:"
```
Request additional capabilities by [updating](https://docs.stripe.com/api/capabilities/update.md) each connected account’s capabilities.
```curl
curl https://api.stripe.com/v1/accounts/{{CONNECTEDACCOUNT_ID}}/capabilities/us_bank_account_ach_payments \
-u "<>:" \
-d requested=true
```
There can be a delay before the requested capability becomes active. If the capability has any activation requirements, the response includes them in the `requirements` arrays.
## Collect fees
As a platform, you can charge your connected accounts a portion of each transaction in the form of application fees. You can set application fee pricing in the following ways:
- Use the [Platform Pricing Tool](https://docs.stripe.com/connect/platform-pricing-tools.md) to set and test pricing rules. This no-code feature in the Stripe Dashboard is currently only available for platforms responsible for paying Stripe fees.
- Specify application fees directly in a [PaymentIntent](https://docs.stripe.com/api/payment_intents/object.md). Fees set with this method override the pricing logic specified in the Platform Pricing Tool.
Your platform can take an application fee with the following limitations:
- The value of `application_fee_amount` must be positive and less than the amount of the charge. The application fee collected is capped at the captured amount of the charge.
- There are no additional Stripe fees on the application fee itself.
- In line with Brazilian regulatory and compliance requirements, platforms based outside of Brazil with Brazilian connected accounts can’t collect application fees through Stripe.
- The currency of `application_fee_amount` depends upon a few [multiple currency](https://docs.stripe.com/connect/currencies.md) factors.
The resulting charge’s [BalanceTransaction](https://docs.stripe.com/api.md#balance_transaction_retrieve) includes a detailed fee breakdown of both the Stripe and application fees. To provide a better reporting experience, collecting a fee generates an [ApplicationFee](https://docs.stripe.com/api/application_fees/object.md) object. Use the `amount` property on the `ApplicationFee` object for reporting.
You can view application fees in the [Collected fees](https://dashboard.stripe.com/connect/application_fees) section of the Dashboard.
> Application fees for direct charges are created asynchronously by default. If you expand the `application_fee` object in a charge creation request, the application fee is created synchronously as part of that request. Only expand the `application_fee` object if you must, because it increases the latency of the request.
>
> To receive notifications of asynchronously created `ApplicationFee` objects, listen for the [application_fee.created](https://docs.stripe.com/api/events/types.md#event_types-application_fee.created) webhook event.
## Issue refunds
Just as platforms can create charges on connected accounts, they can also create refunds of charges on connected accounts. [Create a refund](https://docs.stripe.com/api.md#create_refund) using your platform’s secret key while [authenticated](https://docs.stripe.com/connect/authentication.md#stripe-account-header) as the connected account.
Application fees aren’t automatically refunded when issuing a refund. Your platform must explicitly refund the application fee or the connected account – the account on which the charge was created – loses that amount. You can refund an application fee by passing a `refund_application_fee` value of **true** in the refund request:
```curl
curl https://api.stripe.com/v1/refunds \
-u "<>:" \
-H "Stripe-Account: {{CONNECTEDACCOUNT_ID}}" \
-d "charge={{CHARGE_ID}}" \
-d refund_application_fee=true
```
By default, the entire charge is refunded, but you can create a partial refund by setting an `amount` value as a positive integer. If the refund results in the entire charge being refunded, the entire application fee is refunded. Otherwise, a proportional amount of the application fee is refunded. Alternatively, you can provide a `refund_application_fee` value of **false** and [refund the application fee](https://docs.stripe.com/api.md#create_fee_refund) separately.
## Connect embedded components
[Connect embedded components](https://docs.stripe.com/connect/get-started-connect-embedded-components.md) support direct charges. By using the [payments embedded component](https://docs.stripe.com/connect/supported-embedded-components/payments.md), you can let your connected accounts view payment information, capture charges, and manage disputes from within your site.
Note: The following is a preview/demo component that behaves differently than live mode usage with real connected accounts. The actual component has more functionality than what might appear in this demo component. For example, for connected accounts without Stripe dashboard access (custom accounts), no user authentication is required in production.
The following components display information for direct charges:
- [Payments component](https://docs.stripe.com/connect/supported-embedded-components/payments.md): Displays all of an account’s payments and disputes.
- [Payments details](https://docs.stripe.com/connect/supported-embedded-components/payment-details.md): Displays information for a specific payment.
- [Disputes list component](https://docs.stripe.com/connect/supported-embedded-components/disputes-list.md): Displays all of an account’s disputes.
- [Disputes for a payment component](https://docs.stripe.com/connect/supported-embedded-components/disputes-for-a-payment.md): Displays the disputes for a single specified payment. You can use it to include dispute management functionality on a page with your payments UI.
## See also
- [Working with multiple currencies](https://docs.stripe.com/connect/currencies.md)
- [Statement descriptors with Connect](https://docs.stripe.com/connect/statement-descriptors.md)