# Direct Charges erstellen
Erstellen Sie Zahlungen direkt auf dem verbundenen Konto und erheben Sie Gebühren.
Erstellen Sie *Direct Charges*, wenn Kunden/Kundinnen direkt mit einem verbundenen Konto interagieren, während Ihre Plattform dabei im Hintergrund bleibt. Bei Direct Charges:
- Die Zahlung wird auf dem verbundenen Konto als Abbuchung ausgewiesen, nicht auf dem Konto Ihrer Plattform.
- Das Guthaben des verbundenen Kontos erhöht sich mit jeder Zahlung.
- Ihr Kontoguthaben erhöht sich mit jeder Zahlung um die Plattformgebühren.
Dieser Zahlungstyp eignet sich am besten für Plattformen, die Software as a Service anbieten. Shopify bietet beispielsweise Tools zum Erstellen von Online-Shops und Thinkific ermöglicht es Lehrkräften, Online-Kurse zu geben.
## Einschränkungen der Plattformsichtbarkeit
Direct Charges sind auf Plattformebene nur eingeschränkt sichtbar. Wenn Sie Direct Charges erstellen, beachten Sie bitte Folgendes:
- Transaktionsobjekte wie `PaymentIntents` und `Charges` sind auf dem verbundenen Konto vorhanden, nicht auf der Plattform.
- Um auf Direct Charge-Daten zuzugreifen, müssen Sie die Stripe-API mit der ID des [verbundenen Kontos im Stripe-Konto-Header](https://docs.stripe.com/connect/authentication.md) abfragen.
Dieses Scoping-Verhalten wirkt sich auf Datensynchronisierungsdienste wie Fivetran sowie andere Integrationen von Drittanbietern aus, die auf API-Abfragen auf Plattformebene basieren. Um Direct Charge-Daten abzurufen, müssen sie das verbundene Konto abfragen, nicht die Plattform.
> Wir empfehlen, Direct Charges für verbundene Konten zu verwenden, die Zugriff auf das vollständige Stripe haben.
Führen Sie mithilfe von [Stripe Checkout](https://docs.stripe.com/payments/checkout.md) eine Weiterleitung an eine von Stripe gehostete Zahlungsseite durch. Sehen Sie sich diese Integration [im Vergleich zu anderen Integrationstypen von Stripe](https://docs.stripe.com/payments/online-payments.md#compare-features-and-availability) an.
#### Integrationsaufwand
Complexity: 2/5
#### Integrationstyp
An die von Stripe gehostete Zahlungsseite weiterleiten
#### Anpassung der Nutzeroberfläche
Eingeschränkte Anpassung
- 20 voreingestellte Schriftarten
- 3 voreingestellte Rahmenradien
- Nutzerdefinierte Hintergrund- und Rahmenfarbe
- Individuelles Logo
[Jetzt testen](https://checkout.stripe.dev/)
[Registrieren Sie sich](https://dashboard.stripe.com/register) zunächst für ein Stripe-Konto.
Verwenden Sie unsere offiziellen Bibliotheken, um von Ihrer Anwendung aus auf die Stripe API zuzugreifen:
#### Ruby
```bash
# Available as a gem
sudo gem install stripe
```
```ruby
# If you use bundler, you can add this line to your Gemfile
gem 'stripe'
```
## Checkout-Sitzung erstellen [Clientseitig] [Serverseitig]
Über eine [Checkout-Sitzung](https://docs.stripe.com/api/checkout/sessions.md) wird gesteuert, was die Kundinnen/Kunden auf dem Zahlungsformular sehen, z. B. Posten, Bestellbetrag und Währung. Fügen Sie auf Ihrer Website eine Schaltfläche zum Bezahlen hinzu, die einen serverseitigen Endpoint aufruft, um eine Checkout-Sitzung zu erstellen.
```html
Checkout
```
Erstellen Sie auf Ihrem Server eine Checkout-Sitzung und leiten Sie Ihre Kundinnen/Kunden an die in der Antwort zurückgegebene [URL](https://docs.stripe.com/api/checkout/sessions/object.md#checkout_session_object-url) weiter.
```curl
curl https://api.stripe.com/v1/checkout/sessions \
-u "<>:" \
-H "Stripe-Account: {{CONNECTEDACCOUNT_ID}}" \
-d "line_items[0][price_data][currency]=usd" \
-d "line_items[0][price_data][product_data][name]=T-shirt" \
-d "line_items[0][price_data][unit_amount]=1000" \
-d "line_items[0][quantity]=1" \
-d "payment_intent_data[application_fee_amount]=123" \
-d mode=payment \
--data-urlencode "success_url=https://example.com/success?session_id={CHECKOUT_SESSION_ID}"
```
- `Stripe-Account`: Dieser Header gibt eine Direct Charge für Ihr verbundenes Konto an. In Checkout wird das [Branding](https://docs.stripe.com/connect/direct-charges.md#branding) des verbundenen Kontos verwendet, wodurch Kundinnen und Kunden den Eindruck haben, direkt mit dem verbundenen Konto und nicht mit Ihrer Plattform zu kommunizieren.
- `line_items`: Dieses Attribut stellt Artikel dar, die Ihr Kunde/Ihre Kundin kauft und wird auf der von Stripe gehosteten Checkout-Seite angezeigt.
- `payment_intent_data[application_fee_amount]`: Dieses Attribut gibt den Betrag an, den Ihre Plattform als Plattformgebühr von der Transaktion abzieht. Nachdem die Zahlung für das verbundene Konto verarbeitet wurde, wird der `application_fee_amount` an die Plattform übertragen. Weitere Informationen finden Sie unter [Gebühren erheben](https://docs.stripe.com/connect/direct-charges.md#collect-fees).
- `success_url` – Stripe leitet die Kundin / den Kunden nach Durchführung einer Zahlung an die Bestätigungs-URL weiter und ersetzt die Zeichenfolge `{CHECKOUT_SESSION_ID}` durch die ID der Checkout Session. Rufen Sie damit die Checkout Session ab und prüfen Sie den Status, um zu entscheiden, was Ihrem Kunden/Ihrer Kundin angezeigt werden soll. Sie können auch Ihre eigenen Abfrageparameter anhängen, die während des Weiterleitungsprozesses bestehen bleiben. Weitere Informationen finden Sie unter [Anpassen des Weiterleitungsverhaltens mit einer von Stripe gehosteten Seite](https://docs.stripe.com/payments/checkout/custom-success-page.md).
Zeigen Sie Zahlungen, die Sie auf Ihrem verbundenen Konto erstellen, in Ihrer [Zahlungsliste](https://dashboard.stripe.com/test/payments) an. Direct Charges werden in Exporten nicht angezeigt, aber Sie finden sie in [Berichten](https://docs.stripe.com/stripe-reports.md), [Sigma](https://docs.stripe.com/stripe-data/sigma.md) oder über die API.
## Ereignisse nach Zahlung verarbeiten [Serverseitig]
Stripe übermittelt ein [checkout.session.completed](https://docs.stripe.com/api/events/types.md#event_types-checkout.session.completed)-Ereignis, wenn die Zahlung abgeschlossen ist. [Verwenden Sie einen Webhook, um diese Ereignisse zu empfangen](https://docs.stripe.com/webhooks/quickstart.md) und Aktionen auszuführen (Versenden einer Bestellbestätigung per E-Mail an die Kundinnen/Kunden, Erfassen des Verkaufs in einer Datenbank oder Einleiten des Versandablaufs).
Überwachen Sie diese Ereignisse, anstatt auf einen Callback vom Client zu warten. Auf dem Client könnten die Kundinnen und Kunden das Browserfenster schließen oder die App beenden, bevor der Callback erfolgt ist. Einige Zahlungsmethoden benötigen auch 2 bis 14 Tage bis zur Zahlungsbestätigung. Wenn Sie Ihre Integration so einrichten, dass sie asynchrone Ereignisse überwacht, können Sie mehrere [Zahlungsmethoden](https://stripe.com/payments/payment-methods-guide) mit einer einzelnen Integration akzeptieren.
Stripe empfiehlt, alle folgenden Ereignisse zu verarbeiten, wenn Zahlungen mit Checkout eingezogen werden:
| Ereignis | Beschreibung | Nächste Schritte |
| -------------------------------------------------------------------------------------------------------------------------------------------- | ---------------------------------------------------------------------------------------------------------- | ------------------------------------------------------------------------------------------------------ |
| [checkout.session.completed](https://docs.stripe.com/api/events/types.md#event_types-checkout.session.completed) | Der Kunde/die Kundin hat die Zahlung nach der Übermittlung des Checkout-Formulars erfolgreich autorisiert. | Warten Sie, bis die Zahlung erfolgt ist oder fehlschlägt. |
| [checkout.session.async_payment_succeeded](https://docs.stripe.com/api/events/types.md#event_types-checkout.session.async_payment_succeeded) | Die Kundenzahlung war erfolgreich. | Führen Sie die Bestellung der gekauften Waren oder Dienstleistungen aus. |
| [checkout.session.async_payment_failed](https://docs.stripe.com/api/events/types.md#event_types-checkout.session.async_payment_failed) | Die Zahlung wurde abgelehnt oder ist aus einem anderen Grund fehlgeschlagen. | Kontaktieren Sie den Kunden/die Kundin per E-Mail und fordern Sie eine neue Bestellung von ihm/ihr an. |
Diese Ereignisse beinhalten alle das [Checkout-Sitzungsobjekt](https://docs.stripe.com/api/checkout/sessions.md). Nach erfolgreicher Zahlung ändert sich der [Status](https://docs.stripe.com/payments/paymentintents/lifecycle.md) des zugrunde liegenden *PaymentIntent* (The Payment Intents API tracks the lifecycle of a customer checkout flow and triggers additional authentication steps when required by regulatory mandates, custom Radar fraud rules, or redirect-based payment methods) von `processing` in `succeeded` oder in einen Fehlerstatus.
## Integration testen
#### Karten
| Kartennummer | Szenario | So führen Sie den Test durch |
| ------------------- | ------------------------------------------------------------------------------------------------------------------------------------------------------------------------------------------------------------------------------------------------------------------------------------------------------------------ | -------------------------------------------------------------------------------------------------------------------------------------- |
| 4242424242424242 | Die Kartenzahlung ist erfolgreich und es ist keine Authentifizierung erforderlich. | Füllen Sie das Kreditkartenformular aus und geben Sie die Kreditkartennummer mit beliebiger Gültigkeitsdauer, CVC und Postleitzahl an. |
| 4000002500003155 | Für die Kartenzahlung ist eine *Authentifizierung* (Strong Customer Authentication (SCA) is a regulatory requirement in effect as of September 14, 2019, that impacts many European online payments. It requires customers to use two-factor authentication like 3D Secure to verify their purchase) erforderlich. | Füllen Sie das Kreditkartenformular aus und geben Sie die Kreditkartennummer mit beliebiger Gültigkeitsdauer, CVC und Postleitzahl an. |
| 4000000000009995 | Die Karte wird mit einem Ablehnungscode wie `insufficient_funds` abgelehnt. | Füllen Sie das Kreditkartenformular aus und geben Sie die Kreditkartennummer mit beliebiger Gültigkeitsdauer, CVC und Postleitzahl an. |
| 6205500000000000004 | Die UnionPay-Karte hat eine variable Länge von 13 bis 19 Ziffern. | Füllen Sie das Kreditkartenformular aus und geben Sie die Kreditkartennummer mit beliebiger Gültigkeitsdauer, CVC und Postleitzahl an. |
#### Digitale Geldbörsen (Wallets)
| Zahlungsmethode | Szenario | So führen Sie den Test durch |
| --------------- | ------------------------------------------------------------------------------------------------------------------------------------------------------------------------------------------------------------ | ------------------------------------------------------------------------------------------------------------------------------------------------------------------------------------------------------------------------------------------ |
| Alipay | Ihr Kunde/Ihre Kundin zahlt erfolgreich mit einer auf Weiterleitung basierenden Zahlungsmethode mit [sofortiger Benachrichtigung](https://docs.stripe.com/payments/payment-methods.md#payment-notification). | Wählen Sie eine beliebige, auf Weiterleitung basierende Zahlungsmethode aus, füllen Sie die erforderlichen Informationen aus und bestätigen Sie die Zahlung. Klicken Sie dann auf der Weiterleitungsseite auf **Testzahlung abschließen**. |
#### Bankumleitungen
| Zahlungsmethode | Szenario | So führen Sie den Test durch |
| ------------------------------------- | ------------------------------------------------------------------------------------------------------------------------------------------------------------------------------------------------------------------------------------------------- | --------------------------------------------------------------------------------------------------------------------------------------------------------------------------------------------------------------------------------------------- |
| BECS-Lastschriftverfahren | Ihr/e Kund/in zahlt erfolgreich mit dem BECS-Lastschriftverfahren. | Füllen Sie das Formular mit der Kontonummer `900123456` und BSB `000000` aus. Der bestätigte PaymentIntent geht zunächst in den Status `processing` über und dann 3 Minuten später in den Status `succeeded`. |
| BECS-Lastschriftverfahren | Die Zahlung Ihres/Ihrer Kund/in schlägt fehl mit Code `account_closed` fehl. | Füllen Sie das Formular mit der Kontonummer `111111113` und BSB `000000` aus. |
| Bancontact, EPS, iDEAL und Przelewy24 | Ihr/e Kund/in konnte sich auf der iDEAL-Weiterleitungsseite für eine auf Weiterleitung basierende Zahlungsmethode mit sofortiger Benachrichtigung nicht authentifizieren. | Wählen Sie eine beliebige, auf Weiterleitung basierende Zahlungsmethode aus, füllen Sie die erforderlichen Informationen aus und bestätigen Sie die Zahlung. Klicken Sie dann auf der Weiterleitungsseite auf **Testzahlung fehlgeschlagen**. |
| Pay by Bank | Ihr Kunde/Ihre Kundin zahlt erfolgreich mit einer auf Weiterleitung basierenden Zahlungsmethode mit [verzögerter Benachrichtigung](https://docs.stripe.com/payments/payment-methods.md#payment-notification). | Wählen Sie die Zahlungsmethode aus, füllen Sie die erforderlichen Informationen aus und bestätigen Sie die Zahlung. Klicken Sie dann auf der Weiterleitungsseite auf **Testzahlung abschließen**. |
| Pay by Bank | Ihr/e Kund/in konnte sich auf der iDEAL-Weiterleitungsseite für eine auf Weiterleitung basierende Zahlungsmethode mit verzögerter Benachrichtigung nicht authentifizieren. | Wählen Sie die Zahlungsmethode aus, füllen Sie die erforderlichen Informationen aus und bestätigen Sie die Zahlung. Klicken Sie dann auf der Weiterleitungsseite auf **Testzahlung fehlgeschlagen**. |
| BLIK | BLIK-Zahlungen können aus verschiedenen Gründen fehlschlagen. Es gibt sofortige Fehler (der Code ist abgelaufen oder ungültig), verzögerte Fehler (die Bank lehnt ab) oder Zeitüberschreitungen (der/die Kund/in hat nicht rechtzeitig reagiert). | Verwenden Sie E-Mail-Muster, um [die verschiedenen Fehler zu simulieren](https://docs.stripe.com/payments/blik/accept-a-payment.md#simulate-failures) |
#### Banklastschriften
| Zahlungsmethode | Szenario | So führen Sie den Test durch |
| ---------------- | -------------------------------------------------------------------------------------------------------- | ------------------------------------------------------------------------------------------------------------------------------------------------------------------------------------------------------------------ |
| SEPA-Lastschrift | Ihr/e Kund/in zahlt erfolgreich mit dem SEPA-Lastschriftverfahren. | Füllen Sie das Formular mit der Kontonummer `AT321904300235473204` aus. Die bestätigte PaymentIntent geht zunächst in den Status „wird verarbeitet“ und dann drei Minuten später in den Status „erfolgreich“ über. |
| SEPA-Lastschrift | Der Status der PaymentIntent Ihres/Ihrer Kund/in wechselt von `processing` zu `requires_payment_method`. | Füllen Sie das Formular mit der Kontonummer `AT861904300235473202` aus. |
#### Gutscheine
| Zahlungsmethode | Szenario | So führen Sie den Test durch |
| --------------- | ------------------------------------------------------------ | --------------------------------------------------------------------------------------------------------------------------------------------------- |
| Boleto, OXXO | Ihr/e Kund/in bezahlt mit einem Boleto- oder OXXO-Gutschein. | Wählen Sie als Zahlungsmethode Boleto oder OXXO aus und übermitteln Sie die Zahlung. Schließen Sie das OXXO-Dialogfeld, nachdem es angezeigt wurde. |
Hier finden Sie weitere Informationen zum [Testen](https://docs.stripe.com/testing.md) Ihrer Integration.
## Optional: Weitere Zahlungsmethoden aktivieren
Navigieren Sie im Dashboard zu [Zahlungsmethoden für Ihre verbundenen Konten verwalten](https://dashboard.stripe.com/settings/payment_methods/connected_accounts), um zu konfigurieren, welche Zahlungsmethoden Ihre verbundenen Konten akzeptieren. Änderungen an den Standardeinstellungen gelten für alle neuen und bestehenden verbundenen Konten.
Informationen zu den Zahlungsmethoden finden Sie in den folgenden Ressourcen:
- [Ein Leitfaden zu Zahlungsmethoden](https://stripe.com/payments/payment-methods-guide#choosing-the-right-payment-methods-for-your-business), der Ihnen bei der Auswahl der richtigen Zahlungsmethoden für Ihre Plattform hilft.
- [Kontofunktionen](https://docs.stripe.com/connect/account-capabilities.md), um sicherzustellen, dass die gewählten Zahlungsmethoden für Ihre verbundenen Konten funktionieren.
- [Zahlungsmethode und Produktsupport](https://docs.stripe.com/payments/payment-methods/payment-method-support.md#product-support), um sicherzustellen, dass die gewählten Zahlungsmethoden für Ihre Stripe-Produkte und Zahlungsabläufe geeignet sind.
Für jede Zahlungsmethode können Sie eine der folgenden Dropdown-Optionen wählen:
| |
| |
| **Standardmäßig aktiviert** | Ihre verbundenen Konten akzeptieren diese Zahlungsmethode beim Bezahlvorgang. Einige Zahlungsmethoden können nur deaktiviert oder gesperrt werden. Dies liegt daran, dass Ihre verbundenen Konten mit *Zugriff auf das Stripe-Dashboard* (Platforms can provide connected accounts with access to the full Stripe Dashboard or the Express Dashboard. Otherwise, platforms build an interface for connected accounts using embedded components or the Stripe API) sie auf ihrer Seite mit Einstellungen aktivieren müssen. |
| **Standardmäßig deaktiviert** | Ihre verbundenen Konten akzeptieren diese Zahlungsmethode beim Bezahlvorgang nicht. Wenn Sie Ihren verbundenen Konten mit *Zugriff auf das Stripe-Dashboard* (Platforms can provide connected accounts with access to the full Stripe Dashboard or the Express Dashboard. Otherwise, platforms build an interface for connected accounts using embedded components or the Stripe API) erlauben, ihre eigenen Zahlungsmethoden zu verwalten, haben sie die Möglichkeit, sie zu aktivieren. |
| **Blockiert** | Ihre verbundenen Konten akzeptieren diese Zahlungsmethode beim Bezahlvorgang nicht. Wenn Sie Ihren verbundenen Konten mit *Zugriff auf das Stripe-Dashboard* (Platforms can provide connected accounts with access to the full Stripe Dashboard or the Express Dashboard. Otherwise, platforms build an interface for connected accounts using embedded components or the Stripe API) erlauben, ihre eigenen Zahlungsmethoden zu verwalten, haben sie nicht die Möglichkeit, sie zu aktivieren. |
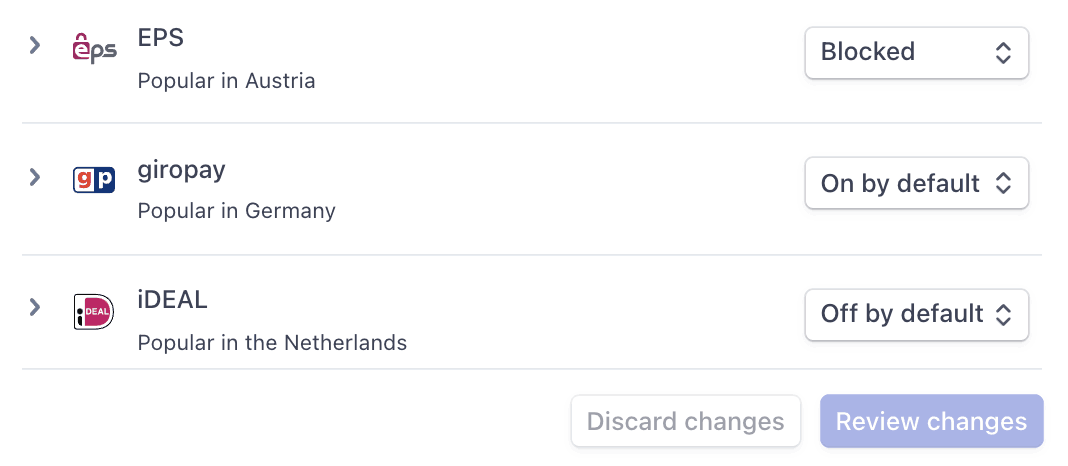
Optionen für Zahlungsmethoden
Wenn Sie eine Änderung an einer Zahlungsmethode vornehmen, müssen Sie auf **Änderungen überprüfen** in der Leiste unten im Bildschirm klicken und auf **Speichern und anwenden**, um Ihre verbundenen Konten zu aktualisieren.

Dialogfeld „Speichern“
### Verbundenen Konten die Verwaltung von Zahlungsmethoden gestatten
Stripe empfiehlt, dass Sie Ihren verbundenen Konten erlauben, ihre eigenen Zahlungsmethoden anzupassen. Diese Option ermöglicht jedem verbundenen Konto mit *Zugriff auf das Stripe-Dashboard* (Platforms can provide connected accounts with access to the full Stripe Dashboard or the Express Dashboard. Otherwise, platforms build an interface for connected accounts using embedded components or the Stripe API), seine Seite mit den [Zahlungsmethoden](https://dashboard.stripe.com/settings/payment_methods) anzuzeigen und zu aktualisieren. Nur Inhaber/innen der verbundenen Konten können ihre Zahlungsmethoden anpassen. Das Stripe-Dashboard zeigt die Standard-Zahlungsmethoden an, die Sie auf alle neuen und bestehenden verbundenen Konten angewendet haben. Ihre verbundenen Konten können diese Standardeinstellungen außer Kraft setzen, mit Ausnahme der von Ihnen blockierten Zahlungsmethoden.
Aktivieren Sie das Kontrollkästchen **Anpassung des Kontos**, um diese Option zu aktivieren. Sie müssen auf **Änderungen überprüfen** in der Leiste unten im Bildschirm klicken und dann **Speichern und übernehmen** auswählen, um diese Einstellung zu aktualisieren.

Kontrollkästchen „Anpassung des Kontos“
### Funktionen der Zahlungsmethode
Damit Ihre verbundenen Konten zusätzliche Zahlungsmethoden akzeptieren können, müssen deren `Accounts` über aktive Zahlungsmethoden verfügen.
Wenn Sie unter [Zahlungsmethoden für Ihre verbundenen Konten verwalten](https://dashboard.stripe.com/settings/payment_methods/connected_accounts) die Option „Standardmäßig aktiviert“ für eine Zahlungsmethode ausgewählt haben, fordert Stripe automatisch die erforderliche Funktion für neue und bestehende verbundene Konten an, sofern diese die Verifizierungsanforderungen erfüllen. Wenn das verbundene Konto die Anforderungen nicht erfüllt oder Sie die direkte Kontrolle behalten möchten, können Sie die Funktion manuell im Dashboard oder über die API anfordern.
Die meisten Zahlungsmethoden haben die gleichen Verifizierungsanforderungen wie die `card_payments`-Funktion, mit einigen Einschränkungen und Ausnahmen. Die [Tabelle der Zahlungsmethodenfunktionen](https://docs.stripe.com/connect/account-capabilities.md#payment-methods) führt die Zahlungsmethoden auf, die eine zusätzliche Verifizierung erfordern.
#### Dashboard
[Suchen Sie im Dashboard ein verbundenes Konto](https://docs.stripe.com/connect/dashboard/managing-individual-accounts.md#finding-accounts), um dessen Funktionen zu bearbeiten und ausstehende Verifizierungsanforderungen einzusehen.
#### API
Für ein bestehendes verbundenes Konto können Sie die vorhandenen Funktionen [auflisten](https://docs.stripe.com/api/capabilities/list.md), um festzustellen, ob Sie zusätzliche Funktionen anfordern müssen.
```curl
curl https://api.stripe.com/v1/accounts/{{CONNECTEDACCOUNT_ID}}/capabilities \
-u "<>:"
```
Fordern Sie zusätzliche Funktionen an, indem Sie die Funktionen jedes verbundenen Kontos [aktualisieren](https://docs.stripe.com/api/capabilities/update.md).
```curl
curl https://api.stripe.com/v1/accounts/{{CONNECTEDACCOUNT_ID}}/capabilities/us_bank_account_ach_payments \
-u "<>:" \
-d requested=true
```
Es kann zu einer Verzögerung kommen, bevor die angeforderte Funktion aktiv wird. Wenn für die Funktion Aktivierungsanforderungen gelten, enthält die Antwort diese in den `requirements`-Arrays.
## Gebühren einziehen
Als Plattform können Sie Ihren verbundenen Konten einen Anteil jeder Transaktion in Form von Plattformgebühren in Rechnung stellen. Sie können die Preise für Plattformgebühren auf folgende Weise festlegen:
- Mit dem [Plattform-Preistool](https://docs.stripe.com/connect/platform-pricing-tools.md) können Sie Preisregeln festlegen und testen. Diese No-Code-Funktion im Stripe-Dashboard ist derzeit nur für Plattformen verfügbar, die für die Zahlung von Stripe-Gebühren verantwortlich sind.
- Geben Sie die Plattformgebühren direkt in einem [PaymentIntent](https://docs.stripe.com/api/payment_intents/object.md) an. Die auf diese Weise festgelegten Gebühren haben Vorrang vor der im Preistool für Plattformen festgelegten Preislogik.
Ihre Plattform kann eine Plattformgebühr unter Berücksichtigung der folgenden Einschränkungen erheben:
- Der Wert von `application_fee_amount` muss positiv und kleiner als der Betrag der Zahlung sein. Die erhobene Plattformgebühr wird auf den Betrag der Zahlung begrenzt.
- Es fallen keine zusätzlichen Stripe-Gebühren für die Plattformgebühr selbst an.
- In Übereinstimmung mit gesetzlich vorgeschriebenen und Compliance-Anforderungen in Brasilien können Plattformen mit Sitz außerhalb Brasiliens und mit brasilianischen verbundenen Konten keine Plattformgebühren über Stripe einziehen.
- Die Währung des `application_fee_amount` hängt von einigen Faktoren für [mehrere Währungen](https://docs.stripe.com/connect/currencies.md) ab.
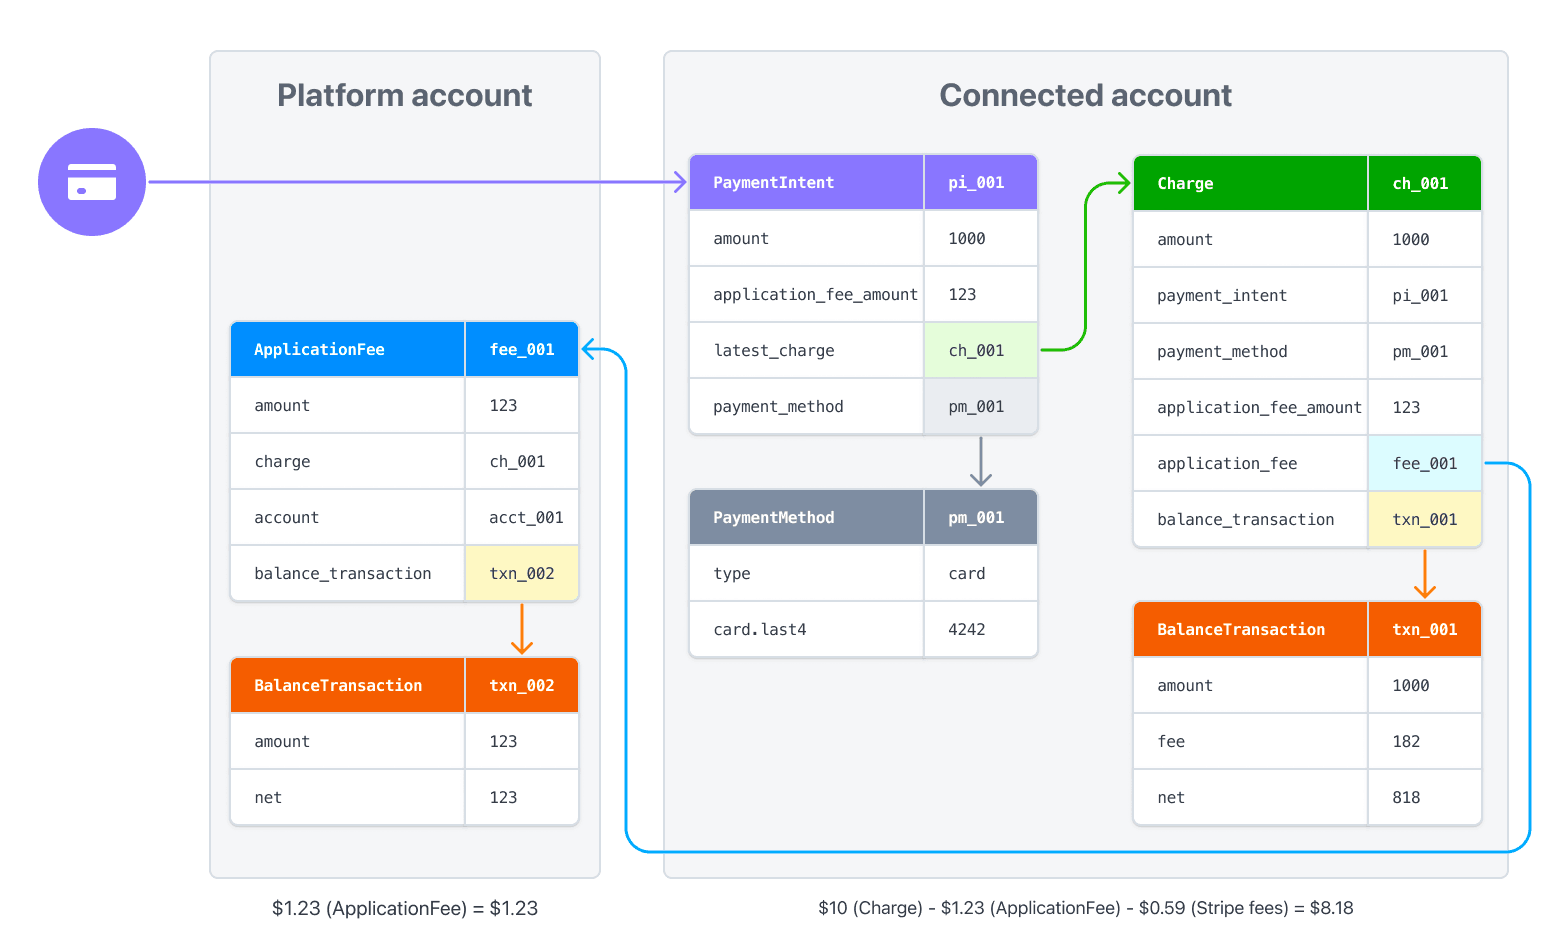
Die [BalanceTransaction](https://docs.stripe.com/api.md#balance_transaction_retrieve) der resultierenden Zahlung enthält eine detaillierte Aufschlüsselung der Transaktionsgebühren von Stripe als auch der Plattformgebühren. Um die Berichterstellung zu verbessern, wird durch die Erhebung einer Transaktionsgebühr ein [ApplicationFee](https://docs.stripe.com/api/application_fees/object.md)-Objekt generiert. Verwenden Sie für die Berichterstellung die Eigenschaft `amount` im `ApplicationFee`-Objekt.
Die Plattformgebühren können Sie im Abschnitt [Erhobene Transaktionsgebühren](https://dashboard.stripe.com/connect/application_fees) des Dashboards einsehen.
> Plattformgebühren für Direct Charges werden standardmäßig asynchron erstellt. Wenn Sie das `application_fee`-Objekt in einer Zahlungserstellungsanfrage erweitern, wird die Plattformgebühr synchron als Teil dieser Anfrage erstellt. Erweitern Sie das `application_fee`-Objekt nur bei Bedarf, da dies die Latenz der Anfrage erhöht.
>
> Um Benachrichtigungen über asynchron erstellte `ApplicationFee`-Objekte zu erhalten, überwachen Sie das Webhook-Ereignis [application_fee.created](https://docs.stripe.com/api/events/types.md#event_types-application_fee.created).
### Geldbewegungen mit Gebühren
Wenn Sie eine Plattformgebühr für eine Zahlung angeben, wird der Gebührenbetrag auf das Stripe-Konto Ihrer Plattform übertragen. Wird eine Zahlung direkt über das verbundene Konto abgewickelt, wird der Zahlungsbetrag – abzüglich der Stripe-Gebühren und der Plattformgebühr – in das verbundene Konto eingezahlt.
Wenn Sie beispielsweise eine Zahlung in Höhe von 10 USD mit einer Plattformgebühr von 1,23 USD vornehmen (wie im vorherigen Beispiel), werden 1,23 USD auf Ihr Plattformkonto überwiesen. 8,18 USD (10 USD – 0,59 USD – 1,23 USD) werden im verbundenen Konto verrechnet (wobei standardmäßig US-Stripe-Gebühren angenommen werden).
Wenn Sie Zahlungen in mehreren Währungen abwickeln, lesen Sie die Informationen zur [Handhabung von Währungen](https://docs.stripe.com/connect/currencies.md) in Connect.
## Branding anpassen
Ihre Plattform und verbundene Konten können die [Branding-Einstellungen](https://dashboard.stripe.com/account/branding) im Dashboard verwenden, um das Branding auf der Zahlungsseite anzupassen. Für Direct Charges verwendet Checkout die Markeneinstellungen des verbundenen Kontos.
Sie können die API auch verwenden, um die [Branding-Einstellungen zu aktualisieren](https://docs.stripe.com/api/accounts/update.md#update_account-settings-branding):
- `icon` – Wird neben dem Unternehmensnamen in der Kopfzeile der Checkout-Seite angezeigt.
- `logo` – Wird anstelle des Symbols und des Unternehmensnamens in der Kopfzeile der Checkout-Seite verwendet.
- `primary_color` – Wird als Hintergrundfarbe auf der Checkout-Seite verwendet.
- `secondary_color` – Wird als Farbe für Schaltflächen auf der Checkout-Seite verwendet.
```curl
curl https://api.stripe.com/v1/accounts/{{CONNECTEDACCOUNT_ID}} \
-u "<>:" \
-d "settings[branding][icon]={{FILE_ID}}" \
-d "settings[branding][logo]={{FILE_ID}}" \
--data-urlencode "settings[branding][primary_color]=#663399" \
--data-urlencode "settings[branding][secondary_color]=#4BB543"
```
Betten Sie mit [Stripe Checkout](https://docs.stripe.com/payments/checkout.md) ein vorgefertigtes Zahlungsformular auf Ihrer Website ein. Sehen Sie sich diese Integration [im Vergleich zu anderen Integrationstypen von Stripe](https://docs.stripe.com/payments/online-payments.md#compare-features-and-availability) an.
#### Integrationsaufwand
Complexity: 2/5
#### Integrationstyp
Vorgefertigtes Zahlungsformular auf Ihrer Website einbetten
#### Anpassung der Nutzeroberfläche
Eingeschränkte Anpassung
- 20 voreingestellte Schriftarten
- 3 voreingestellte Rahmenradien
- Nutzerdefinierte Hintergrund- und Rahmenfarbe
- Individuelles Logo
[Registrieren Sie sich](https://dashboard.stripe.com/register) zunächst für ein Stripe-Konto.
Verwenden Sie unsere offiziellen Bibliotheken, um von Ihrer Anwendung aus auf die Stripe API zuzugreifen:
#### Ruby
```bash
# Available as a gem
sudo gem install stripe
```
```ruby
# If you use bundler, you can add this line to your Gemfile
gem 'stripe'
```
## Checkout-Sitzung erstellen [Serverseitig]
Über eine [Checkout-Sitzung](https://docs.stripe.com/api/checkout/sessions.md) wird gesteuert, was die Kundinnen/Kunden auf dem integrierbaren Zahlungsformular sehen, z. B. Posten, den Bestellbetrag und die Währung. Erstellen Sie eine Checkout-Sitzung in einem serverseitigen Endpoint (zum Beispiel `/create-checkout-session`). Die Antwort enthält ein `client_secret`, das Sie im nächsten Schritt zur Bereitstellung von Checkout verwenden.
```curl
curl https://api.stripe.com/v1/checkout/sessions \
-u "<>:" \
-H "Stripe-Account: {{CONNECTEDACCOUNT_ID}}" \
-d "line_items[0][price_data][currency]=usd" \
-d "line_items[0][price_data][product_data][name]=T-shirt" \
-d "line_items[0][price_data][unit_amount]=1000" \
-d "line_items[0][quantity]=1" \
-d "payment_intent_data[application_fee_amount]=123" \
-d mode=payment \
-d ui_mode=embedded_page \
--data-urlencode "return_url=https://example.com/checkout/return?session_id={CHECKOUT_SESSION_ID}"
```
- `Stripe-Account`: Dieser Header gibt eine Direct Charge für Ihr verbundenes Konto an. In Checkout wird das [Branding](https://docs.stripe.com/connect/direct-charges.md#branding) des verbundenen Kontos verwendet, wodurch Kundinnen und Kunden den Eindruck haben, direkt mit dem verbundenen Konto und nicht mit Ihrer Plattform zu kommunizieren.
- `line_items`: Dieses Attribut stellt Artikel dar, die Ihr Kunde/Ihre Kundin kauft und die im eingebetteten Zahlungsformular angezeigt werden.
- `payment_intent_data[application_fee_amount]`: Dieses Attribut gibt den Betrag an, den Ihre Plattform als Plattformgebühr von der Transaktion abzieht. Nachdem die Zahlung für das verbundene Konto verarbeitet wurde, wird der `application_fee_amount` an die Plattform übertragen. Weitere Informationen finden Sie unter [Gebühren erheben](https://docs.stripe.com/connect/direct-charges.md#collect-fees).
- `return_url`: Stripe leitet die Kundin / den Kunden nach Durchführung eines Zahlungsversuchs an die Rückgabe-URL weiter und ersetzt die Zeichenfolge `{CHECKOUT_SESSION_ID}` durch die ID der Checkout-Sitzung. Rufen Sie damit die Checkout-Sitzung ab und prüfen Sie den Status, um zu entscheiden, was /Ihrer Kundin / Ihrem Kunden angezeigt werden soll. Vergewissern Sie sich, dass die Rückgabe-URL einer Seite auf Ihrer Website entspricht, die den Status der Zahlung zeigt. Sie können auch Ihre eigenen Abfrageparameter anhängen, die während des Weiterleitungsprozesses bestehen bleiben. Weitere Informationen finden Sie unter [Anpassen des Weiterleitungsverhaltens mit einem integrierten Formular](https://docs.stripe.com/payments/checkout/custom-success-page.md?payment-ui=embedded-page).
Zahlungen, die Sie direkt im verbundenen Konto erstellen, werden nur in diesem Konto und [in Ihrem Connect-Dashboard](https://docs.stripe.com/connect/dashboard/understand-your-connect-business.md#supported-charges) gemeldet. Um Transaktionsobjekte wie `PaymentIntents` und `Charges` für Direct Charges abzufragen, müssen Sie die Stripe-API [anhand der verbundenen Konto-ID im Stripe-Konto-Header](https://docs.stripe.com/connect/authentication.md) abfragen.
## Checkout verbinden [Clientseitig]
#### HTML + JS
Checkout ist als Teil von [Stripe.js](https://docs.stripe.com/js.md) verfügbar. Nehmen Sie das Stripe.js-Skript in Ihre Seite auf, indem Sie es zum Header Ihrer HTML-Datei hinzufügen. Als Nächstes erstellen Sie einen leeren DOM-Knoten (Container), der zum Verbinden verwendet wird.
```html
```
Initialisieren Sie Stripe.js mit Ihrem veröffentlichbaren API-Schlüssel und der verbundenen Konto-ID. Übergeben Sie das `client_secret` aus dem vorherigen Schritt an `options`, wenn Sie die Checkout-Instanz erstellen:
```javascript
// Initialize Stripe.js
const stripe = Stripe('<>', {
stripeAccount: '{{CONNECTED_ACCOUNT_ID}}',
});
initialize();
// Fetch Checkout Session and retrieve the client secret
async function initialize() {
const fetchClientSecret = async () => {
const response = await fetch("/create-checkout-session", {
method: "POST",
});
const { clientSecret } = await response.json();
return clientSecret;
};
// Initialize Checkout
const checkout = await stripe.createEmbeddedCheckoutPage({
fetchClientSecret,
});
// Mount Checkout
checkout.mount('#checkout');
}
```
#### React
Installieren Sie [React Stripe.js](https://www.npmjs.com/package/@stripe/react-stripe-js) und den [Stripe.js-Loader](https://www.npmjs.com/package/@stripe/stripe-js) aus dem öffentlichen npm-Register:
```bash
npm install --save @stripe/react-stripe-js @stripe/stripe-js
```
Um die eingebettete Checkout-Komponente zu verwenden, erstellen Sie einen `EmbeddedCheckoutProvider`. Rufen Sie `loadStripe` mit Ihrem veröffentlichbaren API-Schlüssel auf und übergeben Sie das zurückgegebene `Promise` an den Anbieter. Verwenden Sie die vom Anbieter akzeptierte Eigenschaft `options`, um das `client_secret` aus dem vorherigen Schritt zu übergeben.
```jsx
import * as React from 'react';
import {loadStripe} from '@stripe/stripe-js';
import {
EmbeddedCheckoutProvider,
EmbeddedCheckout
} from '@stripe/react-stripe-js';
// Make sure to call `loadStripe` outside of a component's render to avoid
// recreating the `Stripe` object on every render.
const stripePromise = loadStripe('<>', {
stripeAccount: '{{CONNECTED_ACCOUNT_ID}}',
});
const App = ({clientSecret}) => {
const options = {clientSecret};
return (
)
}
```
Checkout wird in einem iFrame gerendert, der Zahlungsinformationen über eine sichere HTTPS-Verbindung an Stripe sendet. Vermeiden Sie es, Checkout in einem anderen iFrame zu platzieren, da einige Zahlungsmethoden die Weiterleitung an eine gesonderte Seite zur Zahlungsbestätigung voraussetzen.
## Ereignisse nach Zahlung verarbeiten [Serverseitig]
Stripe übermittelt ein [checkout.session.completed](https://docs.stripe.com/api/events/types.md#event_types-checkout.session.completed)-Ereignis, wenn die Zahlung abgeschlossen ist. [Verwenden Sie einen Webhook, um diese Ereignisse zu empfangen](https://docs.stripe.com/webhooks/quickstart.md) und Aktionen auszuführen (Versenden einer Bestellbestätigung per E-Mail an die Kundinnen/Kunden, Erfassen des Verkaufs in einer Datenbank oder Einleiten des Versandablaufs).
Überwachen Sie diese Ereignisse, anstatt auf einen Callback vom Client zu warten. Auf dem Client könnten die Kundinnen und Kunden das Browserfenster schließen oder die App beenden, bevor der Callback erfolgt ist. Einige Zahlungsmethoden benötigen auch 2 bis 14 Tage bis zur Zahlungsbestätigung. Wenn Sie Ihre Integration so einrichten, dass sie asynchrone Ereignisse überwacht, können Sie mehrere [Zahlungsmethoden](https://stripe.com/payments/payment-methods-guide) mit einer einzelnen Integration akzeptieren.
Stripe empfiehlt, alle folgenden Ereignisse zu verarbeiten, wenn Zahlungen mit Checkout eingezogen werden:
| Ereignis | Beschreibung | Nächste Schritte |
| -------------------------------------------------------------------------------------------------------------------------------------------- | ---------------------------------------------------------------------------------------------------------- | ------------------------------------------------------------------------------------------------------ |
| [checkout.session.completed](https://docs.stripe.com/api/events/types.md#event_types-checkout.session.completed) | Der Kunde/die Kundin hat die Zahlung nach der Übermittlung des Checkout-Formulars erfolgreich autorisiert. | Warten Sie, bis die Zahlung erfolgt ist oder fehlschlägt. |
| [checkout.session.async_payment_succeeded](https://docs.stripe.com/api/events/types.md#event_types-checkout.session.async_payment_succeeded) | Die Kundenzahlung war erfolgreich. | Führen Sie die Bestellung der gekauften Waren oder Dienstleistungen aus. |
| [checkout.session.async_payment_failed](https://docs.stripe.com/api/events/types.md#event_types-checkout.session.async_payment_failed) | Die Zahlung wurde abgelehnt oder ist aus einem anderen Grund fehlgeschlagen. | Kontaktieren Sie den Kunden/die Kundin per E-Mail und fordern Sie eine neue Bestellung von ihm/ihr an. |
Diese Ereignisse beinhalten alle das [Checkout-Sitzungsobjekt](https://docs.stripe.com/api/checkout/sessions.md). Nach erfolgreicher Zahlung ändert sich der [Status](https://docs.stripe.com/payments/paymentintents/lifecycle.md) des zugrunde liegenden *PaymentIntent* (The Payment Intents API tracks the lifecycle of a customer checkout flow and triggers additional authentication steps when required by regulatory mandates, custom Radar fraud rules, or redirect-based payment methods) von `processing` in `succeeded` oder in einen Fehlerstatus.
## Integration testen
#### Karten
| Kartennummer | Szenario | So führen Sie den Test durch |
| ------------------- | ------------------------------------------------------------------------------------------------------------------------------------------------------------------------------------------------------------------------------------------------------------------------------------------------------------------ | -------------------------------------------------------------------------------------------------------------------------------------- |
| 4242424242424242 | Die Kartenzahlung ist erfolgreich und es ist keine Authentifizierung erforderlich. | Füllen Sie das Kreditkartenformular aus und geben Sie die Kreditkartennummer mit beliebiger Gültigkeitsdauer, CVC und Postleitzahl an. |
| 4000002500003155 | Für die Kartenzahlung ist eine *Authentifizierung* (Strong Customer Authentication (SCA) is a regulatory requirement in effect as of September 14, 2019, that impacts many European online payments. It requires customers to use two-factor authentication like 3D Secure to verify their purchase) erforderlich. | Füllen Sie das Kreditkartenformular aus und geben Sie die Kreditkartennummer mit beliebiger Gültigkeitsdauer, CVC und Postleitzahl an. |
| 4000000000009995 | Die Karte wird mit einem Ablehnungscode wie `insufficient_funds` abgelehnt. | Füllen Sie das Kreditkartenformular aus und geben Sie die Kreditkartennummer mit beliebiger Gültigkeitsdauer, CVC und Postleitzahl an. |
| 6205500000000000004 | Die UnionPay-Karte hat eine variable Länge von 13 bis 19 Ziffern. | Füllen Sie das Kreditkartenformular aus und geben Sie die Kreditkartennummer mit beliebiger Gültigkeitsdauer, CVC und Postleitzahl an. |
#### Digitale Geldbörsen (Wallets)
| Zahlungsmethode | Szenario | So führen Sie den Test durch |
| --------------- | ------------------------------------------------------------------------------------------------------------------------------------------------------------------------------------------------------------ | ------------------------------------------------------------------------------------------------------------------------------------------------------------------------------------------------------------------------------------------ |
| Alipay | Ihr Kunde/Ihre Kundin zahlt erfolgreich mit einer auf Weiterleitung basierenden Zahlungsmethode mit [sofortiger Benachrichtigung](https://docs.stripe.com/payments/payment-methods.md#payment-notification). | Wählen Sie eine beliebige, auf Weiterleitung basierende Zahlungsmethode aus, füllen Sie die erforderlichen Informationen aus und bestätigen Sie die Zahlung. Klicken Sie dann auf der Weiterleitungsseite auf **Testzahlung abschließen**. |
#### Bankumleitungen
| Zahlungsmethode | Szenario | So führen Sie den Test durch |
| ------------------------------------- | ------------------------------------------------------------------------------------------------------------------------------------------------------------------------------------------------------------------------------------------------- | --------------------------------------------------------------------------------------------------------------------------------------------------------------------------------------------------------------------------------------------- |
| BECS-Lastschriftverfahren | Ihr/e Kund/in zahlt erfolgreich mit dem BECS-Lastschriftverfahren. | Füllen Sie das Formular mit der Kontonummer `900123456` und BSB `000000` aus. Der bestätigte PaymentIntent geht zunächst in den Status `processing` über und dann 3 Minuten später in den Status `succeeded`. |
| BECS-Lastschriftverfahren | Die Zahlung Ihres/Ihrer Kund/in schlägt fehl mit Code `account_closed` fehl. | Füllen Sie das Formular mit der Kontonummer `111111113` und BSB `000000` aus. |
| Bancontact, EPS, iDEAL und Przelewy24 | Ihr/e Kund/in konnte sich auf der iDEAL-Weiterleitungsseite für eine auf Weiterleitung basierende Zahlungsmethode mit sofortiger Benachrichtigung nicht authentifizieren. | Wählen Sie eine beliebige, auf Weiterleitung basierende Zahlungsmethode aus, füllen Sie die erforderlichen Informationen aus und bestätigen Sie die Zahlung. Klicken Sie dann auf der Weiterleitungsseite auf **Testzahlung fehlgeschlagen**. |
| Pay by Bank | Ihr Kunde/Ihre Kundin zahlt erfolgreich mit einer auf Weiterleitung basierenden Zahlungsmethode mit [verzögerter Benachrichtigung](https://docs.stripe.com/payments/payment-methods.md#payment-notification). | Wählen Sie die Zahlungsmethode aus, füllen Sie die erforderlichen Informationen aus und bestätigen Sie die Zahlung. Klicken Sie dann auf der Weiterleitungsseite auf **Testzahlung abschließen**. |
| Pay by Bank | Ihr/e Kund/in konnte sich auf der iDEAL-Weiterleitungsseite für eine auf Weiterleitung basierende Zahlungsmethode mit verzögerter Benachrichtigung nicht authentifizieren. | Wählen Sie die Zahlungsmethode aus, füllen Sie die erforderlichen Informationen aus und bestätigen Sie die Zahlung. Klicken Sie dann auf der Weiterleitungsseite auf **Testzahlung fehlgeschlagen**. |
| BLIK | BLIK-Zahlungen können aus verschiedenen Gründen fehlschlagen. Es gibt sofortige Fehler (der Code ist abgelaufen oder ungültig), verzögerte Fehler (die Bank lehnt ab) oder Zeitüberschreitungen (der/die Kund/in hat nicht rechtzeitig reagiert). | Verwenden Sie E-Mail-Muster, um [die verschiedenen Fehler zu simulieren](https://docs.stripe.com/payments/blik/accept-a-payment.md#simulate-failures) |
#### Banklastschriften
| Zahlungsmethode | Szenario | So führen Sie den Test durch |
| ---------------- | -------------------------------------------------------------------------------------------------------- | ------------------------------------------------------------------------------------------------------------------------------------------------------------------------------------------------------------------ |
| SEPA-Lastschrift | Ihr/e Kund/in zahlt erfolgreich mit dem SEPA-Lastschriftverfahren. | Füllen Sie das Formular mit der Kontonummer `AT321904300235473204` aus. Die bestätigte PaymentIntent geht zunächst in den Status „wird verarbeitet“ und dann drei Minuten später in den Status „erfolgreich“ über. |
| SEPA-Lastschrift | Der Status der PaymentIntent Ihres/Ihrer Kund/in wechselt von `processing` zu `requires_payment_method`. | Füllen Sie das Formular mit der Kontonummer `AT861904300235473202` aus. |
#### Gutscheine
| Zahlungsmethode | Szenario | So führen Sie den Test durch |
| --------------- | ------------------------------------------------------------ | --------------------------------------------------------------------------------------------------------------------------------------------------- |
| Boleto, OXXO | Ihr/e Kund/in bezahlt mit einem Boleto- oder OXXO-Gutschein. | Wählen Sie als Zahlungsmethode Boleto oder OXXO aus und übermitteln Sie die Zahlung. Schließen Sie das OXXO-Dialogfeld, nachdem es angezeigt wurde. |
Hier finden Sie weitere Informationen zum [Testen](https://docs.stripe.com/testing.md) Ihrer Integration.
## Optional: Weitere Zahlungsmethoden aktivieren
Navigieren Sie im Dashboard zu [Zahlungsmethoden für Ihre verbundenen Konten verwalten](https://dashboard.stripe.com/settings/payment_methods/connected_accounts), um zu konfigurieren, welche Zahlungsmethoden Ihre verbundenen Konten akzeptieren. Änderungen an den Standardeinstellungen gelten für alle neuen und bestehenden verbundenen Konten.
Informationen zu den Zahlungsmethoden finden Sie in den folgenden Ressourcen:
- [Ein Leitfaden zu Zahlungsmethoden](https://stripe.com/payments/payment-methods-guide#choosing-the-right-payment-methods-for-your-business), der Ihnen bei der Auswahl der richtigen Zahlungsmethoden für Ihre Plattform hilft.
- [Kontofunktionen](https://docs.stripe.com/connect/account-capabilities.md), um sicherzustellen, dass die gewählten Zahlungsmethoden für Ihre verbundenen Konten funktionieren.
- [Zahlungsmethode und Produktsupport](https://docs.stripe.com/payments/payment-methods/payment-method-support.md#product-support), um sicherzustellen, dass die gewählten Zahlungsmethoden für Ihre Stripe-Produkte und Zahlungsabläufe geeignet sind.
Für jede Zahlungsmethode können Sie eine der folgenden Dropdown-Optionen wählen:
| |
| |
| **Standardmäßig aktiviert** | Ihre verbundenen Konten akzeptieren diese Zahlungsmethode beim Bezahlvorgang. Einige Zahlungsmethoden können nur deaktiviert oder gesperrt werden. Dies liegt daran, dass Ihre verbundenen Konten mit *Zugriff auf das Stripe-Dashboard* (Platforms can provide connected accounts with access to the full Stripe Dashboard or the Express Dashboard. Otherwise, platforms build an interface for connected accounts using embedded components or the Stripe API) sie auf ihrer Seite mit Einstellungen aktivieren müssen. |
| **Standardmäßig deaktiviert** | Ihre verbundenen Konten akzeptieren diese Zahlungsmethode beim Bezahlvorgang nicht. Wenn Sie Ihren verbundenen Konten mit *Zugriff auf das Stripe-Dashboard* (Platforms can provide connected accounts with access to the full Stripe Dashboard or the Express Dashboard. Otherwise, platforms build an interface for connected accounts using embedded components or the Stripe API) erlauben, ihre eigenen Zahlungsmethoden zu verwalten, haben sie die Möglichkeit, sie zu aktivieren. |
| **Blockiert** | Ihre verbundenen Konten akzeptieren diese Zahlungsmethode beim Bezahlvorgang nicht. Wenn Sie Ihren verbundenen Konten mit *Zugriff auf das Stripe-Dashboard* (Platforms can provide connected accounts with access to the full Stripe Dashboard or the Express Dashboard. Otherwise, platforms build an interface for connected accounts using embedded components or the Stripe API) erlauben, ihre eigenen Zahlungsmethoden zu verwalten, haben sie nicht die Möglichkeit, sie zu aktivieren. |

Optionen für Zahlungsmethoden
Wenn Sie eine Änderung an einer Zahlungsmethode vornehmen, müssen Sie auf **Änderungen überprüfen** in der Leiste unten im Bildschirm klicken und auf **Speichern und anwenden**, um Ihre verbundenen Konten zu aktualisieren.

Dialogfeld „Speichern“
### Verbundenen Konten die Verwaltung von Zahlungsmethoden gestatten
Stripe empfiehlt, dass Sie Ihren verbundenen Konten erlauben, ihre eigenen Zahlungsmethoden anzupassen. Diese Option ermöglicht jedem verbundenen Konto mit *Zugriff auf das Stripe-Dashboard* (Platforms can provide connected accounts with access to the full Stripe Dashboard or the Express Dashboard. Otherwise, platforms build an interface for connected accounts using embedded components or the Stripe API), seine Seite mit den [Zahlungsmethoden](https://dashboard.stripe.com/settings/payment_methods) anzuzeigen und zu aktualisieren. Nur Inhaber/innen der verbundenen Konten können ihre Zahlungsmethoden anpassen. Das Stripe-Dashboard zeigt die Standard-Zahlungsmethoden an, die Sie auf alle neuen und bestehenden verbundenen Konten angewendet haben. Ihre verbundenen Konten können diese Standardeinstellungen außer Kraft setzen, mit Ausnahme der von Ihnen blockierten Zahlungsmethoden.
Aktivieren Sie das Kontrollkästchen **Anpassung des Kontos**, um diese Option zu aktivieren. Sie müssen auf **Änderungen überprüfen** in der Leiste unten im Bildschirm klicken und dann **Speichern und übernehmen** auswählen, um diese Einstellung zu aktualisieren.

Kontrollkästchen „Anpassung des Kontos“
### Funktionen der Zahlungsmethode
Damit Ihre verbundenen Konten zusätzliche Zahlungsmethoden akzeptieren können, müssen deren `Accounts` über aktive Zahlungsmethoden verfügen.
Wenn Sie unter [Zahlungsmethoden für Ihre verbundenen Konten verwalten](https://dashboard.stripe.com/settings/payment_methods/connected_accounts) die Option „Standardmäßig aktiviert“ für eine Zahlungsmethode ausgewählt haben, fordert Stripe automatisch die erforderliche Funktion für neue und bestehende verbundene Konten an, sofern diese die Verifizierungsanforderungen erfüllen. Wenn das verbundene Konto die Anforderungen nicht erfüllt oder Sie die direkte Kontrolle behalten möchten, können Sie die Funktion manuell im Dashboard oder über die API anfordern.
Die meisten Zahlungsmethoden haben die gleichen Verifizierungsanforderungen wie die `card_payments`-Funktion, mit einigen Einschränkungen und Ausnahmen. Die [Tabelle der Zahlungsmethodenfunktionen](https://docs.stripe.com/connect/account-capabilities.md#payment-methods) führt die Zahlungsmethoden auf, die eine zusätzliche Verifizierung erfordern.
#### Dashboard
[Suchen Sie im Dashboard ein verbundenes Konto](https://docs.stripe.com/connect/dashboard/managing-individual-accounts.md#finding-accounts), um dessen Funktionen zu bearbeiten und ausstehende Verifizierungsanforderungen einzusehen.
#### API
Für ein bestehendes verbundenes Konto können Sie die vorhandenen Funktionen [auflisten](https://docs.stripe.com/api/capabilities/list.md), um festzustellen, ob Sie zusätzliche Funktionen anfordern müssen.
```curl
curl https://api.stripe.com/v1/accounts/{{CONNECTEDACCOUNT_ID}}/capabilities \
-u "<>:"
```
Fordern Sie zusätzliche Funktionen an, indem Sie die Funktionen jedes verbundenen Kontos [aktualisieren](https://docs.stripe.com/api/capabilities/update.md).
```curl
curl https://api.stripe.com/v1/accounts/{{CONNECTEDACCOUNT_ID}}/capabilities/us_bank_account_ach_payments \
-u "<>:" \
-d requested=true
```
Es kann zu einer Verzögerung kommen, bevor die angeforderte Funktion aktiv wird. Wenn für die Funktion Aktivierungsanforderungen gelten, enthält die Antwort diese in den `requirements`-Arrays.
## Gebühren einziehen
Als Plattform können Sie Ihren verbundenen Konten einen Anteil jeder Transaktion in Form von Plattformgebühren in Rechnung stellen. Sie können die Preise für Plattformgebühren auf folgende Weise festlegen:
- Mit dem [Plattform-Preistool](https://docs.stripe.com/connect/platform-pricing-tools.md) können Sie Preisregeln festlegen und testen. Diese No-Code-Funktion im Stripe-Dashboard ist derzeit nur für Plattformen verfügbar, die für die Zahlung von Stripe-Gebühren verantwortlich sind.
- Geben Sie die Plattformgebühren direkt in einem [PaymentIntent](https://docs.stripe.com/api/payment_intents/object.md) an. Die auf diese Weise festgelegten Gebühren haben Vorrang vor der im Preistool für Plattformen festgelegten Preislogik.
Ihre Plattform kann eine Plattformgebühr unter Berücksichtigung der folgenden Einschränkungen erheben:
- Der Wert von `application_fee_amount` muss positiv und kleiner als der Betrag der Zahlung sein. Die erhobene Plattformgebühr wird auf den Betrag der Zahlung begrenzt.
- Es fallen keine zusätzlichen Stripe-Gebühren für die Plattformgebühr selbst an.
- In Übereinstimmung mit gesetzlich vorgeschriebenen und Compliance-Anforderungen in Brasilien können Plattformen mit Sitz außerhalb Brasiliens und mit brasilianischen verbundenen Konten keine Plattformgebühren über Stripe einziehen.
- Die Währung des `application_fee_amount` hängt von einigen Faktoren für [mehrere Währungen](https://docs.stripe.com/connect/currencies.md) ab.
Die [BalanceTransaction](https://docs.stripe.com/api.md#balance_transaction_retrieve) der resultierenden Zahlung enthält eine detaillierte Aufschlüsselung der Transaktionsgebühren von Stripe als auch der Plattformgebühren. Um die Berichterstellung zu verbessern, wird durch die Erhebung einer Transaktionsgebühr ein [ApplicationFee](https://docs.stripe.com/api/application_fees/object.md)-Objekt generiert. Verwenden Sie für die Berichterstellung die Eigenschaft `amount` im `ApplicationFee`-Objekt.
Die Plattformgebühren können Sie im Abschnitt [Erhobene Transaktionsgebühren](https://dashboard.stripe.com/connect/application_fees) des Dashboards einsehen.
> Plattformgebühren für Direct Charges werden standardmäßig asynchron erstellt. Wenn Sie das `application_fee`-Objekt in einer Zahlungserstellungsanfrage erweitern, wird die Plattformgebühr synchron als Teil dieser Anfrage erstellt. Erweitern Sie das `application_fee`-Objekt nur bei Bedarf, da dies die Latenz der Anfrage erhöht.
>
> Um Benachrichtigungen über asynchron erstellte `ApplicationFee`-Objekte zu erhalten, überwachen Sie das Webhook-Ereignis [application_fee.created](https://docs.stripe.com/api/events/types.md#event_types-application_fee.created).
## Branding anpassen
Ihre Plattform und verbundene Konten können die [Branding-Einstellungen](https://dashboard.stripe.com/account/branding) im Dashboard verwenden, um das Branding auf der Zahlungsseite anzupassen. Für Direct Charges verwendet Checkout die Markeneinstellungen des verbundenen Kontos.
Sie können die API auch verwenden, um die [Branding-Einstellungen zu aktualisieren](https://docs.stripe.com/api/accounts/update.md#update_account-settings-branding):
- `icon` – Wird neben dem Unternehmensnamen in der Kopfzeile der Checkout-Seite angezeigt.
- `logo` – Wird anstelle des Symbols und des Unternehmensnamens in der Kopfzeile der Checkout-Seite verwendet.
- `primary_color` – Wird als Hintergrundfarbe auf der Checkout-Seite verwendet.
- `secondary_color` – Wird als Farbe für Schaltflächen auf der Checkout-Seite verwendet.
```curl
curl https://api.stripe.com/v1/accounts/{{CONNECTEDACCOUNT_ID}} \
-u "<>:" \
-d "settings[branding][icon]={{FILE_ID}}" \
-d "settings[branding][logo]={{FILE_ID}}" \
--data-urlencode "settings[branding][primary_color]=#663399" \
--data-urlencode "settings[branding][secondary_color]=#4BB543"
```
Erstellen Sie eine nutzerdefinierte Zahlungsintegration, indem Sie Komponenten der Nutzeroberfläche auf Ihrer Website mit [Stripe Elements](https://docs.stripe.com/payments/elements.md) einbetten. Der clientseitige und der serverseitige Code erstellen ein Checkout-Formular, das verschiedene Zahlungsmethoden akzptiert. Sehen Sie sich diese Integration [im Vergleich zu anderen Integrationstypen von Stripe](https://docs.stripe.com/payments/online-payments.md#compare-features-and-availability) an.
#### Integrationsaufwand
Complexity: 3/5
#### Integrationstyp
Komponenten der Nutzeroberfläche in einem nutzerdefinierten Zahlungsablauf kombinieren
#### Anpassung der Nutzeroberfläche
Anpassung auf CSS-Ebene mit der [Appearance API](https://docs.stripe.com/elements/appearance-api.md)
[Registrieren Sie sich](https://dashboard.stripe.com/register) zunächst für ein Stripe-Konto.
Verwenden Sie unsere offiziellen Bibliotheken, um von Ihrer Anwendung aus auf die Stripe API zuzugreifen:
#### Ruby
```bash
# Available as a gem
sudo gem install stripe
```
```ruby
# If you use bundler, you can add this line to your Gemfile
gem 'stripe'
```
## PaymentIntent erstellen [Serverseitig]
Stripe verwendet ein [PaymentIntent](https://docs.stripe.com/api/payment_intents.md)-Objekt, um Ihre Absicht darzustellen, eine Kundenzahlung einzuziehen. Dabei werden die Abbuchungsversuche und Zahlungsstatusänderungen während des gesamten Vorgangs dokumentiert.
In diesem Dokument finden Sie eine allgemeine Übersicht über die Zahlungsintegration. (See full diagram at https://docs.stripe.com/connect/direct-charges)
Die Zahlungsmethoden, die Kundinnen/Kunden während des Bezahlvorgangs angezeigt werden, sind ebenfalls im PaymentIntent enthalten. Sie können Zahlungsmethoden durch Stripe automatisch aus Ihren Dashboard-Einstellungen abrufen lassen oder sie manuell auflisten.
Sofern Ihre Integration keine codebasierte Option zum Anbieten von Zahlungsmethoden erfordert, listen Sie Zahlungsmethoden nicht manuell auf. Stripe wertet die Währung, die Einschränkungen für Zahlungsmethoden und andere Parameter aus, um die Liste der unterstützten Zahlungsmethoden zu ermitteln. Stripe priorisiert Zahlungsmethoden, die die Konversion steigern und die für die Währung und den Standort des Kunden/der Kundin am relevantesten sind. Stripe verbirgt Zahlungsmethoden mit niedrigerer Priorität in einem Überlaufmenü.
#### Zahlungsmethoden über das Dashboard verwalten
Erstellen Sie einen PaymentIntent auf Ihrem Server mit einem Betrag und einer Währung. In der neuesten Version der API ist die Angabe des Parameters `automatic_payment_methods` optional, da Stripe die Funktionalität standardmäßig aktiviert. Sie können Zahlungsmethoden über das [Dashboard](https://dashboard.stripe.com/settings/payment_methods) verwalten. Stripe handhabt die Rückgabe der in Frage kommenden Zahlungsmethoden anhand von Faktoren wie Transaktionsbetrag, Währung und Zahlungsablauf.
```curl
curl https://api.stripe.com/v1/payment_intents \
-u "<>:" \
-H "Stripe-Account: {{CONNECTEDACCOUNT_ID}}" \
-d amount=1000 \
-d currency=usd \
-d "automatic_payment_methods[enabled]=true" \
-d application_fee_amount=123
```
#### Zahlungsmethoden manuell auflisten
```curl
curl https://api.stripe.com/v1/payment_intents \
-u "<>:" \
-H "Stripe-Account: {{CONNECTEDACCOUNT_ID}}" \
-d amount=1099 \
-d currency=eur \
-d "payment_method_types[]=bancontact" \
-d "payment_method_types[]=card" \
-d "payment_method_types[]=eps" \
-d "payment_method_types[]=ideal" \
-d "payment_method_types[]=p24" \
-d "payment_method_types[]=sepa_debit" \
-d "payment_method_types[]=sofort" \
-d application_fee_amount=123
```
Beim Erstellen eines PaymentIntent müssen Sie bestimmte Parameter angeben:
- `amount` – Erstellen Sie einen PaymentIntent auf Ihrem Server mit einem bestimmten Betrag. Bestimmen Sie immer auf der Serverseite, wie viel berechnet werden soll, da dies eine vertrauenswürdige Umgebung ist. Dieser Ansatz verhindert, dass böswillige Kundinnen und Kunden ihre eigenen Preise wählen können.
- `currency` – Die Währung, die Sie in den PaymentIntent aufnehmen, filtert die Zahlungsmethoden, die dem Kunden/der Kundin angezeigt werden. Wählen Sie also die Zahlungsmethode aus, die Sie anbieten möchten. Wenn Sie beispielsweise `eur` übergeben und OXXO im Dashboard aktiviert ist, wird OXXO dem Kunden/der Kundin nicht angezeigt, da `eur`-Zahlungen nicht unterstützt werden. Einige Zahlungsmethoden unterstützen mehrere Währungen und Länder. Im Beispielcode dieses Leitfadens werden Bancontact, Kreditkarten, EPS, iDEAL, Przelewy24, SEPA-Lastschriften und Sofort verwendet.
- `"payment_method_types[]"` – Führen Sie manuell alle Zahlungsmethoden auf, die Sie unterstützen möchten.
- (Optional) `payment_intent_data[application_fee_amount]` – Dieses Argument bestimmt den Betrag, den Ihre Plattform von der Transaktion abziehen möchte. Wenn Sie das [Platform Pricing Tool](https://docs.stripe.com/connect/platform-pricing-tools.md) von Stripe verwenden, um die Preisgestaltung für Plattformgebühren vom [Dashboard](https://dashboard.stripe.com/test/settings/connect/platform_pricing/payments) aus zu verwalten, sollten Sie dieses Argument nicht einfügen, da es die vom Tool festgelegte Preislogik überschreibt. Nachdem die Zahlung auf dem verbundenen Konto abgewickelt wurde, wird der `application_fee_amount` an die Plattform übertragen, und die Stripe Gebühr wird vom Guthaben des verbundenen Kontos abgezogen.
> Jede Zahlungsmethode muss die im PaymentIntent übergebene Währung unterstützen, und Ihr Unternehmen muss in einem der Länder niedergelassen sein, das von jeder Zahlungsmethode unterstützt wird. Auf der Seite [Integrationsoptionen für Zahlungsmethoden](https://docs.stripe.com/payments/payment-methods/integration-options.md) finden Sie weitere Informationen zu den unterstützten Optionen.
### Client-Geheimnis abrufen
Im PaymentIntent ist ein *Client-Geheimnis* (The client secret is a unique key returned from Stripe as part of a PaymentIntent. This key lets the client access important fields from the PaymentIntent (status, amount, currency) while hiding sensitive ones (metadata, customer)) enthalten, das auf dem Client verwendet wird, um Zahlungen sicher abzuschließen. Es gibt verschiedene Verfahren zum Übergeben des Client-Geheimnisses an den Client.
#### Einseitige Anwendung
Rufen Sie das Client-Geheimnis von einem Endpoint auf Ihrem Server ab, indem Sie die Browser-Funktion `fetch` verwenden. Diese Vorgehensweise funktioniert am besten, wenn es sich bei Ihrer Client-Seite um eine einseitige Anwendung handelt, insbesondere wenn sie mit einem modernen Frontend-Framework wie React erstellt wurde. Erstellen Sie den Server-Endpoint, der das Client-Geheimnis bereitstellt:
#### Ruby
```ruby
get '/secret' do
intent = # ... Create or retrieve the PaymentIntent
{client_secret: intent.client_secret}.to_json
end
```
Und dann rufen Sie das Client-Geheimnis mit JavaScript auf der Client-Seite ab:
```javascript
(async () => {
const response = await fetch('/secret');
const {client_secret: clientSecret} = await response.json();
// Render the form using the clientSecret
})();
```
#### Serverseitiges Rendering
Übergeben Sie das Client-Geheimnis von Ihrem Server an den Client. Diese Vorgehensweise funktioniert am besten, wenn Ihre Anwendung statische Inhalte auf dem Server generiert, bevor sie an den Browser gesendet werden.
Fügen Sie das [client_secret](https://docs.stripe.com/api/payment_intents/object.md#payment_intent_object-client_secret) in Ihr Bezahlformular ein. Rufen Sie in Ihrem serverseitigen Code das Client-Geheimnis aus dem PaymentIntent ab:
#### Ruby
```erb
```
```ruby
get '/checkout' do
@intent = # ... Fetch or create the PaymentIntent
erb :checkout
end
```
## Zahlungsdaten erfassen [Clientseitig]
Erfassen Sie Zahlungsdetails auf dem Client mit dem [Payment Element](https://docs.stripe.com/payments/payment-element.md). Das Payment Element ist eine vorgefertigte Komponente der Nutzeroberfläche, die die Erfassung von Zahlungsdaten für eine Vielzahl von Zahlungsmethoden vereinfacht.
Das Payment Element enthält einen iFrame, der Zahlungsinformationen über eine sichere HTTPS-Verbindung an Stripe sendet. Vermeiden Sie es, das Payment Element in einem anderen iFrame zu platzieren, da einige Zahlungsmethoden die Weiterleitung an eine andere Seite zur Zahlungsbestätigung voraussetzen. Wenn Sie sich für die Verwendung eines Iframes entscheiden und Apple Pay oder Google Pay akzeptieren möchten, muss das [Zulassungs](https://developer.mozilla.org/en-US/docs/Web/HTML/Element/iframe#attr-allowpaymentrequest)-Attribut des iFrames gleich `"payment *"` festgelegt sein.
Die Adresse der Bezahlseite muss mit `https://` beginnen, nicht mit `http://`, damit Ihre Integration funktioniert. Sie können Ihre Integration ohne HTTPS testen. Denken Sie jedoch daran, dieses zu [aktivieren](https://docs.stripe.com/security/guide.md#tls), wenn Sie bereit sind, Live-Zahlungen zu akzeptieren.
#### HTML + JS
### Stripe.js einrichten
Das Payment Element ist ein Feature von Stripe.js und steht damit automatisch zur Verfügung. Fügen Sie das Stripe.js-Skript auf Ihrer Bezahlseite ein, indem Sie es in den `head` Ihrer HTML-Datei einbinden. Laden Sie Stripe.js immer direkt von js.stripe.com, um die PCI-Konformität zu gewährleisten. Fügen Sie das Skript nicht in ein Paket ein und hosten Sie selbst keine Kopie davon.
```html
Checkout
```
Erstellen Sie auf Ihrer Bezahlseite eine Instanz von `Stripe`mit dem folgenden JavaScript:
```javascript
// Initialize Stripe.js with the same connected account ID used when creating
// the PaymentIntent.
const stripe = Stripe('<>', {
stripeAccount: '{{CONNECTED_ACCOUNT_ID}}'
});
```
### Stripe Elements und das Payment Element zu Ihrer Zahlungsseite hinzufügen
Das Payment Element benötigt einen festen Platz auf Ihrer Zahlungsseite. Erstellen Sie einen leeren DOM-Knoten (Container) mit einer eindeutigen ID in Ihrem Zahlungsformular.
```html
```
Wenn das Formular geladen wurde, erstellen Sie eine Instanz des Payment Element und verbinden Sie es zusammen mit dem [Client-Geheimnis](https://docs.stripe.com/api/payment_intents/object.md#payment_intent_object-client_secret) aus dem vorherigen Schritt mit dem Container-DOM-Knoten. Übergeben Sie diesen Wert als Option, wenn Sie die Instanz von [Elements](https://docs.stripe.com/js/elements_object/create) erstellen.
Gehen Sie vorsichtig mit dem Client-Geheimnis um, da mit ihm die Zahlung abgeschlossen werden kann. Es darf nicht protokolliert, in URLs eingebettet oder Personen außer dem Kunden/der Kundin selbst zugänglich gemacht werden.
```javascript
const options = {
clientSecret: '{{CLIENT_SECRET}}',
// Fully customizable with the Appearance API
appearance: {/*...*/},
};
// Set up Stripe.js and Elements to use in checkout form using the client secret
const elements = stripe.elements(options);
// Create and mount the Payment Element
const paymentElement = elements.create("payment");
paymentElement.mount("#payment-element");
```
Das Payment Element stellt ein dynamisches Formular dar, mit dem Ihre Kundinnen und Kunden eine Zahlungsmethode auswählen können. Das Formular erfasst automatisch alle erforderlichen Zahlungsdetails für die vom Kunden/der Kundin ausgewählte Zahlungsmethode. Sie können die [Darstellung des Payment Element](https://docs.stripe.com/elements/appearance-api.md) an das Design Ihrer Website anpassen, wenn Sie das Objekt `Elements` einrichten.
#### React
### Stripe.js einrichten
Installieren Sie [React Stripe.js](https://www.npmjs.com/package/@stripe/react-stripe-js) und den [Stripe.js-Loader](https://www.npmjs.com/package/@stripe/stripe-js) aus dem öffentlichen npm-Register:
```bash
npm install --save @stripe/react-stripe-js @stripe/stripe-js
```
### Den Elements-Anbieter zu Ihrer Zahlungsseite hinzufügen und konfigurieren
Um die Payment Element-Komponente zu verwenden, schließen Sie die Bezahlseitenkomponente in einem [Elements-Anbieter](https://docs.stripe.com/sdks/stripejs-react.md#elements-provider) ein. Rufen Sie `loadStripe` mit Ihrem veröffentlichbaren Schlüssel auf und übergeben Sie das zurückgegebene `Promise` zusammen mit dem [Client-Geheimnis](https://docs.stripe.com/api/payment_intents/object.md#payment_intent_object-client_secret) aus dem vorherigen Schritt als `options` im `Elements`-Anbieter.
```jsx
import React from 'react';
import ReactDOM from 'react-dom';
import {Elements} from '@stripe/react-stripe-js';
import {loadStripe} from '@stripe/stripe-js';
import CheckoutForm from './CheckoutForm';
// Make sure to call `loadStripe` outside of a component's render to avoid
// recreating the `Stripe` object on every render.
const stripePromise = loadStripe("<>", {
stripeAccount: '{{CONNECTED_ACCOUNT_ID}}'
});
function App() {
const options = {
// pass the client secret from the previous step
clientSecret: '{{CLIENT_SECRET}}',
// Fully customizable with the Appearance API
appearance: {/*...*/},
};
return (
);
};
ReactDOM.render(, document.getElementById('root'));
```
### PaymentElement-Komponente hinzufügen
Verwenden Sie die Komponente `PaymentElement`, um Ihr Formular zu erstellen.
```jsx
import React from 'react';
import {PaymentElement} from '@stripe/react-stripe-js';
const CheckoutForm = () => {
return (
);
};
export default CheckoutForm;
```
Das Payment Element stellt ein dynamisches Formular dar, mit dem Ihre Kundinnen und Kunden eine Zahlungsmethode auswählen können. Das Formular erfasst automatisch alle erforderlichen Zahlungsdetails für die vom Kunden/von der Kundin ausgewählte Zahlungsmethode. Sie können die [Darstellung des Payment Element](https://docs.stripe.com/elements/appearance-api.md) an das Design Ihrer Website anpassen, wenn Sie den `Elements`-Anbieter konfigurieren.
## Zahlung an Stripe senden [Clientseitig]
Verwenden Sie [stripe.confirmPayment](https://docs.stripe.com/js/payment_intents/confirm_payment), um die Zahlung mit Details aus dem Payment Element vorzunehmen. Geben Sie für diese Funktion eine [return_url](https://docs.stripe.com/api/payment_intents/create.md#create_payment_intent-return_url) an, um anzugeben, wohin Stripe die Nutzer/innen nach Durchführung der Zahlung weiterleiten soll. Ihre Nutzer/innen werden möglicherweise zunächst an eine zwischengeschaltete Seite weitergeleitet, wie z. B. eine Bankautorisierungsseite, bevor sie zur `return_url` weitergeleitet werden. Kartenzahlungen werden sofort zur `return_url` weitergeleitet, wenn eine Zahlung erfolgreich war.
Wenn Sie Kartenzahlungen nach Abschluss der Zahlung nicht weiterleiten möchten, können Sie [redirect](https://docs.stripe.com/js/payment_intents/confirm_payment#confirm_payment_intent-options-redirect) auf `if_required` festlegen. Dadurch werden nur Kundinnen/Kunden weitergeleitet, die mit weiterleitungsbasierten Zahlungsmethoden bezahlen.
#### HTML + JS
```javascript
const form = document.getElementById('payment-form');
form.addEventListener('submit', async (event) => {
event.preventDefault();
const {error} = await stripe.confirmPayment({
//`Elements` instance that was used to create the Payment Element
elements,
confirmParams: {
return_url: 'https://example.com/order/123/complete',
},
});
if (error) {
// This point will only be reached if there is an immediate error when
// confirming the payment. Show error to your customer (for example, payment
// details incomplete)
const messageContainer = document.querySelector('#error-message');
messageContainer.textContent = error.message;
} else {
// Your customer will be redirected to your `return_url`. For some payment
// methods like iDEAL, your customer will be redirected to an intermediate
// site first to authorize the payment, then redirected to the `return_url`.
}
});
```
#### React
Verwenden Sie die Hooks [useStripe](https://docs.stripe.com/sdks/stripejs-react.md#usestripe-hook) und [useElements](https://docs.stripe.com/sdks/stripejs-react.md#useelements-hook), um [stripe.confirmPayment](https://docs.stripe.com/js/payment_intents/confirm_payment) über die Komponente Ihres Zahlungsformulars aufzurufen.
Wenn Sie herkömmliche Klassenkomponenten gegenüber Hooks bevorzugen, können Sie stattdessen einen [ElementsConsumer](https://docs.stripe.com/sdks/stripejs-react.md#elements-consumer) verwenden.
```jsx
import React, {useState} from 'react';
import {useStripe, useElements, PaymentElement} from '@stripe/react-stripe-js';
const CheckoutForm = () => {
const stripe = useStripe();
const elements = useElements();
const [errorMessage, setErrorMessage] = useState(null);
const handleSubmit = async (event) => {
// We don't want to let default form submission happen here,
// which would refresh the page.
event.preventDefault();
if (!stripe || !elements) {
// Stripe.js hasn't yet loaded.
// Make sure to disable form submission until Stripe.js has loaded.
return;
}
const {error} = await stripe.confirmPayment({
//`Elements` instance that was used to create the Payment Element
elements,
confirmParams: {
return_url: 'https://example.com/order/123/complete',
},
});
if (error) {
// This point will only be reached if there is an immediate error when
// confirming the payment. Show error to your customer (for example, payment
// details incomplete)
setErrorMessage(error.message);
} else {
// Your customer will be redirected to your `return_url`. For some payment
// methods like iDEAL, your customer will be redirected to an intermediate
// site first to authorize the payment, then redirected to the `return_url`.
}
};
return (
);
};
export default CheckoutForm;
```
Achten Sie darauf, dass die `return_url` auf eine Seite Ihrer Website verweist, die den Status der Zahlung angibt. Wenn Stripe den/die Kund/in an die `return_url` weiterleitet, stellen wir die folgenden URL-Abfrageparameter bereit:
| Parameter | Beschreibung |
| ------------------------------ | ---------------------------------------------------------------------------------------------------------------------------------------------- |
| `payment_intent` | Die eindeutige ID für die `PaymentIntent`. |
| `payment_intent_client_secret` | Das [Client-Geheimnis](https://docs.stripe.com/api/payment_intents/object.md#payment_intent_object-client_secret) des `PaymentIntent`-Objekts. |
> Wenn Sie über Tools verfügen, die die Browser-Sitzung der Kund/innen verfolgen, müssen Sie möglicherweise die Domain `stripe.com` zur Referenz-Ausschlussliste hinzufügen. Weiterleitungen haben zur Folge, dass einige Tools neue Sitzungen erstellen. Dies wiederum hindert Sie daran, die gesamte Sitzung zu verfolgen.
Verwenden Sie einen der Abfrageparameter, um den PaymentIntent abzurufen. Überprüfen Sie den [Status des PaymentIntent](https://docs.stripe.com/payments/paymentintents/lifecycle.md), um zu entscheiden, was Ihren Kundinnen/Kunden angezeigt werden soll. Sie können bei der Angabe der `return_url` auch Ihre eigenen Abfrageparameter anhängen, die während des Weiterleitungsvorgangs erhalten bleiben.
#### HTML + JS
```javascript
// Initialize Stripe.js using your publishable key
const stripe = Stripe('<>');
// Retrieve the "payment_intent_client_secret" query parameter appended to
// your return_url by Stripe.js
const clientSecret = new URLSearchParams(window.location.search).get(
'payment_intent_client_secret'
);
// Retrieve the PaymentIntent
stripe.retrievePaymentIntent(clientSecret).then(({paymentIntent}) => {
const message = document.querySelector('#message')
// Inspect the PaymentIntent `status` to indicate the status of the payment
// to your customer.
//
// Some payment methods will [immediately succeed or fail][0] upon
// confirmation, while others will first enter a `processing` state.
//
// [0]: https://stripe.com/docs/payments/payment-methods#payment-notification
switch (paymentIntent.status) {
case 'succeeded':
message.innerText = 'Success! Payment received.';
break;
case 'processing':
message.innerText = "Payment processing. We'll update you when payment is received.";
break;
case 'requires_payment_method':
message.innerText = 'Payment failed. Please try another payment method.';
// Redirect your user back to your payment page to attempt collecting
// payment again
break;
default:
message.innerText = 'Something went wrong.';
break;
}
});
```
#### React
```jsx
import React, {useState, useEffect} from 'react';
import {useStripe} from '@stripe/react-stripe-js';
const PaymentStatus = () => {
const stripe = useStripe();
const [message, setMessage] = useState(null);
useEffect(() => {
if (!stripe) {
return;
}
// Retrieve the "payment_intent_client_secret" query parameter appended to
// your return_url by Stripe.js
const clientSecret = new URLSearchParams(window.location.search).get(
'payment_intent_client_secret'
);
// Retrieve the PaymentIntent
stripe
.retrievePaymentIntent(clientSecret)
.then(({paymentIntent}) => {
// Inspect the PaymentIntent `status` to indicate the status of the payment
// to your customer.
//
// Some payment methods will [immediately succeed or fail][0] upon
// confirmation, while others will first enter a `processing` state.
//
// [0]: https://stripe.com/docs/payments/payment-methods#payment-notification
switch (paymentIntent.status) {
case 'succeeded':
setMessage('Success! Payment received.');
break;
case 'processing':
setMessage("Payment processing. We'll update you when payment is received.");
break;
case 'requires_payment_method':
// Redirect your user back to your payment page to attempt collecting
// payment again
setMessage('Payment failed. Please try another payment method.');
break;
default:
setMessage('Something went wrong.');
break;
}
});
}, [stripe]);
return message;
};
export default PaymentStatus;
```
## Ereignisse nach Zahlung verarbeiten [Serverseitig]
Stripe sendet ein [payment_intent.succeeded](https://docs.stripe.com/api/events/types.md#event_types-payment_intent.succeeded)-Ereignis, wenn die Zahlung abgeschlossen ist. Verwenden Sie [Webhook-Tool im Dashboard](https://dashboard.stripe.com/webhooks) oder folgen Sie der [Webhook-Anleitung](https://docs.stripe.com/webhooks/quickstart.md), um diese Ereignisse zu empfangen und führen Sie Aktionen aus, wie beispielsweise das Senden einer Bestellbestätigung per E-Mail, das Protokollieren des Verkaufs in der Datenbank oder das Starten eines Versand-Workflows.
Überwachen Sie diese Ereignisse, statt auf einen Callback vom Client zu warten. Auf dem Client könnten die Kund/innen das Browserfenster schließen oder die App beenden, bevor der Callback erfolgt ist. Bösartige Clients könnten dann die Antwort manipulieren. Wenn Sie Ihre Integration so einrichten, dass sie asynchrone Ereignisse überwacht, können Sie [verschiedene Arten von Zahlungsmethoden](https://stripe.com/payments/payment-methods-guide) mit einer einzelnen Integration akzeptieren.
Neben der Abwicklung des `payment_intent.succeeded`-Ereignisses empfehlen wir die Abwicklung von diesen weiteren Ereignissen, wenn Sie Zahlungen mit dem Payment Element erfassen:
| Ereignis | Beschreibung | Aktion |
| ------------------------------------------------------------------------------------------------------------------------------- | ---------------------------------------------------------------------------------------------------------------------------------------------------------------------------------------------------------------------------------------------------------------------------------------------------------------------------------------------------- | ----------------------------------------------------------------------------------------------------------------------------------------------------------------------------------------------------------------------- |
| [payment_intent.succeeded](https://docs.stripe.com/api/events/types.md?lang=php#event_types-payment_intent.succeeded) | Wird gesendet, wenn Kundinnen und Kunden eine Zahlung erfolgreich abgeschlossen haben. | Senden Sie den Kund/innen eine Auftragsbestätigung und *wickeln* (Fulfillment is the process of providing the goods or services purchased by a customer, typically after payment is collected) Sie die Bestellung ab. |
| [payment_intent.processing](https://docs.stripe.com/api/events/types.md?lang=php#event_types-payment_intent.processing) | Wird gesendet, wenn eine/e Kund/in eine Zahlung erfolgreich veranlasst hat, die Zahlung aber noch nicht abgeschlossen ist. Dieses Ereignis wird am häufigsten gesendet, wenn der Kunde/die Kundin eine Bankabbuchung veranlasst. In Zukunft folgt darauf entweder ein `payment_intent.succeeded`- oder ein `payment_intent.payment_failed`-Ereignis. | Senden Sie eine Bestellbestätigung an die Kund/innen, in der angegeben ist, dass die Zahlung noch aussteht. Bei digitalen Waren können Sie die Bestellung abwickeln, bevor Sie darauf warten, dass die Zahlung erfolgt. |
| [payment_intent.payment_failed](https://docs.stripe.com/api/events/types.md?lang=php#event_types-payment_intent.payment_failed) | Wird gesendet, wenn ein Kunde/eine Kundin einen Zahlungsversuch durchführt, die Zahlung jedoch fehlschlägt. | Wenn eine Zahlung von `processing` zu `payment_failed` übergeht, bieten Sie der Kundin/dem Kunden einen weiteren Zahlungsversuch an. |
## Integration testen
#### Karten
| Kartennummer | Szenario | So führen Sie den Test durch |
| ------------------- | ------------------------------------------------------------------------------------------------------------------------------------------------------------------------------------------------------------------------------------------------------------------------------------------------------------------ | -------------------------------------------------------------------------------------------------------------------------------------- |
| 4242424242424242 | Die Kartenzahlung ist erfolgreich und es ist keine Authentifizierung erforderlich. | Füllen Sie das Kreditkartenformular aus und geben Sie die Kreditkartennummer mit beliebiger Gültigkeitsdauer, CVC und Postleitzahl an. |
| 4000002500003155 | Für die Kartenzahlung ist eine *Authentifizierung* (Strong Customer Authentication (SCA) is a regulatory requirement in effect as of September 14, 2019, that impacts many European online payments. It requires customers to use two-factor authentication like 3D Secure to verify their purchase) erforderlich. | Füllen Sie das Kreditkartenformular aus und geben Sie die Kreditkartennummer mit beliebiger Gültigkeitsdauer, CVC und Postleitzahl an. |
| 4000000000009995 | Die Karte wird mit einem Ablehnungscode wie `insufficient_funds` abgelehnt. | Füllen Sie das Kreditkartenformular aus und geben Sie die Kreditkartennummer mit beliebiger Gültigkeitsdauer, CVC und Postleitzahl an. |
| 6205500000000000004 | Die UnionPay-Karte hat eine variable Länge von 13 bis 19 Ziffern. | Füllen Sie das Kreditkartenformular aus und geben Sie die Kreditkartennummer mit beliebiger Gültigkeitsdauer, CVC und Postleitzahl an. |
#### Digitale Geldbörsen (Wallets)
| Zahlungsmethode | Szenario | So führen Sie den Test durch |
| --------------- | ------------------------------------------------------------------------------------------------------------------------------------------------------------------------------------------------------------ | ------------------------------------------------------------------------------------------------------------------------------------------------------------------------------------------------------------------------------------------ |
| Alipay | Ihr Kunde/Ihre Kundin zahlt erfolgreich mit einer auf Weiterleitung basierenden Zahlungsmethode mit [sofortiger Benachrichtigung](https://docs.stripe.com/payments/payment-methods.md#payment-notification). | Wählen Sie eine beliebige, auf Weiterleitung basierende Zahlungsmethode aus, füllen Sie die erforderlichen Informationen aus und bestätigen Sie die Zahlung. Klicken Sie dann auf der Weiterleitungsseite auf **Testzahlung abschließen**. |
#### Bankumleitungen
| Zahlungsmethode | Szenario | So führen Sie den Test durch |
| ------------------------------------- | ------------------------------------------------------------------------------------------------------------------------------------------------------------------------------------------------------------------------------------------------- | --------------------------------------------------------------------------------------------------------------------------------------------------------------------------------------------------------------------------------------------- |
| BECS-Lastschriftverfahren | Ihr/e Kund/in zahlt erfolgreich mit dem BECS-Lastschriftverfahren. | Füllen Sie das Formular mit der Kontonummer `900123456` und BSB `000000` aus. Der bestätigte PaymentIntent geht zunächst in den Status `processing` über und dann 3 Minuten später in den Status `succeeded`. |
| BECS-Lastschriftverfahren | Die Zahlung Ihres/Ihrer Kund/in schlägt fehl mit Code `account_closed` fehl. | Füllen Sie das Formular mit der Kontonummer `111111113` und BSB `000000` aus. |
| Bancontact, EPS, iDEAL und Przelewy24 | Ihr/e Kund/in konnte sich auf der iDEAL-Weiterleitungsseite für eine auf Weiterleitung basierende Zahlungsmethode mit sofortiger Benachrichtigung nicht authentifizieren. | Wählen Sie eine beliebige, auf Weiterleitung basierende Zahlungsmethode aus, füllen Sie die erforderlichen Informationen aus und bestätigen Sie die Zahlung. Klicken Sie dann auf der Weiterleitungsseite auf **Testzahlung fehlgeschlagen**. |
| Pay by Bank | Ihr Kunde/Ihre Kundin zahlt erfolgreich mit einer auf Weiterleitung basierenden Zahlungsmethode mit [verzögerter Benachrichtigung](https://docs.stripe.com/payments/payment-methods.md#payment-notification). | Wählen Sie die Zahlungsmethode aus, füllen Sie die erforderlichen Informationen aus und bestätigen Sie die Zahlung. Klicken Sie dann auf der Weiterleitungsseite auf **Testzahlung abschließen**. |
| Pay by Bank | Ihr/e Kund/in konnte sich auf der iDEAL-Weiterleitungsseite für eine auf Weiterleitung basierende Zahlungsmethode mit verzögerter Benachrichtigung nicht authentifizieren. | Wählen Sie die Zahlungsmethode aus, füllen Sie die erforderlichen Informationen aus und bestätigen Sie die Zahlung. Klicken Sie dann auf der Weiterleitungsseite auf **Testzahlung fehlgeschlagen**. |
| BLIK | BLIK-Zahlungen können aus verschiedenen Gründen fehlschlagen. Es gibt sofortige Fehler (der Code ist abgelaufen oder ungültig), verzögerte Fehler (die Bank lehnt ab) oder Zeitüberschreitungen (der/die Kund/in hat nicht rechtzeitig reagiert). | Verwenden Sie E-Mail-Muster, um [die verschiedenen Fehler zu simulieren](https://docs.stripe.com/payments/blik/accept-a-payment.md#simulate-failures) |
#### Banklastschriften
| Zahlungsmethode | Szenario | So führen Sie den Test durch |
| ---------------- | -------------------------------------------------------------------------------------------------------- | ------------------------------------------------------------------------------------------------------------------------------------------------------------------------------------------------------------------ |
| SEPA-Lastschrift | Ihr/e Kund/in zahlt erfolgreich mit dem SEPA-Lastschriftverfahren. | Füllen Sie das Formular mit der Kontonummer `AT321904300235473204` aus. Die bestätigte PaymentIntent geht zunächst in den Status „wird verarbeitet“ und dann drei Minuten später in den Status „erfolgreich“ über. |
| SEPA-Lastschrift | Der Status der PaymentIntent Ihres/Ihrer Kund/in wechselt von `processing` zu `requires_payment_method`. | Füllen Sie das Formular mit der Kontonummer `AT861904300235473202` aus. |
#### Gutscheine
| Zahlungsmethode | Szenario | So führen Sie den Test durch |
| --------------- | ------------------------------------------------------------ | --------------------------------------------------------------------------------------------------------------------------------------------------- |
| Boleto, OXXO | Ihr/e Kund/in bezahlt mit einem Boleto- oder OXXO-Gutschein. | Wählen Sie als Zahlungsmethode Boleto oder OXXO aus und übermitteln Sie die Zahlung. Schließen Sie das OXXO-Dialogfeld, nachdem es angezeigt wurde. |
Hier finden Sie weitere Informationen zum [Testen](https://docs.stripe.com/testing.md) Ihrer Integration.
## Optional: Weitere Zahlungsmethoden aktivieren
Navigieren Sie im Dashboard zu [Zahlungsmethoden für Ihre verbundenen Konten verwalten](https://dashboard.stripe.com/settings/payment_methods/connected_accounts), um zu konfigurieren, welche Zahlungsmethoden Ihre verbundenen Konten akzeptieren. Änderungen an den Standardeinstellungen gelten für alle neuen und bestehenden verbundenen Konten.
Informationen zu den Zahlungsmethoden finden Sie in den folgenden Ressourcen:
- [Ein Leitfaden zu Zahlungsmethoden](https://stripe.com/payments/payment-methods-guide#choosing-the-right-payment-methods-for-your-business), der Ihnen bei der Auswahl der richtigen Zahlungsmethoden für Ihre Plattform hilft.
- [Kontofunktionen](https://docs.stripe.com/connect/account-capabilities.md), um sicherzustellen, dass die gewählten Zahlungsmethoden für Ihre verbundenen Konten funktionieren.
- [Zahlungsmethode und Produktsupport](https://docs.stripe.com/payments/payment-methods/payment-method-support.md#product-support), um sicherzustellen, dass die gewählten Zahlungsmethoden für Ihre Stripe-Produkte und Zahlungsabläufe geeignet sind.
Für jede Zahlungsmethode können Sie eine der folgenden Dropdown-Optionen wählen:
| |
| |
| **Standardmäßig aktiviert** | Ihre verbundenen Konten akzeptieren diese Zahlungsmethode beim Bezahlvorgang. Einige Zahlungsmethoden können nur deaktiviert oder gesperrt werden. Dies liegt daran, dass Ihre verbundenen Konten mit *Zugriff auf das Stripe-Dashboard* (Platforms can provide connected accounts with access to the full Stripe Dashboard or the Express Dashboard. Otherwise, platforms build an interface for connected accounts using embedded components or the Stripe API) sie auf ihrer Seite mit Einstellungen aktivieren müssen. |
| **Standardmäßig deaktiviert** | Ihre verbundenen Konten akzeptieren diese Zahlungsmethode beim Bezahlvorgang nicht. Wenn Sie Ihren verbundenen Konten mit *Zugriff auf das Stripe-Dashboard* (Platforms can provide connected accounts with access to the full Stripe Dashboard or the Express Dashboard. Otherwise, platforms build an interface for connected accounts using embedded components or the Stripe API) erlauben, ihre eigenen Zahlungsmethoden zu verwalten, haben sie die Möglichkeit, sie zu aktivieren. |
| **Blockiert** | Ihre verbundenen Konten akzeptieren diese Zahlungsmethode beim Bezahlvorgang nicht. Wenn Sie Ihren verbundenen Konten mit *Zugriff auf das Stripe-Dashboard* (Platforms can provide connected accounts with access to the full Stripe Dashboard or the Express Dashboard. Otherwise, platforms build an interface for connected accounts using embedded components or the Stripe API) erlauben, ihre eigenen Zahlungsmethoden zu verwalten, haben sie nicht die Möglichkeit, sie zu aktivieren. |

Optionen für Zahlungsmethoden
Wenn Sie eine Änderung an einer Zahlungsmethode vornehmen, müssen Sie auf **Änderungen überprüfen** in der Leiste unten im Bildschirm klicken und auf **Speichern und anwenden**, um Ihre verbundenen Konten zu aktualisieren.

Dialogfeld „Speichern“
### Verbundenen Konten die Verwaltung von Zahlungsmethoden gestatten
Stripe empfiehlt, dass Sie Ihren verbundenen Konten erlauben, ihre eigenen Zahlungsmethoden anzupassen. Diese Option ermöglicht jedem verbundenen Konto mit *Zugriff auf das Stripe-Dashboard* (Platforms can provide connected accounts with access to the full Stripe Dashboard or the Express Dashboard. Otherwise, platforms build an interface for connected accounts using embedded components or the Stripe API), seine Seite mit den [Zahlungsmethoden](https://dashboard.stripe.com/settings/payment_methods) anzuzeigen und zu aktualisieren. Nur Inhaber/innen der verbundenen Konten können ihre Zahlungsmethoden anpassen. Das Stripe-Dashboard zeigt die Standard-Zahlungsmethoden an, die Sie auf alle neuen und bestehenden verbundenen Konten angewendet haben. Ihre verbundenen Konten können diese Standardeinstellungen außer Kraft setzen, mit Ausnahme der von Ihnen blockierten Zahlungsmethoden.
Aktivieren Sie das Kontrollkästchen **Anpassung des Kontos**, um diese Option zu aktivieren. Sie müssen auf **Änderungen überprüfen** in der Leiste unten im Bildschirm klicken und dann **Speichern und übernehmen** auswählen, um diese Einstellung zu aktualisieren.

Kontrollkästchen „Anpassung des Kontos“
### Funktionen der Zahlungsmethode
Damit Ihre verbundenen Konten zusätzliche Zahlungsmethoden akzeptieren können, müssen deren `Accounts` über aktive Zahlungsmethoden verfügen.
Wenn Sie unter [Zahlungsmethoden für Ihre verbundenen Konten verwalten](https://dashboard.stripe.com/settings/payment_methods/connected_accounts) die Option „Standardmäßig aktiviert“ für eine Zahlungsmethode ausgewählt haben, fordert Stripe automatisch die erforderliche Funktion für neue und bestehende verbundene Konten an, sofern diese die Verifizierungsanforderungen erfüllen. Wenn das verbundene Konto die Anforderungen nicht erfüllt oder Sie die direkte Kontrolle behalten möchten, können Sie die Funktion manuell im Dashboard oder über die API anfordern.
Die meisten Zahlungsmethoden haben die gleichen Verifizierungsanforderungen wie die `card_payments`-Funktion, mit einigen Einschränkungen und Ausnahmen. Die [Tabelle der Zahlungsmethodenfunktionen](https://docs.stripe.com/connect/account-capabilities.md#payment-methods) führt die Zahlungsmethoden auf, die eine zusätzliche Verifizierung erfordern.
#### Dashboard
[Suchen Sie im Dashboard ein verbundenes Konto](https://docs.stripe.com/connect/dashboard/managing-individual-accounts.md#finding-accounts), um dessen Funktionen zu bearbeiten und ausstehende Verifizierungsanforderungen einzusehen.
#### API
Für ein bestehendes verbundenes Konto können Sie die vorhandenen Funktionen [auflisten](https://docs.stripe.com/api/capabilities/list.md), um festzustellen, ob Sie zusätzliche Funktionen anfordern müssen.
```curl
curl https://api.stripe.com/v1/accounts/{{CONNECTEDACCOUNT_ID}}/capabilities \
-u "<>:"
```
Fordern Sie zusätzliche Funktionen an, indem Sie die Funktionen jedes verbundenen Kontos [aktualisieren](https://docs.stripe.com/api/capabilities/update.md).
```curl
curl https://api.stripe.com/v1/accounts/{{CONNECTEDACCOUNT_ID}}/capabilities/us_bank_account_ach_payments \
-u "<>:" \
-d requested=true
```
Es kann zu einer Verzögerung kommen, bevor die angeforderte Funktion aktiv wird. Wenn für die Funktion Aktivierungsanforderungen gelten, enthält die Antwort diese in den `requirements`-Arrays.
## Gebühren einziehen
Als Plattform können Sie Ihren verbundenen Konten einen Anteil jeder Transaktion in Form von Plattformgebühren in Rechnung stellen. Sie können die Preise für Plattformgebühren auf folgende Weise festlegen:
- Mit dem [Plattform-Preistool](https://docs.stripe.com/connect/platform-pricing-tools.md) können Sie Preisregeln festlegen und testen. Diese No-Code-Funktion im Stripe-Dashboard ist derzeit nur für Plattformen verfügbar, die für die Zahlung von Stripe-Gebühren verantwortlich sind.
- Geben Sie die Plattformgebühren direkt in einem [PaymentIntent](https://docs.stripe.com/api/payment_intents/object.md) an. Die auf diese Weise festgelegten Gebühren haben Vorrang vor der im Preistool für Plattformen festgelegten Preislogik.
Ihre Plattform kann eine Plattformgebühr unter Berücksichtigung der folgenden Einschränkungen erheben:
- Der Wert von `application_fee_amount` muss positiv und kleiner als der Betrag der Zahlung sein. Die erhobene Plattformgebühr wird auf den Betrag der Zahlung begrenzt.
- Es fallen keine zusätzlichen Stripe-Gebühren für die Plattformgebühr selbst an.
- In Übereinstimmung mit gesetzlich vorgeschriebenen und Compliance-Anforderungen in Brasilien können Plattformen mit Sitz außerhalb Brasiliens und mit brasilianischen verbundenen Konten keine Plattformgebühren über Stripe einziehen.
- Die Währung des `application_fee_amount` hängt von einigen Faktoren für [mehrere Währungen](https://docs.stripe.com/connect/currencies.md) ab.
Die [BalanceTransaction](https://docs.stripe.com/api.md#balance_transaction_retrieve) der resultierenden Zahlung enthält eine detaillierte Aufschlüsselung der Transaktionsgebühren von Stripe als auch der Plattformgebühren. Um die Berichterstellung zu verbessern, wird durch die Erhebung einer Transaktionsgebühr ein [ApplicationFee](https://docs.stripe.com/api/application_fees/object.md)-Objekt generiert. Verwenden Sie für die Berichterstellung die Eigenschaft `amount` im `ApplicationFee`-Objekt.
Die Plattformgebühren können Sie im Abschnitt [Erhobene Transaktionsgebühren](https://dashboard.stripe.com/connect/application_fees) des Dashboards einsehen.
> Plattformgebühren für Direct Charges werden standardmäßig asynchron erstellt. Wenn Sie das `application_fee`-Objekt in einer Zahlungserstellungsanfrage erweitern, wird die Plattformgebühr synchron als Teil dieser Anfrage erstellt. Erweitern Sie das `application_fee`-Objekt nur bei Bedarf, da dies die Latenz der Anfrage erhöht.
>
> Um Benachrichtigungen über asynchron erstellte `ApplicationFee`-Objekte zu erhalten, überwachen Sie das Webhook-Ereignis [application_fee.created](https://docs.stripe.com/api/events/types.md#event_types-application_fee.created).
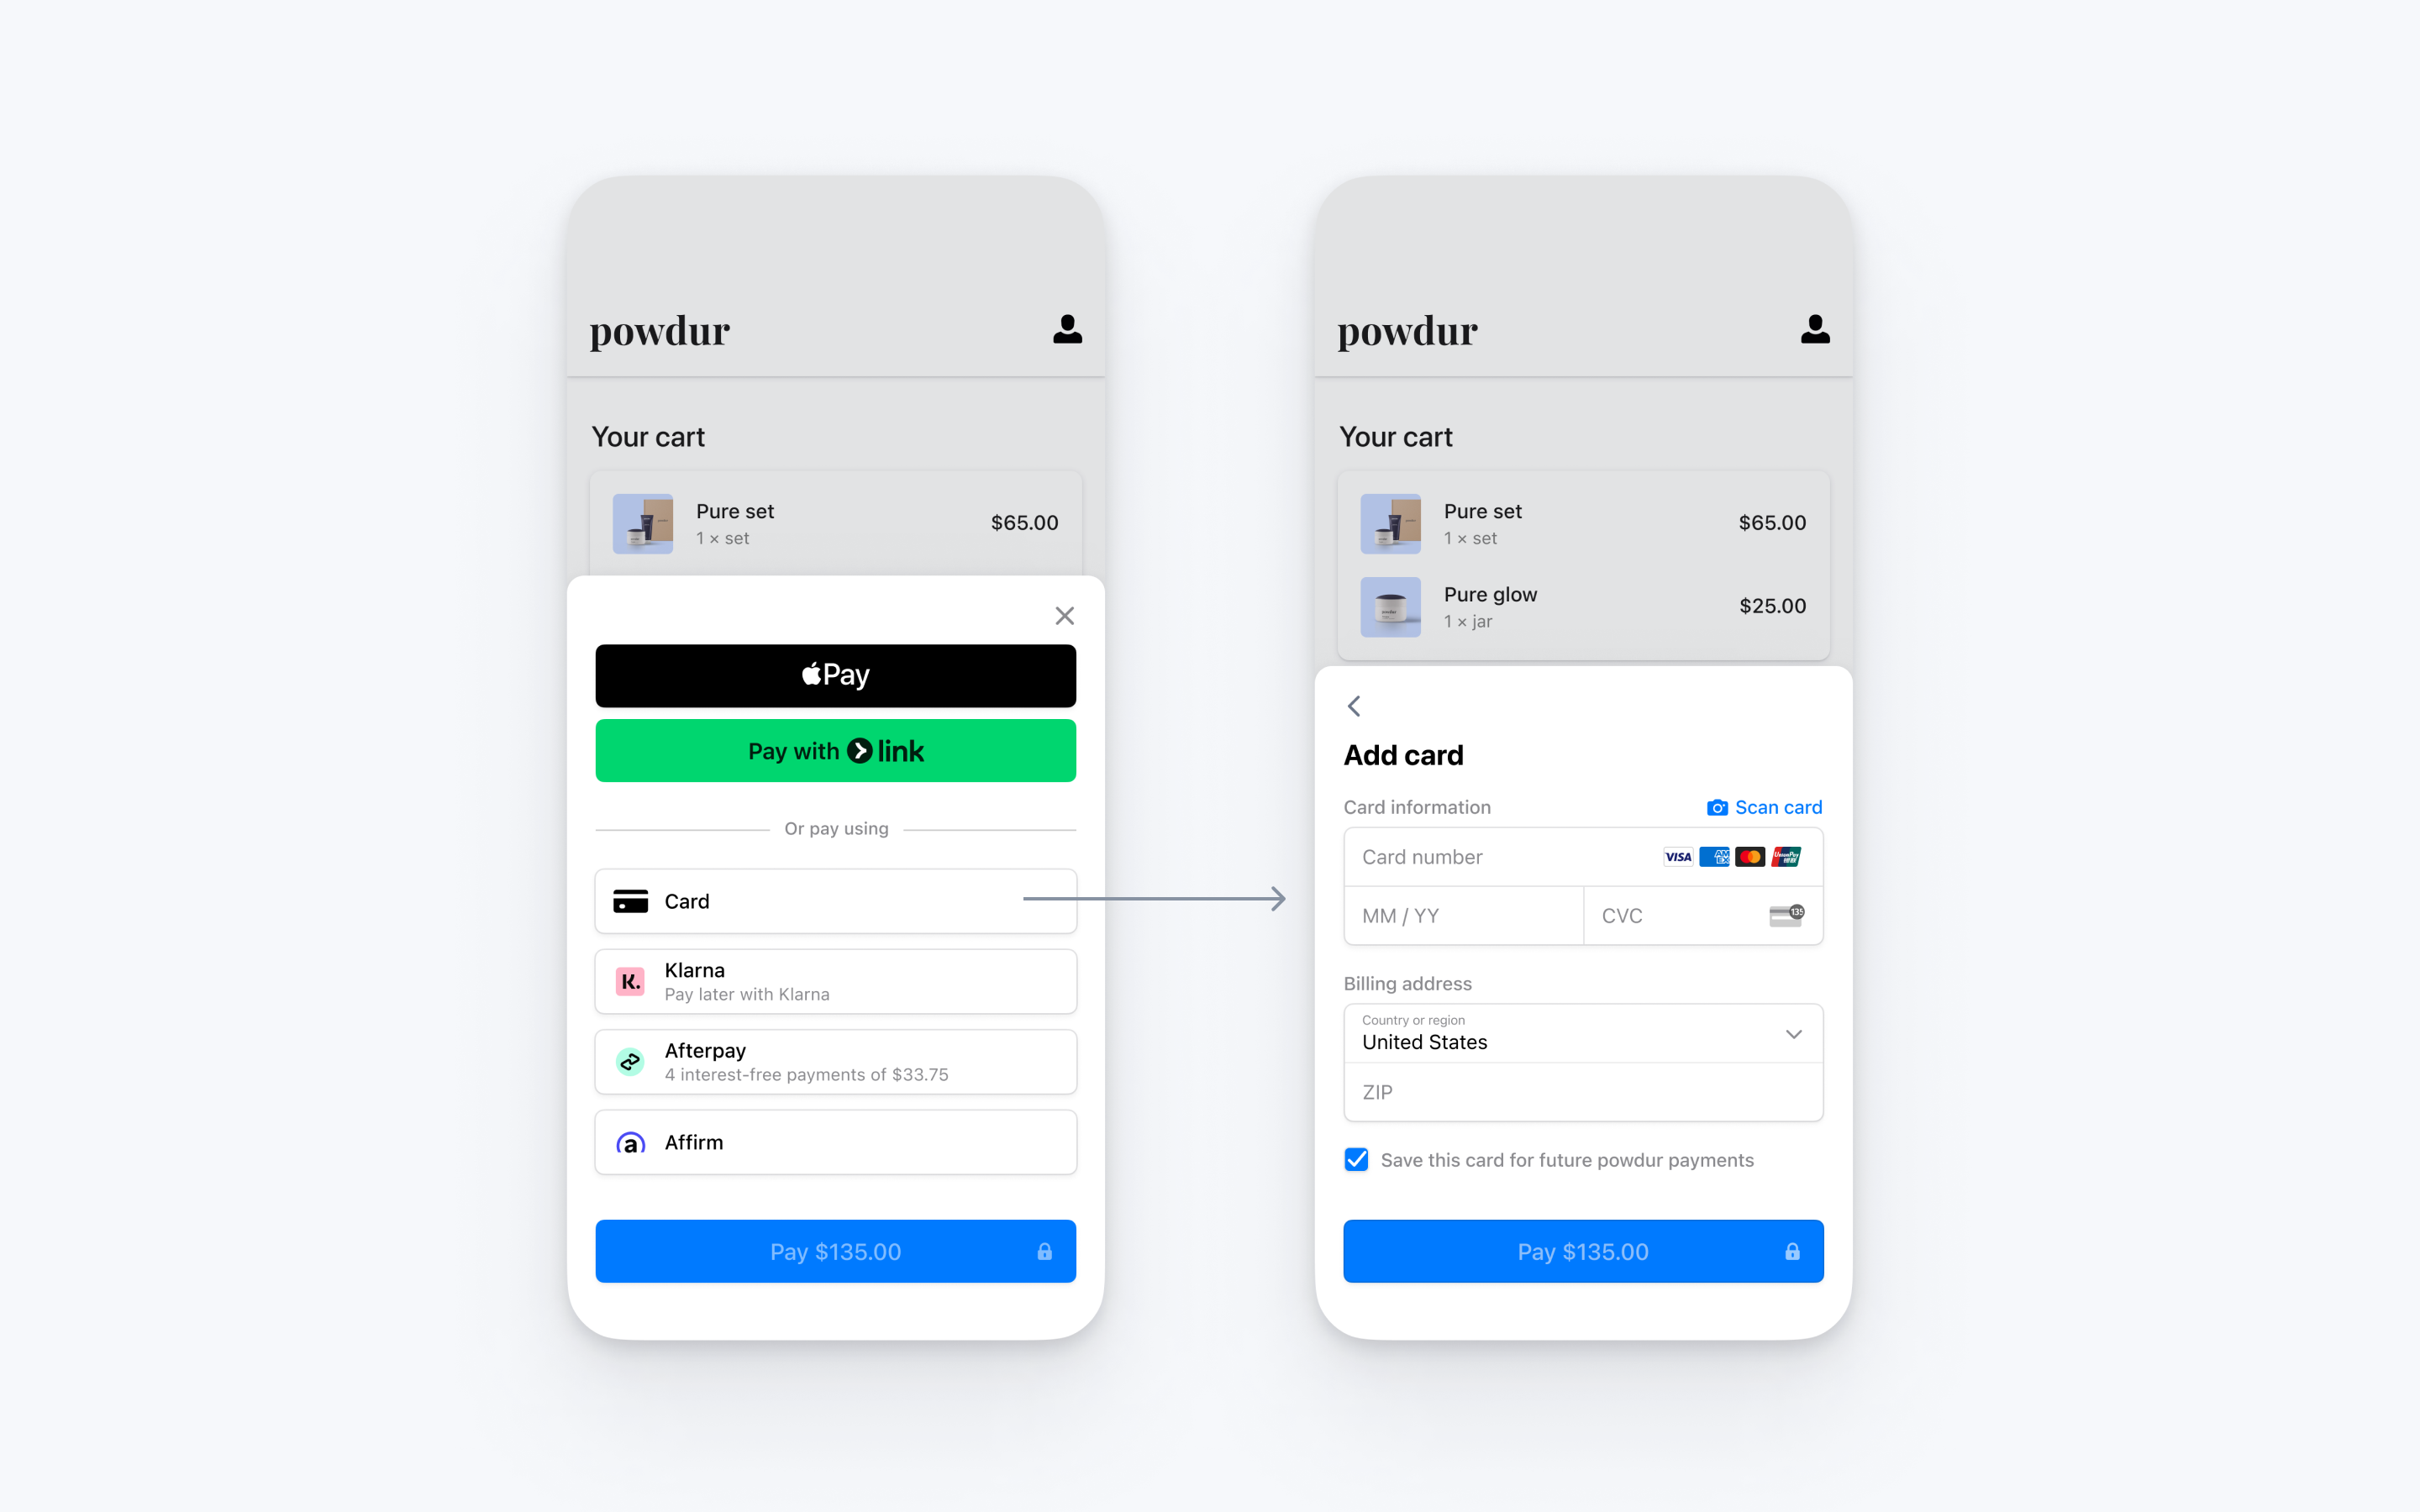
Integrieren Sie die vorgefertigte Zahlungs-UI von Stripe in den Bezahlvorgang Ihrer iOS app mit der [PaymentSheet](https://stripe.dev/stripe-ios/stripe-paymentsheet/Classes/PaymentSheet.html)-Klasse. Sehen Sie sich unsere Beispielintegration [auf GitHub](https://github.com/stripe/stripe-ios/tree/master/Example/PaymentSheet%20Example) an.
> #### Accounts v2 API unterstützt
>
> Das Payment Sheet unterstützt *von Kund/innen konfigurierte Konten* nicht. Es unterstützt nur `Kund/innen`-Objekte.
## Stripe einrichten [Serverseitig] [Clientseitig]
Zunächst benötigen Sie ein Stripe-Konto. [Registrieren Sie sich jetzt](https://dashboard.stripe.com/register).
### Serverseitig
Diese Integration erfordert Endpoints auf Ihrem Server, die mit der Stripe-API kommunizieren können. Nutzen Sie unsere offiziellen Bibliotheken für den Zugriff auf die Stripe-API von Ihrem Server aus:
#### Ruby
```bash
# Available as a gem
sudo gem install stripe
```
```ruby
# If you use bundler, you can add this line to your Gemfile
gem 'stripe'
```
### Clientseitig
Das [Stripe iOS SDK](https://github.com/stripe/stripe-ios) ist Open Source, [vollständig dokumentiert](https://stripe.dev/stripe-ios/index.html) und kompatibel mit Apps, die iOS 13 oder höher unterstützen.
#### Swift Package Manager
Führen Sie zur Installation des SDK die folgenden Schritte aus:
1. Wählen Sie in Xcode **Datei** > **Add Package Dependencies** (Paketabhängigkeiten hinzufügen) aus und geben Sie als Repository-URL `https://github.com/stripe/stripe-ios-spm` ein.
1. Wählen auf unserer [Veröffentlichungsseite](https://github.com/stripe/stripe-ios/releases) die neueste Version aus.
1. Fügen Sie das Produkt **StripePaymentSheet** zum [Ziel Ihrer App](https://developer.apple.com/documentation/swift_packages/adding_package_dependencies_to_your_app) hinzu.
#### CocoaPods
1. Falls noch nicht geschehen, installieren Sie bitte die aktuellste Version von [CocoaPods](https://guides.cocoapods.org/using/getting-started.html).
1. Wenn Sie keine bestehende [Podfile](https://guides.cocoapods.org/syntax/podfile.html) haben, führen Sie folgenden Befehl aus, um eine zu erstellen:
```bash
pod init
```
1. Fügen Sie folgende Zeile in Ihre `Podfile` ein:
```podfile
pod 'StripePaymentSheet'
```
1. Führen Sie folgenden Befehl aus:
```bash
pod install
```
1. Vergessen Sie nicht, ab jetzt in Zukunft anstelle der Datei `.xcodeproj` die Datei `.xcworkspace` zum Öffnen Ihres Projekts in Xcode zu verwenden.
1. Führen Sie für zukünftige Updates auf die jeweils aktuelle Version des SDK Folgendes aus:
```bash
pod update StripePaymentSheet
```
#### Carthage
1. Falls noch nicht geschehen, installieren Sie bitte die aktuelle Version von [Carthage](https://github.com/Carthage/Carthage#installing-carthage).
1. Fügen Sie folgende Zeile in Ihre `Cartfile` ein:
```cartfile
github "stripe/stripe-ios"
```
1. Befolgen Sie die [Carthage-Installationsanweisungen](https://github.com/Carthage/Carthage#if-youre-building-for-ios-tvos-or-watchos). Vergewissern Sie sich, dass Sie alle [hier](https://github.com/stripe/stripe-ios/tree/master/StripePaymentSheet/README.md#manual-linking) aufgeführten erforderlichen Frameworks einbetten.
1. Führen Sie für zukünftige Updates auf die aktuelle Version unseres SDK einfach folgenden Befehl aus:
```bash
carthage update stripe-ios --platform ios
```
#### Manuelles Framework
1. Gehen Sie auf unsere [GitHub-Release-Seite](https://github.com/stripe/stripe-ios/releases/latest), laden Sie **Stripe.xcframework.zip** herunter und entpacken Sie die Datei.
1. Ziehen Sie **StripePaymentSheet.xcframework** in den Abschnitt **Embedded Binaries** (Eingebettete Binärdateien) der Einstellungen unter **General** (Allgemeines) Ihres Xcode-Projekts. Aktivieren Sie dabei die Option **Copy items if needed** (Elemente kopieren, falls nötig).
1. Wiederholen Sie Schritt 2 für alle [hier](https://github.com/stripe/stripe-ios/tree/master/StripePaymentSheet/README.md#manual-linking) aufgeführten erforderlichen Frameworks.
1. Wiederholen Sie für zukünftige Updates auf die jeweils aktuelle Version des SDK die Schritte 1–3.
> Details zur aktuellen SDK-Version und zu vorherigen Versionen finden Sie auf der Seite [Releases](https://github.com/stripe/stripe-ios/releases) auf GitHub. Um bei Veröffentlichung einer neuen Version eine Benachrichtigung zu erhalten, [achten Sie auf die Releases zum jeweiligen Repository](https://help.github.com/en/articles/watching-and-unwatching-releases-for-a-repository#watching-releases-for-a-repository).
Konfigurieren Sie das SDK mit Ihrem [veröffentlichbaren Schlüssel](https://dashboard.stripe.com/test/apikeys) von Stripe, um es beim Start der App auszuführen. Dadurch kann Ihre App Anfragen an die Stripe-API senden.
#### Swift
```swift
import UIKitimportStripePaymentSheet
@main
class AppDelegate: UIResponder, UIApplicationDelegate {
func application(_ application: UIApplication, didFinishLaunchingWithOptions launchOptions: [UIApplication.LaunchOptionsKey: Any]?) -> Bool {StripeAPI.defaultPublishableKey = "<>"
// do any other necessary launch configuration
return true
}
}
```
> Verwenden Sie Ihre [Testschlüssel](https://docs.stripe.com/keys.md#obtain-api-keys) beim Testen und Entwickeln Ihrer App und Ihre [Live-Modus](https://docs.stripe.com/keys.md#test-live-modes)-Schlüssel beim Veröffentlichen Ihrer App.
## Endpoint hinzufügen [Serverseitig]
> #### Hinweis
>
> Um das PaymentSheet vor dem Erstellen eines PaymentIntent anzuzeigen, finden Sie weitere Informationen unter [Erfassen von Zahlungsdetails vor dem Erstellen eines Intent](https://docs.stripe.com/payments/accept-a-payment-deferred.md?type=payment).
Diese Integration verwendet drei Stripe-API-Objekte:
1. [PaymentIntent](https://docs.stripe.com/api/payment_intents.md): Stripe verwendet diesen, um Ihre Absicht darzustellen, Zahlungen von Ihren Kundinnen/Kunden anzufordern, wobei Abbuchungsversuche und Zahlungsstatusänderungen im gesamten Vorgang dokumentiert werden.
1. (Optional) Ein von [Kundinnen/Kunden konfiguriertes Konto](https://docs.stripe.com/api/v2/core/accounts/object.md#v2_account_object-applied_configurations) oder ein [Customer](https://docs.stripe.com/api/customers.md)-Objekt: Um eine Zahlungsmethode für zukünftige Zahlungen einzurichten, müssen Sie diese einem Kunden/einer Kundin zuordnen. Erstellen Sie ein Objekt, das Ihre Kundin/Ihren Kunden repräsentiert, wenn sie/er ein Konto bei Ihrem Unternehmen anlegt. Wenn Ihre Kundin/Ihr Kunde eine Zahlung als Gast durchführt, können Sie vor der Zahlung ein `Account`- oder `Customer`-Objekt erstellen und es zu einem späteren Zeitpunkt mit Ihrer eigenen Darstellung des Kundenkontos verknüpfen.
1. (Optional) [CustomerSession](https://docs.stripe.com/api/customer_sessions.md): Informationen zum Objekt, das Ihre Kundin/Ihren Kunden repräsentiert, sind vertraulich und können nicht direkt über eine App abgerufen werden. Eine `CustomerSession` gewährt dem SDK vorübergehenden, bereichsbezogenen Zugriff auf das `Account` oder die/den `Customer` und stellt zusätzliche Konfigurationsoptionen bereit. Hier finden Sie eine vollständige Liste der [Konfigurationsoptionen](https://docs.stripe.com/api/customer_sessions/create.md#create_customer_session-components).
> Wenn Sie niemals Karten für eine Kundin/einen Kunden speichern und wiederkehrenden Kundinnen und Kunden nicht erlauben, gespeicherte Karten wiederzuverwenden, können Sie das `Account`- oder `Customer`-Objekt und das `CustomerSession`-Objekt aus Ihrer Integration weglassen.
Aus Sicherheitsgründen kann Ihre App diese Objekte nicht erstellen. Fügen Sie stattdessen einen Endpoint auf Ihrem Server hinzu, der:
1. Ruft das `Account` oder die/den `Customer` ab oder erstellt ein neues bzw eine/einen neue/n.
1. Erstellt eine [CustomerSession](https://docs.stripe.com/api/customer_sessions.md) für das `Account` oder die/den `Customer`.
1. Erstellt einen `PaymentIntent` mit dem [Betrag](https://docs.stripe.com/api/payment_intents/create.md#create_payment_intent-amount), der [Währung](https://docs.stripe.com/api/payment_intents/create.md#create_payment_intent-currency), und entweder mit dem [customer_account](https://docs.stripe.com/api/payment_intents/create.md#create_payment_intent-customer_account) oder der [Kundin/dem Kunden](https://docs.stripe.com/api/payment_intents/create.md#create_payment_intent-customer).
1. Gibt das *Client-Geheimnis* (The client secret is a unique key returned from Stripe as part of a PaymentIntent. This key lets the client access important fields from the PaymentIntent (status, amount, currency) while hiding sensitive ones (metadata, customer)) des `PaymentIntent`, das `client_secret` der `CustomerSession`, die ID des `Account`s oder der/des `Customer` und Ihren [veröffentlichbaren Schlüssel](https://dashboard.stripe.com/apikeys) für Ihre App zurück.
Die Zahlungsmethoden, die Kund/innen während des Bezahlvorgangs angezeigt werden, sind ebenfalls in der PaymentIntent enthalten. Sie können Stripe Zahlungsmethoden aus Ihren Dashboard-Einstellungen abrufen lassen oder sie manuell auflisten. Gleich welche Option Sie wählen, die in der PaymentIntent übergebene Währung filtert die Zahlungsmethoden, die dem/r Kund/in angezeigt werden. Wenn Sie beispielsweise `eur` für den PaymentIntent übergeben und OXXO im Dashboard aktiviert ist, wird dem/r Kund/in OXXO nicht angezeigt, da OXXO `eur`-Zahlungen nicht unterstützt.
Sofern Ihre Integration keine codebasierte Option zum Anbieten von Zahlungsmethoden erfordert, empfiehlt Stripe die automatisierte Option, da Stripe die Währung, Einschränkungen für Zahlungsmethoden und andere Parameter auswertet, um die Liste der unterstützten Zahlungsmethoden zu ermitteln. Zahlungsmethoden, die die Konversion steigern und die für die Währung und den Standort des/r Kund/in am relevantesten sind, erhalten Priorität.
#### Zahlungsmethoden über das Dashboard verwalten
Zahlungsmethoden können Sie über das [Dashboard](https://dashboard.stripe.com/settings/payment_methods) verwalten. Stripe handhabt die Rückgabe geeigneter Zahlungsmethoden basierend auf Faktoren wie Betrag, Währung und Zahlungsablauf der Transaktion. Der PaymentIntent wird mit den Zahlungsmethoden erstellt, die Sie im Dashboard konfiguriert haben. Wenn Sie das Dashboard nicht verwenden möchten oder wenn Sie Zahlungsmethoden manuell angeben möchten, können Sie sie mit dem Attribut `payment_method_types` auflisten.
#### Curl
```bash
# Create a Customer (use an existing Customer ID if this is a returning customer)
curl https://api.stripe.com/v1/customers \
-u <>: \
-X "POST" \
-H "Stripe-Account: {{CONNECTED_ACCOUNT_ID}}"
# Create an CustomerSession for the Customer
curl https://api.stripe.com/v1/customer_sessions \
-u <>: \
-X "POST" \
-d "customer"="{{CUSTOMER_ID}}" \
-d "components[mobile_payment_element][enabled]"=true \
-d "components[mobile_payment_element][features][payment_method_save]"=enabled \
-d "components[mobile_payment_element][features][payment_method_redisplay]"=enabled \
-d "components[mobile_payment_element][features][payment_method_remove]"=enabled
# Create a PaymentIntent
curl https://api.stripe.com/v1/payment_intents \
-u <>: \
-H "Stripe-Account: {{CONNECTED_ACCOUNT_ID}}"
-X "POST" \
-d "customer"="{{CUSTOMER_ID}}" \
-d "amount"=1099 \
-d "currency"="eur" \
-d "automatic_payment_methods[enabled]"=true \
-d application_fee_amount="123" \
```
#### Zahlungsmethoden manuell auflisten
#### Curl
```bash
# Create a Customer (use an existing Customer ID if this is a returning customer)
curl https://api.stripe.com/v1/customers \
-u <>: \
-X "POST" \
-H "Stripe-Account: {{CONNECTED_ACCOUNT_ID}}"
# Create an CustomerSession for the Customer
curl https://api.stripe.com/v1/customer_sessions \
-u <>: \
-X "POST" \
-d "customer"="{{CUSTOMER_ID}}" \
-d "components[mobile_payment_element][enabled]"=true \
-d "components[mobile_payment_element][features][payment_method_save]"=enabled \
-d "components[mobile_payment_element][features][payment_method_redisplay]"=enabled \
-d "components[mobile_payment_element][features][payment_method_remove]"=enabled
# Create a PaymentIntent
curl https://api.stripe.com/v1/payment_intents \
-u <>: \
-H "Stripe-Account: {{CONNECTED_ACCOUNT_ID}}"
-X "POST" \
-d "customer"="{{CUSTOMER_ID}}" \
-d "amount"=1099 \
-d "currency"="eur" \
-d "payment_method_types[]"="bancontact" \
-d "payment_method_types[]"="card" \
-d "payment_method_types[]"="ideal" \
-d "payment_method_types[]"="klarna" \
-d "payment_method_types[]"="sepa_debit" \
-d application_fee_amount="123" \
```
> Jede Zahlungsmethode muss die im PaymentIntent übergebene Währung unterstützen, und Ihr Unternehmen muss in einem der Länder ansässig sein, die jede Zahlungsmethode unterstützt. Auf der Seite [Optionen für die Integration von Zahlungsmethoden](https://docs.stripe.com/payments/payment-methods/integration-options.md) finden Sie weitere Informationen zu den unterstützten Zahlungsmethoden.
## Zahlungsformular integrieren [Clientseitig]
So zeigen Sie das Mobile Payment Element auf Ihrem Checkout-Bildschirm an:
- Zeigen Sie vom Kunden/von der Kundin gekaufte Produkte und den Gesamtbetrag an
- Verwenden Sie das [Address Element](https://docs.stripe.com/elements/address-element.md?platform=ios), um alle benötigten Versanddaten des Kunden/der Kundin zu erfassen
- Fügen Sie eine Checkout-Schaltfläche ein, um die Nutzeroberfläche von Stripe anzuzeigen
#### UIKit
#### Accounts v2
Rufen Sie auf dem Checkout-Bildschirm Ihrer App das PaymentIntent-Client-Geheimnis, das `CustomerSession`-Client-Geheimnis, die Kunden/Kundin konfigurierte `Konto`-ID und den veröffentlichbaren Schlüssel von dem Endpoint ab, den Sie im vorherigen Schritt erstellt haben. Legen Sie Ihren veröffentlichbaren Schlüssel mit `STPAPIClient.shared` fest und initialisieren Sie das [PaymentSheet](https://stripe.dev/stripe-ios/stripe-paymentsheet/Classes/PaymentSheet.html).
Legen Sie dann `STPAPIClient.shared.stripeAccount` als ID des verbundenen Kontos fest.
#### iOS (Swift)
```swift
import UIKit@_spi(CustomerSessionBetaAccess) import StripePaymentSheet
class CheckoutViewController: UIViewController {
@IBOutlet weak var checkoutButton: UIButton!
var paymentSheet: PaymentSheet?
let backendCheckoutUrl = URL(string: "Your back-end endpoint/payment-sheet")! // Your back-end endpoint
override func viewDidLoad() {
super.viewDidLoad()
checkoutButton.addTarget(self, action: #selector(didTapCheckoutButton), for: .touchUpInside)
checkoutButton.isEnabled = false
// MARK: Fetch the PaymentIntent client secret, CustomerSession client secret, customer-configured Account ID, and publishable key
var request = URLRequest(url: backendCheckoutUrl)
request.httpMethod = "POST"
let task = URLSession.shared.dataTask(with: request, completionHandler: { [weak self] (data, response, error) in
guard let data = data,
let json = try? JSONSerialization.jsonObject(with: data, options: []) as? [String : Any],
let customerAccountId = json["customerAccount"] as? String,
let customerSessionClientSecret = json["customerSessionClientSecret"] as? String,
let paymentIntentClientSecret = json["paymentIntent"] as? String,
let publishableKey = json["publishableKey"] as? String,
let self = self else {
// Handle error
return
}
STPAPIClient.shared.publishableKey = publishableKeySTPAPIClient.shared.stripeAccount = ""{{CONNECTED_ACCOUNT_ID}}""// MARK: Create a PaymentSheet instance
var configuration = PaymentSheet.Configuration()
configuration.merchantDisplayName = "Example, Inc."
configuration.customerAccount = .init(id: customerAccountId, customerSessionClientSecret: customerSessionClientSecret)
// Set `allowsDelayedPaymentMethods` to true if your business handles
// delayed notification payment methods like US bank accounts.
configuration.allowsDelayedPaymentMethods = true
self.paymentSheet = PaymentSheet(paymentIntentClientSecret:paymentIntentClientSecret, configuration: configuration)
DispatchQueue.main.async {
self.checkoutButton.isEnabled = true
}
})
task.resume()
}
}
```
#### Customers v1
Rufen Sie auf dem Checkout-Bildschirm Ihrer App das PaymentIntent-Client-Geheimnis, das `CustomerSession`-Client-Geheimnis, die `Kunden`-ID und den veröffentlichbaren Schlüssel von dem Endpoint ab, den Sie im vorherigen Schritt erstellt haben. Legen Sie Ihren veröffentlichbaren Schlüssel mit `STPAPIClient.shared` fest und initialisieren Sie das [PaymentSheet](https://stripe.dev/stripe-ios/stripe-paymentsheet/Classes/PaymentSheet.html).
Legen Sie dann `STPAPIClient.shared.stripeAccount` als ID des verbundenen Kontos fest.
#### iOS (Swift)
```swift
import UIKit@_spi(CustomerSessionBetaAccess) import StripePaymentSheet
class CheckoutViewController: UIViewController {
@IBOutlet weak var checkoutButton: UIButton!
var paymentSheet: PaymentSheet?
let backendCheckoutUrl = URL(string: "Your backend endpoint/payment-sheet")! // Your backend endpoint
override func viewDidLoad() {
super.viewDidLoad()
checkoutButton.addTarget(self, action: #selector(didTapCheckoutButton), for: .touchUpInside)
checkoutButton.isEnabled = false
// MARK: Fetch the PaymentIntent client secret, CustomerSession client secret, Customer ID, and publishable key
var request = URLRequest(url: backendCheckoutUrl)
request.httpMethod = "POST"
let task = URLSession.shared.dataTask(with: request, completionHandler: { [weak self] (data, response, error) in
guard let data = data,
let json = try? JSONSerialization.jsonObject(with: data, options: []) as? [String : Any],
let customerId = json["customer"] as? String,
let customerSessionClientSecret = json["customerSessionClientSecret"] as? String,
let paymentIntentClientSecret = json["paymentIntent"] as? String,
let publishableKey = json["publishableKey"] as? String,
let self = self else {
// Handle error
return
}
STPAPIClient.shared.publishableKey = publishableKeySTPAPIClient.shared.stripeAccount = ""{{CONNECTED_ACCOUNT_ID}}""// MARK: Create a PaymentSheet instance
var configuration = PaymentSheet.Configuration()
configuration.merchantDisplayName = "Example, Inc."
configuration.customer = .init(id: customerId, customerSessionClientSecret: customerSessionClientSecret)
// Set `allowsDelayedPaymentMethods` to true if your business handles
// delayed notification payment methods like US bank accounts.
configuration.allowsDelayedPaymentMethods = true
self.paymentSheet = PaymentSheet(paymentIntentClientSecret:paymentIntentClientSecret, configuration: configuration)
DispatchQueue.main.async {
self.checkoutButton.isEnabled = true
}
})
task.resume()
}
}
```
Wenn Kund/innen auf die Schaltfläche **Checkout** tippen, rufen Sie bitte `present` auf, um das Zahlungsformular anzuzeigen. Nachdem die Zahlung abgeschlossen wurde, verwirft Stripe das Formular und der Abschlussblock wird mit einem [PaymentSheetResult](https://stripe.dev/stripe-ios/stripe-paymentsheet/Enums/PaymentSheetResult.html) aufgerufen.
#### iOS (Swift)
```swift
@objc
func didTapCheckoutButton() {
// MARK: Start the checkout process
paymentSheet?.present(from: self) { paymentResult in
// MARK: Handle the payment result
switch paymentResult {
case .completed:
print("Your order is confirmed")
case .canceled:
print("Canceled!")
case .failed(let error):
print("Payment failed: \(error)")
}
}
}
```
#### SwiftUI
#### Accounts v2
Erstellen Sie ein `ObservableObject`-Modell für Ihren Bezahlbildschirm. Dieses Modell veröffentlicht ein [PaymentSheet](https://stripe.dev/stripe-ios/stripe-paymentsheet/Classes/PaymentSheet.html) und ein [PaymentSheetResult](https://stripe.dev/stripe-ios/stripe-paymentsheet/Enums/PaymentSheetResult.html).
```swift
import StripePaymentSheet
import SwiftUI
class CheckoutViewModel: ObservableObject {
let backendCheckoutUrl = URL(string: "Your back-end endpoint/payment-sheet")! // Your back-end endpoint
@Published var paymentSheet: PaymentSheet?
@Published var paymentResult: PaymentSheetResult?
}
```
Rufen Sie das PaymentIntent-Client-Geheimnis, das `CustomerSession`-Client-Geheimnis, die Kunden/Kundin konfigurierte `Konto`-ID und den veröffentlichbaren Schlüssel von dem Endpoint ab, den Sie im vorherigen Schritt erstellt haben. Legen Sie Ihren veröffentlichbaren Schlüssel mit `STPAPIClient.shared` fest und initialisieren Sie das [PaymentSheet](https://stripe.dev/stripe-ios/stripe-paymentsheet/Classes/PaymentSheet.html).
Legen Sie dann `STPAPIClient.shared.stripeAccount` als ID des verbundenen Kontos fest.
```swift
@_spi(CustomerSessionBetaAccess) import StripePaymentSheet
import SwiftUI
class CheckoutViewModel: ObservableObject {
let backendCheckoutUrl = URL(string: "Your back-end endpoint/payment-sheet")! // Your back-end endpoint
@Published var paymentSheet: PaymentSheet?
@Published var paymentResult: PaymentSheetResult?
func preparePaymentSheet() {
// MARK: Fetch thePaymentIntent and customer information from the back end
var request = URLRequest(url: backendCheckoutUrl)
request.httpMethod = "POST"
let task = URLSession.shared.dataTask(with: request, completionHandler: { [weak self] (data, response, error) in
guard let data = data,
let json = try? JSONSerialization.jsonObject(with: data, options: []) as? [String : Any],
let customerAccountId = json["customerAccount"] as? String,
let customerSessionClientSecret = json["customerSessionClientSecret"] as? String,
letpaymentIntentClientSecret = json["paymentIntent"] as? String,
let publishableKey = json["publishableKey"] as? String,
let self = self else {
// Handle error
return
}
STPAPIClient.shared.publishableKey = publishableKeySTPAPIClient.shared.stripeAccount = ""{{CONNECTED_ACCOUNT_ID}}""// MARK: Create a PaymentSheet instance
var configuration = PaymentSheet.Configuration()
configuration.merchantDisplayName = "Example, Inc."
configuration.customerAccount = .init(id: customerAccountId, customerSessionClientSecret: customerSessionClientSecret)
// Set `allowsDelayedPaymentMethods` to true if your business handles
// delayed notification payment methods like US bank accounts.
configuration.allowsDelayedPaymentMethods = true
DispatchQueue.main.async {
self.paymentSheet = PaymentSheet(paymentIntentClientSecret:paymentIntentClientSecret, configuration: configuration)
}
})
task.resume()
}
}
struct CheckoutView: View {
@ObservedObject var model = CheckoutViewModel()
var body: some View {
VStack {
if model.paymentSheet != nil {
Text("Ready to pay.")
} else {
Text("Loading…")
}
}.onAppear { model.preparePaymentSheet() }
}
}
```
Fügen Sie Ihrer `View` ein [PaymentSheet.PaymentButton](https://stripe.dev/stripe-ios/stripe-paymentsheet/Classes/PaymentSheet/PaymentButton.html) hinzu. Diese verhält sich ähnlich wie eine SwiftUI-`Button` und kann durch Hinzufügen einer `View` angepasst werden. Wenn Sie auf die Schaltfläche tippen, wird das PaymentSheet angezeigt. Beim Abschließen der Zahlung verwirft Stripe das PaymentSheet und der `onCompletion`-Handler mit einem [PaymentSheetResult](https://stripe.dev/stripe-ios/stripe-paymentsheet/Enums/PaymentSheetResult.html)-Objekt aufgerufen.
```swift
@_spi(CustomerSessionBetaAccess) import StripePaymentSheet
import SwiftUI
class CheckoutViewModel: ObservableObject {
let backendCheckoutUrl = URL(string: "Your back-end endpoint/payment-sheet")! // Your back-end endpoint
@Published var paymentSheet: PaymentSheet?
@Published var paymentResult: PaymentSheetResult?
func preparePaymentSheet() {
// MARK: Fetch the PaymentIntent and customer information from the back end
var request = URLRequest(url: backendCheckoutUrl)
request.httpMethod = "POST"
let task = URLSession.shared.dataTask(with: request, completionHandler: { [weak self] (data, response, error) in
guard let data = data,
let json = try? JSONSerialization.jsonObject(with: data, options: []) as? [String : Any],
let customerAccountId = json["customerAccount"] as? String,
let customerSessionClientSecret = json["customerSessionClientSecret"] as? String,
let paymentIntentClientSecret = json["paymentIntent"] as? String,
let publishableKey = json["publishableKey"] as? String,
let self = self else {
// Handle error
return
}
STPAPIClient.shared.publishableKey = publishableKey
STPAPIClient.shared.stripeAccount = ""{{CONNECTED_ACCOUNT_ID}}""
// MARK: Create a PaymentSheet instance
var configuration = PaymentSheet.Configuration()
configuration.merchantDisplayName = "Example, Inc."
configuration.customerAccount = .init(id: customerAccountId, customerSessionClientSecret: customerSessionClientSecret)
// Set `allowsDelayedPaymentMethods` to true if your business can handle payment methods
// that complete payment after a delay, like SEPA Debit and Sofort.
configuration.allowsDelayedPaymentMethods = true
DispatchQueue.main.async {
self.paymentSheet = PaymentSheet(paymentIntentClientSecret: paymentIntentClientSecret, configuration: configuration)
}
})
task.resume()
}
func onPaymentCompletion(result: PaymentSheetResult) {
self.paymentResult = result
}
}
struct CheckoutView: View {
@ObservedObject var model = CheckoutViewModel()
var body: some View {
VStack {if let paymentSheet = model.paymentSheet {
PaymentSheet.PaymentButton(
paymentSheet: paymentSheet,
onCompletion: model.onPaymentCompletion
) {
Text("Buy")
}
} else {
Text("Loading…")
}if let result = model.paymentResult {
switch result {
case .completed:
Text("Payment complete")
case .failed(let error):
Text("Payment failed: \(error.localizedDescription)")
case .canceled:
Text("Payment canceled.")
}
}
}.onAppear { model.preparePaymentSheet() }
}
}
```
#### Customers v1
Erstellen Sie ein `ObservableObject`-Modell für Ihren Bezahlbildschirm. Dieses Modell veröffentlicht ein [PaymentSheet](https://stripe.dev/stripe-ios/stripe-paymentsheet/Classes/PaymentSheet.html) und ein [PaymentSheetResult](https://stripe.dev/stripe-ios/stripe-paymentsheet/Enums/PaymentSheetResult.html).
```swift
import StripePaymentSheet
import SwiftUI
class CheckoutViewModel: ObservableObject {
let backendCheckoutUrl = URL(string: "Your back-end endpoint/payment-sheet")! // Your back-end endpoint
@Published var paymentSheet: PaymentSheet?
@Published var paymentResult: PaymentSheetResult?
}
```
Rufen Sie das PaymentIntent-Client-Geheimnis, das CustomerSession-Client-Geheimnis, die `Kunden-ID` und den veröffentlichbaren Schlüssel von dem Endpoint ab, den Sie im vorherigen Schritt erstellt haben. Legen Sie Ihren veröffentlichbaren Schlüssel mit `STPAPIClient.shared` fest und initialisieren Sie das [PaymentSheet](https://stripe.dev/stripe-ios/stripe-paymentsheet/Classes/PaymentSheet.html).
Legen Sie dann `STPAPIClient.shared.stripeAccount` als ID des verbundenen Kontos fest.
```swift
@_spi(CustomerSessionBetaAccess) import StripePaymentSheet
import SwiftUI
class CheckoutViewModel: ObservableObject {
let backendCheckoutUrl = URL(string: "Your back-end endpoint/payment-sheet")! // Your back-end endpoint
@Published var paymentSheet: PaymentSheet?
@Published var paymentResult: PaymentSheetResult?
func preparePaymentSheet() {
// MARK: Fetch thePaymentIntent and Customer information from the back end
var request = URLRequest(url: backendCheckoutUrl)
request.httpMethod = "POST"
let task = URLSession.shared.dataTask(with: request, completionHandler: { [weak self] (data, response, error) in
guard let data = data,
let json = try? JSONSerialization.jsonObject(with: data, options: []) as? [String : Any],
let customerId = json["customer"] as? String,
let customerSessionClientSecret = json["customerSessionClientSecret"] as? String,
letpaymentIntentClientSecret = json["paymentIntent"] as? String,
let publishableKey = json["publishableKey"] as? String,
let self = self else {
// Handle error
return
}
STPAPIClient.shared.publishableKey = publishableKeySTPAPIClient.shared.stripeAccount = ""{{CONNECTED_ACCOUNT_ID}}""// MARK: Create a PaymentSheet instance
var configuration = PaymentSheet.Configuration()
configuration.merchantDisplayName = "Example, Inc."
configuration.customer = .init(id: customerId, customerSessionClientSecret: customerSessionClientSecret)
// Set `allowsDelayedPaymentMethods` to true if your business handles
// delayed notification payment methods like US bank accounts.
configuration.allowsDelayedPaymentMethods = true
DispatchQueue.main.async {
self.paymentSheet = PaymentSheet(paymentIntentClientSecret:paymentIntentClientSecret, configuration: configuration)
}
})
task.resume()
}
}
struct CheckoutView: View {
@ObservedObject var model = CheckoutViewModel()
var body: some View {
VStack {
if model.paymentSheet != nil {
Text("Ready to pay.")
} else {
Text("Loading…")
}
}.onAppear { model.preparePaymentSheet() }
}
}
```
Fügen Sie Ihrer `View` ein [PaymentSheet.PaymentButton](https://stripe.dev/stripe-ios/stripe-paymentsheet/Classes/PaymentSheet/PaymentButton.html) hinzu. Diese verhält sich ähnlich wie eine SwiftUI-`Button` und kann durch Hinzufügen einer `View` angepasst werden. Wenn Sie auf die Schaltfläche tippen, wird das PaymentSheet angezeigt. Beim Abschließen der Zahlung verwirft Stripe das PaymentSheet und der `onCompletion`-Handler mit einem [PaymentSheetResult](https://stripe.dev/stripe-ios/stripe-paymentsheet/Enums/PaymentSheetResult.html)-Objekt aufgerufen.
```swift
@_spi(CustomerSessionBetaAccess) import StripePaymentSheet
import SwiftUI
class CheckoutViewModel: ObservableObject {
let backendCheckoutUrl = URL(string: "Your back-end endpoint/payment-sheet")! // Your back-end endpoint
@Published var paymentSheet: PaymentSheet?
@Published var paymentResult: PaymentSheetResult?
func preparePaymentSheet() {
// MARK: Fetch the PaymentIntent and Customer information from the back end
var request = URLRequest(url: backendCheckoutUrl)
request.httpMethod = "POST"
let task = URLSession.shared.dataTask(with: request, completionHandler: { [weak self] (data, response, error) in
guard let data = data,
let json = try? JSONSerialization.jsonObject(with: data, options: []) as? [String : Any],
let customerId = json["customer"] as? String,
let customerSessionClientSecret = json["customerSessionClientSecret"] as? String,
let paymentIntentClientSecret = json["paymentIntent"] as? String,
let publishableKey = json["publishableKey"] as? String,
let self = self else {
// Handle error
return
}
STPAPIClient.shared.publishableKey = publishableKey
STPAPIClient.shared.stripeAccount = ""{{CONNECTED_ACCOUNT_ID}}""
// MARK: Create a PaymentSheet instance
var configuration = PaymentSheet.Configuration()
configuration.merchantDisplayName = "Example, Inc."
configuration.customer = .init(id: customerId, customerSessionClientSecret: customerSessionClientSecret)
// Set `allowsDelayedPaymentMethods` to true if your business can handle payment methods
// that complete payment after a delay, like SEPA Debit and Sofort.
configuration.allowsDelayedPaymentMethods = true
DispatchQueue.main.async {
self.paymentSheet = PaymentSheet(paymentIntentClientSecret: paymentIntentClientSecret, configuration: configuration)
}
})
task.resume()
}
func onPaymentCompletion(result: PaymentSheetResult) {
self.paymentResult = result
}
}
struct CheckoutView: View {
@ObservedObject var model = CheckoutViewModel()
var body: some View {
VStack {if let paymentSheet = model.paymentSheet {
PaymentSheet.PaymentButton(
paymentSheet: paymentSheet,
onCompletion: model.onPaymentCompletion
) {
Text("Buy")
}
} else {
Text("Loading…")
}if let result = model.paymentResult {
switch result {
case .completed:
Text("Payment complete")
case .failed(let error):
Text("Payment failed: \(error.localizedDescription)")
case .canceled:
Text("Payment canceled.")
}
}
}.onAppear { model.preparePaymentSheet() }
}
}
```
Wenn `PaymentSheetResult` `.completed` ist, informieren Sie den/die Kund/in (zum Beispiel durch die Anzeige einer Bestellbestätigung).
Wenn Sie `allowsDelayedPaymentMethods` auf true festlegen, werden Zahlungsmethoden mit [verzögerter Benachrichtigung](https://docs.stripe.com/payments/payment-methods.md#payment-notification) wie US-Bankkonten zugelassen. Für diese Zahlungsmethoden ist der endgültige Zahlungsstatus nicht bekannt, wenn das `PaymentSheet` abgeschlossen wird. Stattdessen ist sie erfolgreich oder schlägt fehl. Wenn Sie diese Art von Zahlungsmethoden unterstützen, informieren Sie den Kunden/die Kundin darüber, dass seine/ihre Bestellung bestätigt ist, und führen seine/ihre Bestellung erst aus (z. B. das Produkt versenden), wenn die Zahlung erfolgreich ist.
## Rückgabe-URL einrichten [Clientseitig]
Der Kunde/Die Kundin verlässt ggf. Ihre App, um sich zu authentifizieren (z. B. in Safari oder einer Banking-App). Damit sie nach der Authentifizierung automatisch zu Ihrer App zurückkehren können, [konfigurieren Sie ein benutzerdefiniertes URL-Schema](https://developer.apple.com/documentation/xcode/defining-a-custom-url-scheme-for-your-app) und richten Sie Ihren App-Delegate so ein, dass die URL an das SDK weitergeleitet wird. Stripe unterstützt keine [universellen Links](https://developer.apple.com/documentation/xcode/allowing-apps-and-websites-to-link-to-your-content).
#### SceneDelegate
#### Swift
```swift
// This method handles opening custom URL schemes (for example, "your-app://stripe-redirect")
func scene(_ scene: UIScene, openURLContexts URLContexts: Set) {
guard let url = URLContexts.first?.url else {
return
}
let stripeHandled = StripeAPI.handleURLCallback(with: url)
if (!stripeHandled) {
// This was not a Stripe url – handle the URL normally as you would
}
}
```
#### AppDelegate
#### Swift
```swift
// This method handles opening custom URL schemes (for example, "your-app://stripe-redirect")
func application(_ app: UIApplication, open url: URL, options: [UIApplication.OpenURLOptionsKey: Any] = [:]) -> Bool {
let stripeHandled = StripeAPI.handleURLCallback(with: url)
if (stripeHandled) {
return true
} else {
// This was not a Stripe url – handle the URL normally as you would
}
return false
}
```
#### SwiftUI
#### Swift
```swift
@main
struct MyApp: App {
var body: some Scene {
WindowGroup {
Text("Hello, world!").onOpenURL { incomingURL in
let stripeHandled = StripeAPI.handleURLCallback(with: incomingURL)
if (!stripeHandled) {
// This was not a Stripe url – handle the URL normally as you would
}
}
}
}
}
```
## Ereignisse nach Zahlung verarbeiten [Serverseitig]
Stripe sendet ein [payment_intent.succeeded](https://docs.stripe.com/api/events/types.md#event_types-payment_intent.succeeded)-Ereignis, wenn die Zahlung abgeschlossen ist. Verwenden Sie [Webhook-Tool im Dashboard](https://dashboard.stripe.com/webhooks) oder folgen Sie der [Webhook-Anleitung](https://docs.stripe.com/webhooks/quickstart.md), um diese Ereignisse zu empfangen und führen Sie Aktionen aus, wie beispielsweise das Senden einer Bestellbestätigung per E-Mail, das Protokollieren des Verkaufs in der Datenbank oder das Starten eines Versand-Workflows.
Überwachen Sie diese Ereignisse, statt auf einen Callback vom Client zu warten. Auf dem Client könnten die Kund/innen das Browserfenster schließen oder die App beenden, bevor der Callback erfolgt ist. Bösartige Clients könnten dann die Antwort manipulieren. Wenn Sie Ihre Integration so einrichten, dass sie asynchrone Ereignisse überwacht, können Sie [verschiedene Arten von Zahlungsmethoden](https://stripe.com/payments/payment-methods-guide) mit einer einzelnen Integration akzeptieren.
Neben der Abwicklung des `payment_intent.succeeded`-Ereignisses empfehlen wir die Abwicklung von diesen weiteren Ereignissen, wenn Sie Zahlungen mit dem Payment Element erfassen:
| Ereignis | Beschreibung | Aktion |
| ------------------------------------------------------------------------------------------------------------------------------- | ---------------------------------------------------------------------------------------------------------------------------------------------------------------------------------------------------------------------------------------------------------------------------------------------------------------------------------------------------- | ----------------------------------------------------------------------------------------------------------------------------------------------------------------------------------------------------------------------- |
| [payment_intent.succeeded](https://docs.stripe.com/api/events/types.md?lang=php#event_types-payment_intent.succeeded) | Wird gesendet, wenn Kundinnen und Kunden eine Zahlung erfolgreich abgeschlossen haben. | Senden Sie den Kund/innen eine Auftragsbestätigung und *wickeln* (Fulfillment is the process of providing the goods or services purchased by a customer, typically after payment is collected) Sie die Bestellung ab. |
| [payment_intent.processing](https://docs.stripe.com/api/events/types.md?lang=php#event_types-payment_intent.processing) | Wird gesendet, wenn eine/e Kund/in eine Zahlung erfolgreich veranlasst hat, die Zahlung aber noch nicht abgeschlossen ist. Dieses Ereignis wird am häufigsten gesendet, wenn der Kunde/die Kundin eine Bankabbuchung veranlasst. In Zukunft folgt darauf entweder ein `payment_intent.succeeded`- oder ein `payment_intent.payment_failed`-Ereignis. | Senden Sie eine Bestellbestätigung an die Kund/innen, in der angegeben ist, dass die Zahlung noch aussteht. Bei digitalen Waren können Sie die Bestellung abwickeln, bevor Sie darauf warten, dass die Zahlung erfolgt. |
| [payment_intent.payment_failed](https://docs.stripe.com/api/events/types.md?lang=php#event_types-payment_intent.payment_failed) | Wird gesendet, wenn ein Kunde/eine Kundin einen Zahlungsversuch durchführt, die Zahlung jedoch fehlschlägt. | Wenn eine Zahlung von `processing` zu `payment_failed` übergeht, bieten Sie der Kundin/dem Kunden einen weiteren Zahlungsversuch an. |
## Integration testen
#### Karten
| Kartennummer | Szenario | So führen Sie den Test durch |
| ------------------- | ------------------------------------------------------------------------------------------------------------------------------------------------------------------------------------------------------------------------------------------------------------------------------------------------------------------ | -------------------------------------------------------------------------------------------------------------------------------------- |
| 4242424242424242 | Die Kartenzahlung ist erfolgreich und es ist keine Authentifizierung erforderlich. | Füllen Sie das Kreditkartenformular aus und geben Sie die Kreditkartennummer mit beliebiger Gültigkeitsdauer, CVC und Postleitzahl an. |
| 4000002500003155 | Für die Kartenzahlung ist eine *Authentifizierung* (Strong Customer Authentication (SCA) is a regulatory requirement in effect as of September 14, 2019, that impacts many European online payments. It requires customers to use two-factor authentication like 3D Secure to verify their purchase) erforderlich. | Füllen Sie das Kreditkartenformular aus und geben Sie die Kreditkartennummer mit beliebiger Gültigkeitsdauer, CVC und Postleitzahl an. |
| 4000000000009995 | Die Karte wird mit einem Ablehnungscode wie `insufficient_funds` abgelehnt. | Füllen Sie das Kreditkartenformular aus und geben Sie die Kreditkartennummer mit beliebiger Gültigkeitsdauer, CVC und Postleitzahl an. |
| 6205500000000000004 | Die UnionPay-Karte hat eine variable Länge von 13 bis 19 Ziffern. | Füllen Sie das Kreditkartenformular aus und geben Sie die Kreditkartennummer mit beliebiger Gültigkeitsdauer, CVC und Postleitzahl an. |
#### Bankumleitungen
| Zahlungsmethode | Szenario | So führen Sie den Test durch |
| ----------------- | ------------------------------------------------------------------------------------------------------------------------------------------------------------------------------------------------------------------------------------------------- | --------------------------------------------------------------------------------------------------------------------------------------------------------------------------------------------------------------------------------------------- |
| Bancontact, iDEAL | Ihr/e Kund/in konnte sich auf der iDEAL-Weiterleitungsseite für eine auf Weiterleitung basierende Zahlungsmethode mit sofortiger Benachrichtigung nicht authentifizieren. | Wählen Sie eine beliebige, auf Weiterleitung basierende Zahlungsmethode aus, füllen Sie die erforderlichen Informationen aus und bestätigen Sie die Zahlung. Klicken Sie dann auf der Weiterleitungsseite auf **Testzahlung fehlgeschlagen**. |
| Pay by Bank | Ihr Kunde/Ihre Kundin zahlt erfolgreich mit einer auf Weiterleitung basierenden Zahlungsmethode mit [verzögerter Benachrichtigung](https://docs.stripe.com/payments/payment-methods.md#payment-notification). | Wählen Sie die Zahlungsmethode aus, füllen Sie die erforderlichen Informationen aus und bestätigen Sie die Zahlung. Klicken Sie dann auf der Weiterleitungsseite auf **Testzahlung abschließen**. |
| Pay by Bank | Ihr/e Kund/in konnte sich auf der iDEAL-Weiterleitungsseite für eine auf Weiterleitung basierende Zahlungsmethode mit verzögerter Benachrichtigung nicht authentifizieren. | Wählen Sie die Zahlungsmethode aus, füllen Sie die erforderlichen Informationen aus und bestätigen Sie die Zahlung. Klicken Sie dann auf der Weiterleitungsseite auf **Testzahlung fehlgeschlagen**. |
| BLIK | BLIK-Zahlungen können aus verschiedenen Gründen fehlschlagen. Es gibt sofortige Fehler (der Code ist abgelaufen oder ungültig), verzögerte Fehler (die Bank lehnt ab) oder Zeitüberschreitungen (der/die Kund/in hat nicht rechtzeitig reagiert). | Verwenden Sie E-Mail-Muster, um [die verschiedenen Fehler zu simulieren](https://docs.stripe.com/payments/blik/accept-a-payment.md#simulate-failures) |
#### Banklastschriften
| Zahlungsmethode | Szenario | So führen Sie den Test durch |
| ---------------- | -------------------------------------------------------------------------------------------------------- | ------------------------------------------------------------------------------------------------------------------------------------------------------------------------------------------------------------------ |
| SEPA-Lastschrift | Ihr/e Kund/in zahlt erfolgreich mit dem SEPA-Lastschriftverfahren. | Füllen Sie das Formular mit der Kontonummer `AT321904300235473204` aus. Die bestätigte PaymentIntent geht zunächst in den Status „wird verarbeitet“ und dann drei Minuten später in den Status „erfolgreich“ über. |
| SEPA-Lastschrift | Der Status der PaymentIntent Ihres/Ihrer Kund/in wechselt von `processing` zu `requires_payment_method`. | Füllen Sie das Formular mit der Kontonummer `AT861904300235473202` aus. |
Hier finden Sie weitere Informationen zum [Testen](https://docs.stripe.com/testing.md) Ihrer Integration.
## Scannen von Karten aktivieren
Um die Unterstützung für das Scannen von Karten für iOS zu aktivieren, setzen Sie `NSCameraUsageDescription` (**Datenschutz – Beschreibung Kameranutzung**) in der `Info.plist` Ihrer Anwendung und geben einen Grund für den Zugriff auf die Kamera an (z. B. „Zum Scannen von Karten“).
## Optional: Apple Pay aktivieren
> Wenn auf Ihrem Checkout-Bildschirm die Schaltfläche **Apple Pay** angezeigt wird, folgen Sie der [Apple Pay-Anleitung](https://docs.stripe.com/apple-pay.md#present-payment-sheet) und verwenden Sie `ApplePayContext`, um Zahlungen über Ihre Apple Pay-Schaltfläche einzuziehen. Mit `PaymentSheet` können Sie andere Arten von Zahlungsmethoden abwickeln.
### Für eine Apple-Händler-ID registrieren
Beantragen Sie eine Apple-Händler-ID, indem Sie sich auf der Apple Developer-Website [für eine neue Kennung registrieren](https://developer.apple.com/account/resources/identifiers/add/merchant).
Tragen Sie eine Beschreibung und eine Kennung in das Formular ein. Die Beschreibung ist nur für Ihre internen Zwecke bestimmt und kann später geändert werden. Stripe empfiehlt, dass Sie den Namen Ihrer App als Kennung verwenden, zum Beispiel `merchant.com.{{YOUR_APP_NAME}}`.
### Neues Apple Pay-Zertifikat erstellen
Erstellen Sie ein Zertifikat für Ihre App, um Zahlungsdaten zu verschlüsseln.
Gehen Sie zu den [iOS-Zertifikateinstellungen](https://dashboard.stripe.com/settings/ios_certificates) im Dashboard, klicken Sie auf **Neue Anwendung hinzufügen** und befolgen Sie die Anleitung.
Laden Sie eine Certificate Signing Request (CSR)-Datei herunter, um ein sicheres Zertifikat von Apple zu erhalten, mit dem Sie Apple Pay verwenden können.
Eine CSR-Datei muss verwendet werden, um genau ein Zertifikat auszustellen. Wenn Sie Ihre Apple-Händler-ID wechseln, müssen Sie zu den [iOS-Zertifikateinstellungen](https://dashboard.stripe.com/settings/ios_certificates) im Dashboard gehen, um eine neue CSR und ein Zertifikat zu erhalten.
### Mit Xcode integrieren
Fügen Sie Ihrer App die **Apple Pay**-Funktion hinzu. Öffnen Sie in Xcode Ihre Projekteinstellungen, klicken Sie auf die Registerkarte **Signing & Capabilities** (Anmeldung und Funktionen) und fügen Sie die **Apple Pay**-Funktion hinzu. Möglicherweise werden Sie an dieser Stelle aufgefordert, sich bei Ihrem Entwicklerkonto anzumelden. Wählen Sie die zuvor erstellte Händler-ID aus. Ihre App sollte nun Apple Pay unterstützen.
Apple Pay-Funktion in Xcode aktivieren
### Apple Pay hinzufügen
#### Einmalige Zahlung
Um Apple Pay zum PaymentSheet hinzuzufügen, setzen Sie [applePay](https://stripe.dev/stripe-ios/stripe-paymentsheet/Classes/PaymentSheet/Configuration.html#/s:6Stripe12PaymentSheetC13ConfigurationV8applePayAC05ApplefD0VSgvp), nachdem Sie `PaymentSheet.Configuration` mit Ihrer Apple-Händler-ID und dem [Ländercode Ihres Unternehmens](https://dashboard.stripe.com/settings/account) initialisiert haben.
#### iOS (Swift)
```swift
var configuration = PaymentSheet.Configuration()
configuration.applePay = .init(
merchantId: "merchant.com.your_app_name",
merchantCountryCode: "US"
)
```
#### Wiederkehrende Zahlungen
Um Apple Pay zum PaymentSheet hinzuzufügen, setzen Sie [applePay](https://stripe.dev/stripe-ios/stripe-paymentsheet/Classes/PaymentSheet/Configuration.html#/s:6Stripe12PaymentSheetC13ConfigurationV8applePayAC05ApplefD0VSgvp), nachdem Sie `PaymentSheet.Configuration` mit Ihrer Apple-Händler-ID und dem [Ländercode Ihres Unternehmens](https://dashboard.stripe.com/settings/account) initialisiert haben.
Gemäß den [Apple-Richtlinien](https://developer.apple.com/design/human-interface-guidelines/apple-pay#Supporting-subscriptions) für wiederkehrende Zahlungen müssen Sie auch zusätzliche Attribute für `PKPaymentRequest` festlegen. Fügen Sie in [ApplePayConfiguration.paymentRequestHandlers](https://stripe.dev/stripe-ios/stripepaymentsheet/documentation/stripepaymentsheet/paymentsheet/applepayconfiguration/handlers/paymentrequesthandler) einen Handler hinzu, um die [PKPaymentRequest.paymentSummaryItems](https://developer.apple.com/documentation/passkit/pkpaymentrequest/1619231-paymentsummaryitems) mit dem Betrag zu konfigurieren, den Sie berechnen möchten (z. B. 9,95 USD pro Monat).
Sie können auch [Händler-Token](https://developer.apple.com/apple-pay/merchant-tokens/) übernehmen, indem Sie die Eigenschaften `recurringPaymentRequest` oder `automaticReloadPaymentRequest` für `PKPaymentRequest` festlegen.
Weitere Informationen zur Verwendung wiederkehrender Zahlungen mit Apple Pay finden Sie in der [PassKit-Dokumentation von Apple](https://developer.apple.com/documentation/passkit/pkpaymentrequest).
#### iOS (Swift)
```swift
let customHandlers = PaymentSheet.ApplePayConfiguration.Handlers(
paymentRequestHandler: { request in
// PKRecurringPaymentSummaryItem is available on iOS 15 or later
if #available(iOS 15.0, *) {
let billing = PKRecurringPaymentSummaryItem(label: "My Subscription", amount: NSDecimalNumber(string: "59.99"))
// Payment starts today
billing.startDate = Date()
// Payment ends in one year
billing.endDate = Date().addingTimeInterval(60 * 60 * 24 * 365)
// Pay once a month.
billing.intervalUnit = .month
billing.intervalCount = 1
// recurringPaymentRequest is only available on iOS 16 or later
if #available(iOS 16.0, *) {
request.recurringPaymentRequest = PKRecurringPaymentRequest(paymentDescription: "Recurring",
regularBilling: billing,
managementURL: URL(string: "https://my-backend.example.com/customer-portal")!)
request.recurringPaymentRequest?.billingAgreement = "You'll be billed $59.99 every month for the next 12 months. To cancel at any time, go to Account and click 'Cancel Membership.'"
}
request.paymentSummaryItems = [billing]
request.currencyCode = "USD"
} else {
// On older iOS versions, set alternative summary items.
request.paymentSummaryItems = [PKPaymentSummaryItem(label: "Monthly plan starting July 1, 2022", amount: NSDecimalNumber(string: "59.99"), type: .final)]
}
return request
}
)
var configuration = PaymentSheet.Configuration()
configuration.applePay = .init(merchantId: "merchant.com.your_app_name",
merchantCountryCode: "US",
customHandlers: customHandlers)
```
### Bestellverfolgung
Um Informationen zur [Bestellverfolgung](https://developer.apple.com/design/human-interface-guidelines/technologies/wallet/designing-order-tracking) in iOS 16 oder höher hinzuzufügen, konfigurieren Sie einen [authorizationResultHandler](https://stripe.dev/stripe-ios/stripepaymentsheet/documentation/stripepaymentsheet/paymentsheet/applepayconfiguration/handlers/authorizationresulthandler) in Ihren `PaymentSheet.ApplePayConfiguration.Handlers`. Stripe ruft Ihre Implementierung auf, nachdem die Zahlung durchgeführt wurde, aber bevor iOS das Apple Pay-Formular schließt.
Rufen Sie in Ihrer Implementierung von `authorizationResultHandler` die Bestelldetails für die abgeschlossene Bestellung von Ihrem Server ab. Fügen Sie die Details dem bereitgestellten [PKPaymentAuthorizationResult](https://developer.apple.com/documentation/passkit/pkpaymentauthorizationresult) hinzu und geben Sie das geänderte Ergebnis zurück.
Weitere Informationen zur Bestellverfolgung finden Sie in der [Dokumentation zu Wallet-Bestellungen von Apple](https://developer.apple.com/documentation/walletorders).
#### iOS (Swift)
```swift
let customHandlers = PaymentSheet.ApplePayConfiguration.Handlers(
authorizationResultHandler: { result in
do {
// Fetch the order details from your service
let myOrderDetails = try await MyAPIClient.shared.fetchOrderDetails(orderID: orderID)
result.orderDetails = PKPaymentOrderDetails(
orderTypeIdentifier: myOrderDetails.orderTypeIdentifier, // "com.myapp.order"
orderIdentifier: myOrderDetails.orderIdentifier, // "ABC123-AAAA-1111"
webServiceURL: myOrderDetails.webServiceURL, // "https://my-backend.example.com/apple-order-tracking-backend"
authenticationToken: myOrderDetails.authenticationToken) // "abc123"
// Return your modified PKPaymentAuthorizationResult
return result
} catch {
return PKPaymentAuthorizationResult(status: .failure, errors: [error])
}
}
)
var configuration = PaymentSheet.Configuration()
configuration.applePay = .init(merchantId: "merchant.com.your_app_name",
merchantCountryCode: "US",
customHandlers: customHandlers)
```
## Optional: Formular anpassen
Alle Anpassungen werden mithilfe des [PaymentSheet.Configuration](https://stripe.dev/stripe-ios/stripe-paymentsheet/Classes/PaymentSheet/Configuration.html)-Objekts konfiguriert.
### Erscheinungsbild
Passen Sie mit der [Appearance API](https://docs.stripe.com/elements/appearance-api/mobile.md?platform=ios) Farben, Schriftarten und mehr an das Erscheinungsbild Ihrer App an.
### Layout der Zahlungsmethode
Konfigurieren Sie das Layout der Zahlungsmethoden im Formular mit [paymentMethodLayout](https://stripe.dev/stripe-ios/stripepaymentsheet/documentation/stripepaymentsheet/paymentsheet/configuration-swift.struct/paymentmethodlayout). Sie können sie horizontal oder vertikal anzeigen oder das Layout von Stripe automatisch optimieren lassen.

#### Swift
```swift
var configuration = PaymentSheet.Configuration()
configuration.paymentMethodLayout = .automatic
```
### Adressen der Nutzer/innen erfassen
Erfassen Sie lokale und internationale Versand- und Rechnungsadressen von Ihren Kundinnen und Kunden mithilfe des [Address Element](https://docs.stripe.com/elements/address-element.md?platform=ios).
### Anzeigename des Händlers
Geben Sie einen kundenorientierten Unternehmensnamen an, indem Sie [merchantDisplayName](https://stripe.dev/stripe-ios/stripe-paymentsheet/Classes/PaymentSheet/Configuration.html#/s:18StripePaymentSheet0bC0C13ConfigurationV19merchantDisplayNameSSvp) festlegen. Standardmäßig handelt es sich dabei um den Namen Ihrer App.
#### Swift
```swift
var configuration = PaymentSheet.Configuration()
configuration.merchantDisplayName = "My app, Inc."
```
### Dunkelmodus
`PaymentSheet` passt sich automatisch an die systemweiten Erscheinungsbildeinstellungen des Nutzers/der Nutzerin an (heller und dunkler Modus). Wenn Ihre App den Dunkelmodus nicht unterstützt, können Sie den [Stil](https://stripe.dev/stripe-ios/stripe-paymentsheet/Classes/PaymentSheet/Configuration.html#/s:18StripePaymentSheet0bC0C13ConfigurationV5styleAC18UserInterfaceStyleOvp) auf den Modus `alwaysLight` oder `alwaysDark` einstellen.
```swift
var configuration = PaymentSheet.Configuration()
configuration.style = .alwaysLight
```
### Standardabrechnungsdetails
Um Standardwerte für die im Zahlungsformular erfassten Rechnungsdetails festzulegen, konfigurieren Sie die Eigenschaft `defaultBillingDetails`. Die Felder von `PaymentSheet` werden vorab mit den von Ihnen angegebenen Werten ausgefüllt.
```swift
var configuration = PaymentSheet.Configuration()
configuration.defaultBillingDetails.address.country = "US"
configuration.defaultBillingDetails.email = "foo@bar.com"
```
### Erfassung der Rechnungsdetails
Verwenden Sie `billingDetailsCollectionConfiguration`, um anzugeben, wie Sie Rechnungsdetails im Zahlungsformular erfassen möchten.
Sie können den Namen, die E-Mail-Adresse, die Telefonnummer und die Adresse Ihrer Kundinnen und Kunden erfassen.
Wenn Sie nur die für die Zahlungsmethode erforderlichen Rechnungsdetails angeben möchten, legen Sie `billingDetailsCollectionConfiguration.attachDefaultsToPaymentMethod` auf „true“ fest. In diesem Fall werden `PaymentSheet.Configuration.defaultBillingDetails` als [Abrechnungsdetails](https://docs.stripe.com/api/payment_methods/object.md?lang=node#payment_method_object-billing_details) der Zahlungsmethode festgelegt.
Wenn Sie zusätzliche Rechnungsdetails erfassen möchten, die für die Zahlungsmethode nicht unbedingt erforderlich sind, legen Sie `billingDetailsCollectionConfiguration.attachDefaultsToPaymentMethod` auf „false“ fest. In diesem Fall werden die über das `PaymentSheet` erfassten Rechnungsdetails als Rechnungsdetails der Zahlungsmethode festgelegt.
```swift
var configuration = PaymentSheet.Configuration()
configuration.defaultBillingDetails.email = "foo@bar.com"
configuration.billingDetailsCollectionConfiguration.name = .always
configuration.billingDetailsCollectionConfiguration.email = .never
configuration.billingDetailsCollectionConfiguration.address = .full
configuration.billingDetailsCollectionConfiguration.attachDefaultsToPaymentMethod = true
```
> Wenden Sie sich an Ihren Rechtsbeistand bezüglich der Gesetze, die für das Erfassen von Informationen gelten. Erfassen Sie Telefonnummern nur, wenn Sie sie für die Transaktion benötigen.
## Optional: Zahlung in Ihrer Nutzeroberfläche abschließen
Sie können das Zahlungsformular anzeigen, um nur die Details einer Zahlungsmethode zu erfassen, und später eine `confirm`-Methode aufrufen, um die Zahlung in der Nutzeroberfläche Ihrer App abzuschließen. Dies ist nützlich, wenn Sie eine nutzerspezifische Kaufschaltfläche haben oder zusätzliche Schritte erforderlich sind, nachdem Sie die Zahlungsdetails erfasst haben.

Schließen Sie die Zahlung über die Nutzeroberfläche Ihrer App ab
#### UIKit
Die folgenden Schritte führen Sie durch den Abschluss der Zahlung in der Nutzeroberfläche Ihrer Nutzeroberfläche. Sehen Sie sich unsere Beispiel-Integration auf [GitHub](https://github.com/stripe/stripe-ios/blob/master/Example/PaymentSheet%20Example/PaymentSheet%20Example/ExampleCustomCheckoutViewController.swift) an.
1. Initialisieren Sie zunächst [PaymentSheet.FlowController](https://stripe.dev/stripe-ios/stripepaymentsheet/documentation/stripepaymentsheet/paymentsheet/flowcontroller) anstelle von `PaymentSheet` und aktualisieren Sie Ihre Nutzeroberfläche mit der Eigenschaft `paymentOption`. Diese Eigenschaft enthält ein Bild und ein Label, die die ursprünglich ausgewählte Standardzahlungsmethode des/der Kund/in darstellen.
```swift
PaymentSheet.FlowController.create(paymentIntentClientSecret: paymentIntentClientSecret, configuration: configuration) { [weak self] result in
switch result {
case .failure(let error):
print(error)
case .success(let paymentSheetFlowController):
self?.paymentSheetFlowController = paymentSheetFlowController
// Update your UI using paymentSheetFlowController.paymentOption
}
}
```
1. Rufen Sie als Nächstes `presentPaymentOptions` auf, um die Zahlungsdetails zu erfassen. Wenn Sie fertig sind, aktualisieren Sie Ihre Nutzeroberfläche erneut mit der Eigenschaft `paymentOption`.
```swift
paymentSheetFlowController.presentPaymentOptions(from: self) {
// Update your UI using paymentSheetFlowController.paymentOption
}
```
1. Rufen Sie schließlich `confirm` auf.
```swift
paymentSheetFlowController.confirm(from: self) { paymentResult in
// MARK: Handle the payment result
switch paymentResult {
case .completed:
print("Payment complete!")
case .canceled:
print("Canceled!")
case .failed(let error):
print(error)
}
}
```
#### SwiftUI
Die folgenden Schritte führen Sie durch den Abschluss der Zahlung in der Nutzeroberfläche Ihrer Nutzeroberfläche. Sehen Sie sich unsere Beispielintegration auf [GitHub](https://github.com/stripe/stripe-ios/blob/master/Example/PaymentSheet%20Example/PaymentSheet%20Example/ExampleSwiftUICustomPaymentFlow.swift) an.
1. Initialisieren Sie zunächst [PaymentSheet.FlowController](https://stripe.dev/stripe-ios/stripepaymentsheet/documentation/stripepaymentsheet/paymentsheet/flowcontroller) anstelle von `PaymentSheet`. Die Eigenschaft `paymentOption` enthält ein Bild und eine Beschriftung, die die aktuell ausgewählte Zahlungsmethode des/der Kund/in darstellen und die Sie in Ihrer Nutzeroberfläche verwenden können.
```swift
PaymentSheet.FlowController.create(paymentIntentClientSecret: paymentIntentClientSecret, configuration: configuration) { [weak self] result in
switch result {
case .failure(let error):
print(error)
case .success(let paymentSheetFlowController):
self?.paymentSheetFlowController = paymentSheetFlowController
// Use the paymentSheetFlowController.paymentOption properties in your UI
myPaymentMethodLabel = paymentSheetFlowController.paymentOption?.label ?? "Select a payment method"
myPaymentMethodImage = paymentSheetFlowController.paymentOption?.image ?? UIImage(systemName: "square.and.pencil")!
}
}
```
1. Verwenden Sie [PaymentSheet.FlowController.PaymentOptionsButton](https://stripe.dev/stripe-ios/stripepaymentsheet/documentation/stripepaymentsheet/paymentsheet/flowcontroller/paymentoptionsbutton), um die Schaltfläche anzuordnen, die das Formular zum Erfassen der Zahlungsdetails vorlegt. Wenn `PaymentSheet.FlowController` das Argument `onSheetDismissed` aufruft, spiegelt die `paymentOption` für die `PaymentSheet.FlowController`-Instanz die aktuell ausgewählte Zahlungsmethode wider.
```swift
PaymentSheet.FlowController.PaymentOptionsButton(
paymentSheetFlowController: paymentSheetFlowController,
onSheetDismissed: {
myPaymentMethodLabel = paymentSheetFlowController.paymentOption?.label ?? "Select a payment method"
myPaymentMethodImage = paymentSheetFlowController.paymentOption?.image ?? UIImage(systemName: "square.and.pencil")!
},
content: {
/* An example button */
HStack {
Text(myPaymentMethodLabel)
Image(uiImage: myPaymentMethodImage)
}
}
)
```
1. Verwenden Sie [PaymentSheet.FlowController.PaymentOptionsButton](https://stripe.dev/stripe-ios/stripepaymentsheet/documentation/stripepaymentsheet/paymentsheet/flowcontroller/paymentoptionsbutton), um die Schaltfläche zur Bestätigung der Zahlung anzuordnen.
```swift
PaymentSheet.FlowController.ConfirmButton(
paymentSheetFlowController: paymentSheetFlowController,
onCompletion: { result in
// MARK: Handle the payment result
switch result {
case .completed:
print("Payment complete!")
case .canceled:
print("Canceled!")
case .failed(let error):
print(error)
}
},
content: {
/* An example button */
Text("Pay")
}
)
```
Wenn `PaymentSheetResult` `.completed` ist, informieren Sie den/die Kund/in (zum Beispiel durch die Anzeige einer Bestellbestätigung).
Wenn Sie `allowsDelayedPaymentMethods` auf true festlegen, werden Zahlungsmethoden mit [verzögerter Benachrichtigung](https://docs.stripe.com/payments/payment-methods.md#payment-notification) wie US-Bankkonten zugelassen. Für diese Zahlungsmethoden ist der endgültige Zahlungsstatus nicht bekannt, wenn das `PaymentSheet` abgeschlossen wird. Stattdessen ist sie erfolgreich oder schlägt fehl. Wenn Sie diese Art von Zahlungsmethoden unterstützen, informieren Sie den Kunden/die Kundin darüber, dass seine/ihre Bestellung bestätigt ist, und führen seine/ihre Bestellung erst aus (z. B. das Produkt versenden), wenn die Zahlung erfolgreich ist.
## Optional: Weitere Zahlungsmethoden aktivieren
Navigieren Sie im Dashboard zu [Zahlungsmethoden für Ihre verbundenen Konten verwalten](https://dashboard.stripe.com/settings/payment_methods/connected_accounts), um zu konfigurieren, welche Zahlungsmethoden Ihre verbundenen Konten akzeptieren. Änderungen an den Standardeinstellungen gelten für alle neuen und bestehenden verbundenen Konten.
Informationen zu den Zahlungsmethoden finden Sie in den folgenden Ressourcen:
- [Ein Leitfaden zu Zahlungsmethoden](https://stripe.com/payments/payment-methods-guide#choosing-the-right-payment-methods-for-your-business), der Ihnen bei der Auswahl der richtigen Zahlungsmethoden für Ihre Plattform hilft.
- [Kontofunktionen](https://docs.stripe.com/connect/account-capabilities.md), um sicherzustellen, dass die gewählten Zahlungsmethoden für Ihre verbundenen Konten funktionieren.
- [Zahlungsmethode und Produktsupport](https://docs.stripe.com/payments/payment-methods/payment-method-support.md#product-support), um sicherzustellen, dass die gewählten Zahlungsmethoden für Ihre Stripe-Produkte und Zahlungsabläufe geeignet sind.
Für jede Zahlungsmethode können Sie eine der folgenden Dropdown-Optionen wählen:
| |
| |
| **Standardmäßig aktiviert** | Ihre verbundenen Konten akzeptieren diese Zahlungsmethode beim Bezahlvorgang. Einige Zahlungsmethoden können nur deaktiviert oder gesperrt werden. Dies liegt daran, dass Ihre verbundenen Konten mit *Zugriff auf das Stripe-Dashboard* (Platforms can provide connected accounts with access to the full Stripe Dashboard or the Express Dashboard. Otherwise, platforms build an interface for connected accounts using embedded components or the Stripe API) sie auf ihrer Seite mit Einstellungen aktivieren müssen. |
| **Standardmäßig deaktiviert** | Ihre verbundenen Konten akzeptieren diese Zahlungsmethode beim Bezahlvorgang nicht. Wenn Sie Ihren verbundenen Konten mit *Zugriff auf das Stripe-Dashboard* (Platforms can provide connected accounts with access to the full Stripe Dashboard or the Express Dashboard. Otherwise, platforms build an interface for connected accounts using embedded components or the Stripe API) erlauben, ihre eigenen Zahlungsmethoden zu verwalten, haben sie die Möglichkeit, sie zu aktivieren. |
| **Blockiert** | Ihre verbundenen Konten akzeptieren diese Zahlungsmethode beim Bezahlvorgang nicht. Wenn Sie Ihren verbundenen Konten mit *Zugriff auf das Stripe-Dashboard* (Platforms can provide connected accounts with access to the full Stripe Dashboard or the Express Dashboard. Otherwise, platforms build an interface for connected accounts using embedded components or the Stripe API) erlauben, ihre eigenen Zahlungsmethoden zu verwalten, haben sie nicht die Möglichkeit, sie zu aktivieren. |

Optionen für Zahlungsmethoden
Wenn Sie eine Änderung an einer Zahlungsmethode vornehmen, müssen Sie auf **Änderungen überprüfen** in der Leiste unten im Bildschirm klicken und auf **Speichern und anwenden**, um Ihre verbundenen Konten zu aktualisieren.

Dialogfeld „Speichern“
### Verbundenen Konten die Verwaltung von Zahlungsmethoden gestatten
Stripe empfiehlt, dass Sie Ihren verbundenen Konten erlauben, ihre eigenen Zahlungsmethoden anzupassen. Diese Option ermöglicht jedem verbundenen Konto mit *Zugriff auf das Stripe-Dashboard* (Platforms can provide connected accounts with access to the full Stripe Dashboard or the Express Dashboard. Otherwise, platforms build an interface for connected accounts using embedded components or the Stripe API), seine Seite mit den [Zahlungsmethoden](https://dashboard.stripe.com/settings/payment_methods) anzuzeigen und zu aktualisieren. Nur Inhaber/innen der verbundenen Konten können ihre Zahlungsmethoden anpassen. Das Stripe-Dashboard zeigt die Standard-Zahlungsmethoden an, die Sie auf alle neuen und bestehenden verbundenen Konten angewendet haben. Ihre verbundenen Konten können diese Standardeinstellungen außer Kraft setzen, mit Ausnahme der von Ihnen blockierten Zahlungsmethoden.
Aktivieren Sie das Kontrollkästchen **Anpassung des Kontos**, um diese Option zu aktivieren. Sie müssen auf **Änderungen überprüfen** in der Leiste unten im Bildschirm klicken und dann **Speichern und übernehmen** auswählen, um diese Einstellung zu aktualisieren.

Kontrollkästchen „Anpassung des Kontos“
### Funktionen der Zahlungsmethode
Damit Ihre verbundenen Konten zusätzliche Zahlungsmethoden akzeptieren können, müssen deren `Accounts` über aktive Zahlungsmethoden verfügen.
Wenn Sie unter [Zahlungsmethoden für Ihre verbundenen Konten verwalten](https://dashboard.stripe.com/settings/payment_methods/connected_accounts) die Option „Standardmäßig aktiviert“ für eine Zahlungsmethode ausgewählt haben, fordert Stripe automatisch die erforderliche Funktion für neue und bestehende verbundene Konten an, sofern diese die Verifizierungsanforderungen erfüllen. Wenn das verbundene Konto die Anforderungen nicht erfüllt oder Sie die direkte Kontrolle behalten möchten, können Sie die Funktion manuell im Dashboard oder über die API anfordern.
Die meisten Zahlungsmethoden haben die gleichen Verifizierungsanforderungen wie die `card_payments`-Funktion, mit einigen Einschränkungen und Ausnahmen. Die [Tabelle der Zahlungsmethodenfunktionen](https://docs.stripe.com/connect/account-capabilities.md#payment-methods) führt die Zahlungsmethoden auf, die eine zusätzliche Verifizierung erfordern.
#### Dashboard
[Suchen Sie im Dashboard ein verbundenes Konto](https://docs.stripe.com/connect/dashboard/managing-individual-accounts.md#finding-accounts), um dessen Funktionen zu bearbeiten und ausstehende Verifizierungsanforderungen einzusehen.
#### API
Für ein bestehendes verbundenes Konto können Sie die vorhandenen Funktionen [auflisten](https://docs.stripe.com/api/capabilities/list.md), um festzustellen, ob Sie zusätzliche Funktionen anfordern müssen.
```curl
curl https://api.stripe.com/v1/accounts/{{CONNECTEDACCOUNT_ID}}/capabilities \
-u "<>:"
```
Fordern Sie zusätzliche Funktionen an, indem Sie die Funktionen jedes verbundenen Kontos [aktualisieren](https://docs.stripe.com/api/capabilities/update.md).
```curl
curl https://api.stripe.com/v1/accounts/{{CONNECTEDACCOUNT_ID}}/capabilities/us_bank_account_ach_payments \
-u "<>:" \
-d requested=true
```
Es kann zu einer Verzögerung kommen, bevor die angeforderte Funktion aktiv wird. Wenn für die Funktion Aktivierungsanforderungen gelten, enthält die Antwort diese in den `requirements`-Arrays.
## Gebühren einziehen
Als Plattform können Sie Ihren verbundenen Konten einen Anteil jeder Transaktion in Form von Plattformgebühren in Rechnung stellen. Sie können die Preise für Plattformgebühren auf folgende Weise festlegen:
- Mit dem [Plattform-Preistool](https://docs.stripe.com/connect/platform-pricing-tools.md) können Sie Preisregeln festlegen und testen. Diese No-Code-Funktion im Stripe-Dashboard ist derzeit nur für Plattformen verfügbar, die für die Zahlung von Stripe-Gebühren verantwortlich sind.
- Geben Sie die Plattformgebühren direkt in einem [PaymentIntent](https://docs.stripe.com/api/payment_intents/object.md) an. Die auf diese Weise festgelegten Gebühren haben Vorrang vor der im Preistool für Plattformen festgelegten Preislogik.
Ihre Plattform kann eine Plattformgebühr unter Berücksichtigung der folgenden Einschränkungen erheben:
- Der Wert von `application_fee_amount` muss positiv und kleiner als der Betrag der Zahlung sein. Die erhobene Plattformgebühr wird auf den Betrag der Zahlung begrenzt.
- Es fallen keine zusätzlichen Stripe-Gebühren für die Plattformgebühr selbst an.
- In Übereinstimmung mit gesetzlich vorgeschriebenen und Compliance-Anforderungen in Brasilien können Plattformen mit Sitz außerhalb Brasiliens und mit brasilianischen verbundenen Konten keine Plattformgebühren über Stripe einziehen.
- Die Währung des `application_fee_amount` hängt von einigen Faktoren für [mehrere Währungen](https://docs.stripe.com/connect/currencies.md) ab.
Die [BalanceTransaction](https://docs.stripe.com/api.md#balance_transaction_retrieve) der resultierenden Zahlung enthält eine detaillierte Aufschlüsselung der Transaktionsgebühren von Stripe als auch der Plattformgebühren. Um die Berichterstellung zu verbessern, wird durch die Erhebung einer Transaktionsgebühr ein [ApplicationFee](https://docs.stripe.com/api/application_fees/object.md)-Objekt generiert. Verwenden Sie für die Berichterstellung die Eigenschaft `amount` im `ApplicationFee`-Objekt.
Die Plattformgebühren können Sie im Abschnitt [Erhobene Transaktionsgebühren](https://dashboard.stripe.com/connect/application_fees) des Dashboards einsehen.
> Plattformgebühren für Direct Charges werden standardmäßig asynchron erstellt. Wenn Sie das `application_fee`-Objekt in einer Zahlungserstellungsanfrage erweitern, wird die Plattformgebühr synchron als Teil dieser Anfrage erstellt. Erweitern Sie das `application_fee`-Objekt nur bei Bedarf, da dies die Latenz der Anfrage erhöht.
>
> Um Benachrichtigungen über asynchron erstellte `ApplicationFee`-Objekte zu erhalten, überwachen Sie das Webhook-Ereignis [application_fee.created](https://docs.stripe.com/api/events/types.md#event_types-application_fee.created).

Integrieren Sie die vorgefertigte Zahlungs-UI von Stripe in den Bezahlvorgang Ihrer Android-App mit der [PaymentSheet](https://stripe.dev/stripe-android/paymentsheet/com.stripe.android.paymentsheet/-payment-sheet/index.html)-Klasse.
> #### Accounts v2 API unterstützt
>
> Das Payment Sheet unterstützt *von Kund/innen konfigurierte Konten* nicht. Es unterstützt nur `Kund/innen`-Objekte.
## Stripe einrichten [Serverseitig] [Clientseitig]
Zunächst benötigen Sie ein Stripe-Konto. [Registrieren Sie sich jetzt](https://dashboard.stripe.com/register).
### Serverseitig
Für diese Integration sind Endpoints auf Ihrem Server erforderlich, die mit der Stripe-API kommunizieren können. Nutzen Sie die offiziellen Bibliotheken für den Zugriff auf die Stripe-API von Ihrem Server aus:
#### Ruby
```bash
# Available as a gem
sudo gem install stripe
```
```ruby
# If you use bundler, you can add this line to your Gemfile
gem 'stripe'
```
### Clientseitig
Das [Stripe Android SDK](https://github.com/stripe/stripe-android) ist Open Source und [vollständig dokumentiert](https://stripe.dev/stripe-android/).
Um das SDK zu installieren, fügen Sie `stripe-android` in den Block `dependencies` Ihrer [app/build.gradle](https://developer.android.com/studio/build/dependencies)-Datei ein:
#### Kotlin
```kotlin
plugins {
id("com.android.application")
}
android { ... }
dependencies {
// ...
// Stripe Android SDK
implementation("com.stripe:stripe-android:23.7.0")
// Include the financial connections SDK to support US bank account as a payment method
implementation("com.stripe:financial-connections:23.7.0")
}
```
> Details zur aktuellen SDK-Version und zu vorherigen Versionen finden Sie auf der Seite [Releases](https://github.com/stripe/stripe-android/releases) auf GitHub. Um bei Veröffentlichung eines neuen Release eine Benachrichtigung zu erhalten, [beobachten Sie Veröffentlichungen für das jeweilige Repository](https://docs.github.com/en/github/managing-subscriptions-and-notifications-on-github/configuring-notifications#configuring-your-watch-settings-for-an-individual-repository).
Konfigurieren Sie das SDK mit Ihrem [veröffentlichbaren Schlüssel](https://dashboard.stripe.com/apikeys) von Stripe so, dass dieser Anfragen an die API stellen kann, wie beispielsweise in Ihrer Unterklasse `Application`:
#### Kotlin
```kotlin
import com.stripe.android.PaymentConfiguration
class MyApp : Application() {
override fun onCreate() {
super.onCreate()
PaymentConfiguration.init(
applicationContext,
"<>"
)
}
}
```
> Verwenden Sie Ihre [Testschlüssel](https://docs.stripe.com/keys.md#obtain-api-keys) beim Testen und Entwickeln Ihrer App und Ihre [Live-Modus](https://docs.stripe.com/keys.md#test-live-modes)-Schlüssel beim Veröffentlichen Ihrer App.
## Endpoint hinzufügen [Serverseitig]
> #### Hinweis
>
> Um das PaymentSheet vor dem Erstellen eines PaymentIntent anzuzeigen, finden Sie weitere Informationen unter [Erfassen von Zahlungsdetails vor dem Erstellen eines Intent](https://docs.stripe.com/payments/accept-a-payment-deferred.md?type=payment).
Diese Integration verwendet drei Stripe-API-Objekte:
1. [PaymentIntent](https://docs.stripe.com/api/payment_intents.md): Stripe verwendet diesen, um Ihre Absicht darzustellen, Zahlungen von Ihren Kundinnen/Kunden anzufordern, wobei Abbuchungsversuche und Zahlungsstatusänderungen im gesamten Vorgang dokumentiert werden.
1. (Optional) Ein von [Kundinnen/Kunden konfiguriertes Konto](https://docs.stripe.com/api/v2/core/accounts/object.md#v2_account_object-applied_configurations) oder ein [Customer](https://docs.stripe.com/api/customers.md)-Objekt: Um eine Zahlungsmethode für zukünftige Zahlungen einzurichten, müssen Sie diese einem Kunden/einer Kundin zuordnen. Erstellen Sie ein Objekt, das Ihre Kundin/Ihren Kunden repräsentiert, wenn sie/er ein Konto bei Ihrem Unternehmen anlegt. Wenn Ihre Kundin/Ihr Kunde eine Zahlung als Gast durchführt, können Sie vor der Zahlung ein `Account`- oder `Customer`-Objekt erstellen und es zu einem späteren Zeitpunkt mit Ihrer eigenen Darstellung des Kundenkontos verknüpfen.
1. (Optional) [CustomerSession](https://docs.stripe.com/api/customer_sessions.md): Informationen zum Objekt, das Ihre Kundin/Ihren Kunden repräsentiert, sind vertraulich und können nicht direkt über eine App abgerufen werden. Eine `CustomerSession` gewährt dem SDK vorübergehenden, bereichsbezogenen Zugriff auf das `Account` oder die/den `Customer` und stellt zusätzliche Konfigurationsoptionen bereit. Hier finden Sie eine vollständige Liste der [Konfigurationsoptionen](https://docs.stripe.com/api/customer_sessions/create.md#create_customer_session-components).
> Wenn Sie niemals Karten für eine Kundin/einen Kunden speichern und wiederkehrenden Kundinnen und Kunden nicht erlauben, gespeicherte Karten wiederzuverwenden, können Sie das `Account`- oder `Customer`-Objekt und das `CustomerSession`-Objekt aus Ihrer Integration weglassen.
Aus Sicherheitsgründen kann Ihre App diese Objekte nicht erstellen. Fügen Sie stattdessen einen Endpoint auf Ihrem Server hinzu, der:
1. Ruft das `Account` oder die/den `Customer` ab oder erstellt ein neues bzw eine/einen neue/n.
1. Erstellt eine [CustomerSession](https://docs.stripe.com/api/customer_sessions.md) für das `Account` oder die/den `Customer`.
1. Erstellt einen `PaymentIntent` mit dem [Betrag](https://docs.stripe.com/api/payment_intents/create.md#create_payment_intent-amount), der [Währung](https://docs.stripe.com/api/payment_intents/create.md#create_payment_intent-currency), und entweder mit dem [customer_account](https://docs.stripe.com/api/payment_intents/create.md#create_payment_intent-customer_account) oder der [Kundin/dem Kunden](https://docs.stripe.com/api/payment_intents/create.md#create_payment_intent-customer).
1. Gibt das *Client-Geheimnis* (The client secret is a unique key returned from Stripe as part of a PaymentIntent. This key lets the client access important fields from the PaymentIntent (status, amount, currency) while hiding sensitive ones (metadata, customer)) des `PaymentIntent`, das `client_secret` der `CustomerSession`, die ID des `Account`s oder der/des `Customer` und Ihren [veröffentlichbaren Schlüssel](https://dashboard.stripe.com/apikeys) für Ihre App zurück.
Die Zahlungsmethoden, die Kund/innen während des Bezahlvorgangs angezeigt werden, sind ebenfalls in der PaymentIntent enthalten. Sie können Stripe Zahlungsmethoden aus Ihren Dashboard-Einstellungen abrufen lassen oder sie manuell auflisten. Gleich welche Option Sie wählen, die in der PaymentIntent übergebene Währung filtert die Zahlungsmethoden, die dem/r Kund/in angezeigt werden. Wenn Sie beispielsweise `eur` für den PaymentIntent übergeben und OXXO im Dashboard aktiviert ist, wird dem/r Kund/in OXXO nicht angezeigt, da OXXO `eur`-Zahlungen nicht unterstützt.
Sofern Ihre Integration keine codebasierte Option zum Anbieten von Zahlungsmethoden erfordert, empfiehlt Stripe die automatisierte Option, da Stripe die Währung, Einschränkungen für Zahlungsmethoden und andere Parameter auswertet, um die Liste der unterstützten Zahlungsmethoden zu ermitteln. Zahlungsmethoden, die die Konversion steigern und die für die Währung und den Standort des/r Kund/in am relevantesten sind, erhalten Priorität.
#### Zahlungsmethoden über das Dashboard verwalten
Zahlungsmethoden können Sie über das [Dashboard](https://dashboard.stripe.com/settings/payment_methods) verwalten. Stripe handhabt die Rückgabe geeigneter Zahlungsmethoden basierend auf Faktoren wie Betrag, Währung und Zahlungsablauf der Transaktion. Der PaymentIntent wird mit den Zahlungsmethoden erstellt, die Sie im Dashboard konfiguriert haben. Wenn Sie das Dashboard nicht verwenden möchten oder wenn Sie Zahlungsmethoden manuell angeben möchten, können Sie sie mit dem Attribut `payment_method_types` auflisten.
#### Curl
```bash
# Create a Customer (use an existing Customer ID if this is a returning customer)
curl https://api.stripe.com/v1/customers \
-u <>: \
-X "POST" \
-H "Stripe-Account: {{CONNECTED_ACCOUNT_ID}}"
# Create an CustomerSession for the Customer
curl https://api.stripe.com/v1/customer_sessions \
-u <>: \
-X "POST" \
-d "customer"="{{CUSTOMER_ID}}" \
-d "components[mobile_payment_element][enabled]"=true \
-d "components[mobile_payment_element][features][payment_method_save]"=enabled \
-d "components[mobile_payment_element][features][payment_method_redisplay]"=enabled \
-d "components[mobile_payment_element][features][payment_method_remove]"=enabled
# Create a PaymentIntent
curl https://api.stripe.com/v1/payment_intents \
-u <>: \
-H "Stripe-Account: {{CONNECTED_ACCOUNT_ID}}"
-X "POST" \
-d "customer"="{{CUSTOMER_ID}}" \
-d "amount"=1099 \
-d "currency"="eur" \
-d "automatic_payment_methods[enabled]"=true \
-d application_fee_amount="123" \
```
#### Zahlungsmethoden manuell auflisten
#### Curl
```bash
# Create a Customer (use an existing Customer ID if this is a returning customer)
curl https://api.stripe.com/v1/customers \
-u <>: \
-X "POST" \
-H "Stripe-Account: {{CONNECTED_ACCOUNT_ID}}"
# Create an CustomerSession for the Customer
curl https://api.stripe.com/v1/customer_sessions \
-u <>: \
-X "POST" \
-d "customer"="{{CUSTOMER_ID}}" \
-d "components[mobile_payment_element][enabled]"=true \
-d "components[mobile_payment_element][features][payment_method_save]"=enabled \
-d "components[mobile_payment_element][features][payment_method_redisplay]"=enabled \
-d "components[mobile_payment_element][features][payment_method_remove]"=enabled
# Create a PaymentIntent
curl https://api.stripe.com/v1/payment_intents \
-u <>: \
-H "Stripe-Account: {{CONNECTED_ACCOUNT_ID}}"
-X "POST" \
-d "customer"="{{CUSTOMER_ID}}" \
-d "amount"=1099 \
-d "currency"="eur" \
-d "payment_method_types[]"="bancontact" \
-d "payment_method_types[]"="card" \
-d "payment_method_types[]"="ideal" \
-d "payment_method_types[]"="klarna" \
-d "payment_method_types[]"="sepa_debit" \
-d application_fee_amount="123" \
```
> Jede Zahlungsmethode muss die im PaymentIntent übergebene Währung unterstützen, und Ihr Unternehmen muss in einem der Länder ansässig sein, die jede Zahlungsmethode unterstützt. Auf der Seite [Optionen für die Integration von Zahlungsmethoden](https://docs.stripe.com/payments/payment-methods/integration-options.md) finden Sie weitere Informationen zu den unterstützten Zahlungsmethoden.
## Zahlungsformular integrieren [Clientseitig]
Bevor das mobile Payment Element angezeigt wird, sollte Ihre Checkout-Seite:
- Zeigen Sie die gekauften Produkte und den Gesamtbetrag an
- Erfassen Sie erforderliche Versandinformationen mithilfe des [Address Element](https://docs.stripe.com/elements/address-element.md?platform=android).
- Fügen Sie eine Checkout-Schaltfläche ein, um die Nutzeroberfläche von Stripe anzuzeigen
#### Jetpack Compose
[Initialisieren](https://stripe.dev/stripe-android/paymentsheet/com.stripe.android.paymentsheet/-payment-sheet/-builder/index.html) Sie eine `PaymentSheet`-Instanz innerhalb von `onCreate` Ihrer Checkout-Aktivität, wobei eine Methode zur Verarbeitung des Ergebnisses übergeben wird.
```kotlin
import androidx.compose.runtime.Composable
import androidx.compose.runtime.remember
import com.stripe.android.paymentsheet.PaymentSheet
import com.stripe.android.paymentsheet.PaymentSheetResult
@Composable
fun App() {
val paymentSheet = remember { PaymentSheet.Builder(::onPaymentSheetResult) }.build()
}
private fun onPaymentSheetResult(paymentSheetResult: PaymentSheetResult) {
// implemented in the next steps
}
```
Rufen Sie als Nächstes das PaymentIntent-Client-Geheimnis, das Client-Geheimnis der Kunden-Sitzung, die Kundennummer und den veröffentlichbaren Schlüssel vom Endpoint ab, den Sie im vorigen Schritt erstellt haben. Legen Sie den veröffentlichbaren Schlüssel mithilfe von `PaymentConfiguration` fest und speichern Sie die anderen für den Zeitpunkt, an dem Sie das PaymentSheet präsentieren.
```kotlin
import androidx.compose.runtime.Composable
import androidx.compose.runtime.rememberimport androidx.compose.runtime.LaunchedEffect
import androidx.compose.runtime.getValue
import androidx.compose.runtime.mutableStateOf
import androidx.compose.runtime.setValue
import androidx.compose.ui.platform.LocalContext
import com.stripe.android.PaymentConfiguration
import com.stripe.android.paymentsheet.PaymentSheet
import com.stripe.android.paymentsheet.PaymentSheetResult
@Composable
fun App() {
val paymentSheet = remember { PaymentSheet.Builder(::onPaymentSheetResult) }.build()val context = LocalContext.current
var customerConfig by remember { mutableStateOf(null) }
varpaymentIntentClientSecret by remember { mutableStateOf(null) }
LaunchedEffect(context) {
// Make a request to your own server and retrieve payment configurations
val networkResult = ...
if (networkResult.isSuccess) {paymentIntentClientSecret = networkResult.paymentIntent
customerConfig = PaymentSheet.CustomerConfiguration.createWithCustomerSession(
id = networkResult.customer,
clientSecret = networkResult.customerSessionClientSecret
)PaymentConfiguration.init(context, networkResult.publishableKey, ""{{CONNECTED_ACCOUNT_ID}}"")}
}
}
private fun onPaymentSheetResult(paymentSheetResult: PaymentSheetResult) {
// implemented in the next steps
}
```
Wenn der Kunde/die Kundin auf Ihre Checkout-Schaltfläche tippt, rufen Sie [presentWithPaymentIntent](https://stripe.dev/stripe-android/paymentsheet/com.stripe.android.paymentsheet/-payment-sheet/index.html#1814490530%2FFunctions%2F2002900378) auf, um das Zahlungsformular anzuzeigen. Sobald die Zahlung kundenseitig abgeschlossen wurde, wird das Formular verworfen und [PaymentSheetResultCallback](https://stripe.dev/stripe-android/paymentsheet/com.stripe.android.paymentsheet/-payment-sheet-result-callback/index.html) mit einem [PaymentSheetResult](https://stripe.dev/stripe-android/paymentsheet/com.stripe.android.paymentsheet/-payment-sheet-result/index.html) aufgerufen.
```kotlin
import androidx.compose.material.Button
import androidx.compose.material.Text
import androidx.compose.runtime.Composable
import androidx.compose.runtime.LaunchedEffect
import androidx.compose.runtime.getValue
import androidx.compose.runtime.mutableStateOf
import androidx.compose.runtime.remember
import androidx.compose.runtime.setValue
import androidx.compose.ui.platform.LocalContext
import com.stripe.android.PaymentConfiguration
import com.stripe.android.paymentsheet.PaymentSheet
import com.stripe.android.paymentsheet.PaymentSheetResult
@Composable
fun App() {
val paymentSheet = remember { PaymentSheet.Builder(::onPaymentSheetResult) }.build()
val context = LocalContext.current
var customerConfig by remember { mutableStateOf(null) }
var paymentIntentClientSecret by remember { mutableStateOf(null) }
LaunchedEffect(context) {
// Make a request to your own server and retrieve payment configurations
val networkResult = ...
if (networkResult.isSuccess) {
paymentIntentClientSecret = networkResult.paymentIntent
customerConfig = PaymentSheet.CustomerConfiguration.createWithCustomerSession(
id = networkResult.customer,
clientSecret = networkResult.customerSessionClientSecret
)
PaymentConfiguration.init(context, networkResult.publishableKey, ""{{CONNECTED_ACCOUNT_ID}}"")
}
}Button(
onClick = {
val currentConfig = customerConfig
val currentClientSecret =paymentIntentClientSecret
if (currentConfig != null && currentClientSecret != null) {
presentPaymentSheet(paymentSheet, currentConfig, currentClientSecret)
}
}
) {
Text("Checkout")
}
}private fun presentPaymentSheet(
paymentSheet: PaymentSheet,
customerConfig: PaymentSheet.CustomerConfiguration,paymentIntentClientSecret: String
) {
paymentSheet.presentWithPaymentIntent(paymentIntentClientSecret,
PaymentSheet.Configuration.Builder(merchantDisplayName = "My merchant name")
.customer(customerConfig)
// Set `allowsDelayedPaymentMethods` to true if your business handles
// delayed notification payment methods like US bank accounts.
.allowsDelayedPaymentMethods(true)
.build()
)
}
private fun onPaymentSheetResult(paymentSheetResult: PaymentSheetResult) {when(paymentSheetResult) {
is PaymentSheetResult.Canceled -> {
print("Canceled")
}
is PaymentSheetResult.Failed -> {
print("Error: ${paymentSheetResult.error}")
}
is PaymentSheetResult.Completed -> {
// Display for example, an order confirmation screen
print("Completed")
}
}
}
```
#### Ansichten (klassisch)
[Initialisieren](https://stripe.dev/stripe-android/paymentsheet/com.stripe.android.paymentsheet/-payment-sheet/index.html#-394860221%2FConstructors%2F2002900378) Sie innerhalb von `onCreate` Ihrer Checkout-Aktivität eine `PaymentSheet`-Instanz und übergeben Sie eine Methode, um das Ergebnis zu bearbeiten.
#### Kotlin
```kotlin
import com.stripe.android.paymentsheet.PaymentSheet
class CheckoutActivity : AppCompatActivity() {
lateinit var paymentSheet: PaymentSheet
override fun onCreate(savedInstanceState: Bundle?) {
super.onCreate(savedInstanceState)
paymentSheet = PaymentSheet.Builder(::onPaymentSheetResult).build(this)
}
fun onPaymentSheetResult(paymentSheetResult: PaymentSheetResult) {
// implemented in the next steps
}
}
```
Rufen Sie als Nächstes das PaymentIntent-Client-Geheimnis, das Client-Geheimnis der Kunden-Sitzung, die Kundennummer und den veröffentlichbaren Schlüssel vom Endpoint ab, den Sie im vorigen Schritt erstellt haben. Legen Sie den veröffentlichbaren Schlüssel mithilfe von `PaymentConfiguration` fest und speichern Sie die anderen für den Zeitpunkt, an dem Sie das PaymentSheet präsentieren.
#### Kotlin
```kotlin
import com.stripe.android.paymentsheet.PaymentSheet
class CheckoutActivity : AppCompatActivity() {
lateinit var paymentSheet: PaymentSheetlateinit var customerConfig: PaymentSheet.CustomerConfiguration
lateinit varpaymentIntentClientSecret: String
override fun onCreate(savedInstanceState: Bundle?) {
super.onCreate(savedInstanceState)
paymentSheet = PaymentSheet.Builder(::onPaymentSheetResult).build(this)lifecycleScope.launch {
// Make a request to your own server and retrieve payment configurations
val networkResult = MyBackend.getPaymentConfig()
if (networkResult.isSuccess) {paymentIntentClientSecret = networkResult.paymentIntent
customerConfig = PaymentSheet.CustomerConfiguration.createWithCustomerSession(
id = networkResult.customer,
clientSecret = networkResult.customerSessionClientSecret
)PaymentConfiguration.init(context, networkResult.publishableKey, ""{{CONNECTED_ACCOUNT_ID}}"")}
}
}
fun onPaymentSheetResult(paymentSheetResult: PaymentSheetResult) {
// implemented in the next steps
}
}
```
Wenn der Kunde/die Kundin auf Ihre Checkout-Schaltfläche tippt, rufen Sie [presentWithPaymentIntent](https://stripe.dev/stripe-android/paymentsheet/com.stripe.android.paymentsheet/-payment-sheet/index.html#1814490530%2FFunctions%2F2002900378) auf, um das Zahlungsformular anzuzeigen. Sobald die Zahlung kundenseitig abgeschlossen wurde, wird das Formular verworfen und [PaymentSheetResultCallback](https://stripe.dev/stripe-android/paymentsheet/com.stripe.android.paymentsheet/-payment-sheet-result-callback/index.html) mit einem [PaymentSheetResult](https://stripe.dev/stripe-android/paymentsheet/com.stripe.android.paymentsheet/-payment-sheet-result/index.html) aufgerufen.
#### Kotlin
```kotlin
// ...
class CheckoutActivity : AppCompatActivity() {
lateinit var paymentSheet: PaymentSheet
lateinit var customerConfig: PaymentSheet.CustomerConfiguration
lateinit var paymentIntentClientSecret: String
// ...fun presentPaymentSheet() {
paymentSheet.presentWithPaymentIntent(paymentIntentClientSecret,
PaymentSheet.Configuration.Builder(merchantDisplayName = "My merchant name")
.customer(customerConfig)
// Set `allowsDelayedPaymentMethods` to true if your business handles
// delayed notification payment methods like US bank accounts.
.allowsDelayedPaymentMethods(true)
.build()
)
}
fun onPaymentSheetResult(paymentSheetResult: PaymentSheetResult) {when(paymentSheetResult) {
is PaymentSheetResult.Canceled -> {
print("Canceled")
}
is PaymentSheetResult.Failed -> {
print("Error: ${paymentSheetResult.error}")
}
is PaymentSheetResult.Completed -> {
// Display for example, an order confirmation screen
print("Completed")
}
}
}
}
```
Wenn Sie `allowsDelayedPaymentMethods` auf true festlegen, werden Zahlungsmethoden mit [verzögerter Benachrichtigung](https://docs.stripe.com/payments/payment-methods.md#payment-notification) wie US-Bankkonten zugelassen. Für diese Zahlungsmethoden ist der endgültige Zahlungsstatus nicht bekannt, wenn das `PaymentSheet` abgeschlossen wird. Stattdessen ist sie erfolgreich oder schlägt fehl. Wenn Sie diese Art von Zahlungsmethoden unterstützen, informieren Sie den Kunden/die Kundin darüber, dass seine/ihre Bestellung bestätigt ist, und führen seine/ihre Bestellung erst aus (z. B. das Produkt versenden), wenn die Zahlung erfolgreich ist.
## Ereignisse nach Zahlung verarbeiten [Serverseitig]
Stripe sendet ein [payment_intent.succeeded](https://docs.stripe.com/api/events/types.md#event_types-payment_intent.succeeded)-Ereignis, wenn die Zahlung abgeschlossen ist. Verwenden Sie [Webhook-Tool im Dashboard](https://dashboard.stripe.com/webhooks) oder folgen Sie der [Webhook-Anleitung](https://docs.stripe.com/webhooks/quickstart.md), um diese Ereignisse zu empfangen und führen Sie Aktionen aus, wie beispielsweise das Senden einer Bestellbestätigung per E-Mail, das Protokollieren des Verkaufs in der Datenbank oder das Starten eines Versand-Workflows.
Überwachen Sie diese Ereignisse, statt auf einen Callback vom Client zu warten. Auf dem Client könnten die Kund/innen das Browserfenster schließen oder die App beenden, bevor der Callback erfolgt ist. Bösartige Clients könnten dann die Antwort manipulieren. Wenn Sie Ihre Integration so einrichten, dass sie asynchrone Ereignisse überwacht, können Sie [verschiedene Arten von Zahlungsmethoden](https://stripe.com/payments/payment-methods-guide) mit einer einzelnen Integration akzeptieren.
Neben der Abwicklung des `payment_intent.succeeded`-Ereignisses empfehlen wir die Abwicklung von diesen weiteren Ereignissen, wenn Sie Zahlungen mit dem Payment Element erfassen:
| Ereignis | Beschreibung | Aktion |
| ------------------------------------------------------------------------------------------------------------------------------- | ---------------------------------------------------------------------------------------------------------------------------------------------------------------------------------------------------------------------------------------------------------------------------------------------------------------------------------------------------- | ----------------------------------------------------------------------------------------------------------------------------------------------------------------------------------------------------------------------- |
| [payment_intent.succeeded](https://docs.stripe.com/api/events/types.md?lang=php#event_types-payment_intent.succeeded) | Wird gesendet, wenn Kundinnen und Kunden eine Zahlung erfolgreich abgeschlossen haben. | Senden Sie den Kund/innen eine Auftragsbestätigung und *wickeln* (Fulfillment is the process of providing the goods or services purchased by a customer, typically after payment is collected) Sie die Bestellung ab. |
| [payment_intent.processing](https://docs.stripe.com/api/events/types.md?lang=php#event_types-payment_intent.processing) | Wird gesendet, wenn eine/e Kund/in eine Zahlung erfolgreich veranlasst hat, die Zahlung aber noch nicht abgeschlossen ist. Dieses Ereignis wird am häufigsten gesendet, wenn der Kunde/die Kundin eine Bankabbuchung veranlasst. In Zukunft folgt darauf entweder ein `payment_intent.succeeded`- oder ein `payment_intent.payment_failed`-Ereignis. | Senden Sie eine Bestellbestätigung an die Kund/innen, in der angegeben ist, dass die Zahlung noch aussteht. Bei digitalen Waren können Sie die Bestellung abwickeln, bevor Sie darauf warten, dass die Zahlung erfolgt. |
| [payment_intent.payment_failed](https://docs.stripe.com/api/events/types.md?lang=php#event_types-payment_intent.payment_failed) | Wird gesendet, wenn ein Kunde/eine Kundin einen Zahlungsversuch durchführt, die Zahlung jedoch fehlschlägt. | Wenn eine Zahlung von `processing` zu `payment_failed` übergeht, bieten Sie der Kundin/dem Kunden einen weiteren Zahlungsversuch an. |
## Integration testen
#### Karten
| Kartennummer | Szenario | So führen Sie den Test durch |
| ------------------- | ------------------------------------------------------------------------------------------------------------------------------------------------------------------------------------------------------------------------------------------------------------------------------------------------------------------ | -------------------------------------------------------------------------------------------------------------------------------------- |
| 4242424242424242 | Die Kartenzahlung ist erfolgreich und es ist keine Authentifizierung erforderlich. | Füllen Sie das Kreditkartenformular aus und geben Sie die Kreditkartennummer mit beliebiger Gültigkeitsdauer, CVC und Postleitzahl an. |
| 4000002500003155 | Für die Kartenzahlung ist eine *Authentifizierung* (Strong Customer Authentication (SCA) is a regulatory requirement in effect as of September 14, 2019, that impacts many European online payments. It requires customers to use two-factor authentication like 3D Secure to verify their purchase) erforderlich. | Füllen Sie das Kreditkartenformular aus und geben Sie die Kreditkartennummer mit beliebiger Gültigkeitsdauer, CVC und Postleitzahl an. |
| 4000000000009995 | Die Karte wird mit einem Ablehnungscode wie `insufficient_funds` abgelehnt. | Füllen Sie das Kreditkartenformular aus und geben Sie die Kreditkartennummer mit beliebiger Gültigkeitsdauer, CVC und Postleitzahl an. |
| 6205500000000000004 | Die UnionPay-Karte hat eine variable Länge von 13 bis 19 Ziffern. | Füllen Sie das Kreditkartenformular aus und geben Sie die Kreditkartennummer mit beliebiger Gültigkeitsdauer, CVC und Postleitzahl an. |
#### Bankumleitungen
| Zahlungsmethode | Szenario | So führen Sie den Test durch |
| ----------------- | ------------------------------------------------------------------------------------------------------------------------------------------------------------------------------------------------------------------------------------------------- | --------------------------------------------------------------------------------------------------------------------------------------------------------------------------------------------------------------------------------------------- |
| Bancontact, iDEAL | Ihr/e Kund/in konnte sich auf der iDEAL-Weiterleitungsseite für eine auf Weiterleitung basierende Zahlungsmethode mit sofortiger Benachrichtigung nicht authentifizieren. | Wählen Sie eine beliebige, auf Weiterleitung basierende Zahlungsmethode aus, füllen Sie die erforderlichen Informationen aus und bestätigen Sie die Zahlung. Klicken Sie dann auf der Weiterleitungsseite auf **Testzahlung fehlgeschlagen**. |
| Pay by Bank | Ihr Kunde/Ihre Kundin zahlt erfolgreich mit einer auf Weiterleitung basierenden Zahlungsmethode mit [verzögerter Benachrichtigung](https://docs.stripe.com/payments/payment-methods.md#payment-notification). | Wählen Sie die Zahlungsmethode aus, füllen Sie die erforderlichen Informationen aus und bestätigen Sie die Zahlung. Klicken Sie dann auf der Weiterleitungsseite auf **Testzahlung abschließen**. |
| Pay by Bank | Ihr/e Kund/in konnte sich auf der iDEAL-Weiterleitungsseite für eine auf Weiterleitung basierende Zahlungsmethode mit verzögerter Benachrichtigung nicht authentifizieren. | Wählen Sie die Zahlungsmethode aus, füllen Sie die erforderlichen Informationen aus und bestätigen Sie die Zahlung. Klicken Sie dann auf der Weiterleitungsseite auf **Testzahlung fehlgeschlagen**. |
| BLIK | BLIK-Zahlungen können aus verschiedenen Gründen fehlschlagen. Es gibt sofortige Fehler (der Code ist abgelaufen oder ungültig), verzögerte Fehler (die Bank lehnt ab) oder Zeitüberschreitungen (der/die Kund/in hat nicht rechtzeitig reagiert). | Verwenden Sie E-Mail-Muster, um [die verschiedenen Fehler zu simulieren](https://docs.stripe.com/payments/blik/accept-a-payment.md#simulate-failures) |
#### Banklastschriften
| Zahlungsmethode | Szenario | So führen Sie den Test durch |
| ---------------- | -------------------------------------------------------------------------------------------------------- | ------------------------------------------------------------------------------------------------------------------------------------------------------------------------------------------------------------------ |
| SEPA-Lastschrift | Ihr/e Kund/in zahlt erfolgreich mit dem SEPA-Lastschriftverfahren. | Füllen Sie das Formular mit der Kontonummer `AT321904300235473204` aus. Die bestätigte PaymentIntent geht zunächst in den Status „wird verarbeitet“ und dann drei Minuten später in den Status „erfolgreich“ über. |
| SEPA-Lastschrift | Der Status der PaymentIntent Ihres/Ihrer Kund/in wechselt von `processing` zu `requires_payment_method`. | Füllen Sie das Formular mit der Kontonummer `AT861904300235473202` aus. |
Hier finden Sie weitere Informationen zum [Testen](https://docs.stripe.com/testing.md) Ihrer Integration.
## Optional: Google Pay aktivieren
### Integration einrichten
Um Google Pay zu verwenden, aktivieren Sie zuerst die Google Pay API, indem Sie dem Tag `` Ihrer Datei **AndroidManifest.xml** Folgendes hinzufügen:
```xml
...
```
Weitere Informationen finden Sie in der [Google Pay API](https://developers.google.com/pay/api/android/guides/setup) für Android.
### Google Pay hinzufügen
Um Google Pay zu Ihrer Integration hinzuzufügen, übergeben Sie [PaymentSheet.GooglePayConfiguration](https://stripe.dev/stripe-android/paymentsheet/com.stripe.android.paymentsheet/-payment-sheet/-google-pay-configuration/index.html) mit Ihrer Google Pay-Umgebung (Produktion oder Test) sowie den [Ländercode Ihres Unternehmens](https://dashboard.stripe.com/settings/account), wenn Sie [PaymentSheet.Configuration](https://stripe.dev/stripe-android/paymentsheet/com.stripe.android.paymentsheet/-payment-sheet/-configuration/index.html).
#### Kotlin
```kotlin
val googlePayConfiguration = PaymentSheet.GooglePayConfiguration(
environment = PaymentSheet.GooglePayConfiguration.Environment.Test,
countryCode = "US",
currencyCode = "USD" // Required for Setup Intents, optional for Payment Intents
)
val configuration = PaymentSheet.Configuration.Builder(merchantDisplayName = "My merchant name")
.googlePay(googlePayConfiguration)
.build()
```
### Google Pay testen
Google bietet Ihnen die Möglichkeit, Zahlungen über seine [Testkartensuite](https://developers.google.com/pay/api/android/guides/resources/test-card-suite) zu testen. Sie können Stripe-[Testkarten](https://docs.stripe.com/testing.md) mit der Testsuite verwenden.
In einem Land, in dem Google Pay unterstützt wird, müssen Sie Google Pay mit einem physischen Android-Gerät anstelle eines simulierten Geräts testen. Melden Sie sich mit einer echten in Google Wallet gespeicherten Karte bei einem Google-Konto auf Ihrem Testgerät an.
## Optional: Formular anpassen
Alle Anpassungen werden mithilfe des Objekts [PaymentSheet.Configuration](https://stripe.dev/stripe-android/paymentsheet/com.stripe.android.paymentsheet/-payment-sheet/-configuration/index.html) konfiguriert.
### Erscheinungsbild
Passen Sie mit der [Appearance API](https://docs.stripe.com/elements/appearance-api/mobile.md?platform=android) Farben, Schriftarten und mehr an das Erscheinungsbild Ihrer App an.
### Layout der Zahlungsmethode
Konfigurieren Sie das Layout der Zahlungsmethoden im Formular mit [paymentMethodLayout](https://stripe.dev/stripe-android/paymentsheet/com.stripe.android.paymentsheet/-payment-sheet/-configuration/-builder/index.html#2123253356%2FFunctions%2F2002900378). Sie können sie horizontal oder vertikal anzeigen oder das Layout von Stripe automatisch optimieren lassen.

#### Kotlin
```kotlin
PaymentSheet.Configuration.Builder("Example, Inc.")
.paymentMethodLayout(PaymentSheet.PaymentMethodLayout.Automatic)
.build()
```
### Adressen der Nutzer/innen erfassen
Erfassen Sie lokale und internationale Versand- und Rechnungsadressen von Ihren Kundinnen und Kunden mithilfe des [Address Element](https://docs.stripe.com/elements/address-element.md?platform=android).
### Anzeigename des Unternehmens
Geben Sie einen kundenorientierten Unternehmensnamen an, indem Sie [merchantDisplayName](https://stripe.dev/stripe-android/paymentsheet/com.stripe.android.paymentsheet/-payment-sheet/-configuration/index.html#-191101533%2FProperties%2F2002900378) festlegen. Standardmäßig handelt es sich dabei um den Namen Ihrer App.
#### Kotlin
```kotlin
PaymentSheet.Configuration.Builder(
merchantDisplayName = "My app, Inc."
).build()
```
### Dunkelmodus
Standardmäßig passt `PaymentSheet` sich automatisch an die systemweiten Erscheinungsbildeinstellungen des/der Nutzer/in an (heller und dunkler Modus). Dies können Sie ändern, indem Sie in Ihrer App den Hell- oder Dunkelmodus einrichten.
#### Kotlin
```kotlin
// force dark
AppCompatDelegate.setDefaultNightMode(AppCompatDelegate.MODE_NIGHT_YES)
// force light
AppCompatDelegate.setDefaultNightMode(AppCompatDelegate.MODE_NIGHT_NO)
```
### Standardabrechnungsdetails
Um Standardwerte für die im Zahlungsformular erfassten Rechnungsdetails festzulegen, konfigurieren Sie die Eigenschaft `defaultBillingDetails`. Die Felder von `PaymentSheet` werden vorab mit den von Ihnen angegebenen Werten ausgefüllt.
#### Kotlin
```kotlin
val address = PaymentSheet.Address(country = "US")
val billingDetails = PaymentSheet.BillingDetails(
address = address,
email = "foo@bar.com"
)
val configuration = PaymentSheet.Configuration.Builder(merchantDisplayName = "Merchant, Inc.")
.defaultBillingDetails(billingDetails)
.build()
```
### Erfassung von Abrechnungsdetails konfigurieren
`BillingDetailsCollectionConfiguration` verwenden, um anzugeben, wie Sie Rechnungsdetails im PaymentSheet erfassen möchten.
Sie können den Namen, die E-Mail-Adresse, die Telefonnummer und die Adresse Ihrer Kundinnen und Kunden erfassen.
Wenn Sie dem PaymentMethod-Objekt Standard-Abrechnungsdetails zuordnen möchten, auch wenn diese Felder nicht auf der Nutzeroberfläche erfasst werden, legen Sie `billingDetailsCollectionConfiguration.attachDefaultsToPaymentMethod` auf `true` fest.
#### Kotlin
```kotlin
val billingDetails = PaymentSheet.BillingDetails(
email = "foo@bar.com"
)
val billingDetailsCollectionConfiguration = BillingDetailsCollectionConfiguration(
attachDefaultsToPaymentMethod = true,
name = BillingDetailsCollectionConfiguration.CollectionMode.Always,
email = BillingDetailsCollectionConfiguration.CollectionMode.Never,
address = BillingDetailsCollectionConfiguration.AddressCollectionMode.Full,
)
val configuration = PaymentSheet.Configuration.Builder(merchantDisplayName = "Merchant, Inc.")
.defaultBillingDetails(billingDetails)
.billingDetailsCollectionConfiguration(billingDetailsCollectionConfiguration)
.build()
```
> Wenden Sie sich an Ihren Rechtsbeistand bezüglich der Gesetze, die für das Erfassen von Informationen gelten. Erfassen Sie Telefonnummern nur, wenn Sie sie für die Transaktion benötigen.
## Optional: Zahlung in Ihrer Nutzeroberfläche abschließen
Sie können das Zahlungsformular anzeigen, um nur die Details einer Zahlungsmethode zu erfassen, und die Zahlung in der Nutzeroberfläche Ihrer App abzuschließen. Dies ist nützlich, wenn Sie eine nutzerspezifische Kaufschaltfläche haben oder zusätzliche Schritte erfordern, nachdem die Zahlungsdetails erfasst wurden.

> Eine Muster-Integration ist [auf unserem GitHub verfügbar](https://github.com/stripe/stripe-android/blob/master/paymentsheet-example/src/main/java/com/stripe/android/paymentsheet/example/samples/ui/paymentsheet/custom_flow/CustomFlowActivity.kt).
1. Initialisieren Sie zunächst [PaymentSheet.FlowController](https://stripe.dev/stripe-android/paymentsheet/com.stripe.android.paymentsheet/-payment-sheet/-flow-controller/index.html) anstelle von `PaymentSheet` mit einer der [Builder](https://stripe.dev/stripe-android/paymentsheet/com.stripe.android.paymentsheet/-payment-sheet/-flow-controller/-builder/index.html)-Methoden.
#### Android (Kotlin)
```kotlin
class CheckoutActivity : AppCompatActivity() {
private lateinit var flowController: PaymentSheet.FlowController
override fun onCreate(savedInstanceState: Bundle?) {
super.onCreate(savedInstanceState)
val flowController = PaymentSheet.FlowController.Builder(
resultCallback = ::onPaymentSheetResult,
paymentOptionResultCallback = ::onPaymentOption,
).build(this)
}
}
```
1. Rufen Sie als Nächstes `configureWithPaymentIntent` mit den Stripe-Objektschlüsseln auf, die Sie von Ihrem Backend abgerufen haben, und aktualisieren Ihre Nutzeroberfläche im Callback mithilfe von [getPaymentOption()](https://stripe.dev/stripe-android/paymentsheet/com.stripe.android.paymentsheet/-payment-sheet/-flow-controller/index.html#-2091462043%2FFunctions%2F2002900378). Diese enthält ein Bild und ein Label, das die aktuell vom Kunden/von der Kundin ausgewählte Zahlungsmethode darstellt.
#### Android (Kotlin)
```kotlin
flowController.configureWithPaymentIntent(
paymentIntentClientSecret = paymentIntentClientSecret,
configuration = PaymentSheet.Configuration.Builder("Example, Inc.")
.customer(PaymentSheet.CustomerConfiguration(
id = customerId,
ephemeralKeySecret = ephemeralKeySecret
))
.build()
) { isReady, error ->
if (isReady) {
// Update your UI using `flowController.getPaymentOption()`
} else {
// handle FlowController configuration failure
}
}
```
1. Rufen Sie als Nächstes [presentPaymentOptions](https://stripe.dev/stripe-android/paymentsheet/com.stripe.android.paymentsheet/-payment-sheet/-flow-controller/index.html#449924733%2FFunctions%2F2002900378) auf, um die Zahlungsdetails zu erfassen. Wenn der Kunde/die Kundin fertig ist, beendet sich das Formular von selbst und ruft den zuvor in `create` übergebenen [paymentOptionCallback](https://stripe.dev/stripe-android/paymentsheet/com.stripe.android.paymentsheet/-payment-option-callback/index.html) auf. Setzen Sie diese Methode ein, um Ihre Nutzeroberfläche mit der zurückgegebenen `paymentOption` zu aktualisieren.
#### Android (Kotlin)
```kotlin
// ...
flowController.presentPaymentOptions()
// ...
private fun onPaymentOption(paymentOptionResult: PaymentOptionResult) {
val paymentOption = paymentOptionResult.paymentOption
if (paymentOption != null) {
paymentMethodButton.text = paymentOption.label
paymentMethodButton.setCompoundDrawablesRelativeWithIntrinsicBounds(
paymentOption.drawableResourceId,
0,
0,
0
)
} else {
paymentMethodButton.text = "Select"
paymentMethodButton.setCompoundDrawablesRelativeWithIntrinsicBounds(
null,
null,
null,
null
)
}
}
```
1. Rufen Sie schließlich [„bestätigen“](https://stripe.dev/stripe-android/paymentsheet/com.stripe.android.paymentsheet/-payment-sheet/-flow-controller/index.html#-479056656%2FFunctions%2F2002900378) auf, um die Zahlung abzuschließen. Wenn der Kunde/die Kundin den Vorgang abgeschlossen hat, beendet sich das Formular von selbst und ruft das zuvor in `create` übergebene [paymentResultCallback](https://stripe.dev/stripe-android/paymentsheet/com.stripe.android.paymentsheet/-payment-sheet-result-callback/index.html#237248767%2FFunctions%2F2002900378) auf.
#### Android (Kotlin)
```kotlin
// ...
flowController.confirmPayment()
// ...
private fun onPaymentSheetResult(
paymentSheetResult: PaymentSheetResult
) {
when (paymentSheetResult) {
is PaymentSheetResult.Canceled -> {
// Payment canceled
}
is PaymentSheetResult.Failed -> {
// Payment Failed. See logcat for details or inspect paymentSheetResult.error
}
is PaymentSheetResult.Completed -> {
// Payment Complete
}
}
}
```
Wenn Sie `allowsDelayedPaymentMethods` auf true festlegen, werden Zahlungsmethoden mit [verzögerter Benachrichtigung](https://docs.stripe.com/payments/payment-methods.md#payment-notification) wie US-Bankkonten zugelassen. Für diese Zahlungsmethoden ist der endgültige Zahlungsstatus nicht bekannt, wenn das `PaymentSheet` abgeschlossen wird. Stattdessen ist sie erfolgreich oder schlägt fehl. Wenn Sie diese Art von Zahlungsmethoden unterstützen, informieren Sie den Kunden/die Kundin darüber, dass seine/ihre Bestellung bestätigt ist, und führen seine/ihre Bestellung erst aus (z. B. das Produkt versenden), wenn die Zahlung erfolgreich ist.
## Optional: Weitere Zahlungsmethoden aktivieren
Navigieren Sie im Dashboard zu [Zahlungsmethoden für Ihre verbundenen Konten verwalten](https://dashboard.stripe.com/settings/payment_methods/connected_accounts), um zu konfigurieren, welche Zahlungsmethoden Ihre verbundenen Konten akzeptieren. Änderungen an den Standardeinstellungen gelten für alle neuen und bestehenden verbundenen Konten.
Informationen zu den Zahlungsmethoden finden Sie in den folgenden Ressourcen:
- [Ein Leitfaden zu Zahlungsmethoden](https://stripe.com/payments/payment-methods-guide#choosing-the-right-payment-methods-for-your-business), der Ihnen bei der Auswahl der richtigen Zahlungsmethoden für Ihre Plattform hilft.
- [Kontofunktionen](https://docs.stripe.com/connect/account-capabilities.md), um sicherzustellen, dass die gewählten Zahlungsmethoden für Ihre verbundenen Konten funktionieren.
- [Zahlungsmethode und Produktsupport](https://docs.stripe.com/payments/payment-methods/payment-method-support.md#product-support), um sicherzustellen, dass die gewählten Zahlungsmethoden für Ihre Stripe-Produkte und Zahlungsabläufe geeignet sind.
Für jede Zahlungsmethode können Sie eine der folgenden Dropdown-Optionen wählen:
| |
| |
| **Standardmäßig aktiviert** | Ihre verbundenen Konten akzeptieren diese Zahlungsmethode beim Bezahlvorgang. Einige Zahlungsmethoden können nur deaktiviert oder gesperrt werden. Dies liegt daran, dass Ihre verbundenen Konten mit *Zugriff auf das Stripe-Dashboard* (Platforms can provide connected accounts with access to the full Stripe Dashboard or the Express Dashboard. Otherwise, platforms build an interface for connected accounts using embedded components or the Stripe API) sie auf ihrer Seite mit Einstellungen aktivieren müssen. |
| **Standardmäßig deaktiviert** | Ihre verbundenen Konten akzeptieren diese Zahlungsmethode beim Bezahlvorgang nicht. Wenn Sie Ihren verbundenen Konten mit *Zugriff auf das Stripe-Dashboard* (Platforms can provide connected accounts with access to the full Stripe Dashboard or the Express Dashboard. Otherwise, platforms build an interface for connected accounts using embedded components or the Stripe API) erlauben, ihre eigenen Zahlungsmethoden zu verwalten, haben sie die Möglichkeit, sie zu aktivieren. |
| **Blockiert** | Ihre verbundenen Konten akzeptieren diese Zahlungsmethode beim Bezahlvorgang nicht. Wenn Sie Ihren verbundenen Konten mit *Zugriff auf das Stripe-Dashboard* (Platforms can provide connected accounts with access to the full Stripe Dashboard or the Express Dashboard. Otherwise, platforms build an interface for connected accounts using embedded components or the Stripe API) erlauben, ihre eigenen Zahlungsmethoden zu verwalten, haben sie nicht die Möglichkeit, sie zu aktivieren. |

Optionen für Zahlungsmethoden
Wenn Sie eine Änderung an einer Zahlungsmethode vornehmen, müssen Sie auf **Änderungen überprüfen** in der Leiste unten im Bildschirm klicken und auf **Speichern und anwenden**, um Ihre verbundenen Konten zu aktualisieren.

Dialogfeld „Speichern“
### Verbundenen Konten die Verwaltung von Zahlungsmethoden gestatten
Stripe empfiehlt, dass Sie Ihren verbundenen Konten erlauben, ihre eigenen Zahlungsmethoden anzupassen. Diese Option ermöglicht jedem verbundenen Konto mit *Zugriff auf das Stripe-Dashboard* (Platforms can provide connected accounts with access to the full Stripe Dashboard or the Express Dashboard. Otherwise, platforms build an interface for connected accounts using embedded components or the Stripe API), seine Seite mit den [Zahlungsmethoden](https://dashboard.stripe.com/settings/payment_methods) anzuzeigen und zu aktualisieren. Nur Inhaber/innen der verbundenen Konten können ihre Zahlungsmethoden anpassen. Das Stripe-Dashboard zeigt die Standard-Zahlungsmethoden an, die Sie auf alle neuen und bestehenden verbundenen Konten angewendet haben. Ihre verbundenen Konten können diese Standardeinstellungen außer Kraft setzen, mit Ausnahme der von Ihnen blockierten Zahlungsmethoden.
Aktivieren Sie das Kontrollkästchen **Anpassung des Kontos**, um diese Option zu aktivieren. Sie müssen auf **Änderungen überprüfen** in der Leiste unten im Bildschirm klicken und dann **Speichern und übernehmen** auswählen, um diese Einstellung zu aktualisieren.

Kontrollkästchen „Anpassung des Kontos“
### Funktionen der Zahlungsmethode
Damit Ihre verbundenen Konten zusätzliche Zahlungsmethoden akzeptieren können, müssen deren `Accounts` über aktive Zahlungsmethoden verfügen.
Wenn Sie unter [Zahlungsmethoden für Ihre verbundenen Konten verwalten](https://dashboard.stripe.com/settings/payment_methods/connected_accounts) die Option „Standardmäßig aktiviert“ für eine Zahlungsmethode ausgewählt haben, fordert Stripe automatisch die erforderliche Funktion für neue und bestehende verbundene Konten an, sofern diese die Verifizierungsanforderungen erfüllen. Wenn das verbundene Konto die Anforderungen nicht erfüllt oder Sie die direkte Kontrolle behalten möchten, können Sie die Funktion manuell im Dashboard oder über die API anfordern.
Die meisten Zahlungsmethoden haben die gleichen Verifizierungsanforderungen wie die `card_payments`-Funktion, mit einigen Einschränkungen und Ausnahmen. Die [Tabelle der Zahlungsmethodenfunktionen](https://docs.stripe.com/connect/account-capabilities.md#payment-methods) führt die Zahlungsmethoden auf, die eine zusätzliche Verifizierung erfordern.
#### Dashboard
[Suchen Sie im Dashboard ein verbundenes Konto](https://docs.stripe.com/connect/dashboard/managing-individual-accounts.md#finding-accounts), um dessen Funktionen zu bearbeiten und ausstehende Verifizierungsanforderungen einzusehen.
#### API
Für ein bestehendes verbundenes Konto können Sie die vorhandenen Funktionen [auflisten](https://docs.stripe.com/api/capabilities/list.md), um festzustellen, ob Sie zusätzliche Funktionen anfordern müssen.
```curl
curl https://api.stripe.com/v1/accounts/{{CONNECTEDACCOUNT_ID}}/capabilities \
-u "<>:"
```
Fordern Sie zusätzliche Funktionen an, indem Sie die Funktionen jedes verbundenen Kontos [aktualisieren](https://docs.stripe.com/api/capabilities/update.md).
```curl
curl https://api.stripe.com/v1/accounts/{{CONNECTEDACCOUNT_ID}}/capabilities/us_bank_account_ach_payments \
-u "<>:" \
-d requested=true
```
Es kann zu einer Verzögerung kommen, bevor die angeforderte Funktion aktiv wird. Wenn für die Funktion Aktivierungsanforderungen gelten, enthält die Antwort diese in den `requirements`-Arrays.
## Gebühren einziehen
Als Plattform können Sie Ihren verbundenen Konten einen Anteil jeder Transaktion in Form von Plattformgebühren in Rechnung stellen. Sie können die Preise für Plattformgebühren auf folgende Weise festlegen:
- Mit dem [Plattform-Preistool](https://docs.stripe.com/connect/platform-pricing-tools.md) können Sie Preisregeln festlegen und testen. Diese No-Code-Funktion im Stripe-Dashboard ist derzeit nur für Plattformen verfügbar, die für die Zahlung von Stripe-Gebühren verantwortlich sind.
- Geben Sie die Plattformgebühren direkt in einem [PaymentIntent](https://docs.stripe.com/api/payment_intents/object.md) an. Die auf diese Weise festgelegten Gebühren haben Vorrang vor der im Preistool für Plattformen festgelegten Preislogik.
Ihre Plattform kann eine Plattformgebühr unter Berücksichtigung der folgenden Einschränkungen erheben:
- Der Wert von `application_fee_amount` muss positiv und kleiner als der Betrag der Zahlung sein. Die erhobene Plattformgebühr wird auf den Betrag der Zahlung begrenzt.
- Es fallen keine zusätzlichen Stripe-Gebühren für die Plattformgebühr selbst an.
- In Übereinstimmung mit gesetzlich vorgeschriebenen und Compliance-Anforderungen in Brasilien können Plattformen mit Sitz außerhalb Brasiliens und mit brasilianischen verbundenen Konten keine Plattformgebühren über Stripe einziehen.
- Die Währung des `application_fee_amount` hängt von einigen Faktoren für [mehrere Währungen](https://docs.stripe.com/connect/currencies.md) ab.
Die [BalanceTransaction](https://docs.stripe.com/api.md#balance_transaction_retrieve) der resultierenden Zahlung enthält eine detaillierte Aufschlüsselung der Transaktionsgebühren von Stripe als auch der Plattformgebühren. Um die Berichterstellung zu verbessern, wird durch die Erhebung einer Transaktionsgebühr ein [ApplicationFee](https://docs.stripe.com/api/application_fees/object.md)-Objekt generiert. Verwenden Sie für die Berichterstellung die Eigenschaft `amount` im `ApplicationFee`-Objekt.
Die Plattformgebühren können Sie im Abschnitt [Erhobene Transaktionsgebühren](https://dashboard.stripe.com/connect/application_fees) des Dashboards einsehen.
> Plattformgebühren für Direct Charges werden standardmäßig asynchron erstellt. Wenn Sie das `application_fee`-Objekt in einer Zahlungserstellungsanfrage erweitern, wird die Plattformgebühr synchron als Teil dieser Anfrage erstellt. Erweitern Sie das `application_fee`-Objekt nur bei Bedarf, da dies die Latenz der Anfrage erhöht.
>
> Um Benachrichtigungen über asynchron erstellte `ApplicationFee`-Objekte zu erhalten, überwachen Sie das Webhook-Ereignis [application_fee.created](https://docs.stripe.com/api/events/types.md#event_types-application_fee.created).

Diese Integration vereint alle für die Zahlung erforderlichen Schritte, einschließlich der Erfassung der Zahlungsdaten und der Bestätigung der Zahlung, in einem einzigen Fenster, das über Ihrer App angezeigt wird.
> #### Accounts v2 API unterstützt
>
> Das Payment Sheet unterstützt *von Kund/innen konfigurierte Konten* nicht. Es unterstützt nur `Kund/innen`-Objekte.
## Stripe einrichten [Serverseitig] [Clientseitig]
Zunächst benötigen Sie ein Stripe-Konto. [Registrieren Sie sich jetzt](https://dashboard.stripe.com/register).
### Serverseitig
Für diese Integration sind Endpoints auf Ihrem Server erforderlich, die mit der Stripe-API kommunizieren können. Nutzen Sie die offiziellen Bibliotheken für den Zugriff auf die Stripe-API von Ihrem Server aus:
#### Ruby
```bash
# Available as a gem
sudo gem install stripe
```
```ruby
# If you use bundler, you can add this line to your Gemfile
gem 'stripe'
```
### Clientseitig
Das [React Native SDK](https://github.com/stripe/stripe-react-native) ist Open Source und vollständig dokumentiert. Intern werden [native iOS](https://github.com/stripe/stripe-ios) und [Android](https://github.com/stripe/stripe-android) SDKs verwendet. Um das React Native SDK von Stripe zu installieren, führen Sie einen der folgenden Befehle im Verzeichnis Ihres Projekts aus (je nachdem, welchen Paket-Manager Sie verwenden):
#### yarn
```bash
yarn add @stripe/stripe-react-native
```
#### npm
```bash
npm install @stripe/stripe-react-native
```
Installieren Sie als Nächstes einige weitere erforderliche Abhängigkeiten:
- Für iOS wechseln Sie in das Verzeichnis **ios** und führen Sie `pod install` aus, um sicherzustellen, dass Sie auch die erforderlichen nativen Dependencies installiert haben.
- Für Android müssen keine Abhängigkeiten mehr installiert werden.
### Stripe-Initialisierung
Um Stripe in Ihrer React Native-App zu initialisieren, umschließen Sie entweder Ihren Zahlungsbildschirm mit der Komponente `StripeProvider` oder verwenden Sie die Initialisierungsmethode `initStripe`. Nur der [veröffentlichbare API-Schlüssel](https://docs.stripe.com/keys.md#obtain-api-keys) in `publishableKey` ist erforderlich. Das folgende Beispiel zeigt, wie Stripe mithilfe der Komponente `StripeProvider` initialisiert wird.
```javascript
import { StripeProvider } from '@stripe/stripe-react-native';
function App() {
return (
// Your app code here
);
}
```
> Verwenden Sie Ihre [Test-API-Schlüssel](https://docs.stripe.com/keys.md#obtain-api-keys) beim Testen und Entwickeln Ihrer App und Ihre [Live-Modus](https://docs.stripe.com/keys.md#test-live-modes)-Schlüssel beim Veröffentlichen Ihrer App.
## Endpoint hinzufügen [Serverseitig]
> #### Hinweis
>
> Um das PaymentSheet vor dem Erstellen eines PaymentIntent anzuzeigen, finden Sie weitere Informationen unter [Erfassen von Zahlungsdetails vor dem Erstellen eines Intent](https://docs.stripe.com/payments/accept-a-payment-deferred.md?type=payment).
Diese Integration verwendet drei Stripe-API-Objekte:
1. [PaymentIntent](https://docs.stripe.com/api/payment_intents.md): Stripe verwendet diesen, um Ihre Absicht darzustellen, Zahlungen von Ihren Kundinnen/Kunden anzufordern, wobei Abbuchungsversuche und Zahlungsstatusänderungen im gesamten Vorgang dokumentiert werden.
1. (Optional) Ein von [Kundinnen/Kunden konfiguriertes Konto](https://docs.stripe.com/api/v2/core/accounts/object.md#v2_account_object-applied_configurations) oder ein [Customer](https://docs.stripe.com/api/customers.md)-Objekt: Um eine Zahlungsmethode für zukünftige Zahlungen einzurichten, müssen Sie diese einem Kunden/einer Kundin zuordnen. Erstellen Sie ein Objekt, das Ihre Kundin/Ihren Kunden repräsentiert, wenn sie/er ein Konto bei Ihrem Unternehmen anlegt. Wenn Ihre Kundin/Ihr Kunde eine Zahlung als Gast durchführt, können Sie vor der Zahlung ein `Account`- oder `Customer`-Objekt erstellen und es zu einem späteren Zeitpunkt mit Ihrer eigenen Darstellung des Kundenkontos verknüpfen.
1. (Optional) [CustomerSession](https://docs.stripe.com/api/customer_sessions.md): Informationen zum Objekt, das Ihre Kundin/Ihren Kunden repräsentiert, sind vertraulich und können nicht direkt über eine App abgerufen werden. Eine `CustomerSession` gewährt dem SDK vorübergehenden, bereichsbezogenen Zugriff auf das `Account` oder die/den `Customer` und stellt zusätzliche Konfigurationsoptionen bereit. Hier finden Sie eine vollständige Liste der [Konfigurationsoptionen](https://docs.stripe.com/api/customer_sessions/create.md#create_customer_session-components).
> Wenn Sie niemals Karten für eine Kundin/einen Kunden speichern und wiederkehrenden Kundinnen und Kunden nicht erlauben, gespeicherte Karten wiederzuverwenden, können Sie das `Account`- oder `Customer`-Objekt und das `CustomerSession`-Objekt aus Ihrer Integration weglassen.
Aus Sicherheitsgründen kann Ihre App diese Objekte nicht erstellen. Fügen Sie stattdessen einen Endpoint auf Ihrem Server hinzu, der:
1. Ruft das `Account` oder die/den `Customer` ab oder erstellt ein neues bzw eine/einen neue/n.
1. Erstellt eine [CustomerSession](https://docs.stripe.com/api/customer_sessions.md) für das `Account` oder die/den `Customer`.
1. Erstellt einen `PaymentIntent` mit dem [Betrag](https://docs.stripe.com/api/payment_intents/create.md#create_payment_intent-amount), der [Währung](https://docs.stripe.com/api/payment_intents/create.md#create_payment_intent-currency), und entweder mit dem [customer_account](https://docs.stripe.com/api/payment_intents/create.md#create_payment_intent-customer_account) oder der [Kundin/dem Kunden](https://docs.stripe.com/api/payment_intents/create.md#create_payment_intent-customer).
1. Gibt das *Client-Geheimnis* (The client secret is a unique key returned from Stripe as part of a PaymentIntent. This key lets the client access important fields from the PaymentIntent (status, amount, currency) while hiding sensitive ones (metadata, customer)) des `PaymentIntent`, das `client_secret` der `CustomerSession`, die ID des `Account`s oder der/des `Customer` und Ihren [veröffentlichbaren Schlüssel](https://dashboard.stripe.com/apikeys) für Ihre App zurück.
Die Zahlungsmethoden, die Kund/innen während des Bezahlvorgangs angezeigt werden, sind ebenfalls in der PaymentIntent enthalten. Sie können Stripe Zahlungsmethoden aus Ihren Dashboard-Einstellungen abrufen lassen oder sie manuell auflisten. Gleich welche Option Sie wählen, die in der PaymentIntent übergebene Währung filtert die Zahlungsmethoden, die dem/r Kund/in angezeigt werden. Wenn Sie beispielsweise `eur` für den PaymentIntent übergeben und OXXO im Dashboard aktiviert ist, wird dem/r Kund/in OXXO nicht angezeigt, da OXXO `eur`-Zahlungen nicht unterstützt.
Sofern Ihre Integration keine codebasierte Option zum Anbieten von Zahlungsmethoden erfordert, empfiehlt Stripe die automatisierte Option, da Stripe die Währung, Einschränkungen für Zahlungsmethoden und andere Parameter auswertet, um die Liste der unterstützten Zahlungsmethoden zu ermitteln. Zahlungsmethoden, die die Konversion steigern und die für die Währung und den Standort des/r Kund/in am relevantesten sind, erhalten Priorität.
#### Zahlungsmethoden über das Dashboard verwalten
Zahlungsmethoden können Sie über das [Dashboard](https://dashboard.stripe.com/settings/payment_methods) verwalten. Stripe handhabt die Rückgabe geeigneter Zahlungsmethoden basierend auf Faktoren wie Betrag, Währung und Zahlungsablauf der Transaktion. Der PaymentIntent wird mit den Zahlungsmethoden erstellt, die Sie im Dashboard konfiguriert haben. Wenn Sie das Dashboard nicht verwenden möchten oder wenn Sie Zahlungsmethoden manuell angeben möchten, können Sie sie mit dem Attribut `payment_method_types` auflisten.
#### Curl
```bash
# Create a Customer (use an existing Customer ID if this is a returning customer)
curl https://api.stripe.com/v1/customers \
-u <>: \
-X "POST" \
-H "Stripe-Account: {{CONNECTED_ACCOUNT_ID}}"
# Create an CustomerSession for the Customer
curl https://api.stripe.com/v1/customer_sessions \
-u <>: \
-X "POST" \
-d "customer"="{{CUSTOMER_ID}}" \
-d "components[mobile_payment_element][enabled]"=true \
-d "components[mobile_payment_element][features][payment_method_save]"=enabled \
-d "components[mobile_payment_element][features][payment_method_redisplay]"=enabled \
-d "components[mobile_payment_element][features][payment_method_remove]"=enabled
# Create a PaymentIntent
curl https://api.stripe.com/v1/payment_intents \
-u <>: \
-H "Stripe-Account: {{CONNECTED_ACCOUNT_ID}}"
-X "POST" \
-d "customer"="{{CUSTOMER_ID}}" \
-d "amount"=1099 \
-d "currency"="eur" \
-d "automatic_payment_methods[enabled]"=true \
-d application_fee_amount="123" \
```
#### Zahlungsmethoden manuell auflisten
#### Curl
```bash
# Create a Customer (use an existing Customer ID if this is a returning customer)
curl https://api.stripe.com/v1/customers \
-u <>: \
-X "POST" \
-H "Stripe-Account: {{CONNECTED_ACCOUNT_ID}}"
# Create an CustomerSession for the Customer
curl https://api.stripe.com/v1/customer_sessions \
-u <>: \
-X "POST" \
-d "customer"="{{CUSTOMER_ID}}" \
-d "components[mobile_payment_element][enabled]"=true \
-d "components[mobile_payment_element][features][payment_method_save]"=enabled \
-d "components[mobile_payment_element][features][payment_method_redisplay]"=enabled \
-d "components[mobile_payment_element][features][payment_method_remove]"=enabled
# Create a PaymentIntent
curl https://api.stripe.com/v1/payment_intents \
-u <>: \
-H "Stripe-Account: {{CONNECTED_ACCOUNT_ID}}"
-X "POST" \
-d "customer"="{{CUSTOMER_ID}}" \
-d "amount"=1099 \
-d "currency"="eur" \
-d "payment_method_types[]"="bancontact" \
-d "payment_method_types[]"="card" \
-d "payment_method_types[]"="ideal" \
-d "payment_method_types[]"="klarna" \
-d "payment_method_types[]"="sepa_debit" \
-d application_fee_amount="123" \
```
> Jede Zahlungsmethode muss die im PaymentIntent übergebene Währung unterstützen, und Ihr Unternehmen muss in einem der Länder ansässig sein, die jede Zahlungsmethode unterstützt. Auf der Seite [Optionen für die Integration von Zahlungsmethoden](https://docs.stripe.com/payments/payment-methods/integration-options.md) finden Sie weitere Informationen zu den unterstützten Zahlungsmethoden.
## Zahlungsformular integrieren [Clientseitig]
Bevor das mobile Payment Element angezeigt wird, sollte Ihr Checkout-Seite folgendes anzeigen:
- Die gekauften Produkte und den Gesamtbetrag anzeigen
- Alle benötigten Versanddaten erfassen
- Fügen Sie eine Checkout-Schaltfläche ein, um die Nutzeroberfläche von Stripe anzuzeigen
Erstellen Sie im Checkout Ihrer App eine Netzwerkanfrage an den im vorigen Schritt erstellten Backend-Endpoint und rufen Sie `initPaymentSheet` aus dem `useStripe`-Hook auf.
#### Accounts v2
```javascript
export default function CheckoutScreen() {
const { initPaymentSheet, presentPaymentSheet } = useStripe();
const [loading, setLoading] = useState(false);
const fetchPaymentSheetParams = async () => {
const response = await fetch(`${API_URL}/payment-sheet`, {
method: 'POST',
headers: {
'Content-Type': 'application/json',
},
});
const { paymentIntent, ephemeralKey, customer_account } = await response.json();
return {
paymentIntent,
ephemeralKey,
customer_account,
};
};
const initializePaymentSheet = async () => {
const {
paymentIntent,
ephemeralKey,
customer_account,
} = await fetchPaymentSheetParams();
const { error } = await initPaymentSheet({
merchantDisplayName: "Example, Inc.",
customerAccountId: customer_account,
customerEphemeralKeySecret: ephemeralKey,
paymentIntentClientSecret: paymentIntent,
// Set `allowsDelayedPaymentMethods` to true if your business accepts payment
// methods that complete payment after a delay, like SEPA Debit and Sofort.
allowsDelayedPaymentMethods: true,
defaultBillingDetails: {
name: 'Jane Doe',
}
});
if (!error) {
setLoading(true);
}
};
const openPaymentSheet = async () => {
// see below
};
useEffect(() => {
initializePaymentSheet();
}, []);
return (
);
}
```
#### Customers v1
```javascript
export default function CheckoutScreen() {
const { initPaymentSheet, presentPaymentSheet } = useStripe();
const [loading, setLoading] = useState(false);
const fetchPaymentSheetParams = async () => {
const response = await fetch(`${API_URL}/payment-sheet`, {
method: 'POST',
headers: {
'Content-Type': 'application/json',
},
});
const { paymentIntent, ephemeralKey, customer } = await response.json();
return {
paymentIntent,
ephemeralKey,
customer,
};
};
const initializePaymentSheet = async () => {
const {
paymentIntent,
ephemeralKey,
customer,
} = await fetchPaymentSheetParams();
const { error } = await initPaymentSheet({
merchantDisplayName: "Example, Inc.",
customerId: customer,
customerEphemeralKeySecret: ephemeralKey,
paymentIntentClientSecret: paymentIntent,
// Set `allowsDelayedPaymentMethods` to true if your business can handle payment
//methods that complete payment after a delay, like SEPA Debit and Sofort.
allowsDelayedPaymentMethods: true,
defaultBillingDetails: {
name: 'Jane Doe',
}
});
if (!error) {
setLoading(true);
}
};
const openPaymentSheet = async () => {
// see below
};
useEffect(() => {
initializePaymentSheet();
}, []);
return (
);
}
```
Wenn Ihr/e Kund/in auf die Schaltfläche **Checkout** tippt, rufen Sie bitte `presentPaymentSheet()` auf, um das Formular anzuzeigen. Nachdem der/die Kund/in die Zahlung abgeschlossen hat, wird das Formular verworfen und das Promise mit einem optionalen `StripeError` aufgelöst.
```javascript
export default function CheckoutScreen() {
// continued from above
const openPaymentSheet = async () => {
const { error } = await presentPaymentSheet();
if (error) {
Alert.alert(`Error code: ${error.code}`, error.message);
} else {
Alert.alert('Success', 'Your order is confirmed!');
}
};
return (
);
}
```
Wenn kein Fehler auftritt, informieren Sie den/die Kund/in, dass der Vorgang abgeschlossen ist (zum Beispiel durch die Anzeige einer Bestellbestätigung).
Wenn Sie `allowsDelayedPaymentMethods` auf true festlegen, werden Zahlungsmethoden mit [verzögerter Benachrichtigung](https://docs.stripe.com/payments/payment-methods.md#payment-notification) wie US-Bankkonten zugelassen. Für diese Zahlungsmethoden ist der endgültige Zahlungsstatus nicht bekannt, wenn das `PaymentSheet` abgeschlossen wird. Stattdessen ist sie erfolgreich oder schlägt fehl. Wenn Sie diese Art von Zahlungsmethoden unterstützen, informieren Sie den Kunden/die Kundin darüber, dass seine/ihre Bestellung bestätigt ist, und führen seine/ihre Bestellung erst aus (z. B. das Produkt versenden), wenn die Zahlung erfolgreich ist.
## Rückgabe-URL einrichten (nur für iOS) [Clientseitig]
Der Kunde/Die Kundin verlässt ggf. Ihre App, um sich zu authentifizieren (z. B. in Safari oder einer Banking-App). Damit sie nach der Authentifizierung automatisch zu Ihrer App zurückkehren können, [konfigurieren Sie ein benutzerdefiniertes URL-Schema](https://developer.apple.com/documentation/xcode/defining-a-custom-url-scheme-for-your-app) und richten Sie Ihren App-Delegate so ein, dass die URL an das SDK weitergeleitet wird. Stripe unterstützt keine [universellen Links](https://developer.apple.com/documentation/xcode/allowing-apps-and-websites-to-link-to-your-content).
#### SceneDelegate
#### Swift
```swift
// This method handles opening custom URL schemes (for example, "your-app://stripe-redirect")
func scene(_ scene: UIScene, openURLContexts URLContexts: Set) {
guard let url = URLContexts.first?.url else {
return
}
let stripeHandled = StripeAPI.handleURLCallback(with: url)
if (!stripeHandled) {
// This was not a Stripe url – handle the URL normally as you would
}
}
```
#### AppDelegate
#### Swift
```swift
// This method handles opening custom URL schemes (for example, "your-app://stripe-redirect")
func application(_ app: UIApplication, open url: URL, options: [UIApplication.OpenURLOptionsKey: Any] = [:]) -> Bool {
let stripeHandled = StripeAPI.handleURLCallback(with: url)
if (stripeHandled) {
return true
} else {
// This was not a Stripe url – handle the URL normally as you would
}
return false
}
```
#### SwiftUI
#### Swift
```swift
@main
struct MyApp: App {
var body: some Scene {
WindowGroup {
Text("Hello, world!").onOpenURL { incomingURL in
let stripeHandled = StripeAPI.handleURLCallback(with: incomingURL)
if (!stripeHandled) {
// This was not a Stripe url – handle the URL normally as you would
}
}
}
}
}
```
Legen Sie zusätzlich die [returnURL](https://stripe.dev/stripe-ios/stripe-paymentsheet/Classes/PaymentSheet/Configuration.html#/s:6Stripe12PaymentSheetC13ConfigurationV9returnURLSSSgvp) in Ihrem [PaymentSheet.Configuration](https://stripe.dev/stripe-ios/stripe-paymentsheet/Classes/PaymentSheet/Configuration.html)-Objekt auf die URL für Ihre App fest.
```swift
var configuration = PaymentSheet.Configuration()
configuration.returnURL = "your-app://stripe-redirect"
```
## Ereignisse nach Zahlung verarbeiten
Stripe sendet ein [payment_intent.succeeded](https://docs.stripe.com/api/events/types.md#event_types-payment_intent.succeeded)-Ereignis, wenn die Zahlung abgeschlossen ist. Verwenden Sie [Webhook-Tool im Dashboard](https://dashboard.stripe.com/webhooks) oder folgen Sie der [Webhook-Anleitung](https://docs.stripe.com/webhooks/quickstart.md), um diese Ereignisse zu empfangen und führen Sie Aktionen aus, wie beispielsweise das Senden einer Bestellbestätigung per E-Mail, das Protokollieren des Verkaufs in der Datenbank oder das Starten eines Versand-Workflows.
Überwachen Sie diese Ereignisse, statt auf einen Callback vom Client zu warten. Auf dem Client könnten die Kund/innen das Browserfenster schließen oder die App beenden, bevor der Callback erfolgt ist. Bösartige Clients könnten dann die Antwort manipulieren. Wenn Sie Ihre Integration so einrichten, dass sie asynchrone Ereignisse überwacht, können Sie [verschiedene Arten von Zahlungsmethoden](https://stripe.com/payments/payment-methods-guide) mit einer einzelnen Integration akzeptieren.
Neben der Abwicklung des `payment_intent.succeeded`-Ereignisses empfehlen wir die Abwicklung von diesen weiteren Ereignissen, wenn Sie Zahlungen mit dem Payment Element erfassen:
| Ereignis | Beschreibung | Aktion |
| ------------------------------------------------------------------------------------------------------------------------------- | ---------------------------------------------------------------------------------------------------------------------------------------------------------------------------------------------------------------------------------------------------------------------------------------------------------------------------------------------------- | ----------------------------------------------------------------------------------------------------------------------------------------------------------------------------------------------------------------------- |
| [payment_intent.succeeded](https://docs.stripe.com/api/events/types.md?lang=php#event_types-payment_intent.succeeded) | Wird gesendet, wenn Kundinnen und Kunden eine Zahlung erfolgreich abgeschlossen haben. | Senden Sie den Kund/innen eine Auftragsbestätigung und *wickeln* (Fulfillment is the process of providing the goods or services purchased by a customer, typically after payment is collected) Sie die Bestellung ab. |
| [payment_intent.processing](https://docs.stripe.com/api/events/types.md?lang=php#event_types-payment_intent.processing) | Wird gesendet, wenn eine/e Kund/in eine Zahlung erfolgreich veranlasst hat, die Zahlung aber noch nicht abgeschlossen ist. Dieses Ereignis wird am häufigsten gesendet, wenn der Kunde/die Kundin eine Bankabbuchung veranlasst. In Zukunft folgt darauf entweder ein `payment_intent.succeeded`- oder ein `payment_intent.payment_failed`-Ereignis. | Senden Sie eine Bestellbestätigung an die Kund/innen, in der angegeben ist, dass die Zahlung noch aussteht. Bei digitalen Waren können Sie die Bestellung abwickeln, bevor Sie darauf warten, dass die Zahlung erfolgt. |
| [payment_intent.payment_failed](https://docs.stripe.com/api/events/types.md?lang=php#event_types-payment_intent.payment_failed) | Wird gesendet, wenn ein Kunde/eine Kundin einen Zahlungsversuch durchführt, die Zahlung jedoch fehlschlägt. | Wenn eine Zahlung von `processing` zu `payment_failed` übergeht, bieten Sie der Kundin/dem Kunden einen weiteren Zahlungsversuch an. |
## Integration testen
#### Karten
| Kartennummer | Szenario | So führen Sie den Test durch |
| ------------------- | ------------------------------------------------------------------------------------------------------------------------------------------------------------------------------------------------------------------------------------------------------------------------------------------------------------------ | -------------------------------------------------------------------------------------------------------------------------------------- |
| 4242424242424242 | Die Kartenzahlung ist erfolgreich und es ist keine Authentifizierung erforderlich. | Füllen Sie das Kreditkartenformular aus und geben Sie die Kreditkartennummer mit beliebiger Gültigkeitsdauer, CVC und Postleitzahl an. |
| 4000002500003155 | Für die Kartenzahlung ist eine *Authentifizierung* (Strong Customer Authentication (SCA) is a regulatory requirement in effect as of September 14, 2019, that impacts many European online payments. It requires customers to use two-factor authentication like 3D Secure to verify their purchase) erforderlich. | Füllen Sie das Kreditkartenformular aus und geben Sie die Kreditkartennummer mit beliebiger Gültigkeitsdauer, CVC und Postleitzahl an. |
| 4000000000009995 | Die Karte wird mit einem Ablehnungscode wie `insufficient_funds` abgelehnt. | Füllen Sie das Kreditkartenformular aus und geben Sie die Kreditkartennummer mit beliebiger Gültigkeitsdauer, CVC und Postleitzahl an. |
| 6205500000000000004 | Die UnionPay-Karte hat eine variable Länge von 13 bis 19 Ziffern. | Füllen Sie das Kreditkartenformular aus und geben Sie die Kreditkartennummer mit beliebiger Gültigkeitsdauer, CVC und Postleitzahl an. |
#### Bankumleitungen
| Zahlungsmethode | Szenario | So führen Sie den Test durch |
| ----------------- | ------------------------------------------------------------------------------------------------------------------------------------------------------------------------------------------------------------------------------------------------- | --------------------------------------------------------------------------------------------------------------------------------------------------------------------------------------------------------------------------------------------- |
| Bancontact, iDEAL | Ihr/e Kund/in konnte sich auf der iDEAL-Weiterleitungsseite für eine auf Weiterleitung basierende Zahlungsmethode mit sofortiger Benachrichtigung nicht authentifizieren. | Wählen Sie eine beliebige, auf Weiterleitung basierende Zahlungsmethode aus, füllen Sie die erforderlichen Informationen aus und bestätigen Sie die Zahlung. Klicken Sie dann auf der Weiterleitungsseite auf **Testzahlung fehlgeschlagen**. |
| Pay by Bank | Ihr Kunde/Ihre Kundin zahlt erfolgreich mit einer auf Weiterleitung basierenden Zahlungsmethode mit [verzögerter Benachrichtigung](https://docs.stripe.com/payments/payment-methods.md#payment-notification). | Wählen Sie die Zahlungsmethode aus, füllen Sie die erforderlichen Informationen aus und bestätigen Sie die Zahlung. Klicken Sie dann auf der Weiterleitungsseite auf **Testzahlung abschließen**. |
| Pay by Bank | Ihr/e Kund/in konnte sich auf der iDEAL-Weiterleitungsseite für eine auf Weiterleitung basierende Zahlungsmethode mit verzögerter Benachrichtigung nicht authentifizieren. | Wählen Sie die Zahlungsmethode aus, füllen Sie die erforderlichen Informationen aus und bestätigen Sie die Zahlung. Klicken Sie dann auf der Weiterleitungsseite auf **Testzahlung fehlgeschlagen**. |
| BLIK | BLIK-Zahlungen können aus verschiedenen Gründen fehlschlagen. Es gibt sofortige Fehler (der Code ist abgelaufen oder ungültig), verzögerte Fehler (die Bank lehnt ab) oder Zeitüberschreitungen (der/die Kund/in hat nicht rechtzeitig reagiert). | Verwenden Sie E-Mail-Muster, um [die verschiedenen Fehler zu simulieren](https://docs.stripe.com/payments/blik/accept-a-payment.md#simulate-failures) |
#### Banklastschriften
| Zahlungsmethode | Szenario | So führen Sie den Test durch |
| ---------------- | -------------------------------------------------------------------------------------------------------- | ------------------------------------------------------------------------------------------------------------------------------------------------------------------------------------------------------------------ |
| SEPA-Lastschrift | Ihr/e Kund/in zahlt erfolgreich mit dem SEPA-Lastschriftverfahren. | Füllen Sie das Formular mit der Kontonummer `AT321904300235473204` aus. Die bestätigte PaymentIntent geht zunächst in den Status „wird verarbeitet“ und dann drei Minuten später in den Status „erfolgreich“ über. |
| SEPA-Lastschrift | Der Status der PaymentIntent Ihres/Ihrer Kund/in wechselt von `processing` zu `requires_payment_method`. | Füllen Sie das Formular mit der Kontonummer `AT861904300235473202` aus. |
Hier finden Sie weitere Informationen zum [Testen](https://docs.stripe.com/testing.md) Ihrer Integration.
## Scannen von Karten aktivieren [Clientseitig]
> Für App-Überprüfungen durch Apple iOS ist die Aktivierung der Kartenscanfunktion erforderlich. Für App-Überprüfungen durch Android ist die Kartenscanfunktion nicht erforderlich, wir empfehlen jedoch, sie zu aktivieren.
### iOS
Um die Unterstützung für das Scannen von Karten für iOS zu aktivieren, setzen Sie `NSCameraUsageDescription` (**Datenschutz – Beschreibung Kameranutzung**) in der `Info.plist` Ihrer Anwendung und geben einen Grund für den Zugriff auf die Kamera an (z. B. „Zum Scannen von Karten“).
### (Optional) Android
Um den Support für das Scannen von Karten zu aktivieren, [fordern Sie Produktionszugriff](https://developers.google.com/pay/api/android/guides/test-and-deploy/request-prod-access) auf die Google Pay API über die [Google Pay & Wallet Console](https://pay.google.com/business/console?utm_source=devsite&utm_medium=devsite&utm_campaign=devsite) an.
- Wenn Sie Google Pay aktiviert haben, ist die Funktion zum Scannen von Karten auf berechtigten Geräten automatisch auf unserer Nutzeroberfläche verfügbar. Weitere Informationen zu berechtigten Geräten finden Sie unter den [Einschränkungen der Google Pay API](https://developers.google.com/pay/payment-card-recognition/debit-credit-card-recognition)
- **Wichtig:** Die Funktion zum Scannen von Karten wird nur in Builds angezeigt, die mit demselben in der [Google Pay & Wallet Console](https://pay.google.com/business/console) registrierten Signaturschlüssel signiert sind. Test- oder Fehlerbehebungs-Builds mit verschiedenen Signaturschlüsseln (z. B. Builds, die über Firebase App Tester verteilt werden) zeigen die Option **Karte scannen** an. Um Karten in Pre-Release-Builds zu testen, müssen Sie entweder:
- oder Ihre Test-Builds mit Ihrem Produktions-Signaturschlüssel signieren
- Fingerabdruck Ihres Test-Signaturschlüssels zur Google Pay and Wallet-Konsole hinzufügen
Wenn Ihre App Google Pay nicht unterstützt, können Sie den Stripe-Kartenscanner verwenden.
> Der Stripe-Kartenscanner befindet sich in der öffentlichen Vorschau.
Um den Support für das Scannen von Karten zu aktivieren, fügen Sie dem `dependencies`-Block Ihrer Datei [app/build.gradle](https://developer.android.com/studio/build/dependencies) `stripecardscan` hinzu:
#### Groovy
```groovy
implementation 'com.stripe:stripecardscan:23.7.0'
```
## Optional: Apple Pay aktivieren
### Für eine Apple-Händler-ID registrieren
Beantragen Sie eine Apple-Händler-ID, indem Sie sich auf der Apple Developer-Website [für eine neue Kennung registrieren](https://developer.apple.com/account/resources/identifiers/add/merchant).
Tragen Sie eine Beschreibung und eine Kennung in das Formular ein. Die Beschreibung ist nur für Ihre internen Zwecke bestimmt und kann später geändert werden. Stripe empfiehlt, dass Sie den Namen Ihrer App als Kennung verwenden, zum Beispiel `merchant.com.{{YOUR_APP_NAME}}`.
### Neues Apple Pay-Zertifikat erstellen
Erstellen Sie ein Zertifikat für Ihre App, um Zahlungsdaten zu verschlüsseln.
Gehen Sie zu den [iOS-Zertifikateinstellungen](https://dashboard.stripe.com/settings/ios_certificates) im Dashboard, klicken Sie auf **Neue Anwendung hinzufügen** und befolgen Sie die Anleitung.
Laden Sie eine Certificate Signing Request (CSR)-Datei herunter, um ein sicheres Zertifikat von Apple zu erhalten, mit dem Sie Apple Pay verwenden können.
Eine CSR-Datei muss verwendet werden, um genau ein Zertifikat auszustellen. Wenn Sie Ihre Apple-Händler-ID wechseln, müssen Sie zu den [iOS-Zertifikateinstellungen](https://dashboard.stripe.com/settings/ios_certificates) im Dashboard gehen, um eine neue CSR und ein Zertifikat zu erhalten.
### Mit Xcode integrieren
Fügen Sie Ihrer App die **Apple Pay**-Funktion hinzu. Öffnen Sie in Xcode Ihre Projekteinstellungen, klicken Sie auf die Registerkarte **Signing & Capabilities** (Anmeldung und Funktionen) und fügen Sie die **Apple Pay**-Funktion hinzu. Möglicherweise werden Sie an dieser Stelle aufgefordert, sich bei Ihrem Entwicklerkonto anzumelden. Wählen Sie die zuvor erstellte Händler-ID aus. Ihre App sollte nun Apple Pay unterstützen.

Apple Pay-Funktion in Xcode aktivieren
### Apple Pay hinzufügen
#### Einmalige Zahlung
Übergeben Sie beim Erstellen von `StripeProvider` Ihre Händler-ID:
```javascript
import { StripeProvider } from '@stripe/stripe-react-native';
function App() {
return (
{/* Your app code here */}
);
}
```
Wenn Sie `initPaymentSheet` aufrufen, übergeben Sie Ihre [ApplePayParams](https://stripe.dev/stripe-react-native/api-reference/modules/PaymentSheet.html#ApplePayParams):
```javascript
await initPaymentSheet({
// ...
applePay: {
merchantCountryCode: 'US',
},
});
```
#### Wiederkehrende Zahlungen
Wenn Sie `initPaymentSheet` aufrufen, übergeben Sie einen [ApplePayParams](https://stripe.dev/stripe-react-native/api-reference/modules/PaymentSheet.html#ApplePayParams), wobei der `merchantCountryCode` auf den Ländercode Ihres Unternehmens gesetzt ist.
Gemäß [den Apple-Richtlinien](https://developer.apple.com/design/human-interface-guidelines/apple-pay#Supporting-subscriptions) für wiederkehrende Zahlungen müssen Sie auch `cardItems` festlegen, die einen [RecurringCartSummaryItem](https://stripe.dev/stripe-react-native/api-reference/modules/ApplePay.html#RecurringCartSummaryItem) mit dem Betrag enthalten, den Sie zu Zahlungen beabsichtigen (z. B. „59,95 USD pro Monat“).
Sie können auch [Händler-Token](https://developer.apple.com/apple-pay/merchant-tokens/) übernehmen, indem Sie die den `type` der `request` auf `PaymentRequestType.Recurring` festlegen.
Weitere Informationen zur Verwendung wiederkehrender Zahlungen mit Apple Pay finden Sie in der [PassKit-Dokumentation von Apple](https://developer.apple.com/documentation/passkit/pkpaymentrequest).
#### iOS (React Native)
```javascript
const initializePaymentSheet = async () => {
const recurringSummaryItem = {
label: 'My Subscription',
amount: '59.99',
paymentType: 'Recurring',
intervalCount: 1,
intervalUnit: 'month',
// Payment starts today
startDate: new Date().getTime() / 1000,
// Payment ends in one year
endDate: new Date().getTime() / 1000 + 60 * 60 * 24 * 365,
};
const {error} = await initPaymentSheet({
// ...
applePay: {
merchantCountryCode: 'US',
cartItems: [recurringSummaryItem],
request: {
type: PaymentRequestType.Recurring,
description: 'Recurring',
managementUrl: 'https://my-backend.example.com/customer-portal',
billing: recurringSummaryItem,
billingAgreement:
"You'll be billed $59.99 every month for the next 12 months. To cancel at any time, go to Account and click 'Cancel Membership.'",
},
},
});
};
```
### Sendungsverfolgung
Um für iOS 16 und neuere Versionen Informationen zur [Sendungsverfolgung](https://developer.apple.com/design/human-interface-guidelines/technologies/wallet/designing-order-tracking) hinzuzufügen, konfigurieren Sie eine Callback-Funktion für `setOrderTracking`. Stripe ruft Ihre Implementierung auf, nachdem die Zahlung durchgeführt wurde, aber bevor iOS das Apple Pay-Formular schließt.
Rufen Sie in Ihrer Implementierung der Callback-Funktion `setOrderTracking` die Bestelldetails für die abgeschlossene Bestellung von Ihrem Server ab. Übergeben Sie die Details an die angegebene `completion`-Funktion.
Weitere Informationen zur Sendungsverfolgung finden Sie in der [Apple-Dokumentation zu Wallet-Bestellungen](https://developer.apple.com/documentation/walletorders).
#### iOS (React Native)
```javascript
await initPaymentSheet({
// ...
applePay: {
// ...
setOrderTracking: async complete => {
const apiEndpoint =
Platform.OS === 'ios'
? 'http://localhost:4242'
: 'http://10.0.2.2:4567';
const response = await fetch(
`${apiEndpoint}/retrieve-order?orderId=${orderId}`,
{
method: 'GET',
headers: {
'Content-Type': 'application/json',
},
},
);
if (response.status === 200) {
const orderDetails = await response.json();
// orderDetails should include orderIdentifier, orderTypeIdentifier,
// authenticationToken and webServiceUrl
complete(orderDetails);
}
},
},
});
```
## Optional: Google Pay aktivieren
### Integration einrichten
Um Google Pay zu verwenden, aktivieren Sie zuerst die Google Pay API, indem Sie dem Tag `` Ihrer Datei **AndroidManifest.xml** Folgendes hinzufügen:
```xml
...
```
Weitere Informationen finden Sie in der [Google Pay API](https://developers.google.com/pay/api/android/guides/setup) für Android.
### Google Pay hinzufügen
Setzen Sie bei der Initialisierung von `PaymentSheet` `merchantCountryCode` auf den Ländercode Ihres Unternehmens und setzen Sie `googlePay` auf „true“.
Sie können die Testumgebung auch verwenden, indem Sie den Parameter `testEnv` übergeben. Sie können Google Pay nur auf einem physischen Android-Gerät testen. Folgen Sie der [React Native-Dokumentation](https://reactnative.dev/docs/running-on-device), um Ihre Anwendung auf einem physischen Gerät zu testen.
```javascript
const { error, paymentOption } = await initPaymentSheet({
// ...
googlePay: {
merchantCountryCode: 'US',
testEnv: true, // use test environment
},
});
```
## Optional: Formular anpassen
Alle Anpassungen werden mithilfe von `initPaymentSheet` konfiguriert.
### Erscheinungsbild
Passen Sie mit der [Appearance API](https://docs.stripe.com/elements/appearance-api/mobile.md?platform=react-native) Farben, Schriftarten und mehr an das Erscheinungsbild Ihrer App an.
### Anzeigename des Händlers
Geben Sie einen kundenorientierten Unternehmensnamen an, indem Sie `merchantDisplayName` festlegen. Standardmäßig handelt es sich dabei um den Namen Ihrer App.
```javascript
await initPaymentSheet({
// ...
merchantDisplayName: 'Example Inc.',
});
```
### Dunkelmodus
Standardmäßig passt `PaymentSheet` sich automatisch an die systemweiten Erscheinungsbildeinstellungen des/der Nutzer/in an (heller und dunkler Modus). Dies können Sie ändern, indem Sie die Eigenschaft `style` in iOS auf den Modus `alwaysLight` oder `alwaysDark` setzen.
```javascript
await initPaymentSheet({
// ...
style: 'alwaysDark',
});
```
Wählen Sie auf einem Android-Gerät den Hell- oder Dunkelmodus für Ihre App aus:
```
// force dark
AppCompatDelegate.setDefaultNightMode(AppCompatDelegate.MODE_NIGHT_YES)
// force light
AppCompatDelegate.setDefaultNightMode(AppCompatDelegate.MODE_NIGHT_NO)
```
### Standardabrechnungsdetails
Um Standardwerte für die im PaymentSheet erfassten Rechnungsdetails festzulegen, konfigurieren Sie die Eigenschaft `defaultBillingDetails`. Das `PaymentSheet` füllt seine Felder vorab mit den von Ihnen angegebenen Werten aus.
```javascript
await initPaymentSheet({
// ...
defaultBillingDetails: {
email: 'foo@bar.com',
address: {
country: 'US',
},
},
});
```
### Abrechnungdaten erfassen
Verwenden Sie `billingDetailsCollectionConfiguration`, um anzugeben, wie Sie Rechnungsdetails im PaymentSheet erfassen möchten.
Sie können den Namen, die E-Mail-Adresse, die Telefonnummer und die Adresse Ihrer Kundinnen und Kunden erfassen.
Wenn Sie nicht beabsichtigen, die Werte zu erfassen, die für die Zahlungsmethode erforderlich sind, müssen Sie Folgendes tun:
1. Hängen Sie die Werte, die nicht von `PaymentSheet` erfasst werden, an die Eigenschaft `defaultBillingDetails` an.
1. Legen Sie `billingDetailsCollectionConfiguration.attachDefaultsToPaymentMethod` auf `true` fest.
```javascript
await initPaymentSheet({
// ...
defaultBillingDetails: {
email: 'foo@bar.com',
},
billingDetailsCollectionConfiguration: {
name: PaymentSheet.CollectionMode.ALWAYS,
email: PaymentSheet.CollectionMode.NEVER,
address: PaymentSheet.AddressCollectionMode.FULL,
attachDefaultsToPaymentMethod: true
},
});
```
> Wenden Sie sich an Ihren Rechtsbeistand bezüglich der Gesetze, die für das Erfassen von Informationen gelten. Erfassen Sie Telefonnummern nur, wenn Sie sie für die Transaktion benötigen.
## Optional: Zahlung in Ihrer Nutzeroberfläche abschließen
Sie können das Zahlungsformular anzeigen, um nur die Details einer Zahlungsmethode zu erfassen, und später eine `confirm`-Methode aufrufen, um die Zahlung in der Nutzeroberfläche Ihrer App abzuschließen. Dies ist nützlich, wenn Sie eine nutzerspezifische Kaufschaltfläche haben oder zusätzliche Schritte erfordern, nachdem die Zahlungsdetails erfasst wurden.

> Eine Beispiel-Integration ist [in unserem GitHub verfügbar](https://github.com/stripe/stripe-react-native/blob/master/example/src/screens/PaymentsUICustomScreen.tsx).
1. Rufen Sie zunächst `initPaymentSheet` auf und übergeben Sie `customFlow: true`. `initPaymentSheet` wird mit einer anfänglichen Zahlungsoption aufgelöst, die ein Bild und ein Label enthält, die die Zahlungsmethode des/der Kund/in darstellen. Aktualisieren Sie Ihre Nutzeroberfläche mit diesen Details.
```javascript
const {
initPaymentSheet,
presentPaymentSheet,
confirmPaymentSheetPayment,
} = useStripe()
const { error, paymentOption } = await initPaymentSheet({
customerId: customer,
customerEphemeralKeySecret: ephemeralKey,
paymentIntentClientSecret: paymentIntent,
customFlow: true,
merchantDisplayName: 'Example Inc.',
});
// Update your UI with paymentOption
```
1. Verwenden Sie `presentPaymentSheet`, um Zahlungsdetails zu erfassen. Wenn der/die Kund/in fertig ist, schließt sich das Formular von selbst und löst das Versprechen auf. Aktualisieren Sie Ihre Nutzeroberfläche mit den Angaben zur ausgewählten Zahlungsmethode.
```javascript
const { error, paymentOption } = await presentPaymentSheet();
```
1. Verwenden Sie `confirmPaymentSheetPayment`, um die Zahlung zu bestätigen. Dies wird mit dem Ergebnis der Zahlung aufgelöst.
```javascript
const { error } = await confirmPaymentSheetPayment();
if (error) {
Alert.alert(`Error code: ${error.code}`, error.message);
} else {
Alert.alert(
'Success',
'Your order is confirmed!'
);
}
```
Wenn Sie `allowsDelayedPaymentMethods` auf true festlegen, werden Zahlungsmethoden mit [verzögerter Benachrichtigung](https://docs.stripe.com/payments/payment-methods.md#payment-notification) wie US-Bankkonten zugelassen. Für diese Zahlungsmethoden ist der endgültige Zahlungsstatus nicht bekannt, wenn das `PaymentSheet` abgeschlossen wird. Stattdessen ist sie erfolgreich oder schlägt fehl. Wenn Sie diese Art von Zahlungsmethoden unterstützen, informieren Sie den Kunden/die Kundin darüber, dass seine/ihre Bestellung bestätigt ist, und führen seine/ihre Bestellung erst aus (z. B. das Produkt versenden), wenn die Zahlung erfolgreich ist.
## Optional: Weitere Zahlungsmethoden aktivieren
Navigieren Sie im Dashboard zu [Zahlungsmethoden für Ihre verbundenen Konten verwalten](https://dashboard.stripe.com/settings/payment_methods/connected_accounts), um zu konfigurieren, welche Zahlungsmethoden Ihre verbundenen Konten akzeptieren. Änderungen an den Standardeinstellungen gelten für alle neuen und bestehenden verbundenen Konten.
Informationen zu den Zahlungsmethoden finden Sie in den folgenden Ressourcen:
- [Ein Leitfaden zu Zahlungsmethoden](https://stripe.com/payments/payment-methods-guide#choosing-the-right-payment-methods-for-your-business), der Ihnen bei der Auswahl der richtigen Zahlungsmethoden für Ihre Plattform hilft.
- [Kontofunktionen](https://docs.stripe.com/connect/account-capabilities.md), um sicherzustellen, dass die gewählten Zahlungsmethoden für Ihre verbundenen Konten funktionieren.
- [Zahlungsmethode und Produktsupport](https://docs.stripe.com/payments/payment-methods/payment-method-support.md#product-support), um sicherzustellen, dass die gewählten Zahlungsmethoden für Ihre Stripe-Produkte und Zahlungsabläufe geeignet sind.
Für jede Zahlungsmethode können Sie eine der folgenden Dropdown-Optionen wählen:
| |
| |
| **Standardmäßig aktiviert** | Ihre verbundenen Konten akzeptieren diese Zahlungsmethode beim Bezahlvorgang. Einige Zahlungsmethoden können nur deaktiviert oder gesperrt werden. Dies liegt daran, dass Ihre verbundenen Konten mit *Zugriff auf das Stripe-Dashboard* (Platforms can provide connected accounts with access to the full Stripe Dashboard or the Express Dashboard. Otherwise, platforms build an interface for connected accounts using embedded components or the Stripe API) sie auf ihrer Seite mit Einstellungen aktivieren müssen. |
| **Standardmäßig deaktiviert** | Ihre verbundenen Konten akzeptieren diese Zahlungsmethode beim Bezahlvorgang nicht. Wenn Sie Ihren verbundenen Konten mit *Zugriff auf das Stripe-Dashboard* (Platforms can provide connected accounts with access to the full Stripe Dashboard or the Express Dashboard. Otherwise, platforms build an interface for connected accounts using embedded components or the Stripe API) erlauben, ihre eigenen Zahlungsmethoden zu verwalten, haben sie die Möglichkeit, sie zu aktivieren. |
| **Blockiert** | Ihre verbundenen Konten akzeptieren diese Zahlungsmethode beim Bezahlvorgang nicht. Wenn Sie Ihren verbundenen Konten mit *Zugriff auf das Stripe-Dashboard* (Platforms can provide connected accounts with access to the full Stripe Dashboard or the Express Dashboard. Otherwise, platforms build an interface for connected accounts using embedded components or the Stripe API) erlauben, ihre eigenen Zahlungsmethoden zu verwalten, haben sie nicht die Möglichkeit, sie zu aktivieren. |

Optionen für Zahlungsmethoden
Wenn Sie eine Änderung an einer Zahlungsmethode vornehmen, müssen Sie auf **Änderungen überprüfen** in der Leiste unten im Bildschirm klicken und auf **Speichern und anwenden**, um Ihre verbundenen Konten zu aktualisieren.

Dialogfeld „Speichern“
### Verbundenen Konten die Verwaltung von Zahlungsmethoden gestatten
Stripe empfiehlt, dass Sie Ihren verbundenen Konten erlauben, ihre eigenen Zahlungsmethoden anzupassen. Diese Option ermöglicht jedem verbundenen Konto mit *Zugriff auf das Stripe-Dashboard* (Platforms can provide connected accounts with access to the full Stripe Dashboard or the Express Dashboard. Otherwise, platforms build an interface for connected accounts using embedded components or the Stripe API), seine Seite mit den [Zahlungsmethoden](https://dashboard.stripe.com/settings/payment_methods) anzuzeigen und zu aktualisieren. Nur Inhaber/innen der verbundenen Konten können ihre Zahlungsmethoden anpassen. Das Stripe-Dashboard zeigt die Standard-Zahlungsmethoden an, die Sie auf alle neuen und bestehenden verbundenen Konten angewendet haben. Ihre verbundenen Konten können diese Standardeinstellungen außer Kraft setzen, mit Ausnahme der von Ihnen blockierten Zahlungsmethoden.
Aktivieren Sie das Kontrollkästchen **Anpassung des Kontos**, um diese Option zu aktivieren. Sie müssen auf **Änderungen überprüfen** in der Leiste unten im Bildschirm klicken und dann **Speichern und übernehmen** auswählen, um diese Einstellung zu aktualisieren.

Kontrollkästchen „Anpassung des Kontos“
### Funktionen der Zahlungsmethode
Damit Ihre verbundenen Konten zusätzliche Zahlungsmethoden akzeptieren können, müssen deren `Accounts` über aktive Zahlungsmethoden verfügen.
Wenn Sie unter [Zahlungsmethoden für Ihre verbundenen Konten verwalten](https://dashboard.stripe.com/settings/payment_methods/connected_accounts) die Option „Standardmäßig aktiviert“ für eine Zahlungsmethode ausgewählt haben, fordert Stripe automatisch die erforderliche Funktion für neue und bestehende verbundene Konten an, sofern diese die Verifizierungsanforderungen erfüllen. Wenn das verbundene Konto die Anforderungen nicht erfüllt oder Sie die direkte Kontrolle behalten möchten, können Sie die Funktion manuell im Dashboard oder über die API anfordern.
Die meisten Zahlungsmethoden haben die gleichen Verifizierungsanforderungen wie die `card_payments`-Funktion, mit einigen Einschränkungen und Ausnahmen. Die [Tabelle der Zahlungsmethodenfunktionen](https://docs.stripe.com/connect/account-capabilities.md#payment-methods) führt die Zahlungsmethoden auf, die eine zusätzliche Verifizierung erfordern.
#### Dashboard
[Suchen Sie im Dashboard ein verbundenes Konto](https://docs.stripe.com/connect/dashboard/managing-individual-accounts.md#finding-accounts), um dessen Funktionen zu bearbeiten und ausstehende Verifizierungsanforderungen einzusehen.
#### API
Für ein bestehendes verbundenes Konto können Sie die vorhandenen Funktionen [auflisten](https://docs.stripe.com/api/capabilities/list.md), um festzustellen, ob Sie zusätzliche Funktionen anfordern müssen.
```curl
curl https://api.stripe.com/v1/accounts/{{CONNECTEDACCOUNT_ID}}/capabilities \
-u "<>:"
```
Fordern Sie zusätzliche Funktionen an, indem Sie die Funktionen jedes verbundenen Kontos [aktualisieren](https://docs.stripe.com/api/capabilities/update.md).
```curl
curl https://api.stripe.com/v1/accounts/{{CONNECTEDACCOUNT_ID}}/capabilities/us_bank_account_ach_payments \
-u "<>:" \
-d requested=true
```
Es kann zu einer Verzögerung kommen, bevor die angeforderte Funktion aktiv wird. Wenn für die Funktion Aktivierungsanforderungen gelten, enthält die Antwort diese in den `requirements`-Arrays.
## Gebühren einziehen
Als Plattform können Sie Ihren verbundenen Konten einen Anteil jeder Transaktion in Form von Plattformgebühren in Rechnung stellen. Sie können die Preise für Plattformgebühren auf folgende Weise festlegen:
- Mit dem [Plattform-Preistool](https://docs.stripe.com/connect/platform-pricing-tools.md) können Sie Preisregeln festlegen und testen. Diese No-Code-Funktion im Stripe-Dashboard ist derzeit nur für Plattformen verfügbar, die für die Zahlung von Stripe-Gebühren verantwortlich sind.
- Geben Sie die Plattformgebühren direkt in einem [PaymentIntent](https://docs.stripe.com/api/payment_intents/object.md) an. Die auf diese Weise festgelegten Gebühren haben Vorrang vor der im Preistool für Plattformen festgelegten Preislogik.
Ihre Plattform kann eine Plattformgebühr unter Berücksichtigung der folgenden Einschränkungen erheben:
- Der Wert von `application_fee_amount` muss positiv und kleiner als der Betrag der Zahlung sein. Die erhobene Plattformgebühr wird auf den Betrag der Zahlung begrenzt.
- Es fallen keine zusätzlichen Stripe-Gebühren für die Plattformgebühr selbst an.
- In Übereinstimmung mit gesetzlich vorgeschriebenen und Compliance-Anforderungen in Brasilien können Plattformen mit Sitz außerhalb Brasiliens und mit brasilianischen verbundenen Konten keine Plattformgebühren über Stripe einziehen.
- Die Währung des `application_fee_amount` hängt von einigen Faktoren für [mehrere Währungen](https://docs.stripe.com/connect/currencies.md) ab.
Die [BalanceTransaction](https://docs.stripe.com/api.md#balance_transaction_retrieve) der resultierenden Zahlung enthält eine detaillierte Aufschlüsselung der Transaktionsgebühren von Stripe als auch der Plattformgebühren. Um die Berichterstellung zu verbessern, wird durch die Erhebung einer Transaktionsgebühr ein [ApplicationFee](https://docs.stripe.com/api/application_fees/object.md)-Objekt generiert. Verwenden Sie für die Berichterstellung die Eigenschaft `amount` im `ApplicationFee`-Objekt.
Die Plattformgebühren können Sie im Abschnitt [Erhobene Transaktionsgebühren](https://dashboard.stripe.com/connect/application_fees) des Dashboards einsehen.
> Plattformgebühren für Direct Charges werden standardmäßig asynchron erstellt. Wenn Sie das `application_fee`-Objekt in einer Zahlungserstellungsanfrage erweitern, wird die Plattformgebühr synchron als Teil dieser Anfrage erstellt. Erweitern Sie das `application_fee`-Objekt nur bei Bedarf, da dies die Latenz der Anfrage erhöht.
>
> Um Benachrichtigungen über asynchron erstellte `ApplicationFee`-Objekte zu erhalten, überwachen Sie das Webhook-Ereignis [application_fee.created](https://docs.stripe.com/api/events/types.md#event_types-application_fee.created).
## Rückerstattungen ausstellen
Ebenso wie Plattformen Zahlungen für verbundene Konten erstellen können, können sie auch Rückerstattungen von Zahlungen für verbundene Konten erstellen. [Erstellen Sie eine Rückerstattung](https://docs.stripe.com/api.md#create_refund) mit dem Geheimschlüssel Ihrer Plattform, während Sie als das verbundene Konto [authentifiziert](https://docs.stripe.com/connect/authentication.md#stripe-account-header) sind.
Plattformgebühren werden bei Ausstellung einer Rückerstattung nicht automatisch zurückerstattet. Ihre Plattform muss die Plattformgebühr explizit zurückerstatten. Andernfalls büßt das verbundene Konto, d. h. das Konto, auf dem die Zahlung erstellt wurde, diesen Betrag ein. Sie können eine Plattformgebühr zurückerstatten, indem Sie in der Erstattungsanfrage für den Wert `refund_application_fee` **true** angeben:
```curl
curl https://api.stripe.com/v1/refunds \
-u "<>:" \
-H "Stripe-Account: {{CONNECTEDACCOUNT_ID}}" \
-d "charge={{CHARGE_ID}}" \
-d refund_application_fee=true
```
Standardmäßig wird die gesamte Zahlung zurückerstattet. Sie können jedoch auch eine Teilerstattung erstellen, indem Sie den Wert `amount` als positive ganze Zahl festlegen. Wenn die Erstattung zu einer Rückerstattung der gesamten Zahlung führt, wird die gesamte Plattformgebühr zurückerstattet. Andernfalls wird ein anteiliger Betrag der Plattformgebühr zurückerstattet. Alternativ können Sie den Wert `refund_application_fee` als **false** angeben und die [Plattformgebühr getrennt erstatten](https://docs.stripe.com/api.md#create_fee_refund).
## In Connect eingebettete Komponenten
[In Connect eingebettete Komponenten](https://docs.stripe.com/connect/get-started-connect-embedded-components.md) unterstützt Direct Charges. Mithilfe der [eingebetteten Zahlungskomponente](https://docs.stripe.com/connect/supported-embedded-components/payments.md) können Sie Ihren verbundenen Konten innerhalb Ihrer Website die Möglichkeit geben, Zahlungsinformationen einzusehen, Gebühren zu erfassen und Zahlungsanfechtungen zu verwalten.
Note: The following is a preview/demo component that behaves differently than live mode usage with real connected accounts. The actual component has more functionality than what might appear in this demo component. For example, for connected accounts without Stripe dashboard access (custom accounts), no user authentication is required in production.
Die folgenden Komponenten zeigen Informationen für Direct Charges an:
- [Payments-Komponente](https://docs.stripe.com/connect/supported-embedded-components/payments.md): Zeigt alle Zahlungen und Zahlungsanfechtungen eines Kontos an.
- [Zahlungsdetails](https://docs.stripe.com/connect/supported-embedded-components/payment-details.md): Zeigt Informationen für eine bestimmte Zahlung an.
- [Komponente „Zahlungsanfechtungen“](https://docs.stripe.com/connect/supported-embedded-components/disputes-list.md): Zeigt alle Zahlungsanfechtungen eines Kontos an.
- [Komponente „Zahlungsanfechtungen für eine Zahlung“](https://docs.stripe.com/connect/supported-embedded-components/disputes-for-a-payment.md): Zeigt die Zahlungsanfechtungen für eine einzelne angegebene Zahlung an. Sie können damit Funktionen zum Management von Zahlungsanfechtungen in eine Seite Ihrer Zahlungs-Nutzeroberfläche integrieren.
## See also
- [Mit mehreren Währungen arbeiten](https://docs.stripe.com/connect/currencies.md)
- [Zahlungsbeschreibungen mit Connect](https://docs.stripe.com/connect/statement-descriptors.md)