Create direct charges
Create charges directly on the connected account and collect fees.
Create direct charges when customers transact directly with a connected account, often unaware of your platform’s existence. With direct charges:
- The payment appears as a charge on the connected account, not your platform’s account.
- The connected account’s balance increases with every charge.
- Your account balance increases with application fees from every charge.
This charge type is best suited for platforms providing software as a service. For example, Shopify provides tools for building online storefronts, and Thinkific enables educators to sell online courses.
Platform visibility limitations
Direct charges have limited visibility at the platform level. When you create direct charges:
- Transaction objects such as
PaymentIntentsandChargesexist on the connected account, not on the platform. - To access direct charge data, you must query the Stripe API using the connected account ID in the Stripe-Account header.
This scoping behavior affects data synchronization services like Fivetran, as well as other third-party integrations that rely on platform-level API queries. To retrieve direct charge data, they must query the connected account, not the platform.
Note
We recommend using direct charges for connected accounts that have access to the full Stripe Dashboard.
Build a custom payments integration by embedding UI components on your site, using Stripe Elements. The client-side and server-side code builds a checkout form that accepts various payment methods. See how this integration compares to Stripe’s other integration types.
Integration effort
Integration type
Combine UI components into a custom payment flow
UI customization
CSS-level customization with the Appearance API
First, register for a Stripe account.
Use our official libraries to access the Stripe API from your application:
Create a PaymentIntentServer-side
Stripe uses a PaymentIntent object to represent your intent to collect payment from a customer, tracking charge attempts and payment state changes throughout the process.
The payment methods shown to customers during the checkout process are also included on the PaymentIntent. You can let Stripe automatically pull payment methods from your Dashboard settings or you can list them manually.
Unless your integration requires a code-based option for offering payment methods, don’t list payment methods manually. Stripe evaluates the currency, payment method restrictions, and other parameters to determine the list of supported payment methods. Stripe prioritizes payment methods that help increase conversion and are most relevant to the currency and the customer’s location. Stripe hides lower priority payment methods in an overflow menu.
Retrieve the client secret
The PaymentIntent includes a client secret that the client side uses to securely complete the payment process. You can use different approaches to pass the client secret to the client side.
Collect payment detailsClient-side
Collect payment details on the client with the Payment Element. The Payment Element is a prebuilt UI component that simplifies collecting payment details for a variety of payment methods.
The Payment Element contains an iframe that securely sends payment information to Stripe over an HTTPS connection. Avoid placing the Payment Element within another iframe because some payment methods require redirecting to another page for payment confirmation. If you do choose to use an iframe and want to accept Apple Pay or Google Pay, the iframe must have the allow attribute set to equal "payment *".
The checkout page address must start with https:// rather than http:// for your integration to work. You can test your integration without using HTTPS, but remember to enable it when you’re ready to accept live payments.
Submit the payment to StripeClient-side
Use stripe.confirmPayment to complete the payment using details from the Payment Element. Provide a return_url to this function to indicate where Stripe should redirect the user after they complete the payment. Your user may be first redirected to an intermediate site, like a bank authorization page, before being redirected to the return_. Card payments immediately redirect to the return_ when a payment is successful.
If you don’t want to redirect for card payments after payment completion, you can set redirect to if_. This only redirects customers that check out with redirect-based payment methods.
Make sure the return_ corresponds to a page on your website that provides the status of the payment. When Stripe redirects the customer to the return_, we provide the following URL query parameters:
| Parameter | Description |
|---|---|
payment_ | The unique identifier for the PaymentIntent. |
payment_ | The client secret of the PaymentIntent object. |
Caution
If you have tooling that tracks the customer’s browser session, you might need to add the stripe. domain to the referrer exclude list. Redirects cause some tools to create new sessions, which prevents you from tracking the complete session.
Use one of the query parameters to retrieve the PaymentIntent. Inspect the status of the PaymentIntent to decide what to show your customers. You can also append your own query parameters when providing the return_, which persist through the redirect process.
Handle post-payment eventsServer-side
Stripe sends a payment_intent.succeeded event when the payment completes. Use the Dashboard webhook tool or follow the webhook guide to receive these events and run actions, such as sending an order confirmation email to your customer, logging the sale in a database, or starting a shipping workflow.
Listen for these events rather than waiting on a callback from the client. On the client, the customer could close the browser window or quit the app before the callback executes, and malicious clients could manipulate the response. Setting up your integration to listen for asynchronous events is what enables you to accept different types of payment methods with a single integration.
In addition to handling the payment_ event, we recommend handling these other events when collecting payments with the Payment Element:
| Event | Description | Action |
|---|---|---|
| payment_intent.succeeded | Sent when a customer successfully completes a payment. | Send the customer an order confirmation and fulfill their order. |
| payment_intent.processing | Sent when a customer successfully initiates a payment, but the payment has yet to complete. This event is most commonly sent when the customer initiates a bank debit. It’s followed by either a payment_ or payment_ event in the future. | Send the customer an order confirmation that indicates their payment is pending. For digital goods, you might want to fulfill the order before waiting for payment to complete. |
| payment_intent.payment_failed | Sent when a customer attempts a payment, but the payment fails. | If a payment transitions from processing to payment_, offer the customer another attempt to pay. |
Test the integration
See Testing for additional information to test your integration.
OptionalEnable additional payment methods
Navigate to Manage payment methods for your connected accounts in the Dashboard to configure which payment methods your connected accounts accept. Changes to default settings apply to all new and existing connected accounts.
Consult the following resources for payment method information:
- A guide to payment methods to help you choose the correct payment methods for your platform.
- Account capabilities to make sure your chosen payment methods work for your connected accounts.
- Payment method and product support tables to make sure your chosen payment methods work for your Stripe products and payments flows.
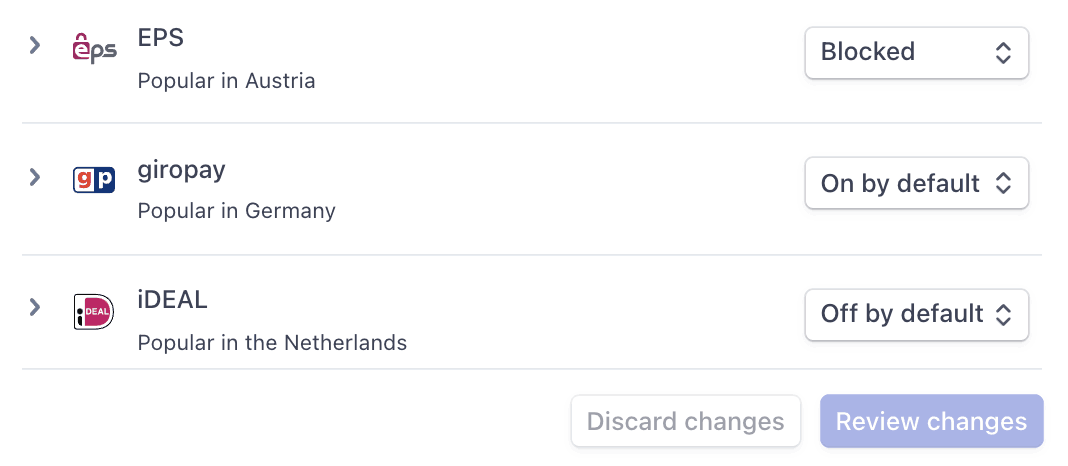
For each payment method, you can select one of the following dropdown options:
| On by default | Your connected accounts accept this payment method during checkout. Some payment methods can only be off or blocked. This is because your connected accounts with access to the Stripe Dashboard must activate them in their settings page. |
| Off by default | Your connected accounts don’t accept this payment method during checkout. If you allow your connected accounts with access to the Stripe Dashboard to manage their own payment methods, they have the ability to turn it on. |
| Blocked | Your connected accounts don’t accept this payment method during checkout. If you allow your connected accounts with access to the Stripe Dashboard to manage their own payment methods, they don’t have the option to turn it on. |

Payment method options
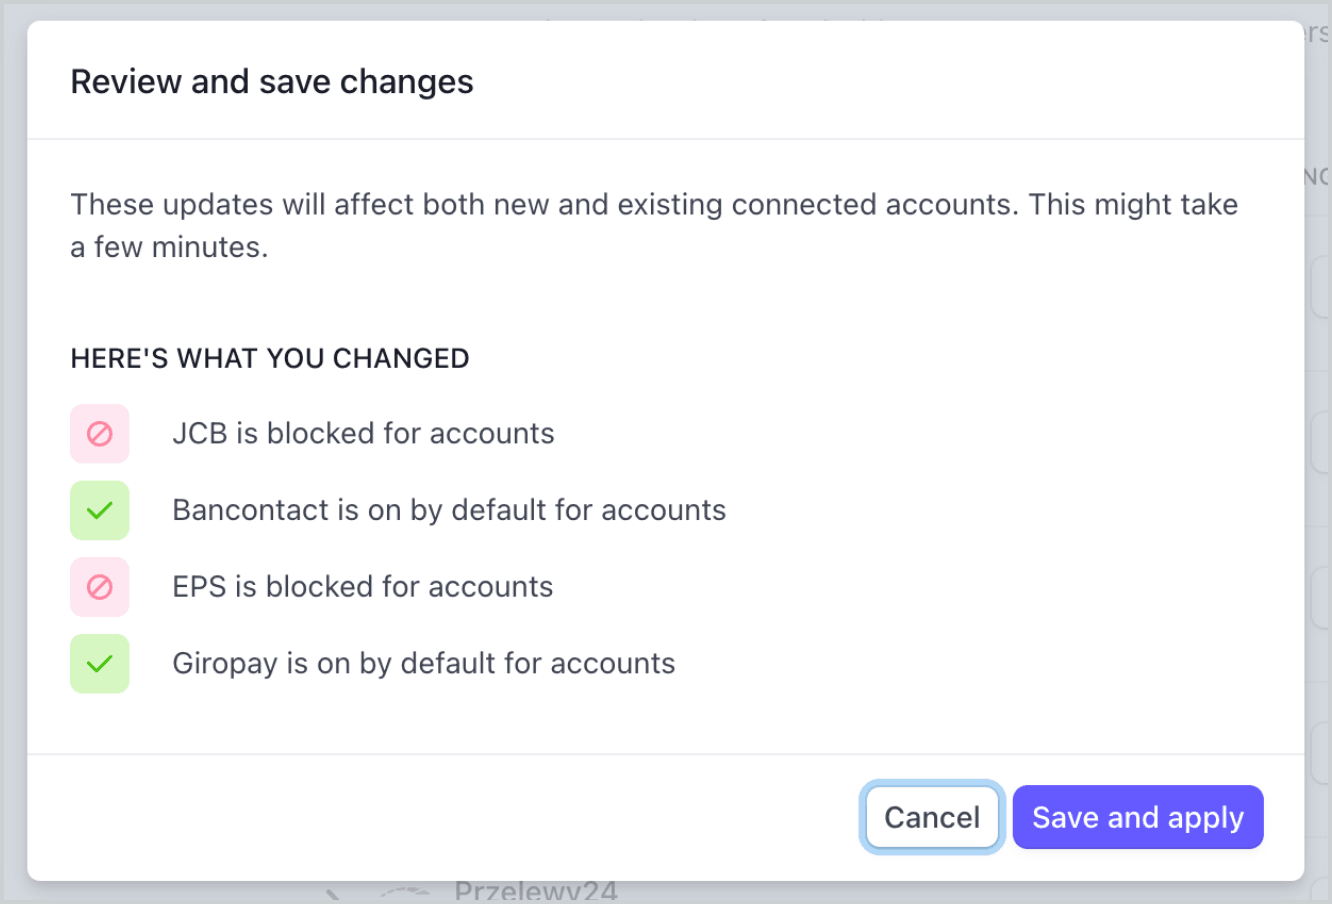
If you make a change to a payment method, you must click Review changes in the bottom bar of your screen and Save and apply to update your connected accounts.

Save dialog
Allow connected accounts to manage payment methods
Stripe recommends allowing your connected accounts to customize their own payment methods. This option allows each connected account with access to the Stripe Dashboard to view and update their Payment methods page. Only owners of the connected accounts can customize their payment methods. The Stripe Dashboard displays the set of payment method defaults you applied to all new and existing connected accounts. Your connected accounts can override these defaults, excluding payment methods you have blocked.
Check the Account customization checkbox to enable this option. You must click Review changes in the bottom bar of your screen and then select Save and apply to update this setting.

Account customization checkbox
Payment method capabilities
To allow your connected accounts to accept additional payment methods, their Accounts must have active payment method capabilities.
If you selected the “On by default” option for a payment method in Manage payment methods for your connected accounts, Stripe automatically requests the necessary capability for new and existing connected accounts if they meet the verification requirements. If the connected account doesn’t meet the requirements or if you want to have direct control, you can manually request the capability in the Dashboard or with the API.
Most payment methods have the same verification requirements as the card_ capability, with some restrictions and exceptions. The payment method capabilities table lists the payment methods that require additional verification.
Collect fees
When a payment is processed, your platform can take a portion of the transaction in the form of application fees. You can set application fee pricing in two ways:
- Use the Platform Pricing Tool to set and test pricing rules. This no-code feature in the Stripe Dashboard is currently only available for platforms responsible for paying Stripe fees.
- Set your pricing rules in-house, specifying application fees directly in a PaymentIntent. Fees set with this method override the pricing logic specified in the Platform Pricing Tool.
Your platform can take an application fee with the following limitations:
- The value of
application_must be positive and less than the amount of the charge. The application fee collected is capped at the captured amount of the charge.fee_ amount - There are no additional Stripe fees on the application fee itself.
- In line with Brazilian regulatory and compliance requirements, platforms based outside of Brazil, with Brazilian connected accounts can’t collect application fees through Stripe.
- The currency of
application_depends upon a few multiple currency factors.fee_ amount
The resulting charge’s balance transaction includes a detailed fee breakdown of both the Stripe and application fees. To provide a better reporting experience, an Application Fee is created after the fee is collected. Use the amount property on the application fee object for reporting. You can then access these objects with the Application Fees endpoint.
Earned application fees are added to your available account balance on the same schedule as funds from regular Stripe charges. Application fees are viewable in the Collected fees section of the Dashboard.
Caution
Application fees for direct charges are created asynchronously by default. If you expand the application_ object in a charge creation request, the application fee is created synchronously as part of that request. Only expand the application_ object if you must, because it increases the latency of the request.
To access the application fee objects for application fees that are created asynchronously, listen for the application_fee.created webhook event.
Flow of funds with fees
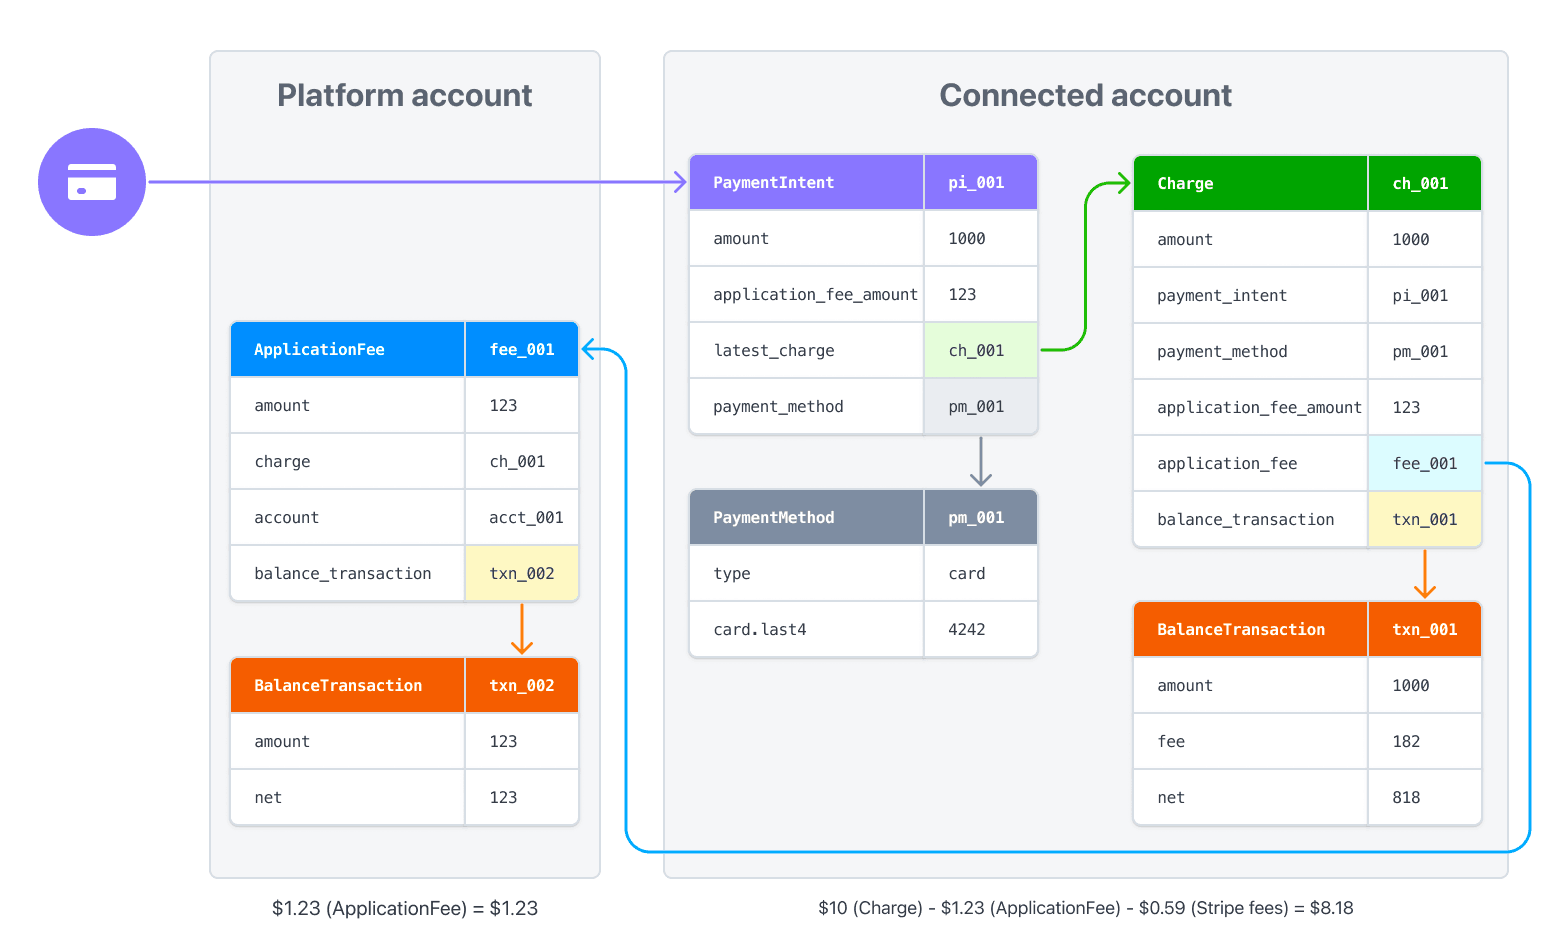
When you specify an application fee on a charge, the fee amount is transferred to your platform’s Stripe account. When processing a charge directly on the connected account, the charge amount—less the Stripe fees and application fee—is deposited into the connected account.
For example, if you make a charge of 10 USD with a 1.23 USD application fee (like in the previous example), 1.23 USD is transferred to your platform account. 8.18 USD (10 USD - 0.59 USD - 1.23 USD) is netted in the connected account (assuming standard US Stripe fees).

If you process payments in multiple currencies, read how currencies are handled in Connect.
Issue refunds
Just as platforms can create charges on connected accounts, they can also create refunds of charges on connected accounts. Create a refund using your platform’s secret key while authenticated as the connected account.
Application fees are not automatically refunded when issuing a refund. Your platform must explicitly refund the application fee or the connected account—the account on which the charge was created—loses that amount. You can refund an application fee by passing a refund_ value of true in the refund request:
By default, the entire charge is refunded, but you can create a partial refund by setting an amount value as a positive integer. If the refund results in the entire charge being refunded, the entire application fee is refunded. Otherwise, a proportional amount of the application fee is refunded. Alternatively, you can provide a refund_ value of false and refund the application fee separately.
Connect embedded components
Connect embedded components support direct charges. By using the payments embedded component, you can let your connected accounts view payment information, capture charges, and manage disputes from within your site.
The following components display information for direct charges:
Payments component: Displays all of an account’s payments and disputes.
Payments details: Displays information for a specific payment.
Disputes list component: Displays all of an account’s disputes.
Disputes for a payment component: Displays the disputes for a single specified payment. You can use it to include dispute management functionality on a page with your payments UI.