Skip to content
Create account
or
Sign in
The Stripe Docs logo
/
Ask AI
Create account
Sign in
Get started
Payments
Revenue
Platforms and marketplaces
Money management
Developer tools
Overview
About Stripe payments
Upgrade your integration
Payments analytics
Online payments
OverviewFind your use caseManaged Payments
Use Payment Links
Build a checkout page
Build an advanced integration
Build an in-app integration
Payment methods
Add payment methods
Manage payment methods
Faster checkout with Link
Payment interfaces
Payment Links
Checkout
Web Elements
In-app Elements
Payment scenarios
Custom payment flows
Flexible acquiring
Orchestration
In-person payments
Terminal
    Overview
    Accept in-person payments
    Integration design
    Select your reader
    Design an integration
    Quickstart
    Example applications
    Testing
    Terminal setup
    Set up your integration
    Connect to a reader
      Network requirements
    Accepting a payment
    Collect card payments
    Additional payment methods
    Accept offline payments
    Mail order and telephone order payments
    Regional considerations
    During checkout
    Collect tips
    Collect and save payment details for future use
    Flexible authorizations
    After checkout
    Refund transactions
    Provide receipts
    Customize checkout
    Cart display
    Collect on-screen inputs
    Collect swiped data
    Collect tapped data for NFC instruments
    Apps on devices
    Manage readers
    Order, return, replace readers
    Register readers
    Manage locations and zones
    Configure readers
    Monitor Readers
    Encryption
    References
    API references
    Mobile readers
    Smart readers
    SDK migration guide
    Deployment checklist
    Stripe Terminal reader product sheets
Other Stripe products
Financial Connections
Crypto
Climate
HomePaymentsTerminal

Connect to a reader

Connect your application to a Stripe Terminal reader.

Copy page

Note

If you haven’t chosen a reader yet, compare the available Terminal readers and choose one that best suits your needs.

Tap to Pay on iPhone lets users accept in-person contactless payments with a compatible iPhone and the Stripe Terminal SDK. Tap to Pay on iPhone supports Visa, Mastercard, American Express, and Discover contactless cards and NFC-based mobile wallets (Apple Pay, Google Pay, and Samsung Pay). Tap to Pay on iPhone is included in the Terminal iOS SDK and enables payments directly in your iOS mobile app.

Discover readers

SDK Reference

  • discoverReaders (iOS)
  • TapToPayDiscoveryConfiguration (iOS)

Use the discoverReaders method to determine whether your iPhone is supported for Tap to Pay.

The completion handler invokes with an error if your application runs on a device that doesn’t meet the supported device criteria.

DiscoverReadersViewController.swift
Swift
import StripeTerminal class DiscoverReadersViewController: UIViewController, DiscoveryDelegate { var discoverCancelable: Cancelable? // ... // Action for a "Discover Readers" button func discoverReadersAction() throws { let config = try TapToPayDiscoveryConfigurationBuilder().build() self.discoverCancelable = Terminal.shared.discoverReaders(config, delegate: self) { error in if let error = error { print("discoverReaders failed: \(error)") } else { print("discoverReaders succeeded") } } } // ... // MARK: DiscoveryDelegate func terminal(_ terminal: Terminal, didUpdateDiscoveredReaders readers: [Reader]) { // In your app, display the ability to use your phone as a reader // Call `connectReader` to initiate a session with the phone } }

Connect to a reader

SDK Reference

  • connectReader (iOS)
  • TapToPayConnectionConfiguration (iOS)

To begin accepting Tap to Pay on iPhone payments, provide the discovered reader to the connectReader method. You also need to create a delegate to handle potential required updates to the reader.

You must register your reader to a location upon connection. To do so, create and use a SCPTapToPayConnectionConfiguration with the locationId set to the relevant location ID when connecting.

Set the display_name to represent the name of the business when creating a location. Your customer sees the location’s display_name on the device’s tap screen unless you explicitly provide the name of a business when you connect to a reader. You can edit existing locations as necessary to adjust this text.

If you use destination charges with on_behalf_of, you must also provide the connected account ID in SCPTapToPayConnectionConfiguration.

APPDiscoverReadersViewController.swift
Swift
// Call `connectReader` with the selected reader and a connection config // to register to a location as set by your app. let connectionConfig = try TapToPayConnectionConfigurationBuilder.init(locationId:
"{{LOCATION_ID}}"
) .delegate(yourTapToPayReaderDelegate) .build() Terminal.shared.connectReader(selectedReader, connectionConfig: connectionConfig) { reader, error in if let reader = reader { print("Successfully connected to reader: \(reader)") } else if let error = error { print("connectReader failed: \(error)") } }

Handle device setup

When connecting to a compatible Tap to Pay on iPhone reader, a configuration update might be required and can take up to a few minutes. We recommend connecting to the reader ahead of time in the background to reduce wait time for businesses.

Make sure your application implements SCPTapToPayReaderDelegate to handle the configuration steps and display messaging to your business to stand by. You’ll see the configuration steps as a software update so you can display progress to your businesses as appropriate.

APPReaderViewController.swift
Swift
class APPReaderViewController: TapToPayReaderDelegate { // MARK: TapToPayReaderDelegate // ... func tapToPayReader(_ reader: Reader, didStartInstallingUpdate update: ReaderSoftwareUpdate, cancelable: Cancelable?) { // In your app, let the user know that an update is being installed on the reader } func tapToPayReader(_ reader: Reader, didReportReaderSoftwareUpdateProgress progress: Float) { // The update or configuration process has reached the specified progress (0.0 to 1.0) // If you are displaying a progress bar or percentage, this can be updated here } func tapToPayReader(_ reader: Reader, didFinishInstallingUpdate update: ReaderSoftwareUpdate?, error: Error?) { // The reader has finished installing an update // If `error` is nil, it is safe to proceed and start collecting payments // Otherwise, check the value of `error` for more information on what went wrong } func tapToPayReader(_ reader: Reader, didRequestReaderDisplayMesage displayMessage: ReaderDisplayMessage) { // This is called to request that a prompt be displayed in your app. // Use Terminal.stringFromReaderDisplayMessage(:) to get a user-facing string for the prompt } func tapToPayReader(_ reader: Reader, didRequestReaderInput inputOptions: ReaderInputOptions = []) { // This is called when the reader begins waiting for input // Use Terminal.stringFromReaderInputOptions(:) to get a user-facing string for the input options } // ... }

Account linking and Apple terms and conditions

You’re presented with Apple’s Tap to Pay on iPhone Terms and Conditions the first time they connect to the reader. To register with Apple, you must specify a valid Apple ID representing your business before accepting the terms presented by Apple. You only need to perform this once per Stripe account. This flow isn’t presented on subsequent connections using the same Stripe account, including on other mobile devices.
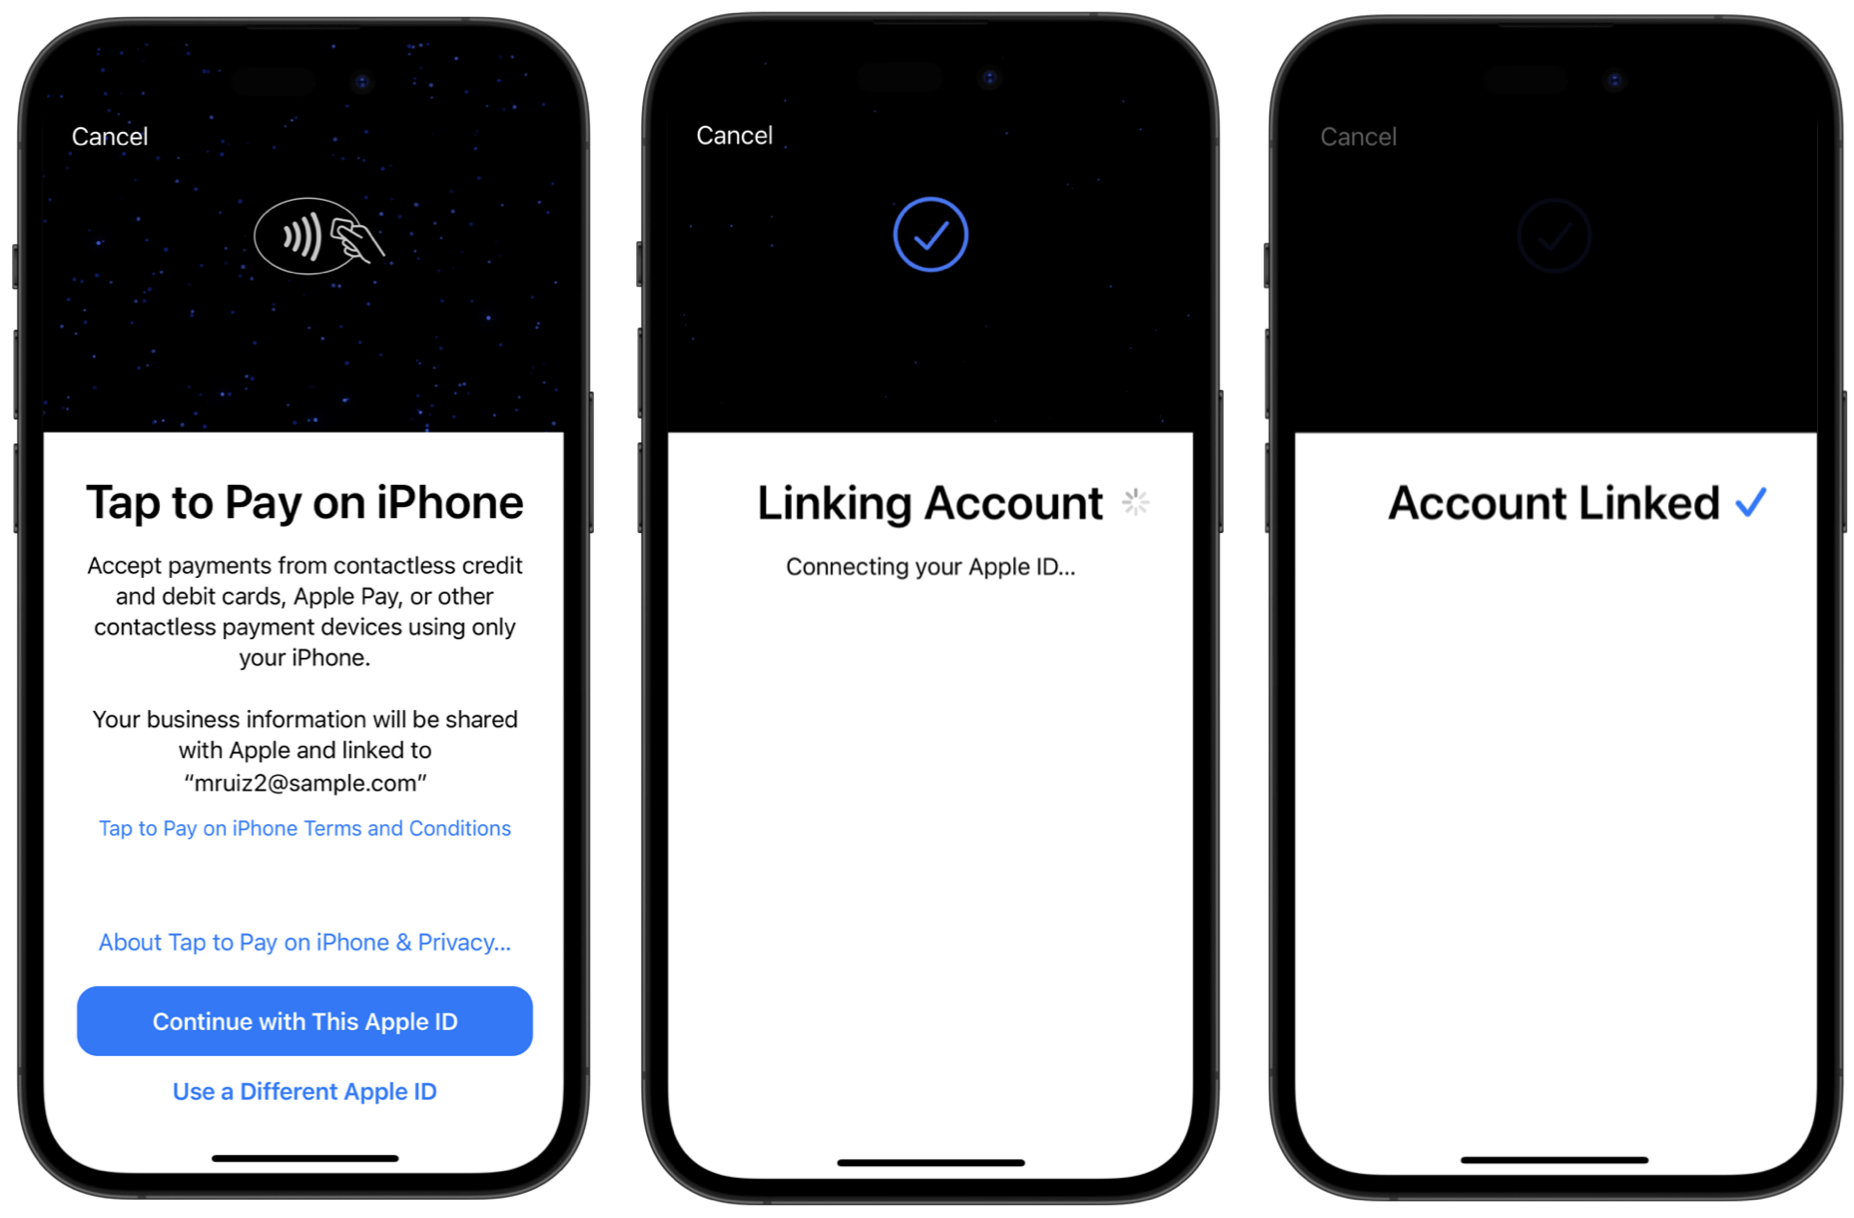
Each connected account must accept the Terms and Conditions when:

  • A Connect user creates direct charges
  • A Connect user creates a destination charge and specifies an on_behalf_of account

Link your Apple ID account to accept Tap to Pay payments

Any iPhone can use up to 3 unique Stripe accounts across apps within a rolling 24-hour period when calling connectReader for Tap to Pay on iPhone. If additional accounts are used for the device within the same 24-hour period, the connectReader method raises an SCPErrorTapToPayReaderMerchantBlocked error.

Learn more about account linking in the Tap to Pay on iPhone Business Information section of the Apple Tap to Pay on iPhone FAQ.

Handle disconnects

Your reader disconnects when your application enters the background or when your iPhone loses connectivity. There are two ways you can handle this:

SDK Reference

  • TapToPayReaderDelegate (iOS)

Handle the disconnect manually

Your application must implement the SCPTapToPayReaderDelegate reader:didDisconnect: delegate method to handle this disconnection. You can use this callback as an opportunity to notify the user that something went wrong and that you need internet connectivity to continue. Additionally, you can manually reconnect to the reader when your application re-enters the foreground.

ReaderViewController.swift
Swift
import StripeTerminal class ReaderViewController: UIViewController, TapToPayReaderDelegate { override func viewDidLoad() { super.viewDidLoad() // Set the reader delegate when connecting to a reader } // ... func reader(_ reader: Reader, didDisconnect reason: DisconnectReason) { // Consider displaying a UI to notify the user and start rediscovering readers } }

Automatically attempt reconnection

Implement the auto reconnect methods in the SCPTapToPayReaderDelegate. You must then pass the SCPTapToPayReaderDelegate to your SCPTapToPayConnectionConfiguration.

ConnectReaderViewController.swift
Swift
let connectionConfig = try TapToPayConnectionConfigurationBuilder(locationId: locationId) .delegate(yourTapToPayReaderDelegate) .build() Terminal.shared.connectReader( reader, connectionConfig: connectionConfig, completion: connectCompletion )

If you automatically attempt reconnection, the following occurs:

  1. When a disconnect occurs, the SDK automatically attempts to reconnect and notifies you through onReaderReconnectStarted. Make sure your app announces that the connection was lost and a reconnection is in progress.
    • You can use the Cancelable object to stop the reconnection attempt at any time.
  2. If the SDK successfully reconnects to the reader, Stripe notifies you through onReaderReconnectSucceeded. Make sure your app announces that the connection was restored and to continue normal operations.
  3. If the SDK can’t reconnect to the reader, Stripe notifies you through both onReaderReconnectFailed and reader:didDisconnect:. Make sure your app announces that an unexpected disconnect occurred.
ReaderViewController.swift
Swift
import StripeTerminal extension ReaderViewController: TapToPayReaderDelegate { // MARK: ReconnectionDelegate func reader(_ reader: Reader, didStartReaderReconnect cancelable: Cancelable) { // 1. Notified at the start of a reconnection attempt // Use cancelable to stop reconnection at any time } func readerDidSucceedReaderReconnect(_ reader: Reader) { // 2. Notified when reader reconnection succeeds // App is now connected } func readerDidFailReaderReconnect(_ reader: Reader) { // 3. Notified when reader reconnection fails // App is now disconnected } }

Next steps

You’ve connected your application to the reader. Next, collect your first Stripe Terminal payment.

The BBPOS and Chipper™ name and logo are trademarks or registered trademarks of BBPOS Limited in the United States and/or other countries. The Verifone® name and logo are either trademarks or registered trademarks of Verifone in the United States and/or other countries. Use of the trademarks does not imply any endorsement by BBPOS or Verifone.

Was this page helpful?
YesNo
Need help? Contact Support.
Join our early access program.
Check out our changelog.
Questions? Contact Sales.
LLM? Read llms.txt.
Powered by Markdoc