Collect on-screen inputs
Use Terminal to collect inputs from your customers.
Readers: Stripe Reader S700 and BBPOS WisePOS E
With Terminal smart readers, you can display input forms and collect information from your customers. You can choose from six input types and they can be used in a variety of use cases.
- Collect your customer identifier for loyalty redemption with the
phoneoremailinput and process it on your backend. - Have your customer acknowledge a waiver or agreement with the
signatureinput. - Ask your customer to fill out a questionnaire with the
selectionortextinput.
You can display input forms anytime before payment, post payment and outside of a payment cycle.
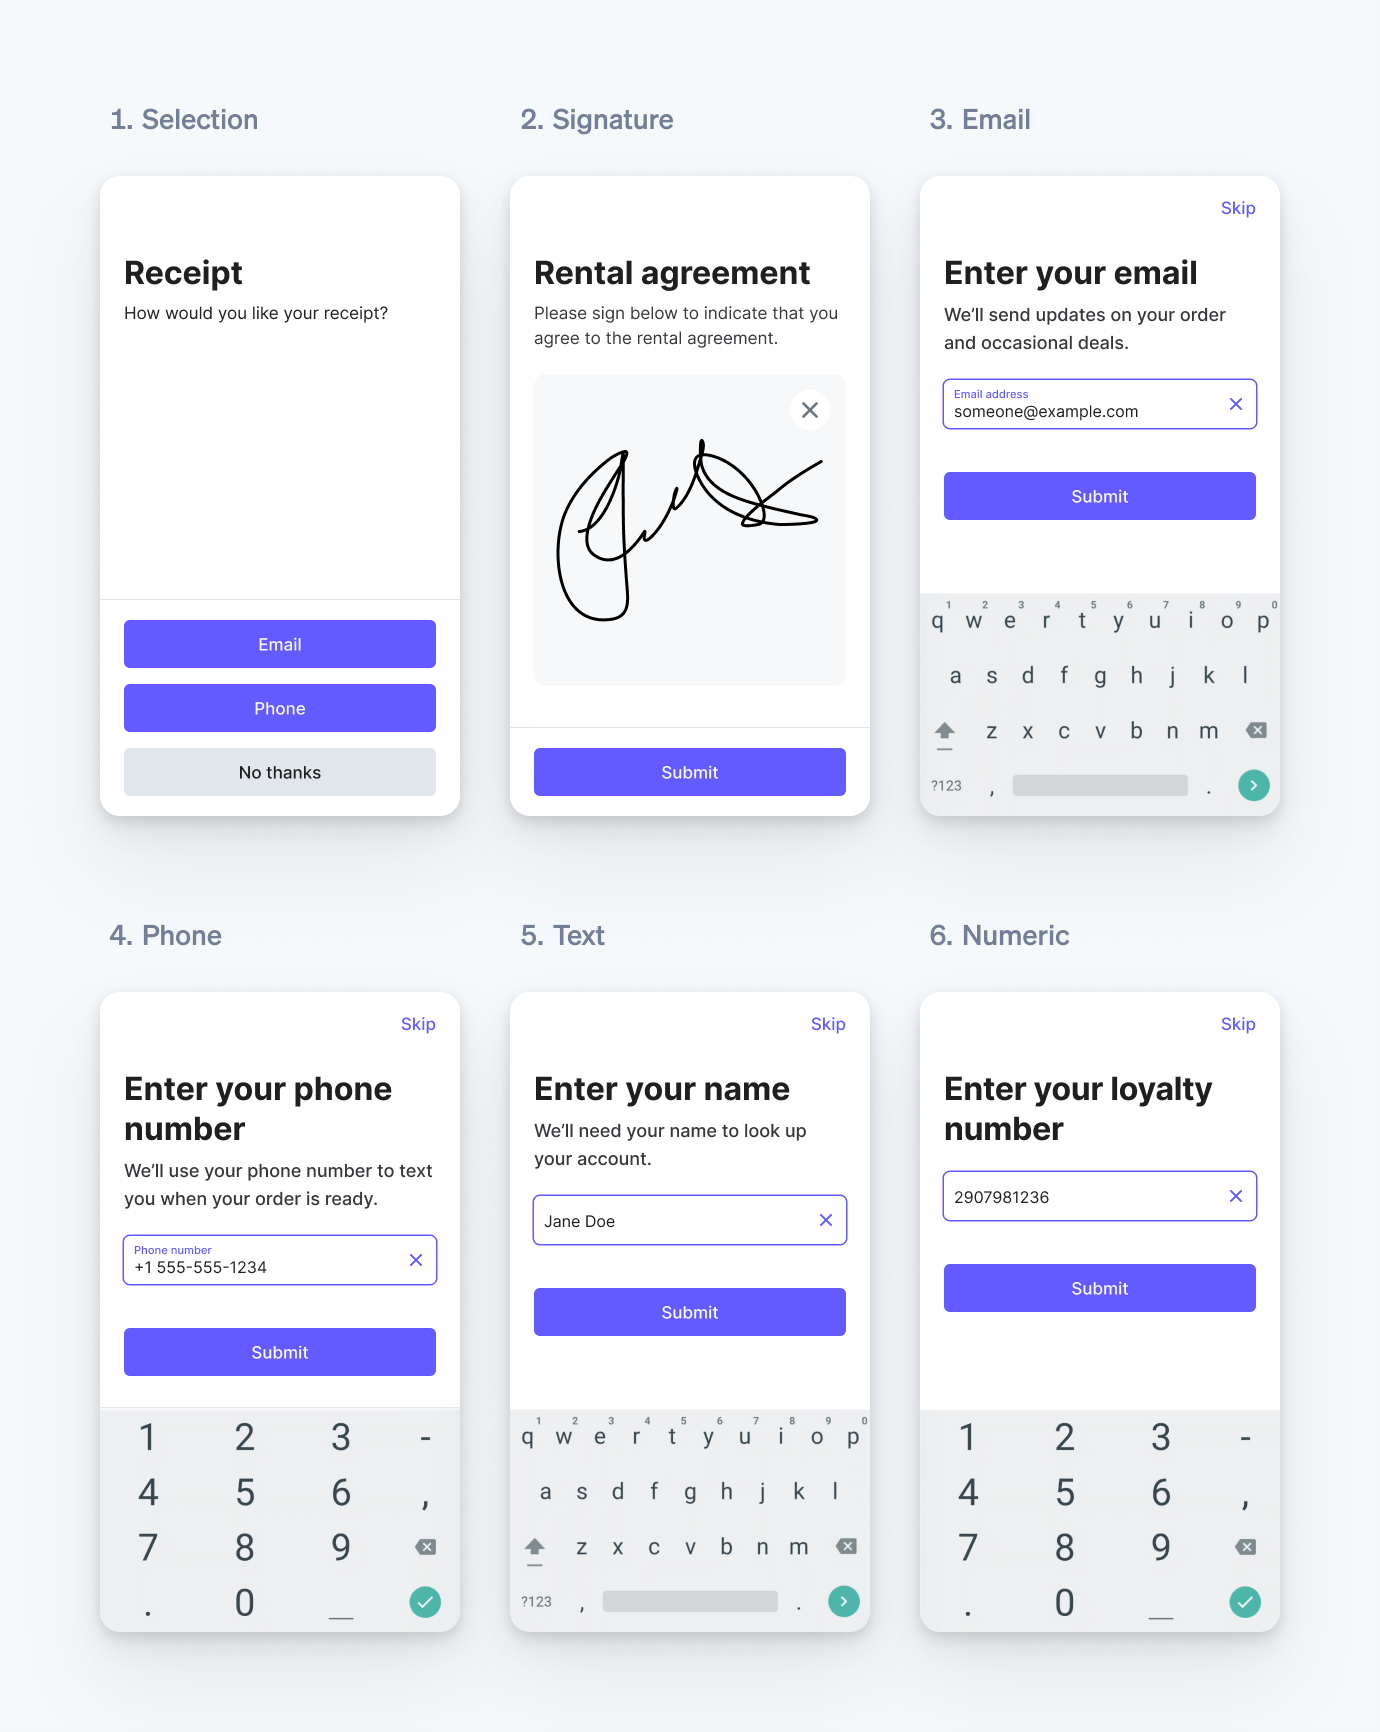
Supported input types.
Observação
Don’t use collect_ to collect sensitive data (including protected health information and customer payment card information), or any information restricted by law.
Collect inputs
To collect inputs using Terminal’s smart readers, use the collect_inputs command. The API communicates with the reader to display a prebuilt UI.
Customization
You can customize the appearance and behavior of all input types:
- Set important inputs as required to ensure they’re collected. For required inputs, the Skip button is hidden.
- Provide context to your customer by specifying the text you want to display on the reader screen for each input using custom_text.
Field name | Field location | Maximum characters |
title | 40 | |
description | 500 when used with the selection form, 100 when used with other form type | |
submit_ | 30 | |
skip_ | 14 | |
- Use line breaks
\nin your text for better formatting. - Add up to 4 toggles that customers can enable or disable for Boolean options, agreements, or opt-ins.
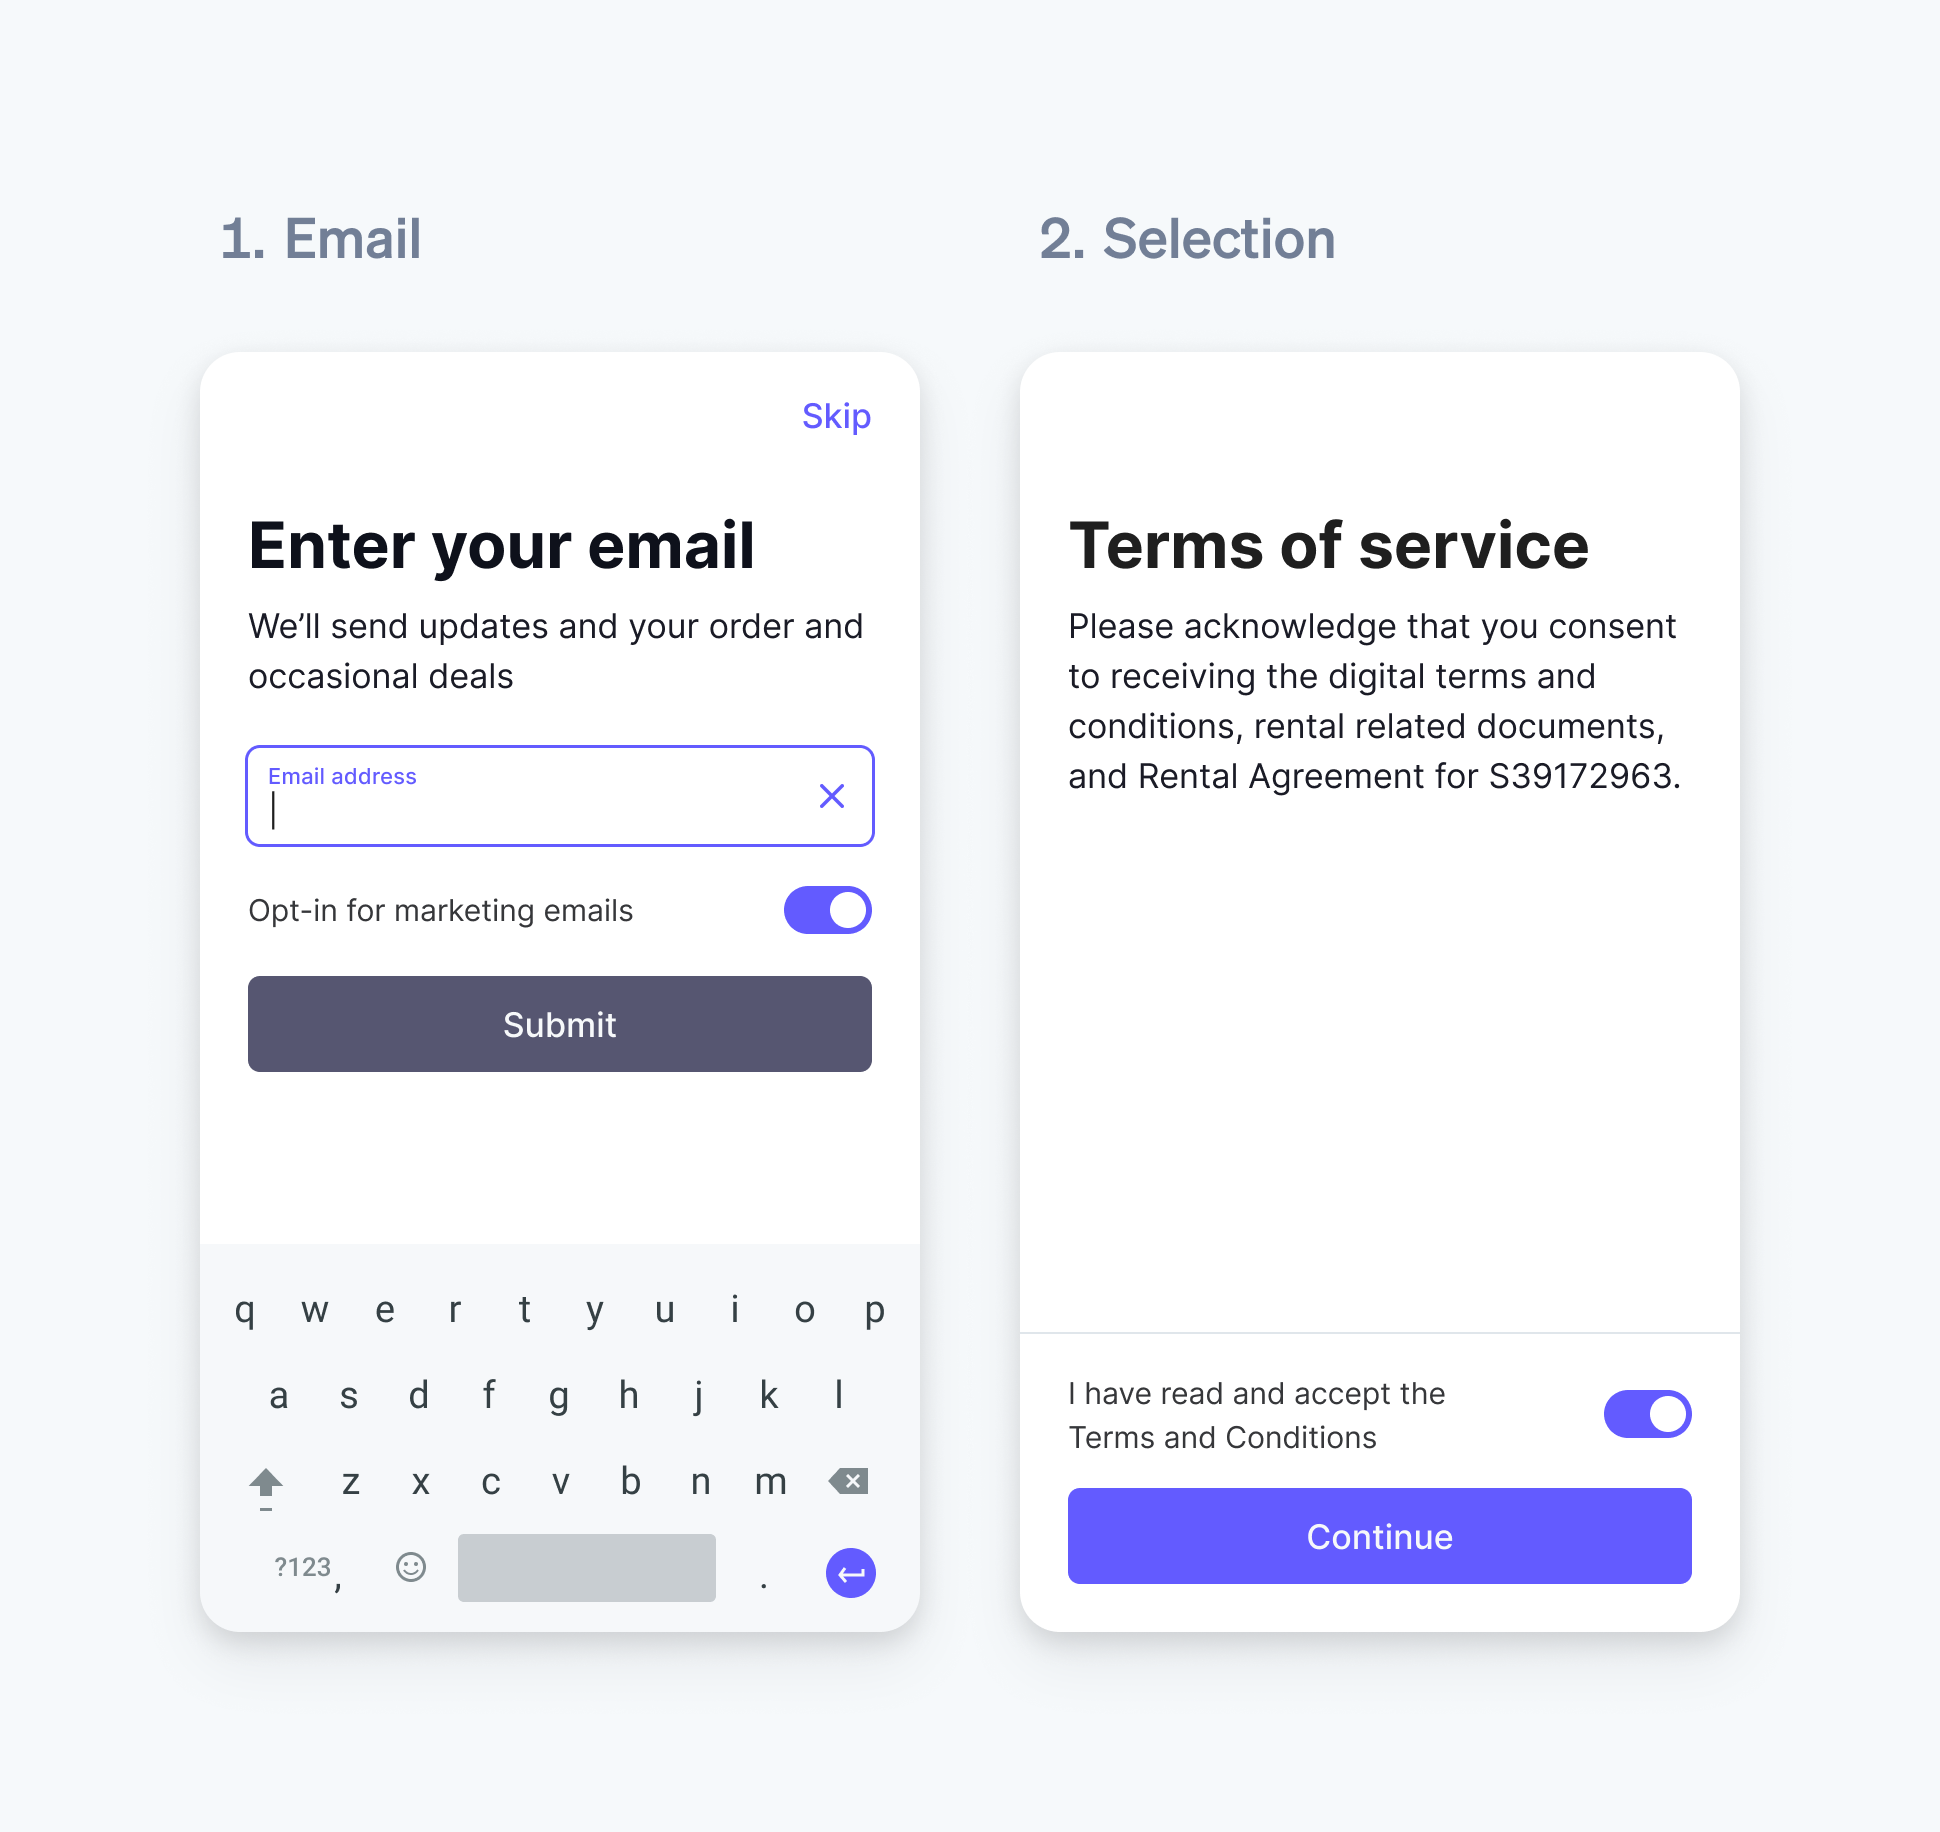
Email and selection form with toggle
Field name | Field location | Maximum characters |
title | 50, 25 when used with toggle description | |
description | 50, 25 when used with toggle title |
- Additional customization is available for selection inputs. When specifying the choices, you can emphasize or de-emphasize choices using the style parameter.

Primary and secondary selection choice styles
Metadata
You can include metadata, like a customer or order ID, in your request. The request payload includes the specified metadata, which appears in both the synchronous response and the success or failure events. By including a unique identifier, you can more easily identify and handle the incoming event.
Customer interaction
When the reader begins collecting inputs, it displays the first input from the list. The customer must make a selection, provide a signature, or use the keyboard to proceed with required inputs. For optional inputs, the customer has the option to skip to the next requested input.
After the customer has completed all the inputs, the reader changes to a transitional state for 3 seconds, waiting for a subsequent request. If there is no subsequent request after 3 seconds, the reader changes back to the splash screen.
Observação
You are fully responsible for being aware of, and complying with all applicable laws and regulations governing your use of this feature, and must in relation to such use, obtain, as applicable, all necessary consents, authorizations, licenses, rights, and permissions. If you use input collected by, or output displayed from a Terminal smart reader to enter into contracts with, or provide notices to your customers, you are fully responsible for ensuring the legal validity and enforceability of such contracts or notices.
Receive input data
When all inputs have been collected or skipped, Stripe sends a request to your webhook endpoint. The request payload is identical to the response when calling collect_inputs, but adds a few additional parameters:
- For signature type inputs, the value is a file ID that retrieves the signature image as an SVG.
- For selection type inputs, the id and text correspond to the selected choice’s
idandtext. - For phone, email, text, and numeric inputs, the value is the string of the customer’s response.
- If an optional input is skipped by the customer, the skipped parameter is set to
true. - The value of each toggle is populated with
enabledordisabled.
Use the curl command below as an example to create a webhook endpoint to receive the collected inputs.
curl https://api.stripe.com/v1/webhook_endpoints \ -u: \ --header "Stripe-Version: 2025-05-28.basil;" \ --data-urlencode "url"="https://example.com/webhook/endpoint" \ --data-urlencode "api_version"="2025-05-28.basil;" \ --data-urlencode "enabled_events[]"="terminal.reader.action_succeeded" \ --data-urlencode "enabled_events[]"="terminal.reader.action_failed"sk_test_BQokikJOvBiI2HlWgH4olfQ2
Subscribe to events to receive collected inputs as soon as they’re available. Alternatively, you can retrieve the events from the reader as a backup if your backend fails to consume the event. Stripe sends two webhooks to notify your backend of the reader’s status:
terminal.: Sent when areader. action_ succeeded collect_action succeeds.inputs terminal.: Sent when areader. action_ failed collect_action fails. This includes timeouts, which occur after the reader screen isn’t touched for 2 minutes.inputs
Download signature images
To download the collected signature image, retrieve the file and use your secret key to access its url.
Observação
Stripe stores the signature images you collect for 7 days. If you need to use signature images more than 7 days after collecting them, download the file and store it. You are fully responsible for being aware of and complying with all laws that apply to your use, storage, and disclosure of your customers’ signatures.
Test your integration
You can test your integration by using a simulated reader. After creating a simulated reader, start collecting inputs using the simulated reader.
The simulated reader supports simulating the following scenarios:
- Successful input collection without skipping any inputs
- Successful input collection with skipping all non-required inputs
- Failed input collection because of a timeout
When simulating successful input collection, the simulated reader returns a hard-coded value for each input based on the type.