Configurer des paiements futurs
Comment enregistrer les informations de paiement de vos clients dans votre application mobile et les débiter ultérieurement.
L’API Setup Intents vous permet d’enregistrer les données de paiement d’un client sans paiement initial. Cette fonction est utile si vous souhaitez configurer des paiements dès l’inscription de vos clients afin de les débiter plus tard, lorsqu’ils sont hors ligne.
Utilisez cette intégration pour configurer des paiements récurrents ou pour créer des paiements ponctuels dont le montant doit être déterminé ultérieurement, généralement après réception du service par votre client.
Transactions avec présentation de la carte
Les transactions avec présentation de la carte, telles que la collecte des informations de carte via Stripe Terminal, utilisent un processus différent pour enregistrer le moyen de paiement. Pour en savoir plus, consultez la documentation de Terminal.
Conformité
Lorsque vous enregistrez les informations de paiement d’un client, vous êtes responsable du respect de l’ensemble des lois, réglementations et règles du réseau en vigueur. Ces exigences s’appliquent généralement si vous souhaitez enregistrer le moyen de paiement de votre client pour une utilisation ultérieure, par exemple en affichant le moyen de paiement dans le tunnel de paiement pour un achat futur ou en débitant ce moyen de paiement lorsque le client n’utilise pas activement votre site Web ou votre application. Ajoutez à votre site Web ou à votre application des conditions indiquant comment vous prévoyez d’enregistrer les informations de paiement et qui permettent à vos clients de choisir cette option.
Lorsque vous enregistrez un moyen de paiement, vous ne pouvez l’utiliser que pour l’utilisation spécifique figurant dans vos conditions. Pour débiter un moyen de paiement lorsque le client n’est pas en ligne et l’enregistrer en tant qu’option pour les futurs achats, assurez-vous de recueillir explicitement le consentement du client pour cette utilisation spécifique. Par exemple, affichez une case à cocher « Enregistrer mon moyen de paiement pour une utilisation ultérieure » afin de recueillir le consentement de votre client.
Pour facturer vos clients lorsqu’ils ne sont pas en ligne, incluez les éléments suivants dans vos conditions :
- Le consentement du client vous autorisant à déclencher un paiement ou une série de paiements en son nom pour les transactions spécifiées
- Le calendrier et la fréquence prévus des paiements (par exemple, si les paiements concernent des versements échelonnés, des paiements d’abonnement ou des recharges non programmées).
- La façon dont vous déterminez le montant du paiement.
- Votre politique d’annulation, si le moyen de paiement est utilisé dans le cadre d’un abonnement
Veillez à conserver une trace écrite de l’acceptation de ces conditions par votre client.
Remarque
Si vous devez utiliser la confirmation manuelle côté serveur ou si votre intégration nécessite de présenter les moyens de paiement séparément, consultez cet autre guide.
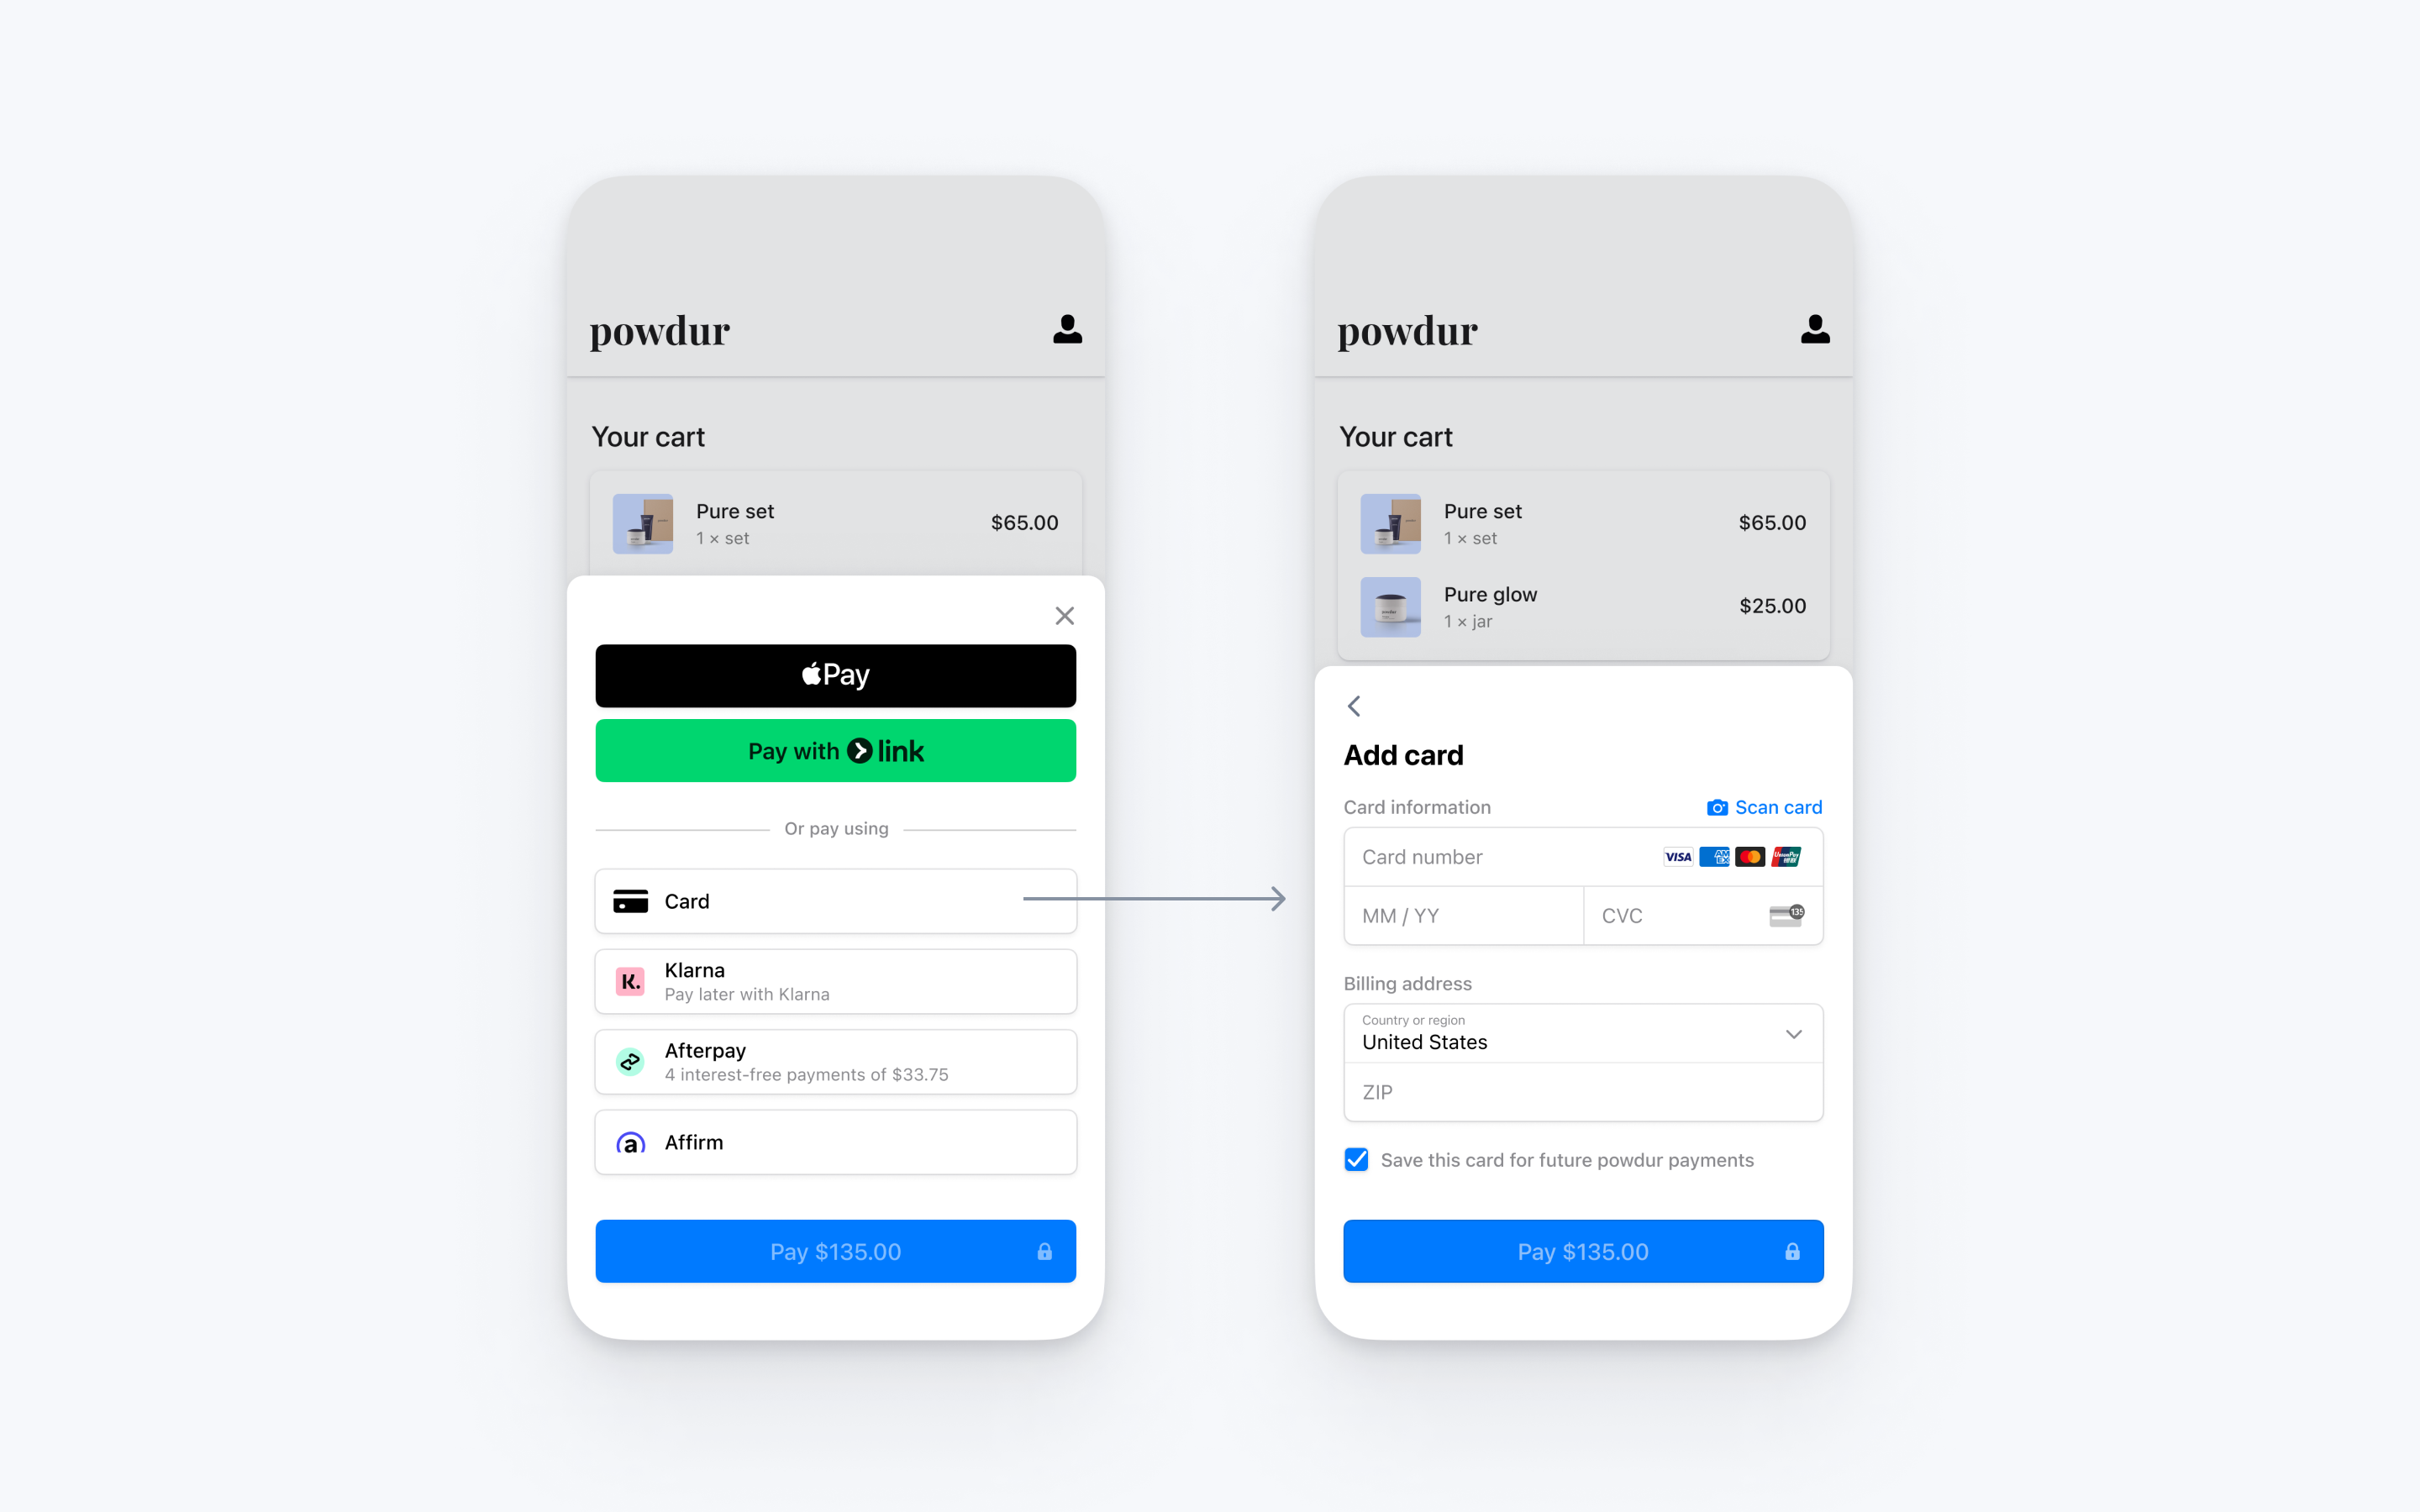
Intégrez l’interface utilisateur de paiement préconfigurée de Stripe au processus de paiement de votre application iOS grâce à la classe PaymentSheet. Consultez notre exemple d’intégration sur GitHub.
Configurer StripeCôté serveurCôté client
Tout d’abord, vous avez besoin d’un compte Stripe. Inscrivez-vous dès maintenant.
Côté serveur
Cette intégration exige que votre serveur dispose d’endpoints qui communiquent avec l’API Stripe. Utilisez nos bibliothèques officielles pour accéder à l’API Stripe depuis votre serveur :
Côté client
Le SDK iOS de Stripe est disponible en open source et fait l’objet d’une documentation complète. Il est également compatible avec les applications prenant en charge iOS 13 et les versions ultérieures.
Remarque
Pour obtenir de plus amples informations sur la version la plus récente du SDK et ses versions antérieures, consultez la page des versions sur GitHub. Pour recevoir une notification lors de la publication d’une nouvelle version, surveillez les versions à partir du référentiel.
Ajouter un endpointCôté serveur
Remarque
Le Payment Element pour mobile ne prend en charge les SetupIntents qu’avec les cartes, Bancontact, iDEAL, Link, les prélèvements automatiques SEPA et les comptes bancaires étasuniens.
Cette intégration utilise trois objets de l’API Stripe :
Un SetupIntent est un objet qui représente votre intention de configurer le moyen de paiement d’un client en vue de paiements futurs. Les moyens de paiement présentés à la clientèle au cours du processus de paiement sont également inclus dans le SetupIntent. Vous pouvez laisser Stripe extraire automatiquement les moyens de paiement depuis les paramètres du Dashboard ou vous pouvez les répertorier manuellement.
Un objet Customer. Pour configurer un moyen de paiement en vue de paiements futurs, vous devez l’associer à un client. Créez un objet Customer lorsque votre client crée un compte chez vous. Si votre client effectue un paiement en tant qu’invité, vous pouvez créer un objet Customer avant le paiement, puis l’associer ultérieurement à votre représentation interne du compte client.
Un objet Customer Ephemeral Key (facultatif). L’objet Customer contient des informations sensibles qu’il n’est pas possible de récupérer directement depuis une application. Une clé éphémère permet d’accorder au SDK un accès temporaire à l’objet Customer.
Pour des raisons de sécurité, votre application ne peut pas créer ces objets. À la place, ajoutez sur votre serveur un endpoint qui :
- Récupère l’objet Customer ou en crée un nouveau.
- Crée une clé éphémère pour l’objet Customer.
- Crée un SetupIntent avec l’ID du client.
- Renvoie la clé secrète du client du SetupIntent, le
secretde la clé éphémère, l’ID du client et votre clé publiable à votre application.
Les moyens de paiement présentés à votre client lors du processus de paiement sont également inclus dans le SetupIntent. Vous pouvez laisser Stripe extraire automatiquement (depuis les paramètres de votre Dashboard) les moyens de paiement à présenter, ou bien les répertorier manuellement.
Collecter les informations de paiementCôté client
Pour afficher le composant Mobile Payment Element sur votre page de paiement, vous devez intégrer un bouton de règlement qui affiche l’interface utilisateur de Stripe.
Si la valeur de PaymentSheetResult est ., informez l’utilisateur (par exemple, en affichant un écran de confirmation de commande).
Si vous définissez allowsDelayedPaymentMethods sur true, les moyens de paiement à notification différée, comme les comptes bancaires étasuniens, seront acceptés. Pour ces moyens de paiement, l’état final du paiement n’est pas connu une fois le processus du PaymentSheet achevé, et le paiement peut plus tard aboutir comme échouer. Si vous prenez en charge ces types de moyens de paiement, informez votre client que sa commande est confirmée et ne la traitez (en lui expédiant son produit, par exemple) qu’une fois le paiement reçu.
Configurer une URL de redirectionCôté serveur
Le client peut quitter votre application pour s’authentifier (par exemple, dans Safari ou dans son application bancaire). Pour lui permettre de revenir automatiquement sur votre application après s’être authentifié, configurez un schéma d’URL personnalisé et configurez votre délégué d’application pour qu’il transmette l’URL au SDK. Stripe ne prend pas en charge les liens universels.
Définissez également le paramètre returnURL correspondant à votre objet PaymentSheet.Configuration sur l’URL de votre application.
var configuration = PaymentSheet.Configuration()
configuration.returnURL = "your-app://stripe-redirect"
Débiter un moyen de paiement précédemment enregistréCôté serveur
Conformité
Lorsque vous enregistrez les informations de paiement d’un client, vous êtes responsable du respect de l’ensemble des lois, réglementations et règles du réseau en vigueur. Lorsque vous présentez au client final des moyens de paiement précédemment utilisés en vue d’effectuer ses prochains achats, assurez-vous de lister les moyens de paiement pour lesquels vous avez obtenu le consentement du client à l’enregistrement des informations de paiement aux fins des futurs achats. Le paramètre allow_redisplay vous permet de différencier les moyens de paiement associés au client qui peuvent ou non être présentés pour les achats futurs.
Au moment de débiter votre client hors session, utilisez l’ID des objets Customer et PaymentMethod afin de créer un PaymentIntent. Pour trouver un moyen de paiement à débiter, répertoriez les moyens de paiement associés à votre client. Cet exemple liste des cartes, mais vous pouvez répertorier n’importe quel type de moyen de paiement pris en charge.
Après avoir obtenu les ID de Customer et de PaymentMethod, créez un PaymentIntent indiquant le montant et la devise du paiement. Définissez quelques autres paramètres afin d’effectuer le paiement hors session :
- Définissez l’attribut off_session sur
truepour indiquer que le client ne se trouve pas dans votre tunnel de paiement lors d’une tentative de paiement, et qu’il ne peut donc pas répondre à une demande d’authentification effectuée par un partenaire, comme un émetteur de cartes, une banque ou un autre établissement de paiement. Si un partenaire demande une authentification dans le tunnel de paiement, Stripe demande une exemption en s’appuyant sur les informations utilisée par le client pendant une session précédente. Si les conditions d’exemption ne sont pas remplies, le PaymentIntent peut renvoyer une erreur. - Définissez la propriété confirm du PaymentIntent sur la valeur
true, ce qui aura pour effet de générer immédiatement une confirmation lors de la création du PaymentIntent. - Renseignez l’ID du PaymentMethod dans payment_method et l’ID du client dans customer.
FacultatifActiver Apple Pay
Remarque
Si votre écran de paiement comporte un bouton Apple Pay dédié, suivez le guide Apple Pay et utilisez ApplePayContext pour collecter le paiement à partir de votre bouton Apple Pay. Vous pouvez utiliser la PaymentSheet pour gérer d’autres types de moyens de paiement.
Demander un ID de marchand Apple
Pour obtenir un ID de marchand Apple, demandez un nouvel identifiant sur le site Web Apple Developer.
Renseignez le formulaire en indiquant une description et un identifiant. La description n’est destinée qu’à votre propre information et vous pourrez la modifier ultérieurement au besoin. En ce qui concerne l’identifiant, Stripe vous recommande d’utiliser le nom de votre application (par exemple, merchant.).
Créer un nouveau certificat Apple Pay
Créez un certificat permettant à votre application de chiffrer les données de paiement.
Accédez aux paramètres des certificats iOS dans le Dashboard, cliquez sur Ajouter une nouvelle application et suivez le guide.
Téléchargez un fichier CSR (Certificate Signing Request) pour obtenir d’Apple un certificat sécurisé vous autorisant à utiliser Apple Pay.
Un fichier CSR peut émettre exactement un certificat. Si vous changez d’ID de marchand Apple, vous devez accéder aux paramètres des certificats iOS dans le Dashboard pour obtenir un nouveau fichier CSR et un nouveau certificat.
Réaliser une intégration avec Xcode
Ajoutez la fonctionnalité Apple Pay à votre application. Dans Xcode, ouvrez vos paramètres de projet, cliquez sur l’onglet Signature et fonctionnalités, puis ajoutez Apple Pay. Vous serez peut-être alors invité(e) à vous connecter à votre compte développeur. Sélectionnez l’ID du marchand créé plus tôt. Il est désormais possible d’utiliser Apple Pay sur votre application.
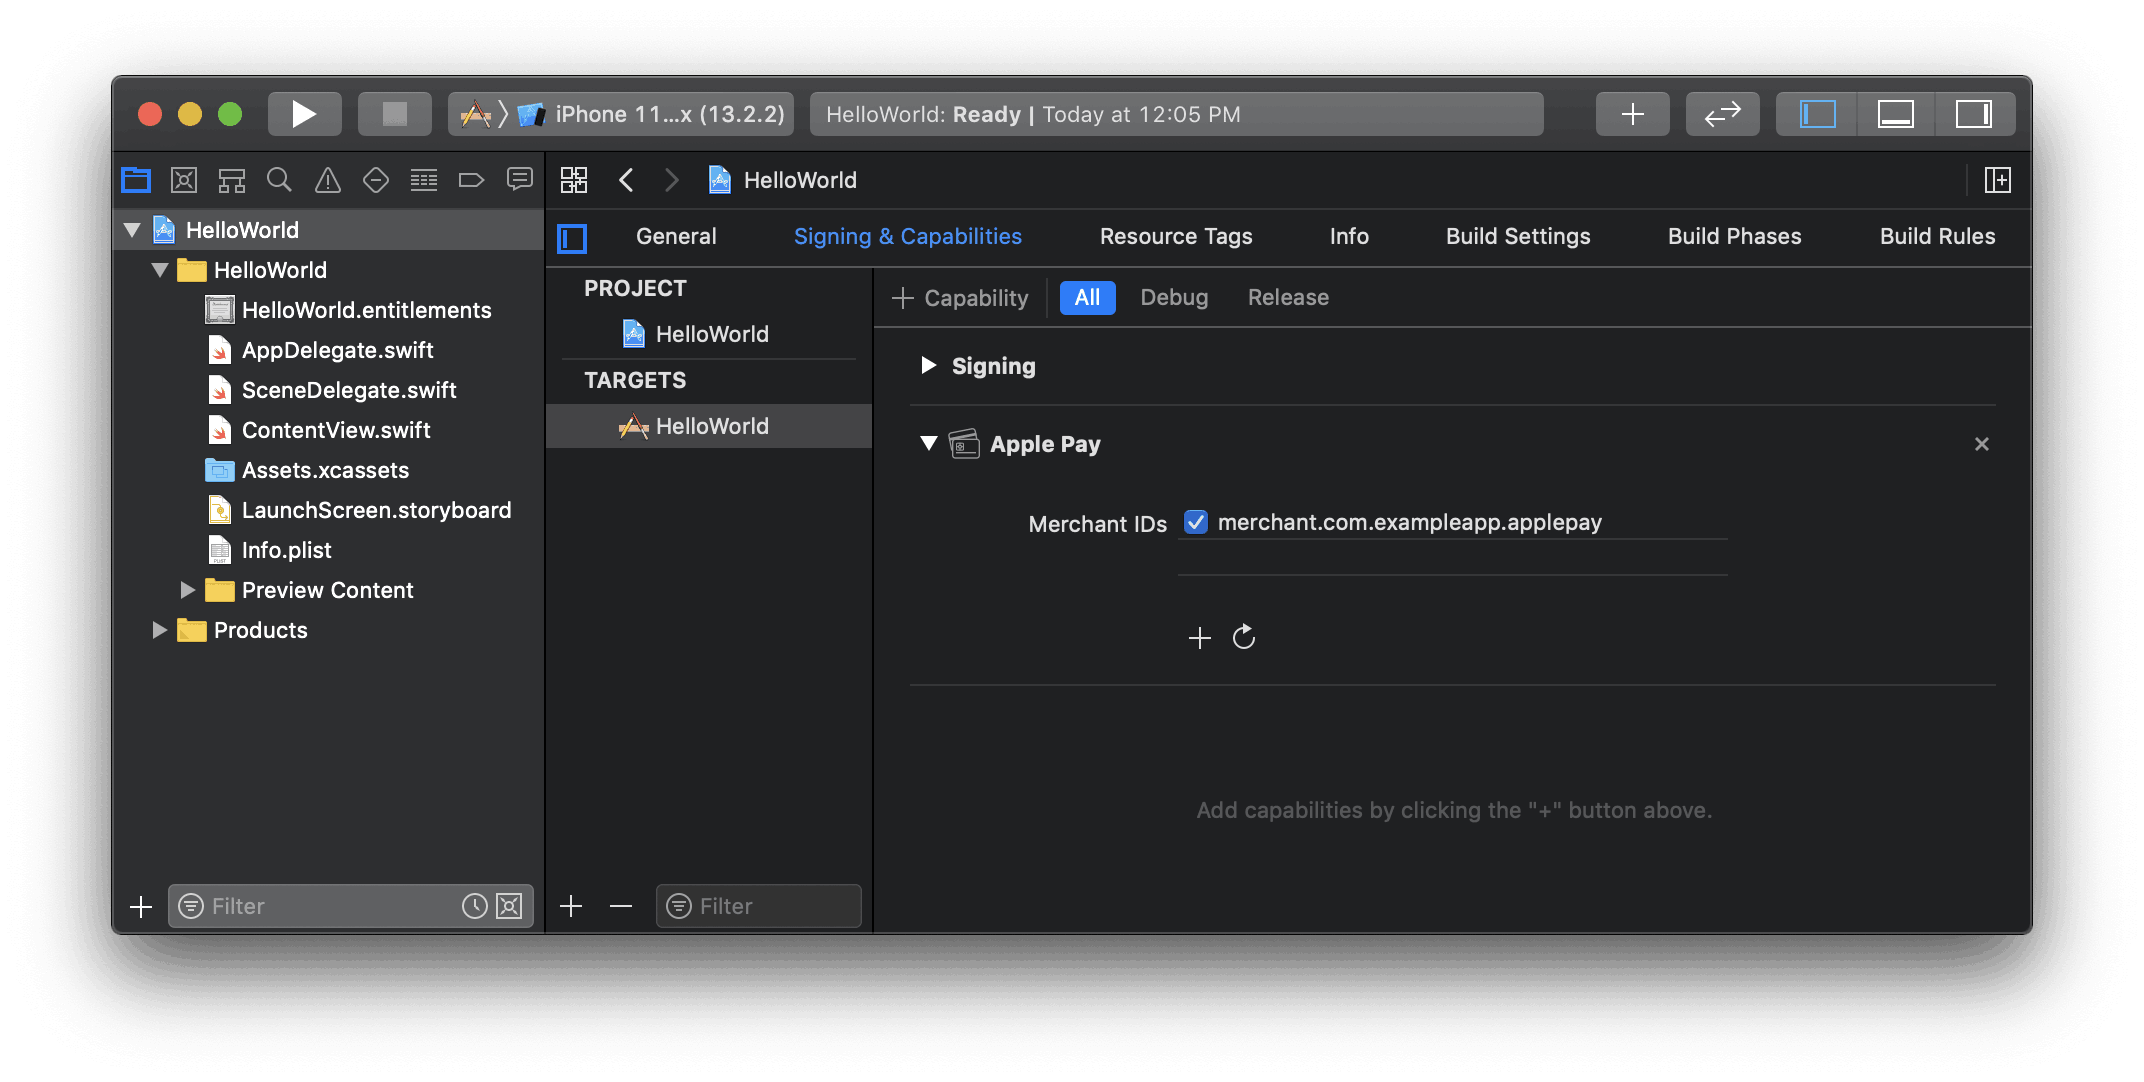
Activez la fonctionnalité Apple Pay dans Xcode
Ajouter Apple Pay
Suivi de commande
Pour ajouter des informations de suivi de commande dans iOS 16 ou version ultérieure, configurez un authorizationResultHandler dans votre PaymentSheet.. Stripe effectue un appel vers votre implémentation une fois le paiement effectué, mais avant qu’iOS ne ferme la fiche Apple Pay.
Dans votre déploiement authorizationResultHandler, récupérez les détails de la commande finalisée sur votre serveur. Ajoutez ces informations au PKPaymentAuthorizationResult spécifié, et renvoyez le résultat modifié.
Pour en savoir plus sur le suivi des commandes, consultez la documentation Apple’s Wallet Orders.
let customHandlers = PaymentSheet.ApplePayConfiguration.Handlers(
    authorizationResultHandler: { result in
      do {
        // Fetch the order details from your service
        let myOrderDetails = try await MyAPIClient.shared.fetchOrderDetails(orderID: orderID)
        result.orderDetails = PKPaymentOrderDetails(
          orderTypeIdentifier: myOrderDetails.orderTypeIdentifier, // "com.myapp.order"
          orderIdentifier: myOrderDetails.orderIdentifier, // "ABC123-AAAA-1111"
          webServiceURL: myOrderDetails.webServiceURL, // "https://my-backend.example.com/apple-order-tracking-backend"
          authenticationToken: myOrderDetails.authenticationToken) // "abc123"
        // Return your modified PKPaymentAuthorizationResult
        return result
      } catch {
        return PKPaymentAuthorizationResult(status: .failure, errors: [error])
      }
    }
)
var configuration = PaymentSheet.Configuration()
configuration.applePay = .init(merchantId: "merchant.com.your_app_name",
                               merchantCountryCode: "US",
                               customHandlers: customHandlers)
FacultatifPersonnaliser le formulaire
Pour personnaliser le formulaire de paiement, vous devez obligatoirement utiliser l’objet PaymentSheet.Configuration.
Appearance
Personnalisez les couleurs, les polices et plus encore afin de vous adapter à l’apparence de votre application à l’aide de l’API Appearance.
Mise en page des moyens de paiement
Configurez la mise en page des moyens de paiement dans la feuille à l’aide de paymentMethodLayout. Vous pouvez les afficher horizontalement, verticalement ou laisser Stripe optimiser la mise en page automatiquement.

var configuration = PaymentSheet.Configuration()
configuration.paymentMethodLayout = .automatic
Recueillir les adresses des utilisateurs
Recueillez les adresses de livraison ou de facturation de vos clients locaux et internationaux à l’aide du composant Address Element.
Nom d’affichage du marchand
Spécifiez un nom d’entreprise à afficher pour le client en définissant merchantDisplayName. Par défaut, il s’agit du nom de votre application.
var configuration = PaymentSheet.Configuration()
configuration.merchantDisplayName = "My app, Inc."
Mode sombre
PaymentSheet s’ajuste automatiquement en fonction des paramètres d’affichage du système de l’utilisateur (mode clair et foncé). Si votre application ne prend pas en charge le mode sombre, vous pouvez définir style sur le mode alwaysLight ou alwaysDark.
var configuration = PaymentSheet.Configuration()
configuration.style = .alwaysLight
Informations de facturation par défaut
Si vous souhaitez définir des valeurs par défaut pour les informations de facturation collectées dans le formulaire de paiement, configurez la propriété defaultBillingDetails. Le PaymentSheet préremplit les champs avec les valeurs que vous fournissez.
var configuration = PaymentSheet.Configuration()
configuration.defaultBillingDetails.address.country = "US"
configuration.defaultBillingDetails.email = "foo@bar.com"
Collecte des informations de facturation
Utilisez billingDetailsCollectionConfiguration pour spécifier la manière dont vous souhaitez collecter les informations de facturation dans le Payment Sheet.
Vous pouvez collecter le nom, l’adresse e-mail, le numéro de téléphone et l’adresse de votre client.
Si vous souhaitez uniquement indiquer les informations de facturation requises par le moyen de paiement, définissez la valeur de billingDetailsCollectionConfiguration. sur « true ». Dans ce cas, les PaymentSheet. sont définis comme les informations de facturation du moyen de paiement.
Si vous souhaitez collecter des informations de facturation supplémentaires qui ne sont pas nécessairement requises par le moyen de paiement, définissez la valeur de billingDetailsCollectionConfiguration. sur false. Dans ce cas, les informations de facturation collectées depuis la PaymentSheet sont définies comme les informations de facturation du moyen de paiement.
var configuration = PaymentSheet.Configuration()
configuration.defaultBillingDetails.email = "foo@bar.com"
configuration.billingDetailsCollectionConfiguration.name = .always
configuration.billingDetailsCollectionConfiguration.email = .never
configuration.billingDetailsCollectionConfiguration.address = .full
configuration.billingDetailsCollectionConfiguration.attachDefaultsToPaymentMethod = true
Remarque
Consultez votre conseiller juridique au sujet des lois qui s’appliquent à la collecte d’informations. Ne collectez les numéros de téléphone que si vous en avez besoin pour la transaction.
FacultatifFinaliser le paiement dans votre interface utilisateur
Vous pouvez présenter le formulaire de paiement pour la seule collecte des données du moyen de paiement, puis appeler une méthode confirm pour mener à bien l’opération de paiement dans l’interface utilisateur de votre application. Cette approche est utile si vous avez intégré un bouton d’achat personnalisé ou si des étapes supplémentaires sont nécessaires après la collecte des informations de paiement.

Mener à bien le paiement dans l’interface utilisateur de votre application