Accept in-app payments
Build a customized payments integration in your iOS, Android, or React Native app using the Payment Sheet.
The Payment Sheet is a customizable component that displays a list of payment methods and collects payment details in your app using a bottom sheet.
Compare Customers v1 and Accounts v2 references
If your Connect platform uses customer-configured Accounts, use our guide to replace Customer and event references in your code with the equivalent Accounts v2 API references.
A PaymentIntent flow allows you to create a charge in your app by rendering the Payment Sheet, creating a PaymentIntent, then confirming a charge in your app.
The Payment Sheet can show the customer’s previously selected payment if it’s saved on their device. When confirming the charge, you can optionally save the payment method to the device. This doesn’t update their default payment method in their Stripe Customer profile.
Set up StripeServer-sideClient-side
Server-side
This integration requires endpoints on your server that talk to the Stripe API. Use our official libraries for access to the Stripe API from your server:
Client-side
The Stripe iOS SDK is open source, fully documented, and compatible with apps supporting iOS 13 or above.
Note
For details on the latest SDK release and past versions, see the Releases page on GitHub. To receive notifications when a new release is published, watch releases for the repository.
You also need to set your publishable key so that the SDK can make API calls to Stripe. To get started, you can hardcode the publishable key on the client while you’re integrating, but fetch the publishable key from your server in production.
// Set your publishable key: remember to change this to your live publishable key in production // See your keys here: https://dashboard.stripe.com/apikeys STPAPIClient.shared.publishableKey ="pk_test_TYooMQauvdEDq54NiTphI7jx"
Enable payment methods
View your payment methods settings and enable the payment methods you want to support. You need at least one payment method enabled to create a PaymentIntent.
By default, Stripe enables cards and other prevalent payment methods that can help you reach more customers, but we recommend turning on additional payment methods that are relevant for your business and customers. See Payment method support for product and payment method support, and our pricing page for fees.
Set up a return URLClient-side
The customer might navigate away from your app to authenticate (for example, in Safari or their banking app). To allow them to automatically return to your app after authenticating, configure a custom URL scheme and set up your app delegate to forward the URL to the SDK. Stripe doesn’t support universal links.
Additionally, set the returnURL on your PaymentSheet.Configuration object to the URL for your app.
var configuration = PaymentSheet.Configuration()
configuration.returnURL = "your-app://stripe-redirect"
Collect payment detailsClient-side
We offer two styles of integration. Choose one to continue.
| PaymentSheet | PaymentSheet.FlowController |
|---|---|
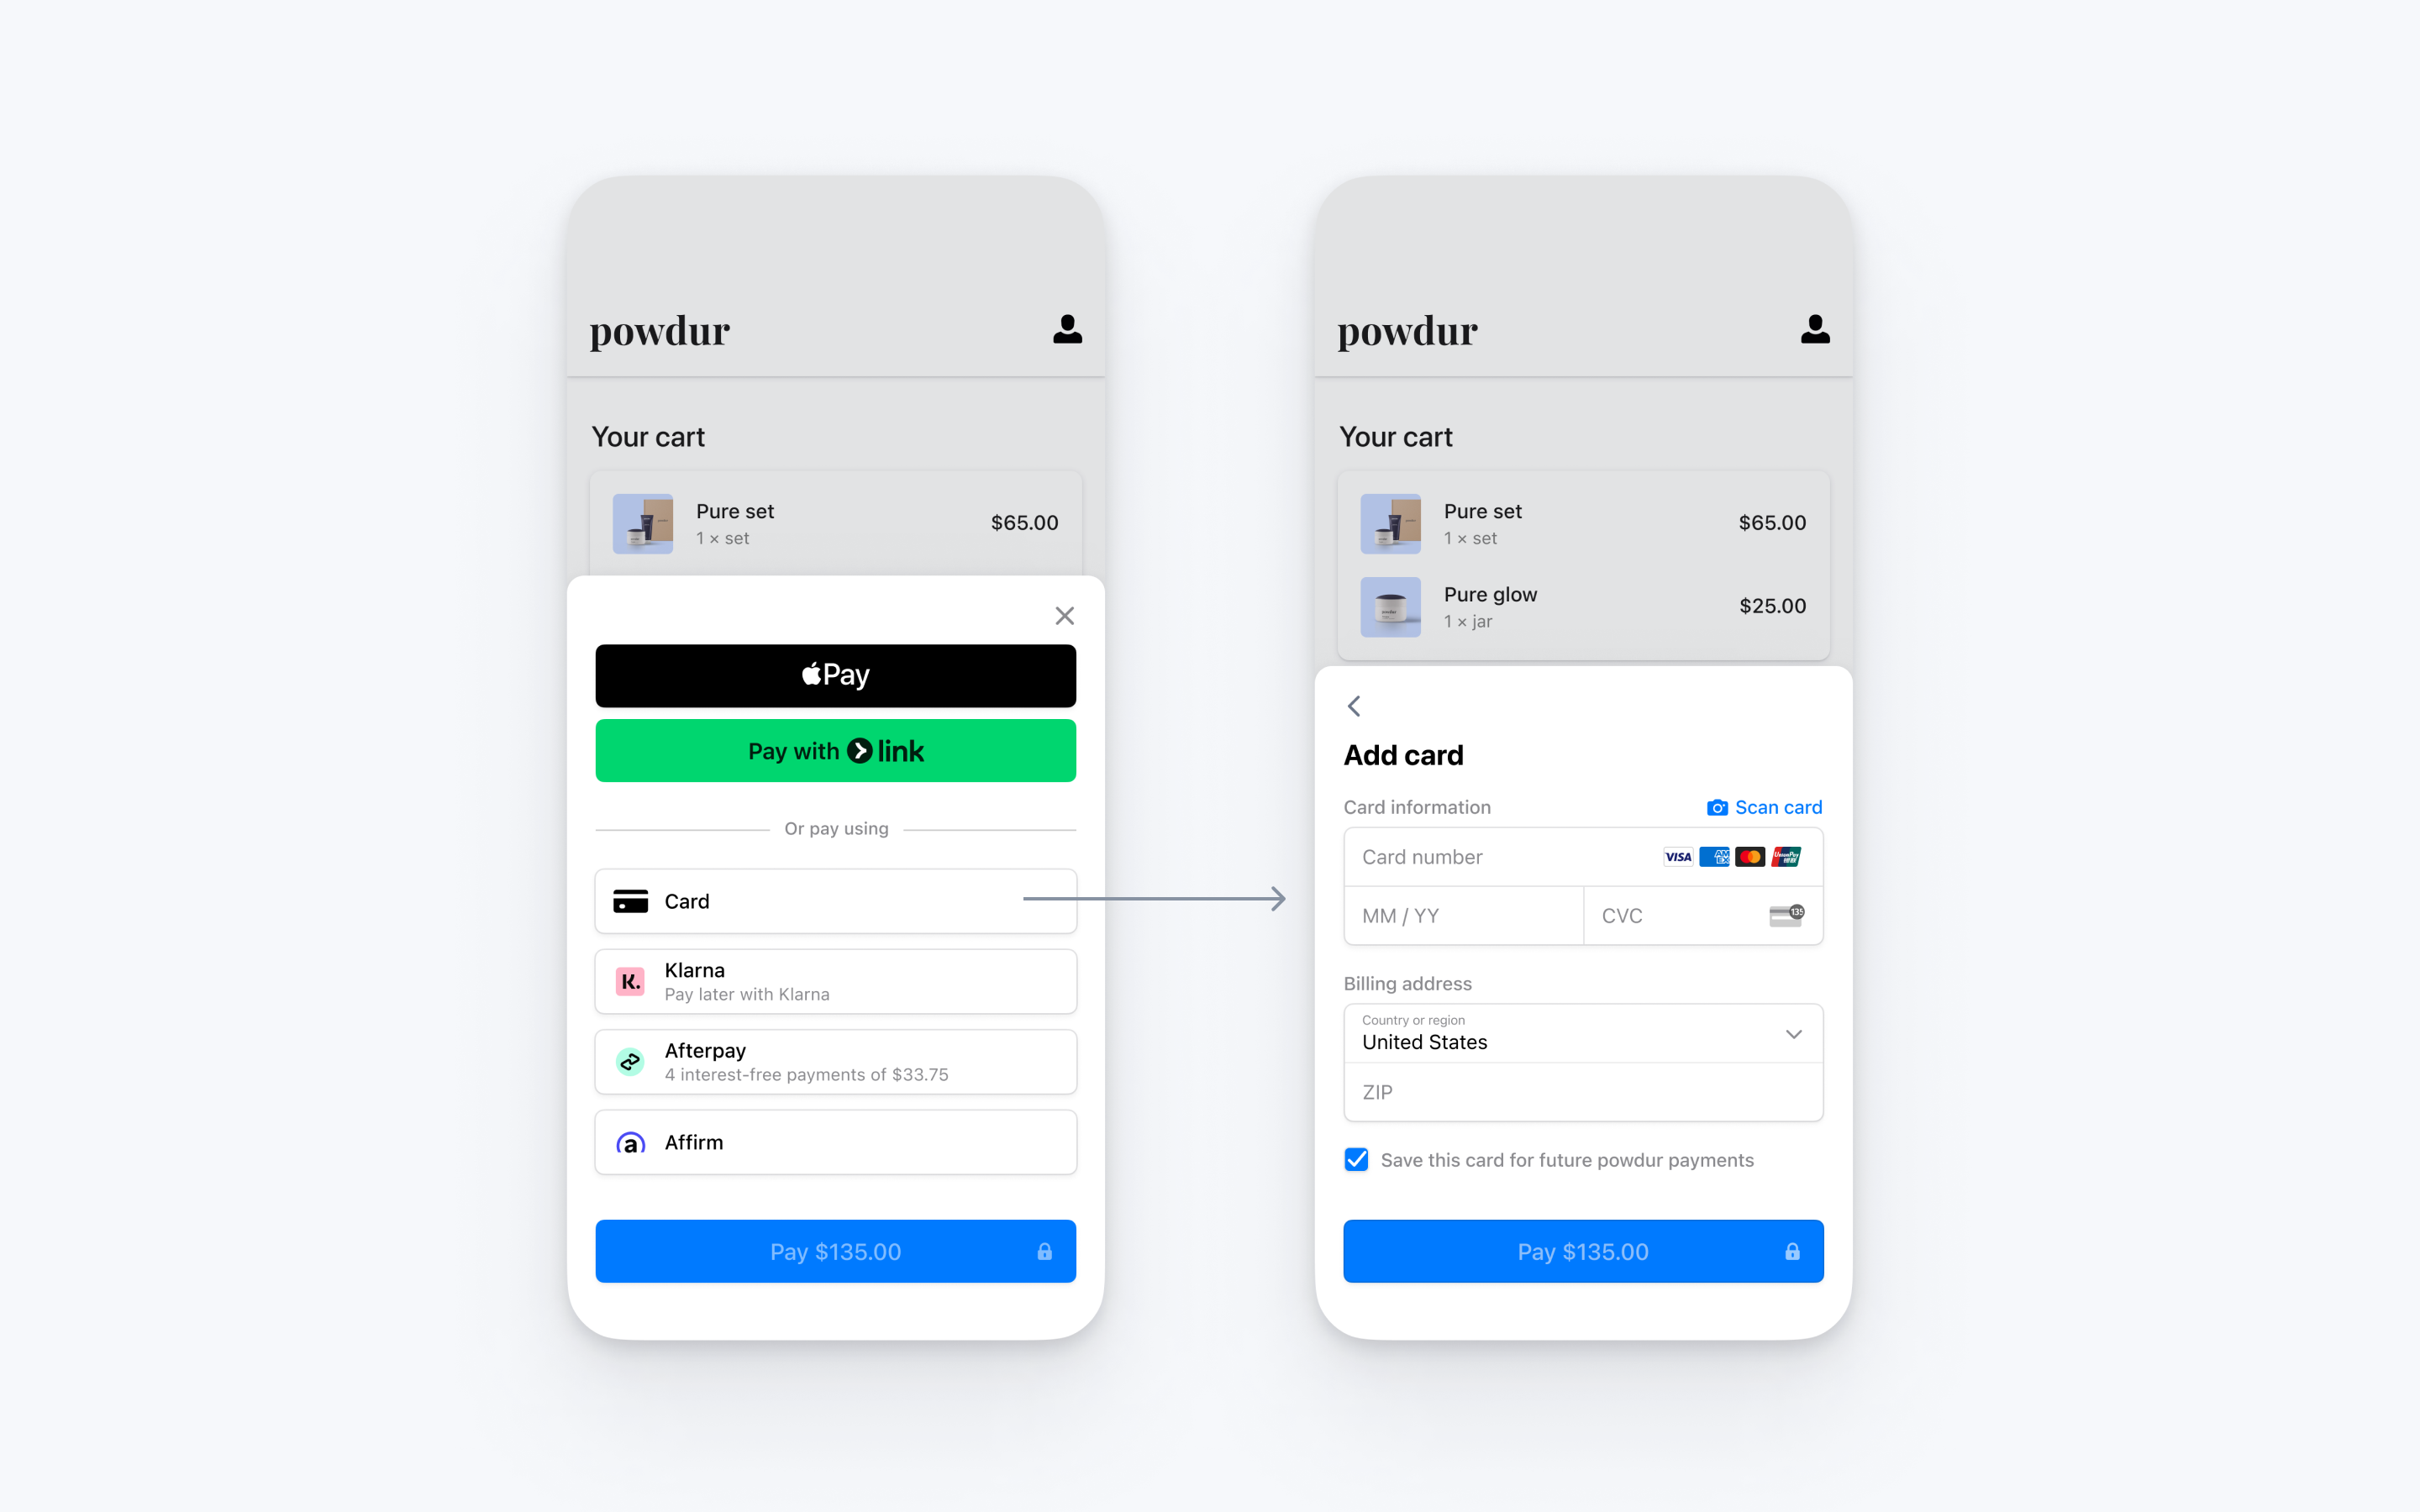 |  |
| Displays a sheet to collect payment details and complete the payment. The sheet contains a *Pay button with the amount and currency, and completes the payment. | Displays a sheet to collect payment details only. The button in the sheet says Continue and returns the customer to your app, where your own button completes payment. |
Create a PaymentIntentServer-side
On your server, create a PaymentIntent with an amount and currency. You can manage payment methods from the Dashboard. Stripe handles the return of eligible payment methods based on factors such as the transaction’s amount, currency, and payment flow. To prevent malicious customers from choosing their own prices, always decide how much to charge on the server-side (a trusted environment) and not the client.
If the call succeeds, return the PaymentIntent client secret. If the call fails, handle the error and return an error message with a brief explanation for your customer.
Note
Verify that all IntentConfiguration properties match your PaymentIntent (for example, setup_, amount, and currency).
Handle post-payment eventsServer-side
Stripe sends a payment_intent.succeeded event when the payment completes. Use the Dashboard webhook tool or follow the webhook guide to receive these events and run actions, such as sending an order confirmation email to your customer, logging the sale in a database, or starting a shipping workflow.
Listen for these events rather than waiting on a callback from the client. On the client, the customer could close the browser window or quit the app before the callback executes, and malicious clients could manipulate the response. Setting up your integration to listen for asynchronous events is what enables you to accept different types of payment methods with a single integration.
In addition to handling the payment_ event, we recommend handling these other events when collecting payments with the Payment Element:
| Event | Description | Action |
|---|---|---|
| payment_intent.succeeded | Sent when a customer successfully completes a payment. | Send the customer an order confirmation and fulfill their order. |
| payment_intent.processing | Sent when a customer successfully initiates a payment, but the payment has yet to complete. This event is most commonly sent when the customer initiates a bank debit. It’s followed by either a payment_ or payment_ event in the future. | Send the customer an order confirmation that indicates their payment is pending. For digital goods, you might want to fulfill the order before waiting for payment to complete. |
| payment_intent.payment_failed | Sent when a customer attempts a payment, but the payment fails. | If a payment transitions from processing to payment_, offer the customer another attempt to pay. |
Test the integration
See Testing for additional information to test your integration.
Enable card scanning
To enable card scanning support for iOS, set the NSCameraUsageDescription (Privacy - Camera Usage Description) in the Info. of your application, and provide a reason for accessing the camera (for example, “To scan cards”).
OptionalEnable saved cardsServer-sideClient-side
PaymentSheet can display a Save this card for future use checkbox that saves the customer’s card, and display the customer’s saved cards. To enable this checkbox, create a Customer object on your server and an associated CustomerSession, with payment_ set to enabled.
Compare Customers v1 and Accounts v2 references
If your Connect platform uses customer-configured Accounts, use our guide to replace Customer and event references in your code with the equivalent Accounts v2 API references.
const stripe = require('stripe')('sk_test_your_secret_key');

app.post('/mobile-payment-element', async (req, res) => {
  // Use an existing Customer ID if this is a returning customer.
  const customer = await stripe.customers.create();
  const customerSession = await stripe.customerSessions.create({
    customer: customer.id,
    components: {
      mobile_payment_element: {
        enabled: true,
        features: {
          payment_method_save: 'enabled',
          payment_method_redisplay: 'enabled',
          payment_method_remove: 'enabled'
        }
      },
    },
  });

  res.json({
    customerSessionClientSecret: customerSession.client_secret,
    customer: customer.id,
  });
});
Next, configure PaymentSheet with the Customer’s ID and the CustomerSession client secret.
@_spi(CustomerSessionBetaAccess) import StripePaymentSheet

var configuration = PaymentSheet.Configuration()
configuration.customer = .init(id: customerId, customerSessionClientSecret: customerSessionClientSecret)

self.paymentSheet = PaymentSheet(..., configuration: configuration)
OptionalAllow delayed payment methodsClient-side
Delayed payment methods don’t guarantee that you’ll receive funds from your customer at the end of the checkout either because they take time to settle (for example, US Bank Accounts, SEPA Debit, iDEAL, and Bancontact) or because they require customer action to complete (for example, OXXO, Konbini, and Boleto).
By default, PaymentSheet doesn’t display delayed payment methods. To opt in, set allowsDelayedPaymentMethods to true in your PaymentSheet.. This step alone doesn’t activate any specific payment methods; rather, it indicates that your app is able to handle them. For example, although OXXO isn’t supported by PaymentSheet, if it becomes supported and you’ve updated to the latest SDK version, your app will be able to display OXXO as a payment option without additional integration changes.
var configuration = PaymentSheet.Configuration()
configuration.allowsDelayedPaymentMethods = true

self.paymentSheet = PaymentSheet(..., configuration: configuration)
If the customer successfully uses one of these delayed payment methods in PaymentSheet, the payment result returned is ..
OptionalEnable Apple Pay
Note
If your checkout screen has a dedicated Apple Pay button, follow the Apple Pay guide and use ApplePayContext to collect payment from your Apple Pay button. You can use PaymentSheet to handle other payment method types.
Register for an Apple Merchant ID
Obtain an Apple Merchant ID by registering for a new identifier on the Apple Developer website.
Fill out the form with a description and identifier. Your description is for your own records and you can modify it in the future. Stripe recommends using the name of your app as the identifier (for example, merchant.).
Create a new Apple Pay certificate
Create a certificate for your app to encrypt payment data.
Go to the iOS Certificate Settings in the Dashboard, click Add new application, and follow the guide.
Download a Certificate Signing Request (CSR) file to get a secure certificate from Apple that allows you to use Apple Pay.
One CSR file must be used to issue exactly one certificate. If you switch your Apple Merchant ID, you must go to the iOS Certificate Settings in the Dashboard to obtain a new CSR and certificate.
Integrate with Xcode
Add the Apple Pay capability to your app. In Xcode, open your project settings, click the Signing & Capabilities tab, and add the Apple Pay capability. You might be prompted to log in to your developer account at this point. Select the merchant ID you created earlier, and your app is ready to accept Apple Pay.
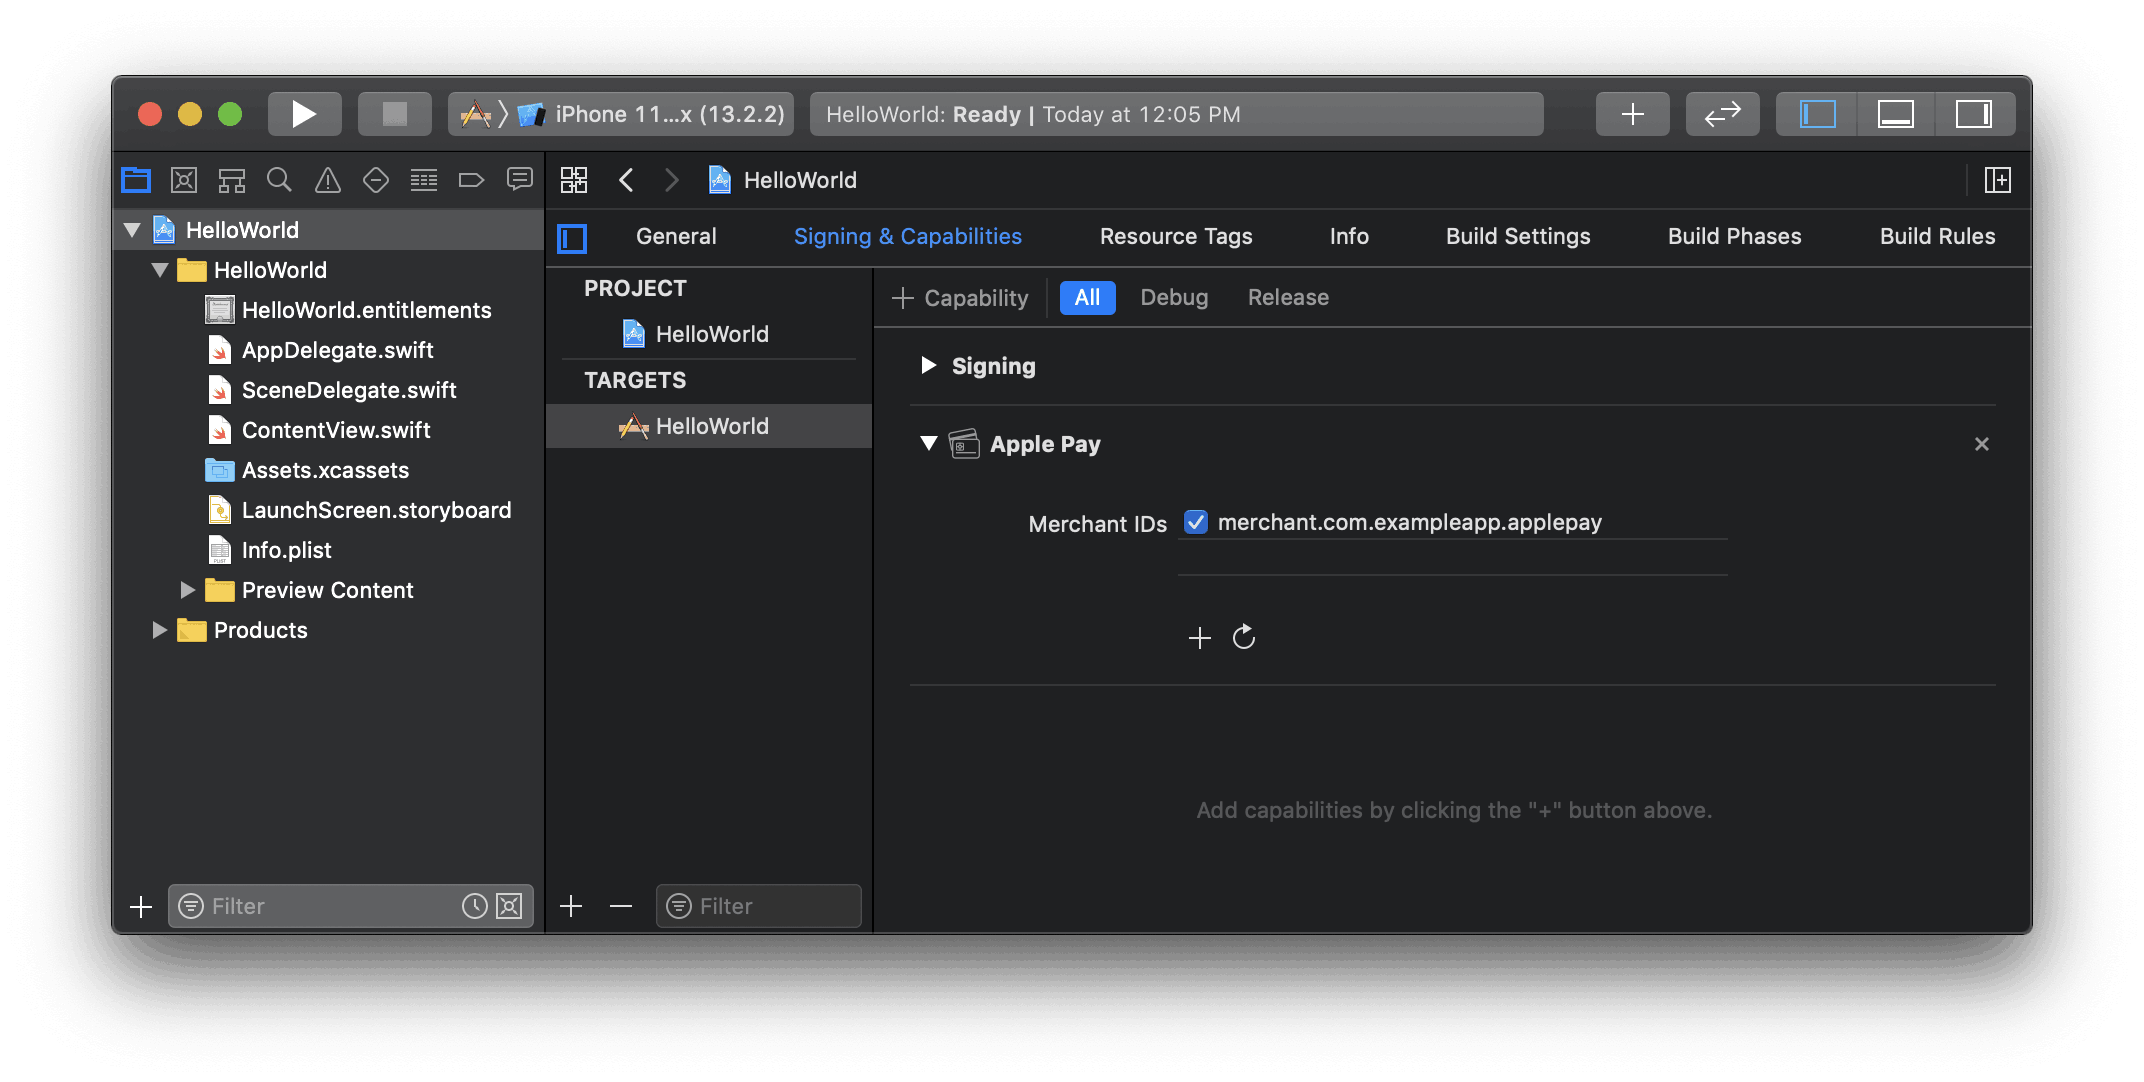
Enable the Apple Pay capability in Xcode
Add Apple Pay
Order tracking
To add order tracking information in iOS 16 or later, configure an authorizationResultHandler in your PaymentSheet.. Stripe calls your implementation after the payment is complete, but before iOS dismisses the Apple Pay sheet.
In your authorizationResultHandler implementation, fetch the order details from your server for the completed order. Add the details to the provided PKPaymentAuthorizationResult and return the modified result.
To learn more about order tracking, see Apple’s Wallet Orders documentation.
let customHandlers = PaymentSheet.ApplePayConfiguration.Handlers(
    authorizationResultHandler: { result in
      do {
        // Fetch the order details from your service
        let myOrderDetails = try await MyAPIClient.shared.fetchOrderDetails(orderID: orderID)
        result.orderDetails = PKPaymentOrderDetails(
          orderTypeIdentifier: myOrderDetails.orderTypeIdentifier, // "com.myapp.order"
          orderIdentifier: myOrderDetails.orderIdentifier, // "ABC123-AAAA-1111"
          webServiceURL: myOrderDetails.webServiceURL, // "https://my-backend.example.com/apple-order-tracking-backend"
          authenticationToken: myOrderDetails.authenticationToken) // "abc123"
        // Return your modified PKPaymentAuthorizationResult
        return result
      } catch {
        return PKPaymentAuthorizationResult(status: .failure, errors: [error])
      }
    }
)
var configuration = PaymentSheet.Configuration()
configuration.applePay = .init(merchantId: "merchant.com.your_app_name",
                               merchantCountryCode: "US",
                               customHandlers: customHandlers)
OptionalCustomize the sheet
All customization is configured through the PaymentSheet.Configuration object.
Appearance
Customize colors, fonts, and so on to match the look and feel of your app by using the appearance API.
Payment method layout
Configure the layout of payment methods in the sheet using paymentMethodLayout. You can display them horizontally, vertically, or let Stripe optimize the layout automatically.

var configuration = PaymentSheet.Configuration()
configuration.paymentMethodLayout = .automatic
Collect users addresses
Collect local and international shipping or billing addresses from your customers using the Address Element.
Merchant display name
Specify a customer-facing business name by setting merchantDisplayName. By default, this is your app’s name.
var configuration = PaymentSheet.Configuration()
configuration.merchantDisplayName = "My app, Inc."
Dark mode
PaymentSheet automatically adapts to the user’s system-wide appearance settings (light and dark mode). If your app doesn’t support dark mode, you can set style to alwaysLight or alwaysDark mode.
var configuration = PaymentSheet.Configuration()
configuration.style = .alwaysLight
Default billing details
To set default values for billing details collected in the payment sheet, configure the defaultBillingDetails property. The PaymentSheet pre-populates its fields with the values that you provide.
var configuration = PaymentSheet.Configuration()
configuration.defaultBillingDetails.address.country = "US"
configuration.defaultBillingDetails.email = "foo@bar.com"
Billing details collection
Use billingDetailsCollectionConfiguration to specify how you want to collect billing details in the payment sheet.
You can collect your customer’s name, email, phone number, and address.
If you only want to billing details required by the payment method, set billingDetailsCollectionConfiguration. to true. In that case, the PaymentSheet. are set as the payment method’s billing details.
If you want to collect additional billing details that aren’t necessarily required by the payment method, set billingDetailsCollectionConfiguration. to false. In that case, the billing details collected through the PaymentSheet are set as the payment method’s billing details.
var configuration = PaymentSheet.Configuration()
configuration.defaultBillingDetails.email = "foo@bar.com"
configuration.billingDetailsCollectionConfiguration.name = .always
configuration.billingDetailsCollectionConfiguration.email = .never
configuration.billingDetailsCollectionConfiguration.address = .full
configuration.billingDetailsCollectionConfiguration.attachDefaultsToPaymentMethod = true
Note
Consult with your legal counsel regarding laws that apply to collecting information. Only collect phone numbers if you need them for the transaction.
OptionalEnable CVC recollection on confirmation
To re-collect the CVC of a saved card during PaymentIntent confirmation, your integration must collect payment details before creating a PaymentIntent.
Update the intent configuration
PaymentSheet. accepts an optional parameter that controls when to re-collect CVC for a saved card.
let intentConfig = PaymentSheet.IntentConfiguration(
  mode: .payment(amount: 1099, currency: "USD"),
  confirmHandler: { confirmationToken in
    // Handle ConfirmationToken...
  }, requireCVCRecollection: true)
Update parameters of the intent creation
To re-collect the CVC when confirming payment, include both the customerId and require_ parameters during the creation of the PaymentIntent.