コンテンツにスキップ
アカウントを作成
または
サインイン
Stripe ドキュメントのロゴ
/
AI に質問する
アカウントを作成
サインイン
始める
支払い
売上
プラットフォームおよびマーケットプレイス
資金管理
開発者向けリソース
概要
Stripe Payments について
構築済みのシステムをアップグレード
支払いの分析
オンライン決済
概要ユースケースを見つけるManaged Payments
Payment Links を使用する
決済ページを構築
高度なシステムを構築
アプリ内実装を構築
    概要
    Payment Sheet
    Payment Element
      アプリ内での決済を受け付け
      デザインをカスタマイズする
      カスタムの支払い方法を追加する
      カードブランドを絞り込む
    アプリ内購入のリンク
    住所を収集
    Manage payment methods in settings
    アメリカとカナダのカード
決済手段
決済手段を追加
決済手段を管理
Link による購入の迅速化
支払いインターフェイス
Payment Links
Checkout
Web Elements
In-app Payments
決済シナリオ
複数の通貨を扱う
カスタムの決済フロー
柔軟なアクワイアリング
オーケストレーション
店頭支払い
端末
決済にとどまらない機能
会社を設立する
仮想通貨
Financial Connections
Climate
不正利用について
Radar の不正防止
不審請求の申請の管理
本人確認
ホーム支払いBuild an in-app integrationPayment Element

注

このページはまだ日本語ではご利用いただけません。より多くの言語で文書が閲覧できるように現在取り組んでいます。準備が整い次第、翻訳版を提供いたしますので、もう少しお待ちください。

アプリ内での決済を受け付け

Payment Element を使用して、iOS、Android、または React Native アプリでカスタマイズされた決済導入を構築します。

Payment Element はカスタマイズ可能なコンポーネントであり、アプリの任意の画面に追加できる決済手段のリストを表示します。顧客がリスト内の決済手段を操作すると、このコンポーネントは決済詳細を収集する個別の下部シートを開きます。

PaymentIntent フローを使用すると、アプリで決済を作成できます。この導入では、Payment Element を表示して、PaymentIntent を作成し、アプリで決済を確定します。

Stripe を設定する
サーバー側
クライアント側

サーバー側

この組み込みは、Stripe API と通信するサーバー上にエンドポイントを必要とします。サーバーから Stripe API にアクセスするには、次のように Stripe の公式ライブラリーを使用します。

Command Line
Ruby
Python
PHP
Java
Node.js
Go
.NET
No results
# Available as a gem sudo gem install stripe
Gemfile
Ruby
Python
PHP
Java
Node.js
Go
.NET
No results
# If you use bundler, you can add this line to your Gemfile gem 'stripe'

クライアント側

Stripe iOS SDK はオープンソースです。詳細なドキュメントが提供されており、iOS 13 以降をサポートするアプリと互換性があります。

SDK をインストールするには、以下のステップに従います。

  1. Xcode で、File (ファイル) > Add Package Dependencies… (パッケージ依存関係を追加) を選択し、リポジトリー URL として https://github.com/stripe/stripe-ios-spm を入力します。
  2. リリースページから最新のバージョン番号を選択します。
  3. StripePaymentSheet 製品をアプリのターゲットに追加します。

注

SDK の最新リリースおよび過去バージョンの詳細については、GitHub の Releases (リリース) ページをご覧ください。リポジトリのリリースをウォッチして、新しいリリースの公開時に通知を受け取ることも可能です。

また、SDK が Stripe への API コールを実行できるように、公開可能キーを設定する必要もあります。開始するには、導入中にクライアント側で公開可能キーをハードコード化できますが、本番環境ではサーバーから公開可能キーを取得します。

// Set your publishable key: remember to change this to your live publishable key in production // See your keys here: https://dashboard.stripe.com/apikeys STPAPIClient.shared.publishableKey =
"pk_test_TYooMQauvdEDq54NiTphI7jx"

支払い方法を有効にする

支払い方法の設定を表示して、サポートする支払い方法を有効にします。PaymentIntent を作成するには、少なくとも 1 つは支払い方法を有効にする必要があります。

多くの顧客から決済を受け付けられるよう、Stripe では、カードやその他一般的な決済手段がデフォルトで有効になっていますが、ビジネスや顧客に適した追加の決済手段を有効にすることをお勧めします。プロダクトと決済手段のサポートについては決済手段のサポートを、手数料については料金体系ページをご覧ください。

支払いの詳細を収集する
クライアント側

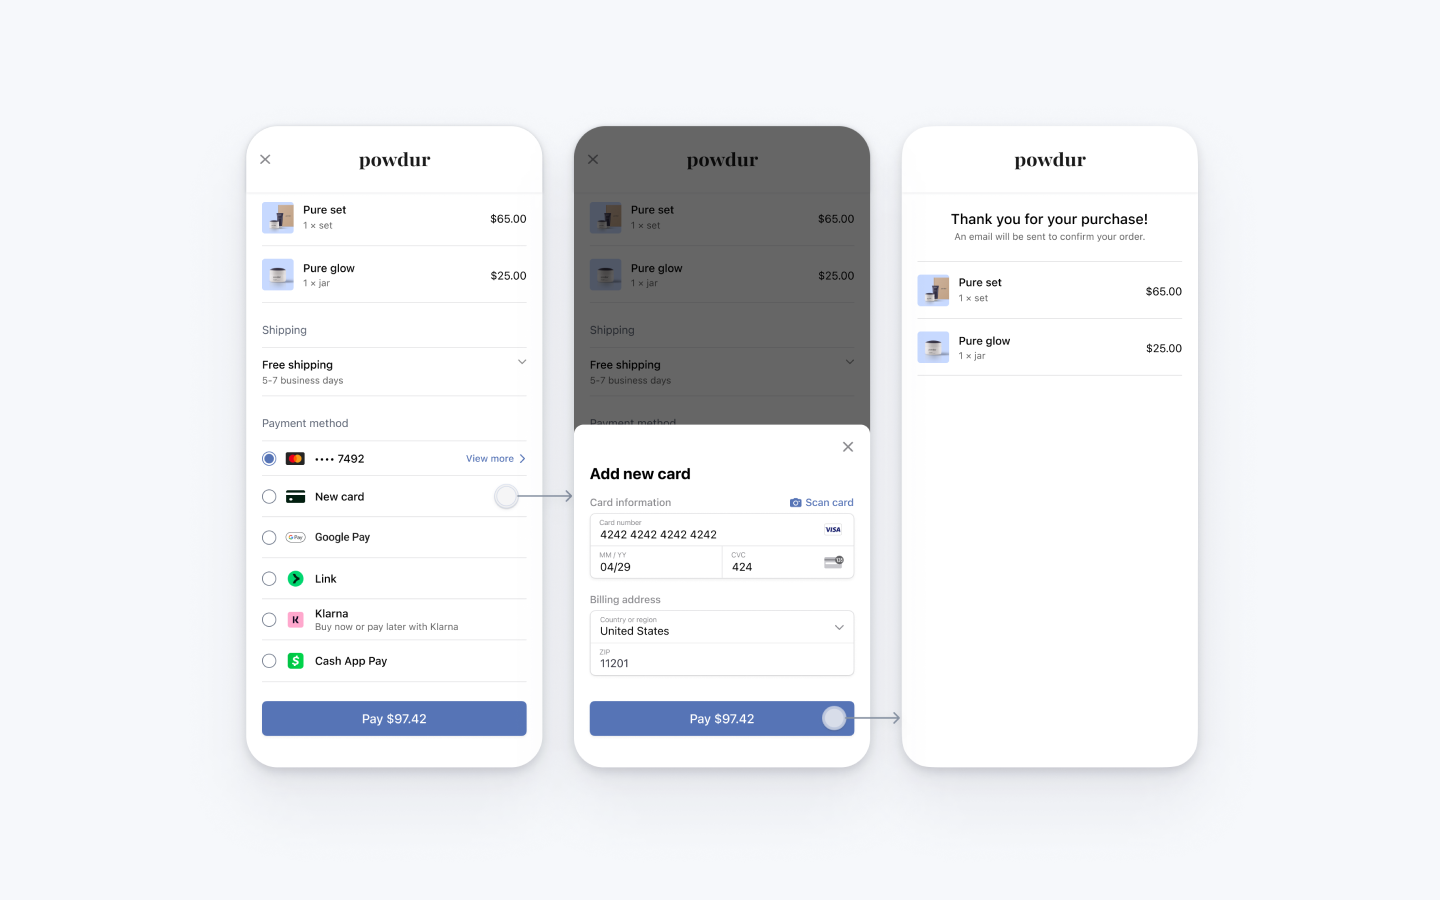
Embedded Mobile Payment Element は、ネイティブモバイルアプリの決済ページに配置するように設計されています。この Element には決済手段の一覧が表示され、アプリのデザインに合わせてカスタマイズできます。

顧客がカード行をタップすると、決済手段の詳細を入力できる画面が表示されます。画面にデフォルトで続行というボタンが表示され、タップすると画面が閉じます。これにより、顧客は決済フローで支払いを完了できます。
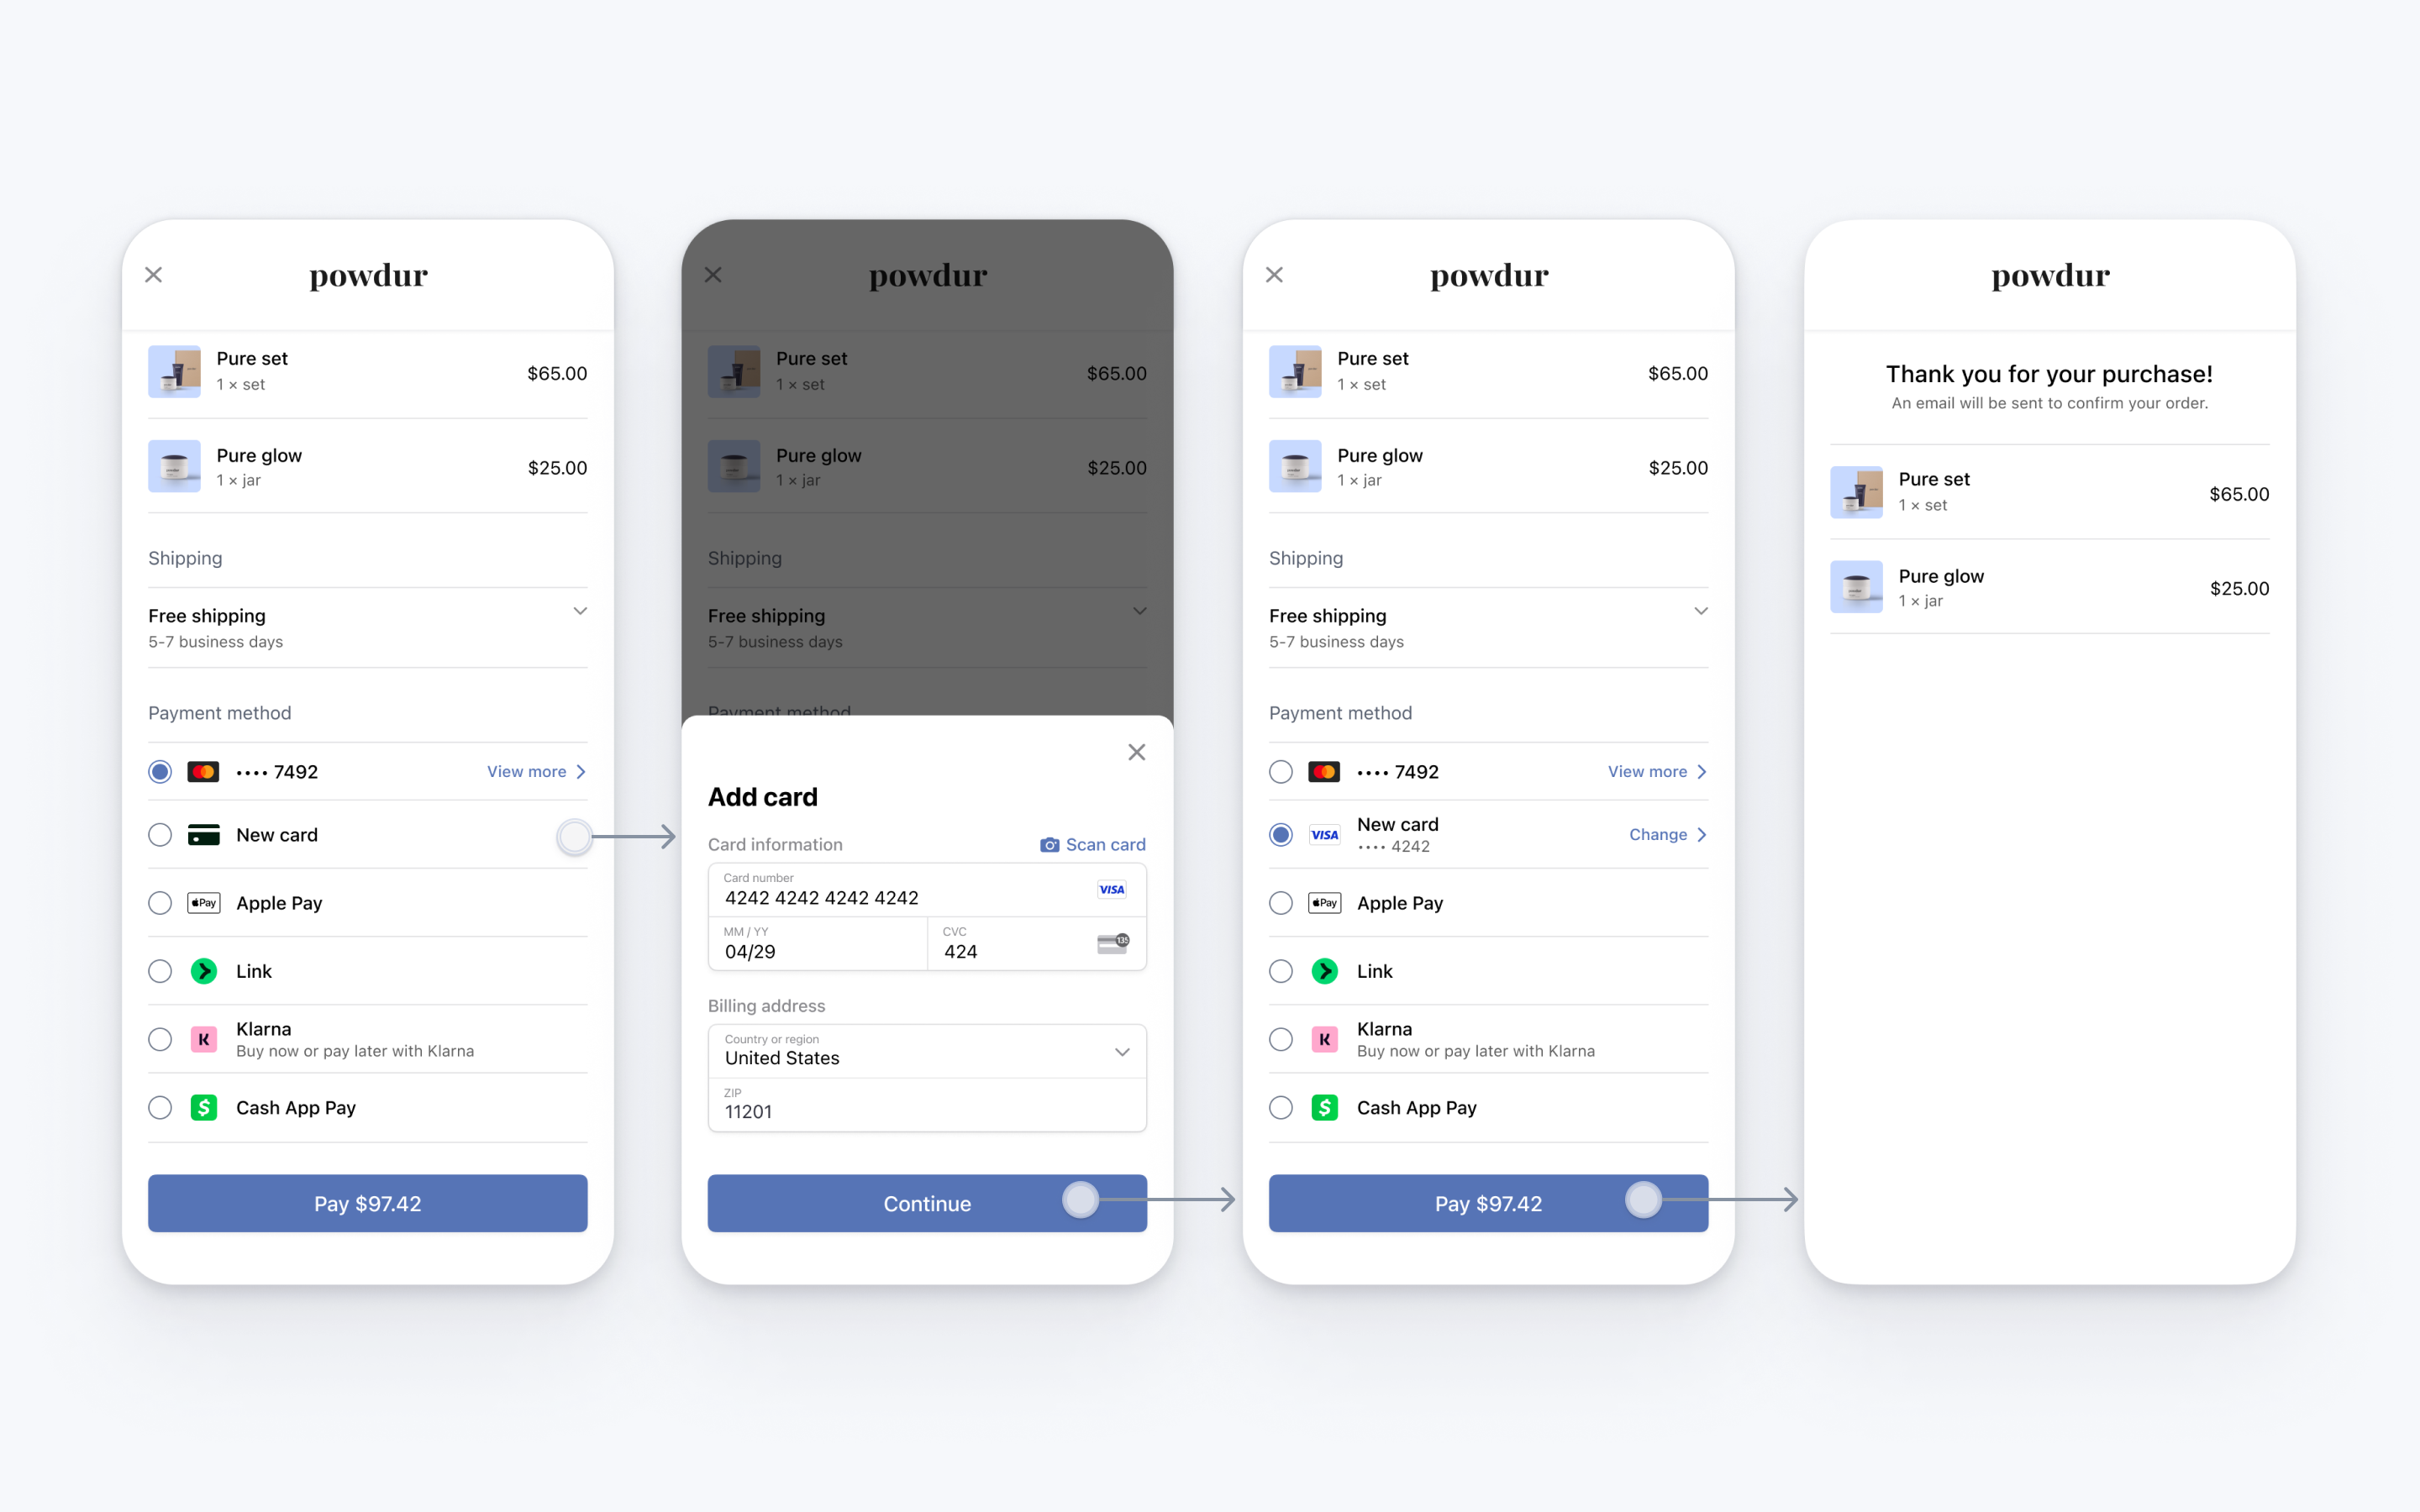
Payment Element

また、続行するのではなく、すぐに支払いを完了するようにボタンを設定することもできます。これを行うには、ガイドに沿って手順を実行した後で、このステップを完了します。

Payment Element を初期化する

create を呼び出し、EmbeddedPaymentElement.Configuration と PaymentSheet.IntentConfiguration を使用して EmbeddedPaymentElement をインスタンス化します。

Configuration オブジェクトには、returnURL など、支払いごとに変化しない EmbeddedPaymentElement の汎用的な設定オプションが含まれています。IntentConfiguration オブジェクトには、金額と通貨などの特定の支払いに関する詳細と、confirmHandler コールバックが含まれます。ここでは、コールバックの実装を空にしておきます。正常に初期化されたら、presentingViewController プロパティと delegate プロパティを設定します。

import StripePaymentSheet class MyCheckoutVC: UIViewController { func createEmbeddedPaymentElement() async throws -> EmbeddedPaymentElement { let intentConfig = PaymentSheet.IntentConfiguration( mode: .payment(amount: 1099, currency: "USD") ) { [weak self] _, _, intentCreationCallback in self?.handleConfirm(intentCreationCallback) } var configuration = EmbeddedPaymentElement.Configuration() configuration.returnURL = "your-app://stripe-redirect" // Use the return url you set up in the previous step let embeddedPaymentElement = try await EmbeddedPaymentElement.create(intentConfiguration: intentConfig, configuration: configuration) embeddedPaymentElement.presentingViewController = self embeddedPaymentElement.delegate = self return embeddedPaymentElement } func handleConfirm(_ intentCreationCallback: @escaping (Result<String, Error>) -> Void) { // ...explained later } }

Payment Element ビューを追加する

EmbeddedPaymentElement が正常に初期化されたら、そのビューを決済 UI に配置します。

注

ビューは、UIScrollView またはその他のスクロール可能なビュー内に含まれている必要があります。これは、ビューに固定サイズがなく、最初にレンダリングした後に高さを変更できるためです。

class MyCheckoutVC: UIViewController { // ... private(set) var embeddedPaymentElement: EmbeddedPaymentElement? private lazy var checkoutButton: UIButton = { let checkoutButton = UIButton(type: .system) checkoutButton.backgroundColor = .systemBlue checkoutButton.layer.cornerRadius = 5.0 checkoutButton.clipsToBounds = true checkoutButton.setTitle("Checkout", for: .normal) checkoutButton.setTitleColor(.white, for: .normal) checkoutButton.translatesAutoresizingMaskIntoConstraints = false checkoutButton.isEnabled = embeddedPaymentElement?.paymentOption != nil checkoutButton.addTarget(self, action: #selector(didTapConfirmButton), for: .touchUpInside) return checkoutButton }() // ... @objc func didTapConfirmButton() { // ...explained later } override func viewDidLoad() { super.viewDidLoad() Task { @MainActor in do { // Create a UIScrollView let scrollView = UIScrollView() scrollView.translatesAutoresizingMaskIntoConstraints = false self.view.addSubview(scrollView) // Create the Payment Element let embeddedPaymentElement = try await createEmbeddedPaymentElement() embeddedPaymentElement.delegate = self embeddedPaymentElement.presentingViewController = self self.embeddedPaymentElement = embeddedPaymentElement // Add its view to the scroll view scrollView.addSubview(embeddedPaymentElement.view) // Add your own checkout button to the scroll view scrollView.addSubview(checkoutButton) // Set up layout constraints embeddedPaymentElement.view.translatesAutoresizingMaskIntoConstraints = false NSLayoutConstraint.activate([ scrollView.topAnchor.constraint(equalTo: view.safeAreaLayoutGuide.topAnchor), scrollView.bottomAnchor.constraint(equalTo: view.safeAreaLayoutGuide.bottomAnchor), scrollView.leadingAnchor.constraint(equalTo: view.safeAreaLayoutGuide.leadingAnchor), scrollView.trailingAnchor.constraint(equalTo: view.safeAreaLayoutGuide.trailingAnchor), embeddedPaymentElement.view.topAnchor.constraint(equalTo: scrollView.topAnchor), embeddedPaymentElement.view.leadingAnchor.constraint(equalTo: scrollView.leadingAnchor), embeddedPaymentElement.view.trailingAnchor.constraint(equalTo: scrollView.trailingAnchor), checkoutButton.topAnchor.constraint(equalTo: embeddedPaymentElement.view.bottomAnchor, constant: 4.0), checkoutButton.leadingAnchor.constraint(equalTo: scrollView.safeAreaLayoutGuide.leadingAnchor, constant: 4.0), checkoutButton.trailingAnchor.constraint(equalTo: scrollView.safeAreaLayoutGuide.trailingAnchor, constant: -4.0), ]) } catch { // handle view not being added to view } } } }

この時点で、アプリを実行して、Embedded Mobile Payment Element を確認できます。

高さの変更に対応する

EmbeddedPaymentElement のビューのサイズは拡大または縮小され、ビューのレイアウトに影響を与える場合があります。

高さの変更に対応するには、embeddedPaymentElementDidUpdateHeight デリゲートメソッドを実装します。EmbeddedPaymentElement のビューは、高さを更新するアニメーションブロック内でこのメソッドを呼び出します。実装では、高さ変更のアニメーションをスムーズに行うために、EmbeddedPaymentElement のビューを含むスクロールビューで setNeedsLayout() と layoutIfNeeded() を呼び出すことが想定されます。

extension MyCheckoutVC: EmbeddedPaymentElementDelegate { func embeddedPaymentElementDidUpdateHeight(embeddedPaymentElement: StripePaymentSheet.EmbeddedPaymentElement) { // Handle layout appropriately self.view.setNeedsLayout() self.view.layoutIfNeeded() } }

ビューが高さの変化に正しく反応するかをテストすることをお勧めします。これを行うには、EmbeddedPaymentElement で testHeightChange() を呼び出し、エレメント内での同意書の表示と非表示をシミュレーションします。testHeightChange() を呼び出した後、スクロールビューがスムーズに調整されることを確認します。

class MyCheckoutVC: UIViewController { override func viewDidLoad() { // This is only for testing purposes: #if DEBUG Timer.scheduledTimer(withTimeInterval: 5.0, repeats: true) { [weak self] _ in Task { @MainActor in self?.embeddedPaymentElement?.testHeightChange() } } #endif } }

任意選択した支払いオプションを表示する

ラベル (「····4242」など)、画像 (VISA ロゴなど)、UI に表示する請求先情報など、顧客が選択した決済オプションの詳細にアクセスする必要がある場合は、EmbeddedPaymentElement の paymentOption プロパティを使用します。

paymentOption が変更されたときに通知を受けるには、embeddedPaymentElementDidUpdatePaymentOption デリゲートメソッドを実装します。

extension MyCheckoutVC: EmbeddedPaymentElementDelegate { func embeddedPaymentElementDidUpdatePaymentOption(embeddedPaymentElement: EmbeddedPaymentElement) { print("The payment option changed: \(embeddedPaymentElement.paymentOption)") checkoutButton.isEnabled = embeddedPaymentElement.paymentOption != nil } }

任意支払いの詳細を更新する

顧客が決済情報を変更する操作 (割引コードの適用など) を実行したときに、update メソッドを呼び出して EmbeddedPaymentElement インスタンスを更新し、新しい値を反映します。Apple Pay や Google Pay など、一部の決済手段では UI に金額が表示されるため、常に正確で最新の状態を維持するようにしてください。

更新コールが完了したら、UI を更新します。更新コールにより、顧客が現在選択している決済オプションが変更される場合もあります。

extension MyCheckoutVC { func update() { Task { @MainActor in var updatedIntentConfig = oldIntentConfig // Update the amount to reflect the price after applying the discount code updatedIntentConfig.mode = PaymentSheet.IntentConfiguration.Mode.payment(amount: 999, currency: "USD") let result = await embeddedPaymentElement?.update(intentConfiguration: updatedIntentConfig) switch result { case .canceled, nil: // Do nothing; this happens when a subsequent `update` call cancels this one break case .failed(let error): // Display error to user in an alert, let users retry case .succeeded: // Update your UI in case the payment option changed } } } }

支払いを確定する

顧客が決済ボタンをタップしたら、embeddedPaymentElement.confirm() を呼び出して支払いを完了します。確定する際は、ユーザーの操作を必ず無効にしてください。

extension MyCheckoutVC { @objc func didTapConfirmButton() { Task { @MainActor in guard let embeddedPaymentElement else { return } self.view.isUserInteractionEnabled = false // Disable user interaction, show a spinner, and so on before calling confirm let result = await embeddedPaymentElement.confirm() switch result { case .completed: // Payment completed - show a confirmation screen. case .failed(let error): self.view.isUserInteractionEnabled = true // Encountered an unrecoverable error. You can display the error to the user, log it, etc. case .canceled: self.view.isUserInteractionEnabled = true // Customer canceled - you should probably do nothing. break } } } }

次に、すでに PaymentSheet.IntentConfiguration に渡している confirmHandler コールバックを実装して、サーバーにリクエストを送信します。サーバーは PaymentIntent を作成し、その client secret を返します。詳細については、PaymentIntent を作成するをご覧ください。

リクエストが返されたら、サーバーレスポンスの client secret またはエラーを指定して intentCreationCallback を呼び出します。EmbeddedPaymentElement は、client secret を使用して PaymentIntent を確定するか、UI に地域の言語に合わせたエラーメッセージ (errorDescription または localizedDescription) を表示します。確定が完了すると、EmbeddedPaymentElement は使用できなくなります。代わりに、ユーザーを領収書画面などに誘導します。

extension MyCheckoutVC { func handleConfirm(_ intentCreationCallback: @escaping (Result<String, Error>)-> Void) { // Make a request to your own server and receive a client secret or an error. let myServerResponse: Result<String, Error> = ... switch myServerResponse { case .success(let clientSecret): // Call the `intentCreationCallback` with the client secret intentCreationCallback(.success(clientSecret)) case .failure(let error): // Call the `intentCreationCallback` with the error intentCreationCallback(.failure(error)) } } }

オプション選択した決済オプションを消去する

EmbeddedPaymentElement 以外の決済オプションがある場合は、選択した決済オプションの消去が必要になることがあります。これを行うには、clearPaymentOption API を使用して、選択した決済オプションの選択を解除します。

extension MyCheckoutVC: UIViewController { func deselectPaymentMethod() { embeddedPaymentElement?.clearPaymentOption() } }

オプション同意書を自分で表示する

デフォルトでは、Embedded Mobile Payment Element は、規制遵守を維持するための同意書と法的免責事項を表示します。このテキストは購入ボタンの近くに配置する必要があります。必要に応じて、ビューでの表示を無効にし、代わりに自分で表示します。

警告

規制を遵守するため、実装で同意書のテキストを表示する必要があります。テキスト内の URL を UITextView などを使用して開けることを確認してください。

var configuration = EmbeddedPaymentElement.Configuration(...) configuration.embeddedViewDisplaysMandateText = true ... let mandateTextView = UITextView() mandateTextView.attributedText = embeddedPaymentElement.paymentOption.mandateText

オプション顧客が画面ですぐに支払えるようにする

Embedded Payment Element

支払いをすぐに確定するようにフォーム画面のボタンを設定するには、EmbeddedPaymentElement.Configuration オブジェクトで formSheetAction を設定します。

画面が閉じられた後、支払い結果によって完了ブロックが実行されます。埋め込み UI は支払い完了後には使用できなくなるため、実装でユーザーを領収書画面など別の画面に誘導することをお勧めします。

var configuration = EmbeddedPaymentElement.Configuration() configuration.formSheetAction = .confirm(completion: { result in switch result { case .completed: // Payment completed. You can e.g. show a confirmation screen. print("Completed") case .failed(let error): // Encountered an unrecoverable error. You can display the error to the user, log it, etc. print(error) case .canceled: // Customer canceled - you should probably do nothing. break } })

PaymentIntent を作成する
サーバー側

サーバー側で、金額と通貨を指定して PaymentIntent を作成します。支払い方法はダッシュボードで管理できます。Stripe は取引額、通貨、決済フローなどの要素に基づいて、適切な支払い方法が返されるように処理します。悪意のある顧客が金額を恣意的に選択できないようにするために、請求額はクライアント側ではなく、常にサーバー側 (信頼性の高い環境) で指定してください。

コールが成功した場合は、PaymentIntent client secret を返します。コールが失敗した場合は、エラーを処理して、エラーメッセージと顧客向けの簡単な説明を返します。

注

すべての IntentConfiguration プロパティが PaymentIntent (setup_future_usage、amount、currency など) と一致していることを確認します。

main.rb
Ruby
Python
PHP
Node.js
Java
Go
.NET
No results
require 'stripe' Stripe.api_key =
'sk_test_BQokikJOvBiI2HlWgH4olfQ2'
post '/create-intent' do data = JSON.parse request.body.read params = { amount: 1099, currency: 'usd', # In the latest version of the API, specifying the `automatic_payment_methods` parameter is optional because Stripe enables its functionality by default. automatic_payment_methods: {enabled: true}, } begin intent = Stripe::PaymentIntent.create(params) {client_secret: intent.client_secret}.to_json rescue Stripe::StripeError => e {error: e.error.message}.to_json end end

戻り先 URL を設定する
クライアント側

顧客はお客様のアプリから離れて、(Safari やバンキングアプリなどで) 認証する場合があります。ユーザーが認証後にアプリに自動的に戻れるようにするには、カスタム URL スキームを構成し、URL を SDK に転送するようにアプリのデリゲートを設定します。Stripe はユニバーサルリンクには対応していません。

SceneDelegate.swift
Swift
No results
// This method handles opening custom URL schemes (for example, "your-app://stripe-redirect") func scene(_ scene: UIScene, openURLContexts URLContexts: Set<UIOpenURLContext>) { guard let url = URLContexts.first?.url else { return } let stripeHandled = StripeAPI.handleURLCallback(with: url) if (!stripeHandled) { // This was not a Stripe url – handle the URL normally as you would } }

さらに、EmbeddedPaymentElement.Configuration オブジェクトの returnURL をアプリの URL に設定します。

var configuration = EmbeddedPaymentElement.Configuration() configuration.returnURL = "your-app://stripe-redirect"

支払い後のイベントを処理する
サーバー側

支払いが完了すると、Stripe は payment_intent.succeeded イベントを送信します。ダッシュボードの Webhook ツールを使用するか Webhook のガイドに従ってこれらのイベントを受信し、顧客への注文確認メールの送信、データベースでの売上の記録、配送ワークフローの開始などのアクションを実行します。

クライアントからのコールバックを待つのではなく、これらのイベントをリッスンします。クライアントでは、コールバックが実行される前に顧客がブラウザーのウィンドウを閉じたり、アプリを終了する場合、また悪意を持つクライアントがレスポンスを不正操作する場合もあります。非同期型のイベントをリッスンするよう組み込みを設定すると、単一の組み込みで複数の異なるタイプの支払い方法を受け付けることができます。

Payment Element を使用して支払いを回収する場合は、payment_intent.succeeded イベントのほかにこれらのイベントを処理することをお勧めします。

イベント説明アクション
payment_intent.succeeded顧客が正常に支払いを完了したときに送信されます。顧客に注文の確定を送信し、顧客の注文のフルフィルメントを実行します。
payment_intent.processing顧客が正常に支払いを開始したが、支払いがまだ完了していない場合に送信されます。このイベントは、多くの場合、顧客が口座引き落としを開始するときに送信されます。その後、payment_intent.succeeded イベント、また、失敗の場合は payment_intent.payment_failed イベントが送信されます。顧客に注文確認メールを送信し、支払いが保留中であることを示します。デジタル商品では、支払いの完了を待たずに注文のフルフィルメントを行うことが必要になる場合があります。
payment_intent.payment_failed顧客が支払いを試みたが、支払いに失敗する場合に送信されます。支払いが processing から payment_failed に変わった場合は、顧客に再度支払いを試すように促します。

実装をテストする

カード番号シナリオテスト方法
カード支払いは成功し、認証は必要とされません。クレジットカード番号と、任意の有効期限、セキュリティコード、郵便番号を使用してクレジットカードフォームに入力します。
カード支払いには認証が必要です。クレジットカード番号と、任意の有効期限、セキュリティコード、郵便番号を使用してクレジットカードフォームに入力します。
カードは、insufficient_funds などの拒否コードで拒否されます。クレジットカード番号と、任意の有効期限、セキュリティコード、郵便番号を使用してクレジットカードフォームに入力します。
UnionPay カードは、13 ~ 19 桁の可変長です。クレジットカード番号と、任意の有効期限、セキュリティコード、郵便番号を使用してクレジットカードフォームに入力します。

実装内容をテストするためのその他の情報については、テストをご覧ください。

オプション保存済みのカードを有効にする
サーバー側
クライアント側

EmbeddedPaymentElement では、今後の支払いのためにこのカードを保存するチェックボックスを表示して顧客のカードを保存し、保存済みのカードを表示できます。このチェックボックスを有効にするには、サーバーで Customer (顧客) オブジェクトと、関連する一時キーを作成します。

const stripe = require('stripe')('sk_test_your_secret_key'); app.post('/mobile-payment-element', async (req, res) => { // Use an existing Customer ID if this is a returning customer. const customer = await stripe.customers.create(); const ephemeralKey = await stripe.ephemeralKeys.create( {customer: customer.id}, {apiVersion: '2020-08-27'} ); res.json({ ephemeralKey: ephemeralKey.secret, customer: customer.id, }); });

次に、顧客の ID と一時キーの client secret を指定して EmbeddedPaymentElement を設定します。

var configuration = EmbeddedPaymentElement.Configuration() configuration.customer = .init(id: customerId, ephemeralKeySecret: customerEphemeralKeySecret) self.embeddedPaymentElement = try await EmbeddedPaymentElement.create(..., configuration: configuration)

オプション遅延型の支払い方法を許可する
クライアント側

遅延型の決済手段では、購入の終了時に顧客から売上を受け取ることが保証されません。これは、決済に時間がかかる (アメリカの銀行口座、SEPA デビット、iDEAL、Bancontact など) 場合や、完了に顧客の対応を必要とする (OXXO、コンビニ決済、Boleto など) 場合があるためです。

デフォルトでは、EmbeddedPaymentElement は遅延型の決済手段を表示しません。オプトインするには、EmbeddedPaymentElement.Configuration で allowsDelayedPaymentMethods を true に設定します。このステップのみでは、特定の決済手段を有効にすることはできませんが、アプリがその決済手段に対応できることが示されます。たとえば、現在 OXXO は EmbeddedPaymentElement でサポートされていませんが、サポートされるようになり、最新の SDK バージョンに更新すると、実装に関する追加の変更なしで、アプリに決済オプションとして OXXO を表示できます。

var configuration = EmbeddedPaymentElement.Configuration() configuration.allowsDelayedPaymentMethods = true self.embeddedPaymentElement = try await EmbeddedPaymentElement.create(..., configuration: configuration)

顧客が EmbeddedPaymentElement でこれらの遅延型の決済手段のいずれかを適切に使用すると、.completed の支払い結果が返されます。

オプションApple Pay を有効にする

注

決済画面に専用の Apple Pay ボタンがある場合は、Apple Pay ガイドに従い、ApplePayContext を使用して Apple Pay ボタンから支払いを回収します。EmbeddedPaymentElement を使用して、他のタイプの決済手段に対応することも可能です。

Apple 加盟店 ID を登録する

Apple Developer Web サイトで 新規 ID を登録 して、Apple 加盟店 ID を取得します。

フォームに説明と ID を入力します。説明はお客様の記録用であり、後で変更できます。アプリの名前を ID として使用することをお勧めします (merchant.com.{{YOUR_APP_NAME}} など)。

新しい Apple Pay 証明書を作成する

支払いデータを暗号化するためのアプリの証明書を作成します。

ダッシュボードの iOS certificate settings (iOS 証明書の設定) に移動して、新規アプリケーションを追加をクリックし、表示されるガイドに従います。

証明書署名リクエスト (CSR) ファイルをダウンロードして、Apple Pay の利用を可能にする安全な証明書を Apple から取得します。

1 つの CSR ファイルを使用して証明書を 1 つだけ発行する必要があります。Apple 加盟店 ID を切り替えた場合、ダッシュボードの iOS Certificate Settings (iOS 証明書の設定) に移動して、新しい CSR と証明書を取得する必要があります。

Xcode を導入する

Apple Pay ケイパビリティをアプリに追加します。Xcode でプロジェクト設定を開き、Signing & Capabilities (署名およびケイパビリティ) タブを選択して、Apple Pay ケイパビリティを追加します。この段階で開発者アカウントへのログインを要求される場合があります。前の手順で作成した加盟店 ID を選択すると、アプリで Apple Pay を受け付けられるようになります。
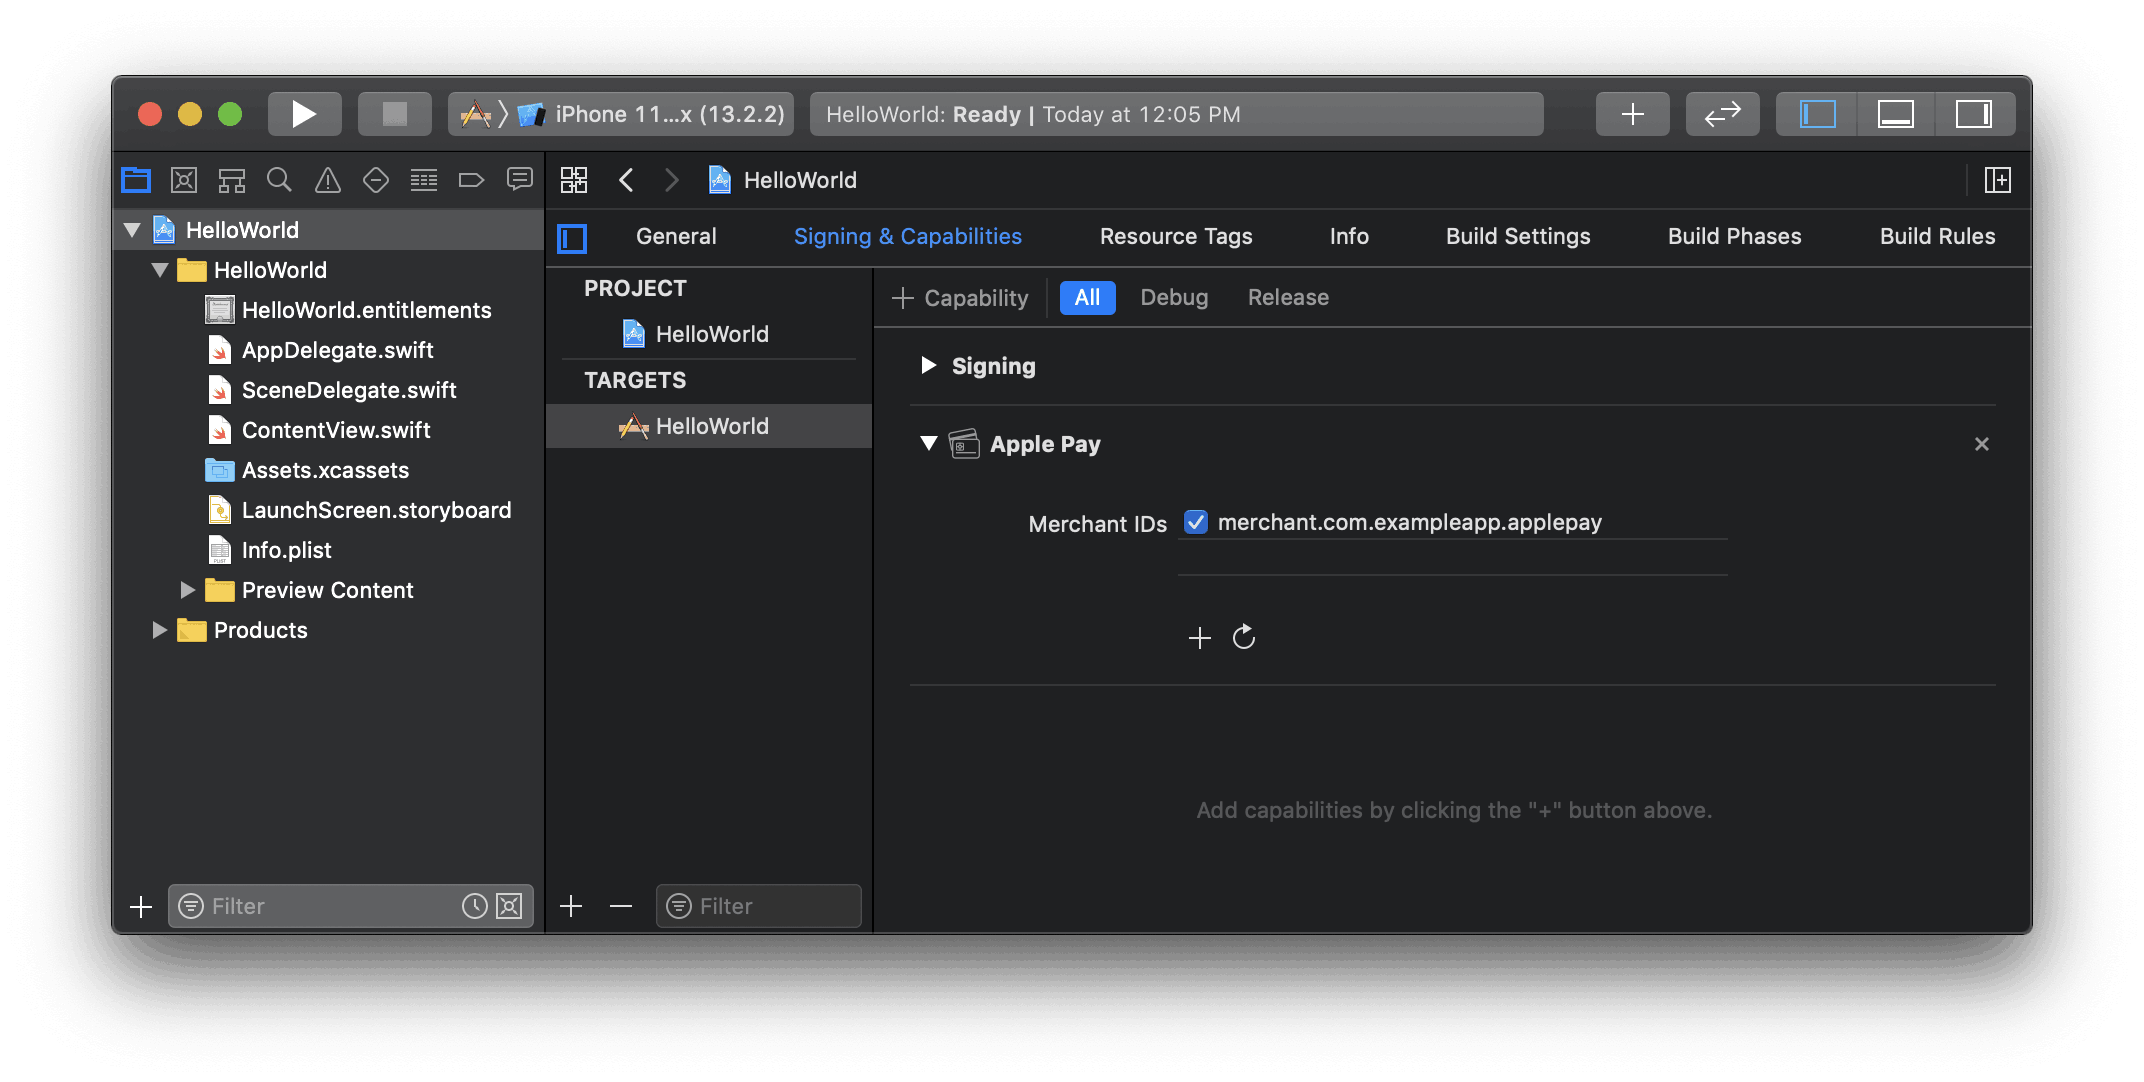
Xcode で Apple Pay ケイパビリティを有効化する

Apple Pay を追加する

EmbeddedPaymentElement に Apple Pay を追加するには、Apple マーチャント ID とビジネスの国コードを使用して EmbeddedPaymentElement.Configuration を初期化してから、applePay を設定します。

var configuration = EmbeddedPaymentElement.Configuration() configuration.applePay = .init( merchantId: "merchant.com.your_app_name", merchantCountryCode: "US" )

注文の追跡

iOS 16 以降で注文の追跡情報を追加するには、PaymentSheet.ApplePayConfiguration.Handlers で authorizationResultHandler を設定します。支払いの完了後、Stripe は iOS が Apple Pay の決済画面を閉じる前に実装を呼び出します。

authorizationResultHandler の実装で、完了した注文の詳細をサーバーから取得します。この詳細を、指定された PKPaymentAuthorizationResult に追加して、指定された完了ハンドラーを呼び出します。

注文の追跡の詳細については、Apple のウォレットでの注文に関するドキュメントをご覧ください。

let customHandlers = EmbeddedPaymentElement.ApplePayConfiguration.Handlers( authorizationResultHandler: { result, completion in // Fetch the order details from your service MyAPIClient.shared.fetchOrderDetails(orderID: orderID) { myOrderDetails result.orderDetails = PKPaymentOrderDetails( orderTypeIdentifier: myOrderDetails.orderTypeIdentifier, // "com.myapp.order" orderIdentifier: myOrderDetails.orderIdentifier, // "ABC123-AAAA-1111" webServiceURL: myOrderDetails.webServiceURL, // "https://my-backend.example.com/apple-order-tracking-backend" authenticationToken: myOrderDetails.authenticationToken) // "abc123" // Call the completion block on the main queue with your modified PKPaymentAuthorizationResult completion(result) } } ) var configuration = EmbeddedPaymentElement.Configuration() configuration.applePay = .init(merchantId: "merchant.com.your_app_name", merchantCountryCode: "US", customHandlers: customHandlers)

オプションカードのスキャンを有効にする

カードのスキャンサポートを有効にするには、アプリケーションの Info.plist で NSCameraUsageDescription (Privacy - Camera Usage Description (プライバシー - カメラの使用に関する記述)) を設定し、カメラにアクセスする理由を入力します (「To scan cards (カードのスキャンのため)」など)。カードのスキャンは、iOS 13 以降のデバイスでサポートされます。

オプション構成要素をカスタマイズする

すべてのカスタマイズは、EmbeddedPaymentElement.Configuration オブジェクトで設定されます。

デザイン

Appearance API を使用して、アプリのデザインに合うように色やフォントなどをカスタマイズします。

ユーザーの住所を収集する

Address Element を使用して、顧客から国内および国外の配送先住所や請求先住所を収集します。

加盟店の表示名

merchantDisplayName を設定し、顧客に表示するビジネス名を指定します。デフォルトではアプリ名になります。

var configuration = EmbeddedPaymentElement.Configuration() configuration.merchantDisplayName = "My app, Inc."

ダークモード

EmbeddedPaymentElement は、ユーザーのシステム全体の表示設定 (ライトモードとダークモード) に合わせて自動的に調整されます。アプリがダークモードに対応していない場合は、スタイルを alwaysLight または alwaysDark モードに設定できます。

var configuration = EmbeddedPaymentElement.Configuration() configuration.style = .alwaysLight

オプション確定時のセキュリティコードの再収集を有効にする

PaymentIntent の確定時に、保存されたカードのセキュリティコードを再収集する次の手順は、実装システムに以下が含まれていることを前提としています。

  • PaymentIntent を作成する前の決済の詳細の収集
  • クライアント側での確定

インテントの設定を更新する

PaymentSheet.IntentConfiguration では、保存されたカードのセキュリティコードを再収集する時期を管理するオプションパラメーターを使用できます。

import StripePaymentSheet class MyCheckoutVC: UIViewController { private func createEmbeddedPaymentElement() async throws { let intentConfig = PaymentSheet.IntentConfiguration( mode: .payment(amount: 1099, currency: "USD"), confirmHandler: { [weak self] _, _, intentCreationCallback in self?.handleConfirm(intentCreationCallback) }, requireCVCRecollection: true) var configuration = EmbeddedPaymentElement.Configuration() configuration.returnURL = "your-app://stripe-redirect" // Use the return url you set up in the previous step let embeddedPaymentElement = try await EmbeddedPaymentElement.create(intentConfiguration: intentConfig, configuration: configuration) // ... Same as before } }

インテント作成のパラメーターを更新する

支払いの確定時にセキュリティコードを再収集するには、PaymentIntent の作成時に customerId パラメーターと require_cvc_recollection パラメーターの両方を含めます。

main.rb
Ruby
Python
PHP
Node.js
Java
Go
.NET
No results
require 'stripe' Stripe.api_key =
'sk_test_BQokikJOvBiI2HlWgH4olfQ2'
post '/create-intent' do data = JSON.parse request.body.read params = { amount: 1099, currency: 'usd', # In the latest version of the API, specifying the `automatic_payment_methods` parameter is optional because Stripe enables its functionality by default. automatic_payment_methods: {enabled: true}, customer: customer.id, payment_method_options: { card: {require_cvc_recollection: true} } } begin intent = Stripe::PaymentIntent.create(params) {client_secret: intent.client_secret}.to_json rescue Stripe::StripeError => e {error: e.error.message}.to_json end end
このページはお役に立ちましたか。
はいいいえ
  • お困りのことがございましたら 、サポートにお問い合わせください。
  • 早期アクセスプログラムにご参加ください。
  • 変更ログをご覧ください。
  • ご不明な点がございましたら、お問い合わせください。
  • LLM ですか?llms.txt を読んでください。
  • Powered by Markdoc