サーバーで支払いを確定する
PaymentIntent や SetupIntent を作成する前に Payment Element をレンダリングする実装を構築し、サーバーから Intent を確定します。
設定フローを使用すると、顧客にすぐに請求を行わずに、今後の決済に備えて支払い方法を設定することができます。この導入では、Payment Element を表示し、SetupIntent を作成して、サーバーから設定を確定する、カスタムの決済フローを構築します。
支払い方法を有効にする
注意
この導入パスは、Automated Clearing Settlement System (ACSS) を使用する BLIK またはプレオーソリデビットに対応していません。
支払い方法の設定を表示して、サポートする支払い方法を有効にします。SetupIntent を作成するには、少なくとも 1 つは支払い方法を有効にする必要があります。
多くの顧客から決済を受け付けられるよう、Stripe では、カードやその他一般的な決済手段がデフォルトで有効になっていますが、ビジネスや顧客に適した追加の決済手段を有効にすることをお勧めします。プロダクトと決済手段のサポートについては決済手段のサポートを、手数料については料金体系ページをご覧ください。
支払いの詳細を収集するクライアント側
Payment Element を使用してクライアントで支払い詳細を収集する準備ができました。Payment Element は事前構築された UI コンポーネントであり、多様な支払い方法の支払い詳細の収集を容易にします。
Payment Element には、HTTPS 接続を介して支払い情報を Stripe に安全に送信する iframe が含まれています。一部の支払い方法では、支払いを確定するために別のページにリダイレクトする必要があるため、Payment Element を別の iframe 内に配置しないでください。
構築済みのシステムを機能させるには、決済ページのアドレスの先頭を http:// ではなく https:// にする必要があります。HTTPS を使用しなくてもシステムをテストできますが、本番環境で決済を受け付ける準備が整ったら、必ず、HTTPS を有効にしてください。
Payment Element によって動的なフォームが表示され、顧客はここで支払い方法を選択できます。このフォームでは、顧客が選択した支払い方法で必要な決済の詳細のすべてが自動的に収集されます。
Elements プロバイダーを作成する際に Appearance (デザイン) オブジェクト を options に渡すことで、サイトのデザインに合わせて Payment Element をカスタマイズできます。
住所を収集
デフォルトでは、Payment Element は必要な請求先住所情報のみを収集します。(たとえば、デジタル商品およびサービスの税金を計算するなどの目的で) 顧客の詳細な請求先住所または配送先住所を収集するには、Address Element を使用します。
オプションレイアウトをカスタマイズするクライアント側
決済フローインターフェイスに合わせて Payment Element のレイアウト (アコーディオンまたはタブ) をカスタマイズできます。各プロパティについて、詳細は elements.create をご覧ください。
以下の画像は、異なるレイアウト設定を適用した同一 Payment Element の表示を示しています。
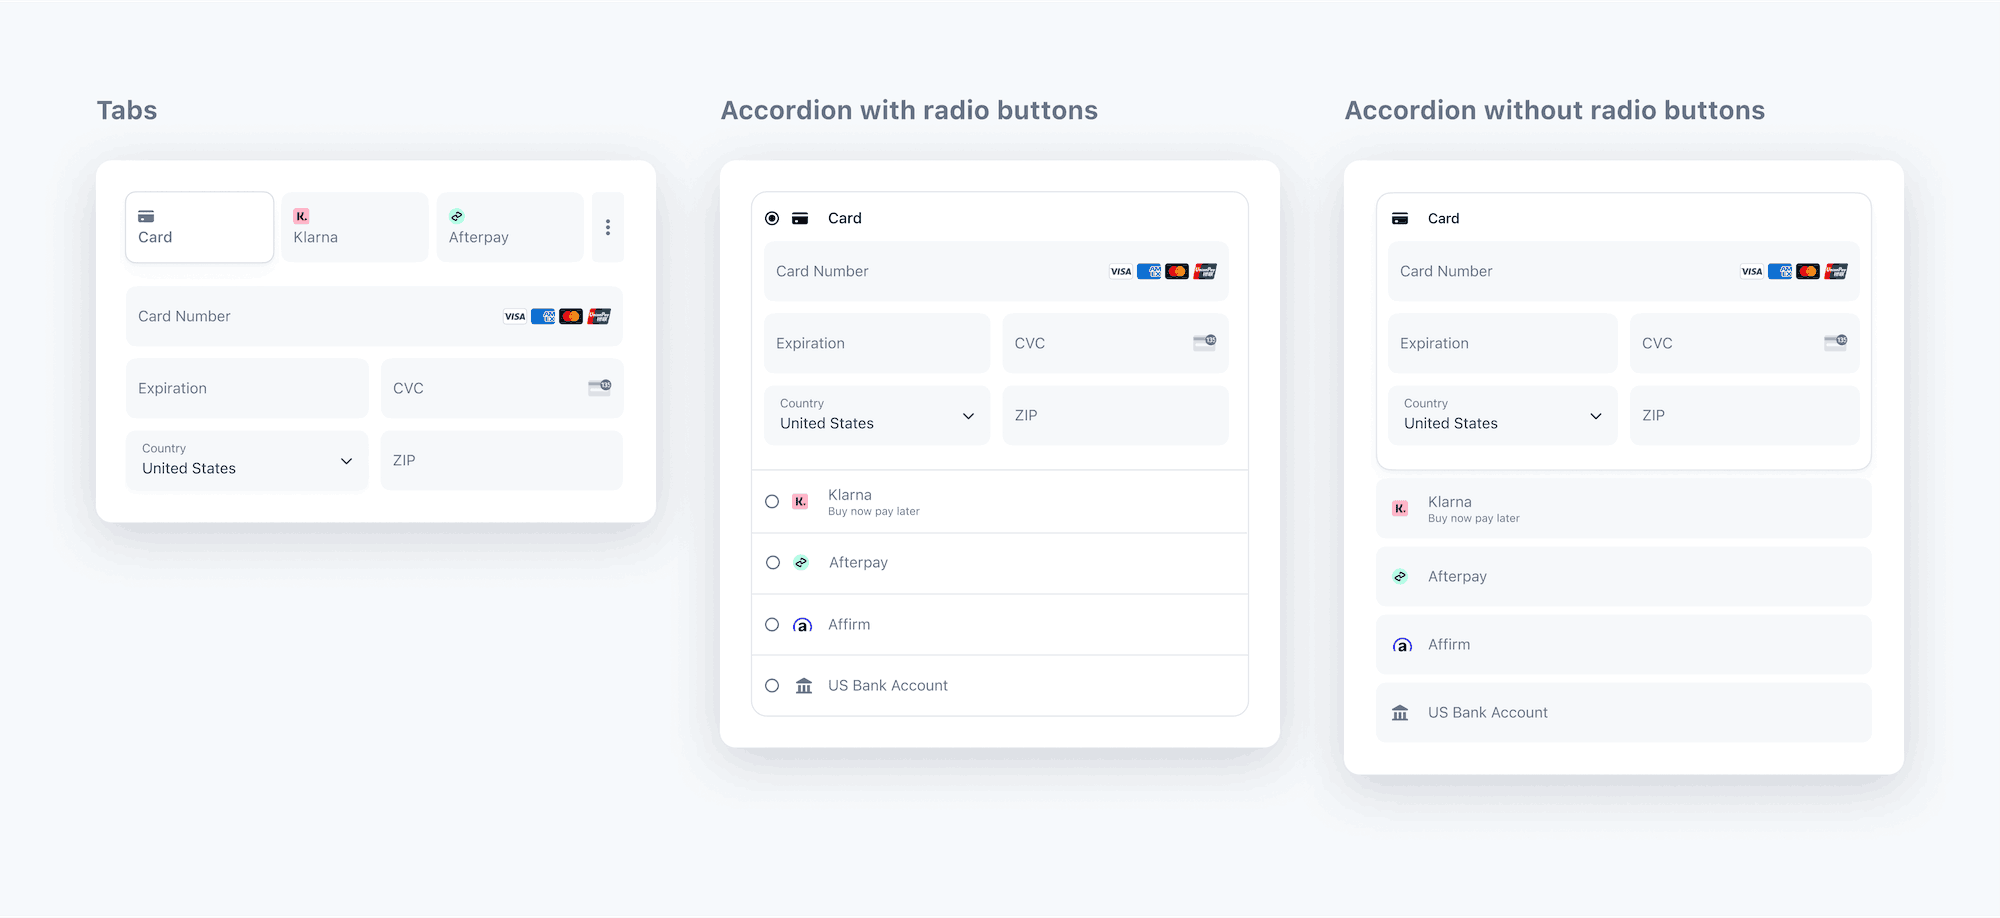
Payment Element のレイアウト
オプションデザインをカスタマイズするクライアント側
これで、Payment Element がページに追加されました。次は、デザインに合わせて外観をカスタマイズできます。Payment Element のカスタマイズについての詳細は、Elements Appearance API をご覧ください。
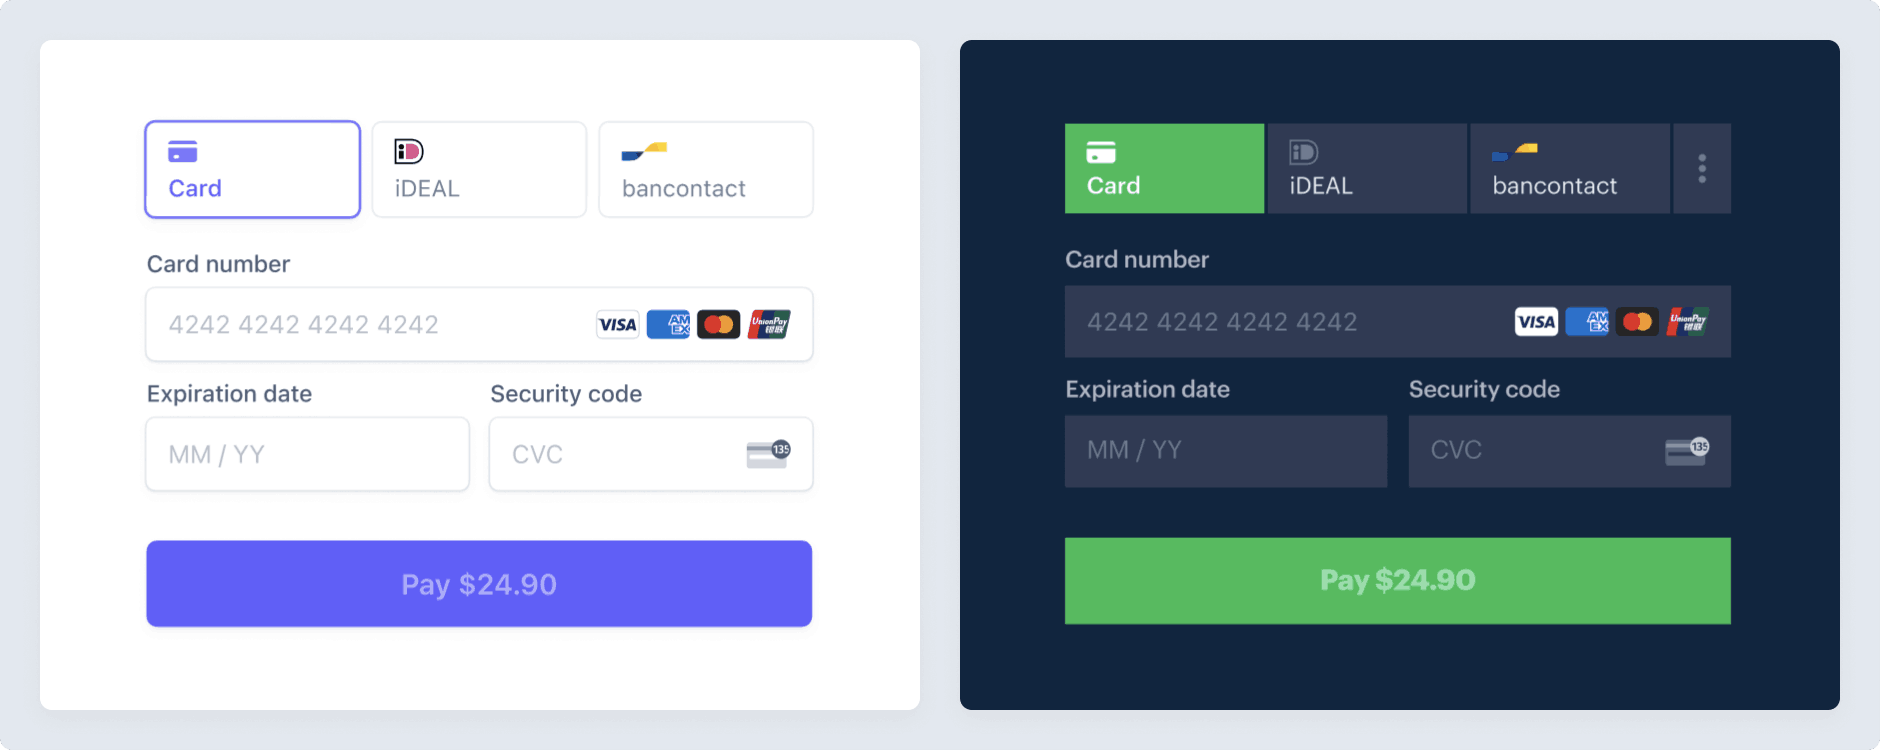
Payment Element をカスタマイズする
オプション顧客の支払い方法を保存および取得する
将来の利用に備えて顧客の決済手段を保存するように Payment Element を設定できます。このセクションでは、決済手段の保存機能を導入する方法を説明しています。Payment Element で以下を実行できます。
- 買い手に支払い方法を保存することの同意を求める
- 買い手が同意した場合に支払い方法を保存する
- 将来の購入時に保存した支払い方法を買い手に表示する
- 買い手が紛失したカードまたは期限切れのカードを交換するときにそれらのカードを自動的に更新する

決済手段を保存します。

以前に保存した支払い方法を再利用します。
Payment Element で支払い方法の保存機能を有効にする
サーバー側で CustomerSession を作成します。その際、Customer ID を指定して、セッションの payment_element コンポーネントを有効にします。有効にする保存済みの決済手段機能を設定します。たとえば、payment_method_save を有効にすると、将来使用できるように支払いの詳細を保存するためのチェックボックスが、顧客に表示されます。
PaymentIntent または Checkout セッションで setup_ を指定して、決済手段を保存するためのデフォルトの動作を上書きできます。これにより、顧客が明示的に保存を選択しなくても、将来の使用に備えて決済手段を自動的に保存できます。
注意
payment_method_remove を有効にして、保存済みの決済手段を買い手が削除できるようにすると、その決済手段を利用しているサブスクリプションに影響します。決済手段を削除すると、PaymentMethod とその Customer の関連付けが解除されます。
Elements インスタンスはその CustomerSession の client secret を使用して、顧客が保存した支払い方法にアクセスします。CustomerSession の作成時に適切にエラーを処理します。エラーが発生した場合、CustomerSession の client secret はオプションなので、Elements インスタンスに指定する必要はありません。
CustomerSession の client secret を使用して Elements インスタンスを作成します。次に、Elements インスタンスを使用して、Payment Element を作成します。
// Create the CustomerSession and obtain its clientSecret
const res = await fetch("/create-customer-session", {
  method: "POST"
});

const {
  customer_session_client_secret: customerSessionClientSecret
} = await res.json();

const elementsOptions = {
  mode: 'setup',
  currency: 'usd',
  customerSessionClientSecret,
  // Fully customizable with appearance API.
  appearance: {/*...*/},
};

// Set up Stripe.js and Elements to use in checkout form, passing the client secret
// and CustomerSession's client secret obtained in a previous step
const elements = stripe.elements(elementsOptions);

// Create and mount the Payment Element
const paymentElementOptions = { layout: 'accordion'};
const paymentElement = elements.create('payment', paymentElementOptions);
paymentElement.mount('#payment-element');
ConfirmationToken の作成時に、顧客が支払いの詳細を保存するためのボックスにチェックマークを付けたかどうかに応じて、Stripe.js が ConfirmationToken の setup_future_usage および allow_redisplay の設定をコントロールします。
保存した支払い方法の選択内容を検出する
保存した支払い方法を選択したときにコンテンツを動的に制御するには、Payment Element の change イベントをリッスンします。このイベントには、選択した支払い方法の情報が入力されています。
paymentElement.on('change', function(event) {
  if (event.value.payment_method) {
    // Control dynamic content if a saved payment method is selected
  }
})
オプション追加の Elements オプションクライアント側
Elements オブジェクトは、支払いの回収に影響する追加オプションを受け入れます。指定したオプションを基に Payment Element は、有効化した決済手段の中から利用可能なものを表示します。詳しくは、決済手段のサポートをご覧ください。
| プロパティー | タイプ | 説明 | 必須 |
|---|---|---|---|
mode |
| Payment Element が PaymentIntent、SetupIntent、またはサブスクリプションで使用されているかどうかを示します。 | はい |
currency | string | 顧客に請求する金額の通貨。 | はい |
amount | number | Apple Pay、Google Pay、または BNPL の UI で示される、顧客に請求する金額。 | payment および subscription のモードの場合 |
setupFutureUsage |
| Payment Element によって収集された決済情報を使用して、今後の支払いを行う意図を示します。 | いいえ |
captureMethod |
| 顧客の口座から売上をキャプチャーするタイミングを管理します。 | いいえ |
onBehalfOf | string | Connect のみ。取引に関する金銭的責任を負う Stripe アカウント ID。このオプションが実装に関連するかを判断するには、ユースケースをご覧ください。 | いいえ |
paymentMethodTypes | string[] | 表示する決済手段タイプのリスト。この属性を省略して、Stripe ダッシュボードで決済手段を管理できます。 | いいえ |
paymentMethodConfiguration | string | Stripe ダッシュボードで決済手段を管理するときに使用する決済手段の設定。指定しない場合は、既定の構成が使用されます。 | いいえ |
paymentMethodCreation | manual | stripe.createPaymentMethod を使用して、Elements インスタンスから PaymentMethods が作成されるようにします。 | いいえ |
paymentMethodOptions | {us_ | us_ 決済手段の確認オプション。Payment Intents と同じ確認手段を受け入れます。 | いいえ |
paymentMethodOptions | {card: {installments: {enabled: boolean}}} | Stripe ダッシュボードで決済手段を管理していないときに、カード分割払いプランの選択 UI を手動で有効化できるようにします。mode='payment' を設定し、「さらに」paymentMethodTypes を明示的に指定する必要があります。それ以外の場合は、エラーが発生します。paymentMethodCreation='manual' とは互換性がありません。 | いいえ |
顧客を作成するサーバー側
将来の支払いに備えて支払い方法を設定するには、その手段を Customer (顧客) に関連付ける必要があります。顧客がビジネスでアカウントを作成する際に、Customer オブジェクトを作成します。Customer オブジェクトを使用すると、支払い方法を再利用したり、複数の支払いを追跡したりできます。
ConfirmationToken を作成するクライアント側
レガシーの実装で createPaymentMethod を使用する
レガシーの実装を使用している場合は、サーバーで支払いを確定するために stripe. の情報を使用することがあります。このガイドに従って Confirmation Tokens に移行することをお勧めしますが、以前のドキュメントを確認してサーバーで支払いを確定することもできます。
顧客が決済フォームを送信すると、stripe.createConfirmationToken が呼び出され ConfirmationToken を作成し、決済の確定前に追加の検証ロジックまたはビジネスロジックをサーバーに送信します。
SetupIntent を確定すると PaymentMethod が生成されます。SetupIntent 確認レスポンスから payment_method ID を表示できます。
注意
作成された ConfirmationToken をすぐに使用して、SetupIntent を確定する必要があります。使用しなかった場合は、12 時間後に期限切れになります。
Stripe に支払いの詳細を送信するサーバー側
顧客が決済フォームを送信したときに、サーバー側で SetupIntent を作成します。支払い方法はダッシュボードで管理できます。Stripe は取引額、通貨、決済フローなどの要素に基づいて、適切な支払い方法が返されるように処理します。
クライアントから送信された PaymentMethod を使用して、1 件のリクエストで SetupIntent を作成して確定できます。
const stripe = require('stripe')(); const express = require('express'); const app = express(); app.set('trust proxy', true); app.use(express.json()); app.use(express.static(".")); app.post('/create-confirm-intent', async (req, res) => { try { const intent = await stripe.setupIntents.create({ confirm: true, customer: req.cookies['customer'], // the Customer ID you previously created // In the latest version of the API, specifying the `automatic_payment_methods` parameter is optional because Stripe enables its functionality by default. automatic_payment_methods: {enabled: true}, confirmation_token: req.body.confirmationTokenId }); res.json({ client_secret: intent.client_secret, status: intent.status }); } catch (err) { res.json({ error: err }) } }); app.listen(3000, () => { console.log('Running on port 3000'); });'sk_test_BQokikJOvBiI2HlWgH4olfQ2'
次のアクションを処理するクライアント側
3D セキュアによる認証や別のサイトへのリダイレクトなど、SetupIntent で顧客による追加アクションが必要になる場合は、そのアクションを起動する必要があります。stripe. を使用して、顧客のアクションを処理して設定を完了するための UI をトリガーします。
保存された支払い方法に後で請求するサーバー側
警告
bancontact と ideal は、デフォルトでは 1 回限りの支払い方法です。以降も使用できるように設定すると、再利用可能な支払い方法タイプ sepa_ が生成されます。このため、保存された支払い方法を照会するには sepa_ を使用する必要があります。
法令遵守
顧客の支払いの詳細を保存する際、お客様は適用されるすべての法律、規制、ネットワークの規則に準拠する責任があります。将来の購入に備えて顧客に過去の決済手段を提供する際は、必ず、特定の将来の使用に備えて決済手段の詳細を保存することについての同意を顧客から収集した決済手段をリストアップします。顧客に関連付けられた決済手段のうち、将来の購入用の保存済みの決済手段として顧客に提示できるものと提示できないものを区別するには、allow_redisplay パラメーターを使用します。
購入者にオフセッションで請求する準備ができたら、Customer ID と PaymentMethod ID を使用して、PaymentIntent を作成します。請求する決済手段を見つけるには、顧客に関連付けられた決済手段を一覧表示します。この例ではカードが一覧表示されますが、サポートされているすべてのタイプを一覧表示できます。
Customer ID と PaymentMethod ID を取得したら、支払いの金額と通貨を使用して PaymentIntent を作成します。その他のいくつかのパラメーターを設定して、オフセッションの支払いを行います。
- off_session を
trueに設定して、支払いの試行時に購入者が決済フローを実行中でないことと、カード発行会社、銀行、その他の決済機関などのパートナーからの認証リクエストに対応できないことを示します。決済フローの実行時にパートナーが認証をリクエストした場合、Stripe は前回のオンセッション取引の顧客情報を使用して免除をリクエストします。免除の条件を満していない場合は PaymentIntent からエラーが返されることがあります。 - PaymentIntent の confirm プロパティの値を
trueに設定します。これにより、PaymentIntent が作成されると直ちに確定されます。 - payment_method を PaymentMethod の ID に設定し、customer を Customer の ID に設定します。
支払いが失敗すると、リクエストも 402 HTTP ステータスコードで失敗し、PaymentIntent のステータスが requires_payment_method になります。アプリケーションに戻って支払いを完了するよう (メールやアプリ内通知を送信するなどして) 顧客に通知する必要があります。
Stripe API ライブラリから発生したエラーのコードを確認します。支払いが authentication_required 拒否コードで失敗した場合には、拒否された PaymentIntent の client secret を confirmPayment とともに使用し、顧客が支払いを認証できるようにします。
const form = document.getElementById('payment-form');

form.addEventListener('submit', async (event) => {
  event.preventDefault();

  const {error} = await stripe.confirmPayment({
    // The client secret of the PaymentIntent
    clientSecret,
    confirmParams: {
      return_url: 'https://example.com/order/123/complete',
    },
  });

  if (error) {
    // This point will only be reached if there is an immediate error when
    // confirming the payment. Show error to your customer (for example, payment
    // details incomplete)
    const messageContainer = document.querySelector('#error-message');
    messageContainer.textContent = error.message;
  } else {
    // Your customer will be redirected to your `return_url`. For some payment
    // methods like iDEAL, your customer will be redirected to an intermediate
    // site first to authorize the payment, then redirected to the `return_url`.
  }
});
注
stripe. の完了には数秒かかる場合があります。この間、フォームが再送信されないように無効化し、スピナーのような待機中のインジケーターを表示します。エラーが発生した場合は、それを顧客に表示し、フォームを再度有効化し、待機中のインジケーターを非表示にします。支払いの完了のために顧客による認証などの追加の手順が必要な場合は、Stripe.js がそのプロセスをステップごとに顧客に提示します。
利用可能額不足など、他の理由で支払いが失敗した場合、新しい支払い方法を入力する支払いページを顧客に送信します。既存の PaymentIntent を再利用し、新しい支払いの詳細を利用して支払いを再試行できます。