# Finalise payments on the server
Build an integration where you render the Payment Element before you create a PaymentIntent or SetupIntent, then confirm the Intent from your server.
# Accept a payment
> This is a Accept a payment for when platform is web and type is payment. View the full page at https://docs.stripe.com/payments/finalize-payments-on-the-server?platform=web&type=payment.
> #### Use the Accounts v2 API to represent customers
>
> If your integration uses [customer-configured Accounts](https://docs.stripe.com/api/v2/core/accounts/create.md#v2_create_accounts-configuration-customer), replace `Customer` and event references in the code examples with the equivalent Accounts v2 API references. For more information, see [Represent customers with Account objects](https://docs.stripe.com/connect/use-accounts-as-customers.md).
The Payment Element allows you to accept multiple payment methods using a single integration. This integration builds a custom payment flow where you render the Payment Element, create the *PaymentIntent* (The Payment Intents API tracks the lifecycle of a customer checkout flow and triggers additional authentication steps when required by regulatory mandates, custom Radar fraud rules, or redirect-based payment methods), and confirm the payment from your server.
## Set up Stripe [Server-side]
First, [create a Stripe account](https://dashboard.stripe.com/register) or [sign in](https://dashboard.stripe.com/login).
Use our official libraries to access the Stripe API from your application:
#### Ruby
```bash
# Available as a gem
sudo gem install stripe
```
```ruby
# If you use bundler, you can add this line to your Gemfile
gem 'stripe'
```
## Enable payment methods
> This integration path doesn’t support BLIK or pre-authorised debits that use the Automated Clearing Settlement System (ACSS). You also can’t use `customer_balance` with dynamic payment methods when the deferred intent is created client-side. The client-side deferred-intent flow can’t include a [Customer](https://docs.stripe.com/api/customers/object.md) and `customer_balance` requires a `Customer` on the [PaymentIntent](https://docs.stripe.com/api/payment_intents.md), so it’s excluded to avoid errors. To use `customer_balance`, create the `PaymentIntent` server-side with a `Customer` and return its `client_secret` to the client.
View your [payment methods settings](https://dashboard.stripe.com/settings/payment_methods) and enable the payment methods you want to support. You need at least one payment method enabled to create a *PaymentIntent* (The Payment Intents API tracks the lifecycle of a customer checkout flow and triggers additional authentication steps when required by regulatory mandates, custom Radar fraud rules, or redirect-based payment methods).
By default, Stripe enables cards and other prevalent payment methods that can help you reach more customers, but we recommend turning on additional payment methods that are relevant for your business and customers. See [Payment method support](https://docs.stripe.com/payments/payment-methods/payment-method-support.md) for product and payment method support, and our [pricing page](https://stripe.com/pricing/local-payment-methods) for fees.
## Collect payment details [Client-side]
Use the [Payment Element](https://docs.stripe.com/payments/payment-element.md) to securely send payment information collected in an iFrame to Stripe over an HTTPS connection.
> #### Conflicting iFrames
>
> Avoid placing the Payment Element within another iframe because it conflicts with payment methods that require redirecting to another page for payment confirmation.
Your checkout page URL must start with `https://` rather than `http://` for your integration to work. You can test your integration without using HTTPS, but remember to [enable it](https://docs.stripe.com/security/guide.md#tls) when you’re ready to accept live payments.
#### HTML + JS
### Set up Stripe.js
The Payment Element is automatically available as a feature of Stripe.js. Include the Stripe.js script on your checkout page by adding it to the `head` of your HTML file. Always load Stripe.js directly from js.stripe.com to remain PCI compliant. Don’t include the script in a bundle or host a copy of it yourself.
```html
Checkout
```
Create an instance of Stripe with the following JavaScript on your checkout page:
```javascript
// Set your publishable key: remember to change this to your live publishable key in production
// See your keys here: https://dashboard.stripe.com/apikeys
const stripe = Stripe('<>');
```
### Add the Payment Element to your checkout page
The Payment Element needs a place to live on your checkout page. Create an empty DOM node (container) with a unique ID in your payment form:
```html
```
After your form loads, create an Elements instance with the mode, amount, and currency. These values determine which payment methods the Element presents to your customer.
Then, create an instance of the Payment Element and mount it to the container DOM node.
```javascript
const options = {mode:'payment',
amount: 1099,
currency: 'usd',paymentMethodCreation: 'manual',
// Fully customizable with appearance API.
appearance: {/*...*/},
};
// Set up Stripe.js and Elements to use in checkout formconst elements = stripe.elements(options);
// Create and mount the Payment Element
const paymentElementOptions = { layout: 'accordion'};
const paymentElement = elements.create('payment', paymentElementOptions);
paymentElement.mount('#payment-element');
```
#### React
### Set up Stripe.js
Install [React Stripe.js](https://www.npmjs.com/package/@stripe/react-stripe-js) and the [Stripe.js loader](https://www.npmjs.com/package/@stripe/stripe-js) from the npm public registry.
```bash
npm install --save @stripe/react-stripe-js @stripe/stripe-js
```
### Add and configure the Elements provider to your checkout page
To use the Payment Element component, wrap your checkout page component in an [Elements provider](https://docs.stripe.com/sdks/stripejs-react.md#elements-provider). Call `loadStripe` with your publishable key, and pass the returned `Promise` to the `Elements` provider.
The `Elements` provider also accepts the mode, amount, and currency. These values determine which payment methods are shown to your customer.
```jsx
import React from 'react';
import ReactDOM from 'react-dom';
import {Elements} from '@stripe/react-stripe-js';
import {loadStripe} from '@stripe/stripe-js';
import CheckoutForm from './CheckoutForm';
// Make sure to call `loadStripe` outside of a component’s render to avoid
// recreating the `Stripe` object on every render.
const stripePromise = loadStripe('<>');
function App() {
const options = {mode:'payment',
amount: 1099,
currency: 'usd',paymentMethodCreation: 'manual',
// Fully customizable with appearance API.
appearance: {/*...*/},
};
return (
);
};
ReactDOM.render(, document.getElementById('root'));
```
### Add the Payment Element component
Use the `PaymentElement` component to build your form.
```jsx
import React from 'react';
import {PaymentElement} from '@stripe/react-stripe-js';
const CheckoutForm = () => {
return (
);
};
export default CheckoutForm;
```
The Payment Element renders a dynamic form that allows your customer to pick a payment method. The form automatically collects all necessary payments details for the payment method selected by the customer.
You can customise the Payment Element to match the design of your site by passing the [appearance object](https://docs.stripe.com/elements/appearance-api.md) into `options` when creating the `Elements` provider.
### Collect addresses
By default, the Payment Element only collects the necessary billing address details. Some behaviour, such as [calculating tax](https://docs.stripe.com/api/tax/calculations/create.md) or entering shipping details, requires your customer’s full address. You can:
- Use the [Address Element](https://docs.stripe.com/elements/address-element.md) to take advantage of autocomplete and localisation features to collect your customer’s full address. This helps ensure the most accurate tax calculation.
- Collect address details using your own custom form.
## Optional: Customise the layout [Client-side]
You can customise the Payment Element’s layout (accordion or tabs) to fit your checkout interface. For more information about each of the properties, see [elements.create](https://docs.stripe.com/js/elements_object/create_payment_element#payment_element_create-options).
#### Accordion
You can start using the layout features by passing a layout `type` and other optional properties when creating the Payment Element:
```javascript
const paymentElement = elements.create('payment', {
layout: {
type: 'accordion',
defaultCollapsed: false,
radios: 'always',
spacedAccordionItems: false
}
});
```
#### Tabs
### Specify the layout
Set the value for layout to `tabs`. You also have the option to specify other properties, such as the ones in the following example:
```javascript
const paymentElement = elements.create('payment', {
layout: {
type: 'tabs',
defaultCollapsed: false,
}
});
```
The following image is the same Payment Element rendered using different layout configurations:
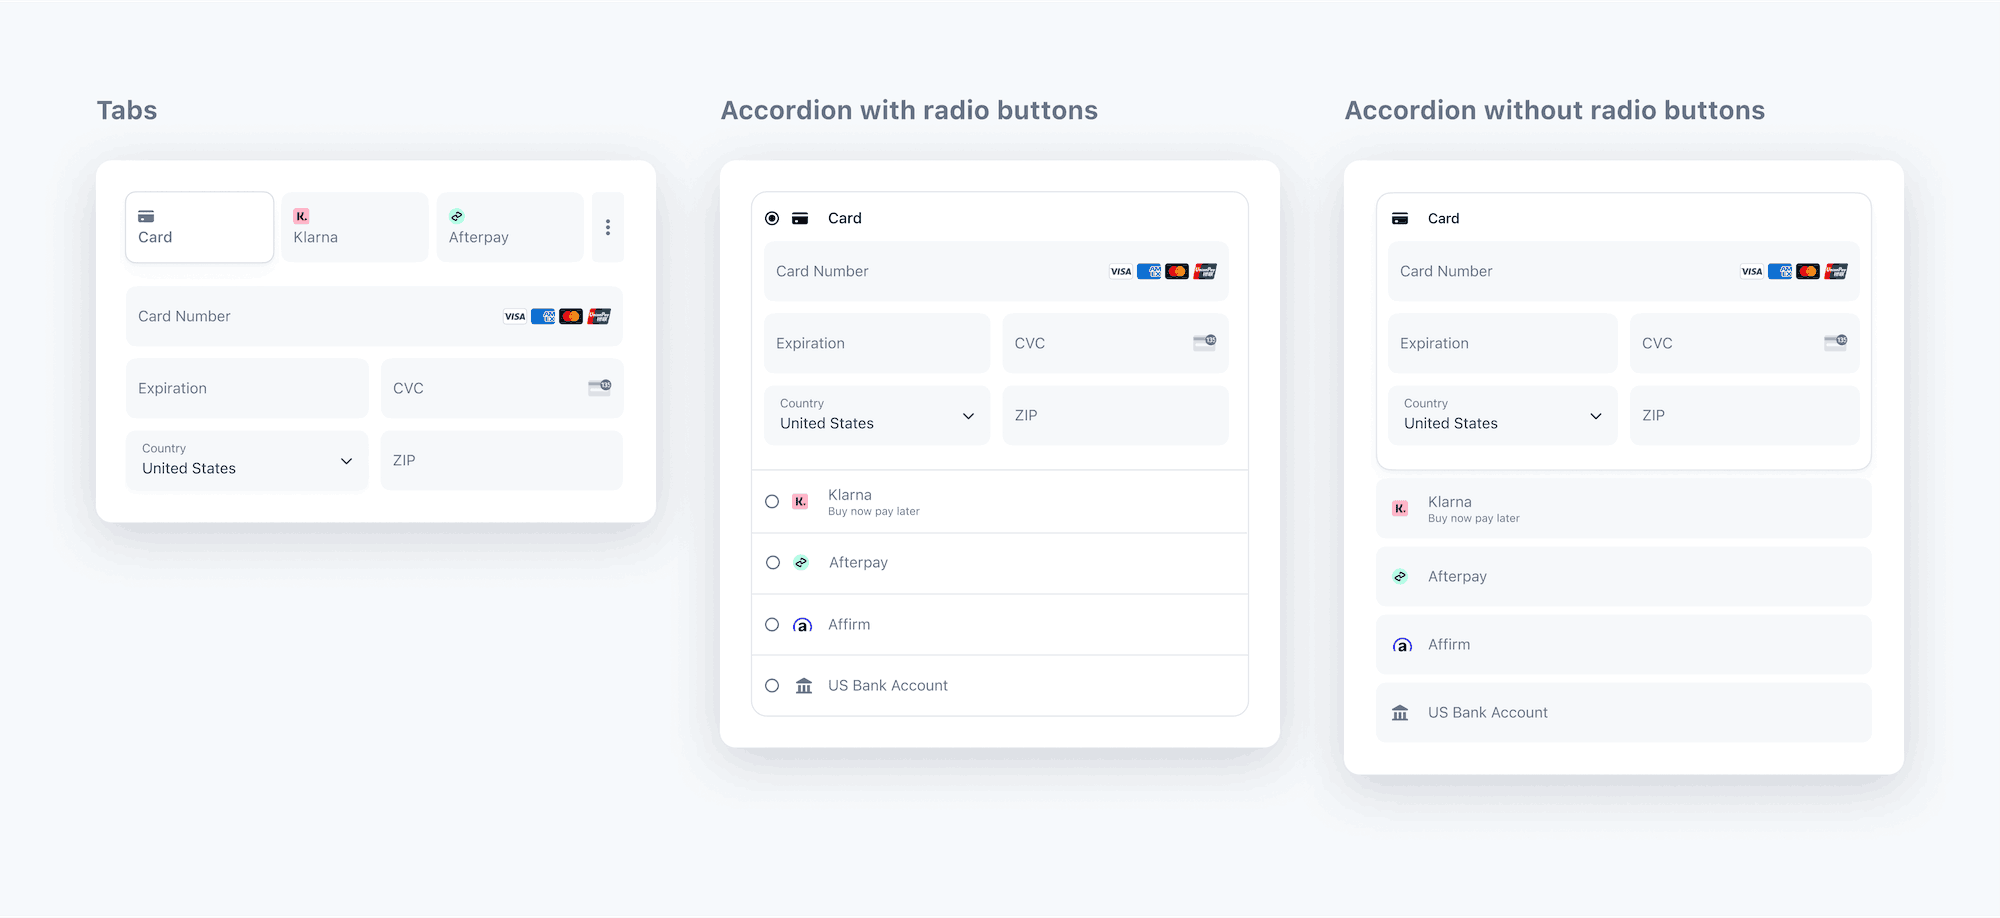
Payment Element layouts
## Optional: Customise the appearance [Client-side]
Now that you’ve added the Payment Element to your page, you can customise its appearance to make it fit your design. To learn more about customising the Payment Element, see [Elements Appearance API](https://docs.stripe.com/elements/appearance-api.md).
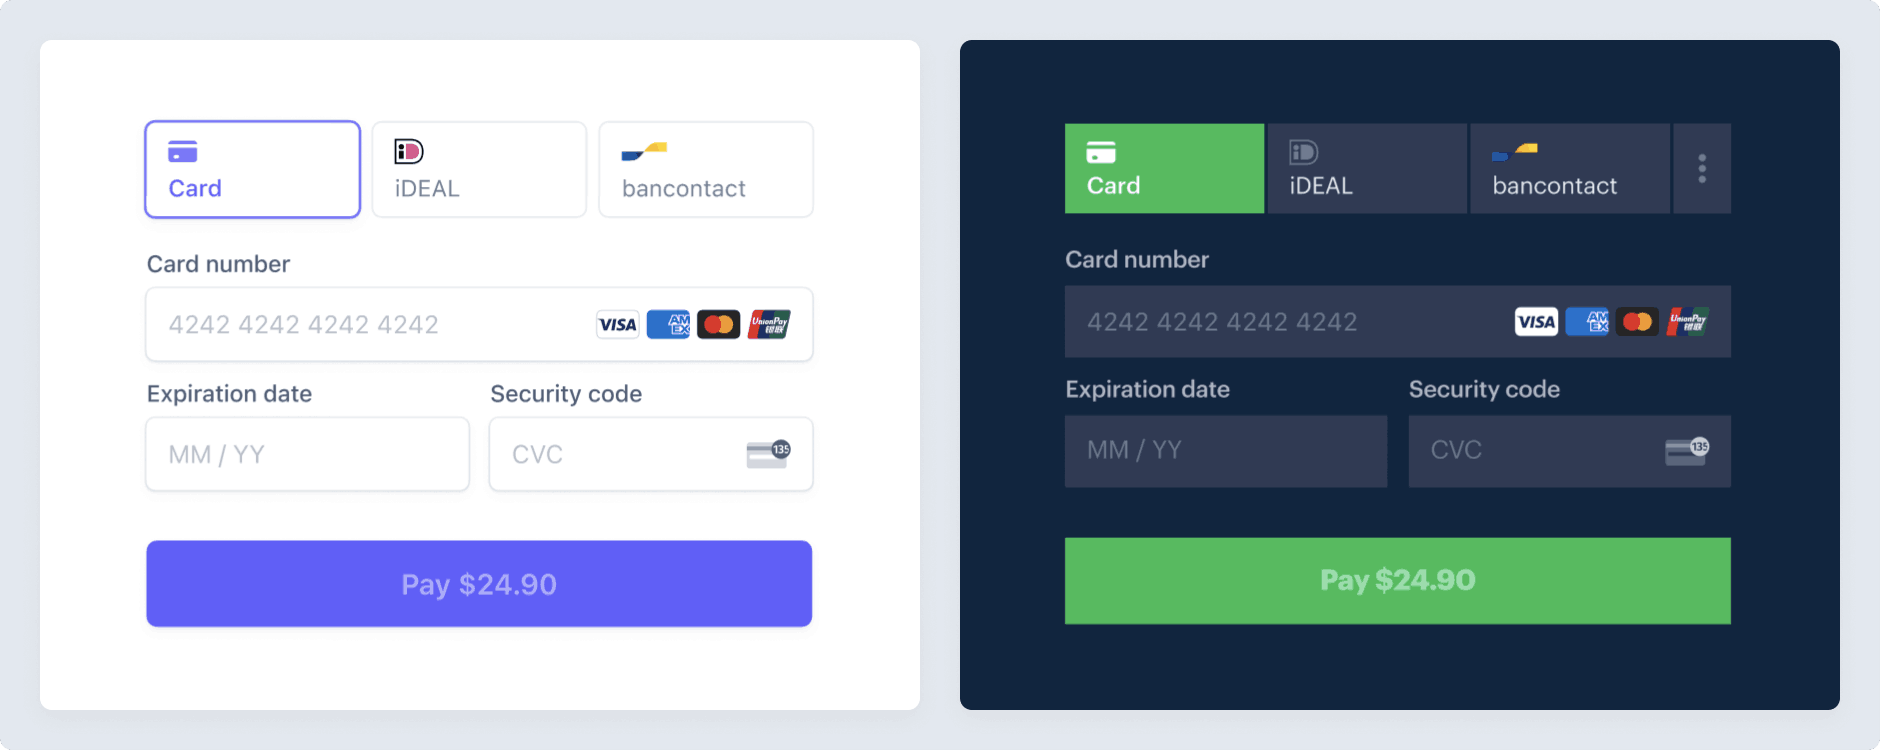
Customise the Payment Element
## Optional: Save and retrieve customer payment methods
You can configure the Payment Element to save your customer’s payment methods for future use. This section shows you how to integrate the [saved payment methods feature](https://docs.stripe.com/payments/save-customer-payment-methods.md), which enables the Payment Element to:
- Prompt buyers for consent to save a payment method
- Save payment methods when buyers provide consent
- Display saved payment methods to buyers for future purchases
- [Automatically update lost or expired cards](https://docs.stripe.com/payments/cards/overview.md#automatic-card-updates) when buyers replace them

Save payment methods.

Re-use a previously saved payment method.
### Enable saving the payment method in the Payment Element
Create a [CustomerSession](https://docs.stripe.com/api/customer_sessions/.md) on your server by providing the customer’s ID (using either `customer` for a `Customer` object or `customer_account` for a customer-configured `Account` object) and enabling the [payment_element](https://docs.stripe.com/api/customer_sessions/object.md#customer_session_object-components-payment_element) component for your session. Configure which saved payment method [features](https://docs.stripe.com/api/customer_sessions/create.md#create_customer_session-components-payment_element-features) you want to enable. For instance, enabling [payment_method_save](https://docs.stripe.com/api/customer_sessions/create.md#create_customer_session-components-payment_element-features-payment_method_save) displays a checkbox that allows customers to save their payment details for future use.
You can specify `setup_future_usage` on a PaymentIntent or Checkout Session to override the default behavior for saving payment methods. This ensures that you automatically save the payment method for future use, even if the customer doesn’t explicitly choose to save it. If you intend to specify `setup_future_usage`, don’t set `payment_method_save_usage` in the same payment transaction because this causes an integration error.
> #### Use the Accounts v2 API to represent customers
>
> The Accounts v2 API is GA for Connect users, and in public preview for other Stripe users. All Stripe users can enable Accounts v2 [in their Dashboard](https://dashboard.stripe.com/settings/connect/platform-setup). However, when making calls to the Accounts v2 API, preview users need to [specify a preview version](https://docs.stripe.com/api-v2-overview.md#sdk-and-api-versioning).
>
> For most use cases, we recommend [modelling your customers as customer-configured Account objects](https://docs.stripe.com/connect/use-accounts-as-customers.md) instead of using [Customer](https://docs.stripe.com/api/customers.md) objects.
#### Accounts v2
#### Ruby
```ruby
# Don't put any keys in code. See https://docs.stripe.com/keys-best-practices.
# Find your keys at https://dashboard.stripe.com/apikeys.
Stripe.api_key = '<>'
post '/create-customer-session' do
customer_session = Stripe::CustomerSession.create({
customer_account: {{CUSTOMER_ACCOUNT_ID}},
components: {
payment_element: {
enabled: true,
features: {
payment_method_redisplay: 'enabled',
payment_method_save: 'enabled',
payment_method_save_usage: 'off_session',
payment_method_remove: 'enabled',
},
},
},
})
{
customer_session_client_secret: customer_session.client_secret
}.to_json
end
```
#### Customers v1
#### Ruby
```ruby
# Don't put any keys in code. See https://docs.stripe.com/keys-best-practices.
# Find your keys at https://dashboard.stripe.com/apikeys.
Stripe.api_key = '<>'
post '/create-customer-session' do
customer_session = Stripe::CustomerSession.create({
customer: {{CUSTOMER_ID}},
components: {
payment_element: {
enabled: true,
features: {
payment_method_redisplay: 'enabled',
payment_method_save: 'enabled',
payment_method_save_usage: 'off_session',
payment_method_remove: 'enabled',
},
},
},
})
{
customer_session_client_secret: customer_session.client_secret
}.to_json
end
```
Your Elements instance uses the CustomerSession’s *client secret* (A client secret is used with your publishable key to authenticate a request for a single object. Each client secret is unique to the object it's associated with) to access that customer’s saved payment methods. [Handle errors](https://docs.stripe.com/error-handling.md) properly when you create the CustomerSession. If an error occurs, you don’t need to provide the CustomerSession client secret to the Elements instance, as it’s optional.
Create the Elements instance using the CustomerSession client secret. Then, use the Elements instance to create a Payment Element.
```javascript
// Create the CustomerSession and obtain its clientSecret
const res = await fetch("/create-customer-session", {
method: "POST"
});
const {
customer_session_client_secret: customerSessionClientSecret
} = await res.json();
const elementsOptions = {
mode: 'payment',
amount: 1099,
currency: 'usd',customerSessionClientSecret,
// Fully customizable with appearance API.
appearance: {/*...*/},
};
// Set up Stripe.js and Elements to use in checkout form, passing the client secret
// and CustomerSession's client secret obtained in a previous step
const elements = stripe.elements(elementsOptions);
// Create and mount the Payment Element
const paymentElementOptions = { layout: 'accordion'};
const paymentElement = elements.create('payment', paymentElementOptions);
paymentElement.mount('#payment-element');
```
> Allowing customers to remove their saved payment methods by enabling [payment_method_remove](https://docs.stripe.com/api/customer_sessions/create.md#create_customer_session-components-payment_element-features-payment_method_remove) impacts subscriptions that depend on that payment method. Removing the payment method detaches the [PaymentMethod](https://docs.stripe.com/api/payment_methods.md) from the object that represents the customer (either a customer-configured `Account` or a `Customer`).
When creating the ConfirmationToken, Stripe.js automatically controls setting [setup_future_usage](https://docs.stripe.com/api/confirmation_tokens/object.md#confirmation_token_object-setup_future_usage) on the ConfirmationToken and [allow_redisplay](https://docs.stripe.com/api/payment_methods/object.md#payment_method_object-allow_redisplay) on the PaymentMethod, depending on whether the customer ticked the box to save their payment details.
### Enforce CVC recollection
Optionally, specify `require_cvc_recollection` both [when creating the PaymentIntent](https://docs.stripe.com/api/payment_intents/create.md#create_payment_intent-payment_method_options-card-require_cvc_recollection) and [when creating Elements](https://docs.stripe.com/js/elements_object/create_without_intent#stripe_elements_no_intent-options-paymentMethodOptions-card-require_cvc_recollection) to enforce CVC recollection when a customer is paying with a card.
### Detect the selection of a saved payment method
To control dynamic content when a saved payment method is selected, listen to the Payment Element `change` event, which is populated with the selected payment method.
```javascript
paymentElement.on('change', function(event) {
if (event.value.payment_method) {
// Control dynamic content if a saved payment method is selected
}
})
```
## Optional: Dynamically update payment details [Client-side]
As the customer performs actions that change the payment details (for example, applying a discount code), update the Elements instance to reflect the new values. Some payment methods, like Apple Pay and Google Pay, show the amount in the UI, so make sure it’s always accurate and up to date.
#### HTML + JS
```js
async function handleDiscountCode(code) {
// On the server, validate that the discount code is valid and return the new amount
const {newAmount} = await fetch("/apply-discount", {
method: "POST",
headers: {"Content-Type": "application/json"},
body: JSON.stringify({code}),
});
elements.update({amount: newAmount});
}
```
#### React
```jsx
function App() {
const [amount, setAmount] = React.useState(1099);
const handleDiscountCode = useCallback(async (code) => {
// On the server, validate that the discount code is valid and return the new amount
const {newAmount} = await fetch("/apply-discount", {
method: "POST",
headers: {"Content-Type": "application/json"},
body: JSON.stringify({code}),
});
// Trigger a state change that re-renders the Elements provider with the new amount
setAmount(newAmount);
}, []);
const options = {
mode: 'payment',
amount,
currency: 'usd',
appearance: {/*...*/},
};
return (
);
};
```
## Optional: Additional Elements options [Client-side]
The [Elements object](https://docs.stripe.com/js/elements_object/create_without_intent) accepts additional options that influence payment collection. Based on the options provided, the Payment Element displays available payment methods from those you’ve enabled. Learn more about [payment method support](https://docs.stripe.com/payments/payment-methods/payment-method-support.md).
Make sure the Elements options you provide (such as `captureMethod`, `setupFutureUsage`, and `paymentMethodOptions`) match the equivalent parameters you pass when creating and confirming the Intent. Mismatched parameters can result in unexpected behaviour or errors.
| Property | Type | Description | Required |
| ---------------------------- | -------------------------------------------------- | --------------------------------------------------------------------------------------------------------------------------------------------------------------------------------------------------------------------------------------------------------------------------------------------------------------------------------------------------------------------------------------------------------------------------------------------------------------------------------------------------------------------------------------------------------------------------------------------------------------------------------------------------------------------------------------------------------------------------------------------------------------- | ------------------------------------- |
| `mode` | - `payment`
- `setup`
- `subscription` | Indicates whether the Payment Element is used with a *PaymentIntent* (The Payment Intents API tracks the lifecycle of a customer checkout flow and triggers additional authentication steps when required by regulatory mandates, custom Radar fraud rules, or redirect-based payment methods), *SetupIntent* (The Setup Intents API lets you build dynamic flows for collecting payment method details for future payments. It tracks the lifecycle of a payment setup flow and can trigger additional authentication steps if required by law or by the payment method), or *Subscription* (A Subscription represents the product details associated with the plan that your customer subscribes to. Allows you to charge the customer on a recurring basis). | Yes |
| `currency` | `string` | The currency of the amount to charge the customer. | Yes |
| `amount` | `number` | The amount to charge the customer, shown in Apple Pay, Google Pay, or BNPL UIs. | For `payment` and `subscription` mode |
| `setupFutureUsage` | - `off_session`
- `on_session` | Indicates that you intend to make future payments with the payment details collected by the Payment Element. | No |
| `captureMethod` | - `automatic`
- `automatic_async`
- `manual` | Controls when to capture the funds from the customer’s account. | No |
| `onBehalfOf` | `string` | Connect only. The Stripe account ID, which is the business of record. See [use cases](https://docs.stripe.com/connect/charges.md) to determine if this option is relevant for your integration. | No |
| `paymentMethodTypes` | `string[]` | A list of payment method types to render. You can omit this attribute to manage your payment methods in the [Stripe Dashboard](https://dashboard.stripe.com/settings/payment_methods). | No |
| `paymentMethodConfiguration` | `string` | The [payment method configuration](https://docs.stripe.com/api/payment_method_configurations.md) to use when managing your payment methods in the [Stripe Dashboard](https://dashboard.stripe.com/settings/payment_methods). If not specified, your default configuration is used. | No |
| `paymentMethodCreation` | `manual` | Allows PaymentMethods to be created from the Elements instance using [stripe.createPaymentMethod](https://docs.stripe.com/js/payment_methods/create_payment_method_elements). | No |
| `paymentMethodOptions` | `{us_bank_account: {verification_method: string}}` | Verification options for the `us_bank_account` payment method. Accepts the same verification methods as [Payment Intents](https://docs.stripe.com/api/payment_intents/create.md#create_payment_intent-payment_method_options-us_bank_account-verification_method). | No |
| `paymentMethodOptions` | `{card: {installments: {enabled: boolean}}}` | Allows manually enabling the card instalment plan selection UI if applicable when you aren’t managing your payment methods in the [Stripe Dashboard](https://dashboard.stripe.com/settings/payment_methods). You must set `mode='payment'` *and* explicitly specify `paymentMethodTypes`. Otherwise an error is raised. Incompatible with `paymentMethodCreation='manual'`. | No |
| `paymentMethodOptions` | `{[paymentMethod]: {setup_future_usage: string}}` | Allows you to specify `setup_future_usage` for only payment methods that support reuse. Only applicable when `mode` is `payment`. The value for each payment method must match the corresponding `payment_method_options[paymentMethod][setup_future_usage]` on the PaymentIntent during confirmation. See the [Stripe.js reference](https://docs.stripe.com/js/elements_object/create_without_intent#stripe_elements_no_intent-options-paymentMethodOptions) for supported payment methods and values. | No |
## Create the ConfirmationToken [Client-side]
> #### Use createPaymentMethod through a legacy implementation
>
> If you’re using a legacy implementation, you might be using the information from `stripe.createPaymentMethod` to finalise payments on the server. While we encourage you to follow this guide to [Migrate to Confirmation Tokens](https://docs.stripe.com/payments/payment-element/migration-ct.md) you can still access our old documentation to [Finalise payments on the server](https://docs.stripe.com/payments/finalize-payments-on-the-server-legacy.md)
When the customer submits your payment form, call [stripe.createConfirmationToken](https://docs.stripe.com/js/confirmation_tokens/create_confirmation_token) to create a *ConfirmationToken* (ConfirmationTokens help capture data from your client, such as your customer's payment instruments and shipping address, and are used to confirm a PaymentIntent or SetupIntent) to send to your server for additional validation or business logic before payment confirmation.
Confirming the PaymentIntent generates a *PaymentMethod* (PaymentMethods represent your customer's payment instruments, used with the Payment Intents or Setup Intents APIs). You can read the [payment_method](https://docs.stripe.com/api/payment_intents/object.md#payment_intent_object-payment_method) ID off the PaymentIntent confirmation response.
> You must immediately use the created ConfirmationToken to confirm a PaymentIntent; if unused, it expires after 12 hours.
#### HTML + JS
```javascript
const form = document.getElementById('payment-form');
const submitBtn = document.getElementById('submit');
const handleError = (error) => {
const messageContainer = document.querySelector('#error-message');
messageContainer.textContent = error.message;
submitBtn.disabled = false;
}
form.addEventListener('submit', async (event) => {
// We don't want to let default form submission happen here,
// which would refresh the page.
event.preventDefault();
// Prevent multiple form submissions
if (submitBtn.disabled) {
return;
}
// Disable form submission while loading
submitBtn.disabled = true;
// Trigger form validation and wallet collection
const {error: submitError} = await elements.submit();
if (submitError) {
handleError(submitError);
return;
}
// Create the ConfirmationToken using the details collected by the Payment Element
// and additional shipping information
const {error, confirmationToken} = await stripe.createConfirmationToken({
elements,
params: {
shipping: {
name: 'Jenny Rosen',
address: {
line1: '1234 Main Street',
city: 'San Francisco',
state: 'CA',
country: 'US',
postal_code: '94111',
},
},
return_url: 'https://example.com/order/123/complete'
}
});
if (error) {
// This point is only reached if there's an immediate error when
// creating the ConfirmationToken. Show the error to your customer (for example, payment details incomplete)
handleError(error);
return;
}
// Create the PaymentIntent
const res = await fetch("/create-confirm-intent", {
method: "POST",
headers: {"Content-Type": "application/json"},
body: JSON.stringify({
confirmationTokenId: confirmationToken.id,
}),
});
const data = await res.json();
// Handle any next actions or errors. See the Handle any next actions step for implementation.
handleServerResponse(data);
});
```
#### React
```jsx
import React, {useState} from 'react';
import {useStripe, useElements, PaymentElement} from '@stripe/react-stripe-js';
export default function CheckoutForm() {
const stripe = useStripe();
const elements = useElements();
const [errorMessage, setErrorMessage] = useState();
const [loading, setLoading] = useState(false);
const handleError = (error) => {
setLoading(false);
setErrorMessage(error.message);
}
const handleSubmit = async (event) => {
// We don't want to let default form submission happen here,
// which would refresh the page.
event.preventDefault();
if (!stripe) {
// Stripe.js hasn't yet loaded.
// Make sure to disable form submission until Stripe.js has loaded.
return;
}
setLoading(true);
// Trigger form validation and wallet collection
const {error: submitError} = await elements.submit();
if (submitError) {
handleError(submitError);
return;
}
// Create the ConfirmationToken using the details collected by the Payment Element
// and additional shipping information
const {error, confirmationToken} = await stripe.createConfirmationToken({
elements,
params: {
shipping: {
name: 'Jenny Rosen',
address: {
line1: '1234 Main Street',
city: 'San Francisco',
state: 'CA',
country: 'US',
postal_code: '94111',
},
}
}
});
if (error) {
// This point is only reached if there's an immediate error when
// creating the ConfirmationToken. Show the error to your customer (for example, payment details incomplete)
handleError(error);
return;
}
// Create the PaymentIntent
const res = await fetch("/create-confirm-intent", {
method: "POST",
headers: {"Content-Type": "application/json"},
body: JSON.stringify({
confirmationTokenId: confirmationToken.id,
}),
});
const data = await res.json();
// Handle any next actions or errors. See the Handle any next actions step for implementation.
handleServerResponse(data);
};
return (
);
}
```
## Optional: Insert custom business logic [Server-side]
Before creating and confirming the payment, you can run your custom business logic. Information about the customer’s payment details is available by looking at the [ConfirmationToken](https://docs.stripe.com/api/confirmation_tokens.md) you created. If you’re using the Stripe SDK, make sure your SDK is up-to-date to these versions:
- `stripe-php v13.15.0`
- `stripe-go v76.22.0`
- `stripe-ruby v10.13.0`
- `stripe-java v24.21.0`
- `stripe-node v14.22.0`
- `stripe-python v8.8.0`
- `stripe-dotnet v43.20.0`
## Create and submit the payment to Stripe [Server-side]
When the customer submits your payment form, use a *PaymentIntent* (The Payment Intents API tracks the lifecycle of a customer checkout flow and triggers additional authentication steps when required by regulatory mandates, custom Radar fraud rules, or redirect-based payment methods) to facilitate the confirmation and payment process. Create a PaymentIntent on your server with an `amount` and `currency` specified. In the latest version of the API, specifying the `automatic_payment_methods` parameter is optional because Stripe enables its functionality by default. You can manage payment methods from the [Dashboard](https://dashboard.stripe.com/settings/payment_methods). Stripe handles the return of eligible payment methods based on factors such as the transaction’s amount, currency, and payment flow. To prevent malicious customers from choosing their own prices, always decide how much to charge on the server-side (a trusted environment) and not the client.
You can use the ConfirmationToken sent by your client to create and confirm the PaymentIntent in a single request.
```javascript
const stripe = require("stripe")("<>");
const express = require('express');
const app = express();
app.set('trust proxy', true);
app.use(express.json());
app.use(express.static("."));
app.post('/create-confirm-intent', async (req, res) => {
try {
const intent = await stripe.paymentIntents.create({
confirm: true,
amount: 1099,
currency: 'usd',
// In the latest version of the API, specifying the `automatic_payment_methods` parameter is optional because Stripe enables its functionality by default.
automatic_payment_methods: {enabled: true},
confirmation_token: req.body.confirmationTokenId, // the ConfirmationToken ID sent by your client
});
res.json({
client_secret: intent.client_secret,
status: intent.status
});
} catch (err) {
res.json({
error: err
})
}
});
app.listen(3000, () => {
console.log('Running on port 3000');
});
```
## Handle any next actions [Client-side]
When the PaymentIntent requires additional action from the customer, such as authenticating with 3D Secure or redirecting to a different site, you need to trigger those actions. Use `stripe.handleNextAction` to trigger the UI for handling customer action and completing the payment.
#### JavaScript
```javascript
const handleServerResponse = async (response) => {
if (response.error) {
// Show error from server on payment form
} else if (response.status === "requires_action") {
// Use Stripe.js to handle the required next action
const {
error,
paymentIntent
} = await stripe.handleNextAction({
clientSecret: response.clientSecret
});
if (error) {
// Show error from Stripe.js in payment form
} else {
// Actions handled, show success message
}
} else {
// No actions needed, show success message
}
}
```
## Optional: Handle post-payment events
Stripe sends a [payment_intent.succeeded](https://docs.stripe.com/api/events/types.md#event_types-payment_intent.succeeded) event when the payment completes. Use the Dashboard, a custom *webhook* (A webhook is a real-time push notification sent to your application as a JSON payload through HTTPS requests), or a partner solution to receive these events and run actions, like sending an order confirmation email to your customer, logging the sale in a database, or starting a shipping workflow.
Listen for these events rather than waiting on a callback from the client. On the client, the customer could close the browser window or quit the app before the callback executes, and malicious clients could manipulate the response. Setting up your integration to listen for asynchronous events also helps you accept more payment methods in the future. Learn about the [differences between all supported payment methods](https://stripe.com/payments/payment-methods-guide).
- **Handle events manually in the Dashboard**
Use the Dashboard to [View your test payments in the Dashboard](https://dashboard.stripe.com/test/payments), send email receipts, handle payouts or retry failed payments.
- **Build a custom webhook**
[Build a custom webhook](https://docs.stripe.com/webhooks/handling-payment-events.md#build-your-own-webhook) handler to listen for events and build custom asynchronous payment flows. Test and debug your webhook integration locally with the Stripe CLI.
- **Integrate a prebuilt app**
Handle common business events, such as [automation](https://stripe.partners/?f_category=automation) or [marketing and sales](https://stripe.partners/?f_category=marketing-and-sales), by integrating a partner application.
# Set up a payment method
> This is a Set up a payment method for when platform is web and type is setup. View the full page at https://docs.stripe.com/payments/finalize-payments-on-the-server?platform=web&type=setup.
> #### Use the Accounts v2 API to represent customers
>
> If your integration uses [customer-configured Accounts](https://docs.stripe.com/api/v2/core/accounts/create.md#v2_create_accounts-configuration-customer), replace `Customer` and event references in the code examples with the equivalent Accounts v2 API references. For more information, see [Represent customers with Account objects](https://docs.stripe.com/connect/use-accounts-as-customers.md).
A setup flow allows you to set up a payment method for future payments without immediately charging your customer. This integration builds a custom payment flow where you render the Payment Element, create the *SetupIntent* (The Setup Intents API lets you build dynamic flows for collecting payment method details for future payments. It tracks the lifecycle of a payment setup flow and can trigger additional authentication steps if required by law or by the payment method), and confirm the setup from your server.
## Set up Stripe [Server-side]
First, [create a Stripe account](https://dashboard.stripe.com/register) or [sign in](https://dashboard.stripe.com/login).
Use our official libraries to access the Stripe API from your application:
#### Ruby
```bash
# Available as a gem
sudo gem install stripe
```
```ruby
# If you use bundler, you can add this line to your Gemfile
gem 'stripe'
```
## Enable payment methods
> This integration path doesn’t support BLIK or pre-authorised debits that use the Automated Clearing Settlement System (ACSS). You also can’t use `customer_balance` with dynamic payment methods when the deferred intent is created client-side. The client-side deferred-intent flow can’t include a [Customer](https://docs.stripe.com/api/customers/object.md) and `customer_balance` requires a `Customer` on the [PaymentIntent](https://docs.stripe.com/api/payment_intents.md), so it’s excluded to avoid errors. To use `customer_balance`, create the `PaymentIntent` server-side with a `Customer` and return its `client_secret` to the client.
View your [payment methods settings](https://dashboard.stripe.com/settings/payment_methods) and enable the payment methods you want to support. You need at least one payment method enabled to create a *SetupIntent* (The Setup Intents API lets you build dynamic flows for collecting payment method details for future payments. It tracks the lifecycle of a payment setup flow and can trigger additional authentication steps if required by law or by the payment method).
By default, Stripe enables cards and other prevalent payment methods that can help you reach more customers, but we recommend turning on additional payment methods that are relevant for your business and customers. See [Payment method support](https://docs.stripe.com/payments/payment-methods/payment-method-support.md) for product and payment method support, and our [pricing page](https://stripe.com/pricing/local-payment-methods) for fees.
## Collect payment details [Client-side]
Use the [Payment Element](https://docs.stripe.com/payments/payment-element.md) to securely send payment information collected in an iFrame to Stripe over an HTTPS connection.
> #### Conflicting iFrames
>
> Avoid placing the Payment Element within another iframe because it conflicts with payment methods that require redirecting to another page for payment confirmation.
Your checkout page URL must start with `https://` rather than `http://` for your integration to work. You can test your integration without using HTTPS, but remember to [enable it](https://docs.stripe.com/security/guide.md#tls) when you’re ready to accept live payments.
#### HTML + JS
### Set up Stripe.js
The Payment Element is automatically available as a feature of Stripe.js. Include the Stripe.js script on your checkout page by adding it to the `head` of your HTML file. Always load Stripe.js directly from js.stripe.com to remain PCI compliant. Don’t include the script in a bundle or host a copy of it yourself.
```html
Checkout
```
Create an instance of Stripe with the following JavaScript on your checkout page:
```javascript
// Set your publishable key: remember to change this to your live publishable key in production
// See your keys here: https://dashboard.stripe.com/apikeys
const stripe = Stripe('<>');
```
### Add the Payment Element to your checkout page
The Payment Element needs a place to live on your checkout page. Create an empty DOM node (container) with a unique ID in your payment form:
```html
```
After your form loads, create an Elements instance with the mode ‘setup’. Then, create an instance of the Payment Element and mount it to the container DOM node.
```javascript
const options = {mode: 'setup',
currency: 'usd',paymentMethodCreation: 'manual',
// Fully customizable with appearance API.
appearance: {/*...*/},
};
// Set up Stripe.js and Elements to use in checkout formconst elements = stripe.elements(options);
// Create and mount the Payment Element
const paymentElementOptions = { layout: 'accordion'};
const paymentElement = elements.create('payment', paymentElementOptions);
paymentElement.mount('#payment-element');
```
#### React
### Set up Stripe.js
Install [React Stripe.js](https://www.npmjs.com/package/@stripe/react-stripe-js) and the [Stripe.js loader](https://www.npmjs.com/package/@stripe/stripe-js) from the npm public registry.
```bash
npm install --save @stripe/react-stripe-js @stripe/stripe-js
```
### Add and configure the Elements provider to your checkout page
To use the Payment Element component, wrap your checkout page component in an [Elements provider](https://docs.stripe.com/sdks/stripejs-react.md#elements-provider). Call `loadStripe` with your publishable key, and pass the returned `Promise` to the `Elements` provider, as well as `mode: 'setup'`.
```jsx
import React from 'react';
import ReactDOM from 'react-dom';
import {Elements} from '@stripe/react-stripe-js';
import {loadStripe} from '@stripe/stripe-js';
import SetupForm from './SetupForm';
// Make sure to call `loadStripe` outside of a component’s render to avoid
// recreating the `Stripe` object on every render.
const stripePromise = loadStripe('<>');
function App() {
const options = {mode: 'setup',
currency: 'usd',paymentMethodCreation: 'manual',
// Fully customizable with appearance API.
appearance: {/*...*/},
};
return (
);
};
ReactDOM.render(, document.getElementById('root'));
```
### Add the Payment Element component
Use the `PaymentElement` component to build your form.
```jsx
import React from 'react';
import {PaymentElement} from '@stripe/react-stripe-js';
const SetupForm = () => {
return (
);
};
export default SetupForm;
```
The Payment Element renders a dynamic form that allows your customer to pick a payment method. The form automatically collects all necessary payments details for the payment method selected by the customer.
You can customise the Payment Element to match the design of your site by passing the [appearance object](https://docs.stripe.com/elements/appearance-api.md) into `options` when creating the `Elements` provider.
### Collect addresses
By default, the Payment Element only collects the necessary billing address details. Some behaviour, such as [calculating tax](https://docs.stripe.com/api/tax/calculations/create.md) or entering shipping details, requires your customer’s full address. You can:
- Use the [Address Element](https://docs.stripe.com/elements/address-element.md) to take advantage of autocomplete and localisation features to collect your customer’s full address. This helps ensure the most accurate tax calculation.
- Collect address details using your own custom form.
## Optional: Customise the layout [Client-side]
You can customise the Payment Element’s layout (accordion or tabs) to fit your checkout interface. For more information about each of the properties, see [elements.create](https://docs.stripe.com/js/elements_object/create_payment_element#payment_element_create-options).
#### Accordion
You can start using the layout features by passing a layout `type` and other optional properties when creating the Payment Element:
```javascript
const paymentElement = elements.create('payment', {
layout: {
type: 'accordion',
defaultCollapsed: false,
radios: 'always',
spacedAccordionItems: false
}
});
```
#### Tabs
### Specify the layout
Set the value for layout to `tabs`. You also have the option to specify other properties, such as the ones in the following example:
```javascript
const paymentElement = elements.create('payment', {
layout: {
type: 'tabs',
defaultCollapsed: false,
}
});
```
The following image is the same Payment Element rendered using different layout configurations:

Payment Element layouts
## Optional: Customise the appearance [Client-side]
Now that you’ve added the Payment Element to your page, you can customise its appearance to make it fit your design. To learn more about customising the Payment Element, see [Elements Appearance API](https://docs.stripe.com/elements/appearance-api.md).

Customise the Payment Element
## Optional: Save and retrieve customer payment methods
You can configure the Payment Element to save your customer’s payment methods for future use. This section shows you how to integrate the [saved payment methods feature](https://docs.stripe.com/payments/save-customer-payment-methods.md), which enables the Payment Element to:
- Prompt buyers for consent to save a payment method
- Save payment methods when buyers provide consent
- Display saved payment methods to buyers for future purchases
- [Automatically update lost or expired cards](https://docs.stripe.com/payments/cards/overview.md#automatic-card-updates) when buyers replace them

Save payment methods.

Re-use a previously saved payment method.
### Enable saving the payment method in the Payment Element
Create a [CustomerSession](https://docs.stripe.com/api/customer_sessions/.md) on your server by providing the customer’s ID (using either `customer` for a `Customer` object or `customer_account` for a customer-configured `Account` object) and enabling the [payment_element](https://docs.stripe.com/api/customer_sessions/object.md#customer_session_object-components-payment_element) component for your session. Configure which saved payment method [features](https://docs.stripe.com/api/customer_sessions/create.md#create_customer_session-components-payment_element-features) you want to enable. For instance, enabling [payment_method_save](https://docs.stripe.com/api/customer_sessions/create.md#create_customer_session-components-payment_element-features-payment_method_save) displays a checkbox that allows customers to save their payment details for future use.
You can specify `setup_future_usage` on a PaymentIntent or Checkout Session to override the default behavior for saving payment methods. This ensures that you automatically save the payment method for future use, even if the customer doesn’t explicitly choose to save it. If you intend to specify `setup_future_usage`, don’t set `payment_method_save_usage` in the same payment transaction because this causes an integration error.
> #### Use the Accounts v2 API to represent customers
>
> The Accounts v2 API is GA for Connect users, and in public preview for other Stripe users. All Stripe users can enable Accounts v2 [in their Dashboard](https://dashboard.stripe.com/settings/connect/platform-setup). However, when making calls to the Accounts v2 API, preview users need to [specify a preview version](https://docs.stripe.com/api-v2-overview.md#sdk-and-api-versioning).
>
> For most use cases, we recommend [modelling your customers as customer-configured Account objects](https://docs.stripe.com/connect/use-accounts-as-customers.md) instead of using [Customer](https://docs.stripe.com/api/customers.md) objects.
#### Accounts v2
#### Ruby
```ruby
# Don't put any keys in code. See https://docs.stripe.com/keys-best-practices.
# Find your keys at https://dashboard.stripe.com/apikeys.
Stripe.api_key = '<>'
post '/create-customer-session' do
customer_session = Stripe::CustomerSession.create({
customer_account: {{CUSTOMER_ACCOUNT_ID}},
components: {
payment_element: {
enabled: true,
features: {
payment_method_redisplay: 'enabled',
payment_method_save: 'enabled',
payment_method_save_usage: 'off_session',
payment_method_remove: 'enabled',
},
},
},
})
{
customer_session_client_secret: customer_session.client_secret
}.to_json
end
```
#### Customers v1
#### Ruby
```ruby
# Don't put any keys in code. See https://docs.stripe.com/keys-best-practices.
# Find your keys at https://dashboard.stripe.com/apikeys.
Stripe.api_key = '<>'
post '/create-customer-session' do
customer_session = Stripe::CustomerSession.create({
customer: {{CUSTOMER_ID}},
components: {
payment_element: {
enabled: true,
features: {
payment_method_redisplay: 'enabled',
payment_method_save: 'enabled',
payment_method_save_usage: 'off_session',
payment_method_remove: 'enabled',
},
},
},
})
{
customer_session_client_secret: customer_session.client_secret
}.to_json
end
```
Your Elements instance uses the CustomerSession’s *client secret* (A client secret is used with your publishable key to authenticate a request for a single object. Each client secret is unique to the object it's associated with) to access that customer’s saved payment methods. [Handle errors](https://docs.stripe.com/error-handling.md) properly when you create the CustomerSession. If an error occurs, you don’t need to provide the CustomerSession client secret to the Elements instance, as it’s optional.
Create the Elements instance using the CustomerSession client secret. Then, use the Elements instance to create a Payment Element.
```javascript
// Create the CustomerSession and obtain its clientSecret
const res = await fetch("/create-customer-session", {
method: "POST"
});
const {
customer_session_client_secret: customerSessionClientSecret
} = await res.json();
const elementsOptions = {
mode: 'setup',
currency: 'usd',customerSessionClientSecret,
// Fully customizable with appearance API.
appearance: {/*...*/},
};
// Set up Stripe.js and Elements to use in checkout form, passing the client secret
// and CustomerSession's client secret obtained in a previous step
const elements = stripe.elements(elementsOptions);
// Create and mount the Payment Element
const paymentElementOptions = { layout: 'accordion'};
const paymentElement = elements.create('payment', paymentElementOptions);
paymentElement.mount('#payment-element');
```
> Allowing customers to remove their saved payment methods by enabling [payment_method_remove](https://docs.stripe.com/api/customer_sessions/create.md#create_customer_session-components-payment_element-features-payment_method_remove) impacts subscriptions that depend on that payment method. Removing the payment method detaches the [PaymentMethod](https://docs.stripe.com/api/payment_methods.md) from the object that represents the customer (either a customer-configured `Account` or a `Customer`).
When creating the ConfirmationToken, Stripe.js automatically controls setting [setup_future_usage](https://docs.stripe.com/api/confirmation_tokens/object.md#confirmation_token_object-setup_future_usage) on the ConfirmationToken and [allow_redisplay](https://docs.stripe.com/api/payment_methods/object.md#payment_method_object-allow_redisplay) on the PaymentMethod, depending on whether the customer ticked the box to save their payment details.
### Detect the selection of a saved payment method
To control dynamic content when a saved payment method is selected, listen to the Payment Element `change` event, which is populated with the selected payment method.
```javascript
paymentElement.on('change', function(event) {
if (event.value.payment_method) {
// Control dynamic content if a saved payment method is selected
}
})
```
## Optional: Additional Elements options [Client-side]
The [Elements object](https://docs.stripe.com/js/elements_object/create_without_intent) accepts additional options that influence payment collection. Based on the options provided, the Payment Element displays available payment methods from those you’ve enabled. Learn more about [payment method support](https://docs.stripe.com/payments/payment-methods/payment-method-support.md).
Make sure the Elements options you provide (such as `captureMethod`, `setupFutureUsage`, and `paymentMethodOptions`) match the equivalent parameters you pass when creating and confirming the Intent. Mismatched parameters can result in unexpected behaviour or errors.
| Property | Type | Description | Required |
| ---------------------------- | -------------------------------------------------- | --------------------------------------------------------------------------------------------------------------------------------------------------------------------------------------------------------------------------------------------------------------------------------------------------------------------------------------------------------------------------------------------------------------------------------------------------------------------------------------------------------------------------------------------------------------------------------------------------------------------------------------------------------------------------------------------------------------------------------------------------------------- | ------------------------------------- |
| `mode` | - `payment`
- `setup`
- `subscription` | Indicates whether the Payment Element is used with a *PaymentIntent* (The Payment Intents API tracks the lifecycle of a customer checkout flow and triggers additional authentication steps when required by regulatory mandates, custom Radar fraud rules, or redirect-based payment methods), *SetupIntent* (The Setup Intents API lets you build dynamic flows for collecting payment method details for future payments. It tracks the lifecycle of a payment setup flow and can trigger additional authentication steps if required by law or by the payment method), or *Subscription* (A Subscription represents the product details associated with the plan that your customer subscribes to. Allows you to charge the customer on a recurring basis). | Yes |
| `currency` | `string` | The currency of the amount to charge the customer. | Yes |
| `amount` | `number` | The amount to charge the customer, shown in Apple Pay, Google Pay, or BNPL UIs. | For `payment` and `subscription` mode |
| `setupFutureUsage` | - `off_session`
- `on_session` | Indicates that you intend to make future payments with the payment details collected by the Payment Element. | No |
| `captureMethod` | - `automatic`
- `automatic_async`
- `manual` | Controls when to capture the funds from the customer’s account. | No |
| `onBehalfOf` | `string` | Connect only. The Stripe account ID, which is the business of record. See [use cases](https://docs.stripe.com/connect/charges.md) to determine if this option is relevant for your integration. | No |
| `paymentMethodTypes` | `string[]` | A list of payment method types to render. You can omit this attribute to manage your payment methods in the [Stripe Dashboard](https://dashboard.stripe.com/settings/payment_methods). | No |
| `paymentMethodConfiguration` | `string` | The [payment method configuration](https://docs.stripe.com/api/payment_method_configurations.md) to use when managing your payment methods in the [Stripe Dashboard](https://dashboard.stripe.com/settings/payment_methods). If not specified, your default configuration is used. | No |
| `paymentMethodCreation` | `manual` | Allows PaymentMethods to be created from the Elements instance using [stripe.createPaymentMethod](https://docs.stripe.com/js/payment_methods/create_payment_method_elements). | No |
| `paymentMethodOptions` | `{us_bank_account: {verification_method: string}}` | Verification options for the `us_bank_account` payment method. Accepts the same verification methods as [Payment Intents](https://docs.stripe.com/api/payment_intents/create.md#create_payment_intent-payment_method_options-us_bank_account-verification_method). | No |
| `paymentMethodOptions` | `{card: {installments: {enabled: boolean}}}` | Allows manually enabling the card instalment plan selection UI if applicable when you aren’t managing your payment methods in the [Stripe Dashboard](https://dashboard.stripe.com/settings/payment_methods). You must set `mode='payment'` *and* explicitly specify `paymentMethodTypes`. Otherwise an error is raised. Incompatible with `paymentMethodCreation='manual'`. | No |
| `paymentMethodOptions` | `{[paymentMethod]: {setup_future_usage: string}}` | Allows you to specify `setup_future_usage` for only payment methods that support reuse. Only applicable when `mode` is `payment`. The value for each payment method must match the corresponding `payment_method_options[paymentMethod][setup_future_usage]` on the PaymentIntent during confirmation. See the [Stripe.js reference](https://docs.stripe.com/js/elements_object/create_without_intent#stripe_elements_no_intent-options-paymentMethodOptions) for supported payment methods and values. | No |
## Create a Customer [Server-side]
To set up a payment method for future payments, you must attach it to an object that represents your customer. When your customer creates an account or has their first transaction with your business, create either a customer-configured [Account](https://docs.stripe.com/api/v2/core/accounts/create.md) object with the Accounts v2 API or a [Customer](https://docs.stripe.com/api/customers/create.md) object with the Customers API.
> #### Use the Accounts v2 API to represent customers
>
> The Accounts v2 API is GA for Connect users, and in public preview for other Stripe users. All Stripe users can enable Accounts v2 [in their Dashboard](https://dashboard.stripe.com/settings/connect/platform-setup). However, when making calls to the Accounts v2 API, preview users need to [specify a preview version](https://docs.stripe.com/api-v2-overview.md#sdk-and-api-versioning).
>
> For most use cases, we recommend [modelling your customers as customer-configured Account objects](https://docs.stripe.com/connect/use-accounts-as-customers.md) instead of using [Customer](https://docs.stripe.com/api/customers.md) objects.
```curl
curl -X POST https://api.stripe.com/v1/customers \
-u "<>:"
```
## Create the ConfirmationToken [Client-side]
> #### Use createPaymentMethod through a legacy implementation
>
> If you’re using a legacy implementation, you might be using the information from `stripe.createPaymentMethod` to finalise payments on the server. While we encourage you to follow this guide to [Migrate to Confirmation Tokens](https://docs.stripe.com/payments/payment-element/migration-ct.md) you can still access our old documentation to [Finalise payments on the server](https://docs.stripe.com/payments/finalize-payments-on-the-server-legacy.md)
When the customer submits your payment form, call [stripe.createConfirmationToken](https://docs.stripe.com/js/confirmation_tokens/create_confirmation_token) to create a *ConfirmationToken* (ConfirmationTokens help capture data from your client, such as your customer's payment instruments and shipping address, and are used to confirm a PaymentIntent or SetupIntent) to send to your server for additional validation or business logic before payment confirmation.
Confirming the SetupIntent generates a *PaymentMethod* (PaymentMethods represent your customer's payment instruments, used with the Payment Intents or Setup Intents APIs). You can read the [payment_method](https://docs.stripe.com/api/setup_intents/object.md#setup_intent_object-payment_method) ID off the SetupIntent confirmation response.
> You must immediately use the created ConfirmationToken to confirm a SetupIntent ; if unused, it expires after 12 hours.
#### HTML + JS
```javascript
const form = document.getElementById('payment-form');
const submitBtn = document.getElementById('submit');
const handleError = (error) => {
const messageContainer = document.querySelector('#error-message');
messageContainer.textContent = error.message;
submitBtn.disabled = false;
}
form.addEventListener('submit', async (event) => {
// We don't want to let default form submission happen here,
// which would refresh the page.
event.preventDefault();
// Prevent multiple form submissions
if (submitBtn.disabled) {
return;
}
// Disable form submission while loading
submitBtn.disabled = true;
// Trigger form validation and wallet collection
const {error: submitError} = await elements.submit();
if (submitError) {
handleError(submitError);
return;
}
// Create the ConfirmationToken using the details collected by the Payment Element
// and additional shipping information
const {error, confirmationToken} = await stripe.createConfirmationToken({
elements,
params: {
return_url: 'https://example.com/order/123/complete'
}
});
if (error) {
// This point is only reached if there's an immediate error when
// creating the ConfirmationToken. Show the error to your customer (for example, payment details incomplete)
handleError(error);
return;
}
// Create the SetupIntent
const res = await fetch("/create-confirm-intent", {
method: "POST",
headers: {"Content-Type": "application/json"},
body: JSON.stringify({
confirmationTokenId: confirmationToken.id,
}),
});
const data = await res.json();
// Handle any next actions or errors. See the Handle any next actions step for implementation.
handleServerResponse(data);
});
```
#### React
```jsx
import React, {useState} from 'react';
import {useStripe, useElements, PaymentElement} from '@stripe/react-stripe-js';
export default function CheckoutForm() {
const stripe = useStripe();
const elements = useElements();
const [errorMessage, setErrorMessage] = useState();
const [loading, setLoading] = useState(false);
const handleError = (error) => {
setLoading(false);
setErrorMessage(error.message);
}
const handleSubmit = async (event) => {
// We don't want to let default form submission happen here,
// which would refresh the page.
event.preventDefault();
if (!stripe) {
// Stripe.js hasn't yet loaded.
// Make sure to disable form submission until Stripe.js has loaded.
return;
}
setLoading(true);
// Trigger form validation and wallet collection
const {error: submitError} = await elements.submit();
if (submitError) {
handleError(submitError);
return;
}
// Create the ConfirmationToken using the details collected by the Payment Element
// and additional shipping information
const {error, confirmationToken} = await stripe.createConfirmationToken({
elements,
params: {
shipping: {
name: 'Jenny Rosen',
address: {
line1: '1234 Main Street',
city: 'San Francisco',
state: 'CA',
country: 'US',
postal_code: '94111',
},
}
}
});
if (error) {
// This point is only reached if there's an immediate error when
// creating the ConfirmationToken. Show the error to your customer (for example, payment details incomplete)
handleError(error);
return;
}
// Create the SetupIntent
const res = await fetch("/create-confirm-intent", {
method: "POST",
headers: {"Content-Type": "application/json"},
body: JSON.stringify({
confirmationTokenId: confirmationToken.id,
}),
});
const data = await res.json();
// Handle any next actions or errors. See the Handle any next actions step for implementation.
handleServerResponse(data);
};
return (
);
}
```
## Submit the payment details to Stripe [Server-side]
When the customer submits your payment form, create a *SetupIntent* (The Setup Intents API lets you build dynamic flows for collecting payment method details for future payments. It tracks the lifecycle of a payment setup flow and can trigger additional authentication steps if required by law or by the payment method) on your server. You can manage payment methods from the [Dashboard](https://dashboard.stripe.com/settings/payment_methods). Stripe handles the return of eligible payment methods based on factors such as the transaction’s amount, currency, and payment flow.
You can use the PaymentMethod sent by your client to create and confirm the SetupIntent in a single request.
```javascript
const stripe = require('stripe')('<>');
const express = require('express');
const app = express();
app.set('trust proxy', true);
app.use(express.json());
app.use(express.static("."));
app.post('/create-confirm-intent', async (req, res) => {
try {
const intent = await stripe.setupIntents.create({
confirm: true,
customer: req.cookies['customer'], // the Customer ID you previously created
// In the latest version of the API, specifying the `automatic_payment_methods` parameter is optional because Stripe enables its functionality by default.
automatic_payment_methods: {enabled: true},
confirmation_token: req.body.confirmationTokenId
});
res.json({
client_secret: intent.client_secret,
status: intent.status
});
} catch (err) {
res.json({
error: err
})
}
});
app.listen(3000, () => {
console.log('Running on port 3000');
});
```
## Handle any next actions [Client-side]
When the SetupIntent requires additional action from the customer, such as authenticating with 3D Secure or redirecting to a different site, you need to trigger those actions. Use `stripe.handleNextAction` to trigger the UI for handling customer action and completing the setup.
#### JavaScript
```javascript
const handleServerResponse = async (response) => {
if (response.error) {
// Show error from server in payment setup form
} else if (response.status === "requires_action") {
// Use Stripe.js to handle the required next action
const {
error,
setupIntent
} = await stripe.handleNextAction({
clientSecret: response.clientSecret
});
if (error) {
// Show error from Stripe.js in payment setup form
} else {
// Actions handled, show success message
}
} else {
// No actions needed, show success message
}
}
```
## Charge the saved payment method later [Server-side]
> `bancontact` and `ideal` are one-off payment methods by default. When set up for future usage, they generate a `sepa_debit` reusable payment method type, so you need to use `sepa_debit` to query for saved payment methods.
> #### Compliance
>
> You’re responsible for your compliance with all applicable laws, regulations, and network rules when saving a customer’s payment details. When rendering past payment methods to your end customer for future purchases, make sure you’re listing payment methods where you’ve collected consent from the customer to save the payment method details for this specific future use. To differentiate between payment methods attached to customers who can and can’t be presented to your end customer as a saved payment method for future purchases, use the [allow_redisplay](https://docs.stripe.com/api/payment_methods/object.md#payment_method_object-allow_redisplay) parameter.
To find a payment method to charge, list the payment methods associated with your customer. This example lists cards but you can list any supported [type](https://docs.stripe.com/api/payment_methods/object.md#payment_method_object-type).
#### Accounts v2
```curl
curl -G https://api.stripe.com/v1/payment_methods \
-u "<>:" \
-d "customer_account={{CUSTOMERACCOUNT_ID}}" \
-d type=card
```
#### Customers v1
```curl
curl -G https://api.stripe.com/v1/payment_methods \
-u "<>:" \
-d "customer={{CUSTOMER_ID}}" \
-d type=card
```
When you’re ready to charge your customer *off-session* (A payment is described as off-session if it occurs without the direct involvement of the customer, using previously-collected payment information), use the customer’s ID and the `PaymentMethod` ID to create a `PaymentIntent` with the amount and currency of the payment. Set a few other parameters to make the off-session payment:
- Set [off_session](https://docs.stripe.com/api/payment_intents/confirm.md#confirm_payment_intent-off_session) to `true` to indicate that the customer isn’t in your checkout flow during a payment attempt and can’t fulfill an authentication request made by a partner, such as a card issuer, bank, or other payment institution. If, during your checkout flow, a partner requests authentication, Stripe requests exemptions using customer information from a previous *on-session* (A payment is described as on-session if it occurs while the customer is actively in your checkout flow and able to authenticate the payment method) transaction. If the conditions for exemption aren’t met, the `PaymentIntent` might throw an error.
- Set the value of the `PaymentIntent`’s [confirm](https://docs.stripe.com/api/payment_intents/create.md#create_payment_intent-confirm) property to true, which causes confirmation to occur immediately when the `PaymentIntent` is created.
- Set [payment_method](https://docs.stripe.com/api.md#create_payment_intent-payment_method) to the `PaymentMethod`’s ID.
- Depending on how you represent customers in your integration, set either [customer_account](https://docs.stripe.com/api/payment_intents/create.md#create_payment_intent-customer_account) to the ID of the customer-configured `Account` or [customer](https://docs.stripe.com/api.md#create_payment_intent-customer) to the ID of the `Customer`.
> #### Use the Accounts v2 API to represent customers
>
> The Accounts v2 API is GA for Connect users, and in public preview for other Stripe users. All Stripe users can enable Accounts v2 [in their Dashboard](https://dashboard.stripe.com/settings/connect/platform-setup). However, when making calls to the Accounts v2 API, preview users need to [specify a preview version](https://docs.stripe.com/api-v2-overview.md#sdk-and-api-versioning).
>
> For most use cases, we recommend [modelling your customers as customer-configured Account objects](https://docs.stripe.com/connect/use-accounts-as-customers.md) instead of using [Customer](https://docs.stripe.com/api/customers.md) objects.
#### Accounts v2
```curl
curl https://api.stripe.com/v1/payment_intents \
-u "<>:" \
-d amount=1099 \
-d currency=usd \
-d "automatic_payment_methods[enabled]=true" \
-d "customer_account={{CUSTOMERACCOUNT_ID}}" \
-d payment_method={{PAYMENT_METHOD_ID}} \
--data-urlencode "return_url=https://example.com/order/123/complete" \
-d off_session=true \
-d confirm=true
```
#### Customers v1
```curl
curl https://api.stripe.com/v1/payment_intents \
-u "<>:" \
-d amount=1099 \
-d currency=usd \
-d "automatic_payment_methods[enabled]=true" \
-d "customer={{CUSTOMER_ID}}" \
-d payment_method={{PAYMENT_METHOD_ID}} \
--data-urlencode "return_url=https://example.com/order/123/complete" \
-d off_session=true \
-d confirm=true
```
When a payment attempt fails, the request also fails with a 402 HTTP status code and the status of the PaymentIntent is *requires\_payment\_method* (This status appears as "requires_source" in API versions before 2019-02-11). You must notify your customer to return to your application to complete the payment (for example, by sending an email or in-app notification).
Check the code of the [error](https://docs.stripe.com/api/errors/handling.md) raised by the Stripe API library. If the payment failed due to an [authentication_required](https://docs.stripe.com/declines/codes.md) decline code, use the declined PaymentIntent’s client secret with confirmPayment to allow the customer to authenticate the payment.
```javascript
const form = document.getElementById('payment-form');
form.addEventListener('submit', async (event) => {
event.preventDefault();
const {error} = await stripe.confirmPayment({
// The client secret of the PaymentIntent
clientSecret,
confirmParams: {
return_url: 'https://example.com/order/123/complete',
},
});
if (error) {
// This point will only be reached if there is an immediate error when
// confirming the payment. Show error to your customer (for example, payment
// details incomplete)
const messageContainer = document.querySelector('#error-message');
messageContainer.textContent = error.message;
} else {
// Your customer will be redirected to your `return_url`. For some payment
// methods like iDEAL, your customer will be redirected to an intermediate
// site first to authorize the payment, then redirected to the `return_url`.
}
});
```
> `stripe.confirmPayment` can take several seconds to complete. During that time, disable your form from being resubmitted and show a waiting indicator like a spinner. If you receive an error, show it to the customer, re-enable the form, and hide the waiting indicator. If the customer must perform additional steps to complete the payment, such as authentication, Stripe.js walks them through that process.
If the payment failed for other reasons, such as insufficient funds, send your customer to a payment page to enter a new payment method. You can reuse the existing PaymentIntent to attempt the payment again with the new payment details.
# Create a subscription
> This is a Create a subscription for when platform is web and type is subscription. View the full page at https://docs.stripe.com/payments/finalize-payments-on-the-server?platform=web&type=subscription.
> #### Use the Accounts v2 API to represent customers
>
> If your integration uses [customer-configured Accounts](https://docs.stripe.com/api/v2/core/accounts/create.md#v2_create_accounts-configuration-customer), replace `Customer` and event references in the code examples with the equivalent Accounts v2 API references. For more information, see [Represent customers with Account objects](https://docs.stripe.com/connect/use-accounts-as-customers.md).
*Subscriptions* (A Subscription represents the product details associated with the plan that your customer subscribes to. Allows you to charge the customer on a recurring basis) is a pricing model where users make recurring payments to use a product. In this integration guide, build a custom payment flow where you render the Payment Element, create a Subscription, and confirm the Subscription from your server.
## Set up Stripe [Server-side]
First, [create a Stripe account](https://dashboard.stripe.com/register) or [sign in](https://dashboard.stripe.com/login).
Use our official libraries to access the Stripe API from your application:
#### Ruby
```bash
# Available as a gem
sudo gem install stripe
```
```ruby
# If you use bundler, you can add this line to your Gemfile
gem 'stripe'
```
## Enable payment methods
> This integration path doesn’t support BLIK or pre-authorised debits that use the Automated Clearing Settlement System (ACSS). You also can’t use `customer_balance` with dynamic payment methods when the deferred intent is created client-side. The client-side deferred-intent flow can’t include a [Customer](https://docs.stripe.com/api/customers/object.md) and `customer_balance` requires a `Customer` on the [PaymentIntent](https://docs.stripe.com/api/payment_intents.md), so it’s excluded to avoid errors. To use `customer_balance`, create the `PaymentIntent` server-side with a `Customer` and return its `client_secret` to the client.
View your [payment methods settings](https://dashboard.stripe.com/settings/payment_methods) and enable the payment methods you want to support. You need at least one payment method enabled to create a *PaymentIntent* (The Payment Intents API tracks the lifecycle of a customer checkout flow and triggers additional authentication steps when required by regulatory mandates, custom Radar fraud rules, or redirect-based payment methods).
By default, Stripe enables cards and other prevalent payment methods that can help you reach more customers, but we recommend turning on additional payment methods that are relevant for your business and customers. See [Payment method support](https://docs.stripe.com/payments/payment-methods/payment-method-support.md) for product and payment method support, and our [pricing page](https://stripe.com/pricing/local-payment-methods) for fees.
For Subscriptions, configure your [invoice settings](https://dashboard.stripe.com/settings/billing/invoice) and supported payment methods. To prevent mismatches and errors, your invoice settings must match your Payment Element settings.
## Collect payment details [Client-side]
Use the [Payment Element](https://docs.stripe.com/payments/payment-element.md) to securely send payment information collected in an iFrame to Stripe over an HTTPS connection.
> #### Conflicting iFrames
>
> Avoid placing the Payment Element within another iframe because it conflicts with payment methods that require redirecting to another page for payment confirmation.
Your checkout page URL must start with `https://` rather than `http://` for your integration to work. You can test your integration without using HTTPS, but remember to [enable it](https://docs.stripe.com/security/guide.md#tls) when you’re ready to accept live payments.
#### HTML + JS
### Set up Stripe.js
The Payment Element is automatically available as a feature of Stripe.js. Include the Stripe.js script on your checkout page by adding it to the `head` of your HTML file. Always load Stripe.js directly from js.stripe.com to remain PCI compliant. Don’t include the script in a bundle or host a copy of it yourself.
```html
Checkout
```
Create an instance of Stripe with the following JavaScript on your checkout page:
```javascript
// Set your publishable key: remember to change this to your live publishable key in production
// See your keys here: https://dashboard.stripe.com/apikeys
const stripe = Stripe('<>');
```
### Add the Payment Element to your checkout page
The Payment Element needs a place to live on your checkout page. Create an empty DOM node (container) with a unique ID in your payment form:
```html
```
After your form loads, create an Elements instance with the mode, amount, and currency. These values determine which payment methods the Element presents to your customer.
Then, create an instance of the Payment Element and mount it to the container DOM node.
> The `amount` passed to the Payment Element should reflect what a customer will be charged immediately. This could either be the first instalment of the subscription or `0` if the subscription has a [trial period](https://docs.stripe.com/billing/subscriptions/trials.md).
```javascript
const options = {mode:'subscription',
amount: 1099,
currency: 'usd',paymentMethodCreation: 'manual',
// Fully customizable with appearance API.
appearance: {/*...*/},
};
// Set up Stripe.js and Elements to use in checkout formconst elements = stripe.elements(options);
// Create and mount the Payment Element
const paymentElementOptions = { layout: 'accordion'};
const paymentElement = elements.create('payment', paymentElementOptions);
paymentElement.mount('#payment-element');
```
#### React
### Set up Stripe.js
Install [React Stripe.js](https://www.npmjs.com/package/@stripe/react-stripe-js) and the [Stripe.js loader](https://www.npmjs.com/package/@stripe/stripe-js) from the npm public registry.
```bash
npm install --save @stripe/react-stripe-js @stripe/stripe-js
```
### Add and configure the Elements provider to your checkout page
To use the Payment Element component, wrap your checkout page component in an [Elements provider](https://docs.stripe.com/sdks/stripejs-react.md#elements-provider). Call `loadStripe` with your publishable key, and pass the returned `Promise` to the `Elements` provider.
The `Elements` provider also accepts the mode, amount, and currency. These values determine which payment methods are shown to your customer.
> The `amount` passed to the Payment Element should reflect what a customer will be charged immediately. This could either be the first instalment of the subscription or `0` if the subscription has a [trial period](https://docs.stripe.com/billing/subscriptions/trials.md).
```jsx
import React from 'react';
import ReactDOM from 'react-dom';
import {Elements} from '@stripe/react-stripe-js';
import {loadStripe} from '@stripe/stripe-js';
import CheckoutForm from './CheckoutForm';
// Make sure to call `loadStripe` outside of a component’s render to avoid
// recreating the `Stripe` object on every render.
const stripePromise = loadStripe('<>');
function App() {
const options = {mode:'subscription',
amount: 1099,
currency: 'usd',paymentMethodCreation: 'manual',
// Fully customizable with appearance API.
appearance: {/*...*/},
};
return (
);
};
ReactDOM.render(, document.getElementById('root'));
```
### Add the Payment Element component
Use the `PaymentElement` component to build your form.
```jsx
import React from 'react';
import {PaymentElement} from '@stripe/react-stripe-js';
const CheckoutForm = () => {
return (
);
};
export default CheckoutForm;
```
The Payment Element renders a dynamic form that allows your customer to pick a payment method. The form automatically collects all necessary payments details for the payment method selected by the customer.
You can customise the Payment Element to match the design of your site by passing the [appearance object](https://docs.stripe.com/elements/appearance-api.md) into `options` when creating the `Elements` provider.
### Collect addresses
By default, the Payment Element only collects the necessary billing address details. Some behaviour, such as [calculating tax](https://docs.stripe.com/api/tax/calculations/create.md) or entering shipping details, requires your customer’s full address. You can:
- Use the [Address Element](https://docs.stripe.com/elements/address-element.md) to take advantage of autocomplete and localisation features to collect your customer’s full address. This helps ensure the most accurate tax calculation.
- Collect address details using your own custom form.
## Optional: Customise the layout [Client-side]
You can customise the Payment Element’s layout (accordion or tabs) to fit your checkout interface. For more information about each of the properties, see [elements.create](https://docs.stripe.com/js/elements_object/create_payment_element#payment_element_create-options).
#### Accordion
You can start using the layout features by passing a layout `type` and other optional properties when creating the Payment Element:
```javascript
const paymentElement = elements.create('payment', {
layout: {
type: 'accordion',
defaultCollapsed: false,
radios: 'always',
spacedAccordionItems: false
}
});
```
#### Tabs
### Specify the layout
Set the value for layout to `tabs`. You also have the option to specify other properties, such as the ones in the following example:
```javascript
const paymentElement = elements.create('payment', {
layout: {
type: 'tabs',
defaultCollapsed: false,
}
});
```
The following image is the same Payment Element rendered using different layout configurations:

Payment Element layouts
## Optional: Customise the appearance [Client-side]
Now that you’ve added the Payment Element to your page, you can customise its appearance to make it fit your design. To learn more about customising the Payment Element, see [Elements Appearance API](https://docs.stripe.com/elements/appearance-api.md).

Customise the Payment Element
## Optional: Save and retrieve customer payment methods
You can configure the Payment Element to save your customer’s payment methods for future use. This section shows you how to integrate the [saved payment methods feature](https://docs.stripe.com/payments/save-customer-payment-methods.md), which enables the Payment Element to:
- Prompt buyers for consent to save a payment method
- Save payment methods when buyers provide consent
- Display saved payment methods to buyers for future purchases
- [Automatically update lost or expired cards](https://docs.stripe.com/payments/cards/overview.md#automatic-card-updates) when buyers replace them

Save payment methods.

Re-use a previously saved payment method.
### Enable saving the payment method in the Payment Element
Create a [CustomerSession](https://docs.stripe.com/api/customer_sessions/.md) on your server by providing the customer’s ID (using either `customer` for a `Customer` object or `customer_account` for a customer-configured `Account` object) and enabling the [payment_element](https://docs.stripe.com/api/customer_sessions/object.md#customer_session_object-components-payment_element) component for your session. Configure which saved payment method [features](https://docs.stripe.com/api/customer_sessions/create.md#create_customer_session-components-payment_element-features) you want to enable. For instance, enabling [payment_method_save](https://docs.stripe.com/api/customer_sessions/create.md#create_customer_session-components-payment_element-features-payment_method_save) displays a checkbox that allows customers to save their payment details for future use.
You can specify `setup_future_usage` on a PaymentIntent or Checkout Session to override the default behavior for saving payment methods. This ensures that you automatically save the payment method for future use, even if the customer doesn’t explicitly choose to save it. If you intend to specify `setup_future_usage`, don’t set `payment_method_save_usage` in the same payment transaction because this causes an integration error.
> #### Use the Accounts v2 API to represent customers
>
> The Accounts v2 API is GA for Connect users, and in public preview for other Stripe users. All Stripe users can enable Accounts v2 [in their Dashboard](https://dashboard.stripe.com/settings/connect/platform-setup). However, when making calls to the Accounts v2 API, preview users need to [specify a preview version](https://docs.stripe.com/api-v2-overview.md#sdk-and-api-versioning).
>
> For most use cases, we recommend [modelling your customers as customer-configured Account objects](https://docs.stripe.com/connect/use-accounts-as-customers.md) instead of using [Customer](https://docs.stripe.com/api/customers.md) objects.
#### Accounts v2
#### Ruby
```ruby
# Don't put any keys in code. See https://docs.stripe.com/keys-best-practices.
# Find your keys at https://dashboard.stripe.com/apikeys.
Stripe.api_key = '<>'
post '/create-customer-session' do
customer_session = Stripe::CustomerSession.create({
customer_account: {{CUSTOMER_ACCOUNT_ID}},
components: {
payment_element: {
enabled: true,
features: {
payment_method_redisplay: 'enabled',
payment_method_save: 'enabled',
payment_method_save_usage: 'off_session',
payment_method_remove: 'enabled',
},
},
},
})
{
customer_session_client_secret: customer_session.client_secret
}.to_json
end
```
#### Customers v1
#### Ruby
```ruby
# Don't put any keys in code. See https://docs.stripe.com/keys-best-practices.
# Find your keys at https://dashboard.stripe.com/apikeys.
Stripe.api_key = '<>'
post '/create-customer-session' do
customer_session = Stripe::CustomerSession.create({
customer: {{CUSTOMER_ID}},
components: {
payment_element: {
enabled: true,
features: {
payment_method_redisplay: 'enabled',
payment_method_save: 'enabled',
payment_method_save_usage: 'off_session',
payment_method_remove: 'enabled',
},
},
},
})
{
customer_session_client_secret: customer_session.client_secret
}.to_json
end
```
Your Elements instance uses the CustomerSession’s *client secret* (A client secret is used with your publishable key to authenticate a request for a single object. Each client secret is unique to the object it's associated with) to access that customer’s saved payment methods. [Handle errors](https://docs.stripe.com/error-handling.md) properly when you create the CustomerSession. If an error occurs, you don’t need to provide the CustomerSession client secret to the Elements instance, as it’s optional.
Create the Elements instance using the CustomerSession client secret. Then, use the Elements instance to create a Payment Element.
```javascript
// Create the CustomerSession and obtain its clientSecret
const res = await fetch("/create-customer-session", {
method: "POST"
});
const {
customer_session_client_secret: customerSessionClientSecret
} = await res.json();
const elementsOptions = {
mode: 'payment',
amount: 1099,
currency: 'usd',customerSessionClientSecret,
// Fully customizable with appearance API.
appearance: {/*...*/},
};
// Set up Stripe.js and Elements to use in checkout form, passing the client secret
// and CustomerSession's client secret obtained in a previous step
const elements = stripe.elements(elementsOptions);
// Create and mount the Payment Element
const paymentElementOptions = { layout: 'accordion'};
const paymentElement = elements.create('payment', paymentElementOptions);
paymentElement.mount('#payment-element');
```
> Allowing customers to remove their saved payment methods by enabling [payment_method_remove](https://docs.stripe.com/api/customer_sessions/create.md#create_customer_session-components-payment_element-features-payment_method_remove) impacts subscriptions that depend on that payment method. Removing the payment method detaches the [PaymentMethod](https://docs.stripe.com/api/payment_methods.md) from the object that represents the customer (either a customer-configured `Account` or a `Customer`).
When creating the ConfirmationToken, Stripe.js automatically controls setting [setup_future_usage](https://docs.stripe.com/api/confirmation_tokens/object.md#confirmation_token_object-setup_future_usage) on the ConfirmationToken and [allow_redisplay](https://docs.stripe.com/api/payment_methods/object.md#payment_method_object-allow_redisplay) on the PaymentMethod, depending on whether the customer ticked the box to save their payment details.
### Enforce CVC recollection
Optionally, specify `require_cvc_recollection` both [when creating the PaymentIntent](https://docs.stripe.com/api/payment_intents/create.md#create_payment_intent-payment_method_options-card-require_cvc_recollection) and [when creating Elements](https://docs.stripe.com/js/elements_object/create_without_intent#stripe_elements_no_intent-options-paymentMethodOptions-card-require_cvc_recollection) to enforce CVC recollection when a customer is paying with a card.
### Detect the selection of a saved payment method
To control dynamic content when a saved payment method is selected, listen to the Payment Element `change` event, which is populated with the selected payment method.
```javascript
paymentElement.on('change', function(event) {
if (event.value.payment_method) {
// Control dynamic content if a saved payment method is selected
}
})
```
## Optional: Dynamically update payment details [Client-side]
As the customer performs actions that change the payment details (for example, applying a discount code), update the Elements instance to reflect the new values. Some payment methods, like Apple Pay and Google Pay, show the amount in the UI, so make sure it’s always accurate and up to date.
#### HTML + JS
```js
async function handleDiscountCode(code) {
// On the server, validate that the discount code is valid and return the new amount
const {newAmount} = await fetch("/apply-discount", {
method: "POST",
headers: {"Content-Type": "application/json"},
body: JSON.stringify({code}),
});
elements.update({amount: newAmount});
}
```
#### React
```jsx
function App() {
const [amount, setAmount] = React.useState(1099);
const handleDiscountCode = useCallback(async (code) => {
// On the server, validate that the discount code is valid and return the new amount
const {newAmount} = await fetch("/apply-discount", {
method: "POST",
headers: {"Content-Type": "application/json"},
body: JSON.stringify({code}),
});
// Trigger a state change that re-renders the Elements provider with the new amount
setAmount(newAmount);
}, []);
const options = {
mode: 'payment',
amount,
currency: 'usd',
appearance: {/*...*/},
};
return (
);
};
```
## Optional: Additional Elements options [Client-side]
The [Elements object](https://docs.stripe.com/js/elements_object/create_without_intent) accepts additional options that influence payment collection. Based on the options provided, the Payment Element displays available payment methods from those you’ve enabled. Learn more about [payment method support](https://docs.stripe.com/payments/payment-methods/payment-method-support.md).
Make sure the Elements options you provide (such as `captureMethod`, `setupFutureUsage`, and `paymentMethodOptions`) match the equivalent parameters you pass when creating and confirming the Intent. Mismatched parameters can result in unexpected behaviour or errors.
| Property | Type | Description | Required |
| ---------------------------- | -------------------------------------------------- | --------------------------------------------------------------------------------------------------------------------------------------------------------------------------------------------------------------------------------------------------------------------------------------------------------------------------------------------------------------------------------------------------------------------------------------------------------------------------------------------------------------------------------------------------------------------------------------------------------------------------------------------------------------------------------------------------------------------------------------------------------------- | ------------------------------------- |
| `mode` | - `payment`
- `setup`
- `subscription` | Indicates whether the Payment Element is used with a *PaymentIntent* (The Payment Intents API tracks the lifecycle of a customer checkout flow and triggers additional authentication steps when required by regulatory mandates, custom Radar fraud rules, or redirect-based payment methods), *SetupIntent* (The Setup Intents API lets you build dynamic flows for collecting payment method details for future payments. It tracks the lifecycle of a payment setup flow and can trigger additional authentication steps if required by law or by the payment method), or *Subscription* (A Subscription represents the product details associated with the plan that your customer subscribes to. Allows you to charge the customer on a recurring basis). | Yes |
| `currency` | `string` | The currency of the amount to charge the customer. | Yes |
| `amount` | `number` | The amount to charge the customer, shown in Apple Pay, Google Pay, or BNPL UIs. | For `payment` and `subscription` mode |
| `setupFutureUsage` | - `off_session`
- `on_session` | Indicates that you intend to make future payments with the payment details collected by the Payment Element. | No |
| `captureMethod` | - `automatic`
- `automatic_async`
- `manual` | Controls when to capture the funds from the customer’s account. | No |
| `onBehalfOf` | `string` | Connect only. The Stripe account ID, which is the business of record. See [use cases](https://docs.stripe.com/connect/charges.md) to determine if this option is relevant for your integration. | No |
| `paymentMethodTypes` | `string[]` | A list of payment method types to render. You can omit this attribute to manage your payment methods in the [Stripe Dashboard](https://dashboard.stripe.com/settings/payment_methods). | No |
| `paymentMethodConfiguration` | `string` | The [payment method configuration](https://docs.stripe.com/api/payment_method_configurations.md) to use when managing your payment methods in the [Stripe Dashboard](https://dashboard.stripe.com/settings/payment_methods). If not specified, your default configuration is used. | No |
| `paymentMethodCreation` | `manual` | Allows PaymentMethods to be created from the Elements instance using [stripe.createPaymentMethod](https://docs.stripe.com/js/payment_methods/create_payment_method_elements). | No |
| `paymentMethodOptions` | `{us_bank_account: {verification_method: string}}` | Verification options for the `us_bank_account` payment method. Accepts the same verification methods as [Payment Intents](https://docs.stripe.com/api/payment_intents/create.md#create_payment_intent-payment_method_options-us_bank_account-verification_method). | No |
| `paymentMethodOptions` | `{card: {installments: {enabled: boolean}}}` | Allows manually enabling the card instalment plan selection UI if applicable when you aren’t managing your payment methods in the [Stripe Dashboard](https://dashboard.stripe.com/settings/payment_methods). You must set `mode='payment'` *and* explicitly specify `paymentMethodTypes`. Otherwise an error is raised. Incompatible with `paymentMethodCreation='manual'`. | No |
| `paymentMethodOptions` | `{[paymentMethod]: {setup_future_usage: string}}` | Allows you to specify `setup_future_usage` for only payment methods that support reuse. Only applicable when `mode` is `payment`. The value for each payment method must match the corresponding `payment_method_options[paymentMethod][setup_future_usage]` on the PaymentIntent during confirmation. See the [Stripe.js reference](https://docs.stripe.com/js/elements_object/create_without_intent#stripe_elements_no_intent-options-paymentMethodOptions) for supported payment methods and values. | No |
## Create the pricing model [Stripe CLI or Dashboard]
[Recurring pricing models](https://docs.stripe.com/products-prices/pricing-models.md) represent the products or services you sell, how much they cost, what currency you accept for payments, and the service period for subscriptions. To build the pricing model, create [products](https://docs.stripe.com/api/products.md) (what you sell) and [prices](https://docs.stripe.com/api/prices.md) (how much and how often to charge for your products).
This example uses flat-rate pricing with two different service-level options: Basic and Premium. For each service-level option, you need to create a product and a recurring price. To add a one-time charge for something like a setup fee, create a third product with a one-time price.
Each product bills at monthly intervals. The price for the Basic product is 5 USD. The price for the Premium product is 15 USD. See the [flat rate pricing](https://docs.stripe.com/subscriptions/pricing-models/flat-rate-pricing.md) guide for an example with three tiers.
#### Dashboard
Go to the [Add a product](https://dashboard.stripe.com/test/products/create) page and create two products. Add one price for each product, each with a monthly recurring billing period:
- Premium product: Premium service with extra features
- Price: Flat rate | 15 USD
- Basic product: Basic service with minimum features
- Price: Flat rate | 5 USD
After you create the prices, record the price IDs so you can use them in other steps. Price IDs look like this: `price_G0FvDp6vZvdwRZ`.
When you’re ready, use the **Copy to live mode** button at the top right of the page to clone your product from [a sandbox to live mode](https://docs.stripe.com/keys.md#test-live-modes).
#### API
You can use the API to create the [Products](https://docs.stripe.com/api/products.md) and [Prices](https://docs.stripe.com/api/prices.md).
Create the Premium product:
```curl
curl https://api.stripe.com/v1/products \
-u "<>:" \
--data-urlencode "name=Billing Guide: Premium Service" \
-d "description=Premium service with extra features"
```
Create the Basic product:
```curl
curl https://api.stripe.com/v1/products \
-u "<>:" \
--data-urlencode "name=Billing Guide: Basic Service" \
-d "description=Basic service with minimum features"
```
Record the product ID for each product. They look like this:
```json
{
"id": "prod_H94k5odtwJXMtQ",
"object": "product",
"active": true,
"attributes": [
],
"created": 1587577341,
"description": "Premium service with extra features",
"images": [
],
"livemode": false,
"metadata": {
},
"name": "Billing Guide: Premium Service",
"statement_descriptor": null,
"type": "service",
"unit_label": null,
"updated": 1587577341
}
```
Use the product IDs to create a price for each product. The [unit_amount](https://docs.stripe.com/api/prices/object.md#price_object-unit_amount) number is in cents, so `1500` = 15 USD, for example.
Create the Premium price:
```curl
curl https://api.stripe.com/v1/prices \
-u "<>:" \
-d product={{PREMIUM_PRODUCT_ID}} \
-d unit_amount=1500 \
-d currency=usd \
-d "recurring[interval]=month"
```
Create the Basic price:
```curl
curl https://api.stripe.com/v1/prices \
-u "<>:" \
-d product={{BASIC_PRODUCT_ID}} \
-d unit_amount=500 \
-d currency=usd \
-d "recurring[interval]=month"
```
Record the price ID for each price so you can use them in subsequent steps. They look like this:
```json
{
"id": "price_HGd7M3DV3IMXkC",
"object": "price",
"product": "prod_HGd6W1VUqqXGvr",
"type": "recurring",
"currency": "usd",
"recurring": {
"interval": "month",
"interval_count": 1,
"trial_period_days": null,
"usage_type": "licensed"
},
"active": true,
"billing_scheme": "per_unit",
"created": 1589319695,
"livemode": false,
"lookup_key": null,
"metadata": {},
"nickname": null,
"unit_amount": 1500,
"unit_amount_decimal": "1500",
"tiers": null,
"tiers_mode": null,
"transform_quantity": null
}
```
## Create the customer [Client and Server]
Stripe needs a *customer* (Customer objects represent customers of your business. They let you reuse payment methods and give you the ability to track multiple payments) for each subscription. In your application’s frontend, collect any necessary user information and pass it to the back-end.
If you need to collect address details, the Address Element enables you to collect a shipping or billing address for your customers. To learn more, see [Address Element](https://docs.stripe.com/elements/address-element.md).
```html
```
```javascript
const emailInput = document.querySelector('#email');
fetch('/create-customer', {
method: 'post',
headers: {
'Content-Type': 'application/json',
},
body: JSON.stringify({
email: emailInput.value,
}),
}).then(r => r.json());
```
On the server, create the Stripe customer object.
```curl
curl https://api.stripe.com/v1/customers \
-u "<>:" \
-d email={{CUSTOMER_EMAIL}} \
-d name={{CUSTOMER_NAME}} \
-d "shipping[address][city]=Brothers" \
-d "shipping[address][country]=US" \
-d "shipping[address][line1]=27 Fredrick Ave" \
-d "shipping[address][postal_code]=97712" \
-d "shipping[address][state]=CA" \
-d "shipping[name]={{CUSTOMER_NAME}}" \
-d "address[city]=Brothers" \
-d "address[country]=US" \
-d "address[line1]=27 Fredrick Ave" \
-d "address[postal_code]=97712" \
-d "address[state]=CA"
```
## Create the ConfirmationToken [Client-side]
> #### Use createPaymentMethod through a legacy implementation
>
> If you’re using a legacy implementation, you might be using the information from `stripe.createPaymentMethod` to finalise payments on the server. While we encourage you to follow this guide to [Migrate to Confirmation Tokens](https://docs.stripe.com/payments/payment-element/migration-ct.md) you can still access our old documentation to [Finalise payments on the server](https://docs.stripe.com/payments/finalize-payments-on-the-server-legacy.md)
When the customer submits your payment form, call [stripe.createConfirmationToken](https://docs.stripe.com/js/confirmation_tokens/create_confirmation_token) to create a *ConfirmationToken* (ConfirmationTokens help capture data from your client, such as your customer's payment instruments and shipping address, and are used to confirm a PaymentIntent or SetupIntent) to send to your server for additional validation or business logic before payment confirmation.
Confirming the PaymentIntent generates a *PaymentMethod* (PaymentMethods represent your customer's payment instruments, used with the Payment Intents or Setup Intents APIs). You can read the [payment_method](https://docs.stripe.com/api/payment_intents/object.md#payment_intent_object-payment_method) ID off the PaymentIntent confirmation response.
> You must immediately use the created ConfirmationToken to confirm a PaymentIntent; if unused, it expires after 12 hours.
#### HTML + JS
```javascript
const form = document.getElementById('payment-form');
const submitBtn = document.getElementById('submit');
const handleError = (error) => {
const messageContainer = document.querySelector('#error-message');
messageContainer.textContent = error.message;
submitBtn.disabled = false;
}
form.addEventListener('submit', async (event) => {
// We don't want to let default form submission happen here,
// which would refresh the page.
event.preventDefault();
// Prevent multiple form submissions
if (submitBtn.disabled) {
return;
}
// Disable form submission while loading
submitBtn.disabled = true;
// Trigger form validation and wallet collection
const {error: submitError} = await elements.submit();
if (submitError) {
handleError(submitError);
return;
}
// Create the ConfirmationToken using the details collected by the Payment Element
// and additional shipping information
const {error, confirmationToken} = await stripe.createConfirmationToken({
elements,
params: {
return_url: 'https://example.com/order/123/complete'
}
});
if (error) {
// This point is only reached if there's an immediate error when
// creating the ConfirmationToken. Show the error to your customer (for example, payment details incomplete)
handleError(error);
return;
}
// Create the Subscription
const res = await fetch("/create-confirm-subscription", {
method: "POST",
headers: {"Content-Type": "application/json"},
body: JSON.stringify({
confirmationTokenId: confirmationToken.id,
}),
});
const data = await res.json();
// Handle any next actions or errors. See the Handle any next actions step for implementation.
handleServerResponse(data);
});
```
#### React
```jsx
import React, {useState} from 'react';
import {useStripe, useElements, PaymentElement} from '@stripe/react-stripe-js';
export default function CheckoutForm() {
const stripe = useStripe();
const elements = useElements();
const [errorMessage, setErrorMessage] = useState();
const [loading, setLoading] = useState(false);
const handleError = (error) => {
setLoading(false);
setErrorMessage(error.message);
}
const handleSubmit = async (event) => {
// We don't want to let default form submission happen here,
// which would refresh the page.
event.preventDefault();
if (!stripe) {
// Stripe.js hasn't yet loaded.
// Make sure to disable form submission until Stripe.js has loaded.
return;
}
setLoading(true);
// Trigger form validation and wallet collection
const {error: submitError} = await elements.submit();
if (submitError) {
handleError(submitError);
return;
}
// Create the ConfirmationToken using the details collected by the Payment Element
// and additional shipping information
const {error, confirmationToken} = await stripe.createConfirmationToken({
elements,
params: {
shipping: {
name: 'Jenny Rosen',
address: {
line1: '1234 Main Street',
city: 'San Francisco',
state: 'CA',
country: 'US',
postal_code: '94111',
},
}
}
});
if (error) {
// This point is only reached if there's an immediate error when
// creating the ConfirmationToken. Show the error to your customer (for example, payment details incomplete)
handleError(error);
return;
}
// Create the Subscription
const res = await fetch("/create-confirm-subscription", {
method: "POST",
headers: {"Content-Type": "application/json"},
body: JSON.stringify({
confirmationTokenId: confirmationToken.id,
}),
});
const data = await res.json();
// Handle any next actions or errors. See the Handle any next actions step for implementation.
handleServerResponse(data);
};
return (
);
}
```
## Create and submit the subscription to Stripe [Server-side]
After the customer submits your payment form, use a *Subscription* (A Subscription represents the product details associated with the plan that your customer subscribes to. Allows you to charge the customer on a recurring basis) to facilitate the confirmation and payment process. On the server, use the customer ID (from a cookie or request parameter), the price ID, and the payment method ID to create and confirm the subscription.
```javascript
const stripe = require("stripe")("<>");
const express = require('express');
const cookieParser = require('cookieParser');
const app = express();
app.set('trust proxy', true);
app.use(express.json());
app.use(express.static("."));
app.use(cookieParser());
app.post('/create-confirm-subscription', async (req, res) => {
const customerId = req.cookies['customer'];
const confirmationTokenId = req.body.confirmationTokenId;
// The ID of the Price that you created previously
const priceId = '{{ PRICE_ID }}';
try {
const subscription = await stripe.subscriptions.create({
customer: customerId,
items: [{
price: priceId,
}],
payment_behavior: 'default_incomplete',
payment_settings: { save_default_payment_method: 'on_subscription' },
expand: ['latest_invoice.payments']
});
// Confirm intent with collected payment method
const {status, clientSecret} = await stripe.paymentIntents.confirm(
subscription.latest_invoice.payments.data[0].payment.payment_intent,
{
confirmation_token: confirmationTokenId,
}
);
res.json({status, clientSecret});
} catch (err) {
res.json({
error: err
});
}
});
app.listen(3000, () => {
console.log('Running on port 3000');
});
```
## Handle any next actions [Client-side]
When the PaymentIntent requires additional action from the customer, such as authenticating with 3D Secure or redirecting to a different site, you need to trigger those actions. Use `stripe.handleNextAction` to trigger the UI for handling customer action and completing the payment.
#### JavaScript
```javascript
const handleServerResponse = async (response) => {
if (response.error) {
// Show error from server on payment form
} else if (response.status === "requires_action") {
// Use Stripe.js to handle the required next action
const {
error,
paymentIntent
} = await stripe.handleNextAction({
clientSecret: response.clientSecret
});
if (error) {
// Show error from Stripe.js in payment form
} else {
// Actions handled, show success message
}
} else {
// No actions needed, show success message
}
}
```
## Manage the Subscription
To complete the integration, you might want to listen for webhooks, provision access to your service, and allow customers to cancel their subscriptions. For more details on how to do this, you can refer to the [subscriptions integration guide](https://docs.stripe.com/billing/subscriptions/build-subscriptions.md?payment-ui=elements).
## Disclose Stripe to your customers
Stripe collects information on customer interactions with Elements to provide services to you, prevent fraud, and improve its services. This includes using cookies and IP addresses to identify which Elements a customer saw during a single checkout session. You’re responsible for disclosing and obtaining all rights and consents necessary for Stripe to use data in these ways. For more information, visit our [privacy center](https://stripe.com/legal/privacy-center#as-a-business-user-what-notice-do-i-provide-to-my-end-customers-about-stripe).
## See also
- [Design an integration](https://docs.stripe.com/payments/payment-element/design-an-integration.md)
- [Build an in-app payments integration](https://docs.stripe.com/payments/mobile.md)