# Développer la confirmation à deux facteurs
Ajoutez une page de vérification facultative ou exécutez une validation après que l'utilisateur ait saisi ses informations de paiement.
Bien que nous recommandions l’[intégration standard](https://docs.stripe.com/payments/accept-a-payment-deferred.md) pour la plupart des cas de figure, cette intégration vous permet d’ajouter une étape supplémentaire à votre processus de paiement. Vous pouvez ainsi effectuer d’autres actions avant de confirmer la commande, telles que :
- Présenter au client les détails de sa commande pour qu’il les vérifie.
- Exécution de validations supplémentaires.
- Calculer les taxes et mettre à jour le total dû.
## Configurer Stripe
Dans un premier temps, vous devez créer un compte Stripe. [S’inscrire maintenant](https://dashboard.stripe.com/register).
Utilisez nos bibliothèques officielles pour accéder à l’API Stripe depuis votre application :
#### Ruby
```bash
# Available as a gem
sudo gem install stripe
```
```ruby
# If you use bundler, you can add this line to your Gemfile
gem 'stripe'
```
## Activer des moyens de paiement
> Ce chemin d’intégration ne prend pas en charge BLIK ou les prélèvements automatiques qui utilisent le Système automatisé de compensation et de règlement (ACSS). De plus, si vous créez l’intention différée côté client, vous ne pouvez pas utiliser `customer_balance` avec des moyens de paiement dynamiques, car le PaymentIntent nécessite un objet [Account](https://docs.stripe.com/api/v2/core/accounts/object.md#v2_account_object-configuration-customer) configuré par le client ou [Customer](https://docs.stripe.com/api/customers/object.md), ce que le flux côté client ne prend pas en charge. Pour utiliser `customer_balance`, créez le `PaymentIntent` côté serveur avec un `Account` ou un `Customer` et renvoyez sa `client_secret` au client.
Affichez vos [paramètres des moyens de paiement](https://dashboard.stripe.com/settings/payment_methods) et activez les moyens de paiement que vous souhaitez prendre en charge. Vous devez activer au moins un moyen de paiement pour créer un *PaymentIntent* (The Payment Intents API tracks the lifecycle of a customer checkout flow and triggers additional authentication steps when required by regulatory mandates, custom Radar fraud rules, or redirect-based payment methods).
Par défaut, Stripe active les cartes bancaires et les autres moyens de paiement courants qui peuvent vous permettre d’atteindre davantage de clients. Nous vous recommandons toutefois d’activer d’autres moyens de paiement pertinents pour votre entreprise et vos clients. Consultez la page [Prise en charge des moyens de paiement](https://docs.stripe.com/payments/payment-methods/payment-method-support.md) pour en savoir plus sur la prise en charge des produits et des moyens de paiement, et notre [page des tarifs](https://stripe.com/pricing/local-payment-methods) pour prendre connaissance des frais que nous appliquons.
## Recueillir les informations de paiement [Côté client]
Utilisez le [Payment Element](https://docs.stripe.com/payments/payment-element.md) pour envoyer en toute sécurité les informations de paiement collectées dans un iFrame à Stripe via une connexion HTTPS.
> #### Conflits entre les iFrames
>
> Évitez de placer le Payment Element dans un autre iframe, car il entre en conflit avec les moyens de paiement qui nécessitent une redirection vers une autre page pour confirmer le paiement.
Your checkout page URL must start with `https://` rather than `http://` for your integration to work. You can test your integration without using HTTPS, but remember to [enable it](https://docs.stripe.com/security/guide.md#tls) when you’re ready to accept live payments.
#### HTML + JS
### Configurer Stripe.js
Le composant Element Payment est automatiquement disponible en tant que fonctionnalité de Stripe.js. Intégrez le script Stripe.js à votre page de paiement en l’ajoutant entre les balises `head` de votre fichier HTML. Chargez toujours Stripe.js directement à partir de js.stripe.com pour maintenir votre conformité PCI. Vous ne devez pas inclure le script dans un lot ni en héberger de copie.
```html
Checkout
```
Créez une instance de Stripe avec le code JavaScript suivant sur votre page de paiement :
```javascript
// Set your publishable key: remember to change this to your live publishable key in production
// See your keys here: https://dashboard.stripe.com/apikeys
const stripe = Stripe('<>');
```
### Ajouter le composant Payment Element à votre page de paiement
Le composant Payment Element doit avoir un emplacement dédié dans votre page de paiement. Créez un nœud DOM (conteneur) vide doté d’un ID unique dans votre formulaire de paiement :
```html
```
Après le chargement de votre formulaire, créez une instance Elements avec le mode, le montant et la devise. Ces valeurs déterminent les moyens de paiement que l’Element présente à votre client.
Ensuite, créez une instance de l’Element Payment et montez-la sur le nœud DOM conteneur.
```javascript
const options = {mode:'payment',
amount: 1099,
currency: 'usd',
// Fully customizable with appearance API.
appearance: {/*...*/},
};
// Set up Stripe.js and Elements to use in checkout formconst elements = stripe.elements(options);
// Create and mount the Payment Element
const paymentElementOptions = { layout: 'accordion'};
const paymentElement = elements.create('payment', paymentElementOptions);
paymentElement.mount('#payment-element');
```
#### React
### Configurer Stripe.js
Installez [React Stripe.js](https://www.npmjs.com/package/@stripe/react-stripe-js) et le [chargeur Stripe.js](https://www.npmjs.com/package/@stripe/stripe-js) à partir du registre public npm.
```bash
npm install --save @stripe/react-stripe-js @stripe/stripe-js
```
### Ajouter et configurer le fournisseur Elements sur votre page de paiement
Pour utiliser le composant Payment Element, incluez votre composant de page de paiement dans un [fournisseur Elements](https://docs.stripe.com/sdks/stripejs-react.md#elements-provider). Appelez `loadStripe` avec votre clé publique et transmettez le paramètre `Promise` renvoyé au fournisseur `Elements`.
Le fournisseur `Elements` accepte également un mode, un montant et une devise. Ces valeurs déterminent les moyens de paiement qui seront présentés à votre client.
```jsx
import React from 'react';
import ReactDOM from 'react-dom';
import {Elements} from '@stripe/react-stripe-js';
import {loadStripe} from '@stripe/stripe-js';
import CheckoutForm from './CheckoutForm';
// Make sure to call `loadStripe` outside of a component's render to avoid
// recreating the `Stripe` object on every render.
const stripePromise = loadStripe('<>');
function App() {
const options = {mode:'payment',
amount: 1099,
currency: 'usd',
// Fully customizable with appearance API.
appearance: {/*...*/},
};
return (
);
};
ReactDOM.render(, document.getElementById('root'));
```
### Ajouter le composant Payment Element
Utilisez le composant `PaymentElement` pour créer votre formulaire.
```jsx
import React from 'react';
import {PaymentElement} from '@stripe/react-stripe-js';
const CheckoutForm = () => {
return (
);
};
export default CheckoutForm;
```
Le composant Element Payment affiche un formulaire dynamique qui permet à votre client de choisir un moyen de paiement. Le formulaire collecte automatiquement toutes les informations de paiement nécessaires pour le moyen de paiement sélectionné par le client.
Vous pouvez personnaliser le Payment Element pour l’adapter au design de votre site en transmettant l’[objet Appearance](https://docs.stripe.com/elements/appearance-api.md) dans les `options` lors de la création du fournisseur `Elements`.
### Collecter les adresses
Par défaut, le Payment Element ne collecte que les informations nécessaires à la facturation. Certaines opérations, telles que le [calcul des taxes](https://docs.stripe.com/api/tax/calculations/create.md) ou la saisie des informations de livraison, nécessitent l’adresse complète de votre client. Vous pouvez :
- Utilisez l’[Address Element](https://docs.stripe.com/elements/address-element.md) pour tirer parti des fonctionnalités de saisie automatique et de localisation et recueillir l’adresse complète de votre client. Cela permet de garantir un calcul des taxes le plus précis possible.
- Recueillez l’adresse à l’aide de votre propre formulaire personnalisé.
## Optional: Personnaliser la mise en page [Côté client]
Vous pouvez adapter la mise en page du composant Payment Element (en accordéon ou en onglets) à votre interface de paiement. Pour plus d’informations sur chacune des propriétés, consultez la section [elements.create](https://docs.stripe.com/js/elements_object/create_payment_element#payment_element_create-options).
#### Accordéon
Vous pouvez commencer à utiliser les fonctionnalités de mise en page en transmettant un `type` de mise en page et d’autres propriétés facultatives lors de la création du Payment Element :
```javascript
const paymentElement = elements.create('payment', {
layout: {
type: 'accordion',
defaultCollapsed: false,
radios: 'always',
spacedAccordionItems: false
}
});
```
#### Onglets
### Spécifier la mise en page
Définissez la valeur de mise en page sur `tabs` (onglets). Vous avez également la possibilité de spécifier d’autres propriétés, notamment celles figurant dans l’exemple suivant :
```javascript
const paymentElement = elements.create('payment', {
layout: {
type: 'tabs',
defaultCollapsed: false,
}
});
```
L’image suivante illustre différents affichages du même composant Element Payment correspondant à différentes configurations de mise en page :
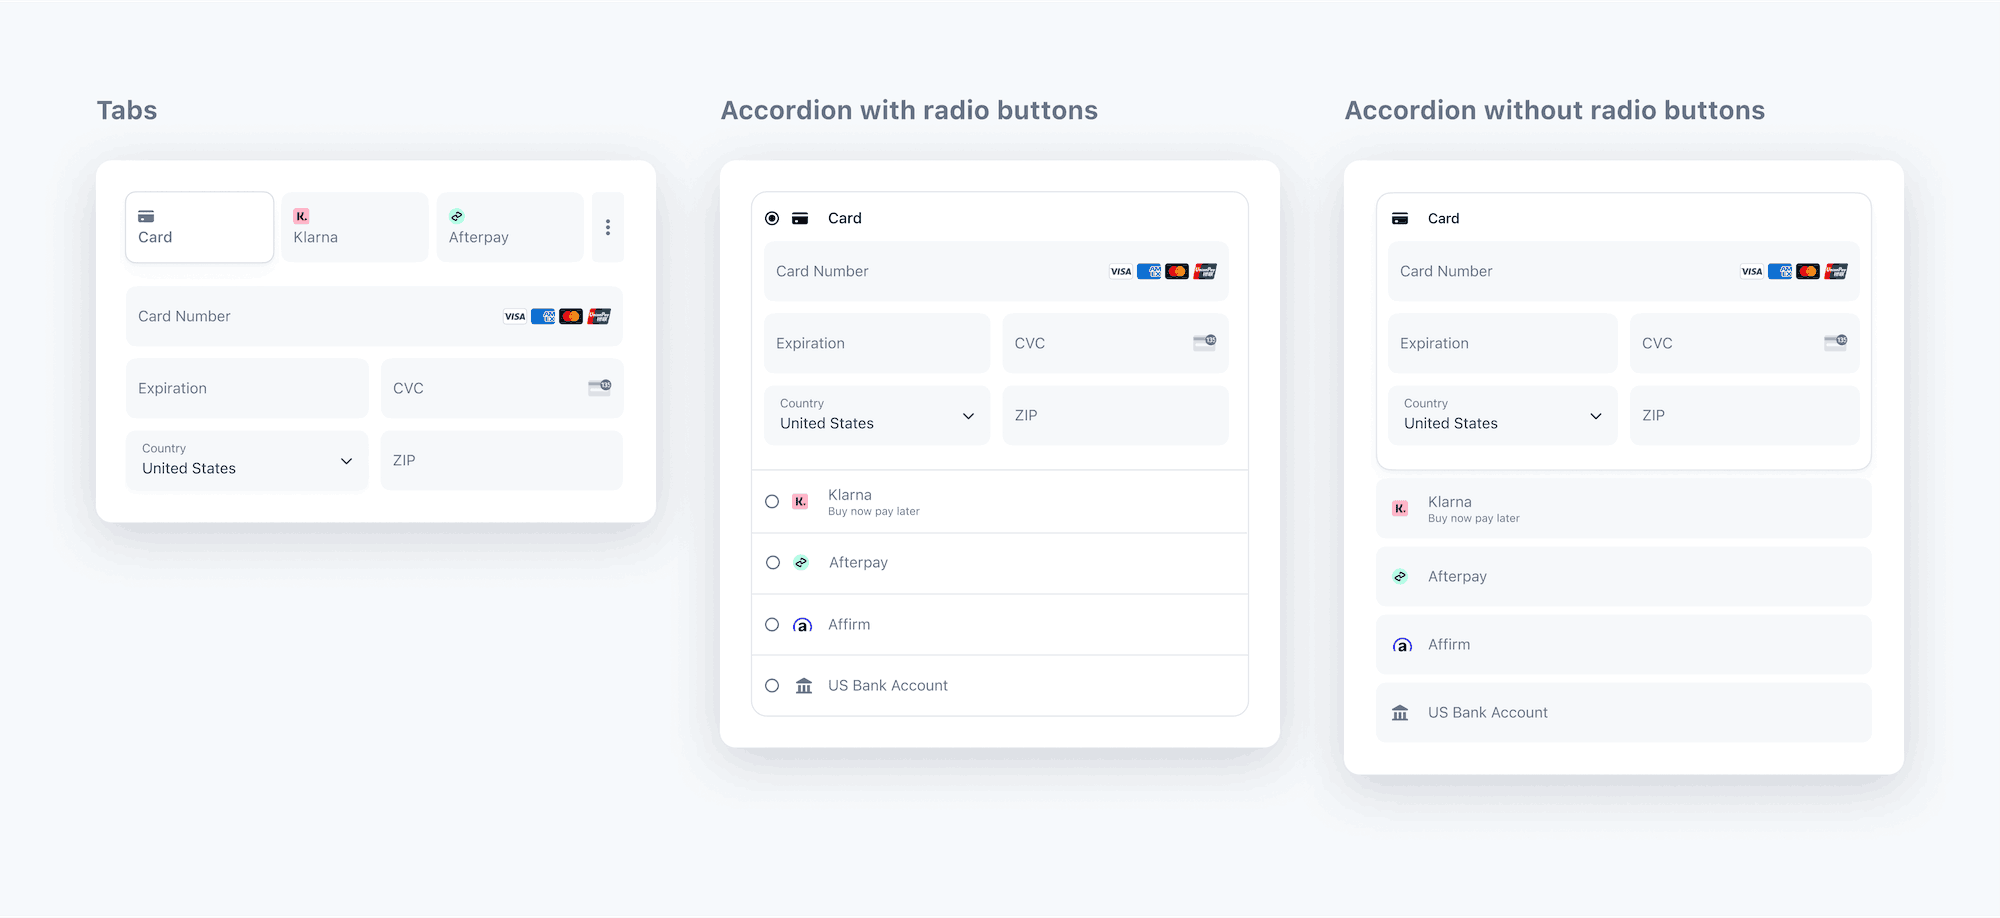
Mise en page du composant Element Payment
## Optional: Personnaliser l'apparence [Côté client]
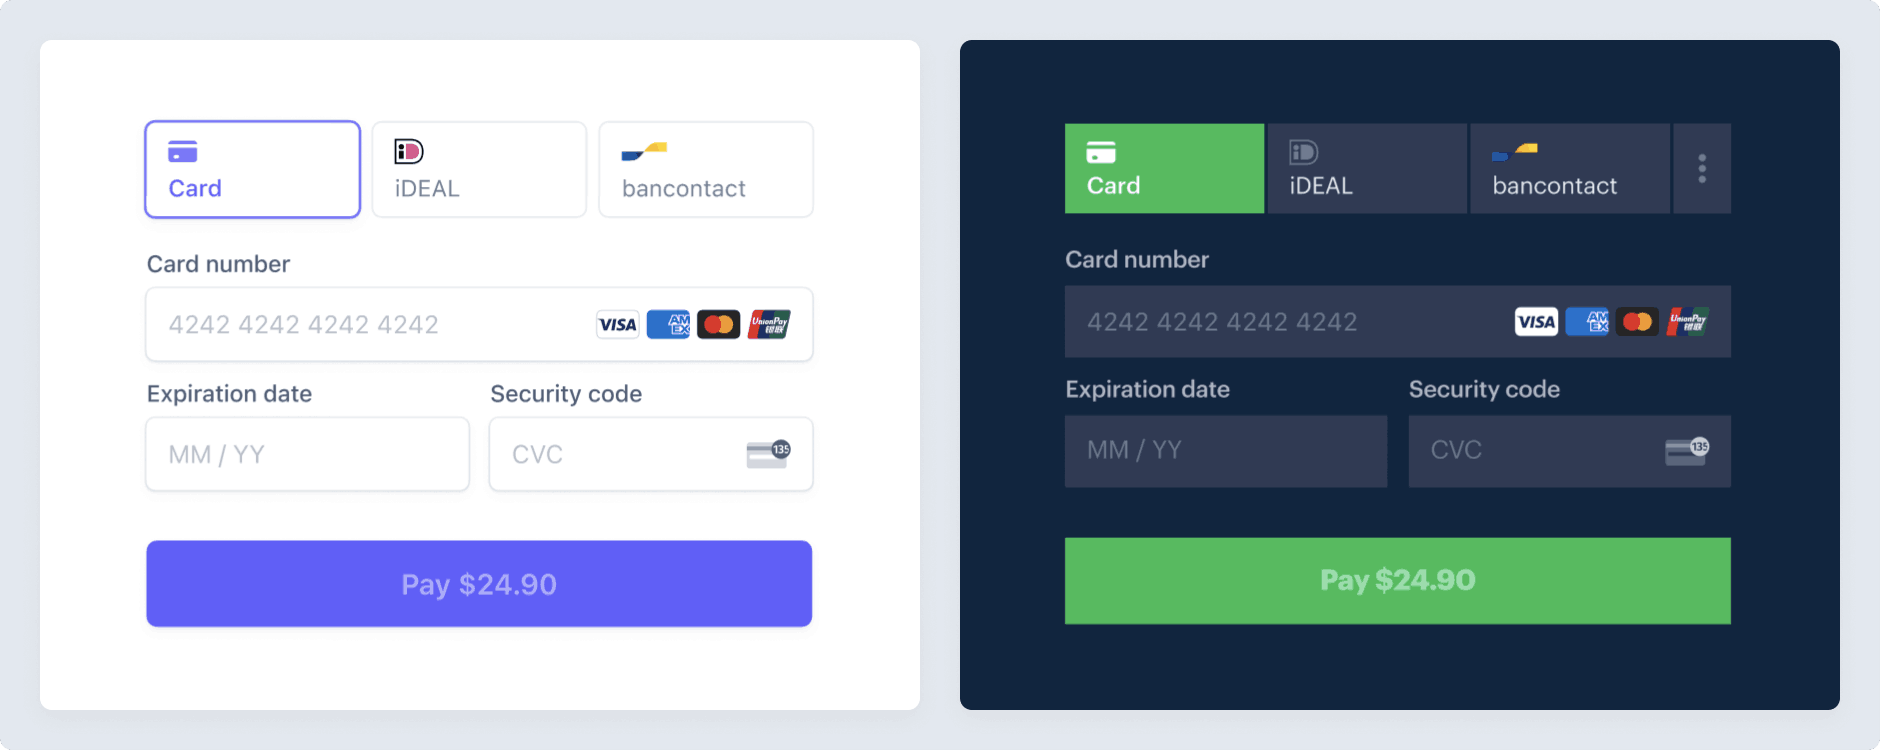
Maintenant que vous avez ajouté le composant Payment Element à votre page, vous pouvez personnaliser son apparence pour l’adapter à votre design. Pour en savoir plus sur la personnalisation de ce composant, consultez la page dédiée à l’[API Elements Appearance](https://docs.stripe.com/elements/appearance-api.md).
Personnaliser le Payment Element
## Optional: Enregistrer et récupérer les moyens de paiement des clients
Vous pouvez configurer le composant Payment Element de façon à enregistrer les moyens de paiement de vos clients en vue d’une utilisation ultérieure. Cette section vous montre comment intégrer la [fonctionnalité d’enregistrement des moyens de paiement](https://docs.stripe.com/payments/save-customer-payment-methods.md), qui permet à Payment Element de :
- De demander aux acheteurs s’ils consentent à ce que leur moyen de paiement soit enregistré
- Enregistrer les moyens de paiement lorsque les clients y consentent
- Afficher les moyens de paiement enregistrés des acheteurs lors de leurs futurs achats
- [Mise à jour automatique des cartes perdues ou expirées](https://docs.stripe.com/payments/cards/overview.md#automatic-card-updates) lorsque les clients les remplacent

Enregistrez les moyens de paiement.

Réutilisez un moyen de paiement précédemment enregistré.
### Activer l’enregistrement du moyen de paiement dans le composant Payment Element
Créez une [CustomerSession](https://docs.stripe.com/api/customer_sessions/.md) sur votre serveur en fournissant l’ID du client (en utilisant soit `customer` pour un objet `Customer`, soit `customer_account` pour un objet `Account` configuré pour le client) et en activant le composant [payment_element](https://docs.stripe.com/api/customer_sessions/object.md#customer_session_object-components-payment_element) pour votre session. Configurez les [fonctionnalités](https://docs.stripe.com/api/customer_sessions/create.md#create_customer_session-components-payment_element-features) des moyens de paiement enregistrés que vous souhaitez activer. Par exemple, l’activation de [payment_method_save](https://docs.stripe.com/api/customer_sessions/create.md#create_customer_session-components-payment_element-features-payment_method_save) affiche une case à cocher qui permet aux clients d’enregistrer leurs informations de paiement pour une utilisation ultérieure.
Vous pouvez définir `setup_future_usage` sur un PaymentIntent ou une Checkout Session pour déroger au comportement par défaut d’enregistrement des moyens de paiement. Cela permet d’enregistrer automatiquement le moyen de paiement pour une utilisation ultérieure, même si le client ne choisit pas explicitement de l’enregistrer. Si vous prévoyez de définir `setup_future_usage`, ne définissez pas `payment_method_save_usage` dans la même transaction de paiement, car cela provoque une erreur d’intégration.
> #### Utiliser l’API Accounts v2 pour représenter les clients
>
> L’API Accounts v2 est généralement disponible pour les utilisateurs de Connect et en aperçu public pour les autres utilisateurs de Stripe. Si vous avez accès à l’aperçu Accounts v2, vous devez spécifier une [version d’aperçu](https://docs.stripe.com/api-v2-overview.md#sdk-and-api-versioning) dans votre code.
>
> Pour demander l’accès à l’aperçu Accounts v2,
>
> Dans la plupart des cas d’usage, nous vous recommandons de [modéliser vos clients en tant qu’objets Account configurés par le client](https://docs.stripe.com/accounts-v2/use-accounts-as-customers.md), plutôt que d’utiliser des objets [Customer](https://docs.stripe.com/api/customers.md).
#### Accounts v2
#### Ruby
```ruby
# Don't put any keys in code. See https://docs.stripe.com/keys-best-practices.
# Find your keys at https://dashboard.stripe.com/apikeys.
client = Stripe::StripeClient.new('<>')
post '/create-customer-session' do
customer_session = client.v1.customer_sessions.create({
customer_account: {{CUSTOMER_ACCOUNT_ID}},
components: {
payment_element: {
enabled: true,
features: {
payment_method_redisplay: 'enabled',
payment_method_save: 'enabled',
payment_method_save_usage: 'off_session',
payment_method_remove: 'enabled',
},
},
},
})
{
customer_session_client_secret: customer_session.client_secret
}.to_json
end
```
#### Customers v1
#### Ruby
```ruby
# Don't put any keys in code. See https://docs.stripe.com/keys-best-practices.
# Find your keys at https://dashboard.stripe.com/apikeys.
client = Stripe::StripeClient.new('<>')
post '/create-customer-session' do
customer_session = client.v1.customer_sessions.create({
customer: {{CUSTOMER_ID}},
components: {
payment_element: {
enabled: true,
features: {
payment_method_redisplay: 'enabled',
payment_method_save: 'enabled',
payment_method_save_usage: 'off_session',
payment_method_remove: 'enabled',
},
},
},
})
{
customer_session_client_secret: customer_session.client_secret
}.to_json
end
```
Votre instance Elements utilise la *clé secrète du client* (A client secret is used with your publishable key to authenticate a request for a single object. Each client secret is unique to the object it's associated with) de la session Client pour accéder aux moyens de paiement enregistrés de ce client. [Gérez les erreurs](https://docs.stripe.com/error-handling.md) correctement lorsque vous créez la session Client. Si une erreur se produit, vous n’avez pas besoin de fournir la clé secrète du client de la session Client à l’instance Elements, car elle est facultative.
Créez l’instance Elements à l’aide de la clé secrète du client de la session Client. Ensuite, utilisez l’instance Elements pour créer un Payment Element.
```javascript
// Create the CustomerSession and obtain its clientSecret
const res = await fetch("/create-customer-session", {
method: "POST"
});
const {
customer_session_client_secret: customerSessionClientSecret
} = await res.json();
const elementsOptions = {
mode: 'payment',
amount: 1099,
currency: 'usd',customerSessionClientSecret,
// Fully customizable with appearance API.
appearance: {/*...*/},
};
// Set up Stripe.js and Elements to use in checkout form, passing the client secret
// and CustomerSession's client secret obtained in a previous step
const elements = stripe.elements(elementsOptions);
// Create and mount the Payment Element
const paymentElementOptions = { layout: 'accordion'};
const paymentElement = elements.create('payment', paymentElementOptions);
paymentElement.mount('#payment-element');
```
Lors de la confirmation du PaymentIntent, Stripe.js contrôle automatiquement le paramètre [setup_future_usage](https://docs.stripe.com/api/payment_intents/object.md#payment_intent_object-setup_future_usage) sur le PaymentIntent et le paramètre [allow_redisplay](https://docs.stripe.com/api/payment_methods/object.md#payment_method_object-allow_redisplay) sur le PaymentMethod, selon que le client a coché ou non la case permettant d’enregistrer ses informations de paiement.
### Exiger la collecte du CVC
Vous pouvez également spécifier `require_cvc_recollection` à la fois [lors de la création du PaymentIntent](https://docs.stripe.com/api/payment_intents/create.md#create_payment_intent-payment_method_options-card-require_cvc_recollection) et [lors de la création d’Elements](https://docs.stripe.com/js/elements_object/create_without_intent#stripe_elements_no_intent-options-paymentMethodOptions-card-require_cvc_recollection) pour appliquer la collecte du CVC lorsqu’un client paie par carte.
### Détecter la sélection d’un moyen de paiement enregistré
Pour contrôler le contenu dynamique qui s’affiche lors de la sélection d’un moyen de paiement enregistré, écoutez l’événement `change` du composant Element Payment, qui contient le moyen de paiement sélectionné.
```javascript
paymentElement.on('change', function(event) {
if (event.value.payment_method) {
// Control dynamic content if a saved payment method is selected
}
})
```
## Optional: Options d'éléments supplémentaires [Côté client]
L’[objet Elements](https://docs.stripe.com/js/elements_object/create_without_intent) accepte des options supplémentaires qui ont une incidence sur l’encaissement des paiements. En fonction des options proposées, le Payment Element affiche les moyens de paiement disponibles parmi ceux que vous avez activés. En savoir plus sur la [prise en charge des moyens de paiement](https://docs.stripe.com/payments/payment-methods/payment-method-support.md).
Assurez-vous que les options Elements que vous fournissez (telles que `captureMethod`, `setupFutureUsage` et `paymentMethodOptions`) correspondent aux paramètres équivalents que vous transmettez lors de la création et de la confirmation de l’Intent. Des paramètres incohérents peuvent entraîner un comportement inattendu ou des erreurs.
If your integration renders the Payment Element before creating an Intent, we suppress microdeposit verification for US bank accounts when the payment amount is 0.
| Propriété | Type | Description | Obligatoire |
| ---------------------------- | -------------------------------------------------- | -------------------------------------------------------------------------------------------------------------------------------------------------------------------------------------------------------------------------------------------------------------------------------------------------------------------------------------------------------------------------------------------------------------------------------------------------------------------------------------------------------------------------------------------------------------------------------------------------------------------------------------------------------------------------------------------------------------------------------------------------------------- | ------------------------------------------ |
| `mode` | - `payment`
- `setup`
- `subscription` | Indique si l’Payment Element est utilisé avec un *PaymentIntent* (The Payment Intents API tracks the lifecycle of a customer checkout flow and triggers additional authentication steps when required by regulatory mandates, custom Radar fraud rules, or redirect-based payment methods), un *SetupIntent* (The Setup Intents API lets you build dynamic flows for collecting payment method details for future payments. It tracks the lifecycle of a payment setup flow and can trigger additional authentication steps if required by law or by the payment method) ou un *abonnement* (A Subscription represents the product details associated with the plan that your customer subscribes to. Allows you to charge the customer on a recurring basis). | Oui |
| `currency` | `string` | La devise du montant à facturer au client. | Oui |
| `amount` | `number` | Le montant à débiter au client, indiqué dans les interfaces utilisateur Apple Pay, Google Pay ou BNPL. | Pour les modes `payment` et `subscription` |
| `setupFutureUsage` | - `off_session`
- `on_session` | Indique que vous avez l’intention d’effectuer des paiements ultérieurs avec les informations de paiement collectées par l’Payment Element. | Non |
| `captureMethod` | - `automatic`
- `automatic_async`
- `manual` | Détermine à quel moment capturer les fonds sur le compte du client. | Non |
| `onBehalfOf` | `string` | Connect uniquement. L’ID de compte Stripe qui correspond à l’entreprise de référence. Consultez les [cas d’usage](https://docs.stripe.com/connect/charges.md) pour déterminer si cette option est pertinente pour votre intégration. | Non |
| `paymentMethodTypes` | `string[]` | Liste des types de moyens de paiement à afficher. Vous pouvez omettre cet attribut pour gérer vos moyens de paiement dans le [Dashboard Stripe](https://dashboard.stripe.com/settings/payment_methods). | Non |
| `paymentMethodConfiguration` | `string` | La [configuration des moyens de paiement](https://docs.stripe.com/api/payment_method_configurations.md) à utiliser lors de la gestion de vos moyens de paiement dans le [Dashboard Stripe](https://dashboard.stripe.com/settings/payment_methods). Si aucune configuration n’est spécifiée, votre configuration par défaut sera utilisée. | Non |
| `paymentMethodCreation` | `manual` | Autorise la création d’objets PaymentMethod à partir de l’instance Elements à l’aide de [stripe.createPaymentMethod](https://docs.stripe.com/js/payment_methods/create_payment_method_elements). | Non |
| `paymentMethodOptions` | `{us_bank_account: {verification_method: string}}` | Options de vérification pour le moyen de paiement `us_bank_account`. Accepte les mêmes méthodes de vérification que les [Payment Intents](https://docs.stripe.com/api/payment_intents/create.md#create_payment_intent-payment_method_options-us_bank_account-verification_method). | Non |
| `paymentMethodOptions` | `{card: {installments: {enabled: boolean}}}` | Permet d’activer manuellement l’interface utilisateur de sélection du calendrier de versements échelonnés par carte, le cas échéant, lorsque vous ne gérez pas vos moyens de paiement dans le [Dashboard Stripe](https://dashboard.stripe.com/settings/payment_methods). Vous devez définir `mode='payment'` *et* spécifier explicitement des `paymentMethodTypes`. Dans le cas contraire, une erreur est générée. Non compatible avec `paymentMethodCreation='manual'`. | Non |
| `paymentMethodOptions` | `{[paymentMethod]: {setup_future_usage: string}}` | Vous permet de spécifier `setup_future_usage` pour les seuls moyens de paiement prenant en charge la réutilisation. Uniquement applicable lorsque `le mode` est `paiement`. La valeur de chaque moyen de paiement doit correspondre au `payment_method_options[paymentMethod][setup_future_usage]` correspondant sur le PaymentIntent lors de la confirmation. Consultez la [documentation Stripe.js](https://docs.stripe.com/js/elements_object/create_without_intent#stripe_elements_no_intent-options-paymentMethodOptions) pour connaître les moyens de paiement et valeurs pris en charge. | Non |
## Créer un ConfirmationToken [Côté client]
> #### Utiliser createPaymentMethod par le biais d’une ancienne implémentation
>
> Si vous utilisez une ancienne implémentation, vous utilisez peut-être les informations de `stripe.createPaymentMethod` pour finaliser les paiements sur votre serveur. Nous vous recommandons de suivre ce guide pour [migrer vers les tokens de confirmation](https://docs.stripe.com/payments/payment-element/migration-ct.md), mais vous pouvez toujours accéder à notre ancienne documentation pour [mettre en place la confirmation à deux facteurs](https://docs.stripe.com/payments/build-a-two-step-confirmation-legacy.md).
Lorsque le client envoie votre formulaire de paiement, appelez [stripe.createConfirmationToken](https://docs.stripe.com/js/confirmation_tokens/create_confirmation_token) pour créer un *ConfirmationToken* (ConfirmationTokens help capture data from your client, such as your customer's payment instruments and shipping address, and are used to confirm a PaymentIntent or SetupIntent) à envoyer à votre serveur et appliquer une logique métier ou une validation supplémentaire avant la confirmation. Vous pouvez inspecter le champ [`payment_method_preview`](https://docs.stripe.com/api/confirmation_tokens/object.md#confirmation_token_object-payment_method_preview) pour exécuter la logique supplémentaire.
#### HTML + JS
```javascript
const form = document.getElementById('payment-form');
const submitBtn = document.getElementById('submit');
const handleError = (error) => {
const messageContainer = document.querySelector('#error-message');
messageContainer.textContent = error.message;
submitBtn.disabled = false;
}
form.addEventListener('submit', async (event) => {
// We don't want to let default form submission happen here,
// which would refresh the page.
event.preventDefault();
// Prevent multiple form submissions
if (submitBtn.disabled) {
return;
}
// Disable form submission while loading
submitBtn.disabled = true;
// Trigger form validation and wallet collection
const {error: submitError} = await elements.submit();
if (submitError) {
handleError(submitError);
return;
}
// Create the ConfirmationToken using the details collected by the Payment Element
const {error, confirmationToken} = await stripe.createConfirmationToken({
elements,
params: {
payment_method_data: {
billing_details: {
name: 'Jenny Rosen',
}
}
}
});
if (error) {
// This point is only reached if there's an immediate error when
// creating the ConfirmationToken. Show the error to your customer (for example, payment details incomplete)
handleError(error);
return;
}
// Now that you have a ConfirmationToken, you can use it in the following steps to render a confirmation page or run additional validations on the server
return fetchAndRenderSummary(confirmationToken)
});
```
#### React
```jsx
import React, {useState} from 'react';
import {useStripe, useElements, PaymentElement} from '@stripe/react-stripe-js';
export default function CheckoutForm() {
const stripe = useStripe();
const elements = useElements();
const [errorMessage, setErrorMessage] = useState();
const [loading, setLoading] = useState(false);
const handleError = (error) => {
setLoading(false);
setErrorMessage(error.message);
}
const handleSubmit = async (event) => {
// We don't want to let default form submission happen here,
// which would refresh the page.
event.preventDefault();
if (!stripe) {
// Stripe.js hasn't yet loaded.
// Make sure to disable form submission until Stripe.js has loaded.
return;
}
setLoading(true);
// Trigger form validation and wallet collection
const {error: submitError} = await elements.submit();
if (submitError) {
handleError(submitError);
return;
}
// Create the ConfirmationToken using the details collected by the Payment Element
const {error, confirmationToken} = await stripe.createConfirmationToken({
elements,
params: {
payment_method_data: {
billing_details: {
name: 'Jenny Rosen',
}
}
}
});
if (error) {
// This point is only reached if there's an immediate error when
// creating the ConfirmationToken. Show the error to your customer (for example, payment details incomplete)
handleError(error);
return;
}
// Now that you have a ConfirmationToken, you can use it in the following steps to render a confirmation page or run additional validations on the server
return fetchAndRenderSummary(confirmationToken)
};
return (
);
}
```
## Afficher les informations de paiement sur la page de confirmation
À ce stade, vous disposez de toutes les informations nécessaires pour afficher la page de confirmation. Appelez le serveur afin d’obtenir les informations requises et affichez la page de confirmation en conséquence.
#### Node.js
```javascript
// Using Express
const express = require('express');
const app = express();
app.use(express.json());
app.post('/summarize-payment', async (req, res) => {
try {
// Retrieve the confirmationTokens and generate the response
const confirmationToken = await stripe.confirmationTokens.retrieve(req.body.confirmation_token_id);
const response = summarizePaymentDetails(confirmationToken);
// Send the response to the client
res.json(response);
} catch (e) {
// Display error on client
return res.json({ error: e.message });
}
});
function summarizePaymentDetails(confirmationToken) {
// Use confirmationToken.payment_method_preview to derive the applicable summary fields for your UI
return {
type: confirmationToken.payment_method_preview.type,
// Add other values (such as Tax Calculation amount) as needed here
};
}
```
#### JavaScript
```javascript
const fetchAndRenderSummary = async (confirmationToken) => {
const res = await fetch('/summarize-payment', {
method: "POST",
body: JSON.stringify({ confirmation_token_id: confirmationToken.id }),
});
const summary = await res.json();
// Render the summary object returned by your server
};
```
## Optional: Calculer les taxes avant le paiement [Côté serveur]
Le Payment Element ne calcule pas les taxes par défaut. Utilisez l’[API Tax](https://docs.stripe.com/api/tax.md) pour calculer les taxes dues sur la transaction.
> Pour calculer les taxes dans le Payment Element, vous devez tout d’abord :
>
> - [Activer Stripe Tax](https://docs.stripe.com/tax/calculating.md)
- [Recueillir l’adresse de facturation](https://docs.stripe.com/payments/build-a-two-step-confirmation.md#collect-addresses)
Mettez à jour la fonction `summarizePaymentDetails` pour créer un calcul des taxes basé sur l’adresse de facturation du client déclaré dans le ConfirmationToken.
### Before
```js
function summarizePaymentDetails(confirmationToken) {
// Use confirmationToken.payment_method_preview to derive the applicable summary fields for your UI
}
```
### After
```js
function summarizePaymentDetails(confirmationToken) {
tax_calculation = await stripe.tax.calculations.create({
currency: 'usd',
line_items: [
{
amount: 1000,
reference: 'L1',
},
],
customer_details: {// Use ConfirmationToken's address for TaxCalculation
address: confirmationToken.paymentMethodPreview.billingDetails.address,
address_source: 'shipping',
},
});
```
Mettez à jour la déclaration pour y inclure le `amount_total` du calcul des taxes, qui représente le montant de facturation majoré des taxes, afin de pouvoir présenter au client le montant total dû.
### Before
```js
return {
type: confirmationToken.payment_method_preview.type,
// Add other values as needed here
};
```
### After
```js
return {
type: confirmationToken.payment_method_preview.type,// Add any other values from TaxCalculation for your display purposes. For example, you can use [tax_breakdown](/tax/standalone-tax-api#tax-breakdowns) to display what tax was applied
amount_total: tax_calculation.amount_total,
tax_calculation_id: tax_calculation.id
// Add other values as needed here
};
```
## Créer un PaymentIntent [Côté serveur]
> #### Exécuter une logique métier personnalisée immédiatement avant la confirmation du paiement
>
> Accédez à l’[étape 5](https://docs.stripe.com/payments/finalize-payments-on-the-server.md?platform=web&type=payment#submit-payment) du guide « Finaliser » les paiements pour exécuter votre logique métier personnalisée immédiatement avant la confirmation du paiement. Sinon, suivez la procédure ci-dessous pour une intégration plus simple, qui utilise `stripe.confirmPayment` au niveau du client afin de confirmer le paiement et gérer les actions qui pourraient suivre.
Lorsque le client envoie votre formulaire de paiement, créez un *PaymentIntent* (The Payment Intents API tracks the lifecycle of a customer checkout flow and triggers additional authentication steps when required by regulatory mandates, custom Radar fraud rules, or redirect-based payment methods) sur votre serveur avec un `amount` et une `currency` activés.
Renvoyez la valeur *clé secrète du client* (The client secret is a unique key returned from Stripe as part of a PaymentIntent. This key lets the client access important fields from the PaymentIntent (status, amount, currency) while hiding sensitive ones (metadata, customer)) à votre client pour que Stripe.js l’utilise afin de finaliser le processus de paiement.
L’exemple suivant comprend du code commenté pour illustrer le [Calcul facultatif des taxes](https://docs.stripe.com/payments/build-a-two-step-confirmation.md#calculate-tax).
#### Accounts v2
#### Ruby
```ruby
require 'stripe'
# Don't put any keys in code. See https://docs.stripe.com/keys-best-practices.
Stripe.api_key = '<>'
post '/create-intent' do
# If you used a Tax Calculation, optionally recalculate taxes
# confirmation_token = Stripe::ConfirmationToken.retrieve(params[:confirmation_token_id])
# summarized_payment_details = summarize_payment_details(confirmation_token)
intent = Stripe::PaymentIntent.create({
# To allow saving and retrieving payment methods, provide the Account ID.
customer_account: customer_account.id,
# If you used a Tax Calculation, use its `amount_total`.
# amount: summarized_payment_details.amount_total,
amount: 1099,
currency: 'usd',
# Specifying the `automatic_payment_methods` parameter is optional because Stripe enables its functionality by default.
automatic_payment_methods: {enabled: true},
# If you used a Tax Calculation, link it to the PaymentIntent to make sure any transitions accurately reflect the tax.
# hooks: {
# inputs: {
# tax: {
# calculation: tax_calculation.id
# }
# }
#}
},
#{
# stripe_version: '2025-09-30.preview' }
)
{client_secret: intent.client_secret}.to_json
end
```
#### Customers v1
#### Ruby
```ruby
require 'stripe'
# Don't put any keys in code. See https://docs.stripe.com/keys-best-practices.
client = Stripe::StripeClient.new('<>')
post '/create-intent' do
# If you used a Tax Calculation, optionally recalculate taxes
# confirmation_token = client.v1.confirmation_tokens.retrieve(params[:confirmation_token_id])
# summarized_payment_details = summarize_payment_details(confirmation_token)
intent = client.v1.payment_intents.create({
# To allow saving and retrieving payment methods, provide the Customer ID.
customer: customer.id,
# If you used a Tax Calculation, use its `amount_total`.
# amount: summarized_payment_details.amount_total,
amount: 1099,
currency: 'usd',
# Specifying the `automatic_payment_methods` parameter is optional because Stripe enables its functionality by default.
automatic_payment_methods: {enabled: true},
# If you used a Tax Calculation, link it to the PaymentIntent to make sure any transitions accurately reflect the tax.
# hooks: {
# inputs: {
# tax: {
# calculation: tax_calculation.id
# }
# }
#}
},
#{
# stripe_version: '2025-09-30.preview' }
)
{client_secret: intent.client_secret}.to_json
end
```
## Envoyer le paiement à Stripe [Côté client]
Utilisez [stripe.confirmPayment](https://docs.stripe.com/js/payment_intents/confirm_payment) pour finaliser le paiement à l’aide des informations du composant Payment Element.
Renseignez le paramètre `confirmation_token` avec l’ID du ConfirmationToken que vous avez créé à la page précédente, qui contient les informations de paiement collectées à l’aide du composant Payment Element.
Ajoutez un paramètre [return_url](https://docs.stripe.com/api/payment_intents/create.md#create_payment_intent-return_url) à cette fonction pour indiquer à Stripe où rediriger l’utilisateur une fois le paiement effectué. Dans un premier temps, votre utilisateur sera peut-être redirigé vers un site intermédiaire, comme une page d’autorisation bancaire, avant d’être redirigé vers l’URL `return_url`. Une fois le paiement par carte abouti, l’utilisateur est immédiatement redirigé vers l’URL `return_url`.
Si vous ne souhaitez pas effectuer de redirection à la fin des paiements par carte, vous pouvez définir le paramètre [redirect](https://docs.stripe.com/js/payment_intents/confirm_payment#confirm_payment_intent-options-redirect) sur `if_required`. De cette manière, seuls les clients qui choisissent un moyen de paiement avec redirection seront redirigés.
#### HTML + JS
```javascript
const form = document.getElementById('payment-form');
const submitBtn = document.getElementById('submit');
const handleError = (error) => {
const messageContainer = document.querySelector('#error-message');
messageContainer.textContent = error.message;
submitBtn.disabled = false;
}
form.addEventListener('submit', async (event) => {
// We don't want to let default form submission happen here,
// which would refresh the page.
event.preventDefault();
// Prevent multiple form submissions
if (submitBtn.disabled) {
return;
}
// Disable form submission while loading
submitBtn.disabled = true;
// Create the PaymentIntent and obtain clientSecret
const res = await fetch("/create-intent", {
method: "POST",
});
const {client_secret: clientSecret} = await res.json();
// Confirm the PaymentIntent using the details collected by the ConfirmationToken
const {error} = await stripe.confirmPayment({
clientSecret,
confirmParams: {
confirmation_token: '{{CONFIRMATION_TOKEN_ID}}',
return_url: 'https://example.com/order/123/complete',
},
});
if (error) {
// This point is only reached if there's an immediate error when
// confirming the payment. Show the error to your customer (for example, payment details incomplete)
handleError(error);
} else {
// Your customer is redirected to your `return_url`. For some payment
// methods like iDEAL, your customer is redirected to an intermediate
// site first to authorize the payment, then redirected to the `return_url`.
}
});
```
#### React
```jsx
import React, {useState} from 'react';
import {useStripe, useElements, PaymentElement} from '@stripe/react-stripe-js';
export default function CheckoutForm() {
const stripe = useStripe();
const elements = useElements();
const [errorMessage, setErrorMessage] = useState();
const [loading, setLoading] = useState(false);
const handleError = (error) => {
setLoading(false);
setErrorMessage(error.message);
}
const handleSubmit = async (event) => {
// We don't want to let default form submission happen here,
// which would refresh the page.
event.preventDefault();
if (!stripe) {
// Stripe.js hasn't yet loaded.
// Make sure to disable form submission until Stripe.js has loaded.
return;
}
setLoading(true);
// Create the PaymentIntent and obtain clientSecret
const res = await fetch("/create-intent", {
method: "POST",
});
const {client_secret: clientSecret} = await res.json();
// Confirm the PaymentIntent using the details collected by the ConfirmationToken
const {error} = await stripe.confirmPayment({
clientSecret,
confirmParams: {
confirmation_token: '{{CONFIRMATION_TOKEN_ID}}',
return_url: 'https://example.com/order/123/complete',
},
});
if (error) {
// This point is only reached if there's an immediate error when
// confirming the payment. Show the error to your customer (for example, payment details incomplete)
handleError(error);
} else {
// Your customer is redirected to your `return_url`. For some payment
// methods like iDEAL, your customer is redirected to an intermediate
// site first to authorize the payment, then redirected to the `return_url`.
}
};
return (
);
}
```
## Divulguer Stripe à vos clients
Stripe recueille des informations sur les interactions des clients avec Elements afin de vous fournir des services, de prévenir la fraude et d’améliorer ses services. Cela inclut l’utilisation de cookies et d’adresses IP pour identifier les Elements qu’un client a vus au cours d’une même session Checkout. Vous êtes responsable de la divulgation et de l’obtention de tous les droits et consentements nécessaires pour que Stripe puisse utiliser les données à cette fin. Pour en savoir plus, visitez notre [Centre de confidentialité](https://stripe.com/legal/privacy-center#as-a-business-user-what-notice-do-i-provide-to-my-end-customers-about-stripe).
## See also
[Concevoir une intégration](https://docs.stripe.com/payments/payment-element/design-an-integration.md)