資金移動のためのプラットフォーム向け金融口座の利用
SetupIntents と PaymentMethods の使用方法と、プラットフォーム向けの Financial Accounts で銀行口座を確認する方法をご紹介します。
Homebox は架空の垂直型 SaaS で、HVAC、清掃業者、配管工などのホームサービス会社向けのソフトウェアを構築しています。この導入例では、Stripe API のトレジャリーエンドポイントを使用した基本的な資金の動きを説明します。この会社がどのように金融口座を設定し、決済カードを発行するかについては、プラットフォーム向け金融口座を使用した金融口座とカードの設定 を参照してください。
外部の銀行口座の使用
プラットフォーム向け金融口座は、連結アカウント資金の保管、管理、移動を支援する口座作成および資金移動 API エンドポイント一式をプラットフォームに提供します。プラットフォームは金融口座に資金を供給し、金融口座と外部銀行口座間で資金を移動できます。
Stripe API は、InboundTransfer と OutboundTransfer を提供し、連結アカウントの外部銀行口座と金融口座間の資金移動を容易にします。Stripe API はまた、OutboundPayment を提供し、連結アカウントの金融口座からサードパーティーの外部銀行口座への資金の移動を容易にします。これらのオブジェクトはすべて、PaymentMethods を使用して、金融番号や口座番号などの外部銀行口座の詳細を保管できます。
PaymentMethods の説明
Stripe API では、PaymentMethod オブジェクトを使用して、支払い方法の情報を保存できます。たとえば、Homebox は、ベンダーのアカウントを PaymentMethods として保存すると、情報を再入力して収集する必要なしに、資金を送金できます。
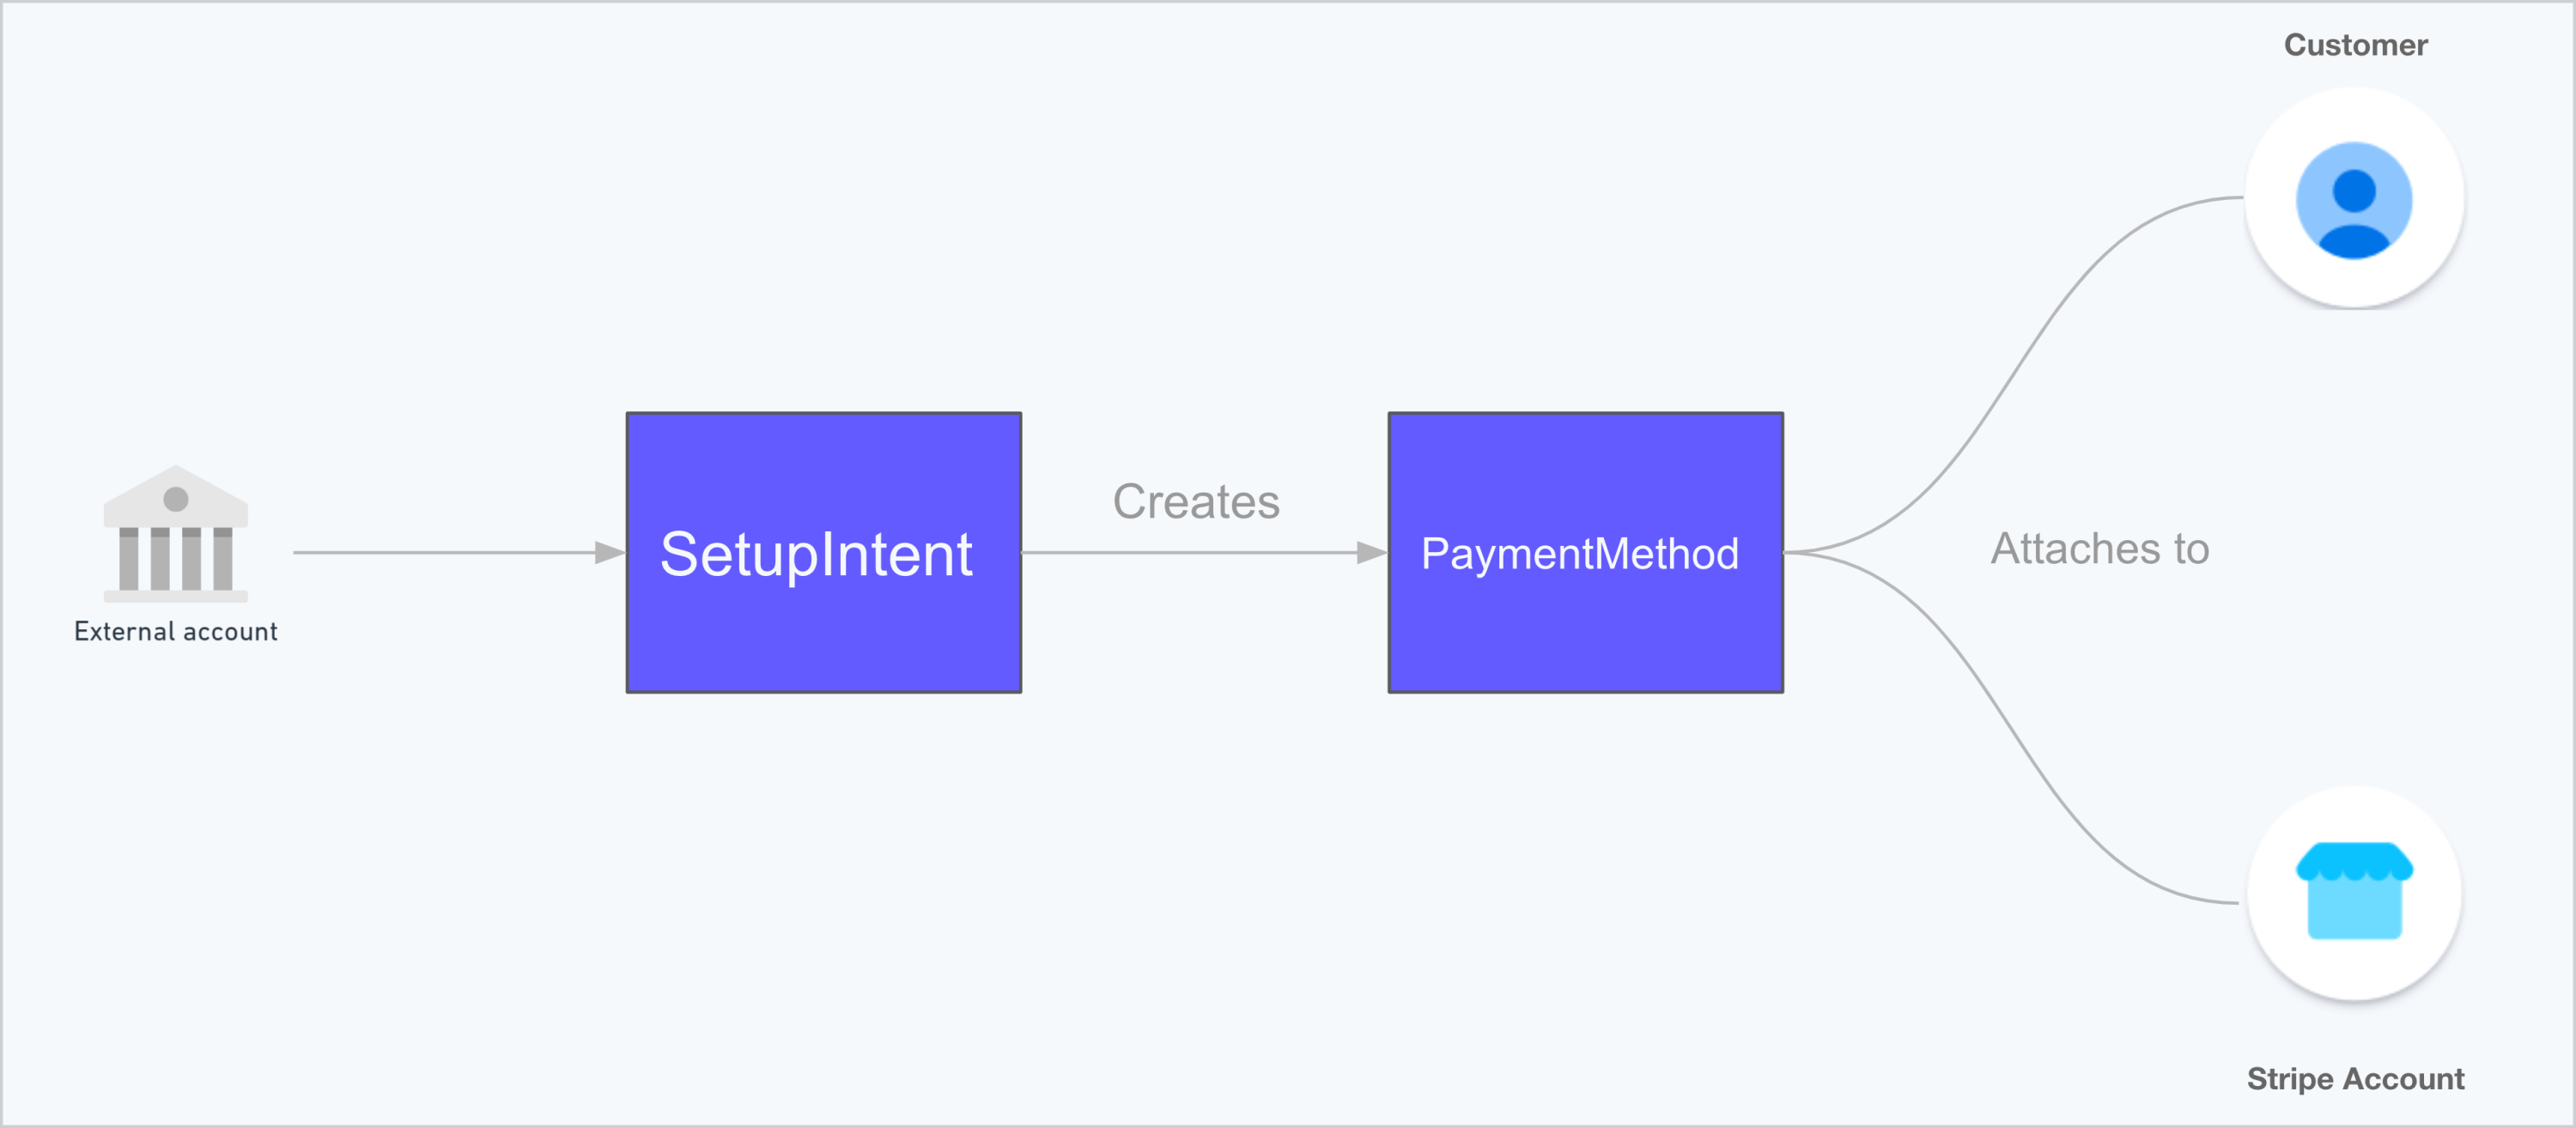
PaymentMethods (外部銀行口座情報を含む) を顧客 (第三者への送金用) または Stripe アカウント (Stripe アカウントホルダーの外部銀行口座からの引き出しまたは外部銀行口座への送金用) にアタッチできます。「顧客」とは、Stripe API の Customer オブジェクトを指し、任意のサードパーティーを定義します。プラットフォーム向け金融口座の使用では、顧客は Stripe アカウントホルダーへの決済ではなく、Stripe アカウントホルダーからの決済を受け取るベンダーであることが一般的です。SetupIntent オブジェクトを使用して、顧客アタッチと口座アタッチの両方の PaymentMethod オブジェクトを設定します。
PaymentMethod で使用できる関連 API オブジェクトは、その関連付けの方法によって異なります。
- 顧客に関連付け:
OutboundPaymentsを使用します。 - アカウントに関連付け:
InboundTransfersおよびOutboundTransfersを使用します。
PaymentMethod のフロー
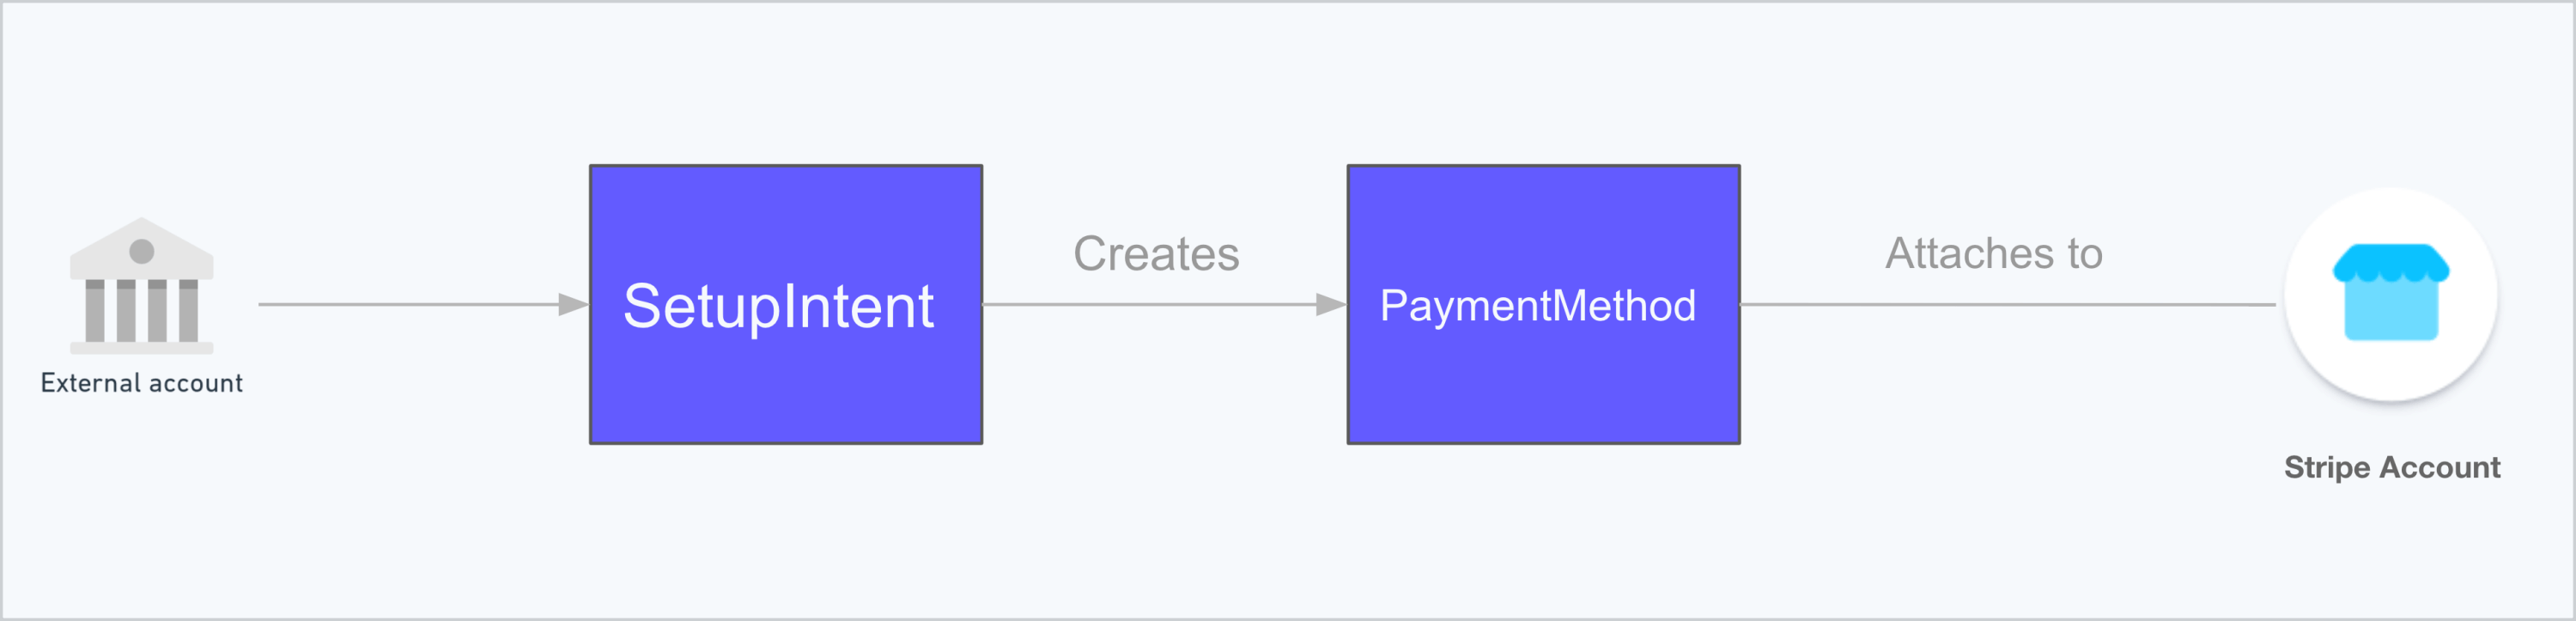
InboundTransfers および OutboundTransfers の概要
InboundTransfer を使用して Stripe アカウントの外部銀行口座から資金を引き出し、OutboundTransfer を使用して同じ所有者の外部銀行口座に資金を追加できます。
InboundTransfer を使用して資金を金融口座に移動するには、Stripe アカウント所有者が外部口座を確認する必要があります。OutboundTransfer を使用して金融口座から資金を送信する際に使用される銀行口座を確認する必要はありません。
外部の銀行口座が InboundTransfers または OutboundTransfers に使用される場合、対応する PaymentMethod を Stripe アカウント (顧客ではなく) にアタッチする必要があります。これを行うには、SetupIntent を使用して PaymentMethod を作成するときに、customer パラメーターではなく、attach_ パラメーターを使用します。
InboundTransfers および OutboundTransfers のフロー。
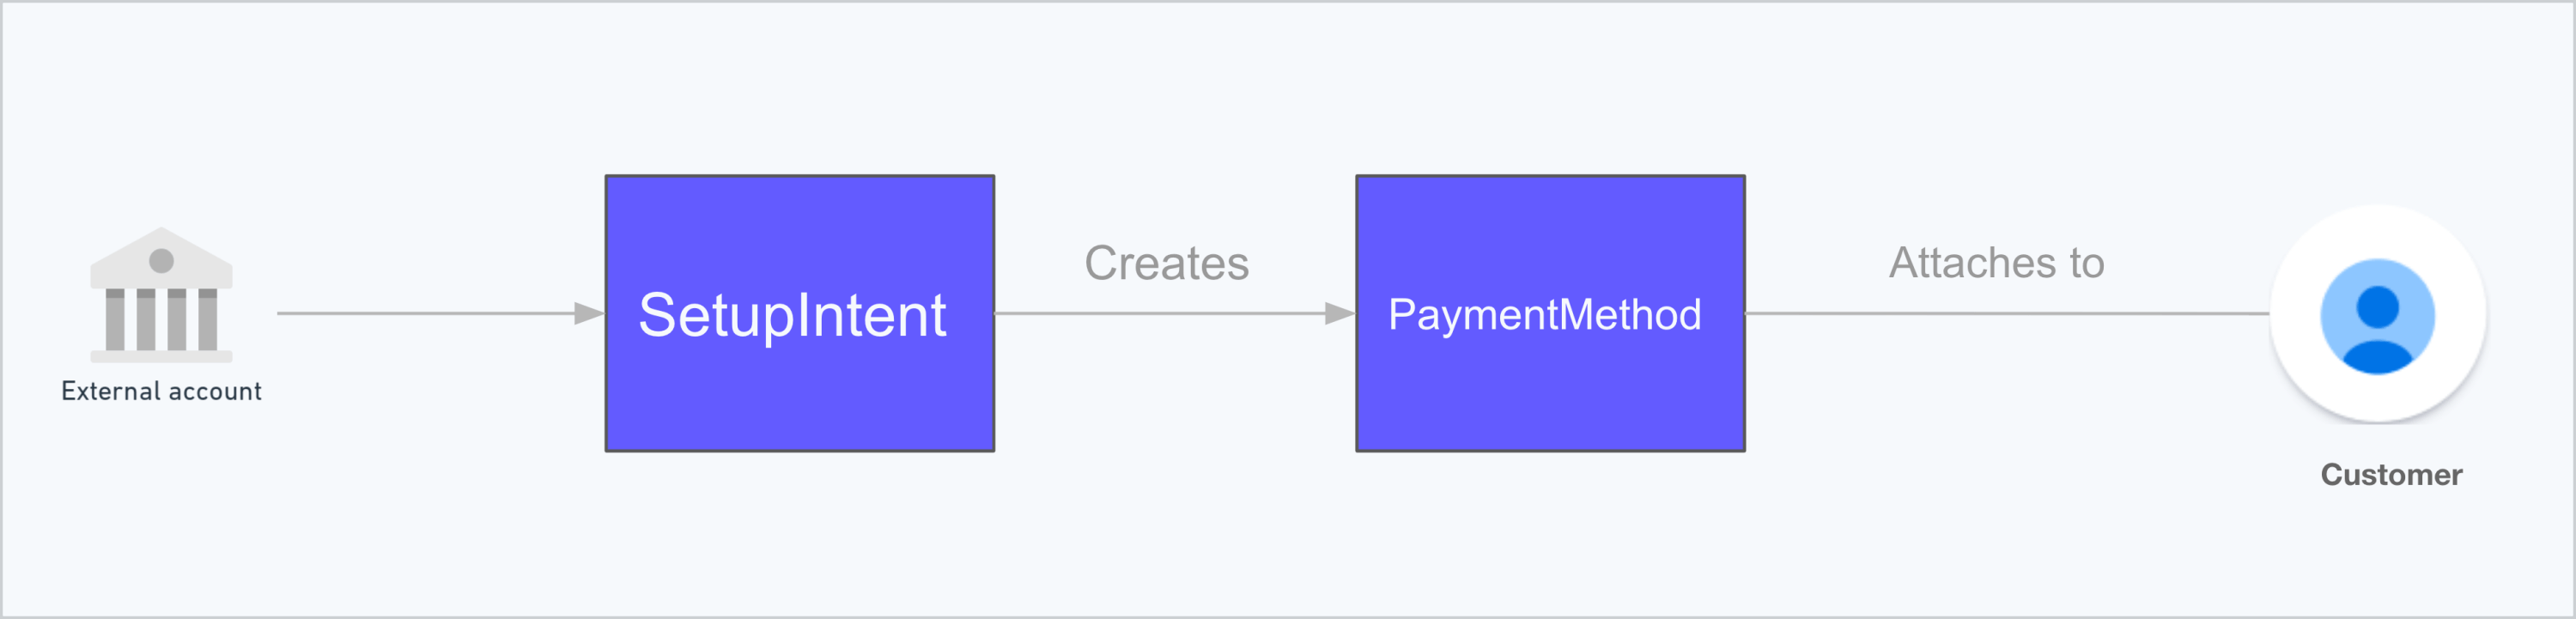
OutboundPayments
プラットフォームは OutboundPayment API を使用して、金融口座から第三者が所有する外部銀行口座に資金を送金します。
OutboundPayments で使用するには、PaymentMethods を顧客にアタッチする必要があります。OutboundPayments に使用する銀行口座を確認する必要はありません。
OutboundPayments のフロー
外部の銀行口座を追加
Homebox は、顧客保有の外部銀行口座をそれぞれの金融口座にリンクしようと考えています。Homebox の連結アカウントは、すべてのビジネス資金を金融口座に保管し、インバウンド送金を使用して外部の口座から金融口座に資金を引き出すことを望んでいます。連結アカウントが外部の口座との間で資金を送金できるようにするために、Homebox は、必要なパラメーターを指定して SetupIntent を作成し、アカウントにアタッチされた PaymentMethod に関連付けます。
OutboundTransfers または InboundTransfers を使用して資金の送受金を行うために、Homebox は、payment_ パラメーターで外部の銀行口座を指定する必要があります。本番環境の外部銀行口座リンクを作成する前に、Homebox は、Stripe が提供するテスト用口座番号を使用してフローをテストします。
上記の例のように、Homebox は、外部の銀行口座 (payment_) を定義して、attach_ を true に設定しました。これにより、銀行口座情報を Stripe アカウント所有者 (サードパーティーではない) に関連付けることができます。プラットフォームがリクエストを送信すると、API は SetupIntent で応答します。
{
  "id": "{{SETUP_INTENT_ID}}",
  "object": "setup_intent",
  "application": "{{APPLICATION_ID}}",
  "attach_to_self": true,
  "cancellation_reason": null,
  "client_secret": "{{SETUP_INTENT_SECRET}}",
  "created": 1642520861,
  "customer": null,
  "description": null,
  "flow_directions": [
    "inbound",
    "outbound"
  ],
  "last_setup_error": null,
  "latest_attempt": "{{ATTEMPT_ID}}",
  "livemode": false,
  "mandate": "{{MANDATE_ID}}",
  "metadata": {
  },
  "next_action": {
    "type": "verify_with_microdeposits",
    "verify_with_microdeposits": {
      "arrival_date": 1642579200,
      "hosted_verification_url": "https://payments.stripe.com/microdeposit/sacs_test_xxx",
      "microdeposit_type": "amounts"
    }
  },
  "on_behalf_of": null,
  "payment_method": "{{PAYMENT_METHOD_ID}}",
  "payment_method_options": {
    "us_bank_account": {
      "verification_method": "automatic"
    }
  },
  "payment_method_types": [
    "us_bank_account"
  ],
  "single_use_mandate": null,
  "status": "requires_confirmation",
  "usage": "off_session"
}
外部の銀行口座の確認
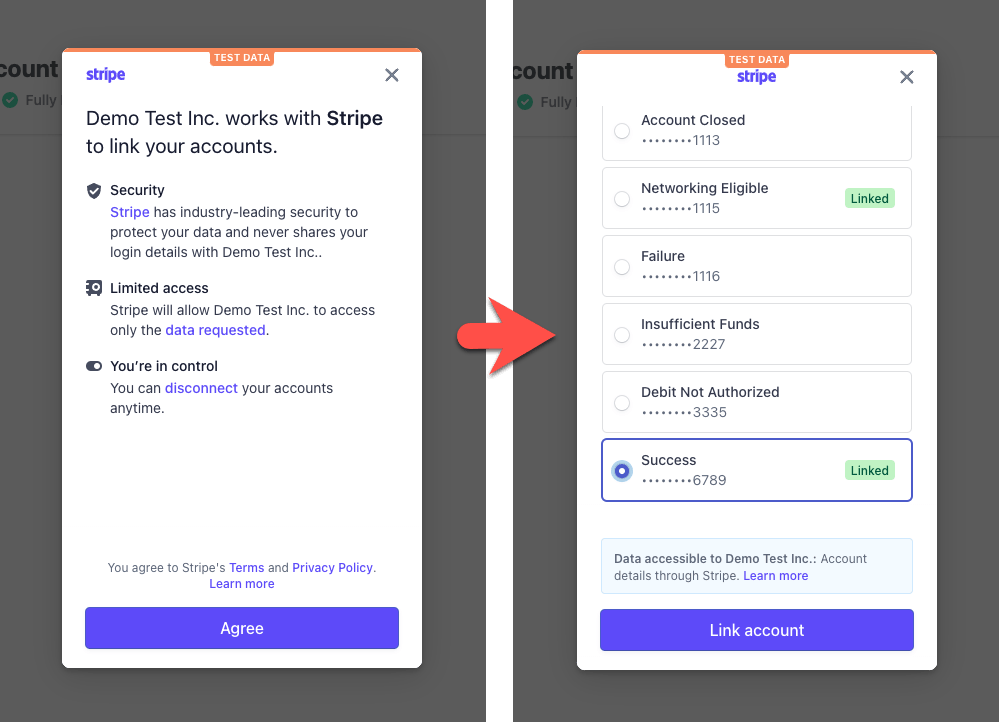
前のセクションで、Homebox は外部の銀行口座をリンクしました。この銀行口座を Homebox が InboundTransfers で使用するには、事前の確認が必要です。銀行口座を確認することで、アカウント所有者は外部の銀行口座の名義人を確認できます。Homebox は、Stripe Financial Connections で即時に確認することも、少額入金 (より時間がかかります) で確認することもできます。
Stripe Financial Connections
Financial Connections を使用して、所有する銀行口座を即時に確認できます。Financial Connections は、Stripe がホストするフローであり、アプリケーションのクライアント側とサーバー側に実装されます。
Homebox が Financial Connections で銀行口座情報を収集して確認するために必要な 3 つのステップ:
customer_プロパティーの代わりにid attach_プロパティーを指定し、to_ self verification_プロパティーの値にmethod instantを指定してSetupIntentを作成します。フロントエンドアプリケーションに
client_を提供してsecret stripe.を使用し、銀行口座の詳細を収集し、collectBankAccountForSetup PaymentMethodを作成して、PaymentMethodをSetupIntentにアタッチします。メモ
billing_パラメーターのアカウント所有者の名前は、アメリカの銀行口座のdetails PaymentMethodを作成するために必要です。同意書の規約を表示して、
PaymentMethodを使用する許可を収集うします。
ステップ 1 では、Homebox は以下のコードを生成してサーバー側で SetupIntent を作成し、handlebars.js テンプレートに情報を渡します。このコードは、アプリケーションには Stripe にログインしているユーザーがいて、Stripe アカウント ID を Session オブジェクト (req.) の一部として渡すことを想定します。
const stripe = require("stripe")(process.env.STRIPE_SECRET_KEY);
router.get('/add_bank_account', async (req, res) => {
  const account = await stripe.accounts.retrieve(req.session.accountId);
  const setupIntent = await stripe.setupIntents.create({
    attach_to_self: true,
    flow_directions: ['inbound', 'outbound'],
    payment_method_types: ['us_bank_account'],
    payment_method_options: {us_bank_account: {verification_method: "automatic"}}
  },{
    stripeAccount: account.id,
  });
  let client_secret= setupIntent.client_secret;
  res.render('add_bank_account', { account: account, client_secret: client_secret, stripe_pk: process.env.STRIPE_PUBLISHABLE_KEY });
});
ステップ 2 は、Homebox が以下のデータを render 関数に渡すと開始します。
- Stripe アカウント ID。
- ID として使用される
SetupIntentから取得した client secret。 - プラットフォームの公開可能な API キー。
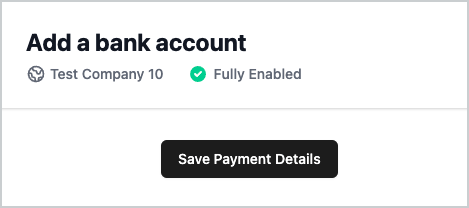
この例では、クライアント側のページに、Financial Connections を使用して銀行口座を確認するためのボタンがレンダリングされます。
銀行口座を追加するためのモーダル
Homebox は、前述のボタンの背後にあるロジックを動作させるために、以下のコードを作成します。
const getBankAccount = async e => {
  paymentMethodButton.setAttribute("disabled", "disabled");
  // Calling this method triggers the Financial Connections modal to display.
  const response = await stripe.collectBankAccountForSetup("{{ client_secret }}", {
    billing_details: {
      name: "John Doe",
      email: "test@test.com",
    },
  });
  if (response.error)
  {
    console.error(response.error);
  }
  if (response.status == "requires_confirmation")
  {
    //Show confirmation modal
    AcceptBankAccountModal.classList.remove("hidden");
  }
};
このコード例では、スクリプトは collectUsBankAccountForSetup メソッドを呼び出し、SetupIntent から取得した client_ を渡します。アプリケーションのダイアログは、銀行口座をリンクする手順をユーザーに示します。
銀行口座を追加するためのワークフロー
ステップ 3 は、SetupIntent ステータスが requires_ に変更され、モーダルにユーザーの確認用の承認メッセージが表示されて、先行のワークフローが正常に完了すると開始されます。
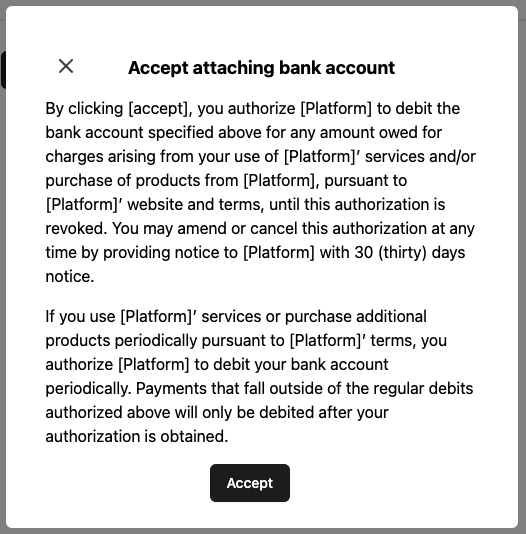
承認メッセージ
ユーザーが同意するをクリックすると、コードは confirmUsBankAccountSetup メソッドを呼び出し、銀行口座が確認済みとして保管されます。これで、銀行口座を InboundTransfers に使用できます。
const acceptBankAccount = async e => {
  acceptButton.setAttribute("disabled", "disabled");
  const response = await stripe.confirmUsBankAccountSetup("{{ client_secret }}");
  if (response.setupIntent.status == "requires_payment_method") {
    // Confirmation failed. Attempt again with a different payment method.
    console.log("Requires payment method")
  } else if (response.setupIntent.status == "succeeded") {
    // Confirmation succeeded! The account is now saved.
    // Display a message to customer.
    AcceptBankAccountModal.classList.add("hidden");
    console.log("Account added");
  } else if (response.setupIntent.next_action?.type == "verify_with_microdeposits") {
    // The account needs to be verified through microdeposits.
    // Display a message to consumer with next steps (consumer waits for
    // microdeposits, then enters an amount on a page sent to them through email).
    console.log("The account needs to be verified with microdeposits")
  }
};
少額入金
少額入金は、Stripe が外部の銀行口座に入金する少額 (通常は本の少額の USD) の資金です。口座の所有者は、こうした入金の正確な金額を確認することにより、口座の所有権を確認できます。
Homebox が前のセクションで作成した SetupIntent オブジェクトには、PaymentMethod ID が含まれています。
{
  "id": "{{SETUP_INTENT_ID}}",
  …
  "on_behalf_of": null,
  "payment_method": "{{PAYMENT_METHOD_ID}}",
  "payment_method_options": {
…
 }
}
SetupIntent には、hosted_ 値で URL が定義された next_ オブジェクトも含まれています。
{
  "id": "{{SETUP_INTENT_ID}}",
…
   "next_action": {
    "type": "verify_with_microdeposits",
    "verify_with_microdeposits": {
      "arrival_date": 1642579200,
      "hosted_verification_url": "https://payments.stripe.com/microdeposit/sacs_test_xxx",
      "microdeposit_type": "amounts"
    }
…
 }
Homebox は、確認を完了するために、連結アカウントの所有者に URL を提供します。所有者は URL をたどり、対象の少額入金の記述子コード (テスト環境では、値 SM11AA を使用) を入力して受領を確認する必要があります。
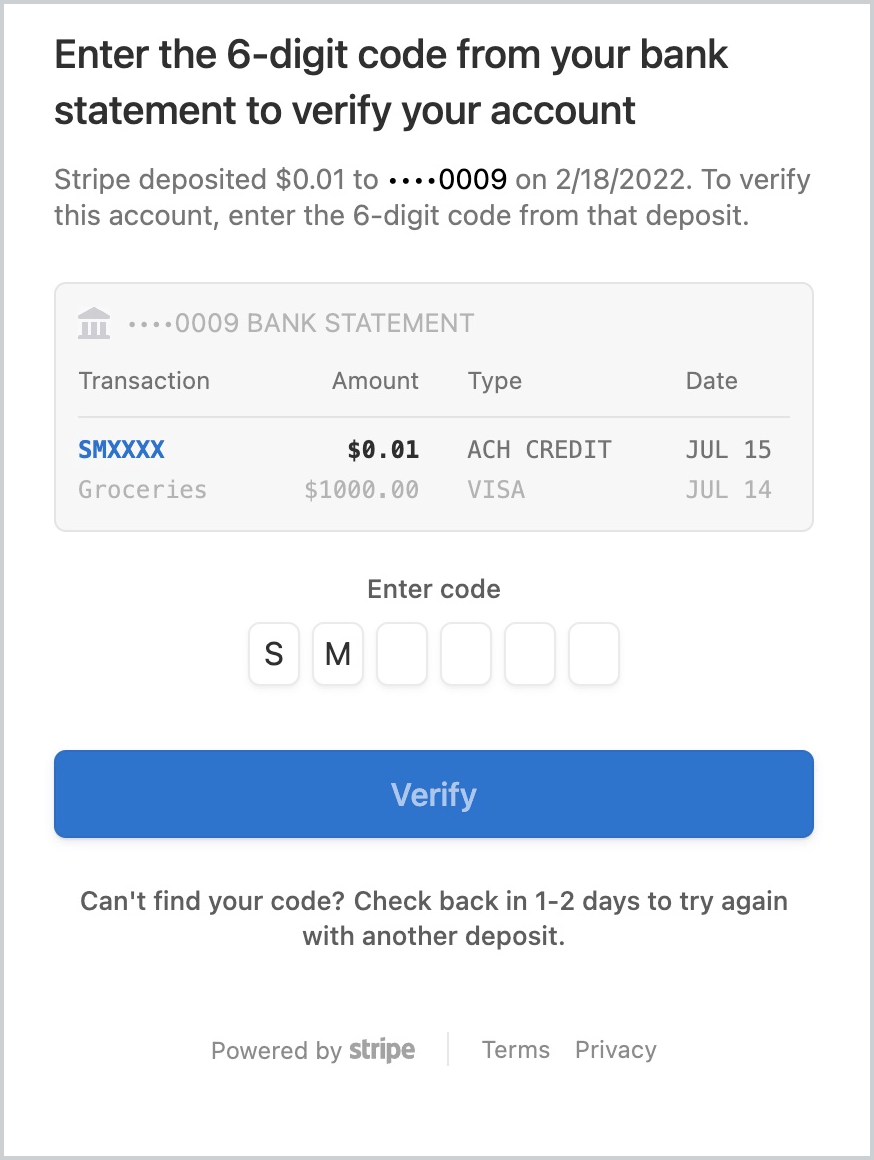
少額入金確認
PaymentMethods を InboundTransfers で使用する
Homebox では、前述のいずれかの方法で確認済みの銀行口座を使用して InboundTransfers の作成を開始できます。
以下のリクエストは、アカウントに関連付けられた支払い方法を使用して 200 USD を指定された ID の金融口座に送金します。Stripe-Account ヘッダー値は、金融アカウントと支払い方法の両方を所有する Stripe アカウントを識別します。
成功すると、レスポンスで InboundTransfer オブジェクトが提供されます。このオブジェクトには、hosted_ が含まれ、Homeboxプラットフォームのアカウント所有者が取引詳細にアクセスできるようにします。
{
    "id": "{{INBOUND_TRANSFER_ID}}",
    "object": "inbound_transfer",
    "amount": 20000,
    "created": 1648071297,
    "currency": "usd",
    "description": "Funds for repair",
    "financial_account": "{{FINANCIAL_ACCOUNT_ID}}",
    "hosted_regulatory_receipt_url": "https://payments.stripe.com/regulatory-receipt/{{IBT_URL}}",
    "linked_flows": null,
    "livemode": false,
    "metadata": {},
    "origin_payment_method": "{{PAYMENT_METHOD_ID}}",
    ...
    "statement_descriptor": "Invoice 12",
    "status": "processing",
    ...
}
PaymentMethods を OutboundPayments で使用する
また PaymentMethod を使用し、OutboundPayment オブジェクトを使用して、サードパーティーが保有する外部の銀行口座に資金を送金することもできます。
Homebox は、用品に対する支払いのために、連結アカウントのベンダー 1 社に継続的に送金する必要があります。そのためには、プラットフォームは、最初に Customers エンドポイントを使用して顧客 ID を取得する必要があります。
レスポンスには、関連する連結アカウントの顧客が示されます。Homebox は、適正な顧客を確認して、ID を記録します。
{
  "id": "{{CUSTOMER_ID}}",
  "object": "customer",
  "address": null,
  "balance": 0,
  "created": 1642523420,
  "currency": null,
  "default_source": null,
  "delinquent": false,
  "description": "Test Customer",
  "discount": null,
  "email": null,
  "invoice_prefix": "96A50A92",
  "invoice_settings": {
    "custom_fields": null,
    "default_payment_method": null,
    "footer": null
  },
  "livemode": false,
  "metadata": {
  },
  "name": null,
  "next_invoice_sequence": 1,
  "phone": null,
  "preferred_locales": [

  ],
  "shipping": null,
  "tax_exempt": "none"
}
次に、Homebox は、ID を使用して SetupIntent を作成します。サードパーティーへのアウトバウンドの資金のフローでは OutboundPayments が使用されるため、Homebox は customer を指定する代わりに flow_ を outbound に設定し、attach_ を使用する必要があります。
呼び出しが成功すると、PaymentMethod が顧客に正常に関連付けられたことを示す次のオブジェクトが返されます。
{
  "id": "{{SETUP_INTENT_ID}}",
  "object": "setup_intent",
  "application": "{{APPLICATION_ID}}",
  "cancellation_reason": null,
  "client_secret": "{{SETUP_INTENT_SECRET}}",
  "created": 1642528487,
  "customer": "{{CUSTOMER_ID}}",
  "description": null,
  "flow_directions": [
    "outbound"
  ],
  "last_setup_error": null,
  "latest_attempt": null,
  "livemode": false,
  "mandate": null,
  "metadata": {
  },
  "next_action": null,
  "on_behalf_of": null,
  "payment_method": "{{PAYMENT_METHOD_ID}}",
  "payment_method_options": {
  },
  "payment_method_types": [
    "us_bank_account"
  ],
  "single_use_mandate": null,
  "status": "succeeded",
  "usage": "off_session"
}
PaymentMethod なしで OutboundPayment を作成する
1 回限りの支払いと同様に受取人の銀行口座を保存する必要がない場合、OutboundPayments を送信または使用するときに PaymentMethods は必要ありません。
Homebox は、消耗品の費用として 50 USD をベンダーに支払う必要がありました。ベンダーに支払うために、プラットフォームは、外部銀行口座情報を指定して OutboundPayments を呼び出します。
呼び出しが成功すると、次のオブジェクトが返されます。
{
  "id": "{{OUTBOUNDPAYMENT_ID}}",
  "object": "treasury.outbound_payment",
  "amount": 5000,
  "cancelable": true,
  "created": 1643033124,
  "currency": "usd",
  "customer": null,
  "description": null,
  "destination_payment_method": null,
  "destination_payment_method_details": {
    "billing_details": {
      "address": {
        "city": null,
        "country": null,
        "line1": null,
        "line2": null,
        "postal_code": null,
        "state": null
      },
      "email": null,
      "name": "John Doe",
      "phone": null
    },
    "type": "us_bank_account",
    "us_bank_account": {
      "account_holder_type": "individual",
      "bank_name": "STRIPE TEST BANK",
      "fingerprint": "SzrMIps1gg91aVKG",
      "last4": "6789",
      "network": "ach",
      "routing_number": "110000000"
    }
  },
  "end_user_details": {
    "present": false,
    "ip_address": null
  },
  "expected_arrival_date": 1643068800,
  "financial_account": "{{FINANCIAL_ACCOUNT_ID}}",
  "hosted_regulatory_receipt_url": "https://payments.stripe.com/regulatory-receipt/bot_test_xxx",
  "livemode": false,
  "metadata": {
  },
  "statement_descriptor": "payment_1",
  "status": "processing",
  "status_transitions": {
    "canceled_at": null,
    "failed_at": null,
    "posted_at": null,
    "processing_at": 1643033124,
    "returned_at": null
  },
  "transaction": "{{TRANSACTION_ID}}"
}