Erscheinungsbild anpassen
Passen Sie Ihre In-App-Integration mit der Appearance API an.
Das eingebettete Zahlungs-Element unterstützt die visuelle Anpassung, sodass Sie das Design Ihrer App anpassen können. Das Layout bleibt konsistent, aber Sie können Farben, Schriftarten und mehr ändern, indem Sie die Eigenschaft appearance Ihrer EmbeddedPaymentElement.Configuration-Objekts verwenden.
- Schriftart anpassen
- Farben so anpassen, dass Sie zu Ihrer App passen
- Formen wie den Eckradius anpassen
- Feinabstimmung bestimmter Komponenten
- Anpassen des Aussehens und der Bedienung des Zahlungs-Elements
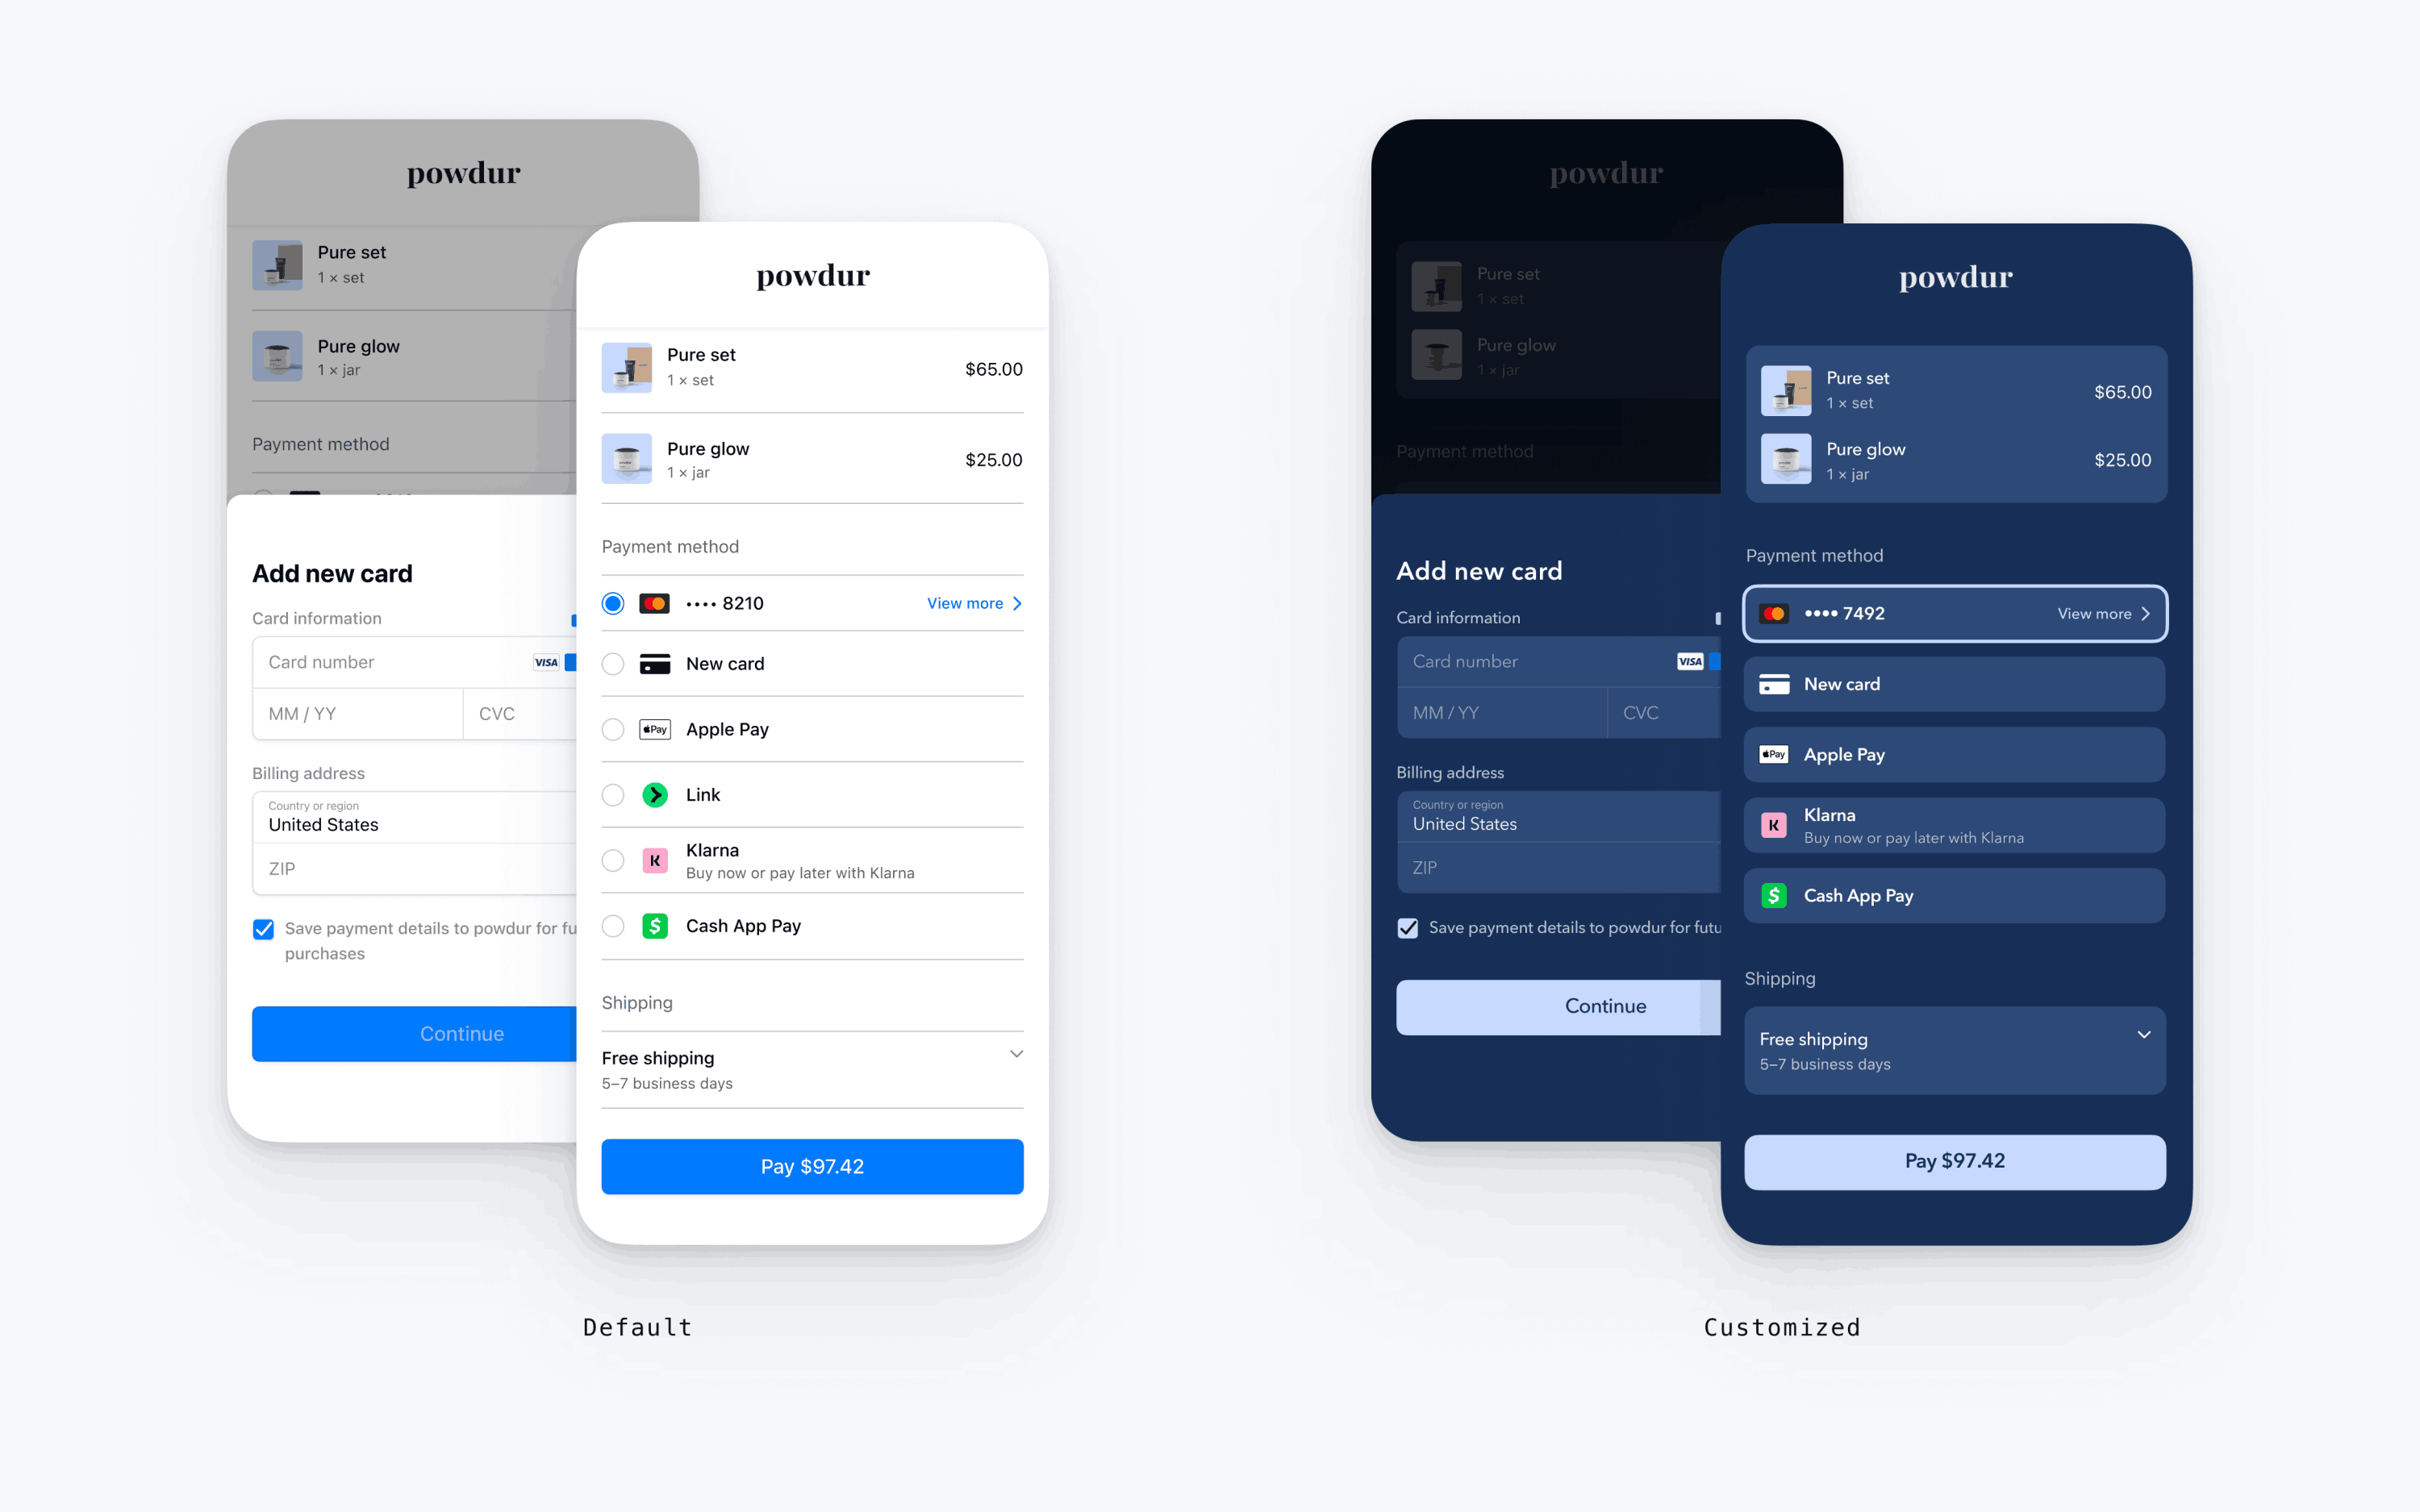
var configuration = EmbeddedPaymentElement.Configuration()
// The following code creates the appearance shown in the screenshot above
var appearance = PaymentSheet.Appearance()
appearance.font.base = UIFont(name: "AvenirNext-Regular", size: UIFont.systemFontSize)!
appearance.cornerRadius = 8
appearance.shadow = .disabled
appearance.borderWidth = 0
appearance.selectedBorderWidth = 2
appearance.colors.background = UIColor(red: 23/255, green: 47/255, blue: 86/255, alpha: 1)
appearance.colors.primary = UIColor(red: 199/255, green: 217/255, blue: 255/255, alpha: 1)
appearance.colors.text = .white
appearance.colors.textSecondary = UIColor(red: 255/255, green: 255/255, blue: 255/255, alpha: .7)
appearance.colors.componentText = .white
appearance.colors.componentPlaceholderText = UIColor(red: 255/255, green: 255/255, blue: 255/255, alpha: .5)
appearance.colors.componentBorder = .clear
appearance.colors.componentDivider = UIColor(red: 255/255, green: 255/255, blue: 255/255, alpha: .1)
appearance.colors.componentBackground = UIColor(red: 44/255, green: 73/255, blue: 119/255, alpha: 1)
appearance.colors.icon = .white
configuration.appearance = appearance
let embeddedPaymentElement = try await EmbeddedPaymentElement.create(/* ... */, configuration: configuration)
Schriftarten
Passen Sie die Schriftart an, indem Sie font.base auf eine beliebige Variante Ihrer nutzerspezifischen Schriftart bei beliebiger Größe und Gewicht festlegen. Das mobile Payment Element verwendet die Schriftfamilie Ihrer benutzerdefinierten Schriftart, bestimmt jedoch Größen und Gewichte selbst.
Um die Schrift größer oder kleiner zu machen, legen Sie font.sizeScaleFactor fest. Wir multiplizieren Schriftgrößen mit diesem Wert, bevor sie angezeigt werden. Dies ist nützlich, wenn Ihre individuelle Schriftart etwas größer oder kleiner als die Schriftart des Systems ist.
var configuration = EmbeddedPaymentElement.Configuration()
configuration.appearance.font.base = UIFont(name: "CustomFont-Regular", size: UIFont.systemFontSize)
configuration.appearance.font.sizeScaleFactor = 1.15 // Increase the size of all text by 1.15x
Farben
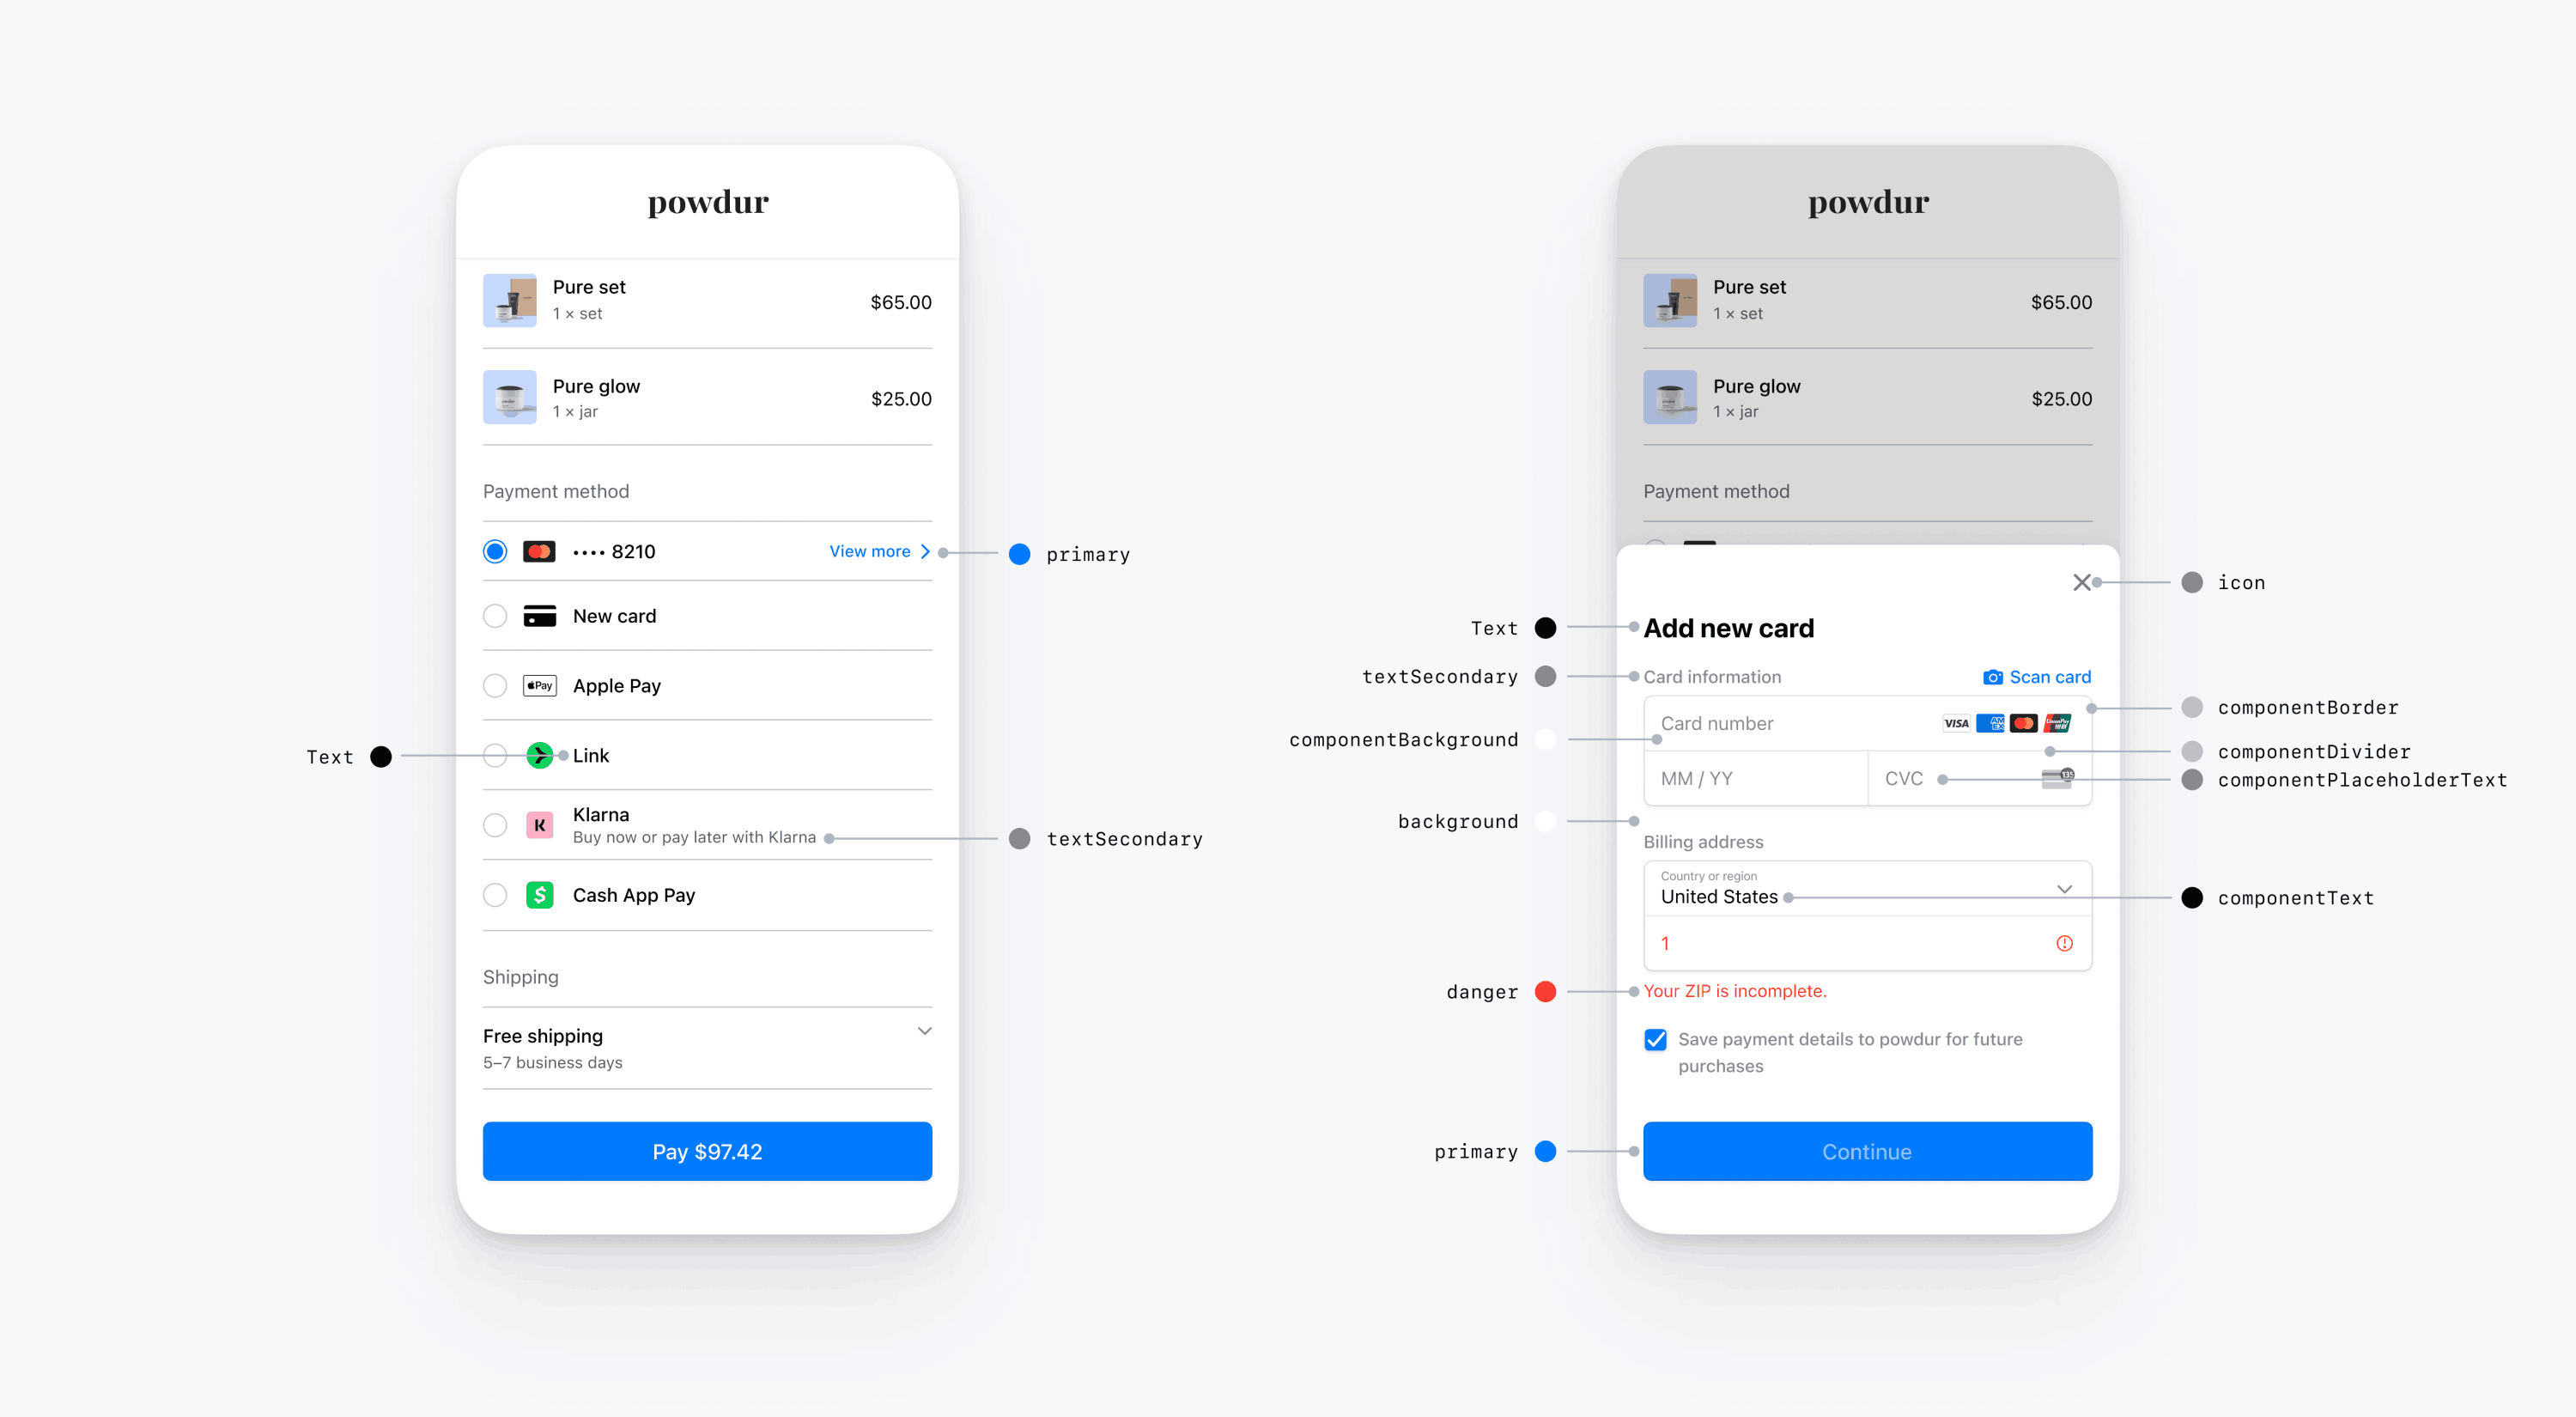
Passen Sie die Farben im mobilen Payment Element an, indem Sie die in Appearance.Colors definierten Farbkategorien ändern. Jede Farbkategorie bestimmt die Farbe einer oder mehrerer Komponenten in der Nutzeroberfläche. primary definiert zum Beispiel die Farbe der Schaltfläche Bezahlen und ausgewählte Elemente wie das Kontrollkästchen Diese Karte speichern. Im nachstehenden Diagramm finden Sie einige der Nutzeroberflächen-Elemente, die jeder Farbkategorie zugeordnet sind.
Hinweis
Um den Dark Mode zu unterstützen, initialisieren Sie Ihre benutzerdefinierten UIColors mit init(dynamicProvider:).
Formen
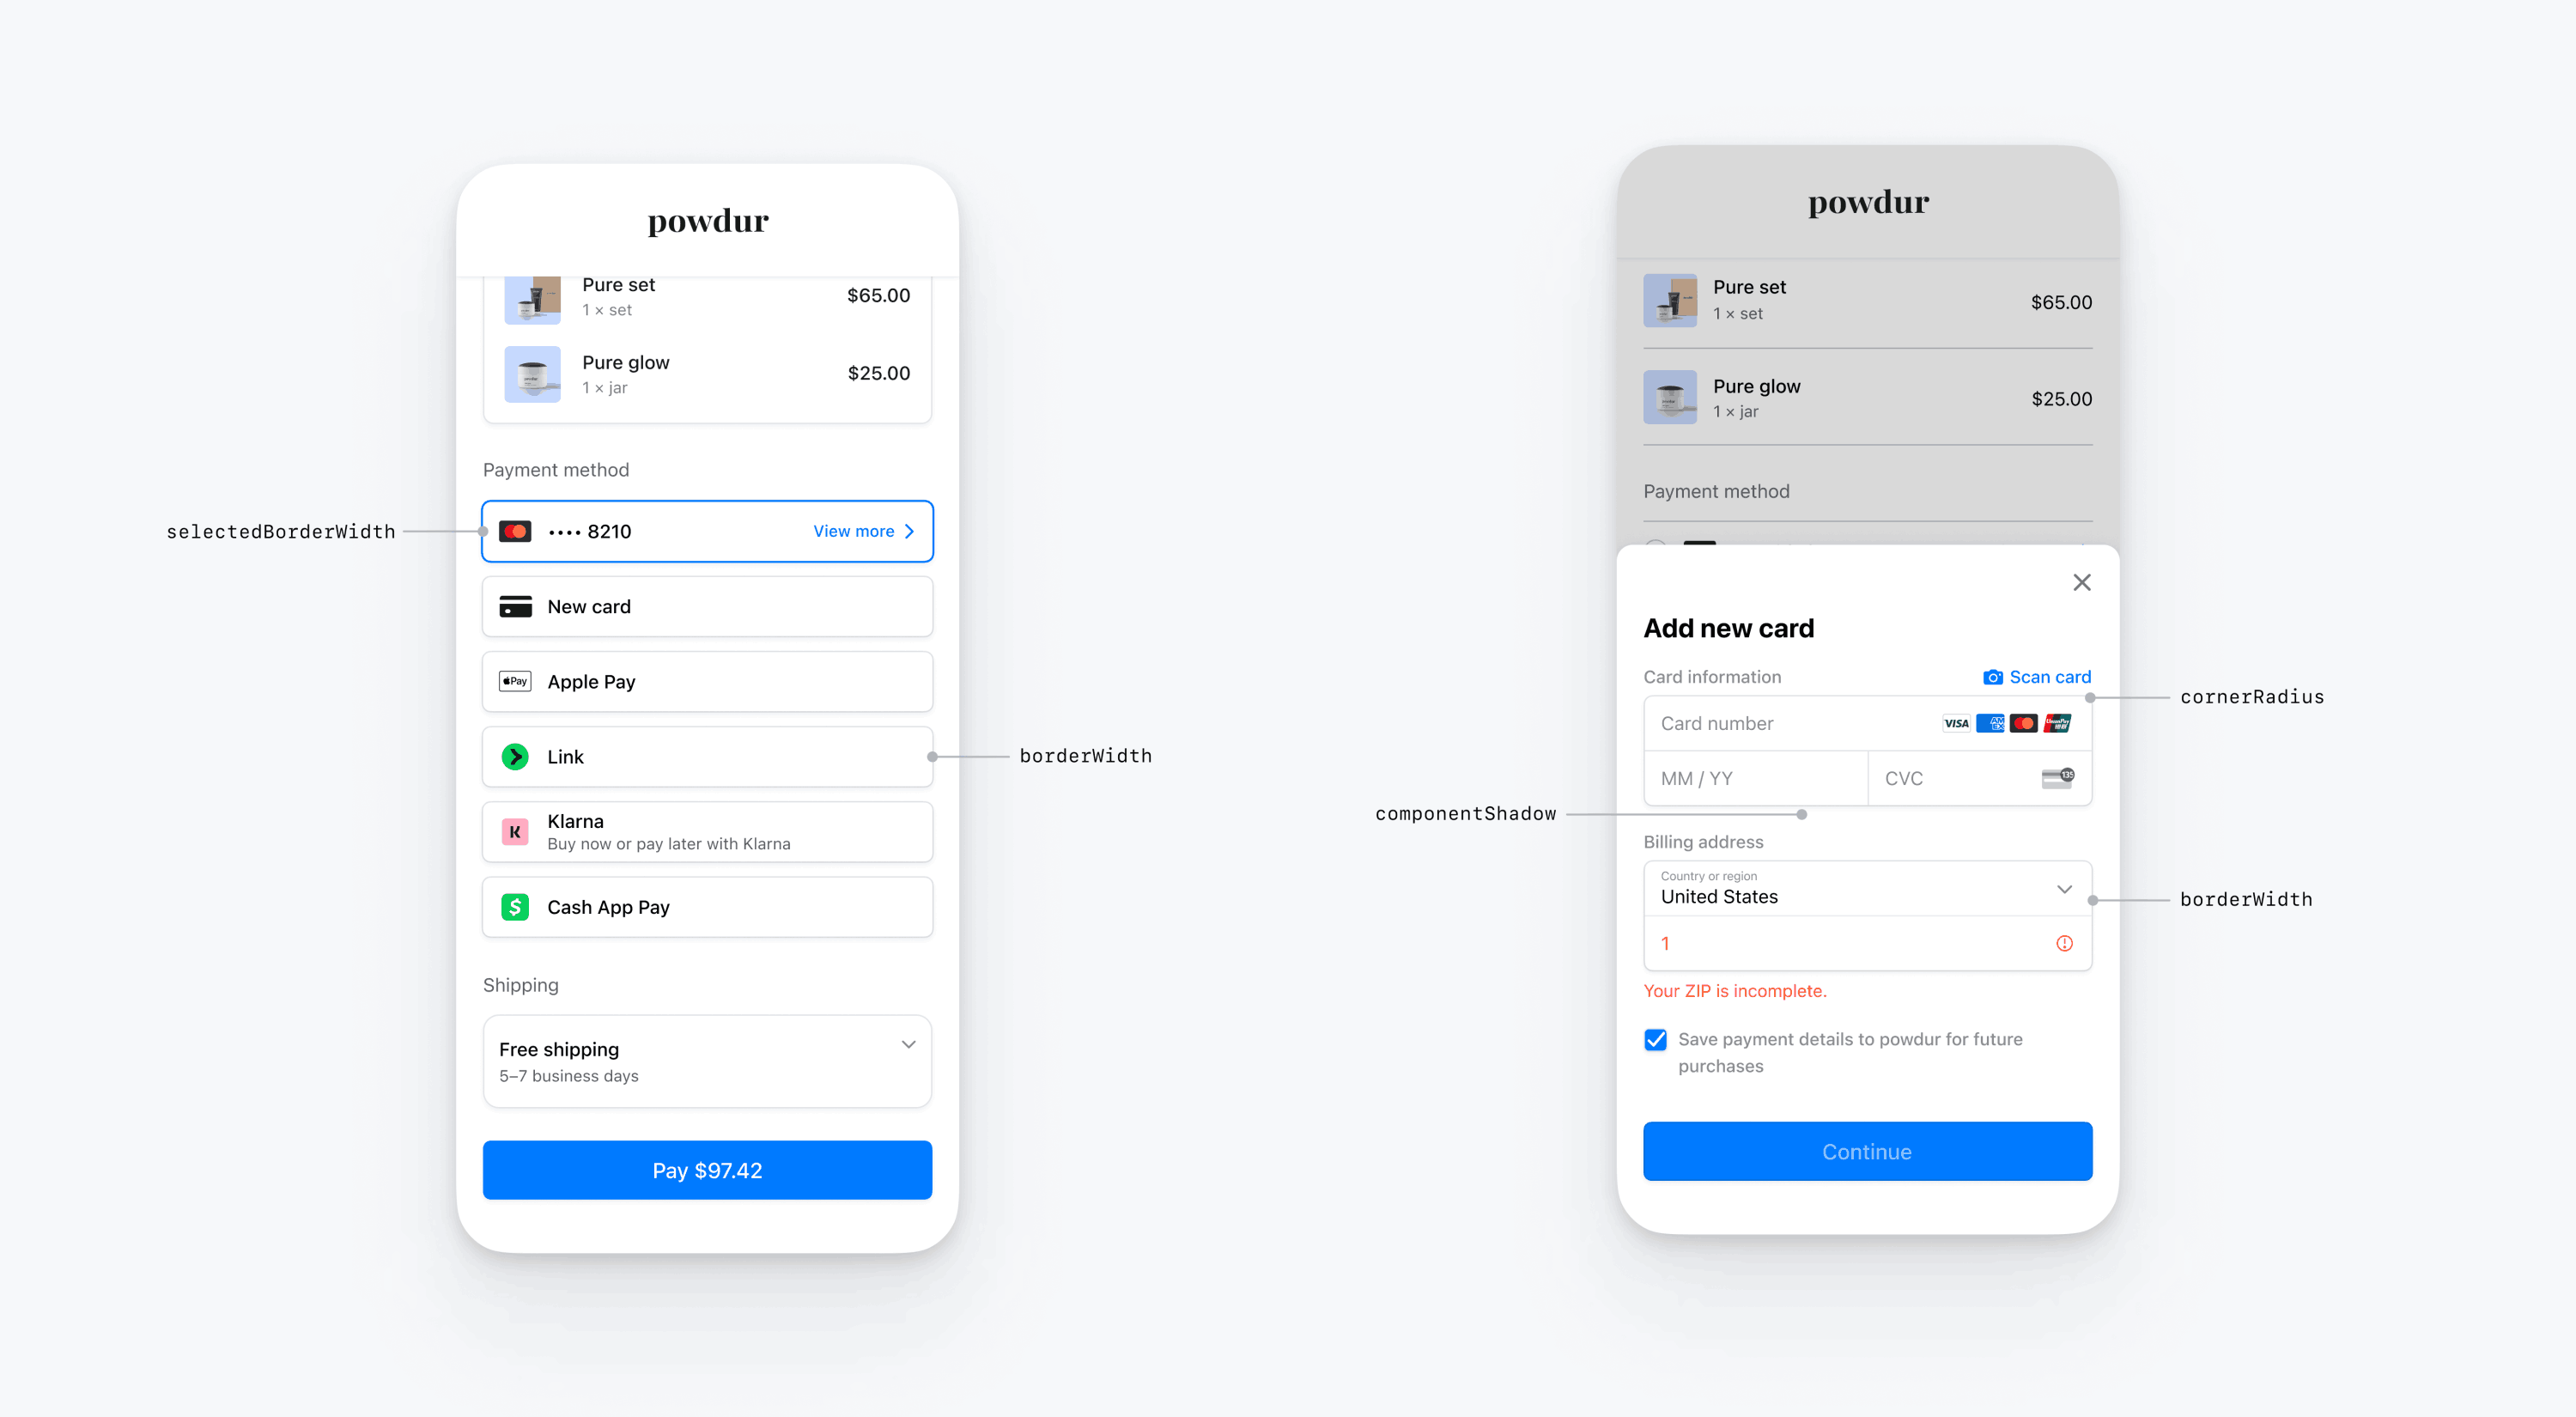
Neben Schriftarten und Farben können Sie auch den Eckenradius, die Breite der Ränder und die Schattierung anpassen, die innerhalb des mobilen Payment Element verwendet werden.
Spezielle Nutzeroberflächenkomponenten
In den vorstehenden Abschnitten werden Anpassungsoptionen beschrieben, die sich umfassend über mehrere Nutzeroberflächen-Komponenten hinweg auf das mobile Payment Element auswirken. Wir bieten auch Anpassungsoptionen speziell für die primäre Schaltfläche (z. B. die Schaltfläche Bezahlen). Eine vollständige Liste der Anpassungsoptionen finden Sie unter Appearance.PrimaryButton.
Anpassungsoptionen für bestimmte Nutzeroberflächen-Komponenten haben Vorrang vor anderen Werten. Beispielsweise überschreibt appearance. den Wert von appearance..
Hinweis
Kontaktieren Sie uns, wenn Sie der Meinung sind, dass wir weitere Anpassungsoptionen hinzufügen sollten.
Zahlungs-Element
Das Zahlungs-Element verfügt über die folgenden Designs: flach mit Optionsschaltflächen, flach mit Häkchen, flache Chevron-Schaltflächen und schwebende Schaltflächen. Jeder Stil verfügt über spezifische Optionen, die dem jeweiligen Stil entsprechen.
Flach mit Optionsfeld
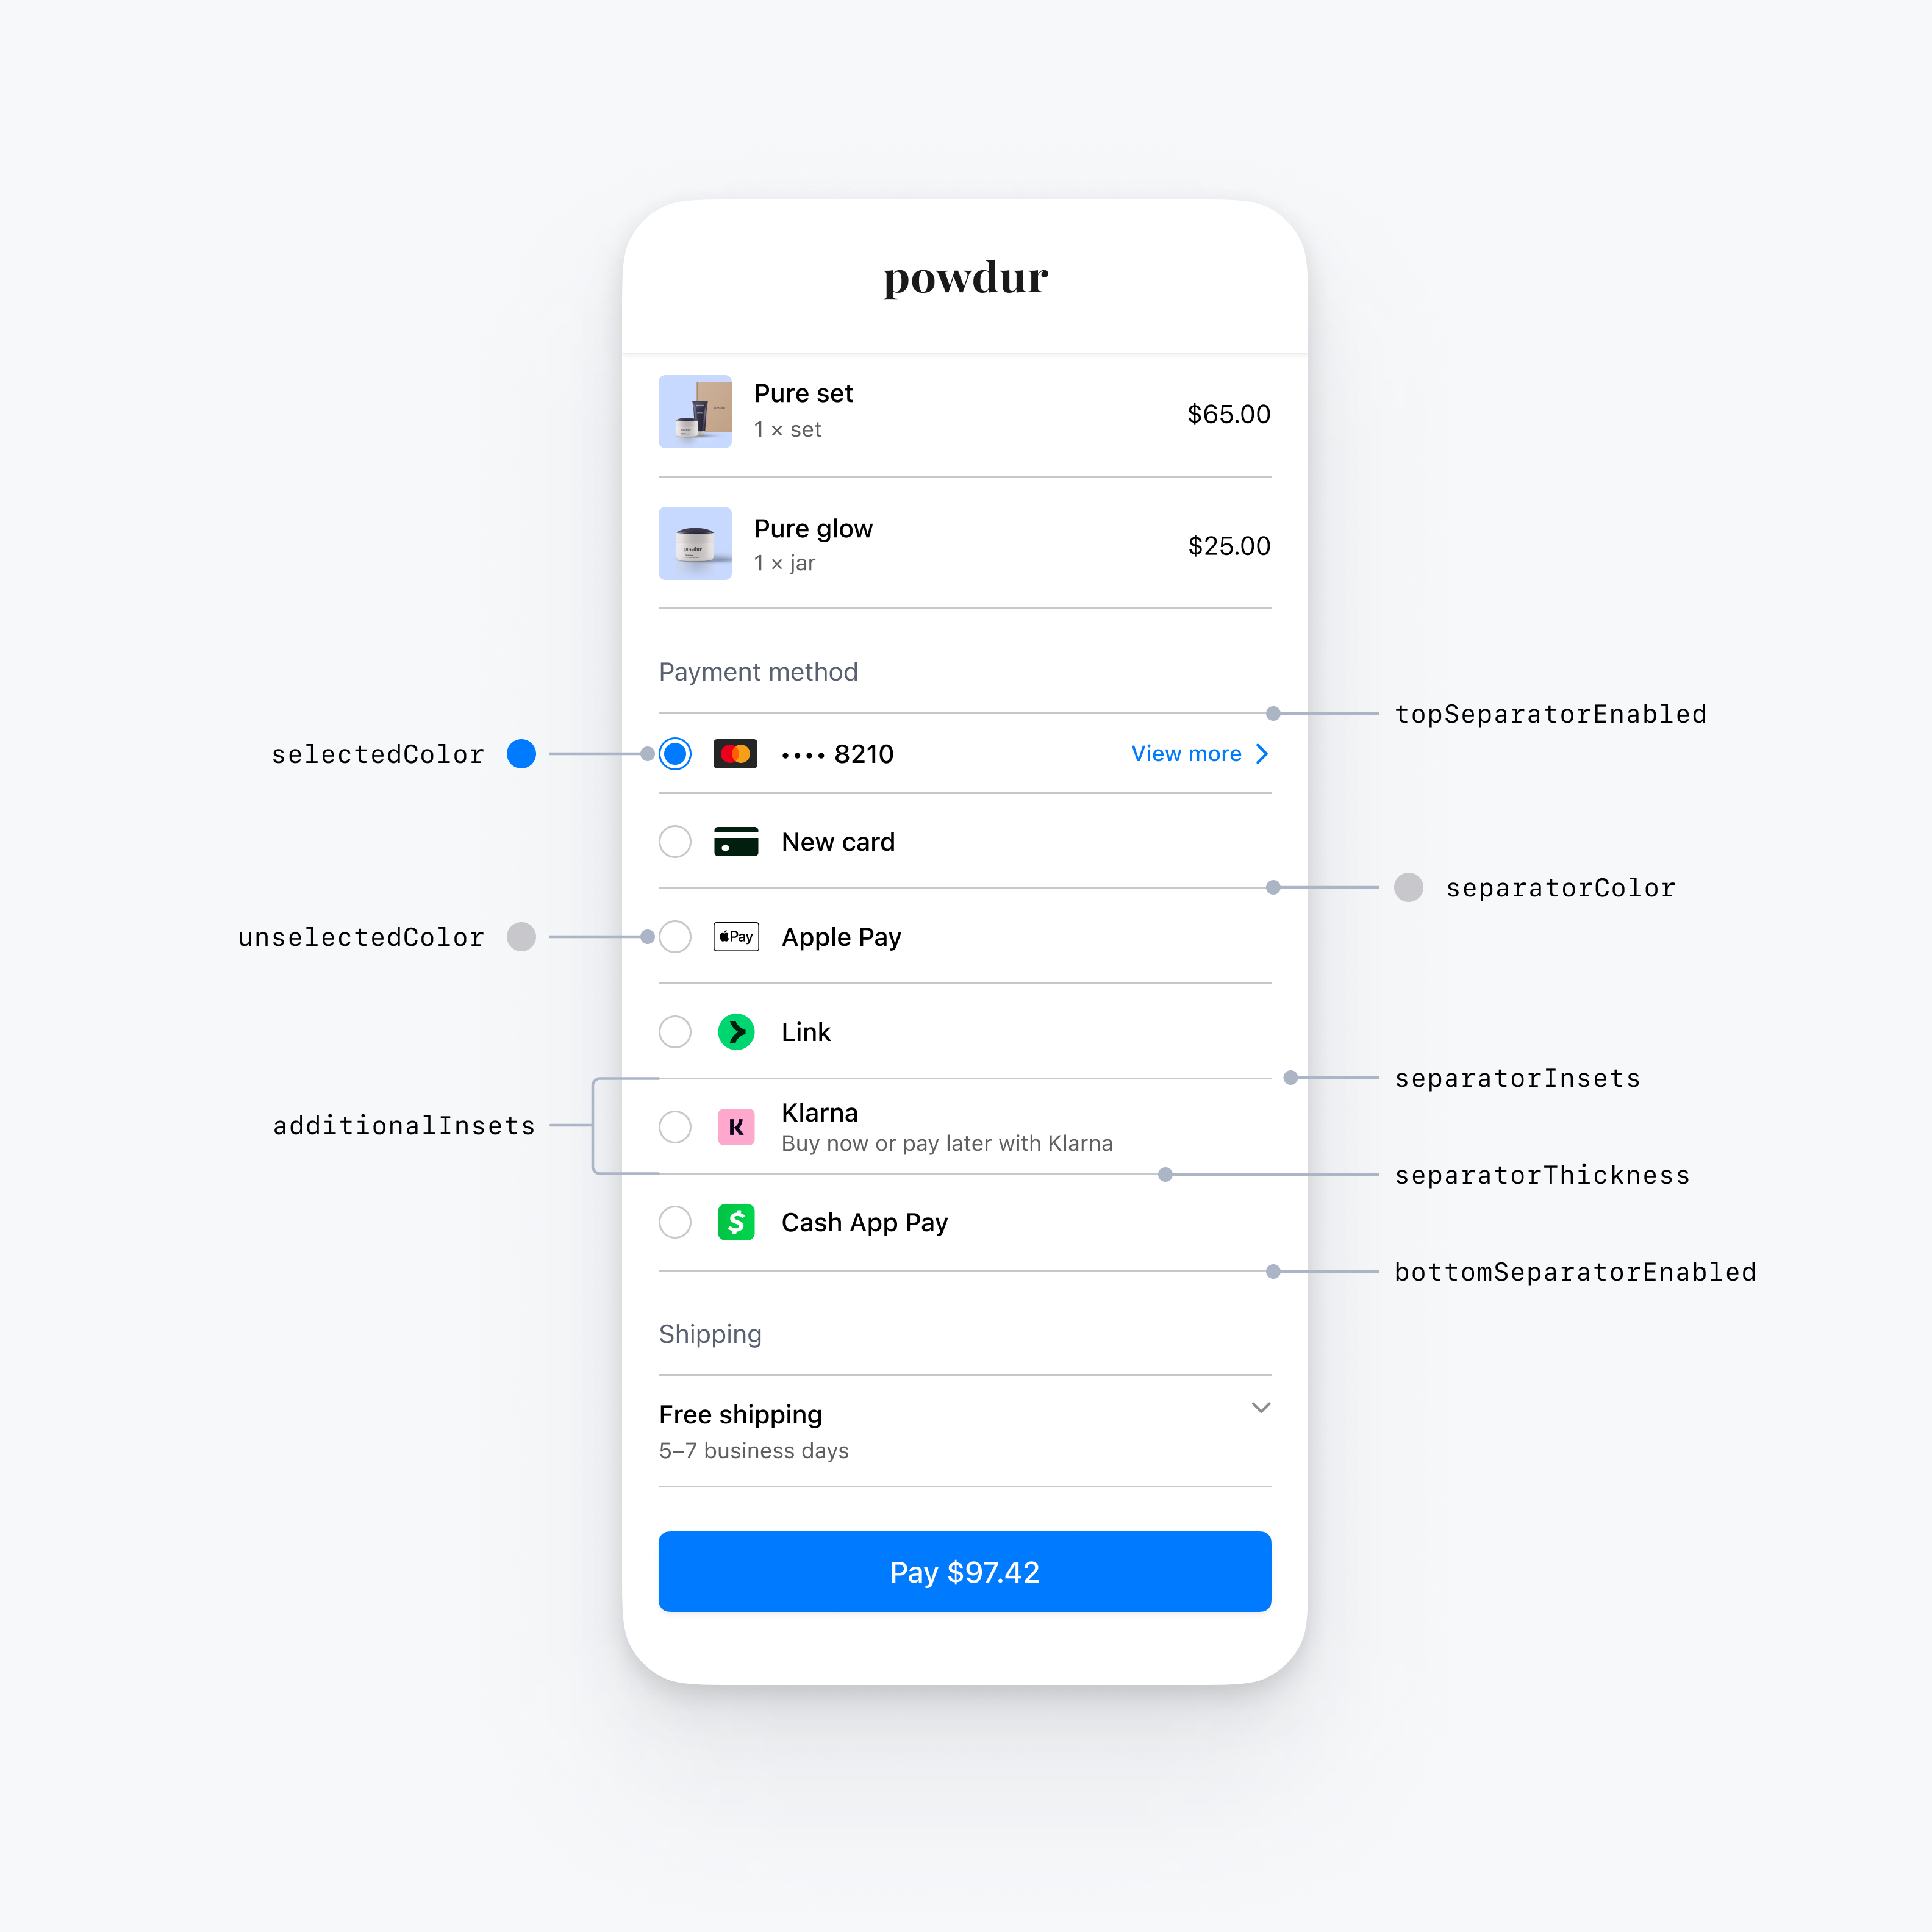
var configuration = EmbeddedPaymentElement.Configuration()

var appearance = PaymentSheet.Appearance.default
appearance.embeddedPaymentElement.row.style = .flatWithRadio
appearance.embeddedPaymentElement.row.flat.bottomSeparatorEnabled = false // Hide the bottom separator
appearance.embeddedPaymentElement.row.flat.topSeparatorEnabled = false // Hide the top separator
appearance.embeddedPaymentElement.row.flat.separatorColor = .gray // Change the separator color to gray
appearance.embeddedPaymentElement.row.flat.separatorInsets = .zero // Make separators full width
appearance.embeddedPaymentElement.row.flat.separatorThickness = 2.0 // Increase separator thickness to 2
appearance.embeddedPaymentElement.row.flat.radio.selectedColor = .blue // Change color of radio button when selected to blue
appearance.embeddedPaymentElement.row.flat.radio.unselectedColor = .darkGray // Change color of radio button when unselected to darkGray

configuration.appearance = appearance
Flach mit Häkchen
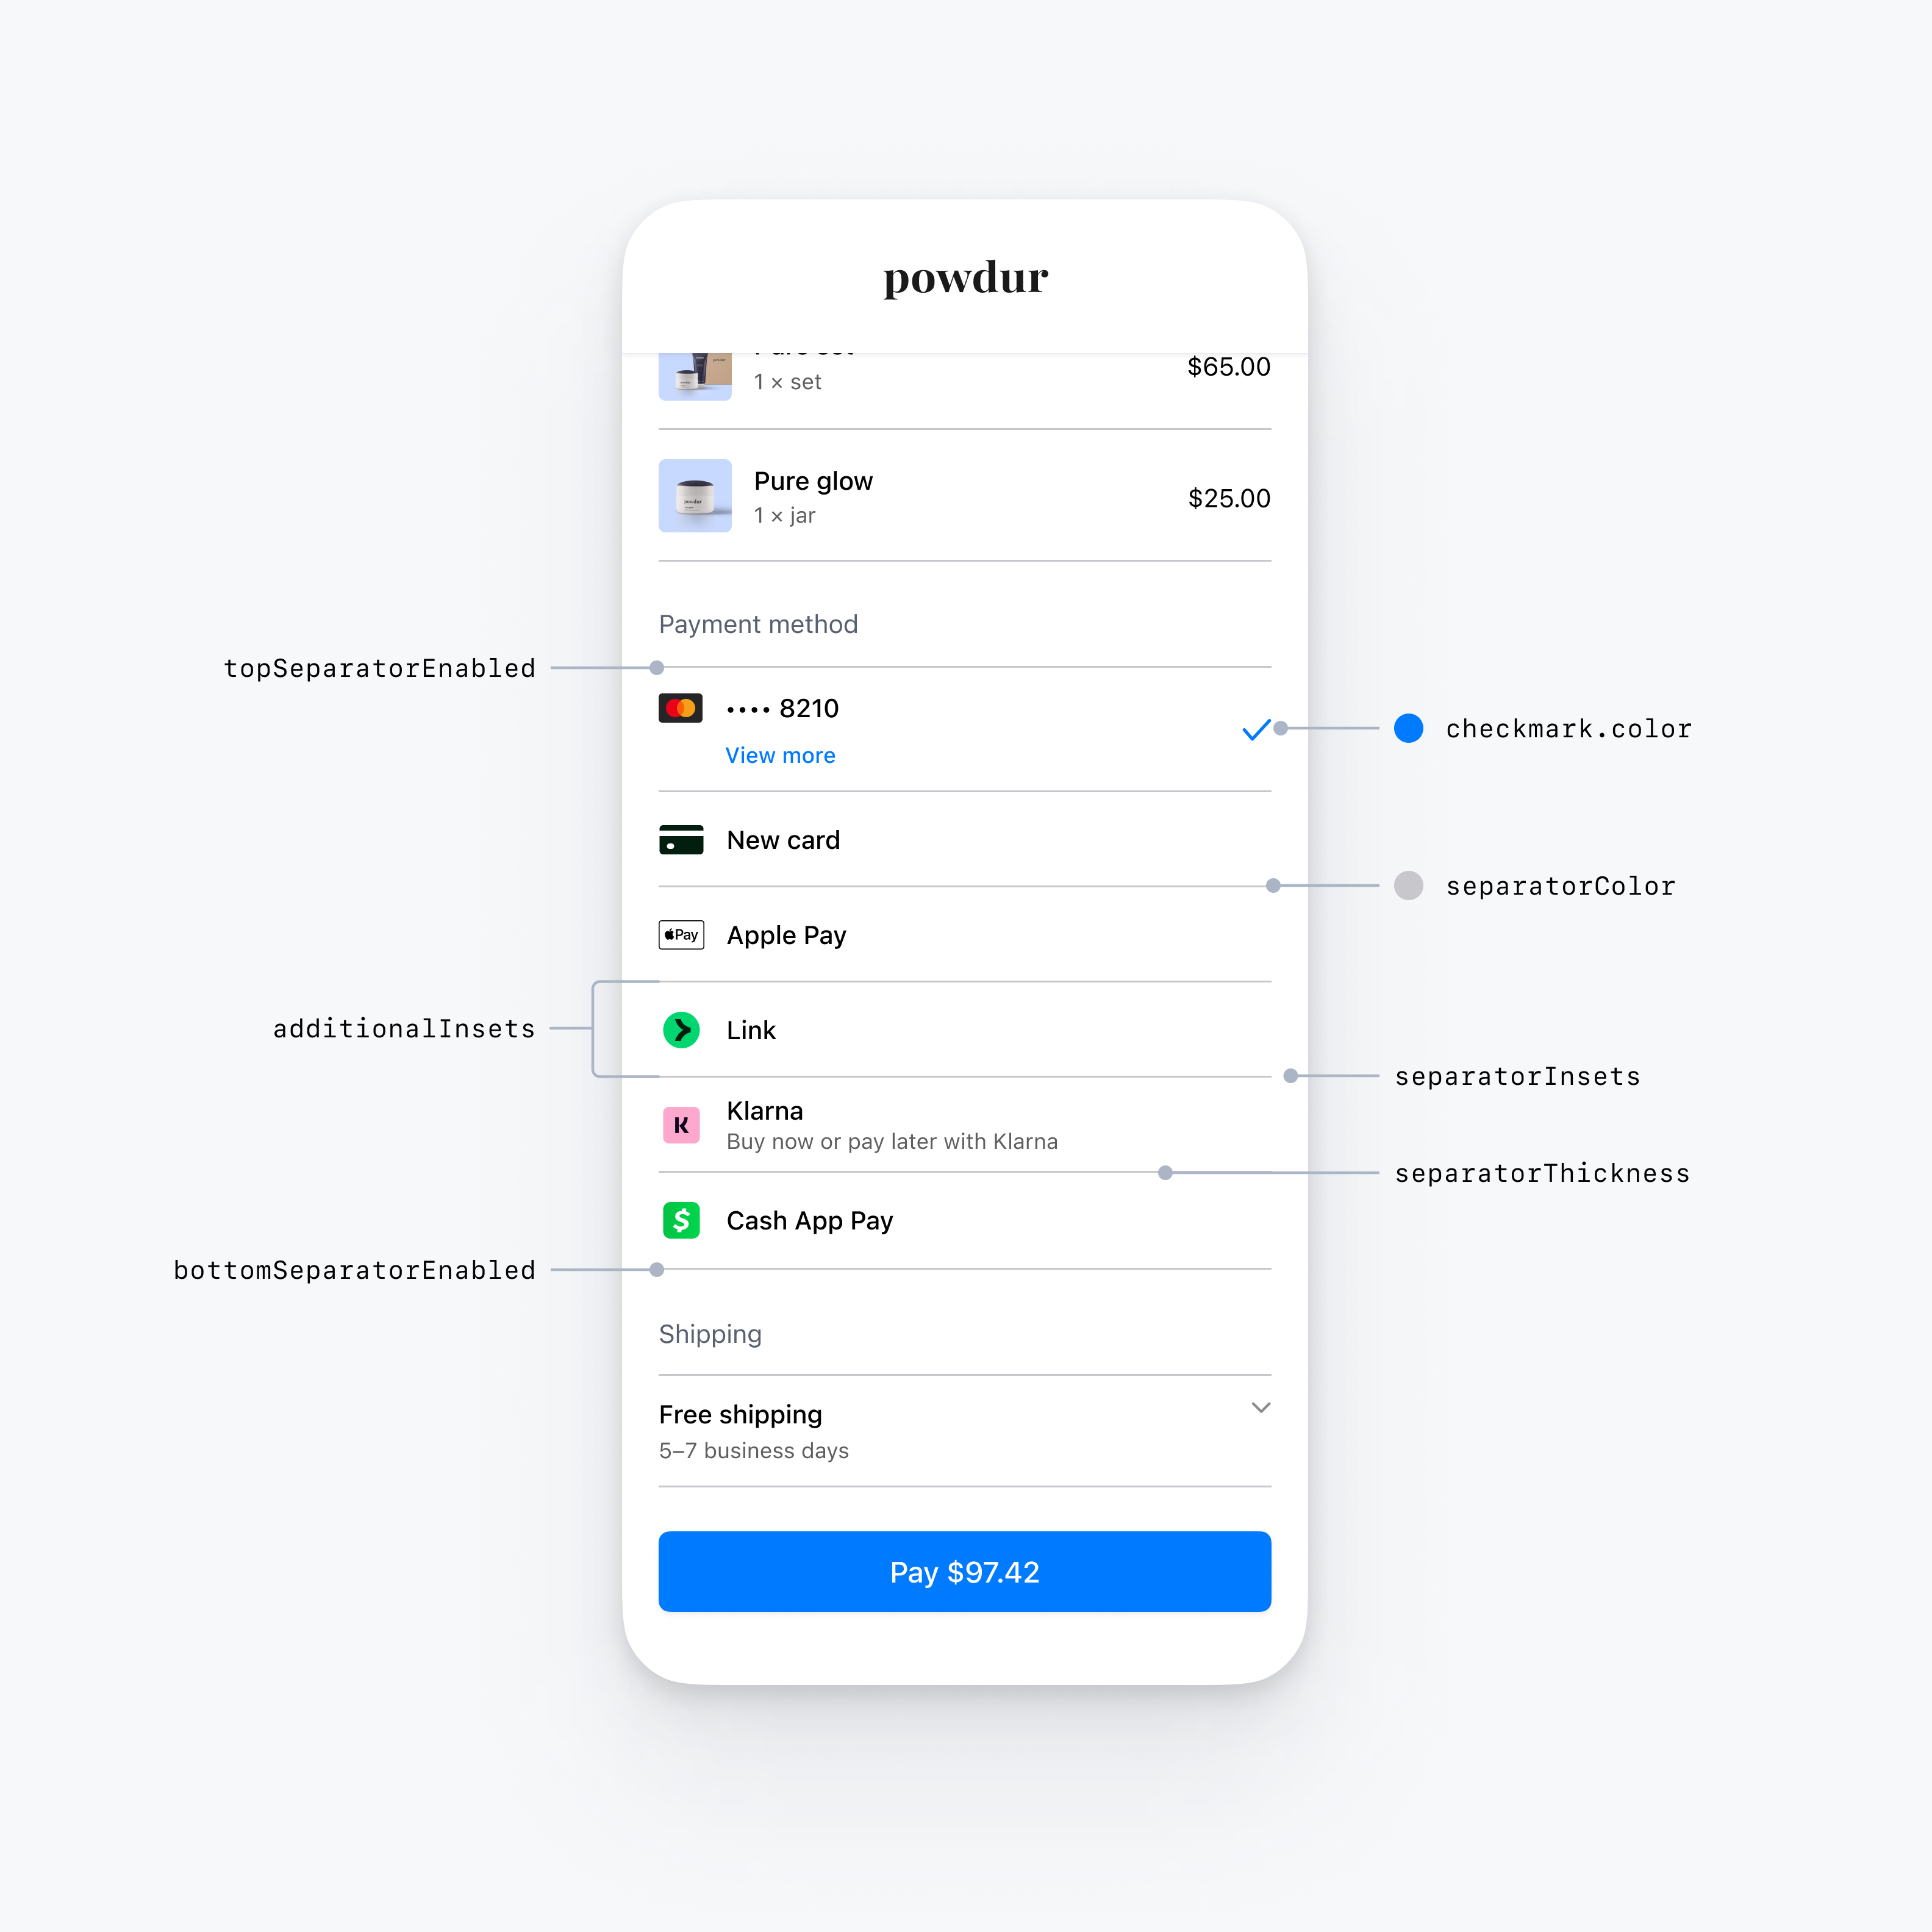
var configuration = EmbeddedPaymentElement.Configuration()

var appearance = PaymentSheet.Appearance.default
appearance.embeddedPaymentElement.row.style = .flatWithCheckmark
appearance.embeddedPaymentElement.row.flat.bottomSeparatorEnabled = false // Hide the bottom separator
appearance.embeddedPaymentElement.row.flat.topSeparatorEnabled = false // Hide the top separator
appearance.embeddedPaymentElement.row.flat.separatorColor = .gray // Change the separator color to gray
appearance.embeddedPaymentElement.row.flat.separatorInsets = .zero // Make separators full width
appearance.embeddedPaymentElement.row.flat.separatorThickness = 2.0 // Increase separator thickness to 2
appearance.embeddedPaymentElement.row.flat.checkmark.color = .blue // Change color of the checkmark


configuration.appearance = appearance
Flat with disclosure
Der Stil FlatWithDisclosure erfordert, dass Sie das Verhalten für die Zeilenauswahl immediateAction festlegen. Nachdem die Kundin/der Kunde eine Zahlungsmethode ausgewählt hat, sollten Sie sie/ihn auf einen neuen Bildschirm weiterleiten (zum Beispiel zurück zu Ihrem Haupt-Checkout-Bildschirm), da die Zeile der ausgewählten Zahlungsmethode nicht als ausgewählt angezeigt wird.
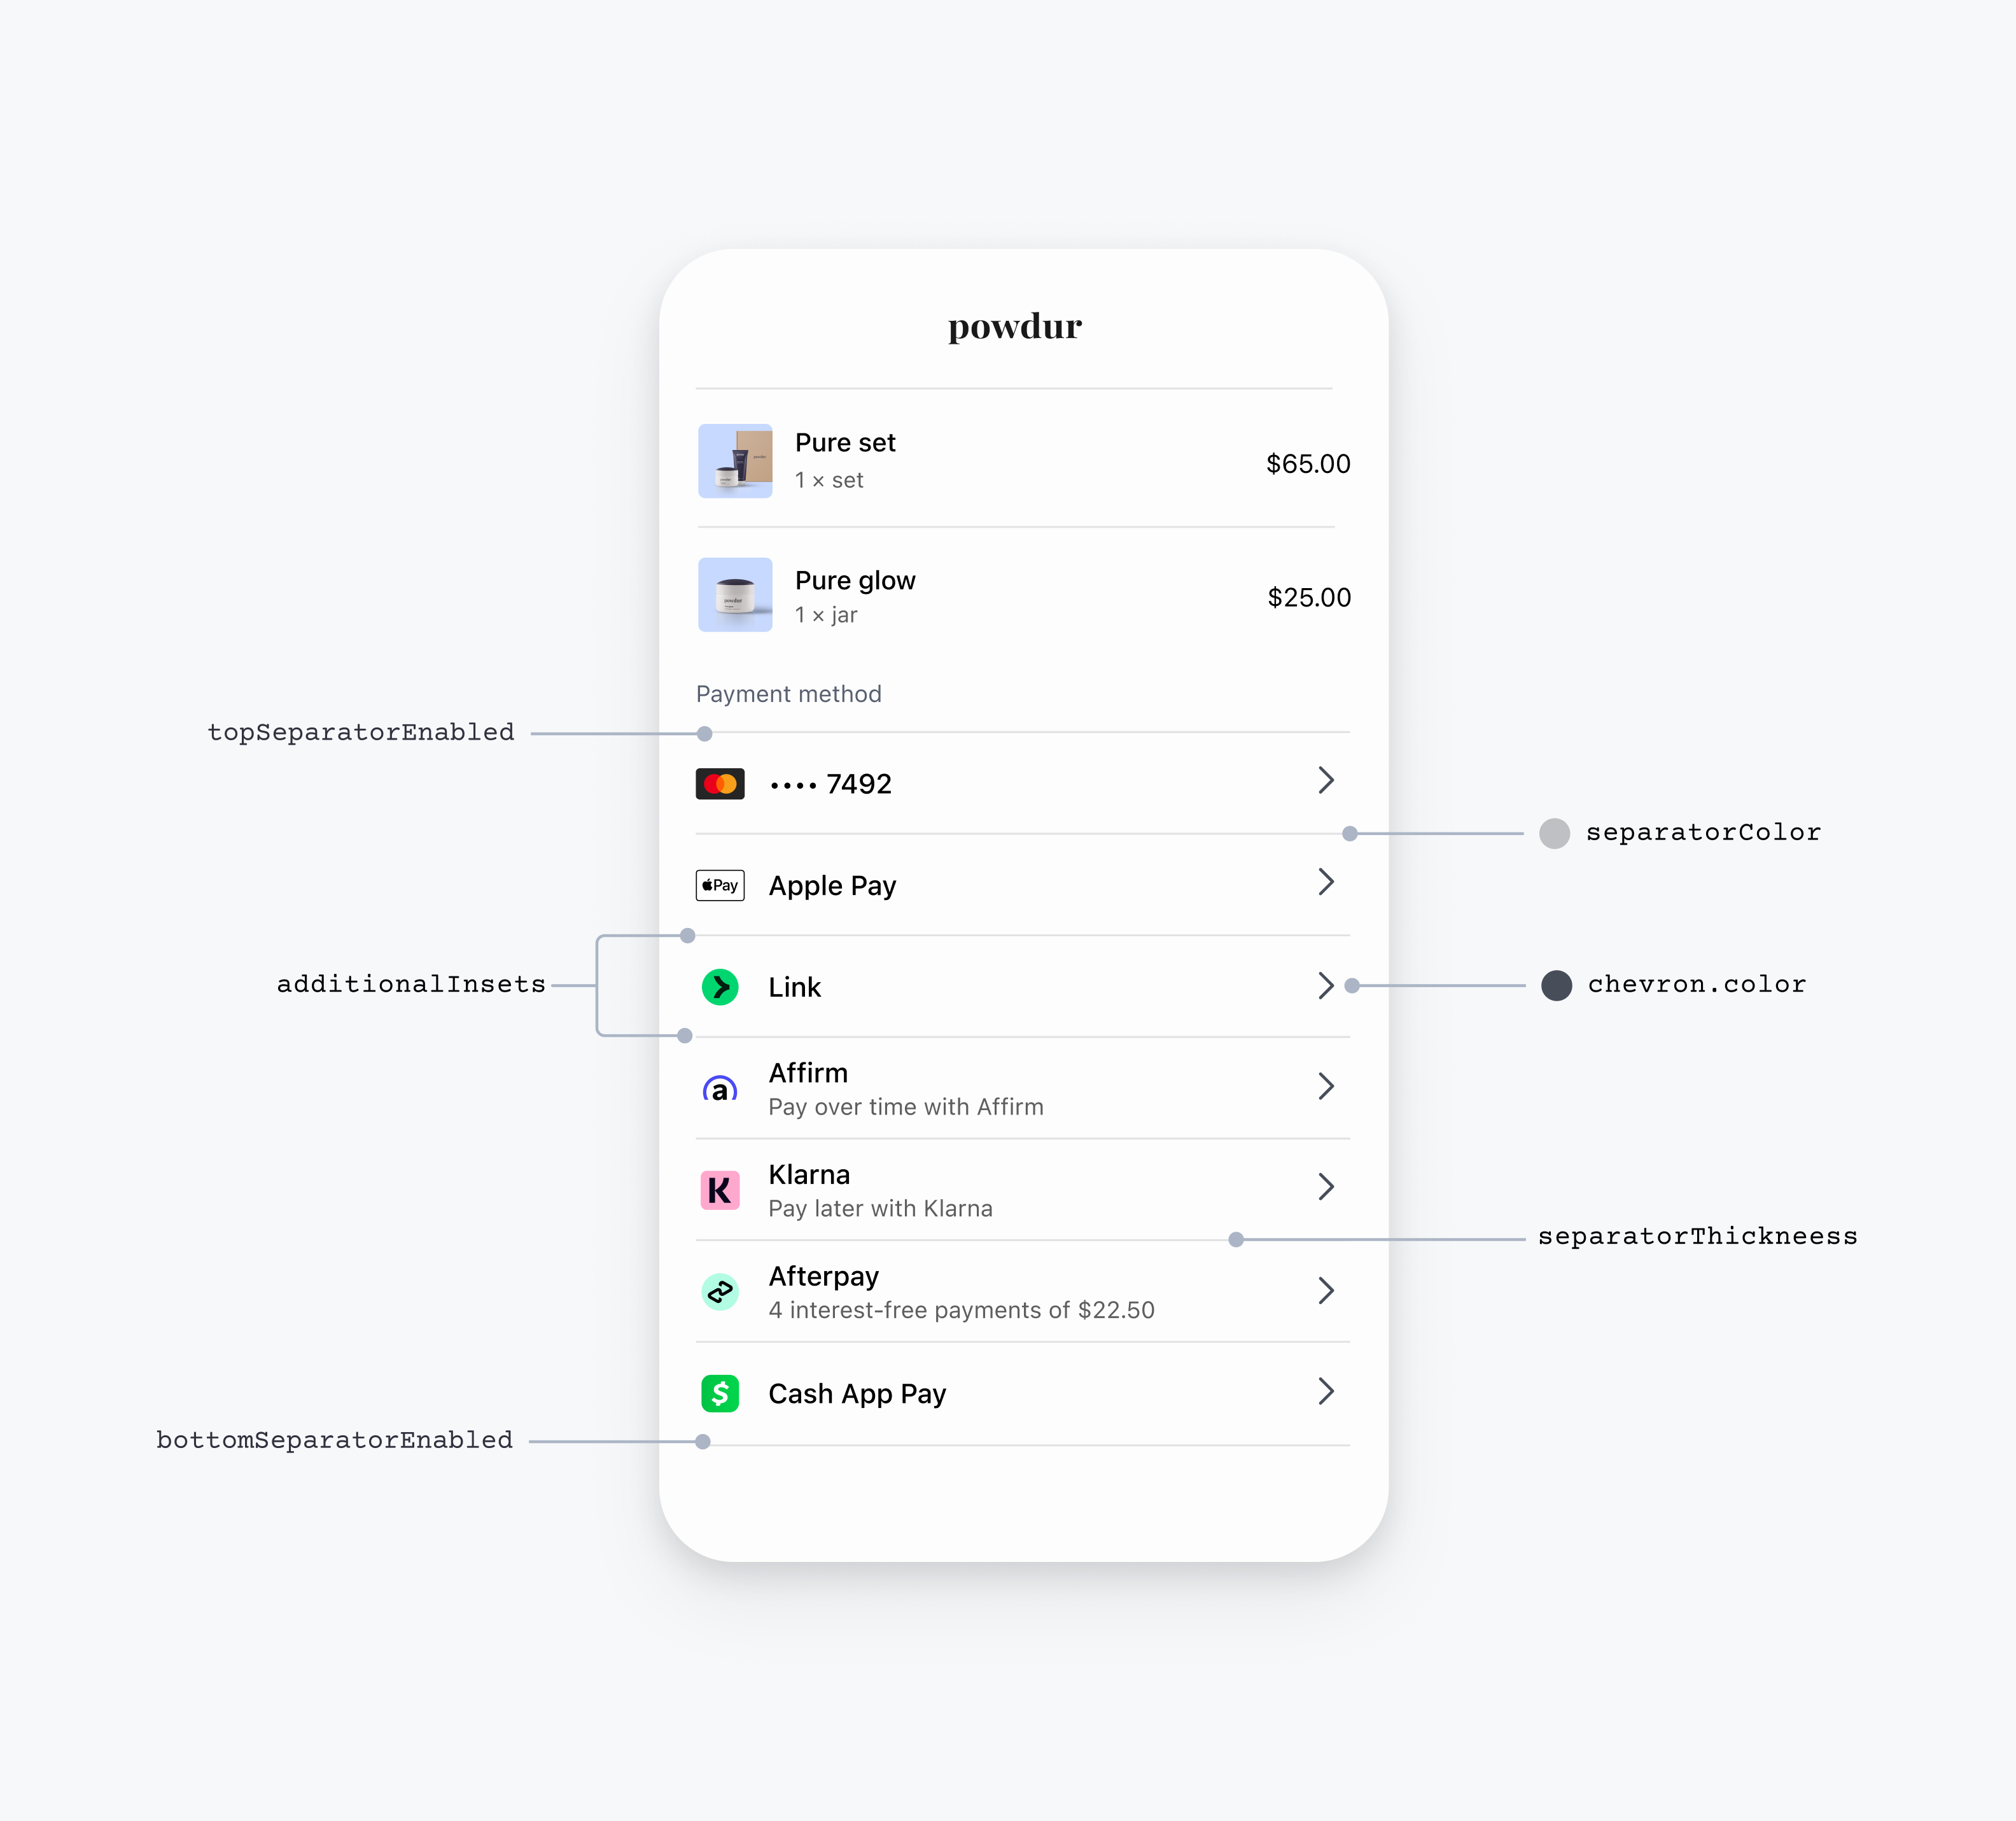
var configuration = EmbeddedPaymentElement.Configuration()
// The flatWithDisclosure style requires the .immediateAction row selection behavior, which accepts a handler for a user selecting a payment method.
configuration.rowSelectionBehavior = .immediateAction(didSelectPaymentOption: myHandlingFunction)

var appearance = PaymentSheet.Appearance.default
appearance.embeddedPaymentElement.row.style = .flatWithDisclosure
appearance.embeddedPaymentElement.row.flat.bottomSeparatorEnabled = false // Hide the bottom separator
appearance.embeddedPaymentElement.row.flat.topSeparatorEnabled = false // Hide the top separator
appearance.embeddedPaymentElement.row.flat.separatorColor = .gray // Change the separator color to gray
appearance.embeddedPaymentElement.row.flat.separatorInsets = .zero // Make separators full width
appearance.embeddedPaymentElement.row.flat.separatorThickness = 2.0 // Increase separator thickness to 2
appearance.embeddedPaymentElement.row.flat.disclosure.color = .black // Change color of the disclosure icon

configuration.appearance = appearance
„Schwebende Schaltfläche“
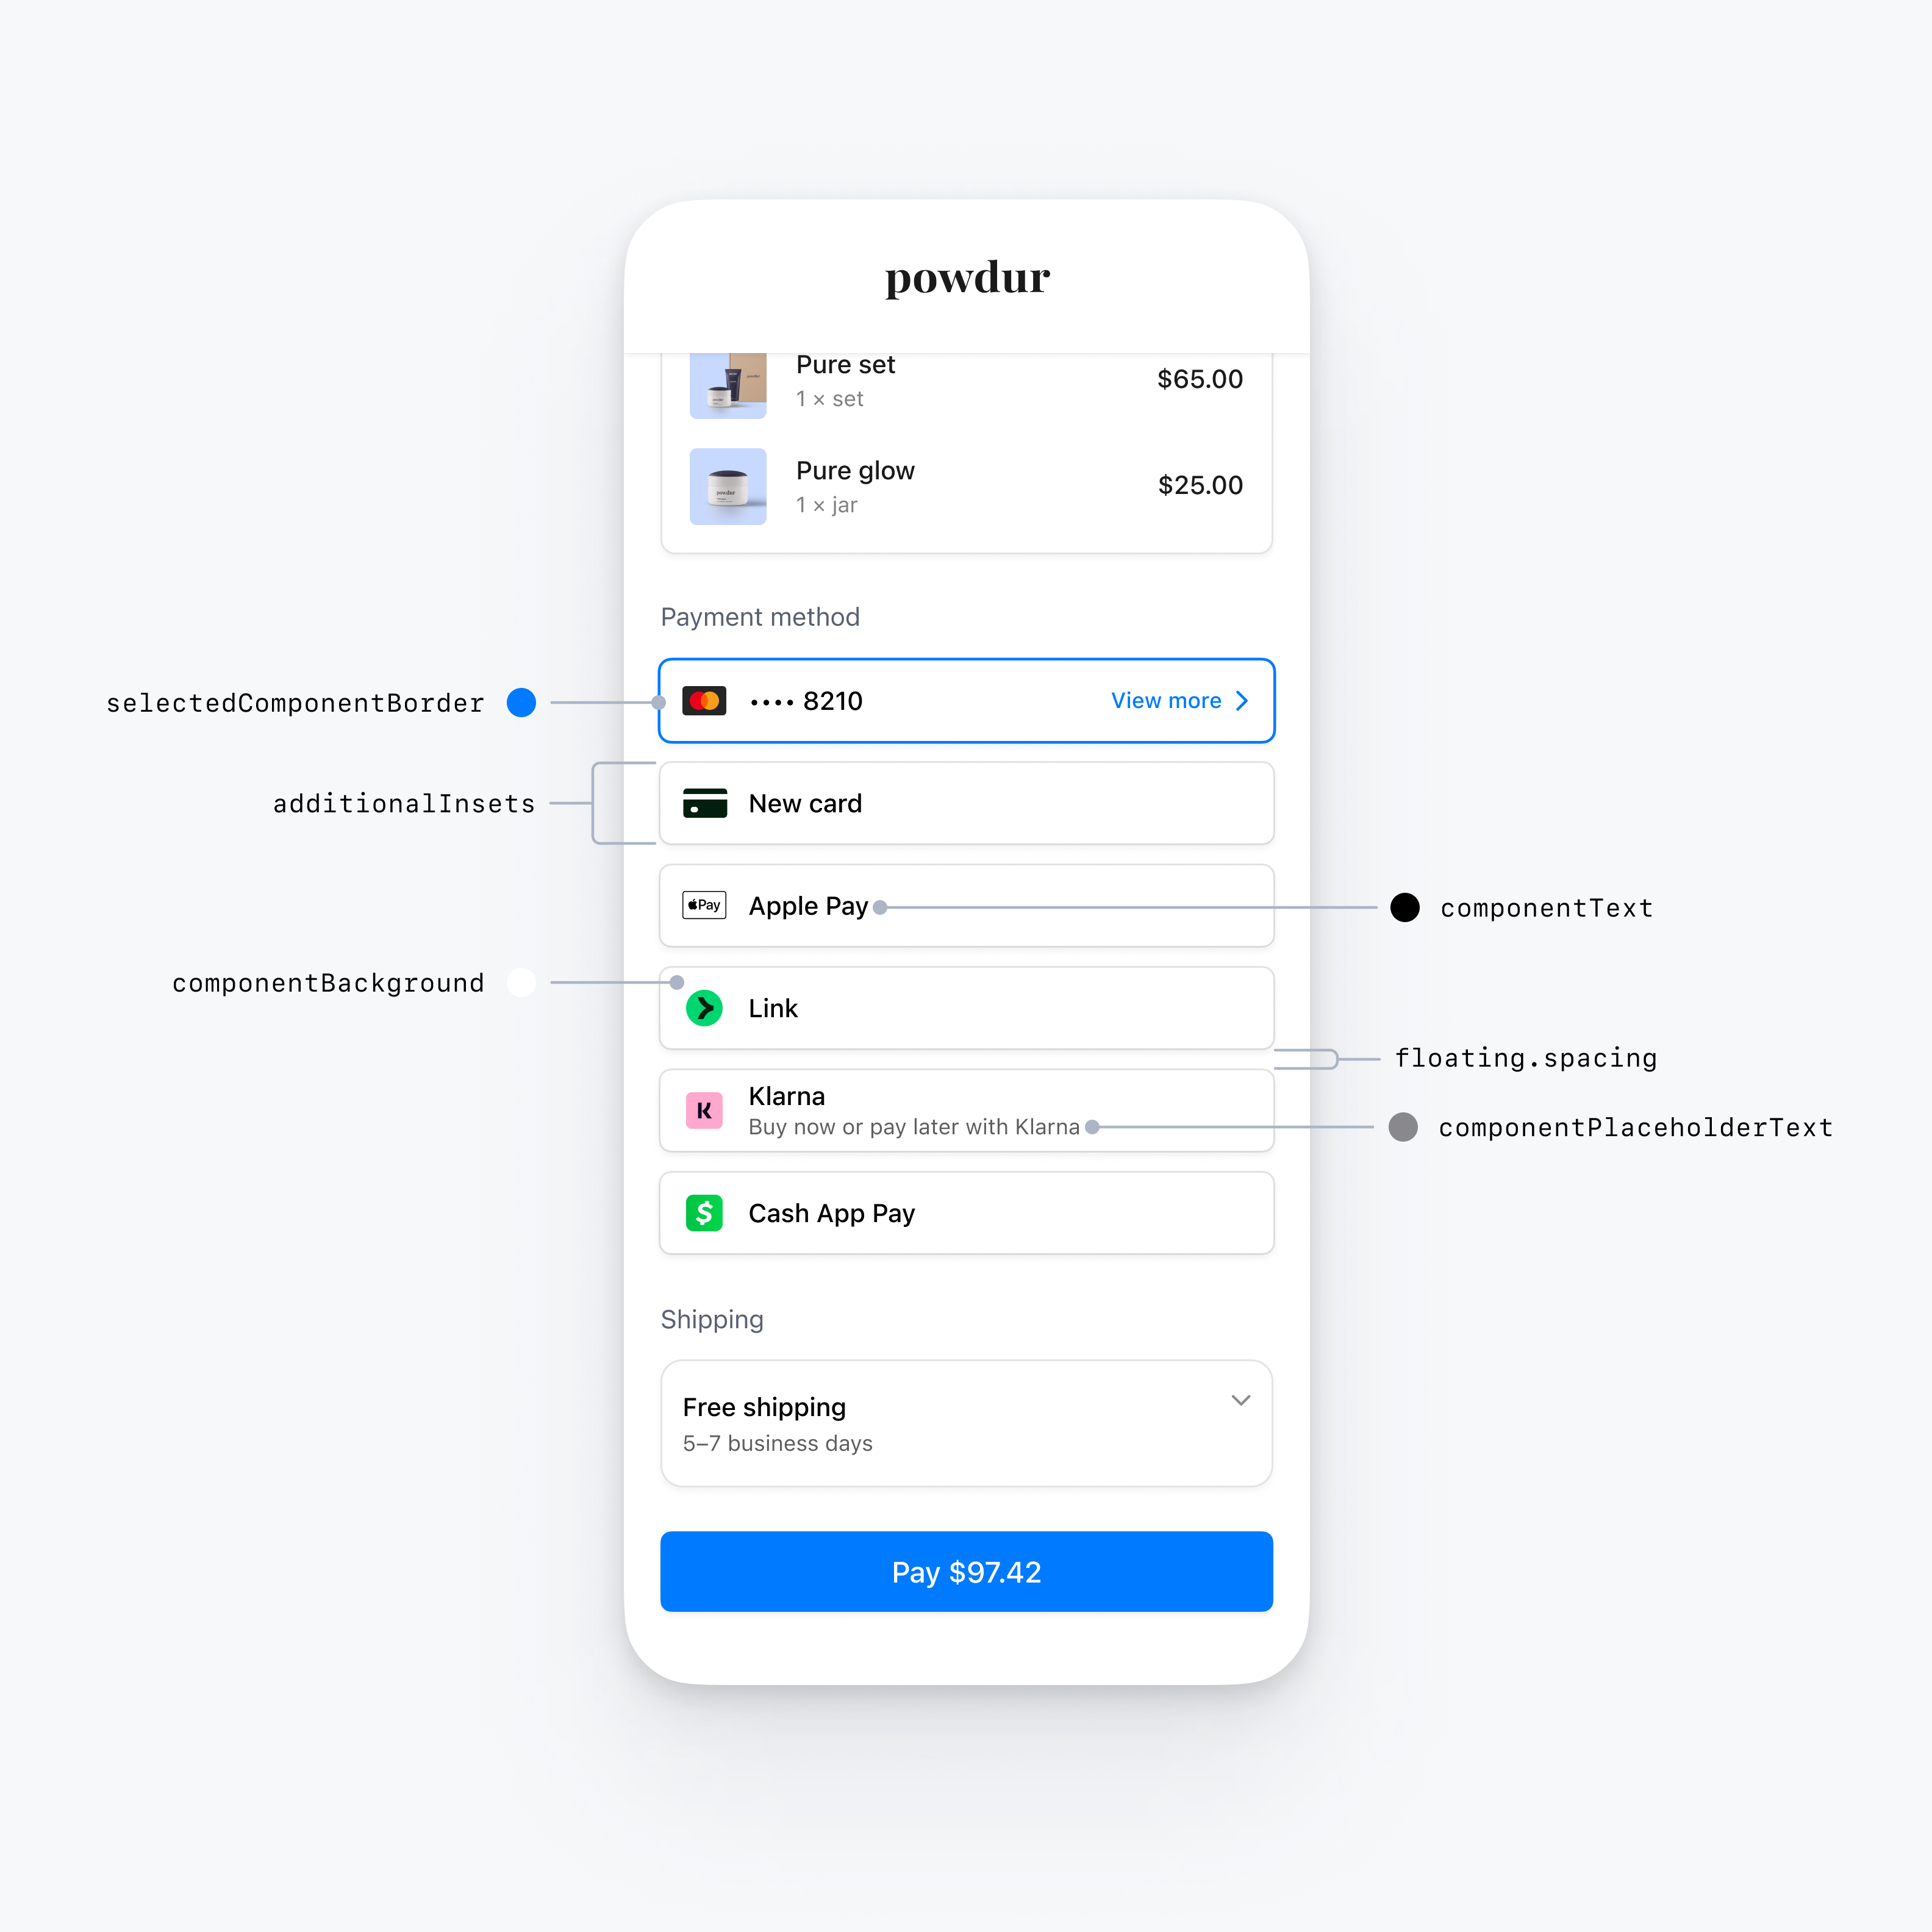
var configuration = EmbeddedPaymentElement.Configuration()

var appearance = PaymentSheet.Appearance.default
appearance.embeddedPaymentElement.row.style = .floatingButton
appearance.embeddedPaymentElement.row.floating.spacing = 20 // Increase spacing
appearance.embeddedPaymentElement.row.additionalInsets = 10 // Increase row height

configuration.appearance = appearance
Häufige Zeilenanpassungen
Sie können Zeileneigenschaften anpassen, die für alle Zeilenstile gelten:
var configuration = EmbeddedPaymentElement.Configuration()

var appearance = PaymentSheet.Appearance.default
appearance.embeddedPaymentElement.row.additionalInsets += 1 // Increase row height by 1 point
appearance.embeddedPaymentElement.row.paymentMethodIconLayoutMargins = .init(top: 0, leading: 10, bottom: 0, trailing: 10) // Custom margins for the payment method icon (for example, the Klarna logo)
appearance.embeddedPaymentElement.row.titleFont = UIFont.systemFont(ofSize: 16, weight: .medium) // Custom font for the row title (for example, "Klarna")
appearance.embeddedPaymentElement.row.subtitleFont = UIFont.systemFont(ofSize: 14, weight: .medium) // Custom font for the row subtitle (for example, "Buy now or pay later with Klarna")