Stripe app for Salesforce B2C Commerce の実装ガイド
Business Manager の設定
The Stripe app for Salesforce B2C Commerce (LINK Cartridge) requires several cartridges for full functionality. Additionally, controller and SFRA support is broken out into two separate cartridges, thereby facilitating the installation and use of one or the other models.
3 つのカートリッジすべてを UX スタジオにインポートし、Server Connection に関連付けます。
サイトカートリッジの割り当て
- Administration (管理) > Sites (サイト) > Manage Sites (サイトの管理) に移動します。
- Stripe の機能を追加するストアフロントサイトのサイト名をクリックします。
- Settings (設定) タブを選択します。
- Storefront Reference Architecture (SFRA) の場合、カートリッジパスに
app_を追加します。stripe_ sfra:int_ stripe_ sfra:int_ stripe_ core
Stripe を導入するストアフロントサイトごとに、この手順を繰り返します。
Business Manager カートリッジの割り当て
- Administration (管理) > Sites (サイト) > Manage Sites (サイトの管理) に移動します。
- Business Manager Site (Business Manager サイト) をクリックしてから、Manage the Business Manager site (Business Manager サイトの管理) リンクをクリックします。
- カートリッジパスに
int_を追加します。stripe_ core
同意書のインポート
- プロジェクトのメタデータフォルダに移動し、
stripe_フォルダを開きます。site_ template sitesフォルダーを開き、siteIDHereフォルダーを目的のサイトのサイト ID に編集します。- Stripe を使用するサイトごとにフォルダーを追加します。
- Administration (管理) > Site Development (サイトの開発) > Site Import & Export (サイトのインポートおよびエクスポート) に移動します。
stripe_フォルダーを zip ファイルに圧縮してインポートします。site_ template
Stripe のスタイリングの構築
必要に応じて、同じルートフォルダから package. にあるベースの SFRA インストールへのパスを更新します。
通常は最上位のプロジェクトフォルダーがあり、ここに SFRA ベースカートリッジのリポジトリーと必要なすべてのプラグイン、ライブラリ、およびその他の LINK カートリッジが複製されます。Stripe カートリッジもそのフォルダーに複製した場合、paths. プロパティを更新する必要はありません。そのフォルダーにカートリッジを複製していない場合は、package. の paths. プロパティを、Storefront Reference Architecture リポジトリーが格納されているローカルディレクトリーへの相対パスを使用して更新します。デフォルトの paths. 値は次のとおりです。
"paths": {
  "base": "../storefront-reference-architecture/cartridges/app_storefront_base/"
}
package. に SFRA カートリッジへの正しいパスが設定されていることを確認したら、Stripe リポジトリーのルートフォルダーから npm run compile:scss コマンドを実行します。
新しい決済代行業者の追加
Stripe カートリッジでは、2 つの決済代行業者が使用されます。STRIPE_ はクレジットカードのみを処理し、STRIPE_ は Payment Element と Express Checkout Element による決済手段を処理します。
クレジットの決済代行業者
- Merchant Tools (加盟店ツール) > Ordering (注文) > Payment Processors (決済プロセッサー) に移動し、New (新規) をクリックします。
- 新しいウィンドウで、ID を
STRIPE_に設定し、Apply (適用) をクリックします。CREDIT
APM の決済代行業者
- Merchant Tools (加盟店ツール) > Ordering (注文) > Payment Processors (決済プロセッサー) に移動し、New (新規) をクリックします。
- 新しいウィンドウで、ID 属性を
STRIPE_値に設定し、Apply (適用) をクリックします。APM
支払い方法の更新
Merchant Tools (加盟店ツール) > Ordering (注文) > Payment Methods (支払い方法) に移動し、CREDIT_CARD 支払い方法をクリックして、CREDIT_CARD 詳細セクションのドロップダウンで STRIPE_CREDIT の決済プロセッサーを選択します。
動的な決済手段または支払いリクエストボタンの場合、STRIPE_APM_METHODS を有効にして、Stripe でサポートされている決済手段を含めます。詳細は決済手段ガイドをご覧ください。
Stripe 支払いリクエストボタンを利用するには、STRIPE_PAYMENT_REQUEST_BTN 支払い方法を有効にします。詳細については、支払いリクエストボタンをご覧ください。
Stripe Salesforce Commerce アプリをインストールする
Use Stripe Apps to bolster security and simplify the use of distinct restricted keys for each integration with your Stripe account. The process of installing the Stripe app and acquiring the newly generated secret and publishable keys is essential for your integration with the Salesforce Commerce connector. This approach eliminates the need to manually create your own restricted key or use a secret key. To integrate the Salesforce Commerce app and reinforce your account’s security infrastructure:
- Stripe App Marketplace に移動して、Salesforce Commerce アプリをインストールするをクリックします。
- アプリをインストールする Stripe アカウントを選択します。
- アプリの権限を確認および承認してからテスト環境または本番環境でアプリをインストールし、インストール をクリックします。
- アプリをインストールしたら、キーをなくさないように安全な場所に保管します。保管場所を忘れないようにするため、ダッシュボードにキーに関するメモを残すことができます。
- Use the newly generated publishable key and secret key to finish the app configuration.
- インストール後にアプリを管理したり、新しいセキュリティキーを生成したりするには、サンドボックスまたは本番環境でアプリケーションの設定ページに移動します。
設定
Merchant Tools (加盟店ツール) > Site Preferences (サイト設定) > Custom Site Preferences (カスタムサイト設定) > Stripe Configurations (Stripe 設定) をサイト固有の値で更新します。
Stripe Salesforce Commerce アプリから Stripe シークレット API キーに値を入力します。
Stripe Salesforce Commerce アプリから公開可能 API キーに値を入力します。
Is this SFRA installation (SFRA インストールですか): 現在のサイトで SFRA を使用している場合は、
yesに設定します。Capture Funds on Stripe Charge (Stripe 支払いで資金をキャプチャーする): デフォルト値は
true(はい) です。Stripe 支払いをオーソリするには、false(いいえ) に設定します。Stripe card element CSS style (Stripe カード Element CSS スタイル): カード Element ボタンがストアフロントのスタイル全体に収まるように CSS スタイリングを設定します
{"base": {"fontFamily": "Arial, sans-serif","fontSize": "14px","color": "#C1C7CD"},"invalid": {"color": "red" } }など)。Stripe API URL:
https://js.stripe. com/basil/stripe. js Stripe Payment Request Button Style (Stripe 支払いリクエストボタンのスタイル): 支払いリクエストボタンには、 limited CSS styling for the button (ボタン用の制限付き CSS スタイル) を選択します。詳細については、Element のスタイル設定 をご覧ください。
Apple Pay Verification String (Apple Pay 確認文字列): Stripe ダッシュボードから提供された Apple 確認文字列を入力します。これは 1 回のみ有効です。Stripe コンソールは、セットアップ時に Apple Pay for Web 確認文字列をプロキシします。支払いリクエストボタンがストアフロントでの支払い形式として使用される場合は、これをサンドボックスで設定します。
国コード (Stripe の支払いリクエストボタン): これは、支払いリクエストボタンのデフォルトの国コード (US など) です。1 つのサイトが複数の国で使用される場合、サイト設定ではなく国コードを動的に渡すようにカスタマイズする必要があります。詳細については、支払いリクエストインスタンスを作成するをご覧ください。
Stripe webhook signing secret (Stripe Webhook 署名シークレット): Stripe ダッシュボードから提供される Webhook 署名シークレットを入力します。Stripe は Webhook イベントに署名し、検証を SFCC に渡します。SFCC は、このシークレットを使用してメッセージの内容を検証します。
Stripe Allowed Webhook Statuses (Stripe で許可される Webhook ステータス): Webhook が応答するための許可ステータスを設定します。

Stripe Enabled (Stripe の有効化): カートリッジを有効または無効にします。
Stripe Quick Setup (Stripe クイック設定)
または、Stripe Quick Setup を使用して Business Manager で Stripe を設定できます
- Business Manager にログインします。
- Administration (管理) の Business Manager 内で「Stripe Quick Setup」を検索します。
- Stripe を設定するサイトを選択します。
- Stripe Salesforce Commerce アプリから取得した
Stripe Publishable KeyとRestricted Access keyを入力します。 - Quick Setup (クイック設定)* をクリックします。
Apple Pay を設定する
Apple Pay の場合:
RedirectURL. を更新します。
server.extend(page);

server.replace('Start', function (req, res, next) {
  const URLRedirectMgr = require('dw/web/URLRedirectMgr');

  // Intercept the incoming path request
  if (URLRedirectMgr.getRedirectOrigin() === '/.well-known/apple-developer-merchantid-domain-association') {
    res.render('stripe/util/apple');
    return next();
  }

  const redirect = URLRedirectMgr.redirect;
  const location = redirect ? redirect.location : null;
  const redirectStatus = redirect ? redirect.getStatus() : null;

  if (!location) {
    res.setStatusCode(404);
    res.render('error/notFound');
  } else {
    if (redirectStatus) {
      res.setRedirectStatus(redirectStatus);
    }
    res.redirect(location);
  }

  return next();
});
Stripe ダッシュボードでドメインを確認できるように、サンドボックスのサイトの 1 つにエイリアスを一時的に設定します。エイリアスは次のようにする必要があります。
{
  "__version": "1",
    "settings": {
      "http-host": "your.sandbox.domain.demandware.net",
      "https-host": "your.sandbox.domain.demandware.net",
      "default": "true",
      "site-path": "/",
  },
  "your.sandbox.domain.demandware.net": [
    {
      "locale": "en_GB",
      "if-site-path": "/",
    }
  ]
}
locale の値は、無効にされていないロケールである必要があります。
- 支払い方法のドメインページで、新しいドメインを追加するをクリックします。
- ドメイン名を入力します。
- 保存して続けるをクリックします。
- ドメインアソシエーションファイルをダウンロードします。
- このファイルを
/.でホストします。たとえば、well-known/apple-developer-merchantid-domain-association https://example.を登録する場合、com https://example.でこのファイルを入手できるようにします。com/. well-known/apple-developer-merchantid-domain-association - 確認するをクリックします。
ストアフロントのコードを更新する
ベースの LINK カートリッジコードには、Stripe でサポートされているすべてのクレジットカードのサポートが含まれています。ストアフロントで使用できるカードのリストは、Business Manager のクレジット/デビットカードリストによる制限も受けます (Merchant Tools (加盟店ツール) > Ordering (注文) > Payment Methods (支払い方法) > Credit/Debit Cards (クレジット/デビットカード))。
Storefront コードを次のように更新します。この例は、SFRA バージョン 4.4 をベースとします。後続のセクションでは、SFRA コードに対するカスタマイズについて詳しく説明します。
コントローラーエンドポイントの中には、置き換えられるのではなく追加されるものが多く存在します。これらのエンドポイントは何もしなくても機能するため、ここでは触れません。
実装でエンドポイントがすでに置き換えられている場合があるため、コントローラーの更新は、エンドポイントが置き換えられた場合にのみ必要です。ベースカートリッジに加えられた変更を、すでに置き換えられているコントローラーに追加します。これらのエンドポイントを拡張/置換していない場合は、必要な操作は何もありません。
コントローラー: CheckoutServices.js
パス: app_
SubmitPayment エンドポイントの決済手段の検証を削除します。
if (!paymentMethodID && currentBasket.totalGrossPrice.value > 0) {
  const noPaymentMethod = {};

  noPaymentMethod[billingData.paymentMethod.htmlName] = Resource.msg(
    'error.no.selected.payment.method',
    'payment',
    null
  );

  delete billingData.paymentInformation;
  res.json({
    form: billingForm,
    fieldErrors: [noPaymentMethod],
    serverErrors: [],
    error: true
  });
  return;
}

// Validate payment method
const creditCardPaymentMethod = PaymentMgr.getPaymentMethod(PaymentInstrument.METHOD_CREDIT_CARD);
const paymentCard = PaymentMgr.getPaymentCard(billingData.paymentInformation.cardType.value);

const applicablePaymentCards = creditCardPaymentMethod.getApplicablePaymentCards(
  req.currentCustomer.raw,
  req.geolocation.countryCode,
  null
);

if (!applicablePaymentCards.contains(paymentCard)) {
  // Invalid payment method
  const invalidPaymentMethod = Resource.msg('error.payment.not.valid', 'checkout', null);
  delete billingData.paymentInformation;
  res.json({
    form: billingForm,
    fieldErrors: [],
    serverErrors: [invalidPaymentMethod],
    error: true
  });
  return;
}
注文作成コードを更新します。
// Re-calculate the payments
const calculatedPaymentTransactionTotal = COHelpers.calculatePaymentTransaction(currentBasket);
if (calculatedPaymentTransactionTotal.error) {
  res.json({
      error: true,
      errorMessage: Resource.msg('error.technical', 'checkout', null);
  });
  return next();
}
const stripeCheckoutHelper = require('int_stripe_core').getCheckoutHelper();
const order = stripeCheckoutHelper.createOrder(currentBasket);

if (!order) {
  res.json({
    error: true,
    errorMessage: Resource.msg('error.technical', 'checkout', null);
  });
  return next();
}
発注コードを更新します。
var isAPMOrder = stripeCheckoutHelper.isAPMORder(order);

if (!isAPMOrder) {
  var stripePaymentInstrument = stripeCheckoutHelper.getStripePaymentInstrument(order);

  if (stripePaymentInstrument && order.custom.stripeIsPaymentIntentInReview) {
    res.json({
      error: false,
      orderID: order.orderNo,
      orderToken: order.orderToken,
      continueUrl: URLUtils.url('Order-Confirm').toString()
    });

    return next();
  }
  // Places the order
  var placeOrderResult = COHelpers.placeOrder(order, fraudDetectionStatus);

  if(placeOrderResult.error) {
    stripeCheckoutHelper.refundCharge(order);
    res.json({
      error: true,
      errorMessage: Resource.msg('error.technical', 'checkout', null)
    });
  const fraudDetectionStatus = hooksHelper(
    'app.fraud.detection',
    'fraudDetection',
    currentBasket,
    require('*/cartridge/scripts/hooks/fraudDetection').fraudDetection
  );

  if (fraudDetectionStatus.status === 'fail') {
    Transaction.wrap(function () {
      OrderMgr.failOrder(order);
    });

    // Fraud detection failed
    req.session.privacyCache.set('fraudDetectionStatus', true);

    res.json({
      error: true,
      cartError: true,
      redirectUrl: URLUtils.url('Error-ErrorCode', 'err', fraudDetectionStatus.errorCode).toString(),
      errorMessage: Resource.msg('error.technical', 'checkout', null);
    });
    return next();
  }
  COHelpers.sendConfirmationEmail(order, req.locale.id);

  // Reset usingMultiShip after successful Order placement
  req.session.privacyCache.set('usingMultiShip', false);

  res.json({
    error: false,
    orderID: order.orderNo,
    orderToken: order.orderToken,
    continueUrl: URLUtils.url('Order-Confirm').toString()
  });

  return next();
}
コントローラー: PaymentInstruments.js
パス: app_
DeletePayment エンドポイントを次のコードに置き換えます。
server.replace('DeletePayment', function(req, res, next) {
  var stripeHelper = require ('int_stripe_core').getStripeHelper();
  var wallet = stripeHelper.getStripeWallet(customer);
  var UUID = req.querystring.UUID;
  wallet.removePaymentInstrument({ custom: { stripeId: UUID }});

  res.json({  UUID: UUID });
  next();
});
コントローラー: RedirectURL.js
パス: app_
次のコードを Start 関数に追加します。
server.replace('Start', function (req, res, next) {
  const URLRedirectMgr = require('dw/web/URLRedirectMgr');

  // Intercept the incoming path request
  if (URLRedirectMgr.getRedirectOrigin() === '/.well-known/apple-developer-merchantid-domain-association') {
    res.render('stripe/util/apple');
    return next();
  }

  const redirect = URLRedirectMgr.redirect;
  const location = redirect ? redirect.location : null;
  const redirectStatus = redirect ? redirect.getStatus() : null;

  if (!location) {
    res.setStatusCode(404);
    res.render('error/notFound');
  } else {
    if (redirectStatus) {
      res.setRedirectStatus(redirectStatus);
    }
    res.redirect(location);
  }

  return next();
});
外部インターフェイス
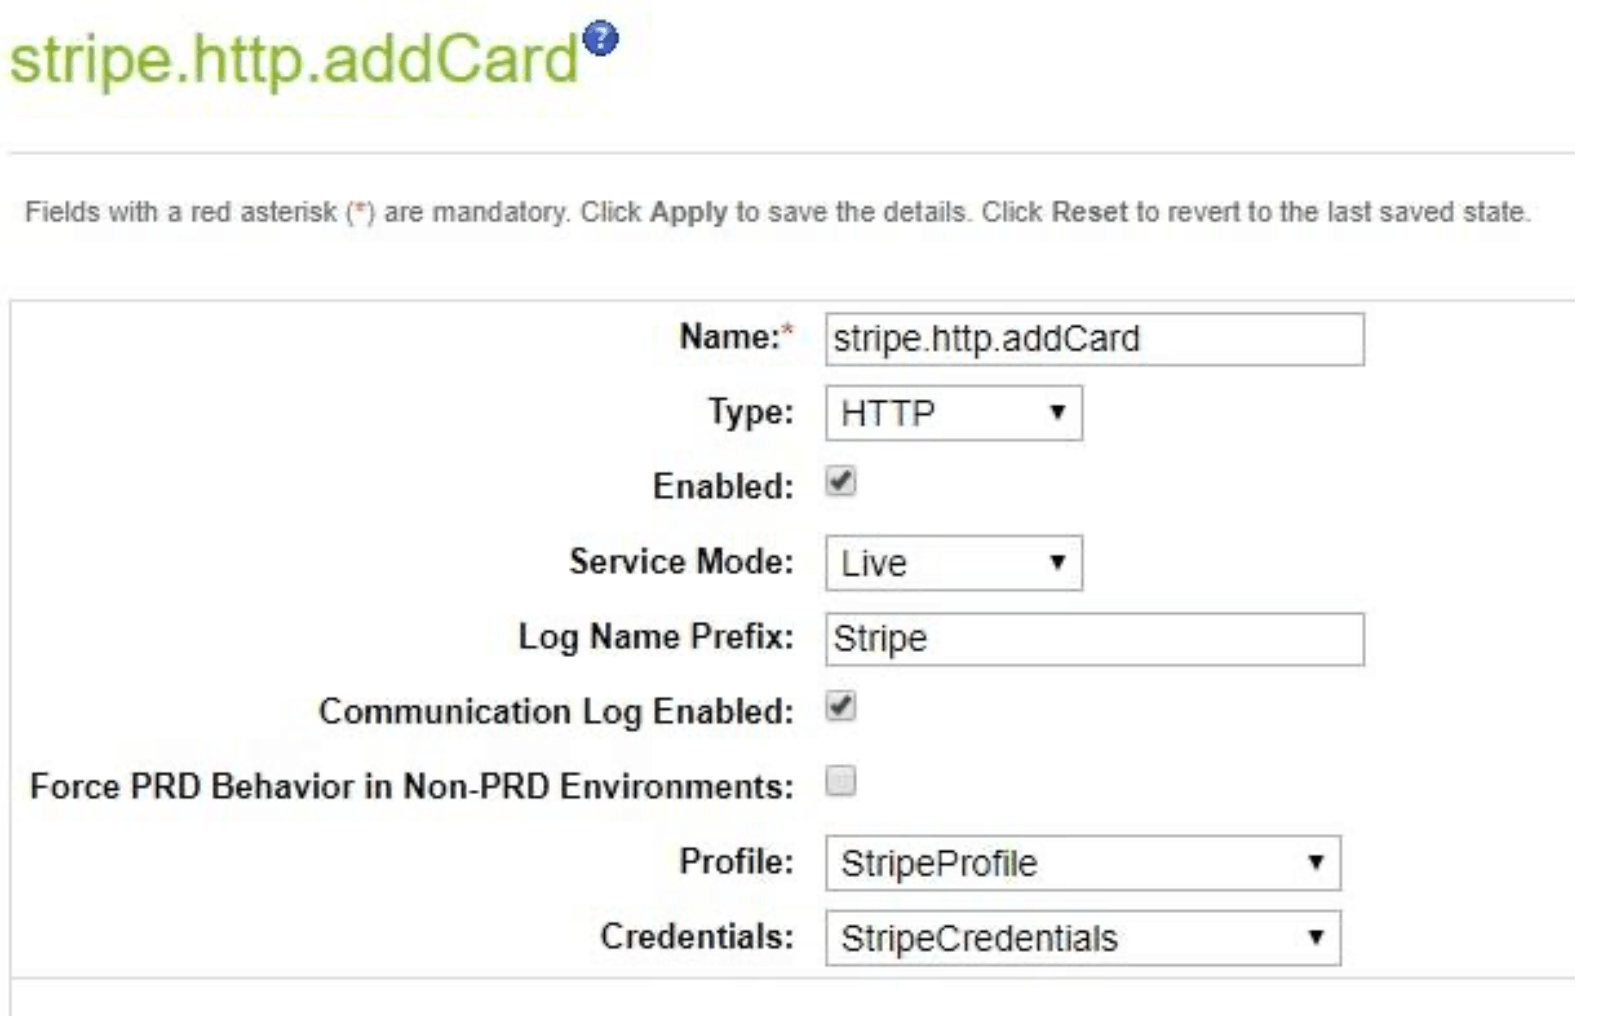
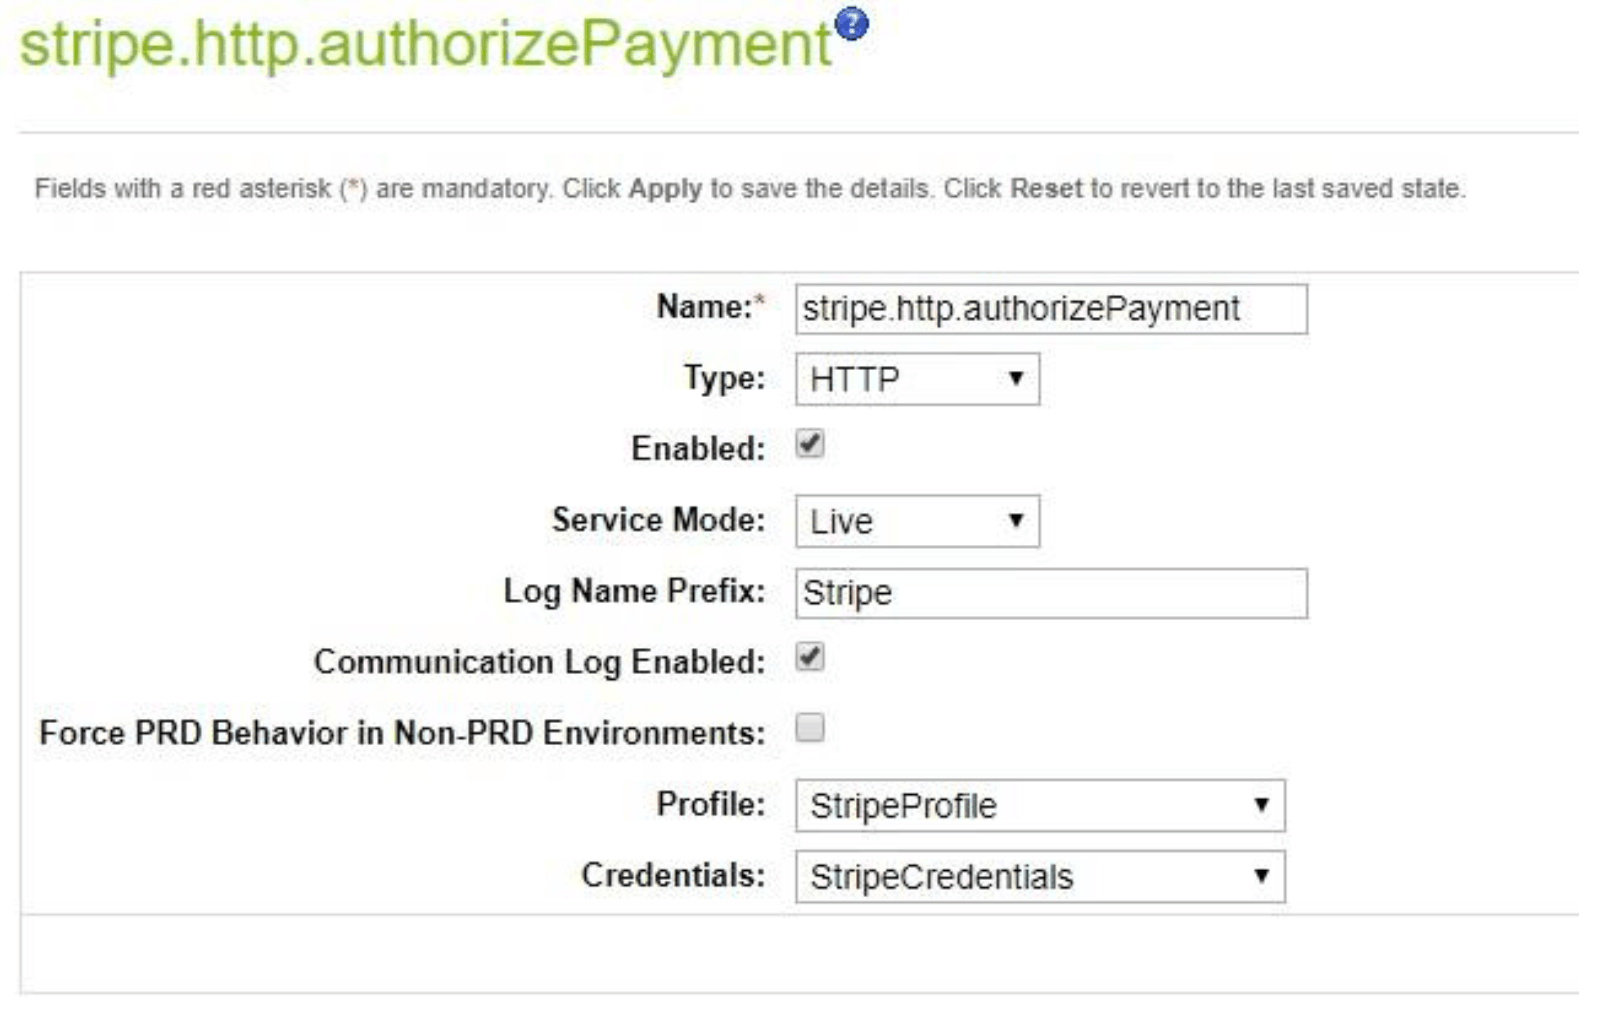
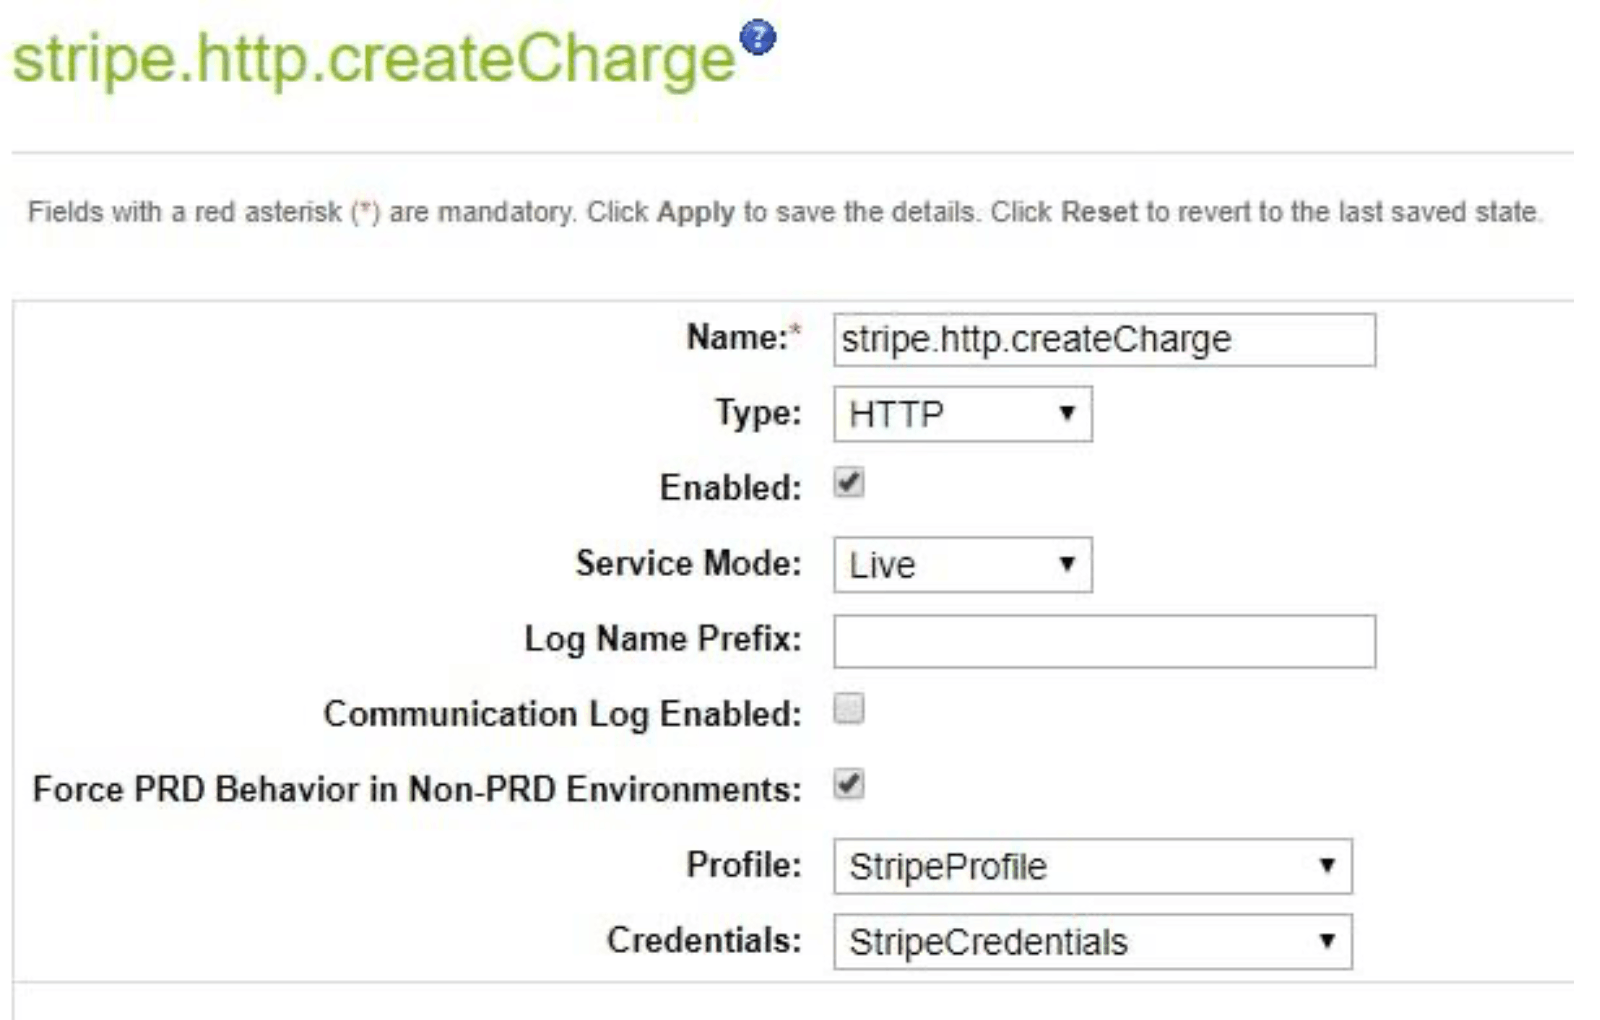
Stripe 機能は、Stripe サービスへの外部コールに大きく依存しています。外部インターフェイスはすべて、Stripe API との通信にサービスフレームワークを使用しています。
Stripe アカウントは、無料で作成して使用できます。Stripe のサービスとの通信のほとんどはログに記録され、Stripe ダッシュボードからアクセスできます。実装の監視とテストには Stripe ダッシュボードを使用することをお勧めします。Stripe のサービスの実装に関する主な設定は、Administration (管理) > Operations (運用) > Services with a different service for each external call (各外部呼出しに異なるサービスを使用するサービス) にあります。
stripe.http. addCard stripe.http. authorizePayment stripe.http. createCharge stripe.http. createCustomer stripe.http. deleteCard stripe.http. fetchCustomerCards stripe.http. fetchCustomerSources stripe.http. refundCharge stripe.http. retrieveCustomer stripe.http. service stripe.http. updateCard
これらのサービスはすべて、同じプロファイルと同じ認証情報を使用します。唯一異なる可能性があるのは、通信ログが有効になっているかどうかと、ログ名のプレフィックスです。いくつかのサービスの設定を以下に示します。
Stripe Payment Element
Stripe カートリッジは、支払い方法として Stripe Payment Element に対応します。
Payment Element は、1 つの実装で 25 種類以上の支払い方法の受け付けを可能にする埋め込みの UI コンポーネントです。

Payment Element を有効にするには、Business Manager > Merchant Tools (加盟店ツール) > Ordering (注文) > Payment Methods (支払い方法) に移動し、ID が STRIPE_ に設定された支払い方法を有効にします。ストアフロントの Checkout (決済) > Payment (支払い) には、Stripe ダッシュボードで有効化されているすべての支払い方法が表示されるウィジェットがあります。
Business Managerで Payment Element を有効にすると、他のすべての支払い方法を置き換えることができます。支払い方法をすべて無効にして、代わりに STRIPE_ を使用することができます。
Stripe Payment Element からの支払い方法を将来の使用に備えて保存できるようにするには、Business Manager > Custom Preferences (カスタム設定) > Stripe Configs (Stripe 設定) に移動し、Stripe Payment Element: Enable Save Payment Method for Future Purchases (Stripe Payment Element: 将来の購入に備えて支払い方法を保存) を Yes に設定します。
決済フローで保存された支払い方法のリストを表示するには、Business Manager > Payments Methods (支払い方法) に移動して、CREDIT_ 支払い方法を有効にします。STRIPE_ も有効にすると、保存されたカードが存在する場合はクレジットカードタブにそのカードのリストが表示されます。
Stripe Radar のインサイトの表示
Stripe LINK カートリッジは、Radar のインサイトビューをサポートし、Business Manager の Orders セクション内にリスクに関するインサイトを表示します。Radar はリアルタイムの不正防止を提供しますが、追加の開発に時間をとられることはありません。不正利用対策の専門家は、Radar for Teams を追加することで、保護をカスタマイズし、より詳細なインサイトを得ることができます。
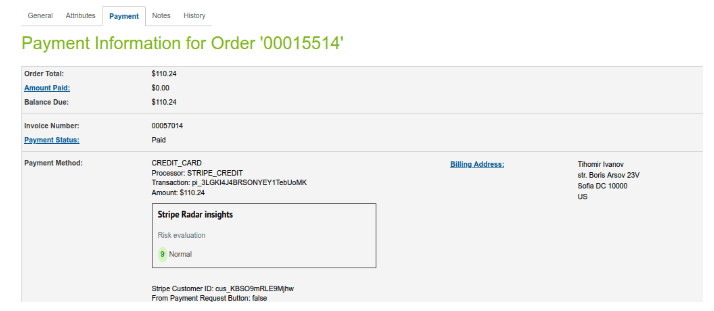
インサイトの表示を有効にするには、Business Manager > Merchant Tools (加盟店ツール) > Custom Preferences (カスタム設定) > Stripe Configs (Stripe 設定) に移動し、Risk Score Data (リスクスコアデータ) を Yes に設定します。
