Crear una integración de suscripciones
Crear y administrar las suscripciones para aceptar pagos recurrentes.
Aprende a vender subscriptions de precio fijo. Usarás Payment Element para dispositivos móviles para crear un formulario de pago personalizado que puedes integrar en tu aplicación.
Nota
Si vendes productos o servicios digitales que se consumen dentro de tu aplicación (por ejemplo, suscripciones, monedas de juegos, niveles de juegos, acceso a contenido prémium o desbloqueo de una versión completa), debes usar las API de compra desde la aplicación de Apple. Esta regla tiene algunas excepciones, como los servicios personales uno a uno y las aplicaciones basadas en regiones específicas. Consulta las pautas de revisión de la App Store para obtener más información.
Crear tu suscripción
Esta guía te explica cómo:
- Modelar tu empresa creando un catálogo de productos.
- Crear un proceso de registro para agregar clientes.
- Crear suscripciones y recopilar información de pago.
- Comprueba y supervisa el estado de los pagos y las suscripciones.
- Permitir que los clientes cambien de plan o cancelen la suscripción.
- Aprenda a usar el modo facturación flexible para acceder a un comportamiento de facturación mejorado y funcionalidades adicionales.
Cómo modelar la suscripción en Stripe
Subscriptions simplifica tu facturación y crea automáticamente Facturas y PaymentIntents por ti. Para crear y activar una suscripción, necesitas crear primero un Producto para modelar lo que se vende, y un Precio, que determina el intervalo y el importe por cobrar. También necesitas un Cliente para almacenar los PaymentMethods utilizados para realizar cada pago recurrente.
Definiciones de los objetos de la API
| Recurso | Definición |
|---|---|
| Customer | Representa a un cliente que compra una suscripción. Usa el objeto Customer asociado a una suscripción para realizar y hacer seguimiento de los cargos recurrentes y para administrar los productos a los que se suscriben. |
| Derecho | Representa el acceso de un cliente a una funcionalidad incluida en un producto de servicio al que está suscrito. Cuando creas una suscripción para la compra recurrente de un producto por parte de un cliente, se crea automáticamente un derecho activo para cada funcionalidad asociada a ese producto. Cuando un cliente accede a tus servicios, utiliza sus derechos activos para habilitar las funcionalidades incluidas en su suscripción. |
| Funcionalidad | Representa una funcionalidad o capacidad a la que tus clientes pueden acceder cuando se suscriben a un producto de servicio. Puedes incluir funciones en un producto creando ProductFeatures. |
| Factura | Una declaración de importes que un cliente adeuda y que rastrea los estados de pago desde el borrador hasta su pago o su finalización. Las suscripciones generan facturas automáticamente. |
| PaymentIntent | Una forma de crear flujos de pago dinámicos. Un PaymentIntent hace un seguimiento del ciclo de vida del flujo del proceso compra del cliente y activa pasos adicionales de autenticación, si así lo exigen las disposiciones normativas, las reglas antifraude personalizadas de Radar o los métodos de pago con redireccionamiento. Las facturas crean PaymentIntents de forma automática. |
| PaymentMethod | Los métodos de pago que utiliza el cliente para pagar tus productos. Por ejemplo, puedes almacenar una tarjeta de crédito en un objeto Customer y usarla para realizar pagos recurrentes para ese cliente. Normalmente se usa con las API Payment Intents o Setup Intents. |
| Precio | Define el precio por unidad, la moneda y el ciclo de facturación para un producto. |
| Producto | Un bien o servicio que vende tu empresa. Un producto de servicio puede incluir una o más funciones. |
| ProductFeature | Representa la inclusión de una sola funcionalidades en un solo producto. Cada producto está asociado a una ProductFeature para cada funcionalidad que incluye, y cada funcionalidad está asociada a una ProductFeature para cada producto que la incluye. |
| Suscripción | Representa la compra recurrente programada de un producto por parte de un cliente. Usa una suscripción para cobrar pagos y proporcionar entrega repetida o acceso continuo a un producto. |
Veamos un ejemplo de cómo funcionan juntos los productos, las funcionalidades y los derechos. Imagina que quieres configurar un servicio recurrente que ofrezca dos niveles: un producto estándar con funcionalidad básica y un producto avanzado que agregue funcionalidad extendida.
- Creas dos funcionalidades:
basic_yfeatures extended_.features - Creas dos productos:
standard_yproduct advanced_.product - Para el producto estándar, creas una ProductFeature que asocia
basic_confeatures standard_.product - Para el producto avanzado, creas dos ProductFeatures: una que asocia
basic_confeatures advanced_y otra que asociaproduct extended_confeatures advanced_.product
Un cliente, first_, se suscribe al producto estándar. Cuando creas la suscripción, Stripe crea automáticamente un derecho que asocia first_ con basic_.
Otro cliente, second_, se suscribe al producto avanzado. Al crear la suscripción, Stripe crea automáticamente dos derechos: uno que asocia second_ con basic_ y otro que asocia second_ con extended_.
Puedes determinar qué funcionalidades aprovisionar para un cliente recuperando sus derechos activos o recibiendo notificaciones del evento Resumen de derechos activos. No tienes que recuperar sus suscripciones, productos y funcionalidades.
Configura Stripe
El SDK para React Native es de código abierto y está plenamente documentado. Internamente, utiliza SDK para iOS nativo y Android. Para instalar el SDK para React Native de Stripe, ejecuta uno de los siguientes comandos en el directorio del proyecto (según el administrador de paquetes que utilices):
A continuación, instala otras dependencias necesarias:
- Para iOS, vaya al directorio ios y ejecute
pod installpara asegurarse de que también instala las dependencias nativas necesarias. - Para Android, no hay más dependencias para instalar.
Nota
Recomendamos seguir la guía oficial de TypeScript para agregar soporte para TypeScript.
Inicialización de Stripe
Para inicializar Stripe en tu aplicación React Native, ajusta tu pantalla de pago con el componente StripeProvider o usa el método de inicialización initStripe. Solo se requiere la clave publicable de la API en publishableKey. El siguiente ejemplo muestra cómo inicializar Stripe usando el componente StripeProvider.
import { useState, useEffect } from 'react';
import { StripeProvider } from '@stripe/stripe-react-native';

function App() {
  const [publishableKey, setPublishableKey] = useState('');

  const fetchPublishableKey = async () => {
    const key = await fetchKey(); // fetch key from your server here
    setPublishableKey(key);
  };

  useEffect(() => {
    fetchPublishableKey();
  }, []);

  return (
    <StripeProvider
      publishableKey={publishableKey}
      merchantIdentifier="merchant.identifier" // required for Apple Pay
      urlScheme="your-url-scheme" // required for 3D Secure and bank redirects
    >
      {/* Your app code here */}
    </StripeProvider>
  );
}
Nota
Usa las claves de prueba de la API durante las pruebas y el desarrollo, y tus claves para modo activo cuando publiques tu aplicación.
A continuación, instala la CLI de Stripe. La CLI proporciona pruebas de webhook y puedes ejecutarla para realizar llamadas API a Stripe. Esta guía muestra cómo utilizar la CLI para configurar un modelo de precios en una sección posterior.
Para obtener más opciones de instalación, consulta Empezar a usar la CLI de Stripe.
Crear el modelo de tarifasCLI o Dashboard de Stripe
Crea los productos con sus precios en el Dashboard o con la CLI de Stripe.
Este ejemplo utiliza un servicio de precio fijo con dos niveles de servicio diferentes: básico y prémium. Para cada opción de nivel de servicio, debes crear un producto y un precio recurrente. (Si quieres agregar un cargo puntual, como el costo de instalación, crea un tercer producto con un precio puntual. Para simplificar, este ejemplo no incluye un cargo puntual).
En este ejemplo, cada producto se factura mensualmente. El precio del producto básico es del 5 USD. El precio del producto prémium es del 15 USD.
Crear el clienteCliente y servidor
Stripe requiere un cliente para cada suscripción. En el front-end de tu aplicación, recopila toda la información necesaria de tus usuarios y envíala al back-end.
Si necesitas recopilar datos de la dirección, el Address Element te permite recopilar una dirección de envío o facturación para tus clientes. Para obtener más información sobre el Address Element, visita la página de Address Element.
import React from 'react';
import {View, TextInput, StyleSheet, Button, Platform} from 'react-native';

function RegisterView() {
  const [email, setEmail] = React.useState('');

  const createCustomer = async () => {
    const apiEndpoint =
      Platform.OS === 'ios' ? 'http://localhost:4242' : 'http://10.0.2.2:4567';
    const response = await fetch(`${apiEndpoint}/create-customer`, {
      method: 'POST',
      headers: {
        'Content-Type': 'application/json',
      },
      body: JSON.stringify({
        email: email,
      }),
    });
    if (response.status === 200) {
      const customer = await response.json();
      console.log(customer);
    }
  };

  return (
    <View>
      <TextInput
        style={styles.input}
        placeholder="Email"
        value={email}
        onChangeText={setEmail}
      />
      <Button
        title="Register"
        onPress={async () => {
          await createCustomer();
        }}
      />
    </View>
  );
}

const styles = StyleSheet.create({
  input: {
    height: 40,
    margin: 12,
    borderWidth: 1,
    padding: 10,
  },
});

export default RegisterView;
Crea el “Customer Object” de Stripe en el servidor.
Crear la suscripciónCliente y servidor
Nota
Si quieres procesar el Payment Element antes de crear una suscripción, consulta Recopilar los datos de pago antes de crear un Intent.
Permite que tu nuevo cliente elija un plan y luego cree la suscripción. En esta guía, elegirá entre un plan Básico y un plan Prémium.
En tu aplicación, envía el ID de precio seleccionado y el ID del registro del cliente al back-end.
const createSubscription = async (priceId, customerId) => {
  const apiEndpoint =
    Platform.OS === 'ios' ? 'http://localhost:4242' : 'http://10.0.2.2:4567';
  const response = await fetch(`${apiEndpoint}/create-subscription`, {
    method: 'POST',
    headers: {
      'Content-Type': 'application/json',
    },
    body: JSON.stringify({
      priceId: priceId,
      customerId: customerId,
    }),
  });
  if (response.status === 200) {
    const subscription = await response.json();
    return subscription;
  }
};
En el back-end, crea una suscripción con estado incomplete usando payment_. Luego, devuelve el client_ desde el primer payment intent de la suscripción al front-end para completar el pago expandiendo el confirmation_ en la factura más reciente de la suscripción.
To enable improved subscription behavior, set billing_ to flexible. You must use Stripe API version 2025-06-30.basil or later.
Establece save_default_payment_method en on_ para guardar el método de pago como predeterminado para una suscripción cuando un pago se realiza correctamente. Guardar un método de pago predeterminado aumenta la tasa de éxito de futuros pagos de suscripción.
Nota
Si usas un precio en múltiples monedas, usa el parámetro currency para indicarle a la suscripción cuál de las monedas del precio debe usar. (Si omites el parámetro currency, la suscripción utilizará la moneda predeterminada del precio).
En este punto, Subscription está inactive y en espera del pago. Veamos un ejemplo. Los campos básicos que se deben almacenar aparecen resaltados, pero debes almacenar todos los campos a los que tu aplicación suela acceder.
{
  "id": "sub_JgRjFjhKbtD2qz",
  "object": "subscription",
  "application_fee_percent": null,
  "automatic_tax": {
    "disabled_reason": null,
    "enabled": false,
    "liability": "null"
  },
  "billing_cycle_anchor": 1623873347,
Recopilar datos de pagoCliente
Utiliza Payment Sheet para recolectar detalles del pago y activar la suscripción. Puedes personalizar Elements para que coincida con la apariencia de tu solicitud.
Payment Sheet recopila de forma segura todos los detalles de pago necesarios para una amplia variedad de métodos de pago. Más información sobre los métodos de pago admitidos para Payment Sheet y Subscriptions.
Agregar el Payment Element a tu aplicación
Nota
Este paso muestra una forma de empezar, pero puedes usar cualquier integración de pagos dentro de la aplicación.
Inicializa y presenta el Payment Element móvil usando la clase PaymentSheet.
import React from 'react';
import {useStripe, PaymentSheetError} from '@stripe/stripe-react-native';
import {View, Button} from 'react-native';

function SubscribeView({clientSecret}) {
  const {initPaymentSheet, presentPaymentSheet} = useStripe();

  React.useEffect(() => {
    const initializePaymentSheet = async () => {
      const {error} = await initPaymentSheet({
        paymentIntentClientSecret: clientSecret,
        returnURL: 'stripe-example://payment-sheet',
        // Set `allowsDelayedPaymentMethods` to true if your business handles
        // delayed notification payment methods like US bank accounts.
        allowsDelayedPaymentMethods: true,
      });
      if (error) {
        // Handle error
      }
    };

    initializePaymentSheet();
  }, [clientSecret, initPaymentSheet]);

  return (
    <View>
      <Button
        title="Subscribe"
        onPress={async () => {
          const {error} = await presentPaymentSheet();
          if (error) {
            if (error.code === PaymentSheetError.Failed) {
              // Handle failed
            } else if (error.code === PaymentSheetError.Canceled) {
              // Handle canceled
            }
          } else {
            // Payment succeeded
          }
        }}
      />
    </View>
  );
}

export default SubscribeView;
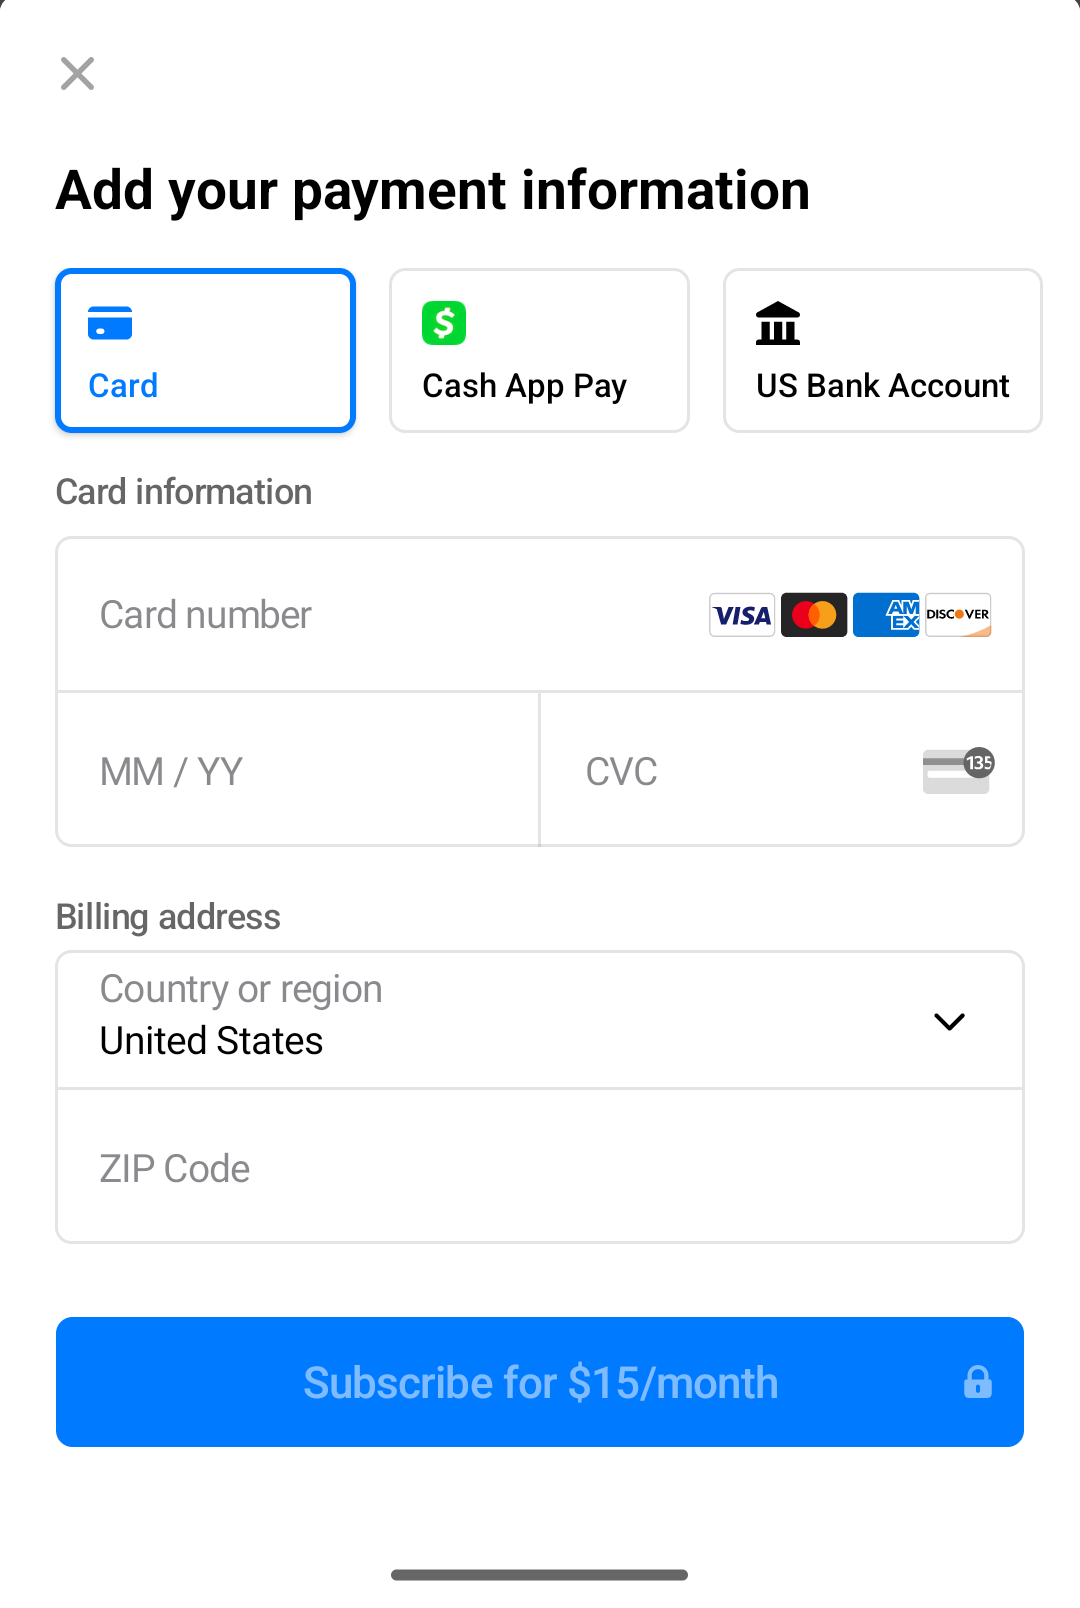
El Payment Element móvil renderiza una hoja que le permite a tu cliente seleccionar un método de pago. El formulario recopila automáticamente todos los datos de pago necesarios para el método de pago que elijan.
Establecer allowsDelayedPaymentMethods en true permite aceptar métodos de pago de notificación diferida como cuentas bancarias en EE. UU. Para estos métodos de pago, el estado final del pago no se conoce cuando se completa el PaymentSheet, sino que se efectúa con éxito o falla más tarde. Si aceptas este tipo de métodos de pago, infórmale al cliente que su pedido está confirmado y solo finalízalo (por ejemplo, envía el producto) cuando el pago se realice correctamente.
Puedes personalizar el Payment Element para que coincida con el diseño de tu aplicación usando la propiedad appearance en tu objeto PaymentSheet..
Confirmar pago
El Payment Element móvil crea un PaymentMethod y confirma que el primer PaymentIntent de la suscripción está incompleto, lo que genera un cargo. Si se requiere autenticación reforzada de clientes (SCA) para el pago, el Payment Element se encarga del proceso de autenticación antes de confirmar el PaymentIntent.
Configurar una URL de retorno (solo para iOS)Lado del cliente
Cuando un cliente sale de tu aplicación (por ejemplo, para autenticarse en Safari o en su aplicación bancaria), proporciona una forma de regresar automáticamente a tu aplicación. Muchos tipos de métodos de pago requieren una URL de retorno. Si no la proporcionas, no podemos presentarles a tus usuarios métodos de pago que requieran una URL de retorno, incluso si los habilitaste.
Para proporcionar una URL de retorno:
- Registra una URL personalizada. No se admiten vínculos universales.
- Configura tu URL personalizada.
- Configura tu componente raíz para reenviar la URL al SDK de Stripe como se muestra a continuación.
Nota
Si utilizas Expo, configura tu esquema en el archivo app..
import { useEffect, useCallback } from 'react';
import { Linking } from 'react-native';
import { useStripe } from '@stripe/stripe-react-native';

export default function MyApp() {
  const { handleURLCallback } = useStripe();

  const handleDeepLink = useCallback(
    async (url: string | null) => {
      if (url) {
        const stripeHandled = await handleURLCallback(url);
        if (stripeHandled) {
          // This was a Stripe URL - you can return or add extra handling here as you see fit
        } else {
          // This was NOT a Stripe URL – handle as you normally would
        }
      }
    },
    [handleURLCallback]
  );

  useEffect(() => {
    const getUrlAsync = async () => {
      const initialUrl = await Linking.getInitialURL();
      handleDeepLink(initialUrl);
    };

    getUrlAsync();

    const deepLinkListener = Linking.addEventListener(
      'url',
      (event: { url: string }) => {
        handleDeepLink(event.url);
      }
    );

    return () => deepLinkListener.remove();
  }, [handleDeepLink]);

  return (
    <View>
      <AwesomeAppComponent />
    </View>
  );
}
Además, al llamar al método initPaymentSheet, debes especificar returnURL:
await initPaymentSheet({
  ...
  returnURL: 'your-app://stripe-redirect',
  ...
});
Para obtener más información sobre esquemas URL nativos, consulta la documentación para Android e iOS.
OpcionalHabilitar Apple Pay
Inscribirse para obtener un ID de comerciante Apple
Obtén un ID de comerciante Apple solicitando un nuevo identificador en el sitio web de desarrolladores de Apple.
Completa el formulario con una descripción y el identificador. La descripción es para tus registros y se puede modificar en el futuro. Stripe recomienda usar el nombre de tu aplicación como identificador (por ejemplo, merchant.).
Crear un nuevo certificado de Apple Pay
Crea un certificado para que tu aplicación cifre los datos de pago.
Ve a Configuración de certificados de iOS en el Dashboard, haz clic en Agregar nueva aplicación y sigue la guía.
Descarga un archivo de solicitud de firma de certificado (CSR) para obtener un certificado seguro de Apple que te permita utilizar Apple Pay.
Se debe usar un archivo CSR para emitir exactamente un certificado. Si cambias tu ID de comerciante de Apple, debes ir a la Configuración de certificados de iOS en el Dashboard para obtener una nueva CSR y un nuevo certificado.
Integrarse con Xcode
Agrega la funcionalidad Apple Pay a tu aplicación. En Xcode, abre la configuración del proyecto, selecciona la pestaña Firma y funcionalidades y agrega la funcionalidad Apple Pay. En este paso, quizá se te solicite iniciar sesión en tu cuenta de desarrollador. Selecciona el ID de comerciante que creaste antes, y tu aplicación estará lista para aceptar Apple Pay.
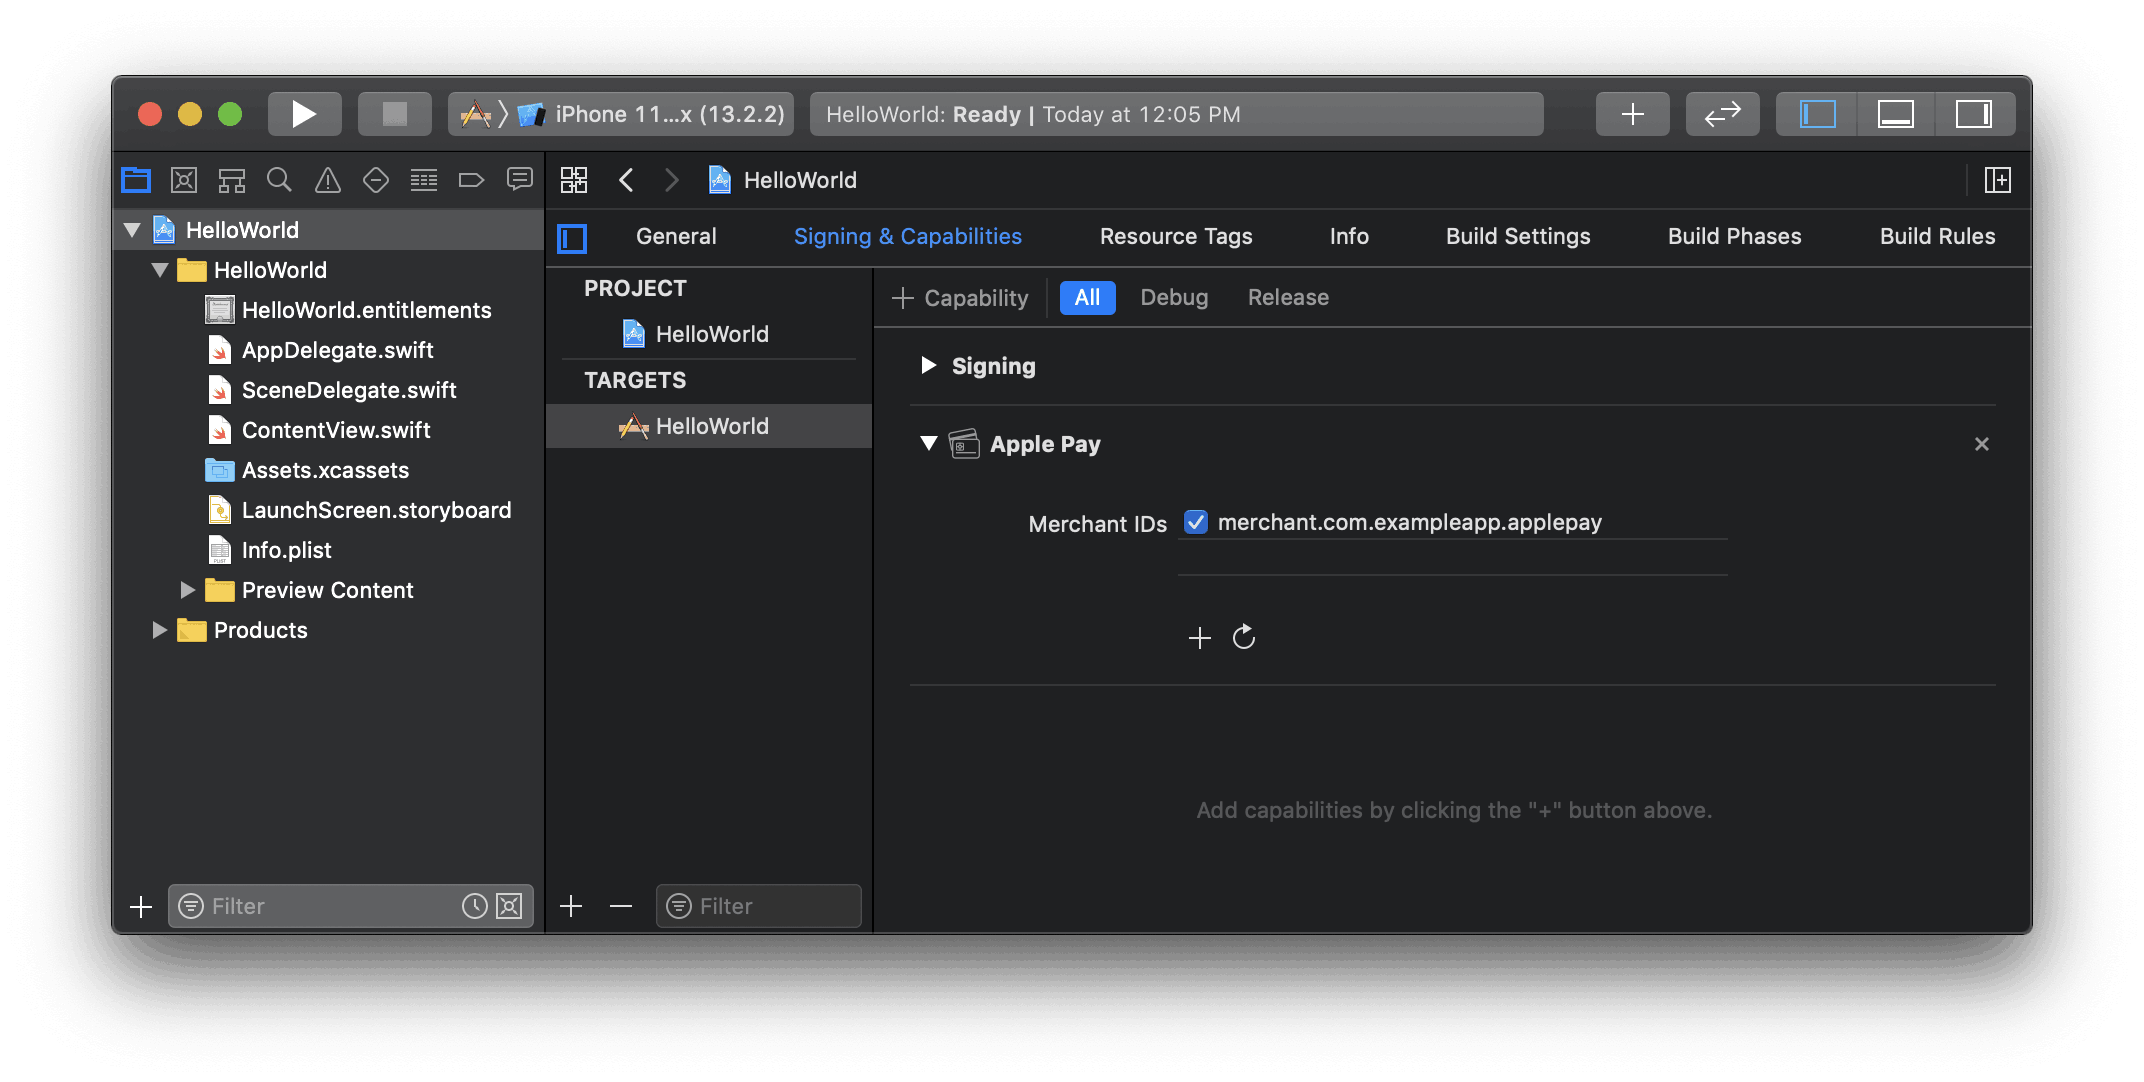
Habilitar la funcionalidad Apple Pay en Xcode
Agregar Apple Pay
Seguimiento de pedidos
Para agregar información de seguimiento de pedidos en iOS 16 o posterior, configura una función de de llamadasetOrderTracking. Stripe llama a tu implementación después de que se complete el pago, pero antes de que iOS descarte la hoja de Apple Pay.
En su implementación de la función de devolución de llamada setOrderTracking, obtén los detalles del pedido de tu servidor para el pedido completado y transfiere los datos a la función de completion proporcionada.
Para obtener más información sobre el seguimiento de pedidos, consulta la documentación sobre pedidos de billetera de Apple.
await initPaymentSheet({
  // ...
  applePay: {
    // ...
    setOrderTracking: async complete => {
      const apiEndpoint =
        Platform.OS === 'ios'
          ? 'http://localhost:4242'
          : 'http://10.0.2.2:4567';
      const response = await fetch(
        `${apiEndpoint}/retrieve-order?orderId=${orderId}`,
        {
          method: 'GET',
          headers: {
            'Content-Type': 'application/json',
          },
        },
      );
      if (response.status === 200) {
        const orderDetails = await response.json();
        // orderDetails should include orderIdentifier, orderTypeIdentifier,
        // authenticationToken and webServiceUrl
        complete(orderDetails);
      }
    },
  },
});
Escuchar webhooksServidor
Para completar la integración, tienes que procesar los webhooks que envió Stripe. Estos son eventos que se originan cada vez que un estado dentro de Stripe cambia, por ejemplo, cuando las suscripciones crean facturas nuevas. En tu aplicación, configura un controlador de HTTP para aceptar una solicitud POST que contenga el evento de webhook y verifica la firma del evento:
Durante el desarrollo, usa la CLI de Stripe para observar los webhooks y reenviarlos a tu aplicación. Ejecuta lo siguiente en una nueva terminal mientras tu aplicación de desarrollo está funcionando:
stripe listen --forward-to localhost:4242/webhook
Para la producción, configura una URL de punto de conexión de webhook en el Dashboard o utiliza la API Webhook Endpoints.
Necesita escuchar algunos eventos para completar los pasos restantes de esta guía. Consulte Eventos de suscripción para más detalles sobre los webhooks específicos de suscripción.
Brindar acceso a tu servicioCliente y servidor
Ahora que la suscripción está activa, dale a tu usuario acceso a tu servicio. Para ello, escucha los eventos customer., customer., y customer.. Estos eventos pasan un objeto Subscription que contiene un campo status que indica si la suscripción está activa, vencida o cancelada. Consulta el ciclo de vida de la suscripción para obtener una lista completa de estados.
En tu controlador de webhook:
- Verifica el estado de la suscripción. Si es
activo, entonces tu usuario ha pagado por su producto. - Revisa el producto al que se suscribió el cliente y bríndale acceso al servicio. Es mejor revisar el producto que el precio porque te da más flexibilidad en caso de que necesites cambiar la tarifa o el intervalo de facturación.
- Almacena el
product.,id subscription.y elid subscription.en tu base de datos junto constatus customer.que ya guardaste. Consulta este registro cuando tengas que determinar qué funcionalidades habilitar para el usuario en tu aplicación.id
El estado de la suscripción puede cambiar en cualquier momento de su ciclo de vida, incluso si tu solicitud no hace ninguna llamada directa a Stripe. Por ejemplo, se puede producir un error de renovación debido a una tarjeta de crédito vencida, lo que genera que el estado de la suscripción pase a vencido. O, si usas el portal de clientes, un usuario puede optar por cancelar la suscripción sin ingresar a tu aplicación directamente. El uso correcto del controlador mantiene el estado de tu solicitud sincronizado con Stripe.
Cancelar la suscripciónCliente y servidor
Con frecuencia, se les permite a los clientes cancelar su suscripción. En este ejemplo, se agrega la opción de cancelación en la página de configuración de la cuenta.
En este ejemplo, el ID de la suscripción se recopila en el front-end, pero tu aplicación puede obtener esta información de tu base de datos para el usuario que ha iniciado sesión.
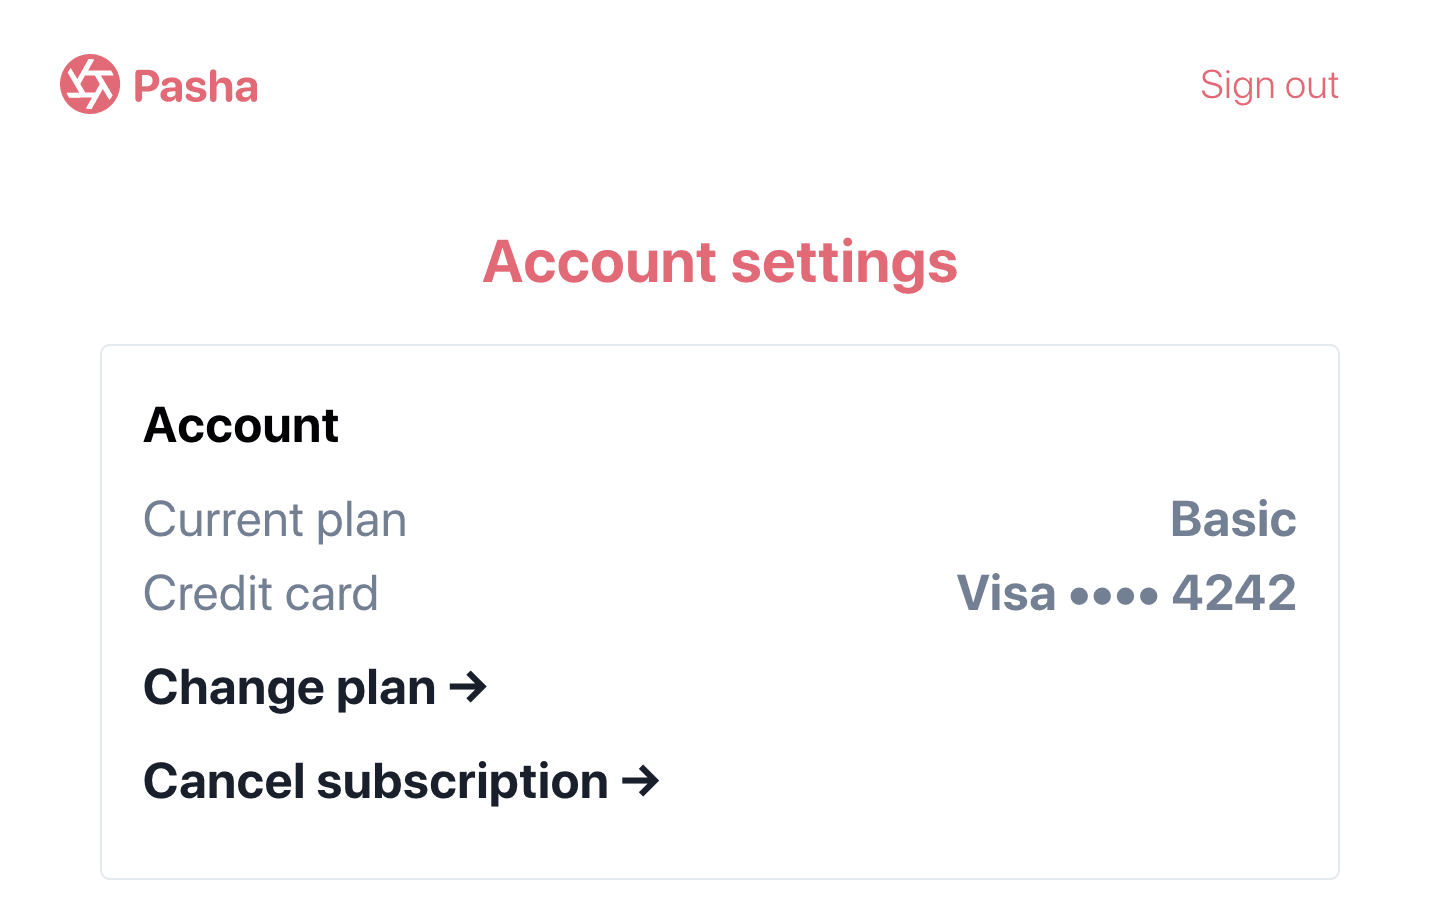
Configuración de la cuenta con la posibilidad de cancelar la suscripción
const cancelSubscription = async subscriptionId => {
  const apiEndpoint =
    Platform.OS === 'ios' ? 'http://localhost:4242' : 'http://10.0.2.2:4567';
  const response = await fetch(`${apiEndpoint}/cancel-subscription`, {
    method: 'POST',
    headers: {
      'Content-Type': 'application/json',
    },
    body: JSON.stringify({
      subscriptionId: subscriptionId,
    }),
  });
  if (response.status === 200) {
    const subscription = await response.json();
    return subscription;
  }
};
En el back-end, define el punto de conexión para que la aplicación haga la llamada.
Tu back-end recibe un evento customer..
Una vez que se cancela la suscripción, actualiza tu base de datos para eliminar el ID de suscripción de Stripe que estaba almacenado y limitar el acceso al servicio.
Cuando una suscripción se cancela, no se puede reactivar. En su lugar, recopila información de facturación actualizada de tu cliente, actualiza su método de pago predeterminado y crea una nueva suscripción con su registro de cliente existente.
Prueba tu integración
Prueba métodos de pago
Usa la siguiente tabla para probar diferentes métodos y escenarios de pago.
| Método de pago | Escenario | Cómo hacer la prueba |
|---|---|---|
| Débito directo BECS | Tu cliente paga correctamente con débito directo BECS. | Completa el formulario con el número de cuenta 900123456 y BSB 000000. El PaymentIntent confirmado pasa en un principio al estado processing y, tres minutos más tarde, a succeeded. |
| Débito directo BECS | El pago de tu cliente falla con un código de error account_. | Completa el formulario con el número de cuenta 111111113 y BSB 000000. |
| Tarjeta de crédito | El pago con tarjeta se efectúa correctamente y no requiere autenticación. | Completa el formulario de tarjeta de crédito con el número de tarjeta 4242 4242 4242 4242 y cualquier fecha de vencimiento, CVC y código postal. |
| Tarjeta de crédito | El pago con tarjeta requiere autenticación. | Completa el formulario de tarjeta de crédito con el número de tarjeta 4000 0025 0000 3155 y cualquier fecha de vencimiento, CVC y código postal. |
| Tarjeta de crédito | La tarjeta es rechazada con el código insufficient_. | Completa el formulario de tarjeta de crédito con el número de tarjeta 4000 0000 0000 9995 y cualquier fecha de vencimiento, CVC y código postal. |
| Débito directo SEPA | Tu cliente paga correctamente con débito directo SEPA. | Completa el formulario con el número de cuenta AT321904300235473204. El PaymentIntent confirmado pasa inicialmente al estado “en proceso” y, tres minutos más tarde, a “completado”. |
| Débito directo SEPA | El estado de PaymentIntent de tu cliente pasa de processing a requires_. | Completa el formulario con el número de cuenta AT861904300235473202. |
Supervisa eventos
Configura webhooks para recibir notificaciones de los eventos de cambios en las suscripciones, como actualizaciones y cancelaciones. Obtén más información sobre los webhooks de suscripciones. Puedes ver los eventos en el Dashboard o con la CLI de Stripe.
Para obtener más detalles, consulta cómo probar tu integración con Billing.
OpcionalPermitir que los clientes cambien de planCliente y servidor
Para permitirles a los clientes cambiar de suscripción, recopila el ID de precio de la opción a la que quieren pasar. A continuación, envía el nuevo ID de precio desde la aplicación a un punto de conexión del back-end. En este ejemplo, también se especifica el ID de suscripción, pero puedes recuperarlo de tu base de datos para el usuario que ha iniciado sesión.
const updateSubscription = async (subscriptionId, priceId) => {
  const apiEndpoint =
    Platform.OS === 'ios' ? 'http://localhost:4242' : 'http://10.0.2.2:4567';
  const response = await fetch(`${apiEndpoint}/update-subscription`, {
    method: 'POST',
    headers: {
      'Content-Type': 'application/json',
    },
    body: JSON.stringify({
      subscriptionId: subscriptionId,
      priceId: priceId,
    }),
  });
  if (response.status === 200) {
    const subscription = await response.json();
    return subscription;
  }
};
En el back-end, define el punto de conexión para que el front-end haga la llamada especificando el ID de suscripción y el nuevo ID de precio. La suscripción ahora es Premium, a USD 15 por mes, en lugar de Básica a USD 5 por mes.
En tu aplicación, se recibe un evento customer..
OpcionalPrevisualizar un cambio de precioCliente y servidor
Cuando tu cliente cambia de suscripción, a menudo es necesario hacer un ajuste en el importe adeudado que se conoce como prorrateo. Puedes usar el punto de conexión de creación de la vista previa de facturas para mostrarles a tus clientes el importe ajustado.
Desde la aplicación, pasa los datos de la vista previa de la factura a un punto de conexión del back-end.
const createPreviewInvoice = async (subscriptionId, priceId, newPriceId) => {
  const apiEndpoint =
    Platform.OS === 'ios' ? 'http://localhost:4242' : 'http://10.0.2.2:4567';
  const response = await fetch(`${apiEndpoint}/create-preview-invoice`, {
    method: 'POST',
    headers: {
      'Content-Type': 'application/json',
    },
    body: JSON.stringify({
      subscriptionId: subscriptionId,
      priceId: priceId,
      newPriceId: newPriceId,
    }),
  });
  if (response.status === 200) {
    const invoice = await response.json();
    return invoice;
  }
};
En el back-end, define el punto de conexión para que el front-end haga la llamada.
OpcionalMostrar el método de pago del clienteCliente y servidor
Mostrar la marca y los últimos 4 dígitos de la tarjeta le permite al cliente saber qué tarjeta se está utilizando o si es necesario actualizar el método de pago.
Desde el front-end, pasa el ID del método de pago a un punto de conexión del back-end que recupere los datos del método de pago.
const retrieveCustomerPaymentMethod = async paymentMethodId => {
  const apiEndpoint =
    Platform.OS === 'ios' ? 'http://localhost:4242' : 'http://10.0.2.2:4567';
  const response = await fetch(
    `${apiEndpoint}/retrieve-customer-payment-method`,
    {
      method: 'POST',
      headers: {
        'Content-Type': 'application/json',
      },
      body: JSON.stringify({
        paymentMethodId: paymentMethodId,
      }),
    },
  );
  if (response.status === 200) {
    const paymentMethod = await response.json();
    return paymentMethod;
  }
};
En el back-end, define el punto de conexión para que la aplicación haga la llamada.
Ejemplo de respuesta:
{
  "id": "pm_1GcbHY2eZvKYlo2CoqlVxo42",
  "object": "payment_method",
  "billing_details": {
    "address": {
      "city": null,
      "country": null,
      "line1": null,
      "line2": null,
      "postal_code": null,
Nota
Te recomendamos guardar paymentMethod. y last4 en tu base de datos, por ejemplo, paymentMethod. como stripeCustomerPaymentMethodId en tu colección o tabla de users. Si lo necesitas, también tienes la opción de guardar exp_, exp_, fingerprint y billing_. Esto sirve para limitar el número de llamadas a Stripe, tanto para mejorar el rendimiento como para evitar una posible limitación de la frecuencia.
Cuéntales a tus clientes qué es Stripe
Stripe recopila información sobre las interacciones de los clientes con Elements para proporcionarte servicios, mejorarlos y prevenir el fraude. Esto incluye el uso de cookies y direcciones IP para identificar qué Elements vio un cliente durante una sola sesión de finalización de compra. Tienes la responsabilidad de divulgar y obtener todos los derechos y consentimientos necesarios para que Stripe use los datos para dichos fines. Si deseas obtener más información, visita nuestro centro de privacidad.