# Integration einrichten
Richten Sie ein Stripe Terminal SDK oder eine servergestützte Integration ein, um persönliche Zahlungen zu akzeptieren.
# Android
Eine ausführlichere Dokumentation mit allen verfügbaren Methoden, Objekten und Fehlern finden Sie in unserer [vollständigen SDK-Referenz](https://stripe.dev/stripe-terminal-android/).
Für den Einstieg in das Android SDK sind vier Schritte erforderlich:
1. [SDK](https://docs.stripe.com/terminal/payments/setup-integration.md#install) in Ihrer App installieren.
2. Ihre App [konfigurieren](https://docs.stripe.com/terminal/payments/setup-integration.md#configure).
3. [Verbindungs-Token](https://docs.stripe.com/terminal/payments/setup-integration.md#connection-token)-Endpoint in Ihrer App und Ihrem Backend einrichten.
4. [SDK](https://docs.stripe.com/terminal/payments/setup-integration.md#initialize) in Ihrer App initialisieren.
## SDK installieren [Clientseitig]
> Das SDK ist nicht länger mit den Support-Bibliotheken kompatibel, da wir zum Speichern und Pflegen der Status über den gesamten Lebenszyklus der App Room verwenden. Stellen Sie sicher, dass Ihre App auf AndroidX migriert ist.
Um das SDK zu installieren, fügen Sie `stripeterminal` dem Block `dependencies` der [Build-Datei Ihrer App](https://developer.android.com/studio/build/dependencies) hinzu:
#### Kotlin
```kotlin
plugins {
id("com.android.application")
}
android { ... }
dependencies {
implementation("com.stripe:stripeterminal:5.6.0")
// ...
}
```
### (Optional) Support für Kotlin Coroutine
Die SDK-Version 5.0.0 enthält ein optionales Modul, `stripeterminal-ktx`. Dieses Modul bietet Wrapper für `suspend`-Funktionen für asynchrone Terminal-APIs, mit denen Sie einfachen, sequentiellen Code schreiben können, anstatt Rückrufe zu verschachteln.
Um es zu verwenden, fügen Sie seine Abhängigkeit hinzu:
#### Kotlin
```kotlin
dependencies {
implementation("com.stripe:stripeterminal:5.6.0")
// Add the coroutines module
implementation("com.stripe:stripeterminal-ktx:5.6.0")
// ...
}
```
Ein Beispiel für dieses Integrationsmuster finden Sie in unserer [Kotlin-Beispiel-App](https://github.com/stripe/stripe-terminal-android/tree/master/Example/kotlinapp) auf GitHub.
### Java-Zielversion festlegen
Da das SDK auf Java 8 basiert, muss diese Version als Ihre Java-Zielversion angegeben werden:
#### Kotlin
```kotlin
android {
// ...
compileOptions {
sourceCompatibility = JavaVersion.VERSION_1_8
targetCompatibility = JavaVersion.VERSION_1_8
}
kotlinOptions {
jvmTarget = "1.8"
}
}
```
> Details zur aktuellen SDK-Version und zu vorherigen Versionen finden Sie auf der Seite [Releases](https://github.com/stripe/stripe-terminal-android/releases) auf GitHub. Um bei Veröffentlichung einer neuen Version eine Benachrichtigung zu erhalten, [achten Sie auf die Releases zum jeweiligen Repository](https://docs.github.com/en/github/managing-subscriptions-and-notifications-on-github/configuring-notifications#configuring-your-watch-settings-for-an-individual-repository).
>
> Informationen zur Migration von früheren Versionen oder Beta-Versionen des Android-SDK finden Sie im [Migrationsleitfaden für Stripe Terminal](https://docs.stripe.com/terminal/references/sdk-migration-guide.md).
## App konfigurieren [Clientseitig]
Sie müssen die Berechtigung `ACCESS_FINE_LOCATION` aktivieren. Um eine Verbindung zu einem Bluetooth-Lesegerät herzustellen, müssen Sie auch Blueteooth-Berechtigungen aktivieren. Fügen Sie Ihrem Manifest die entsprechenden Berechtigungen hinzu, wie hier dargestellt:
```xml
```
Bevor Sie das [Terminal](https://stripe.dev/stripe-terminal-android/core/com.stripe.stripeterminal/-terminal/index.html)-Objekt initialisieren, fügen Sie die folgende Prüfung hinzu, um sicherzustellen, dass die Berechtigung `ACCESS_FINE_LOCATION` in Ihrer App aktiviert ist:
```kotlin
if (ContextCompat.checkSelfPermission(this, android.Manifest.permission.ACCESS_FINE_LOCATION) != PackageManager.PERMISSION_GRANTED) {
val permissions = arrayOf(android.Manifest.permission.ACCESS_FINE_LOCATION)
ActivityCompat.requestPermissions(this, permissions, REQUEST_CODE_LOCATION)
}
```
Prüfen Sie außerdem, ob der/die Nutzer/in der App die Standortberechtigung erteilt – ohne diese funktioniert das SDK nicht. Überschreiben Sie dazu die Methode `onRequestPermissionsResult` in Ihrer App und überprüfen Sie das Berechtigungsergebnis.
```kotlin
override fun onRequestPermissionsResult(
requestCode: Int,
permissions: Array,
grantResults: IntArray
) {
super.onRequestPermissionsResult(requestCode, permissions, grantResults)
if (requestCode == REQUEST_CODE_LOCATION && grantResults.isNotEmpty()
&& grantResults[0] != PackageManager.PERMISSION_GRANTED
) {
throw RuntimeException("Location services are required to connect to a reader.")
}
}
```
Sie sollten auch sicherstellen, dass die Standort- und Bluetooth-Dienste auf dem Gerät aktiviert sind, nicht nur für die Anwendung. Hier sehen Sie ein Beispiel dafür, wie dies in den Geräteeinstellungen aussehen könnte:
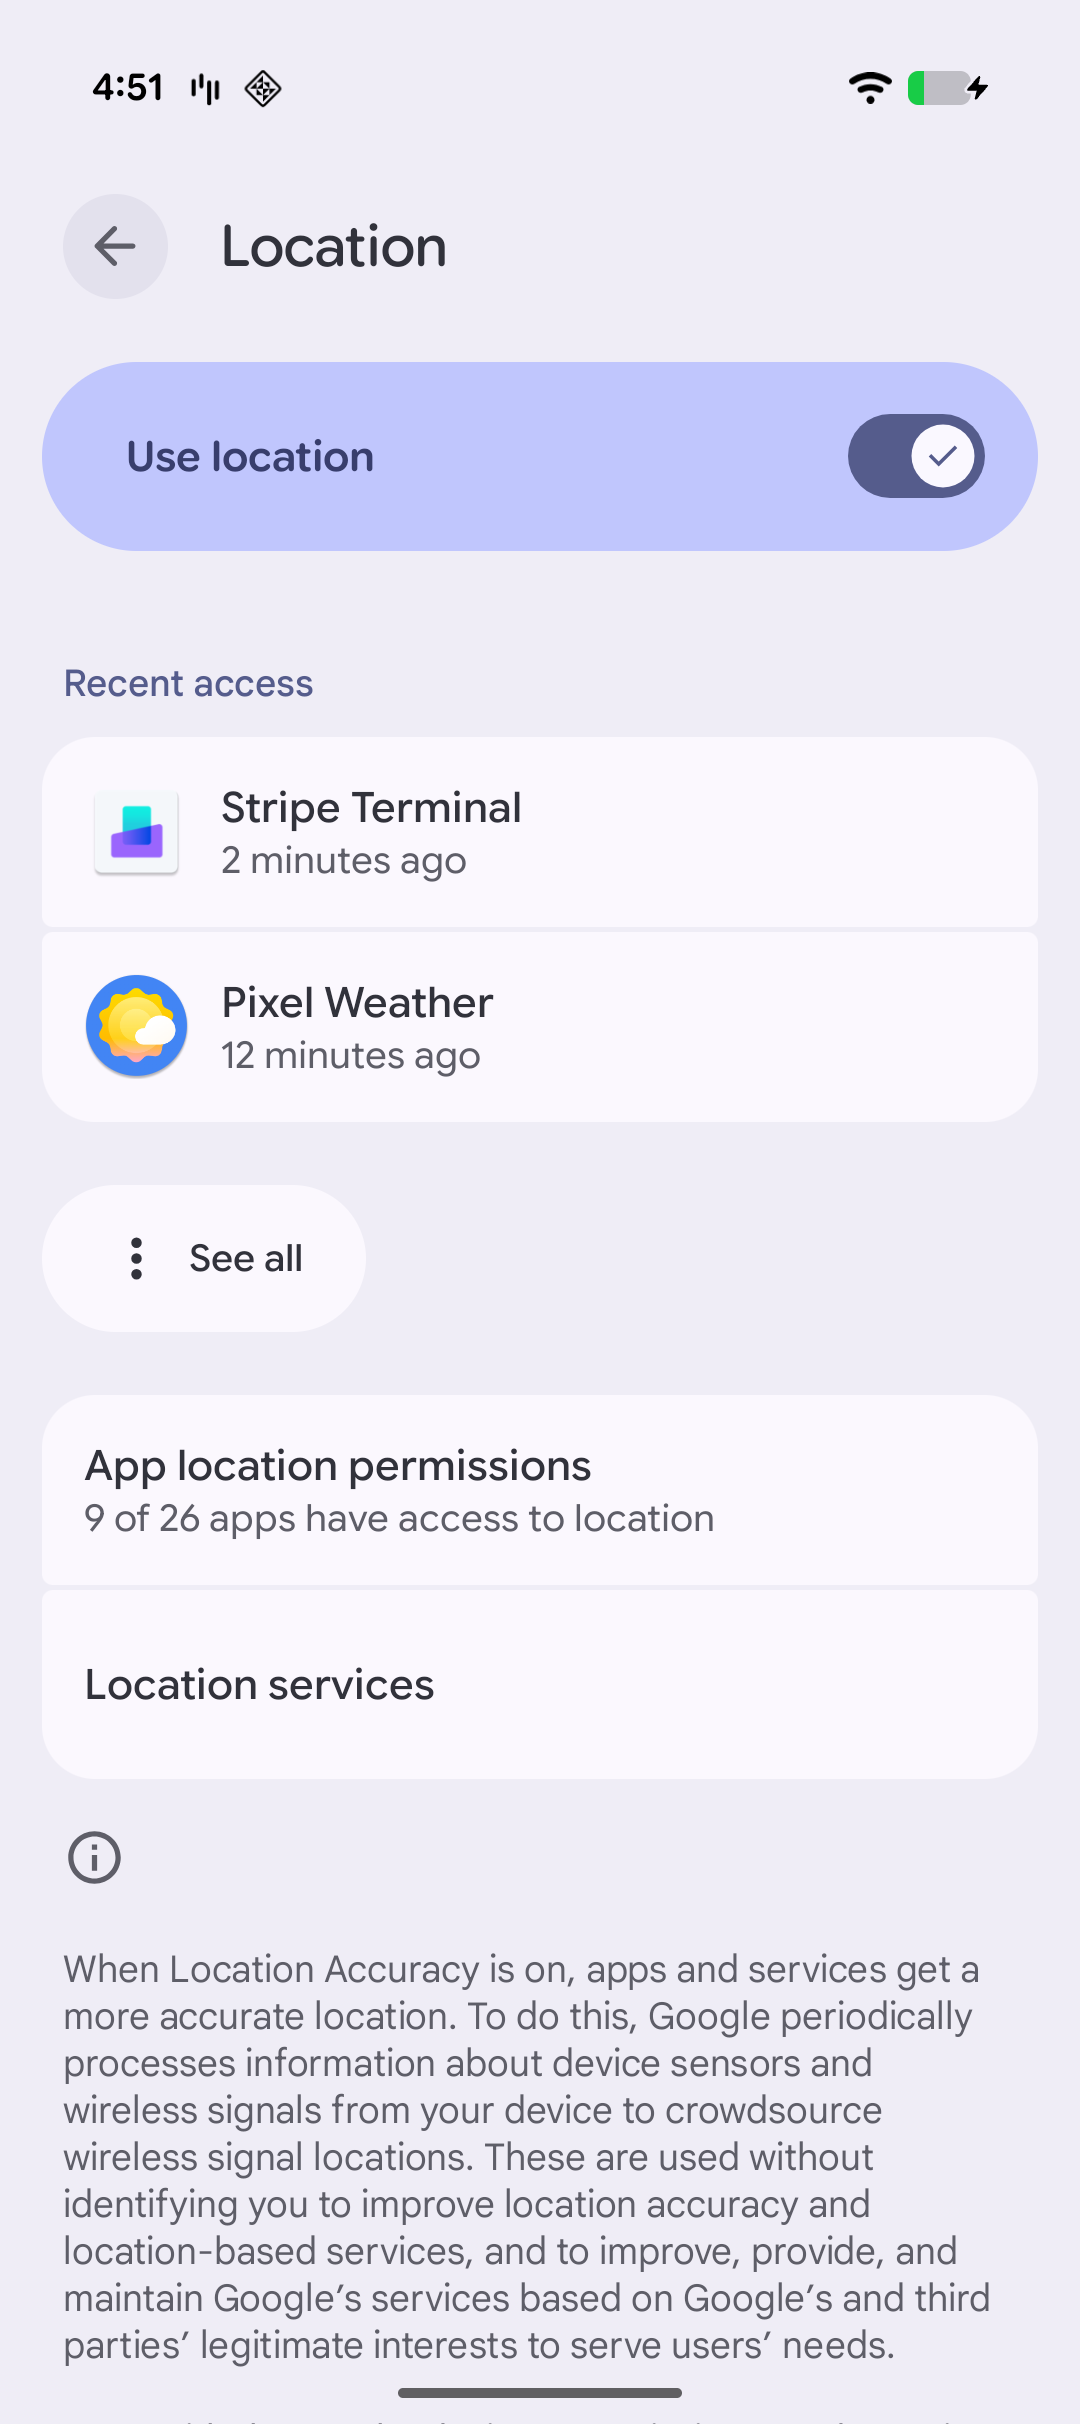
Standorteinstellungen
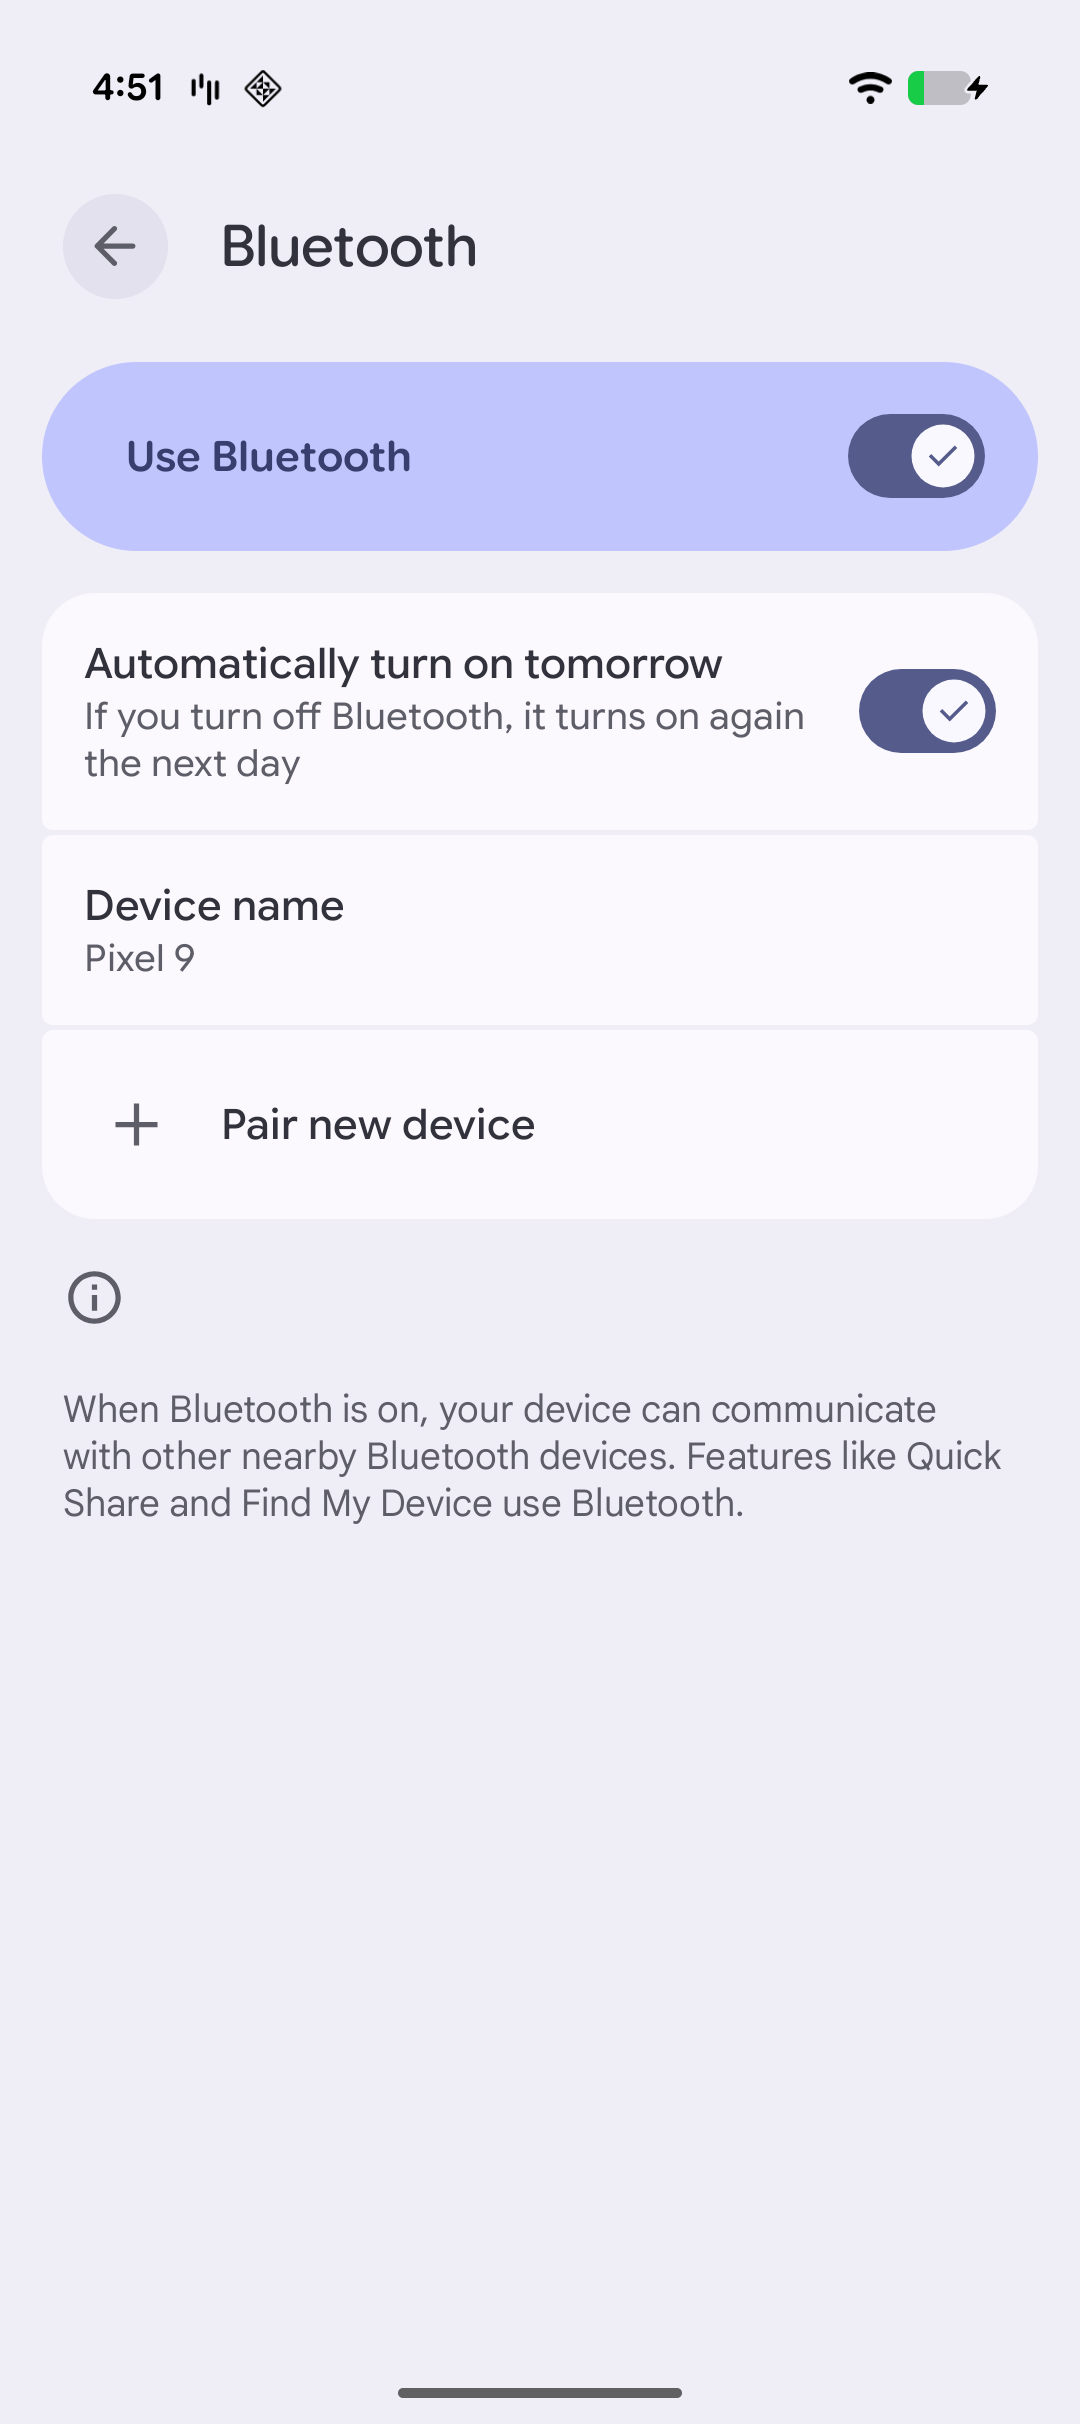
Bluetooth-Einstellungen
> Um das Risiko von Betrugsfällen bei Zahlungen zu reduzieren und Zahlungsanfechtungen zu minimieren, muss Stripe den Standort der getätigten Zahlungen kennen. Wenn das SDK den Standort des Android-Geräts nicht ermitteln kann, werden alle Zahlungen bis zur Wiederherstellung des Standortzugriffs deaktiviert.
## ConnectionToken-Endpoint einrichten [Serverseitig] [Clientseitig]
### Serverseitig
Um sich mit einem Lesegerät verbinden zu können, muss das Backend dem SDK erlauben, das Lesegerät in Ihrem Stripe-Konto zu nutzen. Dazu stellt es dem SDK das [Geheimnis](https://docs.stripe.com/api/terminal/connection_tokens/object.md#terminal_connection_token_object-secret) aus einem [ConnectionToken](https://docs.stripe.com/api/terminal/connection_tokens.md) zur Verfügung. Das Backend muss nur Verbindungstoken für vertrauenswürdige Clients erstellen.
#### curl
```bash
curl https://api.stripe.com/v1/terminal/connection_tokens \
-u <>: \
-X "POST"
```
Beziehen Sie das Geheimnis aus dem `ConnectionToken` auf Ihrem Server und übergeben Sie es an den Client.
#### Ruby
```ruby
post '/connection_token' do
token = # ... Create or retrieve the ConnectionToken
{secret: token.secret}.to_json
end
```
> Mit dem `secret` aus dem `ConnectionToken` können Sie sich mit einem beliebigen Stripe Terminal-Lesegerät verbinden und Zahlungen mit Ihrem Stripe-Konto annehmen. Stellen Sie sicher, dass Sie den Endpoint zum Erstellen von Verbindungstoken authentifizieren und diesen vor Cross Site Request Forgery (CSRF) schützen.
### Clientseitig
Um dem SDK Zugriff auf diesen Endpoint zu ermöglichen, implementieren Sie die [ConnectionTokenProvider](https://stripe.dev/stripe-terminal-android/external/com.stripe.stripeterminal.external.callable/-connection-token-provider/index.html)-Schnittstelle in Ihrer App, die eine einzelne Funktion definiert, die einen `ConnectionToken` aus Ihrem Backend anfordert.
```kotlin
class CustomConnectionTokenProvider : ConnectionTokenProvider {
override fun fetchConnectionToken(callback: ConnectionTokenCallback) {
try {
// Your backend should call /v1/terminal/connection_tokens and return the
// JSON response from Stripe. When the request to your backend succeeds,
// return the `secret` from the response to the SDK.
callback.onSuccess(secret)
} catch (e: Exception) {
callback.onFailure(
ConnectionTokenException("Failed to fetch connection token", e)
)
}
}
}
```
Diese Funktion wird aufgerufen, wenn das SDK sich bei Stripe oder dem Lesegerät authentifizieren muss. Sie wird auch aufgerufen, wenn ein neues Verbindungstoken benötigt wird, um sich mit einem Lesegerät zu verbinden (z. B. wenn Ihre App sich von einem Lesegerät getrennt hat). Wenn das SDK kein neues Verbindungstoken von Ihrem Backend abrufen kann, schlägt die Verbindung zu einem Lesegerät mit einem Fehler von Ihrem Server fehl.
> Speichern Sie den Verbindungstoken nicht im Cache und codieren Sie ihn nicht fest. Der Lifecycle des Verbindungstokens wird vom SDK verwaltet.
> #### Certificate Pinning
>
> In den meisten Fällen sollten Sie Ihre Anwendung nicht mit Certificate Pinning konfigurieren. Erfordert Ihre Anwendung dies dennoch, so lesen Sie bitte die Dokumentation zum [Certificate Pinning](https://docs.stripe.com/tls-certificates.md#certificate-pinning).
## SDK initialisieren [Clientseitig]
Das Android SDK berücksichtigt den Lebenszyklus. Um Speicherlecks zu vermeiden und eine ordnungsgemäße Bereinigung von über einen langen Zeitraum ausgeführten Terminal-SDK-Prozessen zu gewährleisten, muss Ihre Anwendung eine `Application`-Unterklasse implementieren, die `TerminalApplicationDelegate.onCreate()` verwendet, um das SDK über Ereignisse im Lebenszyklus zu informieren.
```kotlin
// Substitute with your application name, and remember to keep it the same as your AndroidManifest.xml
class StripeTerminalApplication : Application() {
override fun onCreate() {
super.onCreate()
TerminalApplicationDelegate.onCreate(this)
}
}
```
> Wenn Sie Tap to Pay auf Android (TTPA) verwenden möchten, unterscheidet sich die Initialisierung in `Application` geringfügig von diesem Beispiel. Weitere Informationen finden Sie unter [Mit einem Lesegerät mit TTPA verbinden](https://docs.stripe.com/terminal/payments/connect-reader.md?terminal-sdk-platform=android&reader-type=tap-to-pay#initialize).
Die vom Stripe Terminal SDK bereitgestellte [Terminal](https://stripe.dev/stripe-terminal-android/core/com.stripe.stripeterminal/-terminal/index.html)-Klasse stellt eine allgemeine Schnittstelle zum Erkennen von Lesegeräten, zum Verbinden mit einem Lesegerät und zum Ausführen von Vorgängen auf dem Lesegerät bereit, wie z. B. Anzeigen von Warenkorbdetails, Erfassen von Zahlungen und Speichern von Karten für die zukünftige Verwendung.
Stellen Sie zunächst den aktuellen Anwendungskontext, den in [Schritt 3](https://docs.stripe.com/terminal/payments/setup-integration.md#connection-token) implementierten [ConnectionTokenProvider](https://stripe.dev/stripe-terminal-android/external/com.stripe.stripeterminal.external.callable/-connection-token-provider/index.html) und ein [TerminalListener](https://stripe.dev/stripe-terminal-android/external/com.stripe.stripeterminal.external.callable/-terminal-listener/index.html)-Objekt bereit. Sie können diesen Listener verwenden, um Ereignisse wie Zahlungen und Aktualisierungen des Verbindungsstatus über das SDK zu verarbeiten.
```kotlin
// Create your listener object. Override any methods that you want to be notified about
val listener = object : TerminalListener {
override fun onConnectionStatusChange(status: ConnectionStatus) {
println("onConnectionStatusChange: $status");
}
override fun onPaymentStatusChange(status: PaymentStatus) {
println("onPaymentStatusChange: $status");
}
}
// Choose the level of messages that should be logged to your console
val logLevel = LogLevel.VERBOSE
// Create your token provider.
val tokenProvider = CustomConnectionTokenProvider()
// Offline listener is optional and only needed if processing offline transactions.
// See https://docs.stripe.com/terminal/features/operate-offline/collect-card-payments
val offlineListener: OfflineListener? = null
// Pass in the current application context, your desired logging level, your token provider, and the listener you created
if (!Terminal.isInitialized()) {
Terminal.init(applicationContext, logLevel, tokenProvider, listener, offlineListener)
}
// Since the Terminal is a singleton, you can call getInstance whenever you need it
Terminal.getInstance()
```
## SDK-Aktualisierungen
Stripe veröffentlicht regelmäßig Updates, die neue Funktionen, Fehlerkorrekturen und Sicherheitsupdates enthalten können. Aktualisieren Sie Ihr SDK, sobald eine neue Version verfügbar ist. Die derzeit verfügbaren SDKs sind:
- [Stripe Terminal Android SDK](https://github.com/stripe/stripe-terminal-android/releases)
- [Stripe Terminal iOS SDK](https://github.com/stripe/stripe-terminal-ios/releases)
- [Stripe Terminal JavaScript SDK](https://docs.stripe.com/terminal/references/api/js-sdk.md#changelog)
- [Stripe Terminal React Native SDK](https://github.com/stripe/stripe-terminal-react-native)
## Nächste Schritte
- [Mit einem Lesegerät verbinden](https://docs.stripe.com/terminal/payments/connect-reader.md?terminal-sdk-platform=android&reader-type=internet)