Accéder directement au contenu
Créez un compte
ou
connectez-vous
Le logo de la documentation Stripe
/
Demander à l’IA
Créer un compte
Connectez-vous
Commencer
Paiements
Revenus
Plateformes et places de marché
Gestion des fonds
Ressources de développement
Aperçu
À propos des paiements Stripe
Mettre votre intégration à niveau
Analyses des paiements
Paiements en ligne
AperçuTrouver votre cas d'usageManaged Payments
Utiliser Payment Links
Créer une page de paiement
Développer une intégration avancée
Développer une intégration dans l'application
Moyens de paiement
Ajout de moyens de paiement
Gérer les moyens de paiement
Payer plus rapidement avec Link
Interfaces de paiement
Payment Links
Paiement
Web Elements
Elements dans l'application
Scénarios de paiement
Gérez plusieurs devises
Flux de paiement personnalisés
Acquisition flexible
Orchestration
Paiements en personne
Terminal
    Aperçu
    Accepter les paiements en personne
    Conception d'intégrations
    Choisir votre lecteur
    Créer une intégration
    Démarrage rapide
    Applications d'exemple
    Test
    Configuration de Terminal
    Configurer votre intégration
    Me connecter à un lecteur
    Acceptation d'un paiement
    Encaisser des paiements par carte
    Autres moyens de paiement
    Accepter les paiements hors ligne
    Paiement des commande par correspondance/téléphone
    Spécificités régionales
    Lors du paiement
    Collecter des pourboires
    Collecter et enregistrer des informations de paiement pour une utilisation ultérieure
    Autorisations flexibles
    Après le paiement
    Rembourser des transactions
    Fournir des reçus
    Personnalisez Checkout
    Affichage du panier
    Collecter les données saisies à l'écran
    Collecter les données des lectures de la piste magnétique
    Collecter les données des paiements NFC sans contact
    Applications sur des appareils
    Gérer les lecteurs
    Commander, renvoyer, remplacer des lecteurs
    Enregistrer des lecteurs
    Gérer les emplacements et les zones
    Configurer des lecteurs
    Contrôler les lecteurs
    Chiffrement
    Références
    Documentation sur les API
    Lecteurs mobiles
    Lecteurs intelligents
    Guide de migration du SDK
    Liste de vérification pour le déploiement
    Fiches produit du lecteur Stripe Terminal
Au-delà des paiements
Constituer son entreprise
Cryptomonnaie
Financial Connections
Climate
Comprendre la fraude
Radar pour la protection contre la fraude
Gérer les litiges
Vérifier l'identité
AccueilPaiementsTerminal

Example applications

Try Stripe Terminal by using the example applications and simulated reader.

Remarques

For a more immersive guide including details on server driven integration using only the Stripe API, check out the sample integration.

A Stripe Terminal integration starts with your point of sale application running at a physical location. Your point of sale application communicates with a reader through the Terminal SDK to collect in-person payments from your customers. Your backend works with your point of sale application to authenticate the Terminal SDK and finalize payments.
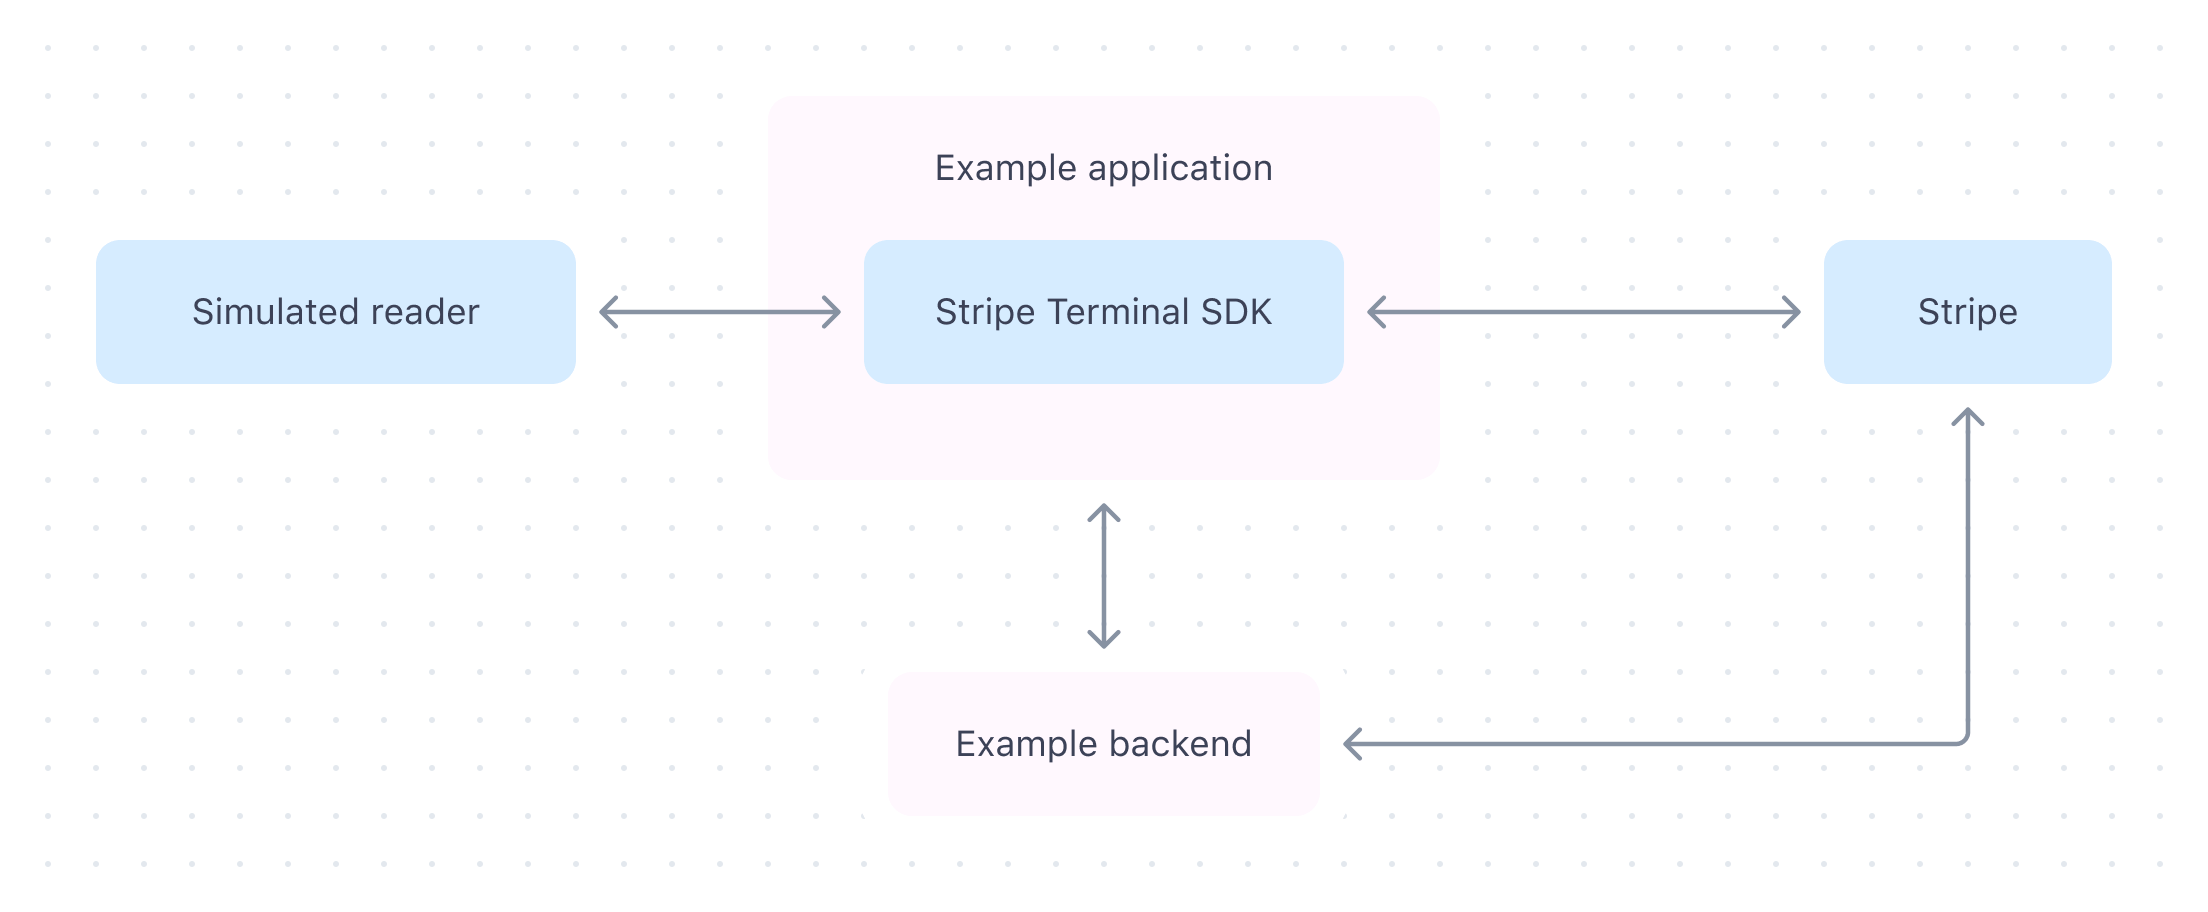
Before starting your own integration, we recommend setting up one of the Terminal example applications. This will give you a better feel for how the components of a Terminal integration fit together and show you the interactions between the SDK, the reader, your point of sale application, and your backend code.

Deploy the example backend

To get started with the example applications, set up the Sinatra-based example backend by following the instructions in the README. You can either run the backend locally or deploy it to Render with a free account. The example backend works with the example application to authenticate the Terminal SDK and finalize payments.

Run the example application

Build and run one of the example applications:

  1. Clone the example from GitHub:
Command Line
git clone https://github.com/stripe/stripe-terminal-js-demo.git
  1. Run the following commands to run the example:
Command Line
cd stripe-terminal-js-demo npm install npm run start
  1. In the running example, enter the URL of the example backend that you deployed in step 1.

Connect to a simulated reader

After you have the example running, select Use simulator to connect to a simulated reader.

The JavaScript example app connected to a simulated reader

The simulated reader handles events just like a physical reader, so you can continue to collecting your first payment.

The simulated reader functionality is built into the SDK, so you can use it to develop and test your own point of sale application without connecting to a physical device.

Collect your first payment

Collect your first payment using the example application and a simulated reader. Each of the examples features an event log for you to reference as you integrate Terminal in your own application. As you collect your first payment, you’ll see the following sequence:

  • Create payment: The example application collects a payment method using the SDK.
  • Collect payment method: The simulated reader receives a card.
  • Process and capture: The example application and backend finalize the payment.

Remarques

(Optional) Use separate authorization and capture to add a reconciliation step before finalizing the transaction. You can also automatically capture Terminal transactions.

Javascript example app connected to simulated reader

Collecting a payment, using the JavaScript example app and a simulated reader

Next steps

  • Design an integration
Cette page vous a-t-elle été utile?
OuiNon
  • Besoin d'aide? Contactez le service d'assistance.
  • Rejoignez notre programme d'accès anticipé.
  • Consultez notre journal des modifications.
  • Des questions? Contactez l'équipe commerciale.
  • GML? Lire llms.txt.
  • Optimisé par Markdoc