Skip to content
Create account
or
Sign in
The Stripe Docs logo
/
Ask AI
Create account
Sign in
Get started
Payments
Finance automation
Platforms and marketplaces
Money management
Developer tools
Get started
Payments
Finance automation
Get started
Payments
Finance automation
Platforms and marketplaces
Money management
Overview
Versioning
Changelog
Upgrade your API version
Upgrade your SDK version
Developer tools
SDKs
API
Testing
Workbench
Event Destinations
Workflows
Stripe CLI
Stripe Shell
Developers Dashboard
Agent toolkit
Stripe health alertsBuilding with LLMsStripe for Visual Studio CodeFile uploads
Security
Security
Extend Stripe
Stripe Apps
Stripe Connectors
    Overview
    Integrate a connector
    Commercetools
    Adobe Commerce
    Mirakl
    NetSuite
    Oracle Opera
    Cegid
    PrestaShop
    Salesforce
      Stripe Connector for Salesforce Platform
        Installation
        Configure events
        Enablement
        Configuration
      Stripe Billing for Salesforce CPQ
      Salesforce B2C Commerce
    SAP
    Shopware 6
    Stripe Tax for WooCommerce
    Stripe Tax for BigCommerce
    Partner connectors
    Build your own connector
Partners
Partner ecosystem
Partner certification
HomeDeveloper toolsStripe ConnectorsSalesforceStripe Connector for Salesforce Platform

Stripe Connector for Salesforce Platform Installation Guide

Install and configure the Stripe Connector for Salesforce Platform.

Copy page

Identify the environment where you want to install your app. We provide separate installation options for test and production environments.

  • To install this Application from the Salesforce AppExchange , follow this link. For users in Japan, AppExchange Japan is also available.
  1. Log into the Salesforce organization where you want to install the package.
  2. After logging in, you’re directed to the installation page. Click Continue to begin the installation process.
  3. We recommend installing Install for Admins Only. This option allows for controlling access and permissions after the package has been installed.
  4. Approve Third-Party Access check off the box and click Continue to start the package installation when the modal appears. As it states, this is to allow data to be sent back and forth between your Salesforce org and the Stripe PBO.

Configure permission sets

The package incorporates both the Stripe Connector Integration User and the Stripe Connector Data User permission sets. These sets enable different users within your organization to access specific application features.

Stripe Connector integration user

The Stripe Connector Integration User permission set must be assigned to any non-system administrator persona designated to manage setup log cleanup settings and event subscriptions. However, since system permissions are unable to be packaged due to limitations with Salesforce AppExchange apps. You must add additional permissions manually by cloning the permission set, in order for these users to access setup features.

  1. Clone Permission Set To clone the permission set, navigate to Setup > User > Permission Sets.
  2. Next to the Stripe Connector Integration User permission set, click Clone.
  3. Enter a new unique Label and API Name, then click Save.
  4. Modify Permission Set Navigate to Setup > User > Permission Sets and select your cloned permission set.
  5. Select System Permissions.
  6. Click Edit then select the Download AppExchange Packages permissions, and click Save.
  7. Click Save again to confirm changes.
  8. Assign Permission Set to users by navigating to Setup > User > Permission Sets.
  9. Select your cloned permission set.
  10. From the Permission Set Overview page, click Manage Assignments.
  11. Click Add Assignments.
  12. Check the box next to the users to assign permission set to and click Next at the bottom of the page.

Stripe Connector data user

The Stripe Connector Data User has the ability to perform operations on the Stripe_Event__c object records, which the Webhook Handler class creates. To provide non-admin users access to Stripe Event records, you must assign a data user permission set to their user profile.

  1. Assign a permission set to a user by navigating to Setup > User > Permission Sets.
  2. Select the Stripe Connector Data User permission set.
  3. From the Permission Set Overview page, click Manage Assignments.
  4. Click Add Assignments.
  5. Check the box next to a user to assign a permission set to them
  6. Click Next at the bottom of the page.

Stripe for Salesforce Platform setup wizard

When users first access the Stripe Connector for Salesforce app, they must complete an Initial Setup flow. This guided wizard flow helps users authorize an org, add a Stripe account, and configure sync preferences. After completing the initial setup, the Account Management tab becomes the users’ landing page. Here, they can add more Stripe accounts or navigate to other tabs to edit configuration settings.

Add a Stripe account using the setup wizard

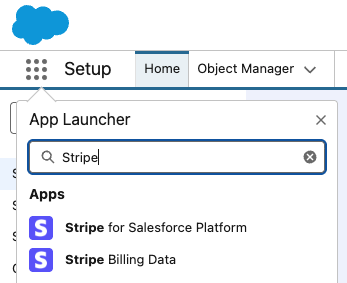
  1. Launch the initial setup wizard, and navigate to App Launcher > Stripe for Salesforce Platform
  2. Click the Get Started button.
  3. Click the Authorize button.
  4. After the new window opens, click Allow to grant access for your org.
  5. Click the Next button.
  6. Input your Stripe API Key, and click Add Account button to add the Stripe account.
  7. After you select an account, click the Next button.
  8. (Optional) Click the toggle if you wish to enable the Stripe Events and Sync Logs cleanup.
  9. If the cleanup trigger is active, enter the numerical value in the input box to set the desired amount of records to be retained in the Salesforce org.
  10. Click the Next button.
  11. Click the Stripe API Version dropdown.
  12. Select the Stripe API version to install. If you’re unsure what version to install, select the latest version.
  13. Click the Install Package button, which launches another window that you need to use to complete the installation of the extension package.
  14. Click Finish

See also

  • Enablement videos
  • Configure events
Was this page helpful?
YesNo
Need help? Contact Support.
Join our early access program.
Check out our changelog.
Questions? Contact Sales.
LLM? Read llms.txt.
Powered by Markdoc