# Checkout 移行ガイド
Stripe の最新の組み込みに移行する方法をご紹介します。
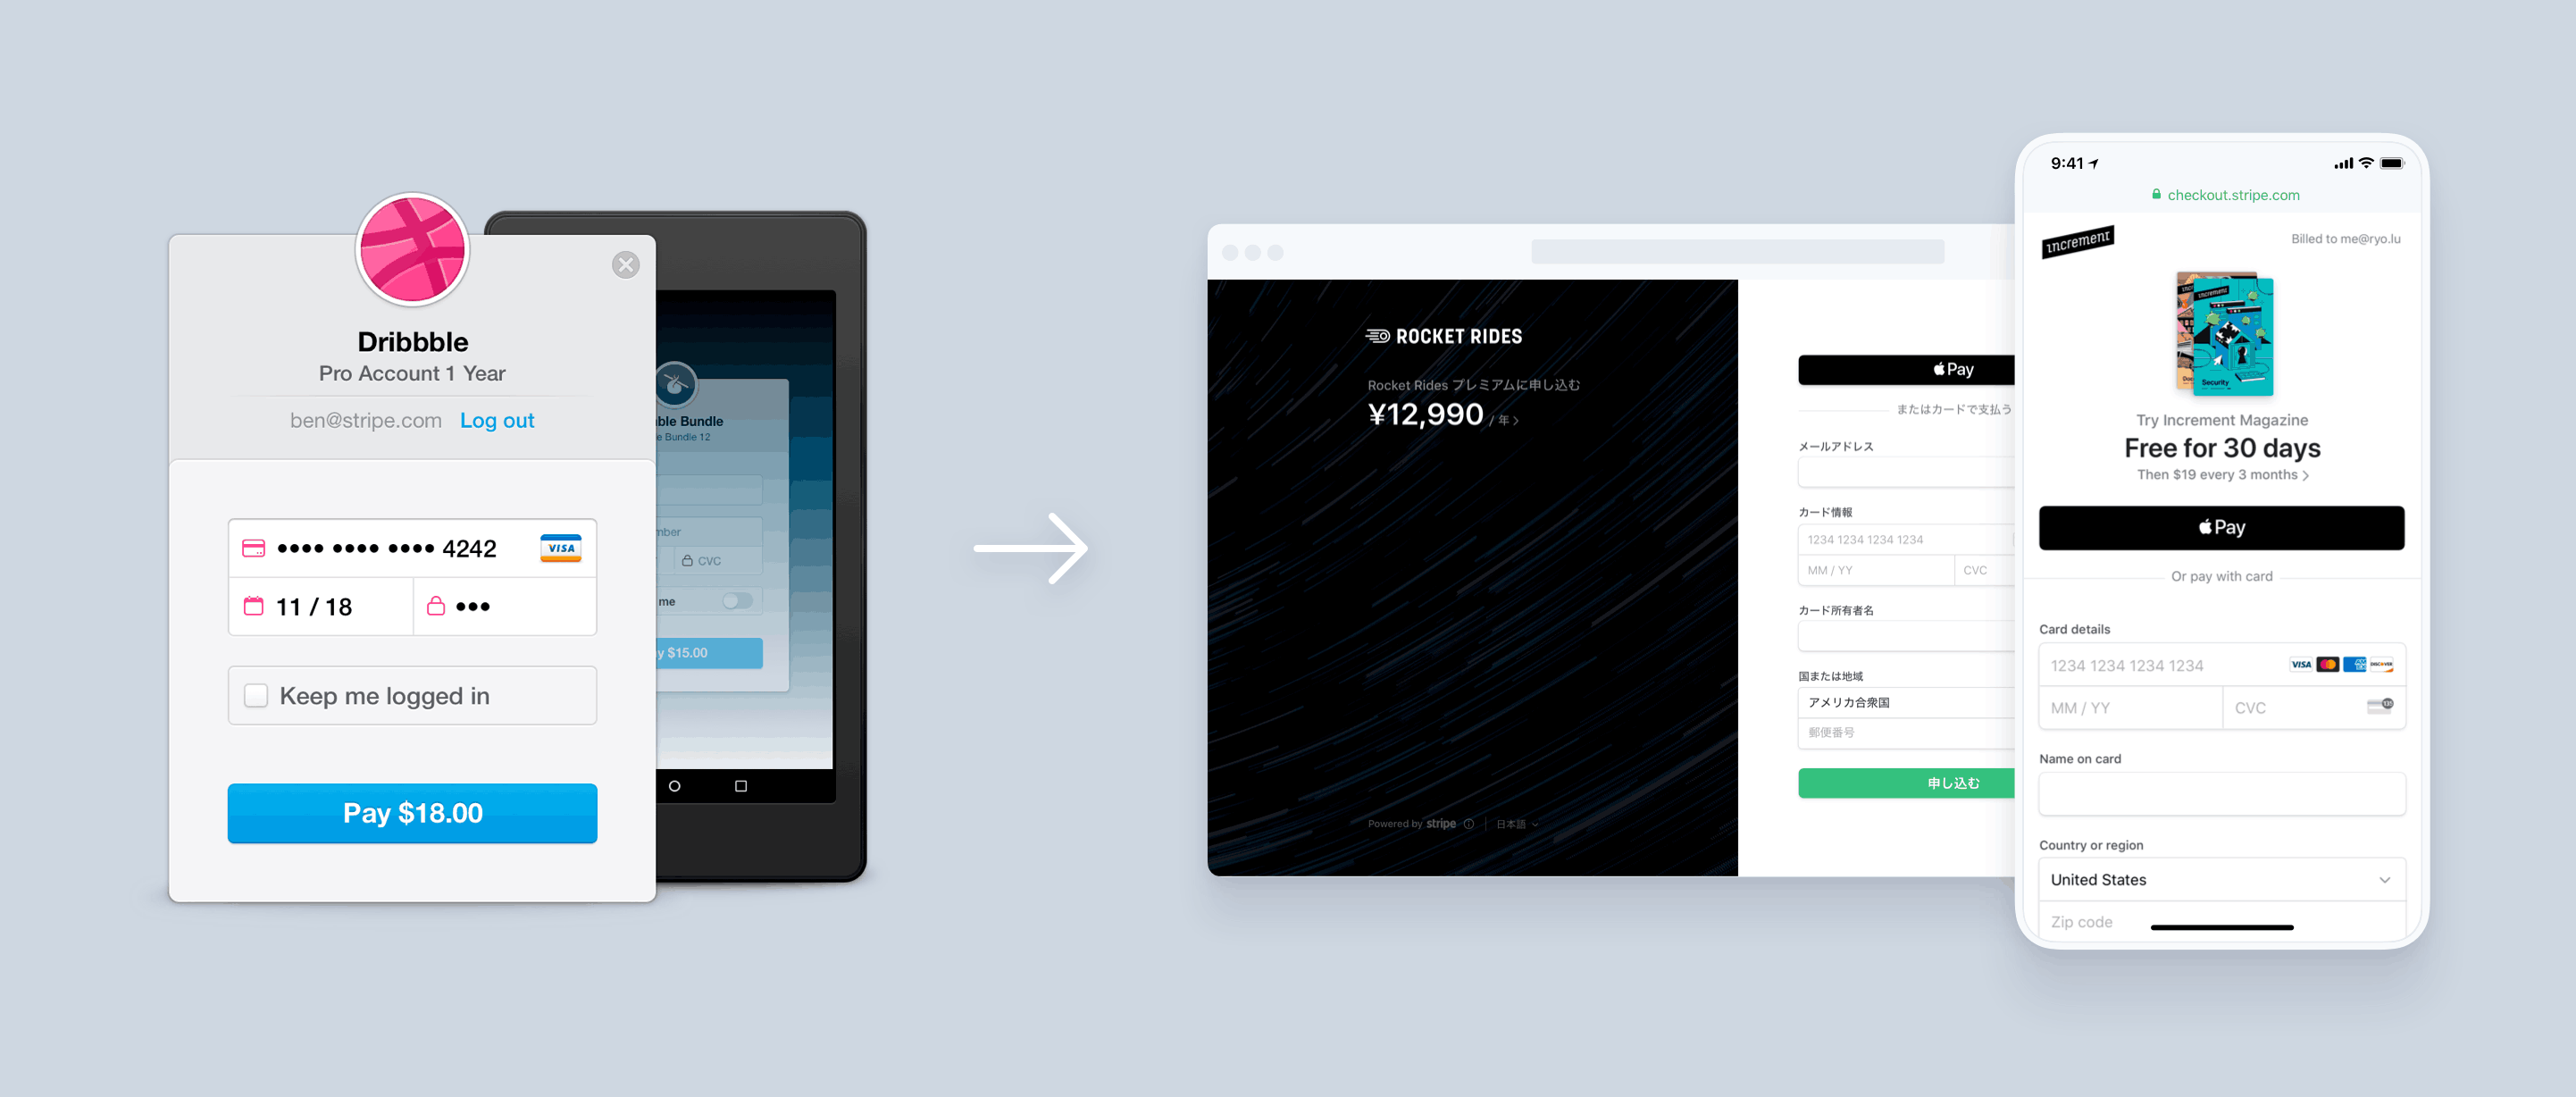
旧バージョンの Checkout では、カード情報を収集するモーダルダイアログを顧客に表示し、トークンまたはソースをお客様のウェブサイトに返していました。一方、[Payment Links](https://docs.stripe.com/payment-links.md) と現在の [Checkout](https://docs.stripe.com/payments/checkout.md) は、Stripe がホストするスマートな決済ページで、決済または*サブスクリプション* (A Subscription represents the product details associated with the plan that your customer subscribes to. Allows you to charge the customer on a recurring basis)を作成します。どちらの実装も、Apple Pay、Google Pay、Dynamic *3D Secure* (3D Secure (3DS) provides an additional layer of authentication for credit card transactions that protects businesses from liability for fraudulent card payments)、*Connect* (Connect is Stripe's solution for multi-party businesses, such as marketplace or software platforms, to route payments between sellers, customers, and other recipients)、既存顧客の再利用、そのほか多くの機能に対応しています。Payment Links または Checkout がユースケースに合わない場合は、[他の決済導入を比較する](https://docs.stripe.com/payments/online-payments.md#compare-features-and-availability)こともできます。
## Before you begin
Stripe の [SDK](https://docs.stripe.com/sdks.md) を使用している場合は、最新バージョンにアップグレードしてください。
## ビジネスモデルを選択する
レガシーバージョンの Checkout からに移行するには、お客様のビジネスモデルに最もよく適合するガイドを使用してください。各ガイドでは、推奨される組み込みパスがサンプルコードとともに示されています。
- [動的な商品カタログおよび料金体系](https://docs.stripe.com/payments/checkout/migration.md#api-products)
大規模な商品カタログを所有している場合や、動的に生成されるラインアイテム (寄付や税金など) への対応が必要な場合。
- [動的なサブスクリプション](https://docs.stripe.com/payments/checkout/migration.md#api-subscriptions)
SaaS プロバイダとしてユーザに請求を行い、高度な機能への対応が必要な場合。
- [Connect プラットフォームとマーケットプレイス](https://docs.stripe.com/payments/checkout/migration.md#connect)
サービスプロバイダと顧客をつなぐマーケットプレイスを運営している場合。
- [将来の利用に備えて支払い方法を保存する](https://docs.stripe.com/payments/checkout/migration.md#setup-mode)
アフターサービスの提供後に顧客に請求を行うビジネスを運営している場合。
- [固定価格によるシンプルな商品カタログ](https://docs.stripe.com/payments/checkout/migration.md#simple-products)
数点の商品を事前設定済みの価格で販売している場合。
- [シンプルなサブスクリプション](https://docs.stripe.com/payments/checkout/migration.md#simple-subscriptions)
SaaS プロバイダとして、月額のサブスクリプションプランを提供している場合。
関連する移行ガイドに従う際に、特定のパラメータおよび設定オプションのマッピングを示した[変換表](https://docs.stripe.com/payments/checkout/migration.md#parameter-conversion)を参照することもできます。
## 動的な商品カタログおよび料金体系
金額やラインアイテムが動的に決定される商品を販売している場合 (大規模な商品カタログを所有していたり、寄付を目的とする場合など) は、[1 回限りの支払いの受け付け](https://docs.stripe.com/payments/accept-a-payment.md?integration=checkout)をご覧ください。
レガシーバージョンの Checkout では、クライアント側でトークンまたはソースを作成し、それをサーバに渡して支払いを作成していたかもしれません。現行バージョンの Checkout ではこのフローは逆になります。まずサーバー側でセッションを作成し、顧客を Checkout にリダイレクトします。支払い後に、顧客はお客様のアプリケーションに再度リダイレクトされます。
### 移行前
レガシーバージョンの Checkout では、動的な金額と明細を表示して、顧客からカード情報を収集していました。
```html
```
次に、生成されたトークンやソースをサーバに送信し、それに請求していました。
#### curl
```bash
curl https://api.stripe.com/v1/customers \
-u <>: \
-d "email"="customer@example.com" \
-d "source"="{{STRIPE_TOKEN}}"
curl https://api.stripe.com/v1/charges \
-u <>: \
-d "customer"="{{CUSTOMER_ID}}" \
-d "description"="Custom t-shirt" \
-d "amount"="{{ORDER_AMOUNT}}" \
-d "currency"="usd"
```
### 移行後
ウェブサイトにサーバー側のエンドポイントを呼び出す決済ボタンを追加して [Checkout セッション](https://docs.stripe.com/api/checkout/sessions/create.md)を作成します。
```html
Buy cool new product
```
Checkout セッションは、顧客が支払いフォームにリダイレクトされた際に表示される内容をプログラムで示したものです。以下のようなオプションを使用して設定できます。
- 請求する[ラインアイテム](https://docs.stripe.com/api/checkout/sessions/create.md#create_checkout_session-line_items)
- 使用する通貨
支払いを完了した後に顧客をリダイレクトするウェブサイト上のページの URL を `success_url` に含めます。
```curl
curl https://api.stripe.com/v1/checkout/sessions \
-u "<>:" \
-d "line_items[0][price_data][currency]=usd" \
-d "line_items[0][price_data][product_data][name]=Custom t-shirt" \
-d "line_items[0][price_data][unit_amount]=2000" \
-d "line_items[0][quantity]=1" \
-d mode=payment \
--data-urlencode "success_url=https://example.com/success"
```
Checkout セッションを作成したら、レスポンスで返された [URL](https://docs.stripe.com/api/checkout/sessions/object.md#checkout_session_object-url) に顧客をリダイレクトします。支払い後に購入した商品のフルフィルメントを行う必要がある場合は、[Checkout および Payment Link の支払いのフルフィルメント](https://docs.stripe.com/checkout/fulfillment.md)をご覧ください。
## 動的なサブスクリプション
動的に決定されるサブスクリプションサービスを提供している場合や、その他の高度な機能のサポートが必要な場合は、[サブスクリプションの設定](https://docs.stripe.com/billing/subscriptions/build-subscriptions.md)をご覧ください。
レガシーバージョンの Checkout では、クライアント側でトークンまたはソースを作成し、それをサーバに渡して支払いを作成していたかもしれません。現行バージョンの Checkout ではこのフローは逆になります。まずサーバー側でセッションを作成し、顧客を Checkout にリダイレクトします。支払いが成功すると、顧客はお客様のアプリケーションに再度リダイレクトされます。
### 移行前
レガシーバージョンの Checkout では、サブスクリプション情報を表示して、顧客からカード情報を収集していました。
```html
```
次に、生成されたトークンやソースをサーバに送信し、顧客およびサブスクリプションを作成していました。
#### curl
```bash
curl https://api.stripe.com/v1/customers \
-u <>: \
-d "email"="customer@example.com" \
-d "source"="{{STRIPE_TOKEN}}"
curl https://api.stripe.com/v1/subscriptions \
-u <>: \
-d "customer"="{{CUSTOMER_ID}}" \
-d "items[0][price]"="{PRICE_ID}" \
-d "trial_period_days"=30
```
### 移行後
ウェブサイトにサーバー側のエンドポイントを呼び出す決済ボタンを追加して [Checkout セッション](https://docs.stripe.com/api/checkout/sessions/create.md)を作成します。
```html
Subscribe to cool new service
```
Checkout セッションは、顧客が支払いフォームにリダイレクトされた際に表示される内容をプログラムで示したものです。以下のようなオプションを使用して設定できます。
- 請求する[ラインアイテム](https://docs.stripe.com/api/checkout/sessions/create.md#create_checkout_session-line_items)
- 使用する通貨
支払いを完了した後に顧客をリダイレクトするウェブサイト上のページの URL を `success_url` に含めます。
```curl
curl https://api.stripe.com/v1/checkout/sessions \
-u "<>:" \
-d "line_items[0][price]={{PRICE_ID}}" \
-d "line_items[0][quantity]=1" \
-d "subscription_data[trial_period_days]=30" \
-d mode=subscription \
--data-urlencode "success_url=https://example.com/success"
```
Checkout セッションを作成したら、レスポンスで返された [URL](https://docs.stripe.com/api/checkout/sessions/object.md#checkout_session_object-url) に顧客をリダイレクトします。顧客とサブスクリプションが作成されると、顧客は `success_url` にリダイレクトされます。支払い後に購入したサービスのフルフィルメントを行う必要がある場合は、[Checkout および Payment Link の支払いのフルフィルメント](https://docs.stripe.com/checkout/fulfillment.md)をご覧ください。
## Connect プラットフォームとマーケットプレイス
お客様が Connect プラットフォームまたはマーケットプレイスを運営していて、連結アカウントに関連する支払いを作成する場合には、現行バージョンの Checkout を使用することを検討してください。
以下の例では、Checkout Sessions API を使用したダイレクト支払いの処理について説明しています。また、Checkout と Connect を[デスティネーション支払い](https://docs.stripe.com/connect/destination-charges.md?platform=web&ui=stripe-hosted)および[支払いと送金別方式](https://docs.stripe.com/connect/separate-charges-and-transfers.md?platform=web&ui=stripe-hosted)で使用することもできます。
### 移行前
レガシーバージョンの Checkout では、クライアント側で顧客からカード情報を収集していました。
```html
```
次に、生成されたトークンやソースをサーバに送信し、連結アカウントに代わって請求を行っていました。
#### curl
```bash
curl https://api.stripe.com/v1/charges \
-u <>: \
-d "source"="{{TOKEN_ID}}" \
-d "description"="10 cucumbers from Roger\"s Farm" \
-d "amount"=2000 \
-d "currency"="usd" \
-d "application_fee_amount"=200 \
-H "Stripe-Account: {{CONNECTED_STRIPE_ACCOUNT_ID}}"
```
### 移行後
ウェブサイトにサーバー側のエンドポイントを呼び出す決済ボタンを追加して [Checkout セッション](https://docs.stripe.com/api/checkout/sessions/create.md)を作成します。
```html
Roger's Farm
```
Checkout セッションは、顧客が支払いフォームにリダイレクトされた際に表示される内容をプログラムで示したものです。以下のようなオプションを使用して設定できます。
- 請求する[ラインアイテム](https://docs.stripe.com/api/checkout/sessions/create.md#create_checkout_session-line_items)
- 使用する通貨
支払いを完了した後に顧客をリダイレクトするウェブサイト上のページの URL を `success_url` に含めます。
```curl
curl https://api.stripe.com/v1/checkout/sessions \
-u "<>:" \
-H "Stripe-Account: {{CONNECTEDACCOUNT_ID}}" \
-d "line_items[0][price_data][currency]=usd" \
--data-urlencode "line_items[0][price_data][product_data][name]=Cucumbers from Roger's Farm" \
-d "line_items[0][price_data][unit_amount]=200" \
-d "line_items[0][quantity]=10" \
-d "payment_intent_data[application_fee_amount]=200" \
-d mode=payment \
--data-urlencode "success_url=https://example.com/success"
```
Checkout セッションを作成したら、レスポンスで返された [URL](https://docs.stripe.com/api/checkout/sessions/object.md#checkout_session_object-url) に顧客をリダイレクトします。支払い後に購入した商品またはサービスのフルフィルメントを行う必要がある場合は、[Checkout および Payment Link の支払いのフルフィルメント](https://docs.stripe.com/checkout/fulfillment.md)をご覧ください。
## 将来の利用に備えて支払い方法を保存する
顧客に対して即時請求を行わないサービスを提供している場合は、[将来の支払いを設定する](https://docs.stripe.com/payments/save-and-reuse.md?platform=checkout)をご覧ください。
レガシーバージョンの Checkout では、クライアント側でトークンまたはソースを作成し、それをサーバに渡して今後の使用に備えて保存していたかもしれません。現行バージョンの Checkout ではこのフローは逆になります。まずサーバー側でセッションを作成し、顧客を Checkout にリダイレクトします。支払いが成功すると、顧客はお客様のアプリケーションに再度リダイレクトされます。
### 移行前
レガシーバージョンの Checkout では、支払い情報を表示して、顧客からカード情報を収集していました。
```html
```
次に、結果として得られたトークンまたはソースをサーバに送信し、最終的に支払いを作成していました。
#### curl
```bash
curl https://api.stripe.com/v1/customers \
-u <>: \
-d "email"="customer@example.com" \
-d "source"="{{STRIPE_TOKEN}}"
curl https://api.stripe.com/v1/charges \
-u <>: \
-d "customer"="{{CUSTOMER_ID}}" \
-d "description"="Cleaning service" \
-d "amount"="{{ORDER_AMOUNT}}" \
-d "currency"="usd"
```
### 移行後
ウェブサイトにサーバー側のエンドポイントを呼び出す決済ボタンを追加して [Checkout セッション](https://docs.stripe.com/api/checkout/sessions/create.md)を作成します。
```html
Cleaning service
```
Checkout セッションは、顧客が支払いフォームにリダイレクトされた際に表示される内容をプログラムで示したものです。以下のようなオプションを使用して設定できます。
- 請求する[ラインアイテム](https://docs.stripe.com/api/checkout/sessions/create.md#create_checkout_session-line_items)
- 使用する通貨
支払いの設定を完了した後に顧客をリダイレクトするウェブサイト上のページの URL を `success_url` に含めます。
```curl
curl https://api.stripe.com/v1/checkout/sessions \
-u "<>:" \
-d mode=setup \
-d currency=usd \
--data-urlencode "success_url=https://example.com/success?session_id={CHECKOUT_SESSION_ID}"
```
Checkout セッションを作成したら、レスポンスで返された [URL](https://docs.stripe.com/api/checkout/sessions/object.md#checkout_session_object-url) に顧客をリダイレクトして、決済手段の詳細を収集します。顧客は、フローを完了すると `success_url` にリダイレクトされます。支払いを回収する準備ができたら、Checkout セッションから [SetupIntent を取得](https://docs.stripe.com/payments/checkout/save-and-reuse.md?payment-ui=stripe-hosted#retrieve-checkout-session)し、それを使用して取引を準備します。
## 固定価格によるシンプルな商品カタログ
固定料金の商品 (T シャツや電子書籍など) を販売している場合は、[決済用のリンク](https://docs.stripe.com/payment-links/create.md)に関するガイドをご覧ください。レガシーバージョンの Checkout を使用して、クライアント側でトークンまたはソースを作成し、それをサーバーに渡して請求を作成していた可能性があります。
### 移行前
レガシーバージョンの Checkout では、金額と明細を表示して、顧客からカード情報を収集していました。
```html
```
次に、生成されたトークンやソースをサーバに送信し、顧客および請求を作成していました。
#### Curl
```bash
curl https://api.stripe.com/v1/customers \
-u <>: \
-d "email"="{{STRIPE_EMAIL}}" \
-d "source"="{{STRIPE_TOKEN}}"
curl https://api.stripe.com/v1/charges \
-u <>: \
-d "customer"="{{CUSTOMER_ID}}" \
-d "description"="T-shirt" \
-d "amount"=500 \
-d "currency"="usd"
```
### 移行後
アイテムを表す[商品](https://docs.stripe.com/api/products.md)と[価格](https://docs.stripe.com/api/prices.md)を作成します。次の例では、Product インラインを作成します。これらのオブジェクトは、[ダッシュボード](https://dashboard.stripe.com/test/products)で作成することもできます。
```curl
curl https://api.stripe.com/v1/prices \
-u "<>:" \
-d currency=usd \
-d unit_amount=500 \
-d "product_data[name]=T-shirt"
```
商品と価格を使用して、ダッシュボードで[決済用のリンク](https://dashboard.stripe.com/payment-links/create) を作成します。リンクを作成したら、**購入ボタン** をクリックしてデザインを設定し、ウェブサイトにコピーアンドペーストできるコードを生成します。
#### HTML
```html
Purchase your new kit
```
## シンプルなサブスクリプション
シンプルなサブスクリプションサービス (ソフトウェアへの月次アクセスなど) を提供している場合は、[決済用のリンク](https://docs.stripe.com/payment-links/create.md)に関するガイドをご覧ください。レガシーバージョンの Checkout を使用して、クライアント側でトークンまたはソースを作成し、それをサーバーに渡して顧客とサブスクリプションを作成していた可能性があります。
### 移行前
レガシーバージョンの Checkout では、サブスクリプション情報を表示して、顧客からカード情報を収集していました。
```html
```
次に、生成されたトークンやソースをサーバに送信し、顧客およびサブスクリプションを作成していました。
#### Curl
```bash
curl https://api.stripe.com/v1/customers \
-u <>: \
-d "email"="{{STRIPE_EMAIL}}" \
-d "source"="{{STRIPE_TOKEN}}"
curl https://api.stripe.com/v1/subscriptions \
-u <>: \
-d "customer"="{{CUSTOMER_ID}}" \
-d "items[][price]"="{PRICE_ID}" \
-d "items[][quantity]"=1
```
### 移行後
サブスクリプションを表す[商品](https://docs.stripe.com/api/products.md)と[価格](https://docs.stripe.com/api/prices.md)を作成します。次の例では、Product インラインを作成します。これらのオブジェクトは、[ダッシュボード](https://dashboard.stripe.com/test/products)で作成することもできます。
```curl
curl https://api.stripe.com/v1/prices \
-u "<>:" \
-d currency=usd \
-d unit_amount=2000 \
-d "recurring[interval]=month" \
-d "product_data[name]=Gold Tier"
```
商品と価格を使用して、ダッシュボードで[決済用のリンク](https://dashboard.stripe.com/payment-links/create) を作成します。リンクを作成したら、**購入ボタン** をクリックしてデザインを設定し、ウェブサイトにコピーアンドペーストできるコードを生成します。
#### HTML
```html
Purchase your new kit
```
## パラメータの変換
現行バージョンの Checkout は、レガシーバージョンの Checkout のほとんどの機能に対応していますが、同じAPI を共有しているわけではありません。次の表は、レガシーバージョンと現行バージョンのパラメーターおよび設定オプションの対応関係を示しています。設定オプションの一覧については、[Checkout セッション](https://docs.stripe.com/api/checkout/sessions.md) をご覧ください。
| レガシーバージョン | 現行バージョン | 組み込みのヒント |
| --- | --- | --- |
| `allowRememberMe` | サポート対象外 | [Checkout Session](https://docs.stripe.com/api/checkout/sessions/create.md) を作成する際に、`customer_account` または `customer` パラメーターを指定すると、既存の顧客を再利用できます。[Link](https://docs.stripe.com/payments/link/checkout-link.md) を有効にすると、顧客は決済情報を安全に保存して再利用できるようになります。 |
| `amount` | すべての `line_items` の金額の合計として自動計算されます | 合計金額は Checkout に渡すラインアイテムの合計です。 |
| `billingAddress` | `Session.billing_address_collection` | Checkout は、不正使用の防止または規制への準拠を目的として要求されたときに、請求先住所を自動的に収集します。このパラメータを `required` に設定すると、請求先住所が常に収集されます。 |
| `closed` | 顧客が決済を閉じる場合は、ブラウザタブを閉じます。 | |
| `currency` | `Session.currency` | |
| `description` | `Session.line_items.description` または `product.description` | 価格を指定すると、Checkout は支払いの発生頻度についての記述を自動的に計算して表示します。`Session.line_items` を指定すると、Checkout は各ラインアイテムの `name` を表示します。 |
| `email` | `Session.customer_email` | 顧客のメールアドレスがすでにわかっている場合は、Checkout セッションを作成する際に、[customer_email](https://docs.stripe.com/api/checkout/sessions/create.md#create_checkout_session-customer_email) を事前入力できます。 |
| `image` | **ビジネスブランディング**: ダッシュボードでブランドロゴまたはアイコンをアップロードします。
**商品画像**: 各ラインアイテムの画像を `product.images` で指定します。 | Checkout はお客様のビジネスの[ブランディング](https://docs.stripe.com/payments/checkout/customization/appearance.md#branding)と、販売する商品用に専用の画像を使用します。Checkout はデフォルトでビジネス名の横にビジネスロゴを表示し、ビジネスアイコンにフォールバックします。 |
| `key` | Checkout にパラメータは渡されなくなりました | |
| `locale` | `Session.locale` | Checkout Session の作成時に、サポートされている[ロケール](https://docs.stripe.com/payments/checkout/custom-components.md#localization)を指定できます。 |
| `name` | `Session.line_items` で指定された価格の `product.name` | 価格を指定した場合、Checkout はその価格と関連付けられている商品の名前を表示します。`Session.line_items` を指定した場合、Checkout は各ラインアイテムの `name` を表示します。 |
| `panelLabel` | `submit_type` | Checkout は、販売する商品に応じてボタンのテキストを自動的にカスタマイズします。1 回限りの決済の場合は、[submit_type](https://docs.stripe.com/payments/checkout/custom-components.md#submit-button) を使用してボタンのテキストをカスタマイズします。 |
| `shippingAddress` | `session.shipping_address_collection` | 配送先の `allowed_countries` の配列を渡すことにより、[配送先住所情報を収集](https://docs.stripe.com/payments/collect-addresses.md?payment-ui=checkout)します。 |
| `token` または `source` | `success_url` | 支払い完了時の JavaScript のコールバックはなくなりました。顧客は別のページで支払いを行っているため、支払い完了後に顧客をリダイレクトするように `success_url` を設定します。 |
| `zipCode` | Checkout により自動的に収集されます | 不正使用の防止または規制への準拠を目的として要求される場合、Checkout は郵便番号を自動的に収集します。 |
## See also
- [決済手段をさらに追加する](https://docs.stripe.com/payments/payment-methods/overview.md)
- [住所と電話番号を収集する](https://docs.stripe.com/payments/collect-addresses.md)