Zahlung annehmen
Nehmen Sie Zahlungen sicher online an.
Erstellen Sie ein Zahlungsformular oder verwenden Sie eine vorgefertigte Bezahlseite, um mit der Annahme von Online-Zahlungen zu beginnen.
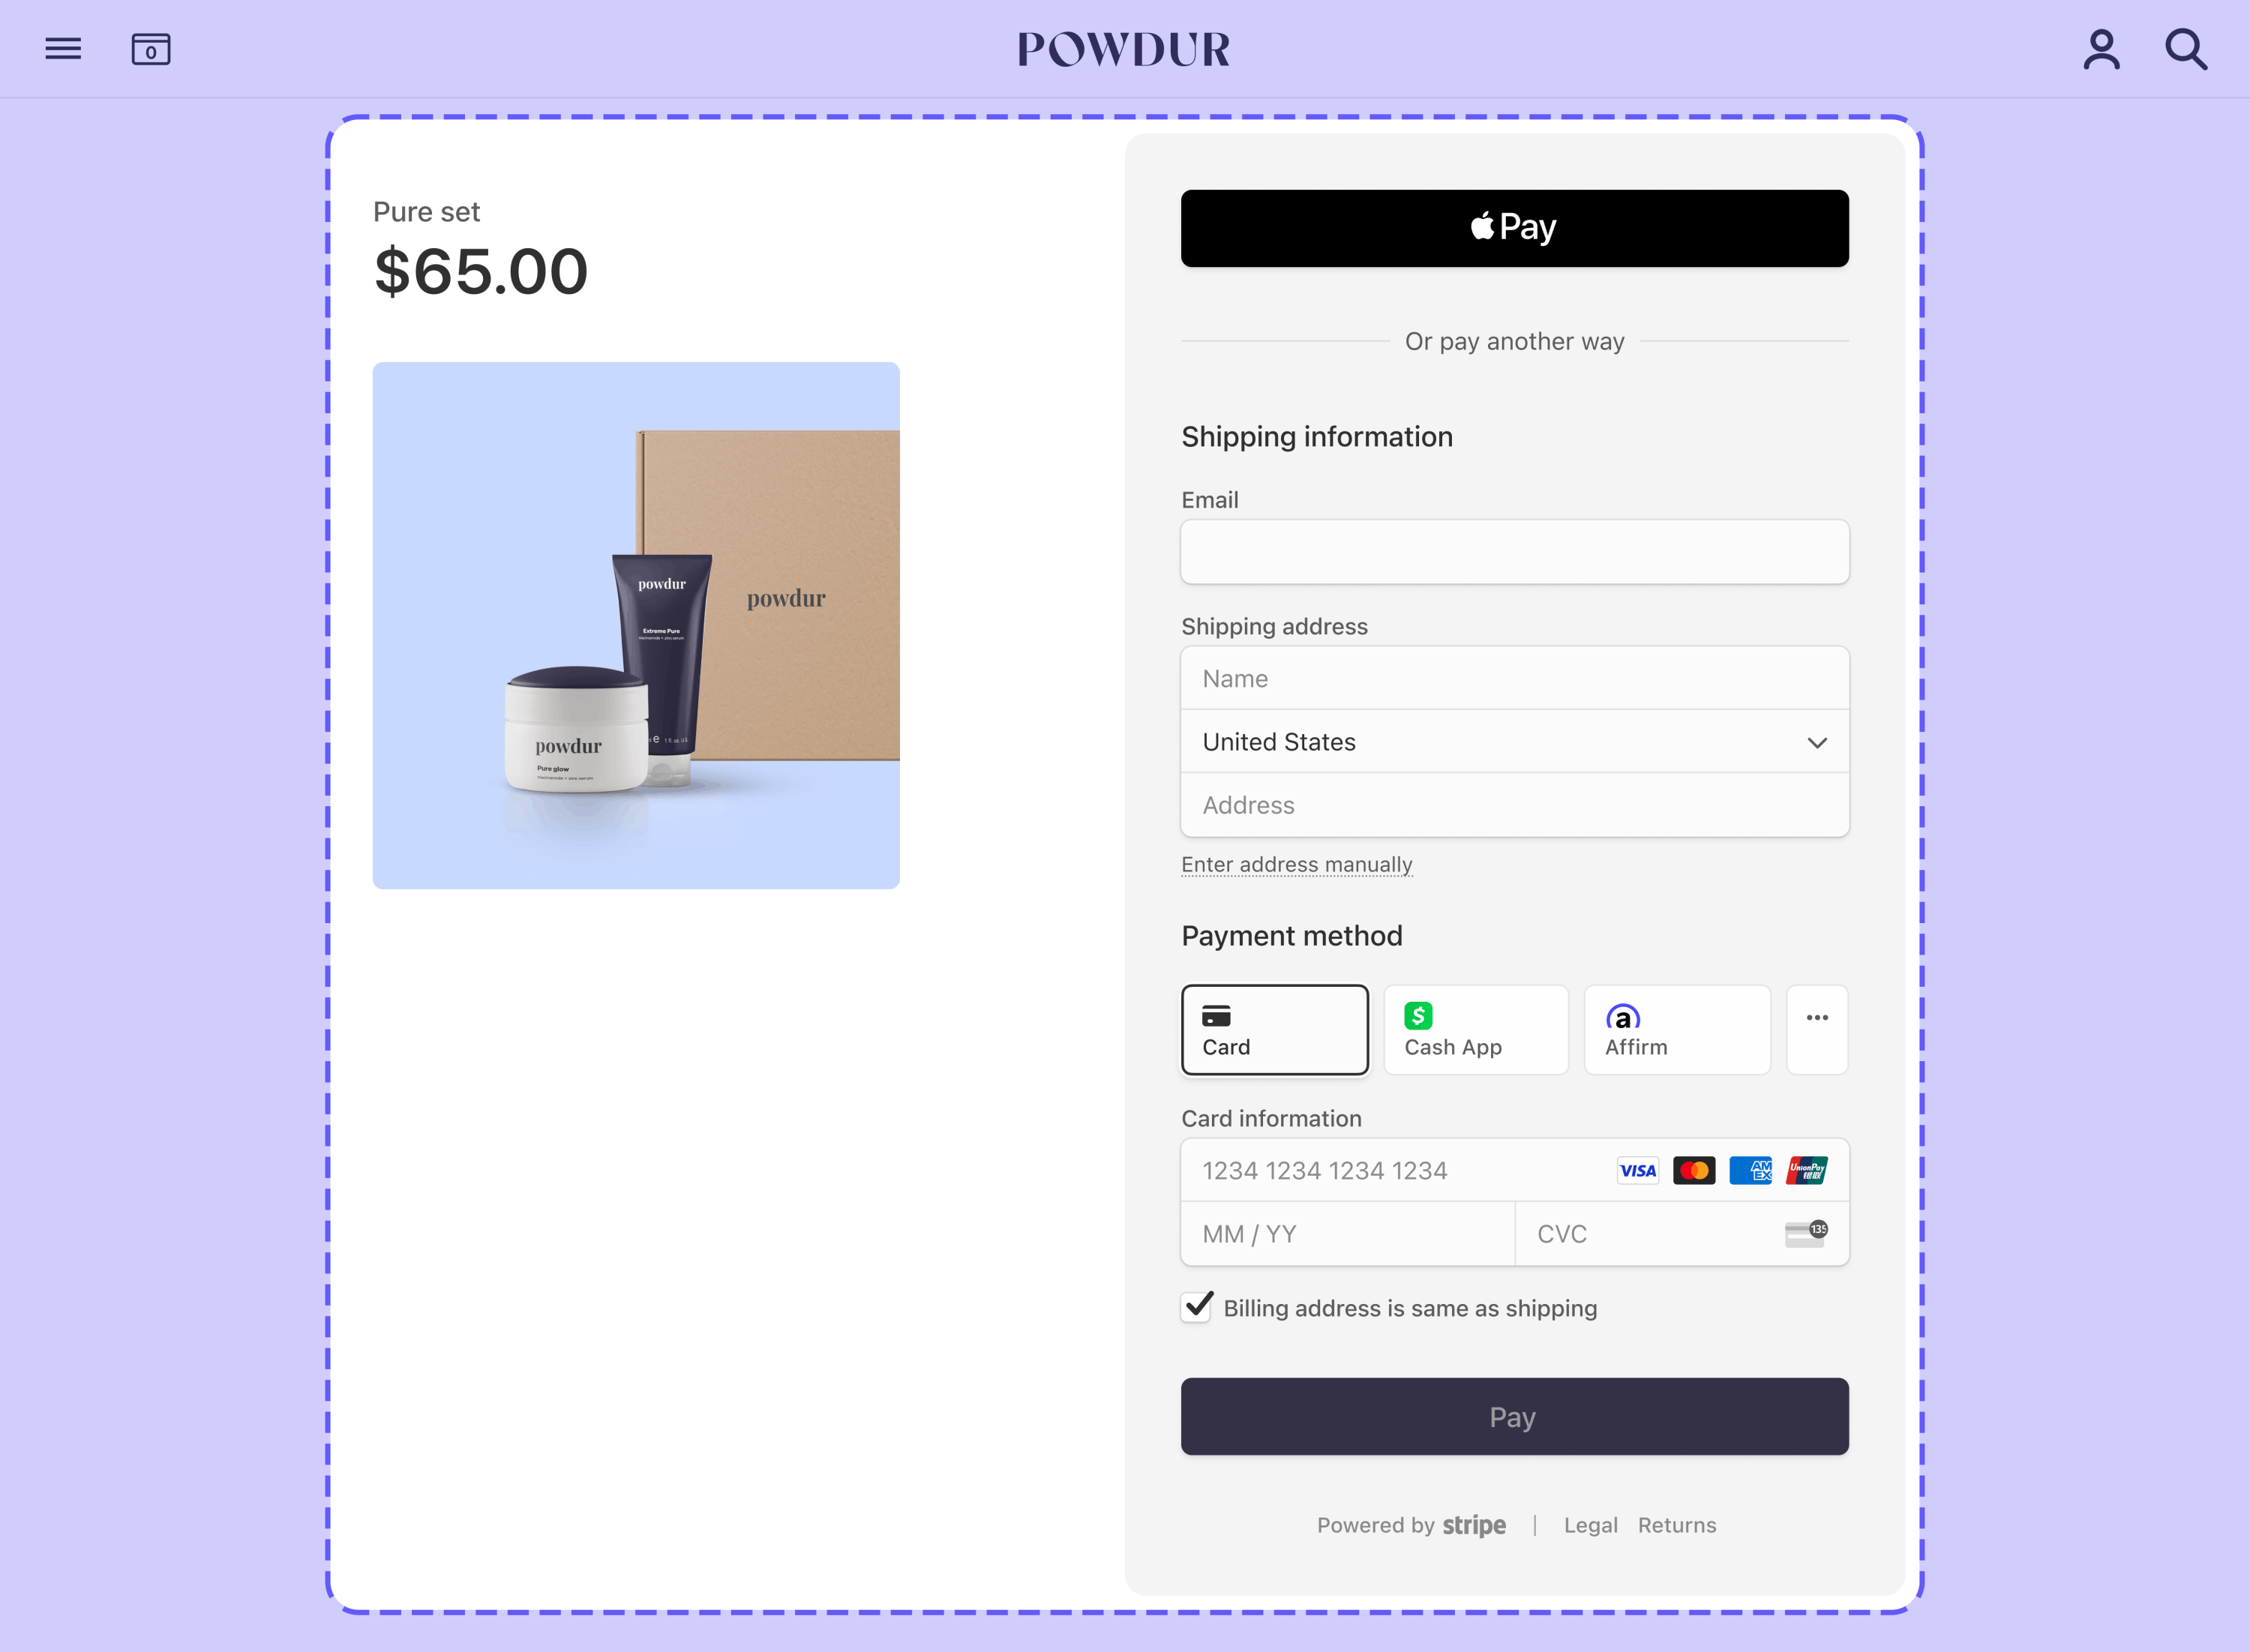
Betten Sie mit Stripe Checkout ein vorgefertigtes Zahlungsformular auf Ihrer Website ein. Sehen Sie sich diese Integration im Vergleich zu anderen Integrationstypen von Stripe an.


Integrationsaufwand
Integration
Vorgefertigtes Zahlungsformular auf Ihrer Website einbetten
Anpassung der Nutzeroberfläche
Verwenden Sie die Branding-Einstellungen im Stripe-Dashboard, um Checkout an Ihr Website-Design anzupassen.
Registrieren Sie sich zunächst für ein Stripe-Konto.
Verwenden Sie unsere offiziellen Bibliotheken, um von Ihrer Anwendung aus auf die Stripe API zuzugreifen:
Checkout-Sitzung erstellenServerseitig
Erstellen Sie von Ihrem Server aus eine Checkout-Sitzung und setzen Sie den ui_mode-Endpoint auf embedded. Sie können die Checkout-Sitzung mit den Posten so konfigurieren, dass auch Optionen wie die Währung enthalten sind.
Sie können auch eine Checkout-Sitzung für einen bestehenden Kunden/eine bestehende Kundin erstellen. Dadurch können Sie Checkout-Felder mit bekannten Kontaktinformationen vorab ausfüllen und Ihre Kaufhistorie für diesen Kunden/diese Kundin vereinheitlichen.
Um Kundinnen/Kunden zu einer nutzerdefinierten Seite zurückzuleiten, die Sie auf Ihrer Website hosten, geben Sie die URL dieser Seite im Parameter return_url an. Fügen Sie die Vorlagenvariable {CHECKOUT_ in die URL ein, um den Status der Sitzung auf der Rückgabeseite abzurufen. Checkout ersetzt die Variable vor der Weiterleitung automatisch durch die Checkout-Sitzungs-ID.
Erfahren Sie mehr über das Konfigurieren der Rückgabeseite und andere Optionen zum Anpassen des Weiterleitungsverhaltens.
Nachdem Sie die Checkout-Sitzung erstellt haben, verwenden Sie das client_, das in der Antwort auf Checkout verbinden zurückgegeben wurde.
Checkout verbindenClientseitig
Checkout wird in einem iFrame gerendert, der Zahlungsdaten sicher über eine HTTPS-Verbindung an Stripe sendet.
Häufiger Fehler
Vermeiden Sie es, Checkout in einem anderen iFrame zu platzieren, da bei einigen Zahlungsmethoden die Weiterleitung an eine andere Seite zur Zahlungsbestätigung erforderlich ist.
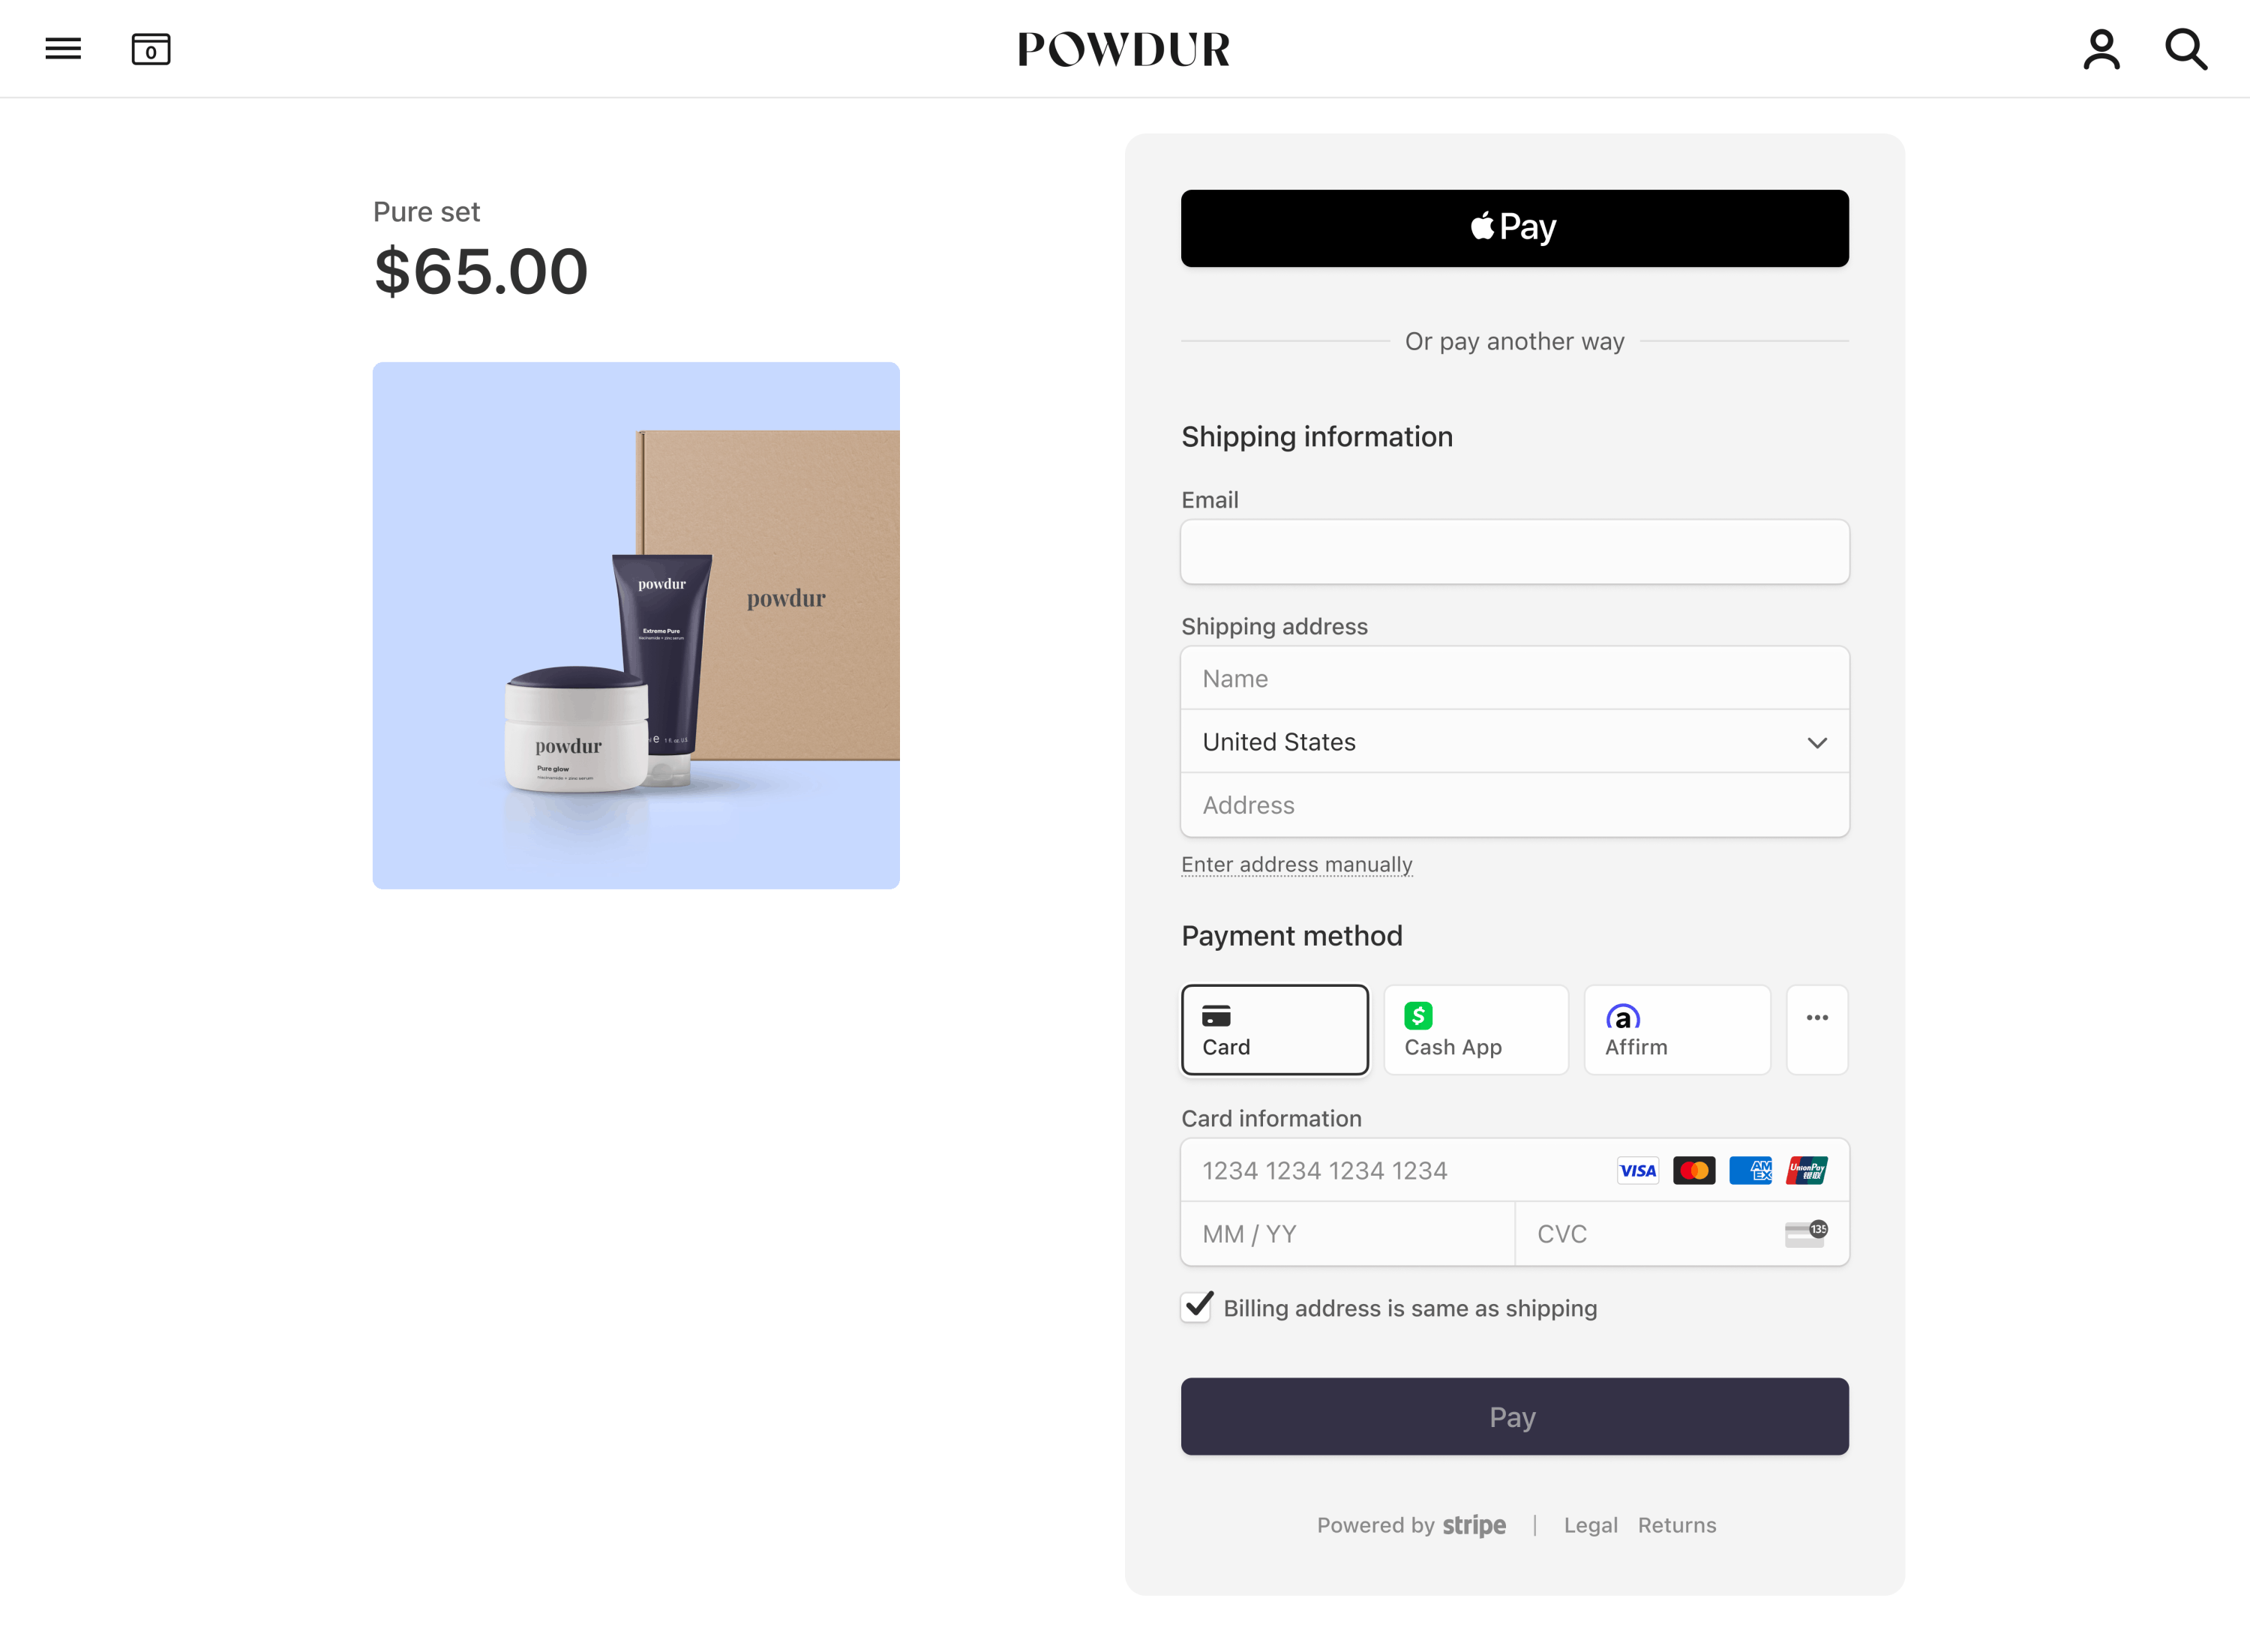
Erscheinungsbild anpassen
Passen Sie Checkout an das Design Ihrer Website an, indem Sie Hintergrundfarbe, Schaltflächenfarbe, Rahmenradius und Schriftarten in den Branding-Einstellungen Ihres Kontos festlegen.
Checkout wird standardmäßig ohne externes Padding oder Ränder gerendert. Um Ihren gewünschten Rand hinzuzufügen (z. B. 16px auf allen Seiten), empfehlen wir, ein Container-Element zu verwenden.
Eine Rückgabeseite anzeigen
Nachdem Ihre Kundinnen/Kunden einen Zahlungsversuch unternommen haben, leitet Stripe sie zu einer Rückgabeseite weiter, die Sie auf Ihrer Website hosten. Beim Erstellen der Checkout-Sitzung haben Sie die URL der Rückgabeseite im Parameter return_url angegeben. Erfahren Sie mehr über andere Optionen zum Anpassen des Weiterleitungsverhaltens.
Rufen Sie beim Rendern Ihrer Rückgabeseite den Status der Checkout-Sitzung mithilfe der ID der Checkout-Sitzung in der URL ab. Gehen Sie je nach Sitzungsstatus wie folgt mit dem Ergebnis um:
complete: Die Zahlung war erfolgreich. Verwenden Sie die Informationen aus der Checkout-Sitzung, um eine Bestätigungsseite zu rendern.open: Die Zahlung ist fehlgeschlagen oder wurde storniert. Stellen Sie erneut eine Verbindung zu Checkout her, damit Ihre Kundinnen/Kunden es nochmals versuchen können.
const session = await fetch(`/session_status?session_id=${session_id}`)
if (session.status == 'open') {
  // Remount embedded Checkout
} else if (session.status == 'complete') {
  // Show success page
  // Optionally use session.payment_status or session.customer_email
  // to customize the success page
}
Auf Weiterleitung basierende Zahlungsmethoden
Während der Zahlung leiten einige Zahlungsmethoden die Kundin/den Kunden auf eine Zwischenseite weiter, zum Beispiel eine Bankautorisierungsseite. Wenn sie diese Seite ausgefüllt haben, leitet Stripe sie zu Ihrer Rückgabeseite weiter.
Erfahren Sie mehr über auf Weiterleitung basierende Zahlungsmethoden und das Weiterleitungsverhalten.
Ereignisse nach der Zahlung verarbeiten
Stripe sendet das Ereignis checkout.session.completed, wenn ein Kunde/eine Kundin eine Zahlung in der Checkout-Sitzung abschließt. Verwenden Sie das Webhook-Tool des Dashboards oder befolgen Sie die Webhook-Anleitung, um diese Ereignisse zu empfangen und zu verarbeiten. Dies kann zu Folgendem führen:
- Senden Sie eine Bestellbestätigung per E-Mail an Ihre Kundinnen/Kunden.
- Protokollieren Sie den Verkauf in einer Datenbank.
- Starten Sie einen Versand-Workflow.
Überwachen Sie diese Ereignisse, anstatt darauf zu warten, dass Ihre Kundinnen/Kunden auf Ihre Website zurückgeleitet werden. Es ist unzuverlässig, die Ausführung nur über die Landingpage Ihrer Zahlungsseite auszulösen. Wenn Sie Ihre Integration so einrichten, dass sie asynchrone Ereignisse überwacht, können Sie verschiedene Arten von Zahlungsmethoden mit einer einzelnen Integration akzeptieren.
Weitere Informationen finden Sie in unserem Fulfillment-Leitfaden für Checkout.
Verarbeiten Sie die folgenden Ereignisse, wenn Sie Zahlungen mit Checkout einziehen:
| Ereignis | Beschreibung | Aktion |
|---|---|---|
| checkout.session.completed | Wird gesendet, wenn ein Kunde/eine Kundin eine Checkout-Sitzung erfolgreich abschließt. | Senden Sie den Kundinnen/Kunden eine Auftragsbestätigung und wickeln Sie die Bestellung ab. |
| checkout.session.async_payment_succeeded | Wird gesendet, wenn eine Zahlung mit einer Zahlungsmethode mit Verzögerung, wie z. B. ACH-Lastschriftverfahren, erfolgreich ausgeführt wird. | Senden Sie den Kundinnen/Kunden eine Auftragsbestätigung und wickeln Sie die Bestellung ab. |
| checkout.session.async_payment_failed | Wird gesendet, wenn eine Zahlung mit einer Zahlungsmethode mit Verzögerung, wie z. B. ACH-Lastschriftverfahren, fehlschlägt. | Benachrichtigen Sie die Kundin/den Kunden über den Fehler und bitten Sie ihn/sie, für einen erneuten Zahlungsversuch zur Sitzung zurückzukehren. |
Integration testen
So testen Sie die Integration Ihres eingebetteten Zahlungsformulars:
- Erstellen Sie eine eingebettete Checkout-Sitzung und verbinden Sie Checkout auf Ihrer Seite.
- Geben Sie die Zahlungsdetails mit einer Methode aus der folgenden Tabelle ein.
- Geben Sie für die Karte ein beliebiges Ablaufdatum in der Zukunft ein.
- Geben Sie als Prüfziffer/CVC eine 3-stellige Zahl ein.
- Geben Sie eine beliebige Postleitzahl ein.
- Klicken Sie auf Bezahlen. Sie werden zu Ihrer
return_weitergeleitet.url - Gehen Sie zum Dashboard und suchen Sie auf der Seite Transaktionen nach der Zahlung. Wenn Ihre Zahlung erfolgreich war, wird sie in dieser Liste angezeigt.
- Klicken Sie auf Ihre Zahlung, um weitere Details anzuzeigen, wie beispielsweise eine Checkout-Zusammenfassung mit Rechnungsinformationen und die Liste der gekauften Artikel. Sie können diese Informationen zur Abwicklung der Bestellung verwenden.
Erfahren Sie mehr über das Testen Ihrer Integration.
Hier finden Sie weitere Informationen zum Testen Ihrer Integration.
OptionalWeitere Zahlungsmethoden hinzufügen
Standardmäßig unterstützt Checkout viele Zahlungsmethoden. Sie müssen zusätzliche Schritte unternehmen, um einige Methoden wie Apple Pay, Google Pay und „Jetzt kaufen, später bezahlen“ zu aktivieren und anzuzeigen.
Apple Pay und Google Pay
Um Zahlungen mit Apple Pay und Google Pay zu akzeptieren, müssen Sie:
- Aktivieren Sie sie in Ihren Zahlungsmethodeneinstellungen. Apple Pay ist standardmäßig aktiviert.
- Stellen Sie Ihre Anwendung über HTTPS in einer Entwicklungs- und Produktionsumgebung bereit.
- Registrieren Sie Ihre Domain.
- Ihre Anwendung wird in der Entwicklungs- und in der Produktionsumgebung über HTTPS angesprochen. Sie können einen Dienst wie ngrok verwenden, um Ihre Anwendung für lokale Tests bereitzustellen.
Zusätzlich wird in einer Checkout-Sitzung die Apple Pay-Schaltfläche Kunden/Kundinnen nur angezeigt, wenn alle folgenden Bedingungen erfüllt sind:
- Auf dem Kundengerät ist macOS Version 17 oder höher oder iOS Version 17 oder höher installiert.
- Die Kundin/der Kunde verwendet Safari.
- Die Kundin/der Kunde hat sich mit einer gültigen Karte bei Apple Pay registriert.
In einer Checkout-Sitzung wird die Google Pay-Schaltfläche für Kundinnen/Kunden nur angezeigt, wenn alle der folgenden Bedingungen erfüllt sind:
- Auf dem Kundengerät ist Chrome 61 oder neuer installiert.
- Die Kundin/der Kunde hat sich mit einer gültigen Karte bei Google Pay registriert.
Regionale TestsIndien
Stripe Checkout unterstützt Apple Pay oder Google Pay für Stripe-Konten oder Kundinnen und Kunden in Indien nicht. Daher können Sie Ihre Apple Pay- oder Google Pay-Integration nicht testen, wenn sich Ihre IP-Adresse in Indien befindet, selbst wenn sich das Stripe-Konto außerhalb Indiens befindet.
OptionalProdukte und Preise erstellen
Bevor Sie eine Checkout-Sitzung erstellen, können Sie im Voraus Produkte und Preise erstellen. Verwenden Sie Produkte, um verschiedene physische Waren oder Dienstleistungsebenen darzustellen, und Preise, um die Preise jedes Produkts darzustellen.
Sie können zum Beispiel ein T-Shirt als Produkt mit einem Preis von 20 USD erstellen. Auf diese Weise können Sie Preise aktualisieren und hinzufügen, ohne die Details der zugrunde liegenden Produkte ändern zu müssen. Sie können Produkte und Preise entweder mit dem Stripe-Dashboard oder über die API erstellen. Erfahren Sie mehr darüber, wie Produkte und Preise funktionieren.
Jeder von Ihnen erstellte Preis hat eine ID. Wenn Sie eine Checkout-Sitzung erstellen, verweisen Sie auf die Preis-ID und die Menge. Wenn Sie in mehreren Währungen Verkäufe tätigen, legen Sie Ihren Preis in mehreren Währungen fest. Checkout erkennt die lokale Währung des/der Kund/in automatisch und gibt diese Währung an, wenn der Preis diese unterstützt.
OptionalKundendaten vorab angebenServerseitig
Wenn Sie die E-Mail-Adresse Ihrer Kundin/Ihres Kunden bereits erfasst haben und sie in einer Checkout-Sitzung vorab angeben möchten, übergeben Sie customer_email beim Erstellen der Checkout-Sitzung.
OptionalAngaben zur Zahlungsmethode speichernServerseitig
Standardmäßig sind Zahlungsmethoden, die für einmalige Zahlungen mit Checkout verwendet werden, nicht für die zukünftige Verwendung verfügbar.
Zahlungsmethoden speichern, um sie Off-Session zu belasten
Sie können Checkout die für eine einmalige Zahlung verwendeten Zahlungsmethoden speichern lassen, indem Sie das Argument payment_intent_data.setup_future_usage übergeben. Das ist hilfreich, wenn Sie eine hinterlegte Zahlungsmethode für künftige Gebühren, wie Stornogebühren oder Gebühren bei Nichterscheinen, erfassen müssen.
Wenn Sie Checkout im subscription-Modus verwenden, speichert Stripe die Zahlungsmethode automatisch, um sie für nachfolgende Zahlungen zu belasten. Kartenzahlungsmethoden, die für Kundinnen und Kunden entweder im setup_- oder im subscription-Modus gespeichert wurden, werden für Rücksendungen nicht in Checkout angezeigt (mehr dazu unten). Wir empfehlen, nutzerdefinierten Text zu verwenden, um auf alle relevanten Bedingungen in Bezug auf die Nutzung gespeicherter Zahlungsinformationen zu verweisen.
Vorsicht
Die weltweiten Datenschutzgesetze sind komplex und vielschichtig. Wir empfehlen Ihnen, sich vor der Implementierung von setup_future_usage mit Ihrem Rechts- und Datenschutzteam in Verbindung zu setzen, da dies Ihr bestehendes Compliance-Framework für den Datenschutz beeinträchtigen könnte. Weitere Informationen zum Speichern von Zahlungsdaten finden Sie in den Leitlinien des Europäischen Datenschutzausschusses.
Zahlungsmethoden speichern, um sie in Checkout vorab auszufüllen
Standardmäßig verwendet CheckoutLink um Ihren Kunden die Möglichkeit zu geben, ihre Zahlungsinformationen sicher zu speichern und wiederzuverwenden. Wenn Sie es vorziehen, die Zahlungsmethoden selbst zu verwalten, verwenden Siesaved_payment_method_options.payment_method_save wenn Sie eine Checkout Session erstellen, damit Ihre Kunden ihre Zahlungsmethoden für zukünftige Einkäufe in Checkout speichern können.
Wenn Sie diesen Parameter entweder im Zahlungs- oder im Abonnement-Modus übergeben, wird ein optionales Kontrollkästchen angezeigt, mit dem Kundinnen/Kunden ihre Zahlungsmethode für zukünftige Käufe explizit speichern können. Wenn Kundinnen/Kunden dieses Kontrollkästchen aktivieren, speichert Checkout die Zahlungsmethode mit allow_redisplay: always. Checkout verwendet diesen Parameter, um zu ermitteln, ob eine Zahlungsmethode für zukünftige Käufe vorausgefüllt werden kann. Wenn Sie saved_ verwenden, müssen Sie setup_ nicht übergeben, um die Zahlungsmethode zu speichern.
Für die Verwendung von saved_payment_method_options.payment_method_save ist ein Customer erforderlich. Um einen neuen Kunden/eine neue Kundin zu speichern, legen Sie die customer_creation der Checkout-Sitzung auf always fest. Andernfalls wird in der Sitzung weder der Kunde/die Kundin noch die Zahlungsmethode gespeichert.
Wenn payment_ nicht übergeben wird oder wenn der Kunde/die Kundin nicht zustimmt, die Zahlungsmethode zu speichern, speichert Checkout weiterhin Zahlungsmethoden, die im Modus subscription oder mit setup_ erstellt wurden. Diese Zahlungsmethoden haben den allow_-Wert limited, der verhindert, dass sie für wiederkehrende Käufe vorausgefüllt werden, und es Ihnen ermöglicht, die Regeln des Kartennetzwerks und die Datenschutzbestimmungen einzuhalten. Erfahren Sie, wie Sie das durch diese Modi aktivierte Standardverhalten ändern und wie Sie das allow_-Verhalten ändern oder außer Kraft setzen können.
Hinweis
Sie können Checkout verwenden, um Karten und andere Zahlungsmethoden zu speichern, um sie Off-Session zu belasten, aber Checkout füllt nur gespeicherte Karten vorab aus. So können Sie gespeicherte Karten vorab ausfüllen. Um eine Zahlungsmethode ohne anfängliche Zahlung zu speichern, verwenden Sie Checkout im Einrichtungsmodus.
Lassen Sie Kundinnen und Kunden gespeicherte Zahlungsmethoden entfernen
Damit Ihre Kundinnen und Kunden eine gespeicherte Zahlungsmethode entfernen können, damit sie für zukünftige Zahlungen nicht wieder angezeigt wird, verwenden Sie beim Erstellen einer Checkout-Sitzung saved_payment_method_options.payment_method_remove.
Der Kunde/Die Kundin kann eine Zahlungsmethode nicht entfernen, wenn sie an ein aktives Abonnement gebunden ist und der Kunde/die Kundin keine Standardzahlungsmethode für Rechnungs- und Abonnementzahlungen gespeichert hat.
OptionalVerwaltung von KundenkontenKein Code
Lassen Sie Ihre Kundinnen/Kunden ihre eigenen Konten verwalten und senden sie ihnen einen Link zu Ihrem Kundenportal. Über das Kundenportal können sich Kundinnen/Kunden mit ihrer E-Mail-Adresse anmelden, um Abonnements zu verwalten, Zahlungsmethoden zu aktualisieren und vieles mehr.
OptionalGetrennte Autorisierung und ErfassungServerseitig
Stripe unterstützt Kartenzahlungen in zwei Schritten. Sie können also Karten autorisieren und die Gelder erst später erfassen. Wenn Stripe eine Zahlung autorisiert, garantiert der Kartenaussteller die Gelder und stellt den Zahlungsbetrag auf der Kundenkarte zurück. Sie müssen die Gelder dann in einem bestimmten Zeitraum erfassen – wie lange Sie Zeit haben, hängt von der Karte ab). Wenn Sie die Zahlung nicht vor Ablauf der Autorisierung erfassen, wird die Zahlung storniert und der Kartenaussteller gibt die zurückgestellten Gelder wieder frei.
Die zeitliche Trennung von Autorisierung und Erfassung ist hilfreich, wenn Sie zwischen dem Bestätigen der Zahlungsfähigkeit einer Kundin/eines Kunden und dem Einziehen der Zahlung zusätzliche Schritte ausführen möchten. Wenn Sie beispielsweise Artikel mit begrenztem Bestand verkaufen, müssen Sie gegebenenfalls überprüfen, ob der bestellte Artikel überhaupt verfügbar ist, bevor Sie die Zahlung erfassen und den Kauf abwickeln. Nutzen Sie dafür den folgenden Ablauf:
- Überprüfen Sie, ob Stripe die Zahlungsmethode der Kundin/des Kunden autorisiert hat.
- Kontrollieren Sie in Ihrem Bestandsverwaltungssystem, ob der Artikel verfügbar ist.
- Geben Sie in Ihrem Bestandsverwaltungssystem an, dass der Kunde/die Kundin den Artikel gekauft hat.
- Erfassen Sie die Zahlung der Kundin/des Kunden.
- Informieren Sie die Kundin/den Kunden auf Ihrer Bestätigungsseite darüber, ob der Kauf erfolgreich war.
Um anzugeben, dass Sie Autorisierung und Erfassung trennen möchten, müssen Sie beim Erstellen der Checkout-Sitzung den Wert von payment_intent_data.capture_method auf manual festlegen. Dadurch wird Stripe angewiesen, nur den Betrag auf der Karte der Kundin/des Kunden zu autorisieren.
Eine nicht erfasste Zahlung können Sie entweder über den Endpoint Dashboard oder Erfassung erfassen. Um Zahlungen programmgesteuert zu erfassen, ist der Zugriff auf den PaymentIntent erforderlich, der während der Checkout-Sitzung erstellt wurde. Diesen können Sie über das Session-Objekt abrufen.
OptionalBestellabwicklung
Erfahren Sie, wie Sie nach einer Kundenzahlung programmgesteuert benachrichtigt werden.