Ereignisse an Amazon EventBridge senden
Nutzen Sie Stripe-Ereignisse in Ihrer AWS-Infrastruktur.
Workbench aktivieren
Um Ereignisse an Amazon EventBridge zu senden, aktivieren Sie Workbench in Ihren Entwickler-Einstellungen im Dashboard.
Amazon EventBridge ist ein ereignisgestützter Dienst von AWS, der ohne Server auskommt und Ihre Anwendungen zentral zusammenfasst. AWS erleichtert Ihnen die Verarbeitung, Anpassung und Übermittlung von Ereignissen. Wenn Sie eine Integration mit EventBridge und einem Ereignisziel vornehmen, können Sie Ereignisdaten von Stripe direkt über Ihr AWS-Konto empfangen. Um Datenverkehr und die Codelogik der Integration brauchen Sie sich dann nicht mehr kümmern. Wenn Ereignisse empfangen werden, kann EventBridge diese an 20 unterstützte Ziele weiterleiten und so automatische Vorgänge in Ihrem Unternehmen verarbeiten oder auslösen.
Ereignisse an Amazon EventBridge senden
Führen Sie die folgenden Schritte aus, um Ereignisse in EventBridge zu empfangen. Dazu müssen Sie ein neues Ereignisziel in Workbench erstellen und die EventBridge-Konfiguration in der AWS Management-Konsole einrichten.
Warnung
Sie erhalten erst dann Ereignisdaten in Ihrer Amazon EventBridge, wenn Sie die einzelnen Schritte ausgeführt haben.
Partner-Ereignisquelle zuordnenAWS-Konsole
Nachdem Sie ein Ereignisziel eingerichtet haben, erstellt Stripe eine Partner-Ereignisquelle im AWS-Konto und der Region, die Sie bei der Konfiguration angegeben haben. Um mit dem Empfang von Ereignissen zu beginnen, müssen Sie diese Ereignisquelle innerhalb von 7 Tagen nach der Erstellung des Ereignisziels mit einem Event Bus verknüpfen. Wenn Sie keine Zuordnung innerhalb dieses Zeitraums vornehmen, löscht Amazon die ausstehende Ereignisquelle automatisch. Nachdem eine Ereignisquelle gelöscht wurde, wird Ihr Stripe-Ereignisziel automatisch deaktiviert, und Sie müssen ein neues Ziel erstellen, um Ereignisse zu empfangen.
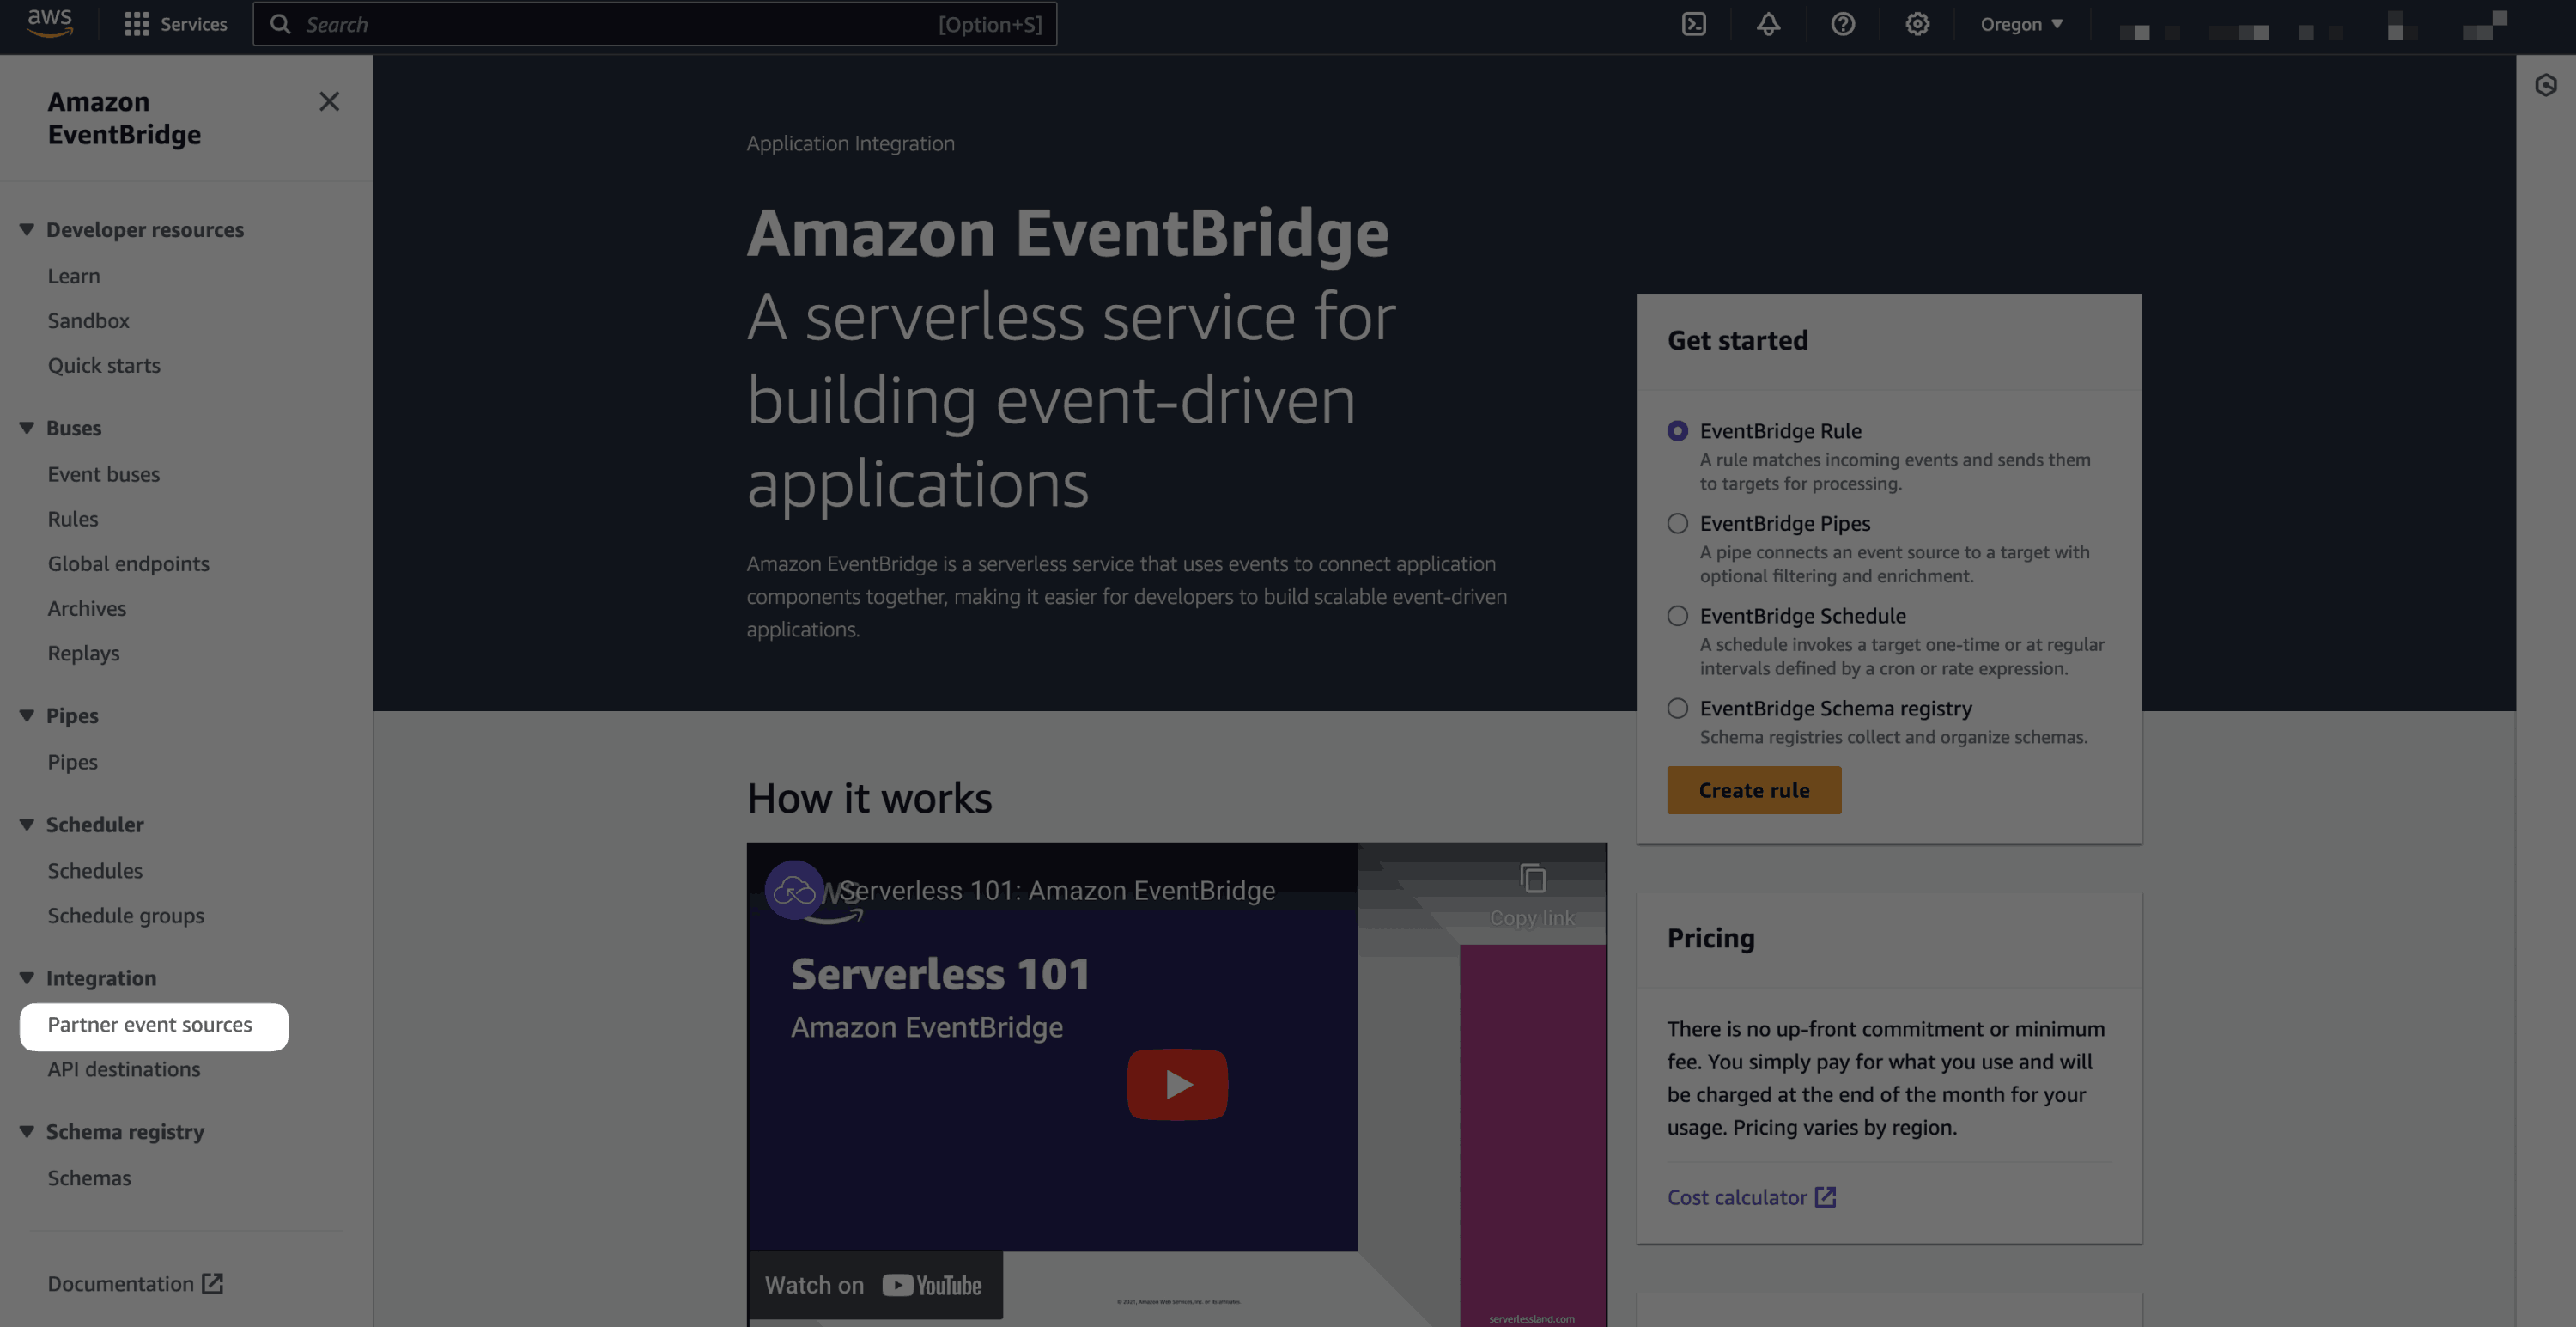
- Gehen Sie in Ihrer AWS-Konsole unter EventBridge auf die Seite Partner-Ereignisquellen, die im Abschnitt Integration auf der linken Seite aufgeführt ist.
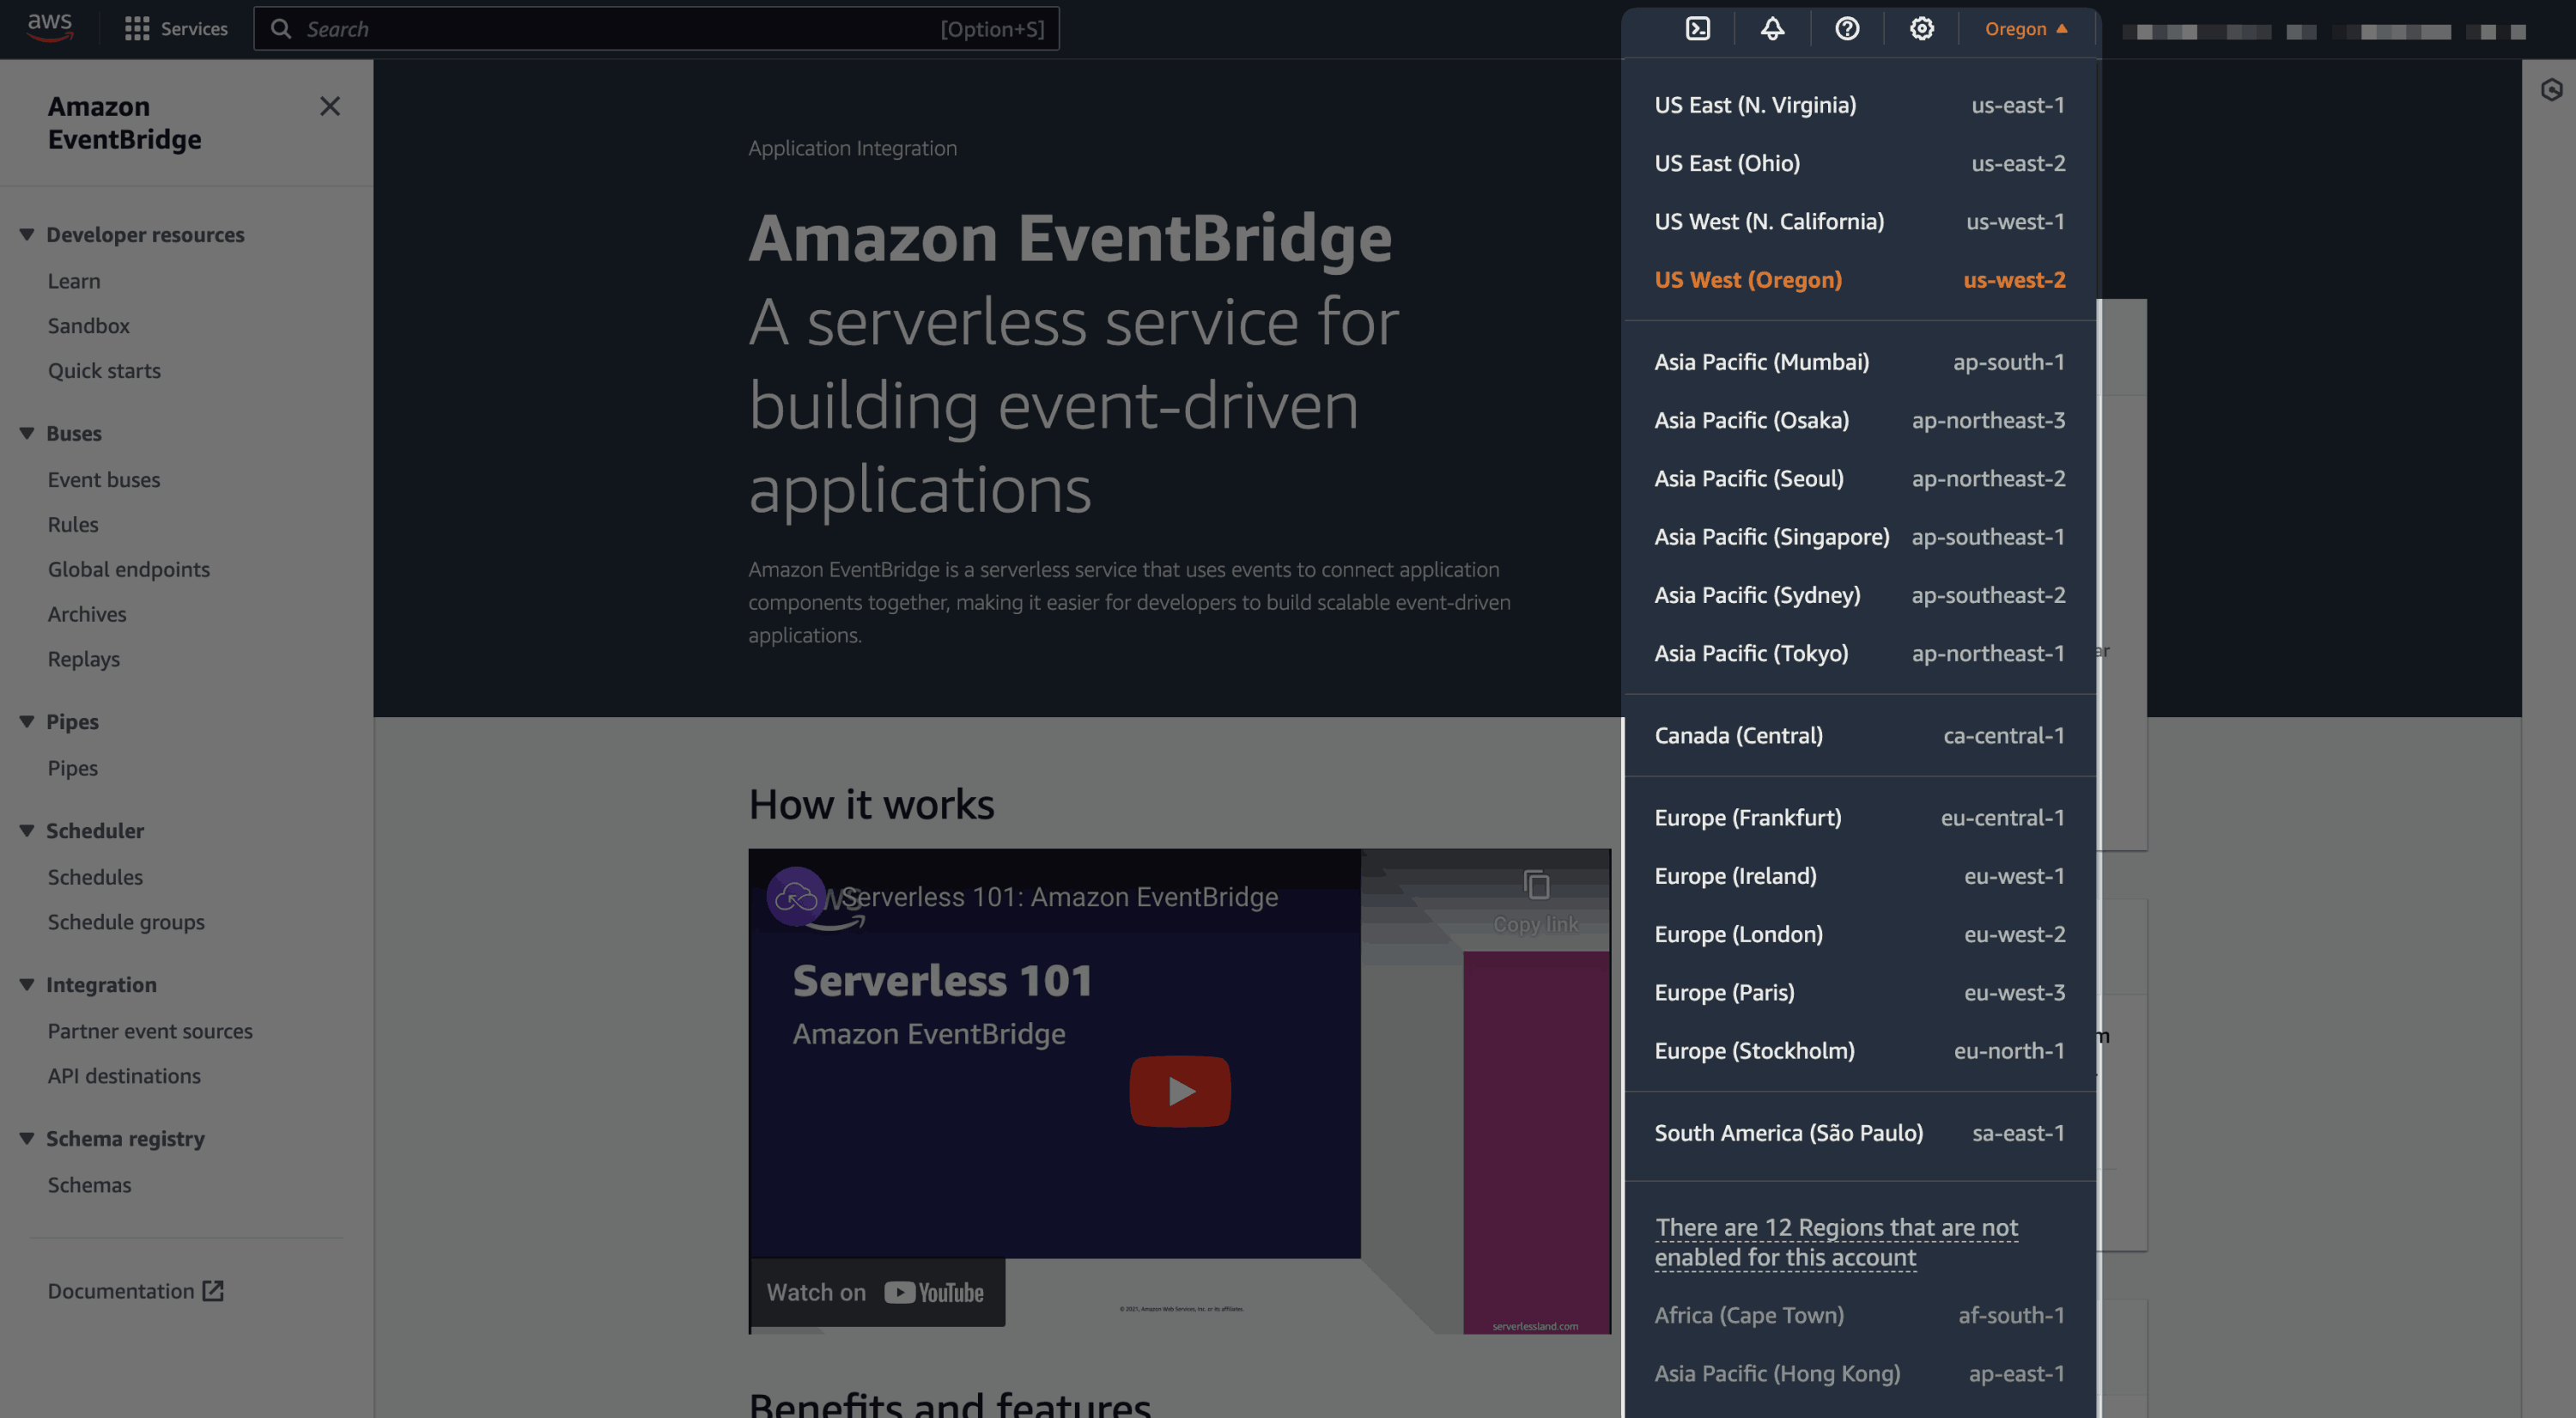
- Verwenden Sie die Dropdown-Liste Region oben in der Konsole, um die Region auszuwählen, die Sie beim Konfigurieren Ihres Ereignisziels in Workbench auswählen.
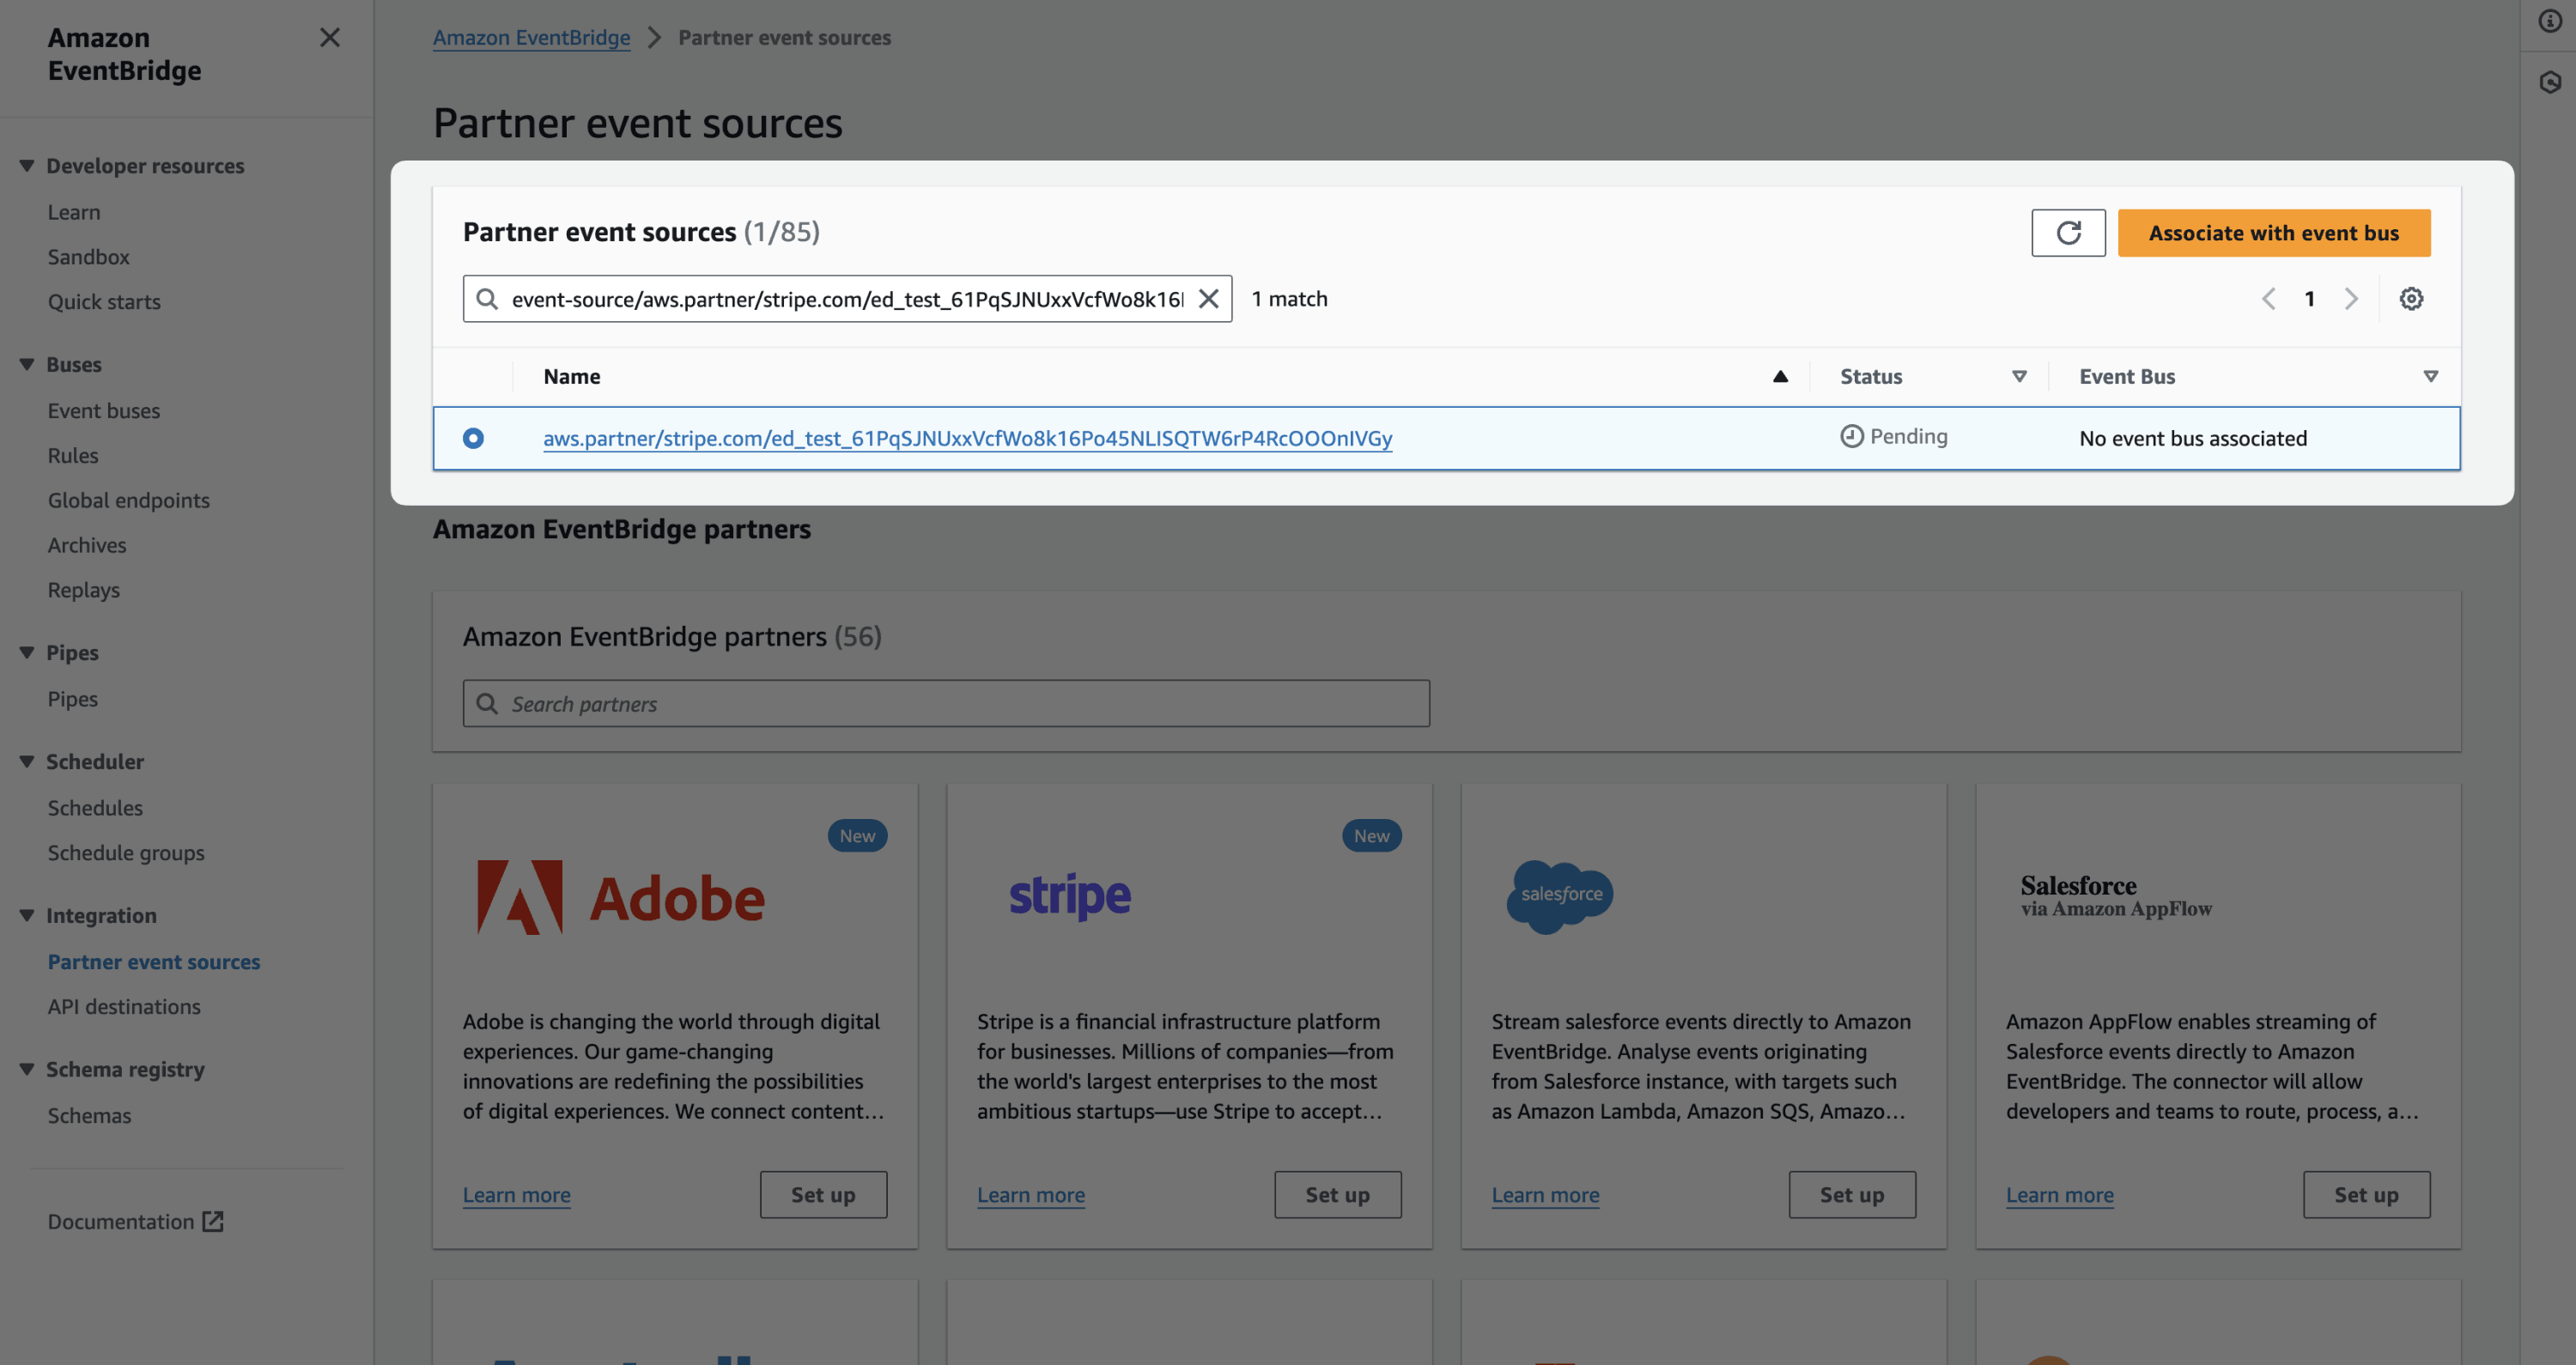
- Wählen Sie im Dropdown-Menü die neu erstellte Partner-Ereignisquelle aus. Um das Feld „Ereignisquelle ARN“ in Workbench zu finden, wählen Sie Ihr Ereignisziel aus. Ihre Partnerquelle stimmt mit dem Teil
event-source/aws.der ARN überein. Klicken Sie dann auf Mit Event Bus verknüpfen.partner/stripe. com/{UNIQUE_ ID}
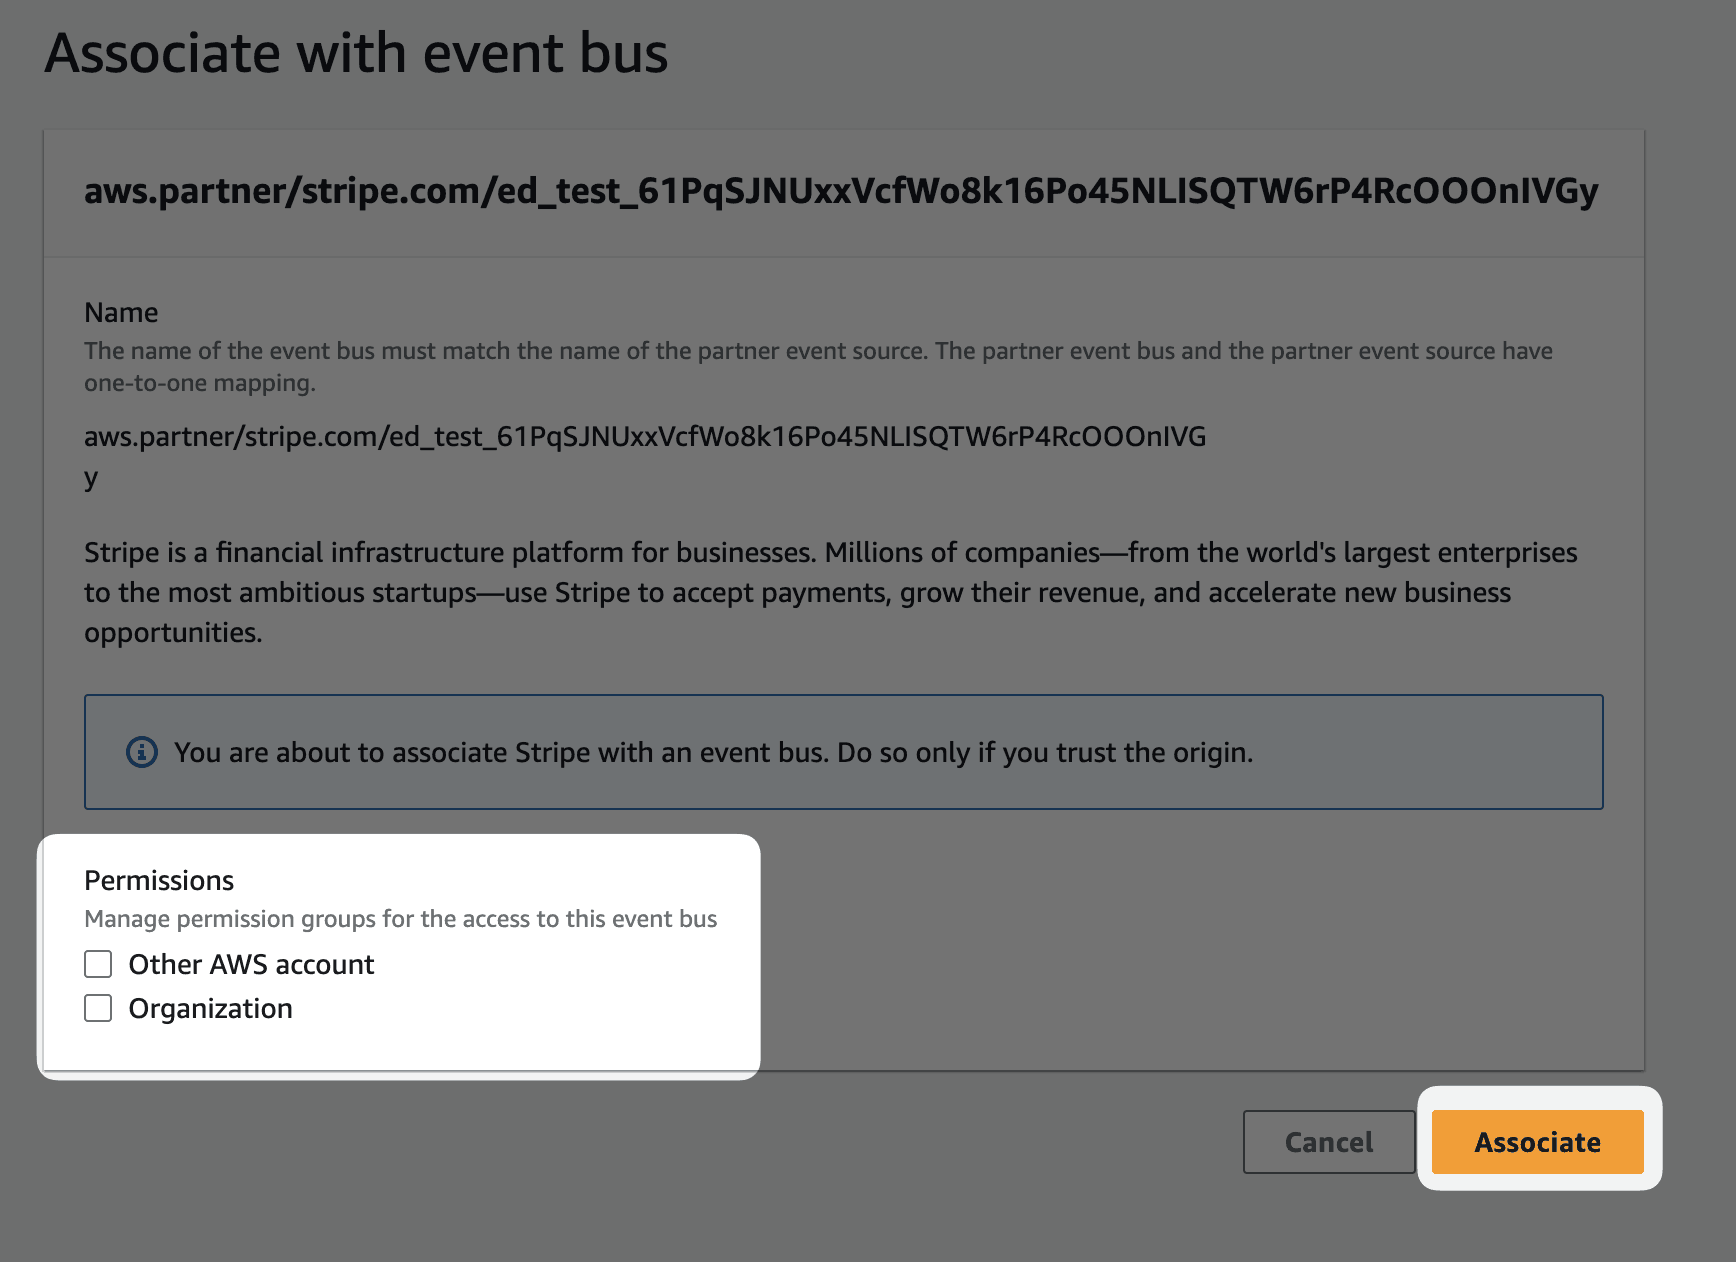
- Wählen Sie nach Bedarf Berechtigungen aus, die Sie für diesen Event Bus erteilen möchten, und klicken Sie dann auf Verknüpfen.
EventBridge-Regeln erstellenAWS-Konsole
EventBridge gruppiert und leitet Ereignisse basierend auf von Ihnen definierten Regeln weiter. Nachdem Sie ein Ereignisziel erstellt und dessen Partner-Ereignisquelle einem Event Bus zugeordnet haben, müssen Sie Regeln definieren. So stellen Sie sicher, dass EventBridge weiß, wie die auf dem Event Bus empfangenen Ereignisse zu behandeln sind. Sie können diese Schritte mehrmals wiederholen, um mehrere Regeln zu definieren.
- Navigieren Sie zur AWS-Managementkonsole und klicken Sie dann auf Regeln.
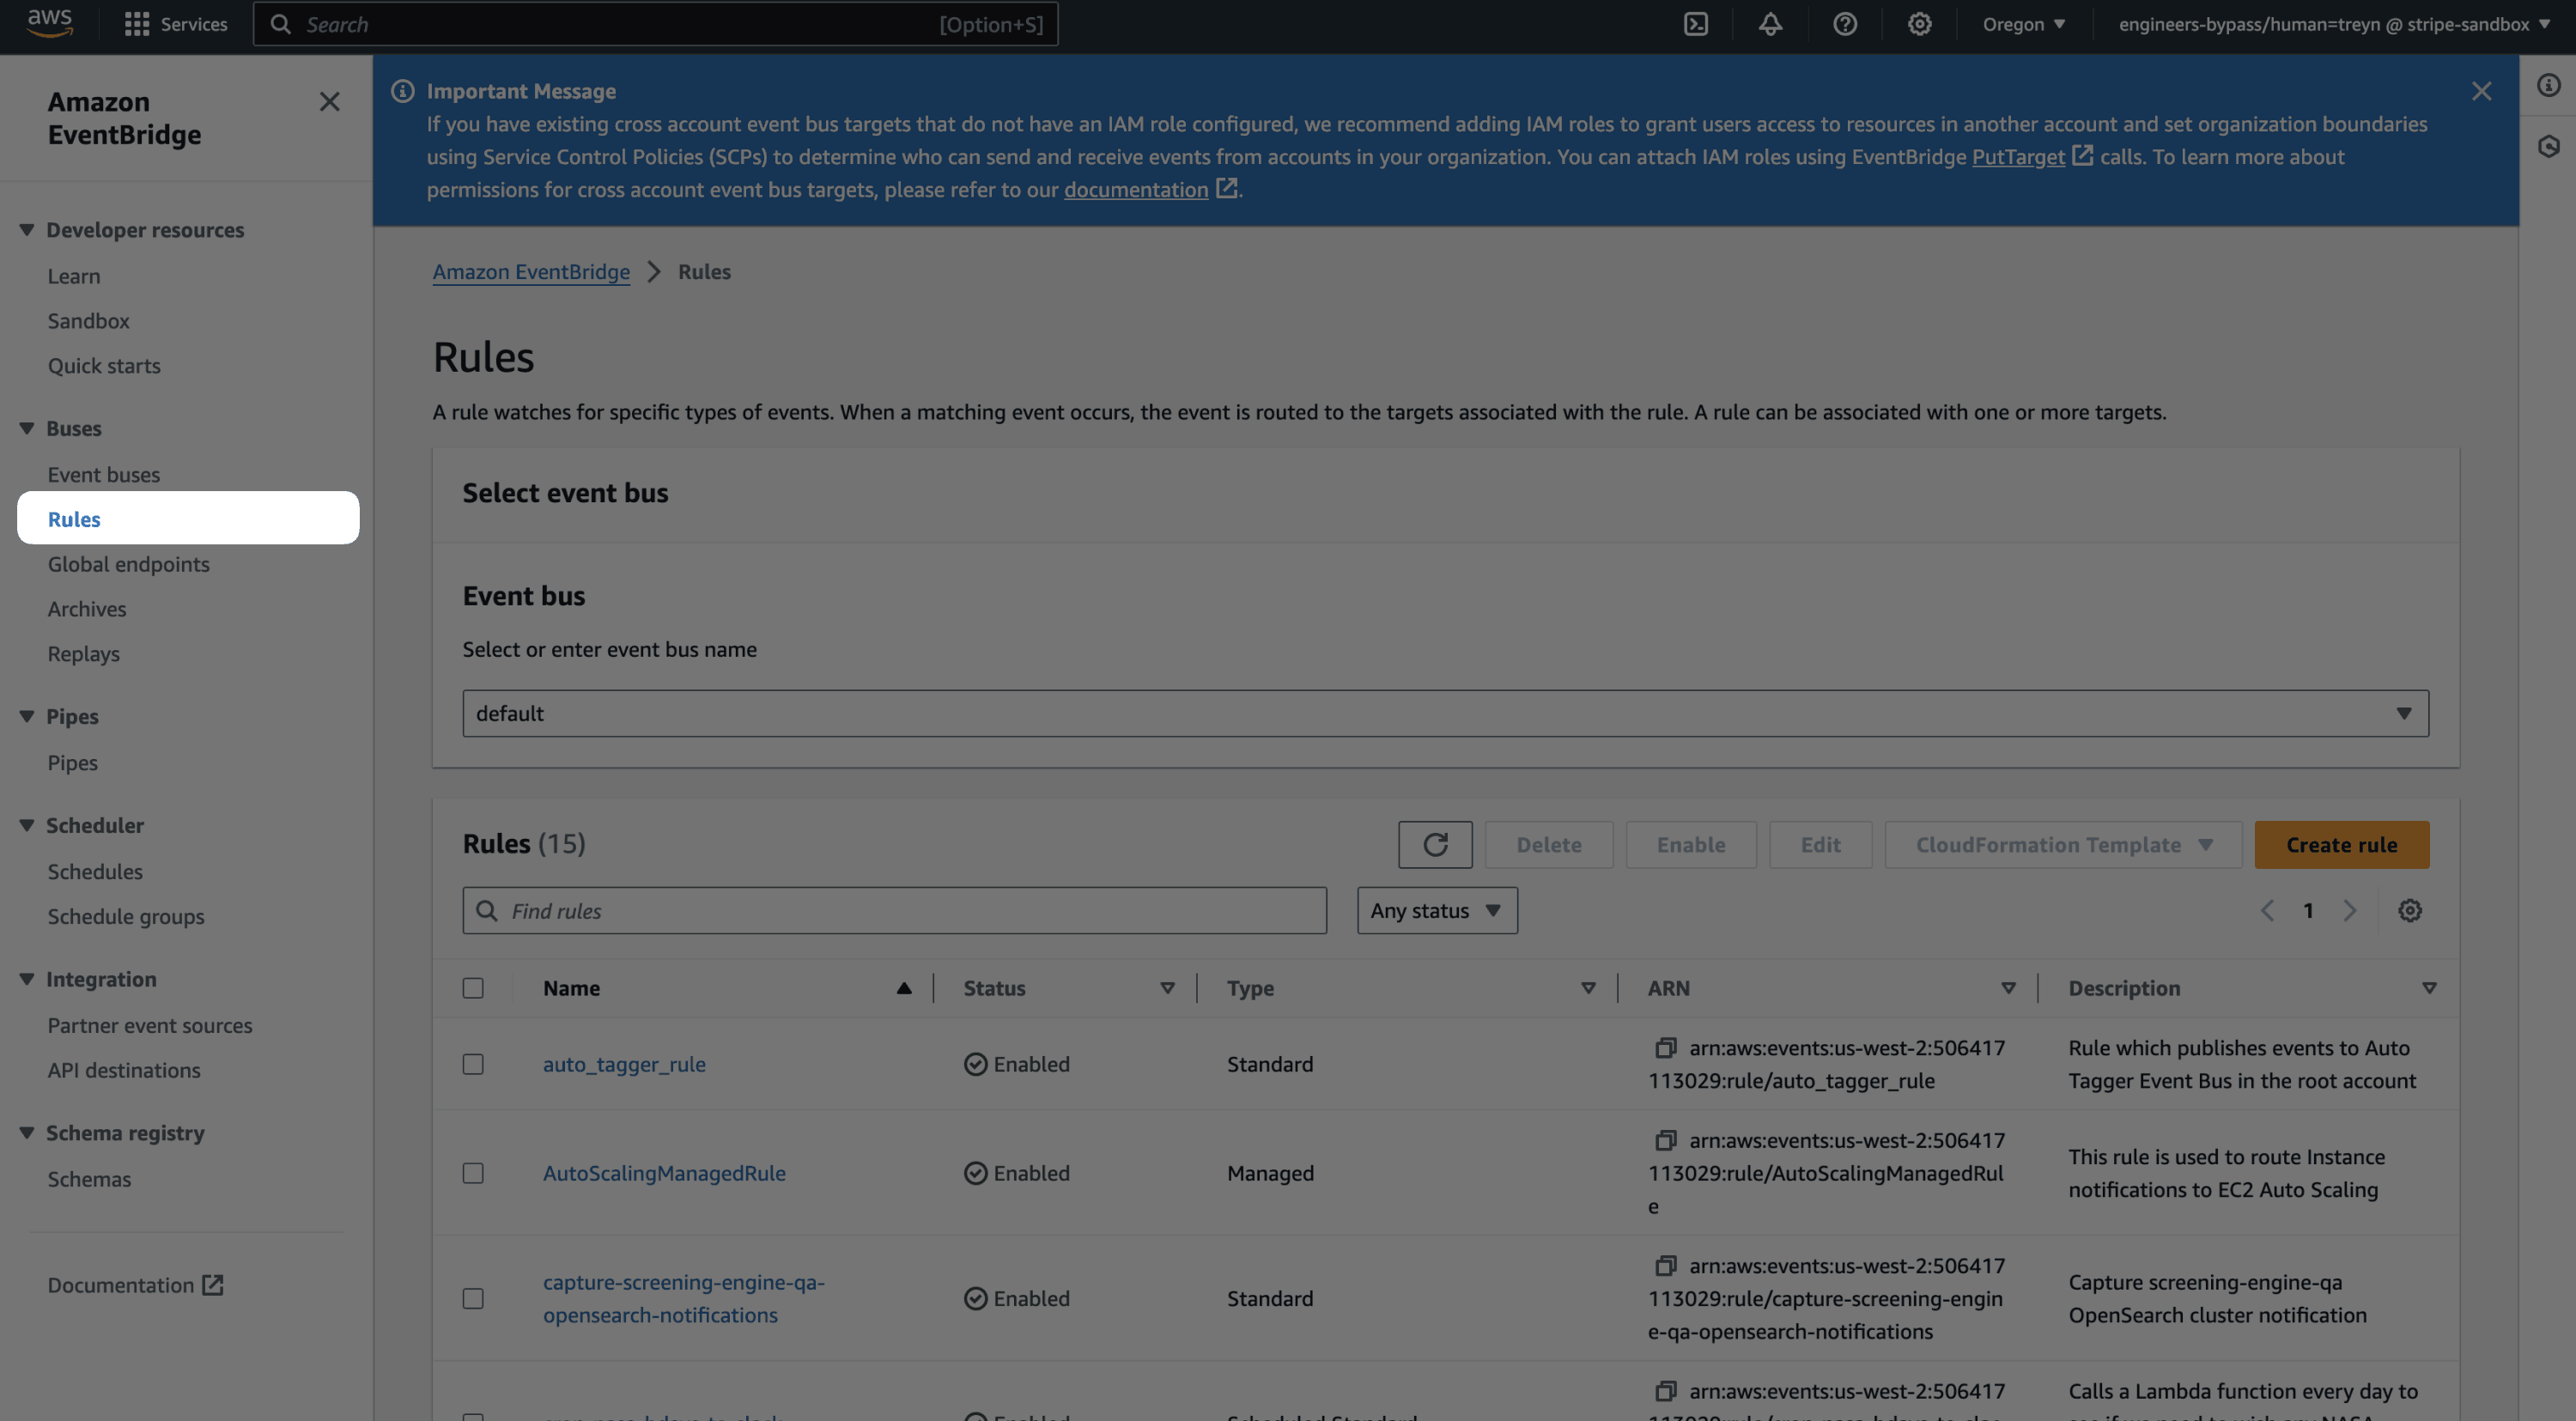
- Klicken Sie auf Regel erstellen und geben Sie einen Namen und eine Beschreibung der Regel an.
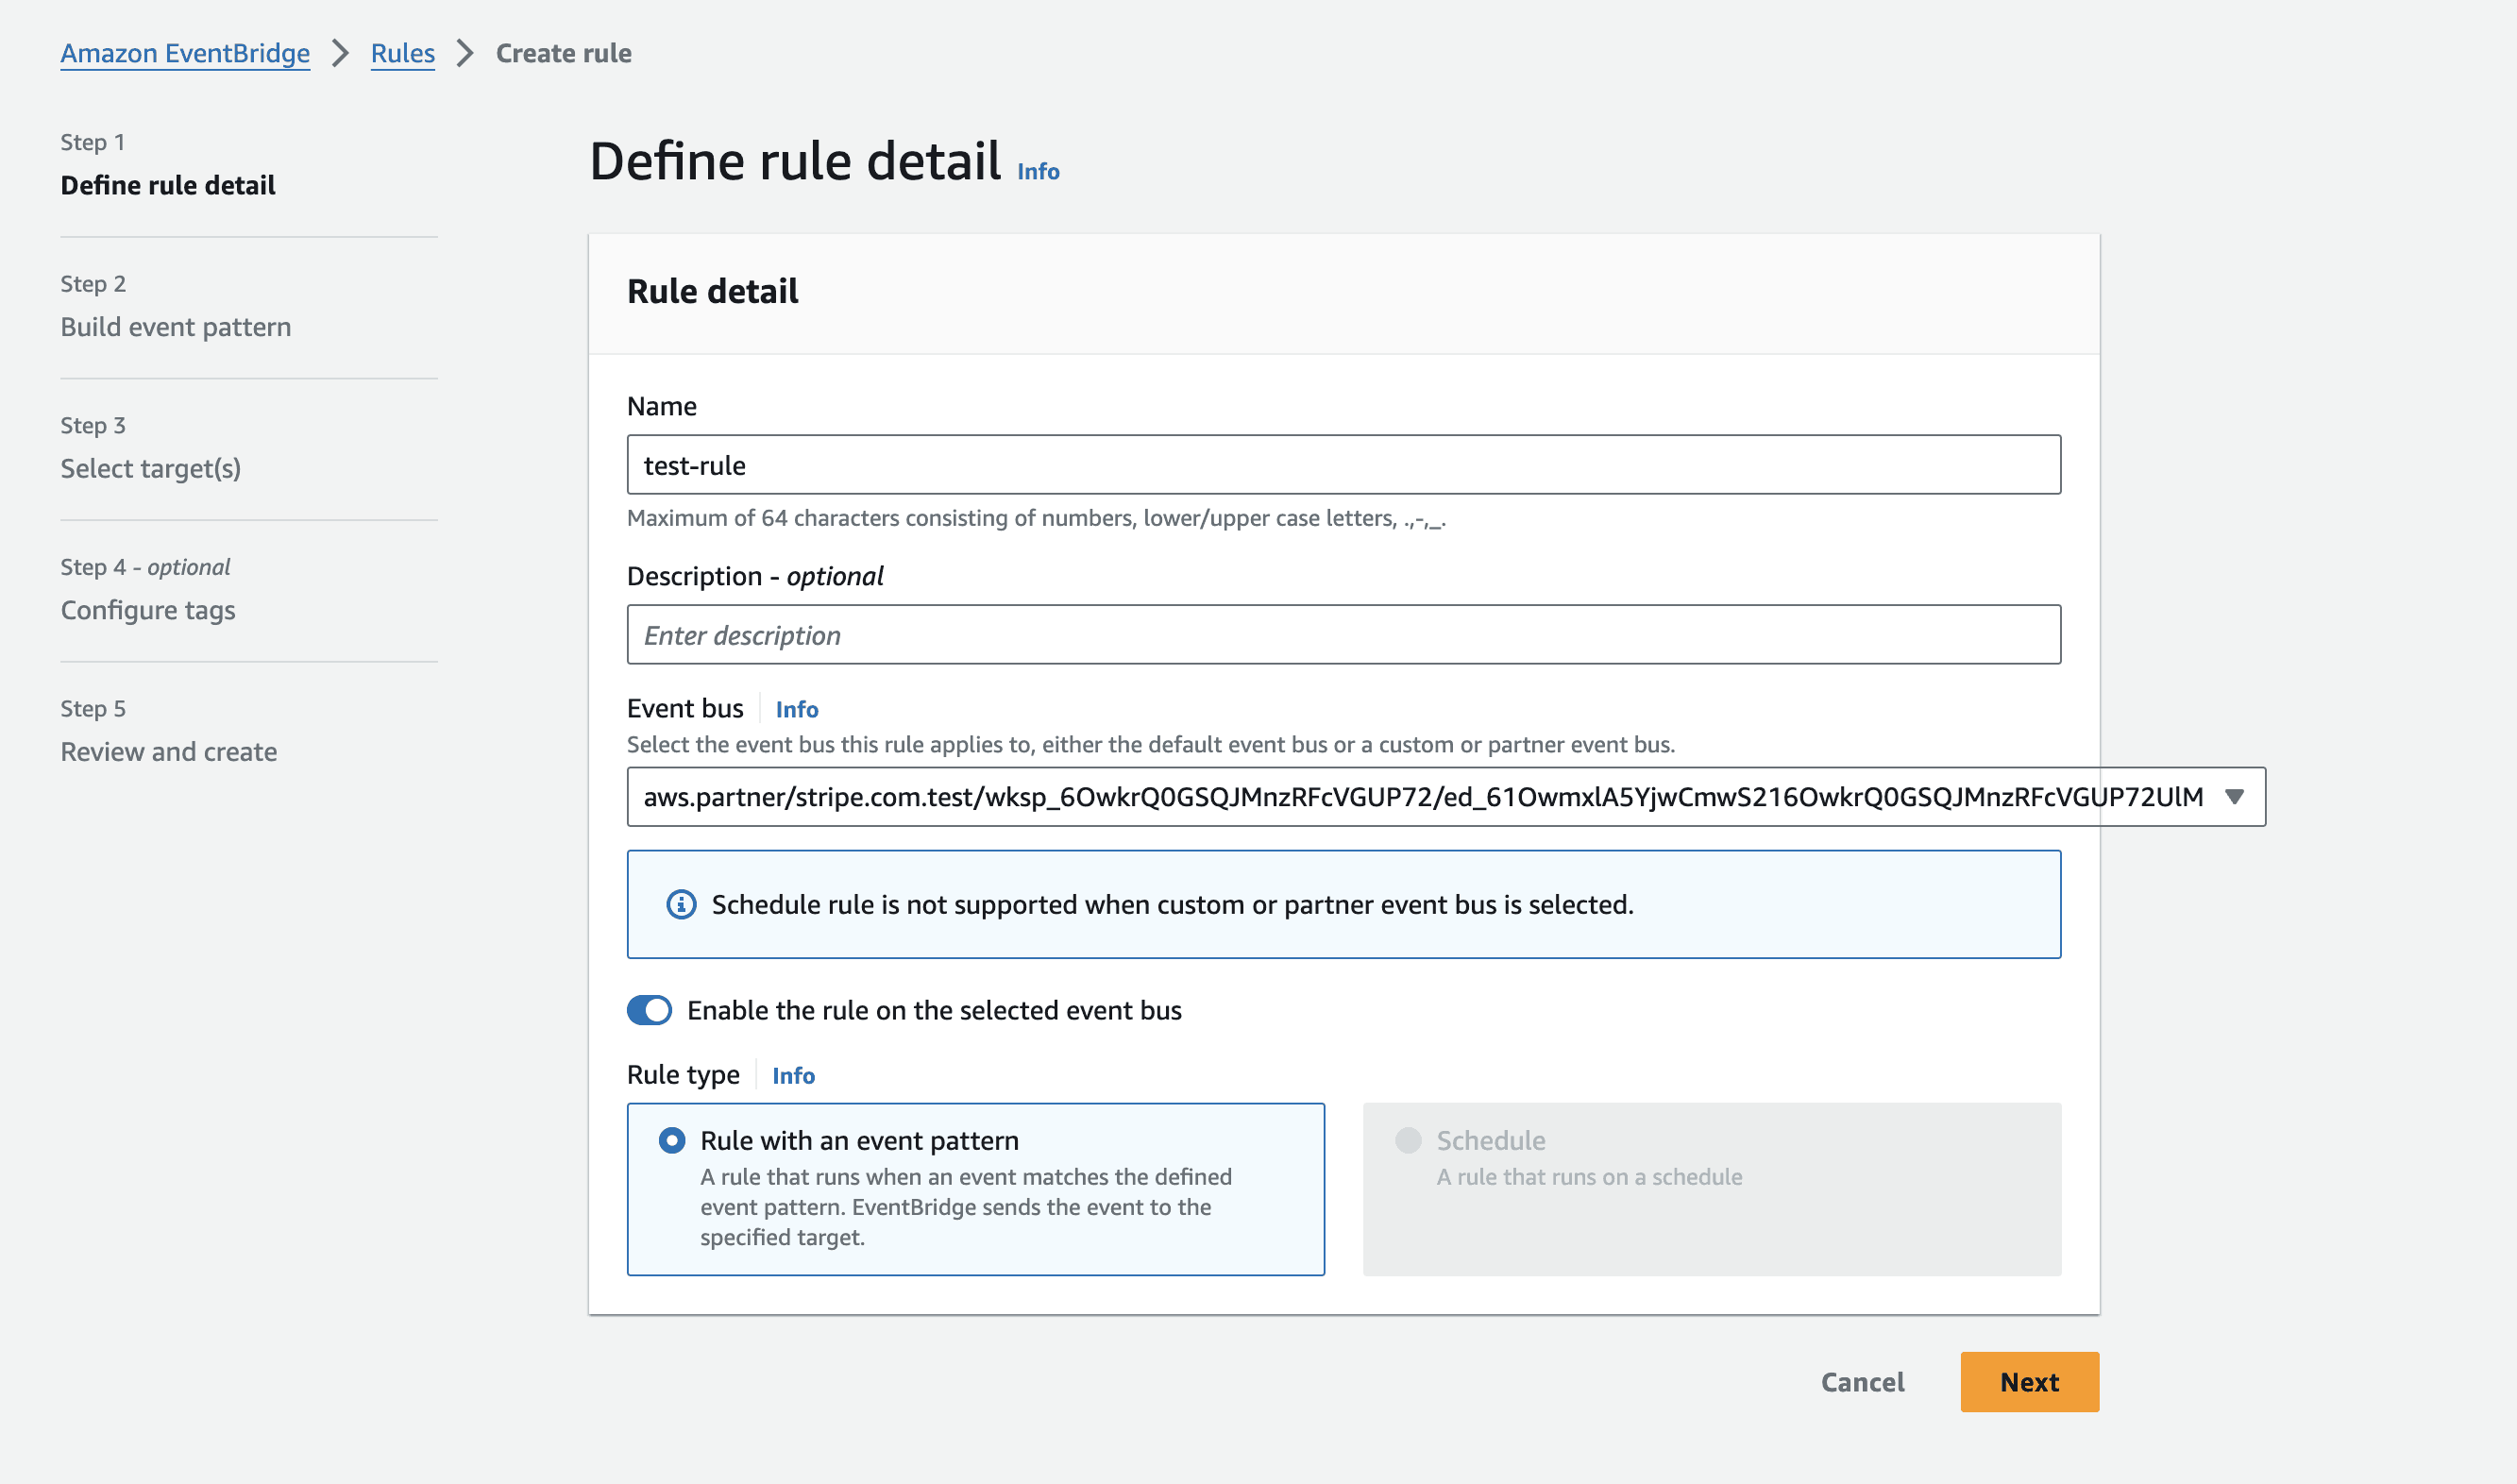
- Wählen Sie Ihren Event Bus aus der Dropdown-Liste. Um Ihren Event Bus zu finden, gehen Sie zu Workbench, wählen Sie auf der Registerkarte Webhooks Ihr Ziel aus und sehen Sie sich dann das Feld Ereignisquelle ARN an, das denselben Namen wie Ihre Ereignisquelle ARN hat. Klicken Sie dann auf Next.
- Wählen Sie unter Ereignisquelle AWS-Ereignisse oder EventBridge-Partnerereignisse aus, da es sich bei Stripe-Ereignissen um Partnerereignisse handelt.
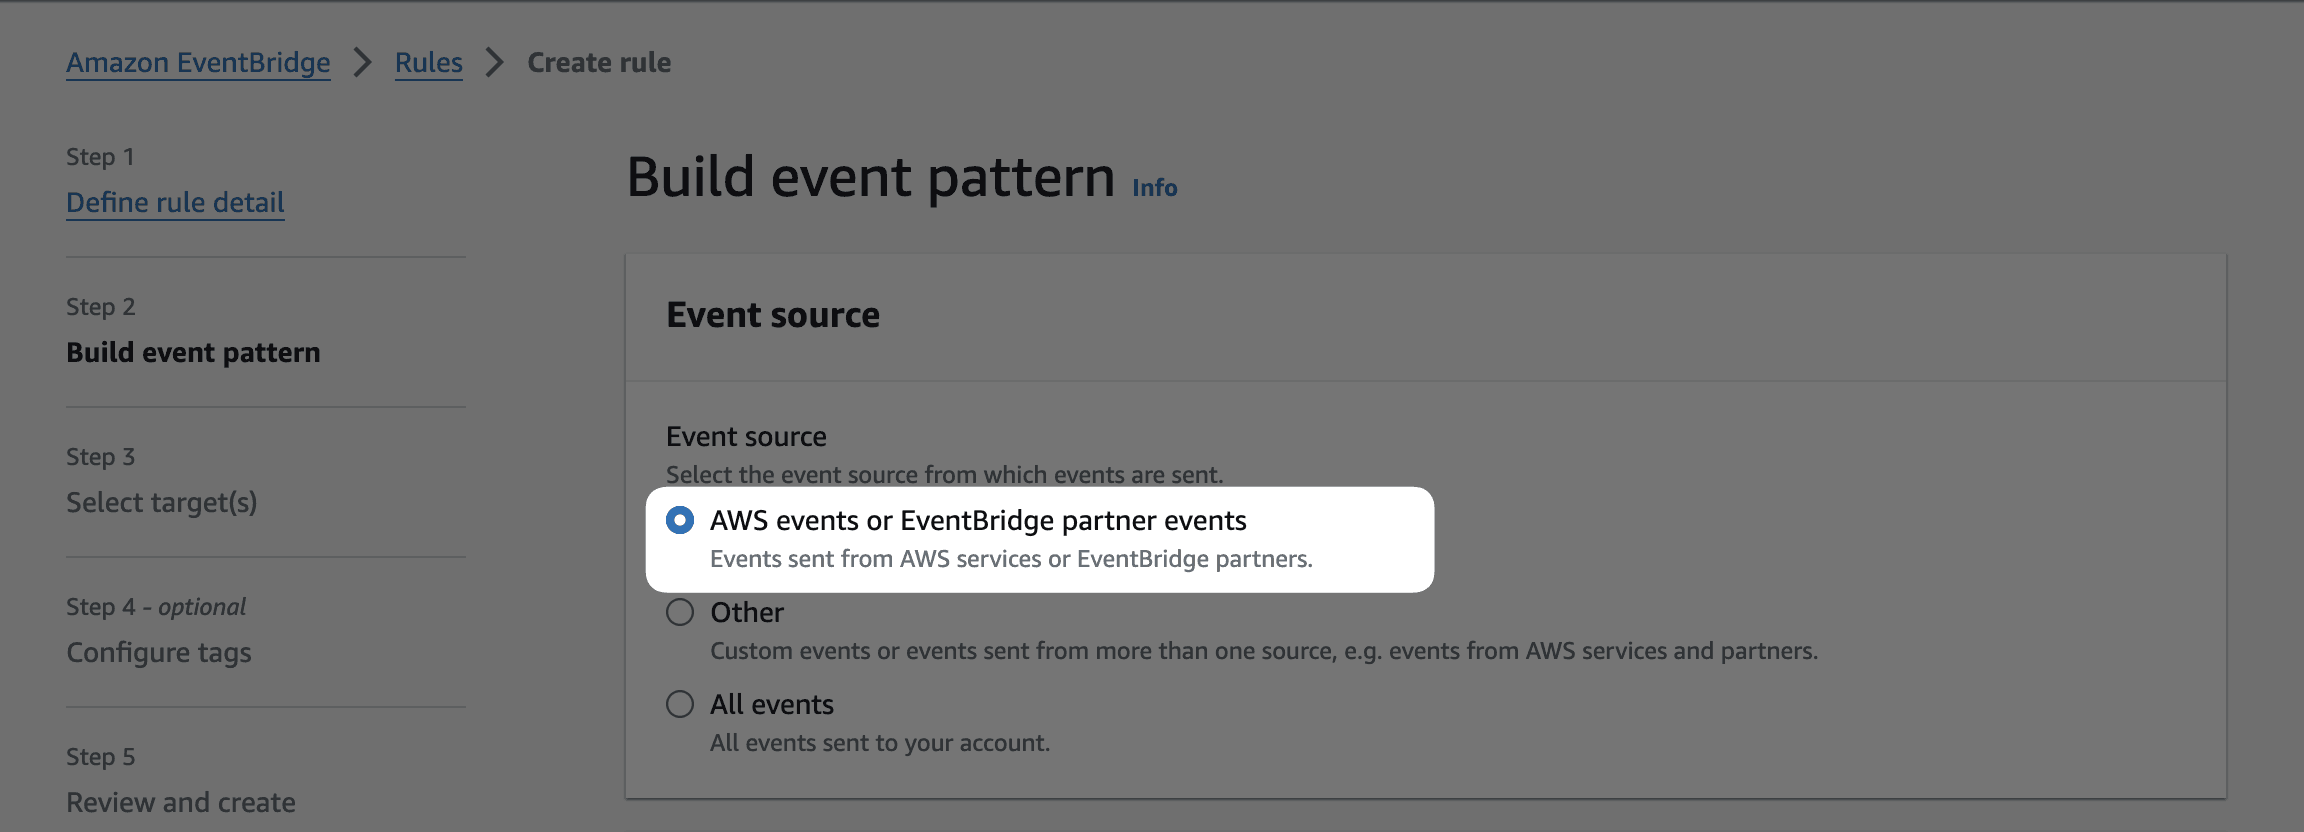
- (Optional) Fügen Sie ein Stripe-Ereignisbeispiel hinzu.
- Wählen Sie unter Erstellungsmethode die Option Musterformular verwenden aus, um ein vordefiniertes Muster zu verwenden. Alternativ können Sie ein benutzerdefiniertes Ereignismuster erstellen.
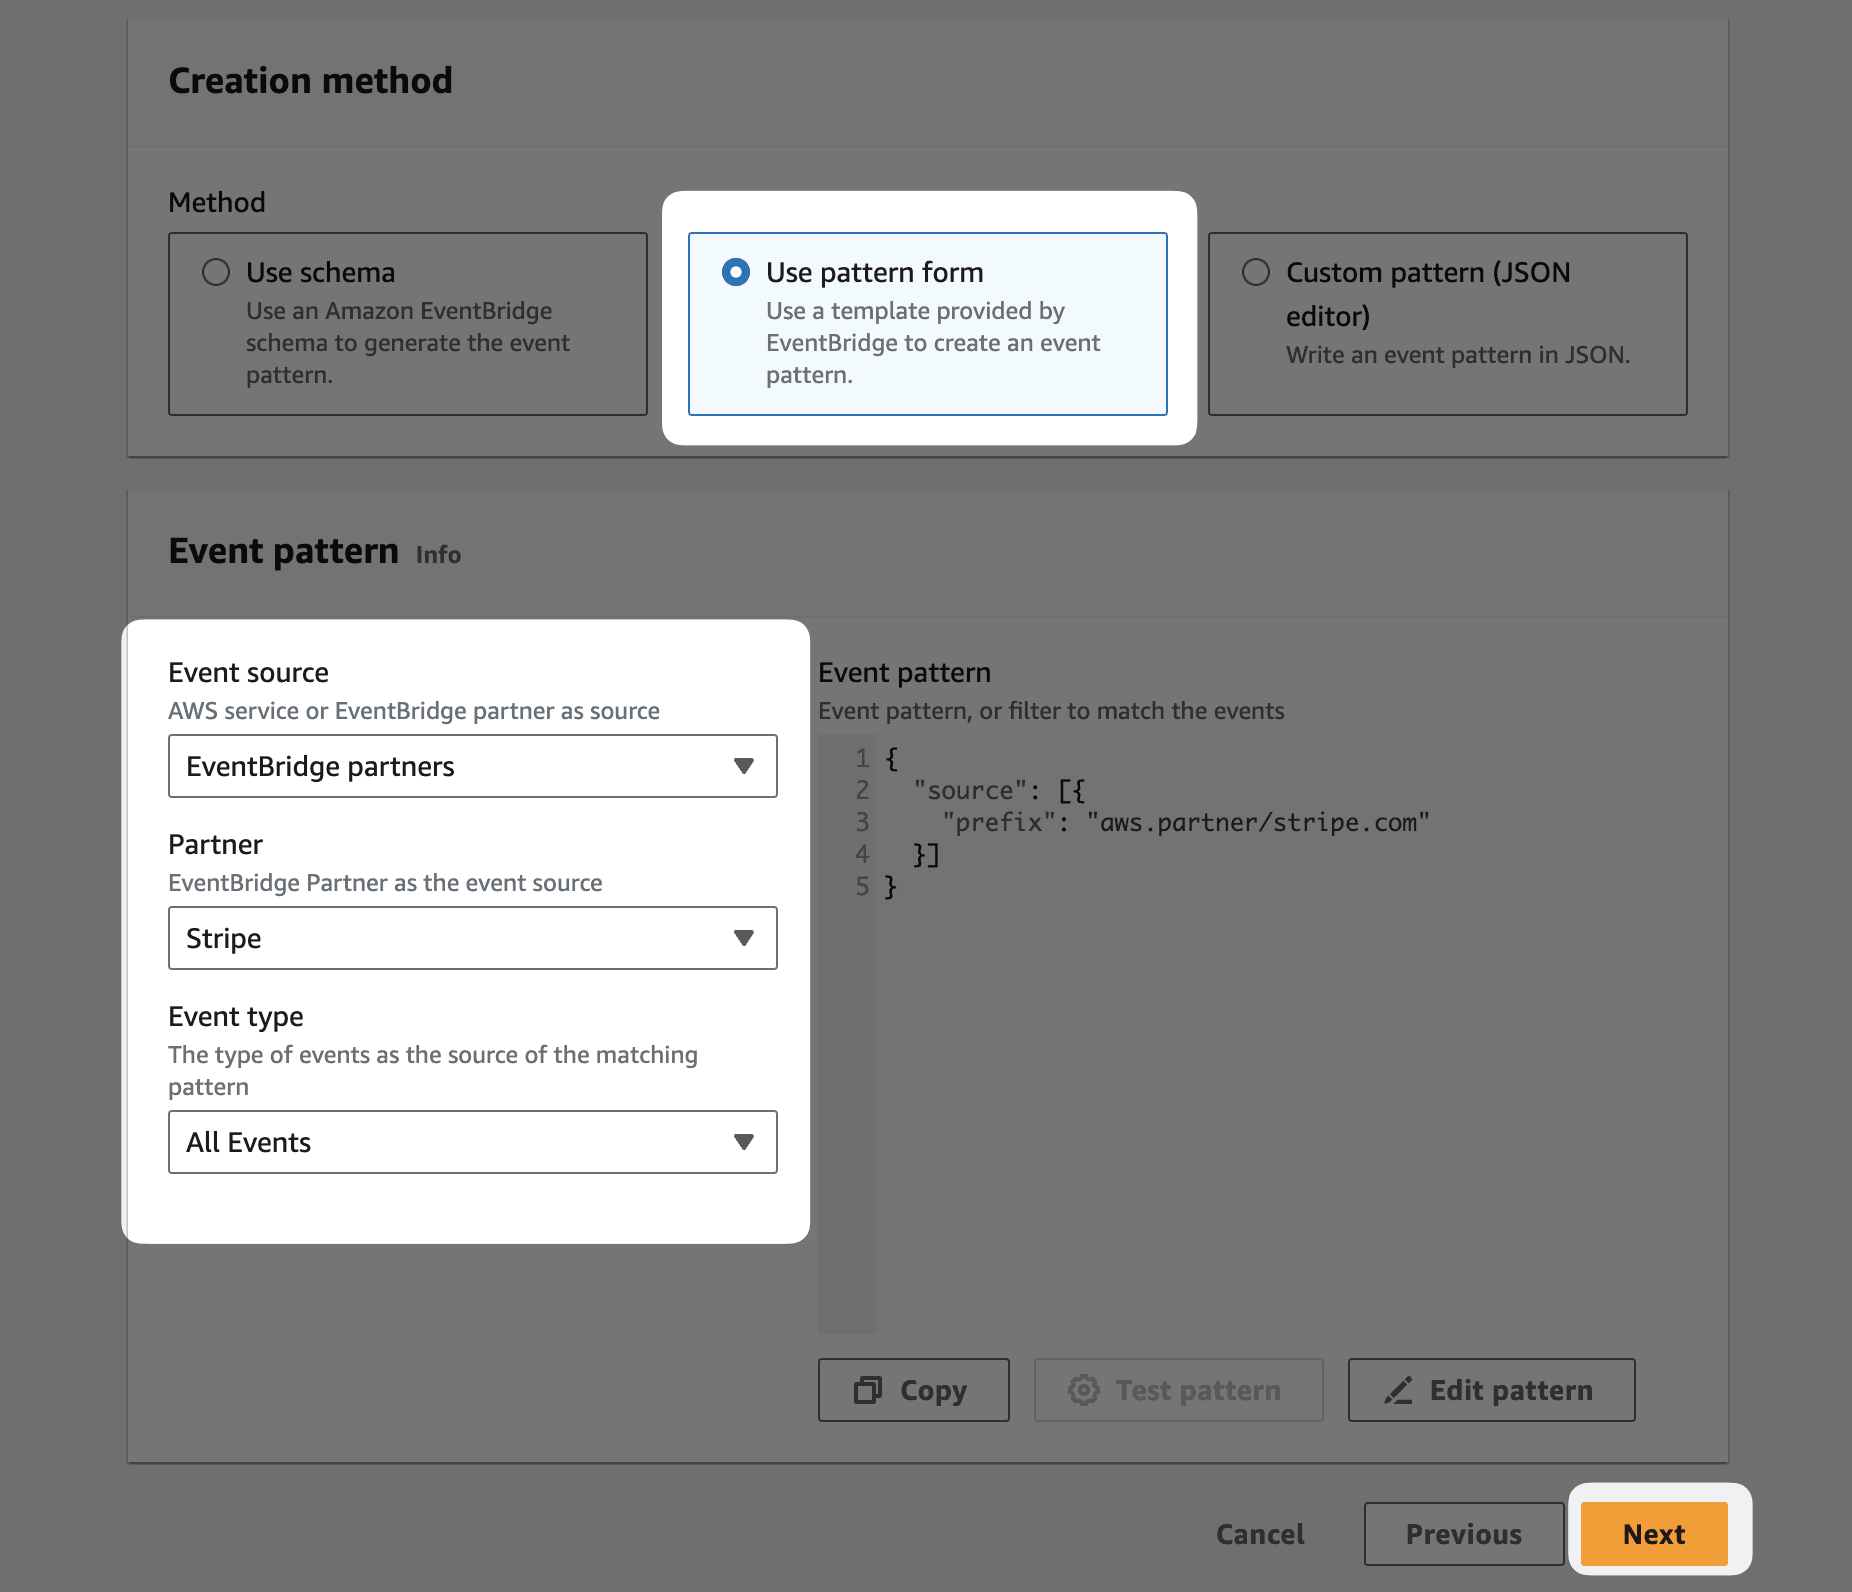
- Wählen Sie unter Ereignismuster die Option EventBridge-Partner als Ereignisquelle aus.
- Wählen Sie unter Ereignismuster Stripe als Partner aus.
- Wählen Sie den entsprechenden Ereignistyp aus, für den Sie eine Regel erstellen möchten. Sie können auch Alle Ereignisse auswählen, um diese Regel mit allen Ereignistypen abzugleichen. Klicken Sie anschließend auf Weiter.
- Wählen Sie das Ziel aus, an das diese Regel Ereignisse senden soll, und klicken Sie auf Weiter.
Empfehlung
Wir empfehlen Ihnen, für jeden Event Bus ein CloudWatch Logs-Ziel zu erstellen, um die Überwachung für Ihr Ereignisziel zu ermöglichen. Ziehen Sie in Betracht, andere gängige Architekturmuster mit EventBridge- und Stripe-Ereignissen zu verwenden.
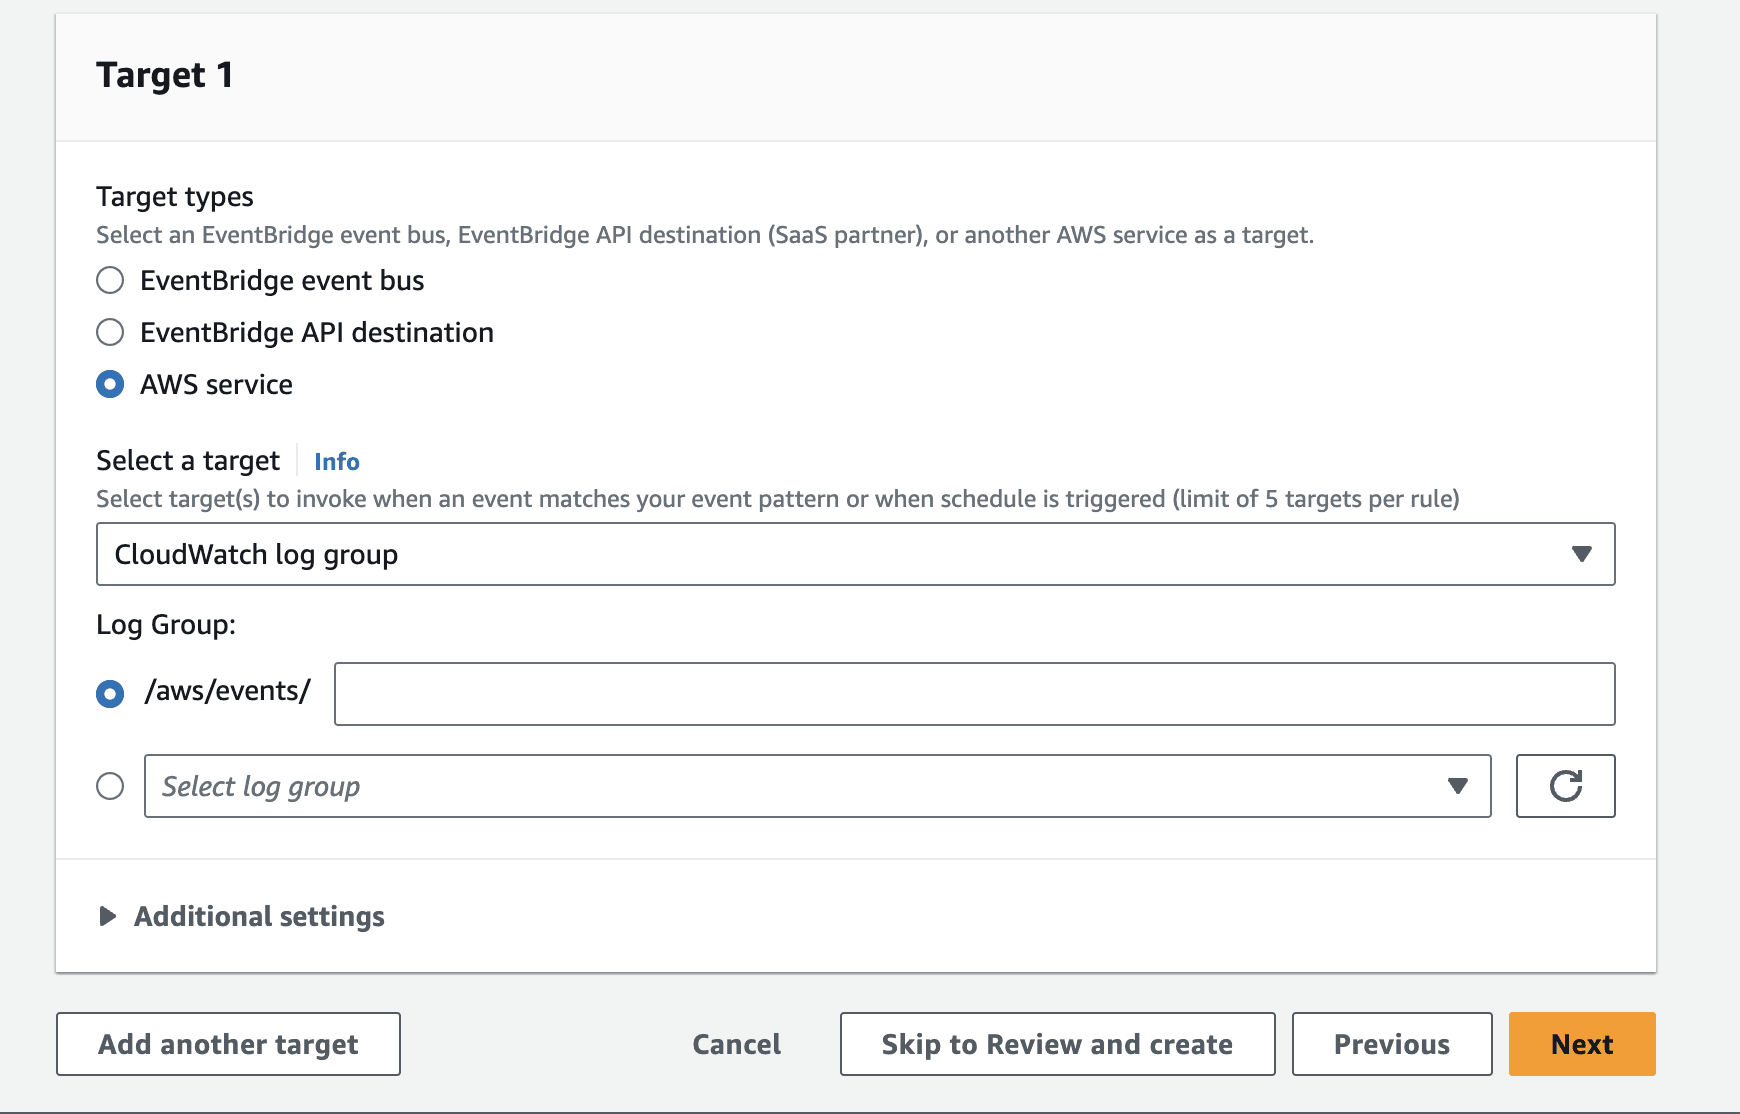
- Fügen Sie optionale Tags hinzu und klicken Sie dann auf Weiter.
- Überprüfen Sie Ihre Regel und nehmen Sie bei Bedarf Änderungen vor. Klicken Sie dann auf Regel erstellen.
Ihre Stripe-Ereignisse werden nun erfolgreich an EventBridge und die entsprechenden in Ihrer Regel definierten Ziele gesendet.
Auslösen von Testereignissen
Um Testereignisse zu senden, lösen Sie einen Ereignistyp aus, den Ihr Ereignisziel abonniert hat, indem Sie manuell ein Objekt im Stripe-Dashboard erstellen. Erfahren Sie, wie Sie Ereignisse mit Stripe für VS-Code auslösen können.
Verhaltensweisen der Ereignisübermittlung
In diesem Abschnitt erfahren Sie, welche Verhaltensweisen Sie in Bezug auf das Senden von Ereignissen durch Stripe an Amazon EventBridge erwarten können.
Automatische Wiederholungsversuche
Stripe versucht, Ereignisse mit einem exponentiellen Backoff im Live-Modus bis zu drei Tage an Ihr Ziel zu senden. Wann der nächste Wiederholungsversuch stattfinden wird, sofern zutreffend, sehen Sie auf der Registerkarte Ereignisübermittlungen Ihres Ereignisziels. Wir versuchen, Ereignisse, die in einer Sandbox erstellt wurde, innerhalb weniger Stunden dreimal zu übermitteln. Wenn Ihr Ziel bei unserem Wiederholungsversuch deaktiviert oder gelöscht wurde, unternehmen wir keine zukünftigen Wiederholungsversuche für dieses Ereignis. Wenn Sie ein Ereignisziel jedoch deaktivieren und wieder reaktivieren, bevor wir einen erneuten Versuch starten können, sehen Sie nach wie vor zukünftige Wiederholungsversuche.
Manuelle Wiederholungsversuche
Sie können Ereignisse nicht manuell erneut an Amazon EventBridge senden.
Anordnung von Ereignissen
Stripe garantiert die Übermittlung von Ereignissen nicht in der Reihenfolge, in der sie generiert wurden. Beim Erstellen eines Abonnements können beispielsweise die folgenden Ereignisse generiert werden:
customer.subscription. created invoice.created invoice.paid charge.(wenn eine Zahlung vorhanden ist)created
Stellen Sie sicher, dass Ihr Ereignisziel Ereignisse nicht nur in einer bestimmten Reihenfolge empfangen kann. Ihr Ziel sollte jegliche Übermittlung entsprechend verarbeiten können. Sie können fehlende Objekte auch mit der API abrufen. So können Sie beispielsweise die Objekte für Rechnung, Zahlung und Abonnement mit den Informationen aus invoice. abrufen, wenn Sie dieses Ereignis zuerst erhalten.
API-Versionierung
Die API-Version in Ihren Kontoeinstellungen beim Auftreten des Ereignisses bestimmt die API-Version und damit die Struktur eines Ereignisses, das an Ihr Ziel gesendet wird. Wenn für Ihr Konto beispielsweise eine ältere API-Version festgelegt ist, z. B. 16.02.2015, und Sie die API-Version mit Versionierung für eine bestimmte Anfrage ändern, basiert das generierte und an Ihr Ziel gesendete Ereignis-Objekt weiterhin auf der API-Version 2015-02-16. Sie können Ereignis-Objekte nach der Erstellung nicht mehr ändern. Wenn Sie beispielsweise eine Zahlung aktualisieren, bleibt das ursprüngliche Zahlungsereignis unverändert. Nachfolgende Aktualisierungen der API-Version Ihres Kontos ändern daher vorhandene Ereignis-Objekte nicht rückwirkend. Auch das Abrufen eines älteren Ereignisses durch Aufrufen von /v1/events mithilfe einer neueren API-Version wirkt sich nicht auf die Struktur des empfangenen Ereignisses aus. Sie können Testereignisziele entweder auf Ihre Standard-API-Version oder die neueste API-Version festlegen. Das an das Ziel gesendete Ereignis ist für die angegebene Version des Ereignisziels strukturiert.
Status des Ereignisziels
Amazon EventBridge-Ziele haben mehrere Status, die seine Bereitschaft zum Empfangen von Ereignissen beschreiben:
- Aktiv: Stripe sendet Ereignisse an Amazon EventBridge, wenn Sie die Partnerereignisquelle in AWS verknüpft haben.
- Deaktiviert: Stripe sendet keine Ereignisse an Amazon EventBridge. Ihr Ziel befindet sich entweder in diesem Status, weil Sie es manuell deaktiviert haben oder weil Stripe es aufgrund einer AWS-Fehlkonfiguration automatisch deaktiviert hat.
Ereignisstruktur
EventBridge verwendet eine eigene Ereignisstruktur, die das JSON-Ereignis des Stripe-event in einem detail-Feld auf oberster Ebene umschließt.
Dieses Beispiel ist eine customer. erstellte Ereignisnutzlast von EventBridge:
{
   "version":"0",
   "id":"17e8dff5-d6cd-3770-ace9-aeac02b6ac3f",
   "detail-type":"customer.created",
   "source":"aws.partner/stripe.com/ed_61PgtRTG5aTCIz98516PLsRGLISQK0Otk6FWKjBrcDia",
   "account":"506417113029",
   "time":"2024-03-07T18:27:56Z",
   "region":"us-west-2",
   "resources":[
Unterstützung von Ereignistypen, bei denen Stripe auf eine Antwort wartet
Stripe sendet die meisten Ereignistypen asynchron. Für bestimmte Ereignistypen wartet Stripe jedoch auf eine Antwort. Das Vorhandensein oder Nichtvorhandensein einer Antwort vom Ereignisziel wirkt sich direkt darauf aus, wie Stripe mit diesen bestimmten Ereignistypen umgeht.
Amazon EventBridge-Ziele bieten eingeschränkten Support für Ereignistypen, für die eine Antwort erforderlich ist:
- Sie können den Ereignistyp
issuing_in Amazon EventBridge-Zielen nicht abonnieren. Richten Sie stattdessen einen Webhook-Endpoint ein, um diesen Ereignistyp zu abonnieren. Verwenden Sieauthorization. request issuing_, um Kaufanfragen in Echtzeit zu autorisieren. Dies erfordert, dass Ihr Ziel Anfragen genehmigt oder ablehnt, indem es auf das Ereignis antwortet. EventBridge verarbeitet die Antwort an Stripe, bevor es an Ihre Kundinnen/Kunden gesendet wird. Folglich kann dieser Zieltyp diesen Ereignistyp nicht verwenden, um Zahlungen zu autorisieren.authorization. request - Sie können
checkout_abonnieren, wenn Sie Amazon EventBridge verwenden. Dadurch wird jedoch kein Weiterleitungsverhalten verarbeitet, wenn Sie Checkout direkt in Ihre Website einbetten oder Kundinnen/Kunden auf eine von Stripe gehostete Bezahlseite weiterleiten. Die Übermittlung einessessions. completed checkout_-Ereignisses an Amazon EventBridge wirkt sich nicht auf das Weiterleitungsverhalten aus. Um das Verhalten der Checkout-Weiterleitung zu ändern, verarbeiten Sie diesen Ereignistyp mit einem Webhook-Endpoint.sessions. completed
Gängige Architekturmuster mit EventBridge- und Stripe-Ereignissen
Berücksichtigen Sie die folgenden Architekturmuster, wenn Sie Amazon EventBridge mit Stripe verwenden:
- Funktionen ohne Server mit Lambda auslösen, um Unternehmensautomatisierungen zu definieren: Senden Sie Stripe-Ereignisse von EventBridge an Lambda, um Computing-Funktionen ohne Server auszulösen, zum Beispiel das Erstellen eines Versandetiketts nach erfolgreicher Zahlung.
- Ereignisüberwachung mit CloudWatch aktivieren: Senden Sie Ereignisse von EventBridge an CloudWatch Logs, um Ereignisse als Log-Daten zu speichern, die Sie interaktiv durchsuchen und analysieren können. Überwachen Sie Nutzungsmuster und Fehler mit CloudWatch. Erwägen Sie die Einrichtung von Warnmeldungen bei Fehlern (zum Beispiel bei einem Verstoß gegen eine EventBridge-Regel).
- Low- und No-Code-Workflows mit Step Functions auslösen: Senden Sie Ereignisse, die Ihre Geschäftsszenarien auslösen, z. B. Benachrichtigung Ihrer Kundinnen/Kunden darüber, dass ihr Testzeitraum bald endet, an einen StepFunction-Workflow.
- Ereignisse an interne Systeme mit Simple Notification Service (SNS) oder Simple Queue Service (SQS) weiterleiten: Senden Sie Stripe-Ereignisse an SNS oder SQS, um Stripe-Ereignisdaten an Ihre internen Teams weiterzuleiten, um sicherzustellen, dass diese sie besitzen und verarbeiten können.
