# 組み込みオンランプの導入
このガイドを使用して、埋め込み可能なオンランプを全面的にカスタマイズできます。
このガイドは、[組み込みオンランプクイックスタート](https://docs.stripe.com/crypto/onramp/embedded-quickstart.md) の拡張版です。次の方法などの機能の追加方法をご覧ください。
- スクリプトタグまたはパッケージマネージャーを使用して SDK をインストールする
- オンランプのデザインをカスタマイズする
- モバイル Web ビューへのオンランプ UI の設定
- 顧客サポート状況と不正利用に対処する
- 暗号資産換算の推定 Quotes を取得
## Before you begin
1. 埋め込み型オンランプは、EU とアメリカ (ハワイを除く) でのみ使用できます。
2. Onramp API はパブリックプレビューです。テスト環境で開発を開始する前に、[オンランプアプリケーションを送信](https://docs.stripe.com/crypto/onramp.md#submit-your-application)する必要があります。
3. [Onramp API へのアクセスを取得した後](https://dashboard.stripe.com/crypto-onramp/onboarding)、[ダッシュボード](https://dashboard.stripe.com/apikeys)を使用してシークレット API キーと公開可能 [API キー](https://docs.stripe.com/keys.md#obtain-api-keys)を取得します。
## SDK およびクライアントライブラリをインストールする [クライアント側] [サーバー側]
### クライアント側
HTML の `` 要素内にスクリプトタグを使用して次のスクリプトを含めてください。互換性と *PCI 準拠* (Any party involved in processing, transmitting, or storing credit card data must comply with the rules specified in the Payment Card Industry (PCI) Data Security Standards. PCI compliance is a shared responsibility and applies to both Stripe and your business)のために、これらのスクリプトは常に Stripe のドメイン (https://js.stripe.com および https://crypto-js.stripe.com) から直接読み込む必要があります。
スクリプトをバンドルに含めたり、コピーを自身でホストしたりしないでください。導入が警告なしに中断される可能性があります。
```html
Onramp
```
### JS SDK
npm パッケージを使用して、オンランプ JS SDK を ES モジュールとして読み込みます。パッケージには、TypeScript の型定義が含まれています。
```
npm install --save @stripe/stripe-js @stripe/crypto
```
### 代替 SDK のインストール
または、スクリプトタグまたはパッケージマネージャーを使用して、[Stripe 暗号資産 ES モジュール](https://www.npmjs.com/@stripe/crypto)のクライアント側 SDK をインストールできます。SDK は、Stripe 暗号資産スクリプトが提供するグローバル `StripeOnramp` 関数を ES モジュールとしてラップします。
1. スクリプトを手動で読み込みます。HTML の `` 要素内で、以下のスクリプトを script タグを使って読み込む必要があります。これらのスクリプトは常に Stripe のドメイン *https://js.stripe.com* から_ https://crypto-js.stripe.com_,直接読み込む必要があり、互換性および *PCI compliance* (Any party involved in processing, transmitting, or storing credit card data must comply with the rules specified in the Payment Card Industry (PCI) Data Security Standards. PCI compliance is a shared responsibility and applies to both Stripe and your business) のために必要です。スクリプトをバンドルに含めたり、自分でホストしたコピーを使ったりしないでください。その場合、統合が予告なく動作しなくなる可能性があります。
```html
Onramp
```
2. [API 公開可能キー](https://dashboard.stripe.com/test/apikeys)を設定し、バックエンドで作成した `OnrampSession` オブジェクトを Stripe が取得できるようにします。以下に例を示します。
```javascript
const stripeOnramp = StripeOnramp('<>');
```
3. パッケージマネージャーを使用してモジュールをインストールするには、まず [npm 公開レジストリ](https://www.npmjs.com/)から [Stripe.js ES モジュール](https://github.com/stripe/stripe-js)と [Stripe 暗号資産 ES モジュール](https://www.npmjs.com/package/@stripe/crypto)をインストールします。パッケージには TypeScript 型定義が含まれています。
```bash
npm install @stripe/stripe-js @stripe/crypto
```
4. モジュールをインポートし、[API 公開可能キー](https://dashboard.stripe.com/test/apikeys)を設定して、バックエンドで作成した `OnrampSession` オブジェクトを Stripe が取得できるようにします。この関数は、スクリプトの読み込み後に新しく作成された `StripeOnramp` オブジェクトによって解決される `Promise` オブジェクトを返します。
```javascript
import {loadStripeOnramp} from '@stripe/crypto';
const stripeOnramp = await loadStripeOnramp('<>');
```
### サーバー側
オンランプ API は公開プレビューであるため、公式ライブラリには API エンドポイントのサポートが含まれていません。このため、サンプルではバックエンドとのやり取りに curl を使用しています。
## 暗号資産オンランプセッションを作成する [サーバー側]
サーバーで、新しい API エンドポイント (たとえば、`myserver.com/mint-onramp-session`) を公開します。このエンドポイントは、Stripe `POST /v1/crypto/onramp_sessions` エンドポイントへのコールを行います。これにより、新規顧客やリピート顧客で使用できるオンランプセッションが Stripe で発行されます。顧客ごとにセッションを 1 つ発行する必要があります。
端末で次の curl コマンドを実行して、[暗号資産オンランプセッションを作成](https://docs.stripe.com/api/crypto/onramp_sessions/create.md)します。
```bash
curl -X POST https://api.stripe.com/v1/crypto/onramp_sessions \
-u <>: \
-d "wallet_addresses[ethereum]"="0xB00F0759DbeeF5E543Cc3E3B07A6442F5f3928a2"
# add as many parameters as you'd like
```
次のようなレスポンスを受信します。
```json
{
"id": "cos_0MYfrA589O8KAxCGEDdIVYy3",
"object": "crypto.onramp_session",
"client_secret": "cos_0MYfrA589O8KAxCGEDdIVYy3_secret_rnpnWaxQbYQOvp6nVMvEeczx300NRU4hErZ",
"created": 1675732824,
"livemode": false,
"status": "initialized",
"transaction_details": {
"destination_currency": null,
"destination_amount": null,
"destination_network": null,
"fees": null,
"lock_wallet_address": false,
"source_currency": null,
"source_amount": null,
"destination_currencies": [
"btc",
"eth",
"sol",
"usdc"
],
"destination_networks": [
"bitcoin",
"ethereum",
"solana"
],
"transaction_id": null,
"wallet_address": null,
"wallet_addresses": {
"bitcoin": null,
"ethereum": "0xB00F0759DbeeF5E543Cc3E3B07A6442F5f3928a2",
"polygon": null,
"solana": null
}
}
}
```
### エラー
このエンドポイントは、Stripe がオンランプセッションを作成できない場合にエラーコードを返します。この状況が発生する理由については、[顧客サポート状況と不正利用の処理](https://docs.stripe.com/crypto/onramp/embedded.md#support-and-fraud)をご覧ください。セッションの作成時に顧客が HTTP ステータス `200` を受け取った場合にオンランプコンポーネントをレンダリングし、セッション作成エラーを処理できるフォールバック UI を用意することをお勧めします。
セッションの作成時に渡すことができるパラメーターの一覧は、[Onramp API](https://docs.stripe.com/api/crypto/onramp_sessions/create.md) を参照してください。
### 州
各オンランプセッションは、次の状態を経て進行します。
- `initialized`: アプリケーションがサーバー側でオンランプセッションを新規に発行しましたが、顧客はまだ使用していません。顧客がアカウント登録を行って決済の準備ができるまで、セッションはこの状態になります。
- `rejected`: いずれかの理由により (KYC の失敗、制裁遵守のためのスクリーニングの問題、不正利用チェック)、Stripe が顧客を拒否しました。
- `requires_payment`: 顧客はユーザ登録またはサインインを完了し、決済ページに進みます。決済を試行して失敗した場合は、このステータスのままになります。
- `fulfillment_processing`: 顧客が正常に決済を完了しました。顧客が購入した暗号資産はまだ送信されていません。
- `fulfillment_complete`: 顧客が暗号資産に対する決済を正常に行い、Stripe は暗号資産の送信を確認しました。
## Optional: オンランプのデザインをカスタマイズする
オンランプのデザインをカスタマイズできます。
### ブランディングを更新
[ブランディング設定](https://docs.stripe.com/payments/checkout/customization/appearance.md#branding)を使用して、ロゴおよびブランドカラーをアップロードできます。いずれも、プラットフォーム API キーを使用して作成されたオンランプセッションに自動的に適用されます。
### ダークモードを有効にする
ダークモードを有効にするには、セッション作成コールに appearance 構造を含めます。
```js
const onrampSession = stripeOnramp.createSession({
clientSecret: clientSecret,
appearance: {
theme: 'dark'
},
});
```
appearance を指定しなかった場合、オンランプはデフォルトでライトテーマになります。テーマはオンランプのレンダリング後に以下を呼び出すことでも変更できます。
```js
onrampSession.setAppearance({
theme: newTheme
});
```
## Optional: パラメーターの事前入力
オンランプセッションのパラメーターの一部を事前入力できます。
### 取引パラメーターに事前入力する
たとえば、Dapp またはウォレットに顧客の `wallet_addresses` をすでに格納できます。これは、セッションの作成時に実行できます。
```bash
curl -X POST https://api.stripe.com/v1/crypto/onramp_sessions \
-u <>: \
-d "wallet_addresses[ethereum]"="0xB00F0759DbeeF5E543Cc3E3B07A6442F5f3928a2" \
-d "source_currency"="usd" \
-d "destination_currency"="eth" \
-d "destination_network"="ethereum" \
-d "destination_amount"="0.1234"
```
次のような応答を受け取ります。
```json
{
"id": "cos_0MYvnp589O8KAxCGwmWATYfA",
"object": "crypto.onramp_session",
"client_secret": "cos_0MYvnp589O8KAxCGwmWATYfA_secret_LhqXJi2lvbMCYhVHfrHGfUfX6009qtZPtV7",
"created": 1675794121,
"livemode": false,
"status": "initialized",
"transaction_details": {
"destination_currency": "eth",
"destination_amount": "0.123400000000000000",
"destination_network": "ethereum",
"fees": null,
"lock_wallet_address": false,
"source_currency": "usd",
"source_amount": null,
"destination_currencies": [
"btc",
"eth",
"sol",
"usdc",
"xlm"
],
"destination_networks": [
"bitcoin",
"ethereum",
"solana",
"stellar"
],
"transaction_id": null,
"wallet_address": null,
"wallet_addresses": {
"bitcoin": null,
"ethereum": "0xB00F0759DbeeF5E543Cc3E3B07A6442F5f3928a2",
"polygon": null,
"solana": null,
"stellar": null,
"destination_tags": null
}
}
}
```
次のパラメーターに事前入力できます。
- `wallet_addresses`: 暗号資産の送信先とする推奨ウォレットアドレス (ウォレットの関連付け画面でのデフォルトの選択項目)
- `lock_wallet_address`: 推奨ウォレットアドレスをロックするかどうか
- `source_currency`: 取引の法定通貨 (現在は `usd` と `eur` のみ)
- `source_amount`: 暗号資産の購入に使用する法定通貨の金額 (目的金額と相互排他的)
- `destination_network`: このオンランプのデフォルト暗号資産ネットワーク (例: `ethereum`)
- `destination_currency`: このオンランプセッションのデフォルト暗号資産 (例: `eth`)
- `destination_amount`: 購入する暗号資産の金額 (ソースの金額とは相互排他的)
- `destination_currencies`: サポート対象とする暗号資産の配列 (例: `[eth, usdc]`)
- `destination_networks`: 限定先にする暗号資産ネットワークの配列 (例: `[ethereum, polygon]`)。
具体的な要件およびオンランプ UI における顧客への影響について、詳細は [Onramp API リファレンス](https://docs.stripe.com/api/crypto/onramp_sessions.md)をご覧ください。
### 顧客情報を事前入力する
顧客の負担を減らし、コンバージョン率を向上させるために、すでにアプリケーション内で収集した顧客の必要な KYC 情報の一部を事前入力することができます。
フロー全体を通じて、顧客は以下を提供する必要があります。
- メール
- お名前 (名)
- 姓
- 生年月日
- SSN
- 自宅住所 (国、住所 (1 行目)、住所 (2 行目)、市区町村、都道府県/州、郵便番号)
Onramp API は、SSN 以外のすべてのフィールドに事前入力できる機能を提供します。この情報を事前入力するには、OnrampSession creation API で `customer_information` パラメーターを使用して指定します。
リクエスト例:
```bash
curl -X POST https://api.stripe.com/v1/crypto/onramp_sessions \
-u <>: \
-d "customer_information[email]"="john@doe.com" \
-d "customer_information[first_name]"="John" \
-d "customer_information[last_name]"="Doe" \
-d "customer_information[dob][year]"=1990 \
-d "customer_information[dob][month]"=7 \
-d "customer_information[dob][day]"=4 \
-d "customer_information[address][country]"="US" \
-d "customer_information[address][line1]"="354 Oyster Point Blvd" \
-d "customer_information[address][line2]"="Apt 1A" \
-d "customer_information[address][city]"="South San Francisco" \
-d "customer_information[address][state]"="CA" \
-d "customer_information[address][postal_code]"="94080"
```
レスポンス例を以下に示します。
```json
{
"id": "cos_1MbuUeAEFtmWU4EVBFZS0gce",
"object": "crypto.onramp_session",
"client_secret": "cos_1MbuUeAEFtmWU4EVBFZS0gce_secret_zPsPPytwNU6mMKh1Bmz7ymXGi00ILwwyGeG",
"created": 1676504072,
"livemode": false,
"status": "initialized",
"transaction_details": {
"destination_currency": null,
"destination_amount": null,
"destination_network": null,
"fees": null,
"lock_wallet_address": false,
"source_currency": null,
"source_amount": null,
"destination_currencies": [
"btc",
"eth",
"sol",
"usdc",
"xlm"
],
"destination_networks": [
"bitcoin",
"ethereum",
"solana",
"polygon",
"stellar"
],
"transaction_id": null,
"wallet_address": null,
"wallet_addresses": null
}
}
```
次のパラメーターに事前入力できます。
- `customer_information.email`: 顧客のメールアドレスを表す自由形式の文字列
- `customer_information.first_name` — 顧客の名を表す自由形式の文字
- `customer_information.last_name`: 顧客の姓を表す自由形式の文字列
- `customer_information.dob.year`: 顧客の生年月日の年を表す整数
- `customer_information.dob.month`: 顧客の誕生月を表す整数
- ``customer_information.dob.day`: 顧客の生年月日を表す整数
- `customer_information.address.country`: 顧客の居住国の国コードを表す 2 文字の文字列
- `customer_information.address.line1`: 顧客の住所 (1 行目) を表す自由形式の文字列
- `customer_information.address.line2`: 顧客の住所 (2 行目) を表す自由形式の文字列
- `customer_information.address.city`: 顧客の市区町村を表す自由形式の文字列
- `customer_information.address.state`: アメリカの州の 2 文字の州コード (完全な州名も使用できます) を表す文字列 (例: “CA” または “California”)
- `customer_information.address.postal_code`: 顧客の郵便番号を表す自由形式の文字列
すべてのフィールドはオプションで、事前入力の対象としてその一部を指定できます。ただし、生年月日を指定する場合は、`year`、`month`、`day` のすべてを指定する必要があります。
## オンランプ UI をレンダリングする [クライアント側]
#### JavaScript
StripeJS と OnrampJS の両方のバンドルをインポートします。
```html
Crypto Onramp
```
前のステップのサーバー側の呼び出しから *client\_secret* (A client secret is used with your publishable key to authenticate a request for a single object. Each client secret is unique to the object it's associated with) を使用し、オンランプセッションの開始とマウントを行います。
```javascript
const stripeOnramp = StripeOnramp("<>");
initialize();
// Initialize the onramp element with a client secret
function initialize() {
// IMPORTANT: replace the following with your logic of how to mint/retrieve the client secret
const clientSecret = "cos_1Lb6vsAY1pjOSNXVWF3nUtkV_secret_8fuPvTzBaxj3XRh14C6tqvdl600rpW7hG4G";
const onrampSession = stripeOnramp.createSession({clientSecret});
onrampSession
.mount("#onramp-element");
}
```
#### React
React でオンランプを使用するために、2 つのコンポーネント `CryptoElements` と `OnrampElement` を定義します。`CryptoElements` は、初期化された `StripeOnramp` インスタンスの [React Context](https://reactjs.org/docs/context.html) プロバイダーです。`OnrampElement` コンポーネントは、前のステップで示したサーバー側の呼び出しから *client\_secret* (A client secret is used with your publishable key to authenticate a request for a single object. Each client secret is unique to the object it's associated with) を使用して、オンランプ UI をレンダリングします。
```jsx
import {loadStripeOnramp} from '@stripe/crypto';
import {CryptoElements, OnrampElement} from './StripeCryptoElements';
const stripeOnrampPromise = loadStripeOnramp("<>");
export default () => {
// IMPORTANT: replace with your logic of how to mint/retrieve client secret
const clientSecret = "cos_1Lb6vsAY1pjOSNXVWF3nUtkV_secret_8fuPvTzBaxj3XRh14C6tqvdl600rpW7hG4G";
return (
);
}
```
```jsx
import React, { ReactNode } from 'react';
// ReactContext to simplify access of StripeOnramp object
const CryptoElementsContext = React.createContext(null);
export const CryptoElements = ({
stripeOnramp,
children,
}) => {
const [ctx, setContext] = React.useState(() => ({ onramp: null }));
React.useEffect(() => {
let isMounted = true;
Promise.resolve(stripeOnramp).then((onramp) => {
if (onramp && isMounted) {
setContext((ctx) => (ctx.onramp ? ctx : { onramp }));
}
});
return () => {
isMounted = false;
};
}, [stripeOnramp]);
return (
{children}
);
};
// React hook to get StripeOnramp from context
export const useStripeOnramp = () => {
const context = React.useContext(CryptoElementsContext);
return context?.onramp;
};
// React element to render Onramp UI
export const OnrampElement = ({
clientSecret,
appearance,
...props
}) => {
const stripeOnramp = useStripeOnramp();
const onrampElementRef = React.useRef(null);
React.useEffect(() => {
const containerRef = onrampElementRef.current;
if (containerRef) {
containerRef.innerHTML = '';
if (clientSecret && stripeOnramp) {
stripeOnramp
.createSession({
clientSecret,
appearance,
})
.mount(containerRef);
}
}
}, [clientSecret, stripeOnramp]);
return ;
};
```
スクリプトを実行すると、オンランプに以下のダイアログが表示されます。
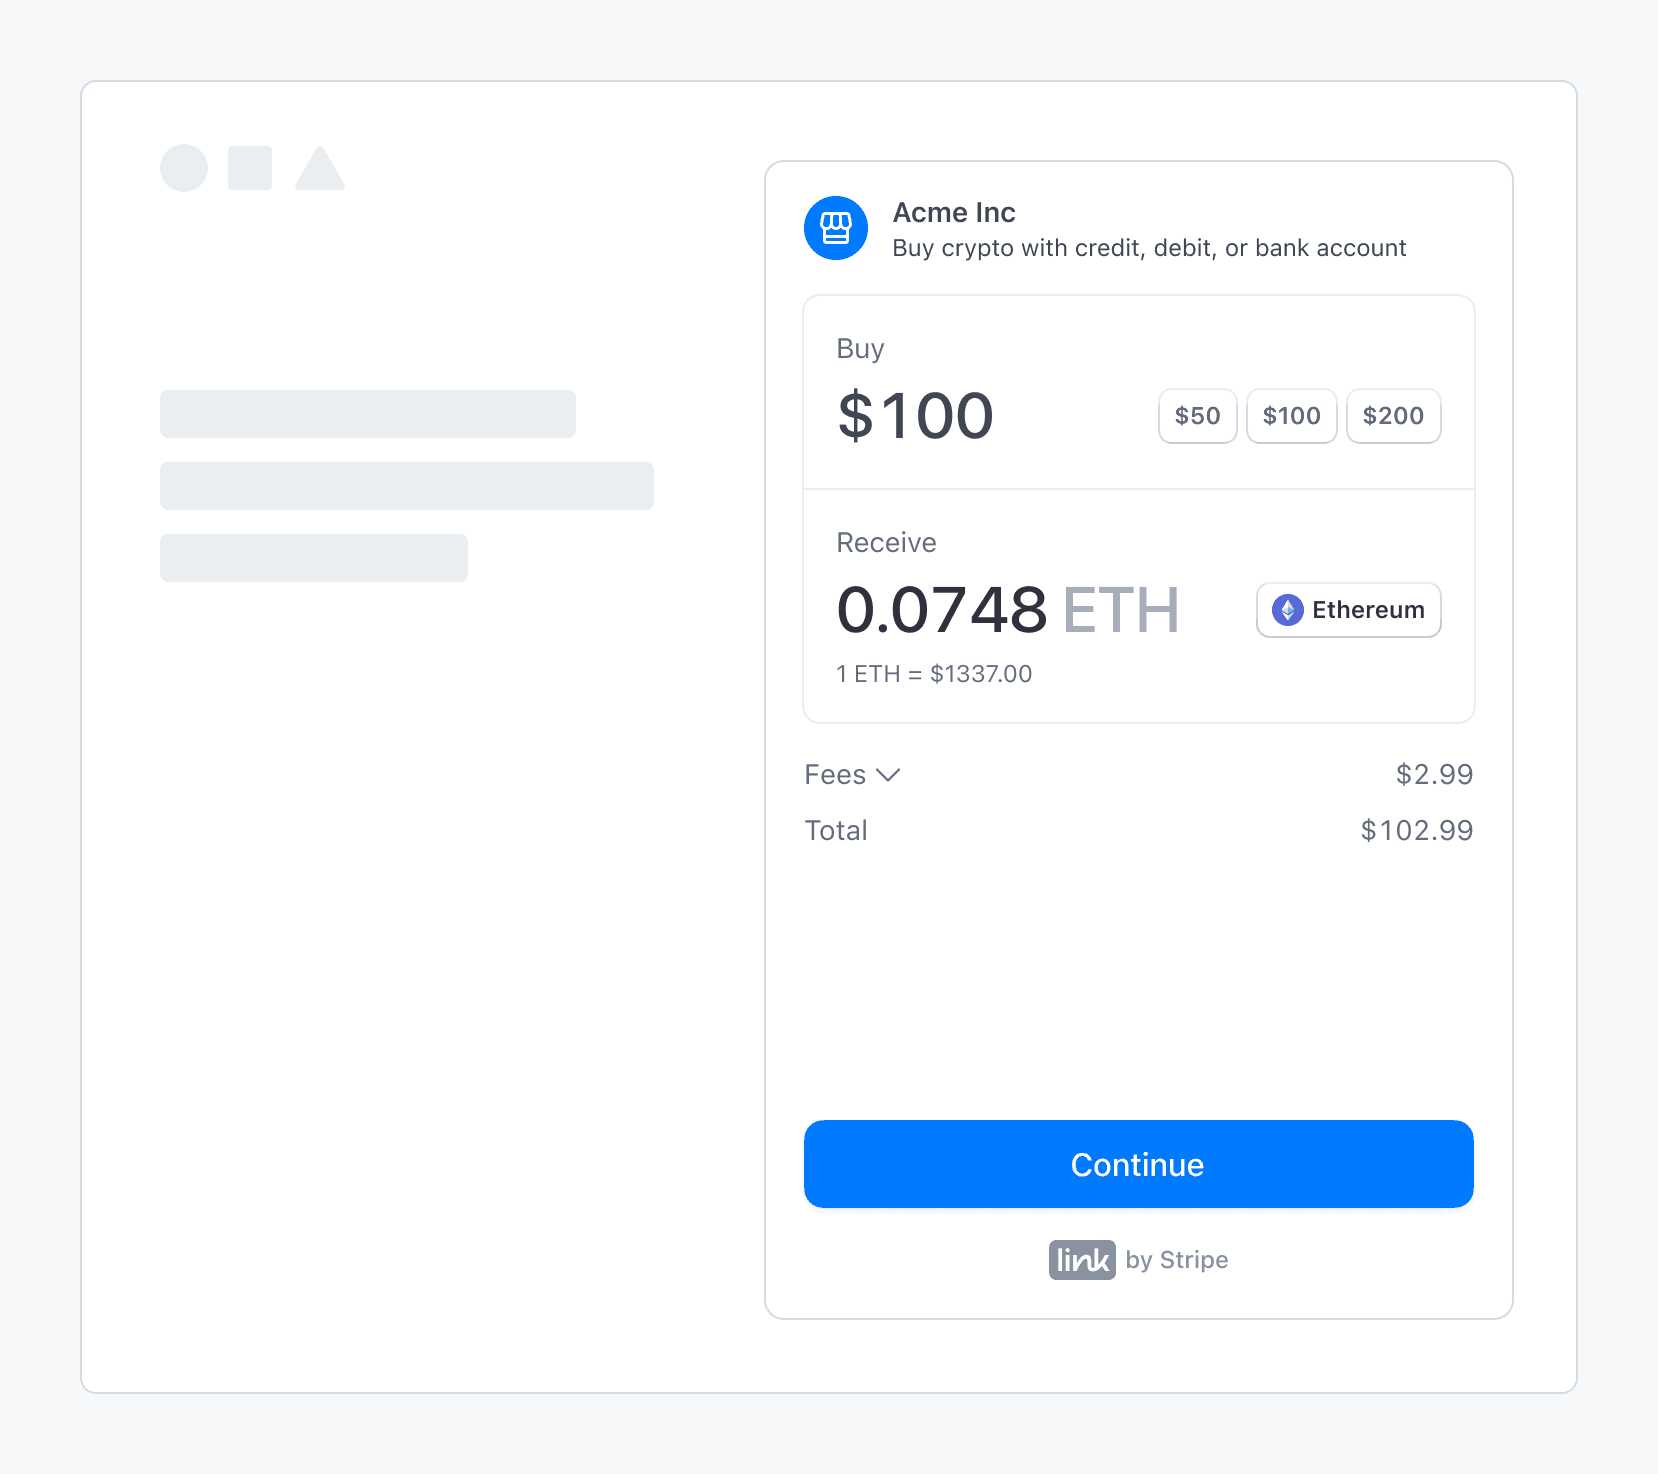
サードパーティーアプリケーションに埋め込まれた、Stripe による法定通貨から暗号資産へのオンランプ
### サンドボックスの値
> サンドボックスの取引金額は、事前に決定された限度額によって上書きされます。
次の値を使用して、*サンドボックス* (A sandbox is an isolated test environment that allows you to test Stripe functionality in your account without affecting your live integration. Use sandboxes to safely experiment with new features and changes)でオンランプ取引を完了します。
- OTP 画面で、確認コードに `000000` を使用します。
- 個人情報画面で、SSN には `000000000` を使用して、住所 (1 行目) には `address_full_match` を使用します。
- 支払いの詳細画面で、テスト用クレジットカード番号 `4242424242424242` を使用します。
## 実装の使用状況を表示
オンランプを起動した後、[Stripe ダッシュボード](https://dashboard.stripe.com/crypto-onramp/reports)でカスタマイズされた使用量レポートを表示できます。また、[アカウント登録ページ](https://dashboard.stripe.com/crypto-onramp/onboarding)に戻って、オンランプのホストを計画しているドメインを更新し、アカウント登録タスクのステータスを確認することもできます。
## Optional: モバイル用にオンランプを設定する
セッションを作成して、オンランプ UI をホストし、購入を完了して、ユーザーをモバイルアプリにリダイレクトすることで、Stripe の暗号資産オンランプ UI をモバイルの Web ビューやブラウザに導入します。
### セッションを発行する
他の導入と同様に、ユーザーがアクセスするたびに[新規オンランプセッションを作成](https://docs.stripe.com/crypto/onramp/embedded.md#create-onramp-session)するサーバーエンドポイントを実装する必要があります。このエンドポイントは `client_secret` を返します。これにより、オンランプ UI を読み込み、オンランプが利用できない場合にエラーを表示することができます。
### オンランプ UI をホストする
フロントエンドルートを作成する (*たとえば、www.my-web3-wallet.com/onramp/*) ことで、オンランプ UI をホストします。*/onramp/* は onramp.html を指します。
```html
Crypto Onramp
```
ここで、onramp.js が URL から `client_secret` を使用して、オンランプ UI をマウントします。
```js
const stripeOnramp = StripeOnramp(<>);
initialize();
// initialize onramp element with client secret
function initialize() {
const url = window.location.href.replace(/\/$/, '');
const clientSecret = url.substring(url.lastIndexOf('/') + 1);
const onrampSession = stripeOnramp.createSession({
clientSecret,
// other client side options that customize the look and feel
});
onrampSession
.addEventListener('onramp_session_updated', handleSessionUpdate)
.mount("#onramp-element");
}
function handleSessionUpdate(event) {
const session = event.payload.session;
if (session.status === 'fulfillment_complete' || session.status === 'rejected') {
// redirect back to mobile app through universal link
window.location.assign('/onramp_success/' + session.id);
}
}
```
モバイルアプリに戻るディープリンク `/onramp_success` へのユニバーサルリンクを設定します。顧客に手動でアプリに切り替えるように求めるフォールバックまたは `onramp_success` ページを用意することを検討してください。
### 購入を完了する
標準的な導入と同様に、フロントエンドクライアントがオンランプ UI 全体を制御します。この UI は画面サイズに合うようにサイズが変更されます。セッションの状態が変化し、さらに `transaction_details` が収集されると、`CryptoOnrampSession` オブジェクトがそれに従って更新されます。ステータスが移行するたびに、Webhook とフロントエンドイベントが生成されます。フロントエンドイベントリスナーを使用することで、`OnrampSession` の完了時にユーザーをアプリケーションフローにリダイレクトできます。
### モバイルアプリにリダイレクトする
ユーザーはディープリンクまたは手動切り替えを使用して、モバイルアプリでフローを再開できます。モバイルアプリではバックエンドを使用して、`CryptoOnrampSession` の状態のクエリを続行できます。
たとえば、顧客が初期設定時に残高にチャージする場合、セッションが `fulfillment_processing` に移行した時点でユーザーをアプリケーションにリダイレクトできます。バックグラウンドで `OnrampSession` のステータスをポーリングしている間に、顧客がアプリケーションの残りの部分を確認できるようにすることができます。
## Optional: コンバージョンの見積もりを設定する
[Onramp Quotes](https://docs.stripe.com/api/crypto/onramp_quotes.md) API を使用すると、プラットフォームはさまざまなネットワークでさまざまな暗号資産へのオンランプ換算の見積もりを取得することができます。ソースまたは宛先の固定金額を指定して、宛先の通貨またはネットワークのサブセットに見積もりを制限することもできます。この API では、顧客ーをオンランプウィジェットに誘導する前に商品 UI で見積もりを表示することができます。顧客がオンランプウィジェットにアクセスする前に見積もりの有効期限が切れた場合は、オンランプウィジェットで顧客に表示される見積もりが若干異なる可能性があります。
### コンバージョンの見積もりを取得する
[`GET /v1/crypto/onramp/quotes`](https://docs.stripe.com/api/crypto/onramp_quotes/retrieve.md) エンドポイントを使用して、コンバージョンの見積もりを取得します。次の表は、このエンドポイントで使用できるすべてのパラメーターをまとめたものです。
| パラメーター | タイプ | デフォルト | 詳細 |
| ------------------------ | ------------------ | --------------------------------------------------------- | -------------------------------------------------------------------------------------------------------------------------------------------------------------------------------------------------------------------------------- |
| `source_currency` | 文字列 (オプション) | `usd` | [ISO-4217](https://www.iso.org/iso-4217-currency-codes.html) 通貨コード。現在は `usd` と `eur` のみをサポートしています。 |
| `source_amount` | 文字列 (オプション) | `100.00` | オンランプが必要な法定通貨の金額の文字列表現。`source_amount` が設定される場合、`destination_amount` は null にする必要があります (固定金額を設定できるのは取引の一方のみであるため、これらは相互排他的です)。 |
| `destination_amount` | 文字列 (オプション) | `null` | 購入する `destination_currency` の金額の文字列表現。`destination_amount` を設定する場合、`source_amount` は null にする必要があります。このフィールドを指定する場合は、`destination_currencies` に単一値を、`destination_networks` にも単一値を指定する必要があります (これにより、Stripe で見積もり対象の暗号資産を認識できます)。 |
| `destination_currencies` | 配列 (オプション) | `null`
- `['usdc', 'ethereum']` | 見積もり生成の対象となる暗号資産のリスト。`null` のままである場合は、`destination_networks` がサポートしているすべての `destination_currencies` の見積もりを取得します。
- 通貨: `btc`, `eth`, `sol`, `matic`, `usdc`, `xlm` |
| `destination_networks` | 配列 (オプション) | `null`
- `['polygon', 'bitcoin', 'solana', 'ethereum']` | 見積もりを生成する暗号資産ネットワークのリスト。`null` のままである場合は、すべてのネットワークの `destination_currencies` の見積もりを取得します。
- ネットワーク: `bitcoin`, `ethereum`, `solana`, `polygon`, `stellar` |
### 見積もりリクエストの例
デフォルトのソースの金額が 100 USD の宛先通貨とネットワークのペアをすべて取得するには、次のコマンドを実行します。
```bash
curl -G https://api.stripe.com/v1/crypto/onramp/quotes \
-u <>:
```
次のようなレスポンスを受信します。
```json
{
"id": "cd35838481497f403988360cc0ff5ce5c5ce7451ce8938f86d379dff7157d33d",
"rate_fetched_at": 1674265380.6883376,
"destination_network_quotes": {
"ethereum": [
{
"id": "7eb9ccb7c1bffadf3773ca1f56ba3a352fe4a226328e72142925a80e7242b70c",
"destination_currency": "eth",
"destination_amount": "0.060232255577506866",
"destination_network": "ethereum",
"fees": {
"network_fee_monetary": "1.41",
"transaction_fee_monetary": "3.03"
},
"source_total_amount": "104.44"
},
{
"id": "398de047128b6dff1abbc41519811db68dd8bcb69939b87c4a4621b1740a1c5b",
"destination_currency": "usdc",
"destination_amount": "100.00",
"destination_network": "ethereum",
"fees": {
"network_fee_monetary": "5.63",
"transaction_fee_monetary": "3.07"
},
"source_total_amount": "108.70"
}
],
...
},
"livemode": true,
"source_currency": "usd",
"source_amount": "100.00"
}
```
ソースの金額が 200 USD の宛先通貨とネットワークのペアをすべて取得するには、次のコマンドを実行します。
```bash
curl -G https://api.stripe.com/v1/crypto/onramp/quotes \
-u <>: \
-d "source_amount"="200"
```
次のようなレスポンスを受信します。
```json
{
"id": "2e5818944df6a2325c7e9c1e72d27174b9bedfc8e64ace47c081370a5b982a7b",
"rate_fetched_at": 1674265506.3408287,
"destination_network_quotes": {
"ethereum": [
{
"id": "d160a80828eabb6b6d4aeafac585eee62d95425c7fb7577866ab04b9a786df00",
"destination_currency": "eth",
"destination_amount": "0.253568242640499553",
"destination_network": "ethereum",
"fees": {
"network_fee_monetary": "1.45",
"transaction_fee_monetary": "12.71"
},
"source_total_amount": "214.20"
},
{
"id": "53f864cb28a42f11e1d9d5aff7e43ac96b056406f74cbf618399c6fa40f3d275",
"destination_currency": "usdc",
"destination_amount": "200.00",
"destination_network": "ethereum",
"fees": {
"network_fee_monetary": "5.80",
"transaction_fee_monetary": "12.76"
},
"source_total_amount": "218.56"
}
],
...
},
"livemode": true,
"source_currency": "usd",
"source_amount": "200.00"
}
```
イーサリアムとソラナのネットワークで ETH と SOL の見積もりを取得するには、次のコマンドを実行します (イーサリアムでは ETH に、ソラナのネットワークでは SOL が返されます)。`destination_currencies` と `destination_networks` を指定すると、クロス積の有効な通貨とネットワークのペアごとに見積もりが返されます。`destination_currencies` のデフォルト値はすべての通貨で、`destination_networks` のデフォルト値はすべてのネットワークです。
```bash
curl -G https://api.stripe.com/v1/crypto/onramp/quotes \
-u <>: \
-d "source_amount"="200" \
-d "destination_currencies[]"="eth" \
-d "destination_currencies[]"="sol" \
-d "destination_networks[]"="ethereum" \
-d "destination_networks[]"="solana"
```
次のようなレスポンスを受信します。
```json
{
"id": "c9ab6fd14f87290ef94b583f0dd346de8e197321e029776c12b7790cd83fb78c",
"rate_fetched_at": 1674265576.8238478,
"destination_network_quotes": {
"bitcoin": [],
"ethereum": [
{
"id": "97bbd7b9f8bc1a029264cdc28b47b636e989f8bcab96a80a3bded2094131e311",
"destination_currency": "eth",
"destination_amount": "0.253433817682353791",
"destination_network": "ethereum",
"fees": {
"network_fee_monetary": "1.46",
"transaction_fee_monetary": "12.71"
},
"source_total_amount": "214.17"
}
],
"polygon": [],
"solana": [
{
"id": "79f00923b96543aa69d140172c7cefd0e73a2ed089d8935e63dcf21028698e23",
"destination_currency": "sol",
"destination_amount": "16.767237943",
"destination_network": "solana",
"fees": {
"network_fee_monetary": "0.01",
"transaction_fee_monetary": "12.70"
},
"source_total_amount": "212.71"
}
]
},
"livemode": true,
"source_currency": "usd",
"source_amount": "200.00"
}
```
イーサリアムとソラナで USDC の見積もりを取得するには、次のコマンドを実行します。
```bash
curl -G https://api.stripe.com/v1/crypto/onramp/quotes \
-u <>: \
-d "source_amount"="200" \
-d "destination_currencies[]"="usdc" \
-d "destination_networks[]"="ethereum" \
-d "destination_networks[]"="solana"
```
次のようなレスポンスを受信します。
```json
{
"id": "8727e8de9a22915aea079973028054e31d362a328758a5953cee6ba1b6f22569",
"rate_fetched_at": 1674268717.432479,
"destination_network_quotes": {
"bitcoin": [],
"ethereum": [
{
"id": "603f29933c921d59b169572cf2d61da7d88f2a6973da0d6fcb686b3dec3de223",
"destination_currency": "usdc",
"destination_amount": "200.00",
"destination_network": "ethereum",
"fees": {
"network_fee_monetary": "5.88",
"transaction_fee_monetary": "12.76"
},
"source_total_amount": "218.64"
}
],
"polygon": [],
"solana": [
{
"id": "38b8388072e6272e7a0c0d5ee1161d3d747362a574f54fe76f1554ff60e3a007",
"destination_currency": "usdc",
"destination_amount": "200.00",
"destination_network": "solana",
"fees": {
"network_fee_monetary": "0.01",
"transaction_fee_monetary": "12.70"
},
"source_total_amount": "212.71"
}
]
},
"livemode": true,
"source_currency": "usd",
"source_amount": "200.00"
}
```
`destination_amount` が指定された単一の支払い先の通貨とネットワークのペア (イーサリアムの ETH) の見積もりを取得するには、次のコマンドを実行します。
```bash
curl -G https://api.stripe.com/v1/crypto/onramp/quotes \
-u <>: \
-d "destination_amount"="0.42" \
-d "destination_currencies[]"="eth" \
-d "destination_networks[]"="ethereum"
```
次のようなレスポンスを受信します。
```json
{
"id": "74f73859a8836293ce4f1e6757dc258c9f1016deea7b075faba8b5755d163168",
"rate_fetched_at": 1674268804.6989243,
"destination_network_quotes": {
"bitcoin": null,
"ethereum": [
{
"id": "f1adad5680b081031b03b89c174d25ce6b609416fc82f976423e95a089a10334",
"destination_currency": "eth",
"destination_amount": "0.420000000000000000",
"destination_network": "ethereum",
"fees": {
"network_fee_monetary": "1.45",
"transaction_fee_monetary": "21.06"
},
"source_total_amount": "719.53"
}
],
"polygon": null,
"solana": null
},
"livemode": true,
"source_currency": "usd",
"source_amount": "697.02"
}
```
## Optional: Webhook イベントをリッスンする
オンランプセッションの作成後にステータスが変化するたびに、`crypto.onramp_session.updated` webhook を送信します。新しいセッションが作成されたときにはイベントを送信しません。ダッシュボードで [Webhook を設定](https://docs.stripe.com/webhooks.md)できます。
Webhook は `CryptoOnrampSession` リソースを使用します。
```json
{
"id": "evt_123",
"object": "event",
"data": {
"object": {
"id": "cos_0MYvv9589O8KAxCGPm84FhVR",
"object": "crypto.onramp_session",
"client_secret": "cos_0MYvv9589O8KAxCGPm84FhVR_secret_IGBYKVlTlnJL8UGxji48pKxBO00deNcBuVc",
"created": 1675794575,
"livemode": false,
"status": "initialized",
"transaction_details": {
"destination_currency": "eth",
"destination_amount": null,
"destination_network": "ethereum",
"fees": null,
"lock_wallet_address": false,
"source_currency": "usd",
"source_amount": null,
"destination_currencies": [
"eth"
],
"destination_networks": [
"ethereum"
],
"transaction_id": null,
"wallet_address": null,
"wallet_addresses": {
"bitcoin": null,
"ethereum": "0xB00F0759DbeeF5E543Cc3E3B07A6442F5f3928a2",
"polygon": null,
"solana": null,
"stellar": null,
"destination_tags": null
}
}
}
}
}
```
### フロントエンドイベント
以下のフロントエンドイベントに登録できます。
```js
// when the onramp UI is rendered
{
type: 'onramp_ui_loaded',
payload: {session: OnrampSession},
}
// when the onramp session object is updated
{
type: 'onramp_session_updated',
payload: {session: OnrampSession},
}
// for modal overlay render mode only
{
type: 'onramp_ui_modal_opened',
payload: {session: OnrampSession},
}
{
type: 'onramp_ui_modal_closed',
payload: {session: OnrampSession},
}
```
上記のように、OnrampSession で標準の `addEventListener/removeEventListener` 関数を使用して、イベントを登録したり登録解除したりできます。`'*'` を使用すると、すべてのイベントに一致させることができます。
## Optional: 顧客サポート状況と不正利用に対処する
Stripe では、顧客サポート状況のため、および不正利用攻撃が発生した場合に、埋め込みオンランプ製品に制限を適用します。
### 顧客サポートの対応状況の確認
セッションの作成時に `customer_ip_address` を渡して、前述の制限を事前チェックできるようにします。
顧客が、サポートできない地域 (`customer_ip_address` に基づく) にいる場合、エンドポイントは `code=crypto_onramp_unsupportable_customer` とともに `HTTP 400` を返します。この場合、顧客にオンランプオプションを非表示にできます。それ以外の場合、オンランプ UI は `disabled` 状態で表示されます。
以下に、この動作を示すリクエストのサンプルを示します。
```bash
curl -X POST https://api.stripe.com/v1/crypto/onramp_sessions \
-u <>: \
-d "customer_ip_address"="8.8.8.8" \
```
サンプルレスポンス (400):
```json
{
"error": {
"type": "invalid_request_error",
"code": "crypto_onramp_unsupportable_customer",
"message": "Based on the information provided about the customer, we're currently unable to support them."
}
}
```
### 不正利用攻撃に対処する
Stripe は、取引に関する加盟店の役割を果たし、不審請求の申し立てと不正利用に対して責任を負います。Stripe はリスク管理の深い専門知識を有していますが、ハイリスクの状況が検出された場合 (たとえば、活発な攻撃や悪用が見つかった場合)、オンランプセッションの作成を一時的に制限することがあります。
際限のない不正な攻撃が原因で API を停止する必要がある場合は、新しいセッションの作成が試行されると Stripe から以下を返します。
```bash
curl -X POST https://api.stripe.com/v1/crypto/onramp_sessions \
-u <>: \
```
次のようなレスポンスを受信します。
```json
{
"error": {
"type": "api_error",
"code": "crypto_onramp_disabled",
"message": "The v1/crypto/onramp_sessions endpoint has been disabled temporarily. Stripe will get in contact with you about details of the outage.",
"updated": 1652025690
}
}
```
### 追加の検証とエラー
| 条件 | HTTP ステータス | エラーコード |
| ----------------------------------------------------------------------------------------------------------------------------------------------------------------------------------------- | ---------- | ------------------------------------------------------------------------------ |
| インシデントのため、新しいセッションを発行できません | 400 | `crypto_onramp_disabled` |
| `customer_ip_address` パラメーターに基づき、Stripe では指定された顧客をサポートできません。 | 400 | `crypto_onramp_unsupported_country` または `crypto_onramp_unsupportable_customer` |
| `/v1/crypto/onramp_session` エンドポイントに渡された `customer_ip_address` の形式が正しくありません | 400 | `customer_ip_address` |
| `source_amount` と `destination_amount` は相互排他的ですが、プラットフォームでは両方が設定されています。 | 400 | `crypto_onramp_invalid_source_destination_pair` |
| `destination_currency` と `destination_network` の一方が設定されていますが、もう一方が設定されていません | 400 | `crypto_onramp_incomplete_destination_currency_and_network_pair` |
| `destination_currency` と `destination_network` の組み合わせが無効です | 400 | `crypto_onramp_invalid_destination_currency_and_network_pair` |
| `source_amount` が設定されていますが、`source_currency` が設定されていません | 400 | `crypto_onramp_missing_source_currency` |
| `source_amount` が正の数ではありません | 400 | `crypto_onramp_invalid_source_amount` |
| `destination_amount` が設定されていますが、`destination_currency` が設定されていません | 400 | `crypto_onramp_missing_destination_currency` |
| `destination_amount` が正の数ではありません | 400 | `crypto_onramp_invalid_destination_amount` |
| `destination_currencies` と `destination_networks` の組み合わせに、サポートされている通貨がありません | 400 | `crypto_onramp_invalid_destination_currencies_and_networks` |
| `destination_currency` が `destination_currencies` に含まれていません | 400 | `crypto_onramp_conflicting_destination_currency` |
| `destination_network` が `destination_networks` に含まれていません | 400 | `crypto_onramp_conflicting_destination_network` |
| `wallet_addresses` のウォレットアドレスの 1 つ以上が、`destination_networks` に含まれていないネットワークに関連付けられています | 400 | `crypto_onramp_wallet_addresses_not_all_networks_supported` |
| `wallet_addresses` にウォレットアドレスが指定されていませんが、`lock_wallet_address` が true に設定されていました | 400 | `crypto_onramp_no_wallet_address_to_lock` |
| ビジネスの `business_name` フィールドまたは `business_url` フィールドが設定されていません。これらのフィールドは、[ダッシュボード](https://dashboard.stripe.com/settings/public/)の `Public business name` と `Business website` で入力されています。 | 400 | `crypto_onramp_merchant_not_properly_setup` |
## Optional: セッションの持続性を使用する
セッションの持続機能を使用すると、通知を提供したり、購入の完了後に顧客をオンランプに関与させ続けることができます。
#### セッションの持続機能のメリット
場合によっては、顧客訪問全体でオンランプセッションを保持できます。たとえば、顧客のオンランプセッションが中断または切断されたときに、プロンプトを表示し、後でオンランプセッションを再開する方法を提供できます。または、決済の完了後に顧客がページを更新した場合、以前のオンランプ購入がフルフィルメントされたときに通知する機能を保持できます。
このため、OnrampSession オブジェクトはステートフルであり、サーバー側のリソースとして保管されます。以前に使用した OnrampSession Client Secret を使用してオンランプ UI を初期化すると、顧客は中断した時点の状態に戻ります。
#### セッションの持続機能の設定
Client Secret は、オンランプセッションの一意の識別子であり、機密性の高い決済情報を漏洩することなくセッションのライフサイクルを保存します。ただし、ウォレットアドレスなどのプライベートな情報は漏洩する可能性があります。記録したり、URL に埋め込んだり、顧客以外に公開したりしないでください。Client Secret を含むすべてのページで TLS が設定されていることを確認してください。
Web2 のようなアカウント構造の場合、OnrampSession を顧客オブジェクトにリンクし、認証時に取得できます。アカウントない Web3 アプリケーションの場合、認証にメッセージ署名を使用する必要があるため、顧客の負担が増えます。プライバシーを保持したローカルストレージは、許容される顧客体験を実現します。
## Optional: ユースケースごとのオンランプの設定
オンランプセッションのパラメーターはユースケースベースで設定できます。
- ウォレット
- Dapp または NFT の決済
- 分散交換 (DEX) 導入
オンランプを商品 UI の一部のように見せるには、オンランプをアプリケーションのネイティブコンポーネントとして組み込み、商品 UI の一部のように見せます。
## ウォレット
ウォレットユーザーにはオンランプの主要エントリーポイントが 2 つあります。1 つはウォレットの資金追加で、もう 1 つは取引でのチャージです。
### ウォレットへの資金追加
顧客が新しいウォレットを作成した後、あるいは資金が極めて少ないときに、ウォレットに資金を追加するように積極的に促すことができます。
これらのケースでは、以下のパラメーターを指定することを検討してください。
- `wallet_addresses`: すでに使用しているウォレットアドレスを使用します。
- `destination_networks`: デフォルトまたは選択したネットワークに設定し、顧客の混乱を軽減します。
- `destination_currencies`: これを空白のままにしても構いません。ただし、ネイティブガストークンや望ましい暗号資産に限定することもできます。たとえば、USDC で DeFi サービスを提供している場合は、ユーザーが USDC とガストークンの両方を必要とする可能性が高いことを考慮してください。
- `destination_network`: これを空白のままにすると、サポートされているネットワークの最初の値を継承します。
- `destination_currency`: これを空白にすると、サポート対象の暗号資産の最初の値を継承します。
以下のコード例は、これらのパラメーターのいくつかを使用したオンランプセッションの作成方法を示しています。
```bash
curl -X POST https://api.stripe.com/v1/crypto/onramp_sessions \
-u <>: \
-d "customer_ip_address"="8.8.8.8" \
-d "wallet_addresses[ethereum]"="0xB00F0759DbeeF5E543Cc3E3B07A6442F5f3928a2" \
-d "wallet_addresses[solana]"="bufoH37MTiMTNAfBS4VEZ94dCEwMsmeSijD2vZRShuV" \
-d "destination_networks[]"="ethereum" \
-d "destination_networks[]"="solana"
```
### 取引のトップアップ
Dapp またはユーザーが取引を提案したときに、資金不足が原因で取引が失敗することがあります。この場合、取引の完了に必要な差額を計算できます。ただし、ERC トークンまたは SPL トークンでリクエストされた金額や暗号資産は、多くの場合検出が困難です。
これらのケースでは、以下を指定することを検討してください。
- `wallet_addresses`: 使用しているウォレットアドレスを使用します。
- `destination_networks`: 選択したネットワークに設定します。
- `destination_currencies`: 可能な場合は不足している通貨に限定します。
- `destination_network`: 選択したネットワークに設定します (金額を設定する場合は必須値)。
- `destination_currency`: ターゲット通貨に設定します (金額を設定する場合は必須値)。
- `destination_amount`: 残高の差異に設定し、できればガス (手数料) 用に十分な余地を残しておきます。
以下のコード例は、これらのパラメーターのいくつかを使用したオンランプセッションの作成方法を示しています。
```bash
curl -X POST https://api.stripe.com/v1/crypto/onramp_sessions \
-u <>: \
-d "customer_ip_address"="8.8.8.8" \
-d "wallet_addresses[ethereum]"="0xB00F0759DbeeF5E543Cc3E3B07A6442F5f3928a2" \
-d "destination_networks[]"="ethereum" \
-d "destination_currencies[]"="usdc" \
-d "destination_network"="ethereum" \
-d "destination_currency"="usdc" \
-d "destination_amount"="10"
```
## Dapp または NFT の決済
送金額がわかっている場合に Checkout でオンランプを使用できます。たとえば、Dapp を使用して、固定価格でメンバーシップを販売できます。あるいは、顧客がマーケットプレイスから特定の NFT を購入しようとする場合もあります。
これらのケースでは、以下を指定することを検討してください。
- `wallet_addresses`: 接続されているウォレットアドレスを使用します。
- `destination_networks`: 接続されているネットワークを使用します。
- `destination_currencies`: 取引通貨 (商品の見積もりに使用される通貨での価格) を使用します
- `destination_network`: 上記の選択したネットワークに設定します (金額を設定する場合は必須値)。
- `destination_currency`: 上記のターゲット通貨に設定します (金額を設定する場合は必須値)
- `destination_amount`: 残高の差異に設定するか、購入金額全体を対象とします。均等に分割してオンチェーン分析を併用する顧客もいます。また、全額を選択して、税務上の取得原価基準を簡素化したり、蓄積している資産を使わないようにすることもできます。いずれの場合でも、ガス用の余地を残しておく必要があります。
以下のコード例は、これらのパラメーターのいくつかを使用したオンランプセッションの作成方法を示しています。
```bash
curl -X POST https://api.stripe.com/v1/crypto/onramp_sessions \
-u <>: \
-d "customer_ip_address"="8.8.8.8" \
-d "wallet_addresses[ethereum]"="0xB00F0759DbeeF5E543Cc3E3B07A6442F5f3928a2" \
-d "destination_networks[]"="ethereum" \
-d "destination_currencies[]"="eth" \
-d "destination_network"="ethereum" \
-d "destination_currency"="eth" \
-d "destination_amount"="0.2343"
```
## DEX
DEX では、法定通貨で暗号資産を購入できる独自の機会が得られます。DEX では既存のインターフェイスを使用して任意の暗号資産ペアを交換する際に暗号資産のチャージ (資金を追加) を促すことができます。ただし、法定通貨から暗号資産への交換のみを目的とする専用の顧客フローを用意することをお勧めします。
オンランプによりブランドと UI を管理できるため、DEX でオンランプウィジェットを構築し、法定通貨を指定した暗号資産に交換する Stripe の能力を活用できます。DEX では、暗号資産を任意の通貨に交換する最終工程を完了できます。また、DEX では特定のトークンのオンランプウィジェットを構築することもできます。たとえば、DAO では特定の流動性プールを承認し、DEX を使用してトークンを分散し、法定通貨で新規ユーザーをアカウント登録することができます。
これらのケースでは、以下を指定することを検討してください。
- `wallet_addresses`: すでに使用しているウォレットアドレスを使用します。
- `destination_networks`: 選択したネットワークに設定します。
- `destination_currencies`: 選択した暗号資産に限定します。
- `destination_network`: 選択したネットワークに設定します (金額を設定する場合は必須値)。
- `destination_currency`: ターゲット通貨に設定します (金額を設定する場合は必須値)
- `destination_amount`: あらかじめ顧客のインテントを徴収できる場合にのみ設定します。空白のままにした場合は、Stripe が適切なデフォルト値を提案します。
以下のコード例は、これらのパラメーターのいくつかを使用したオンランプセッションの作成方法を示しています。
```bash
curl -X POST https://api.stripe.com/v1/crypto/onramp_sessions \
-u <>: \
-d "customer_ip_address"="8.8.8.8" \
-d "wallet_addresses[ethereum]"="0xB00F0759DbeeF5E543Cc3E3B07A6442F5f3928a2" \
-d "destination_networks[]"="ethereum" \
-d "destination_currencies[]"="eth" \
-d "destination_network"="ethereum" \
-d "destination_currency"="eth"
```