# Set up an Embedded onramp integration
Use this guide to fully customise the embeddable onramp.
This guide is an extended version of the [Embedded onramp quickstart](https://docs.stripe.com/crypto/onramp/embedded-quickstart.md). Learn to add more functionality such as how to:
- Install the SDK using a script tag or package manager
- Customise the on-ramp appearance
- Configure the on-ramp UI into mobile web views
- Handle customer supportability and fraud
- Fetch estimated cryptocurrency conversion quotes
## Before you begin
1. The embedded on-ramp is only available in the EU and the US (excluding Hawaii).
1. The on-ramp API is in public preview. You must [submit the onramp application](https://docs.stripe.com/crypto/onramp.md#submit-your-application) before you start development in a testing environment.
1. [After you get access to the Onramp API](https://dashboard.stripe.com/crypto-onramp/onboarding), use the [Dashboard](https://dashboard.stripe.com/apikeys) to grab your secret and publishable [API keys](https://docs.stripe.com/keys.md#obtain-api-keys).
## Install the SDK and client library [client-side] [server-side]
### Client-side
Include the following scripts using script tags within the `` element of your HTML. These scripts must always load directly from Stripe’s domains (https://js.stripe.com and https://crypto-js.stripe.com) for compatibility and *PCI compliance* (Any party involved in processing, transmitting, or storing credit card data must comply with the rules specified in the Payment Card Industry (PCI) Data Security Standards. PCI compliance is a shared responsibility and applies to both Stripe and your business).
Don’t include the scripts in a bundle or host a copy yourself because your integration might break without warning.
```html
Onramp
```
### JS SDK
Use the npm package to load the onramp JS SDK as an ES module. The package includes Typescript type definitions.
```
npm install --save @stripe/stripe-js @stripe/crypto
```
### Alternative SDK installation
Alternatively, you can install the [Stripe Crypto ES module](https://www.npmjs.com/@stripe/crypto) client-side SDK using a script tag or package manager. The SDK wraps the global `StripeOnramp` function provided by the Stripe crypto script as an ES module.
1. Manually load the script. Include the following scripts using script tags within the `` element of your HTML. These scripts must always load directly from Stripe’s domains, *https://js.stripe.com* and *https://crypto-js.stripe.com*, for compatibility and *PCI compliance* (Any party involved in processing, transmitting, or storing credit card data must comply with the rules specified in the Payment Card Industry (PCI) Data Security Standards. PCI compliance is a shared responsibility and applies to both Stripe and your business). Don’t include the scripts in a bundle or host a copy yourself. If you do, your integration might break without warning.
```html
Onramp
```
1. Set the [API publishable key](https://dashboard.stripe.com/test/apikeys) to allow Stripe to retrieve the `OnrampSession` object created by your back end. For example:
```javascript
const stripeOnramp = StripeOnramp('<>');
```
1. To install the module through the package manager, first install the [Stripe.js ES module](https://github.com/stripe/stripe-js) and [Stripe crypto ES module](https://www.npmjs.com/package/@stripe/crypto) from the [npm public registry](https://www.npmjs.com/). The package includes Typescript type definitions.
```bash
npm install @stripe/stripe-js @stripe/crypto
```
1. Import the module and set the [API publishable key](https://dashboard.stripe.com/test/apikeys) to allow Stripe to retrieve the `OnrampSession` object created by your back end. The function returns a `Promise` object that resolves with a newly created `StripeOnramp` object after the scripts load.
```javascript
import {loadStripeOnramp} from '@stripe/crypto';
const stripeOnramp = await loadStripeOnramp('<>');
```
### Server-side
Our official libraries don’t contain built-in support for the API endpoints because the on-ramp API is in public preview. As a result, our examples use curl for back-end interactions.
## Create a crypto on-ramp session [server-side]
On the server, expose a new API endpoint (for example, `myserver.com/mint-onramp-session`) that makes a call to the Stripe `POST /v1/crypto/onramp_sessions` endpoint. This mints an on-ramp session with Stripe you can use with new or returning customers. You must mint one session per customer.
[Create a crypto on-ramp session](https://docs.stripe.com/api/crypto/onramp_sessions/create.md) by running the following curl command in your terminal:
```bash
curl -X POST https://api.stripe.com/v1/crypto/onramp_sessions \
-u <>: \
-d "wallet_addresses[ethereum]"="0xB00F0759DbeeF5E543Cc3E3B07A6442F5f3928a2"
# add as many parameters as you'd like
```
You receive a response similar to the following:
```json
{
"id": "cos_0MYfrA589O8KAxCGEDdIVYy3",
"object": "crypto.onramp_session",
"client_secret": "cos_0MYfrA589O8KAxCGEDdIVYy3_secret_rnpnWaxQbYQOvp6nVMvEeczx300NRU4hErZ",
"created": 1675732824,
"livemode": false,
"status": "initialized",
"transaction_details": {
"destination_currency": null,
"destination_amount": null,
"destination_network": null,
"fees": null,
"lock_wallet_address": false,
"source_currency": null,
"source_amount": null,
"destination_currencies": [
"btc",
"eth",
"sol",
"usdc"
],
"destination_networks": [
"bitcoin",
"ethereum",
"solana"
],
"transaction_id": null,
"wallet_address": null,
"wallet_addresses": {
"bitcoin": null,
"ethereum": "0xB00F0759DbeeF5E543Cc3E3B07A6442F5f3928a2",
"polygon": null,
"solana": null
}
}
}
```
### Errors
This endpoint returns error codes if Stripe can’t create on-ramp sessions. To learn why this might happen, see [Handle customer supportability and fraud](https://docs.stripe.com/crypto/onramp/embedded.md#support-and-fraud). We recommend that you render the on-ramp component conditional when a customer gets an HTTP status `200` during session creation, providing a fallback UI that can deal with session creation errors.
For the full parameter list you can pass when creating a session, see the [Onramp API](https://docs.stripe.com/api/crypto/onramp_sessions/create.md).
### States
Each on-ramp session progresses through the following states:
- `initialized`: The app has newly minted the on-ramp session on the server-side, but the customer hasn’t used it yet. Sessions are in this state until the customer onboards and is ready to pay.
- `rejected`: Stripe rejected the customer for some reason (KYC failure, sanctions screening issues, fraud checks).
- `requires_payment`: The customer has completed onboarding or sign-in and gets to the payment page. If they attempt payment and fail, they stay in this state.
- `fulfillment_processing`: The customer successfully completed payment. We haven’t delivered the crypto they purchased yet.
- `fulfillment_complete`: The customer was successfully able to pay for crypto, and we have confirmed delivery.
## Optional: Customise the appearance of the on-ramp
You can customise the appearance of the on-ramp.
### Update branding
Use the [branding settings](https://docs.stripe.com/payments/checkout/customization/appearance.md#branding) to upload your logo and brand colours which automatically apply to on-ramp sessions created with your platform API key.
### Enable dark mode
To enable dark mode, include an appearance structure in the session creation call:
```js
const onrampSession = stripeOnramp.createSession({
clientSecret: clientSecret,
appearance: {
theme: 'dark'
},
});
```
If you don’t specify the appearance, the on-ramp defaults to a light theme. You can also change the theme after the on-ramp renders by calling:
```js
onrampSession.setAppearance({
theme: newTheme
});
```
## Optional: Pre-populate parameters
You can pre-populate some of the parameters of the on-ramp session.
### Pre-populate transaction parameters
For example, a Dapp or wallet can already store a customer’s `wallet_addresses`. You can achieve this during session creation:
```bash
curl -X POST https://api.stripe.com/v1/crypto/onramp_sessions \
-u <>: \
-d "wallet_addresses[ethereum]"="0xB00F0759DbeeF5E543Cc3E3B07A6442F5f3928a2" \
-d "source_currency"="usd" \
-d "destination_currency"="eth" \
-d "destination_network"="ethereum" \
-d "destination_amount"="0.1234"
```
You receive a response such as:
```json
{
"id": "cos_0MYvnp589O8KAxCGwmWATYfA",
"object": "crypto.onramp_session",
"client_secret": "cos_0MYvnp589O8KAxCGwmWATYfA_secret_LhqXJi2lvbMCYhVHfrHGfUfX6009qtZPtV7",
"created": 1675794121,
"livemode": false,
"status": "initialized",
"transaction_details": {
"destination_currency": "eth",
"destination_amount": "0.123400000000000000",
"destination_network": "ethereum",
"fees": null,
"lock_wallet_address": false,
"source_currency": "usd",
"source_amount": null,
"destination_currencies": [
"btc",
"eth",
"sol",
"usdc",
"xlm"
],
"destination_networks": [
"bitcoin",
"ethereum",
"solana",
"stellar"
],
"transaction_id": null,
"wallet_address": null,
"wallet_addresses": {
"bitcoin": null,
"ethereum": "0xB00F0759DbeeF5E543Cc3E3B07A6442F5f3928a2",
"polygon": null,
"solana": null,
"stellar": null,
"destination_tags": null
}
}
}
```
We allow the following parameters to be pre-populated:
- `wallet_addresses`: The suggested wallet address to deliver crypto to (the default selection on the wallet attach screen)
- `lock_wallet_address`: Whether or not to lock the suggested wallet address
- `source_currency`: The fiat currency for the transaction (`usd` and `eur` only for now)
- `source_amount`: The amount of fiat currency to use for the purchase of crypto (mutually exclusive with destination amount)
- `destination_network`: The default crypto network for this on-ramp (for example, `ethereum`)
- `destination_currency`: The default cryptocurrency for this on-ramp session (for example, `eth`)
- `destination_amount`: The amount of cryptocurrency to purchase (mutually exclusive with the source amount)
- `destination_currencies`: An array of cryptocurrencies you want to restrict to (for example, `[eth, usdc]`)
- `destination_networks`: An array of crypto networks you want to restrict to (for example, `[ethereum, polygon]`)
For more details on the specific requirements and how they impact customers in the on-ramp UI, see [Onramp API reference](https://docs.stripe.com/api/crypto/onramp_sessions.md).
### Pre-populate customer information
To help decrease customer friction and increase conversion, you might want to pre-populate some of the required KYC information for the customer if you’ve already collected it within your application.
Throughout the flow, customers must provide their:
- Email
- First name
- Last name
- Date of birth
- SSN
- Home address (country, address line 1, address line 2, city, state, post code)
The on-ramp API provides the ability to pre-populate all of those fields except for SSN. To pre-populate this information, you can provide it using the `customer_information` parameter in the on-rampSession creation API.
Example request:
```bash
curl -X POST https://api.stripe.com/v1/crypto/onramp_sessions \
-u <>: \
-d "customer_information[email]"="john@doe.com" \
-d "customer_information[first_name]"="John" \
-d "customer_information[last_name]"="Doe" \
-d "customer_information[dob][year]"=1990 \
-d "customer_information[dob][month]"=7 \
-d "customer_information[dob][day]"=4 \
-d "customer_information[address][country]"="US" \
-d "customer_information[address][line1]"="354 Oyster Point Blvd" \
-d "customer_information[address][line2]"="Apt 1A" \
-d "customer_information[address][city]"="South San Francisco" \
-d "customer_information[address][state]"="CA" \
-d "customer_information[address][postal_code]"="94080"
```
Example response:
```json
{
"id": "cos_1MbuUeAEFtmWU4EVBFZS0gce",
"object": "crypto.onramp_session",
"client_secret": "cos_1MbuUeAEFtmWU4EVBFZS0gce_secret_zPsPPytwNU6mMKh1Bmz7ymXGi00ILwwyGeG",
"created": 1676504072,
"livemode": false,
"status": "initialized",
"transaction_details": {
"destination_currency": null,
"destination_amount": null,
"destination_network": null,
"fees": null,
"lock_wallet_address": false,
"source_currency": null,
"source_amount": null,
"destination_currencies": [
"btc",
"eth",
"sol",
"usdc",
"xlm"
],
"destination_networks": [
"bitcoin",
"ethereum",
"solana",
"polygon",
"stellar"
],
"transaction_id": null,
"wallet_address": null,
"wallet_addresses": null
}
}
```
We allow the following parameters to be pre-populated:
- `customer_information.email` – Freeform string for the customer’s email
- `customer_information.first_name` – Freeform string for the customer’s first name
- `customer_information.last_name` – Freeform string for the customer’s last name
- `customer_information.dob.year` – Integer for the customer’s birth year
- `customer_information.dob.month` – Integer for the customer’s birth month
- `customer_information.dob.day` – Integer for the customer’s birth day
- `customer_information.address.country` – String of the two letter country code for the customer’s country of residence
- `customer_information.address.line1` – Freeform string for the customer’s address line one
- `customer_information.address.line2` – Freeform string for the customer’s address line two
- `customer_information.address.city` – Freeform string for the customer’s city
- `customer_information.address.state` – String of the two letter state code for US states (the full state name also works), for example, “CA” or “California”
- `customer_information.address.postal_code` – Freeform string for the customer’s postal code
All of the fields are optional and you can provide any subset of them for pre-population. However, if you provide date of birth, you must also provide all three values for the following fields: `year`, `month`, and `day`.
## Render the Onramp UI [client-side]
#### JavaScript
Import both the StripeJS and the OnrampJS bundles:
```html
Crypto Onramp
```
Use the *client\_secret* (A client secret is used with your publishable key to authenticate a request for a single object. Each client secret is unique to the object it's associated with) from your server-side call in the previous step to initiate and mount the onramp session:
```javascript
const stripeOnramp = StripeOnramp("<>");
initialize();
// Initialize the onramp element with a client secret
function initialize() {
// IMPORTANT: replace the following with your logic of how to mint/retrieve the client secret
const clientSecret = "cos_1Lb6vsAY1pjOSNXVWF3nUtkV_secret_8fuPvTzBaxj3XRh14C6tqvdl600rpW7hG4G";
const onrampSession = stripeOnramp.createSession({clientSecret});
onrampSession
.mount("#onramp-element");
}
```
#### React
To use the onramp in React, define two components: `CryptoElements` and `OnrampElement`. `CryptoElements` is a [React context](https://reactjs.org/docs/context.html) provider for an initialised `StripeOnramp` instance. The `OnrampElement` component renders the onramp UI using the *client\_secret* (A client secret is used with your publishable key to authenticate a request for a single object. Each client secret is unique to the object it's associated with) from the server-side call, shown in the previous step.
```jsx
import {loadStripeOnramp} from '@stripe/crypto';
import {CryptoElements, OnrampElement} from './StripeCryptoElements';
const stripeOnrampPromise = loadStripeOnramp("<>");
export default () => {
// IMPORTANT: replace with your logic of how to mint/retrieve client secret
const clientSecret = "cos_1Lb6vsAY1pjOSNXVWF3nUtkV_secret_8fuPvTzBaxj3XRh14C6tqvdl600rpW7hG4G";
return (
);
}
```
```jsx
import React, { ReactNode } from 'react';
// ReactContext to simplify access of StripeOnramp object
const CryptoElementsContext = React.createContext(null);
export const CryptoElements = ({
stripeOnramp,
children,
}) => {
const [ctx, setContext] = React.useState(() => ({ onramp: null }));
React.useEffect(() => {
let isMounted = true;
Promise.resolve(stripeOnramp).then((onramp) => {
if (onramp && isMounted) {
setContext((ctx) => (ctx.onramp ? ctx : { onramp }));
}
});
return () => {
isMounted = false;
};
}, [stripeOnramp]);
return (
{children}
);
};
// React hook to get StripeOnramp from context
export const useStripeOnramp = () => {
const context = React.useContext(CryptoElementsContext);
return context?.onramp;
};
// React element to render Onramp UI
export const OnrampElement = ({
clientSecret,
appearance,
...props
}) => {
const stripeOnramp = useStripeOnramp();
const onrampElementRef = React.useRef(null);
React.useEffect(() => {
const containerRef = onrampElementRef.current;
if (containerRef) {
containerRef.innerHTML = '';
if (clientSecret && stripeOnramp) {
stripeOnramp
.createSession({
clientSecret,
appearance,
})
.mount(containerRef);
}
}
}, [clientSecret, stripeOnramp]);
return ;
};
```
After running the script, the onramp renders the following window:
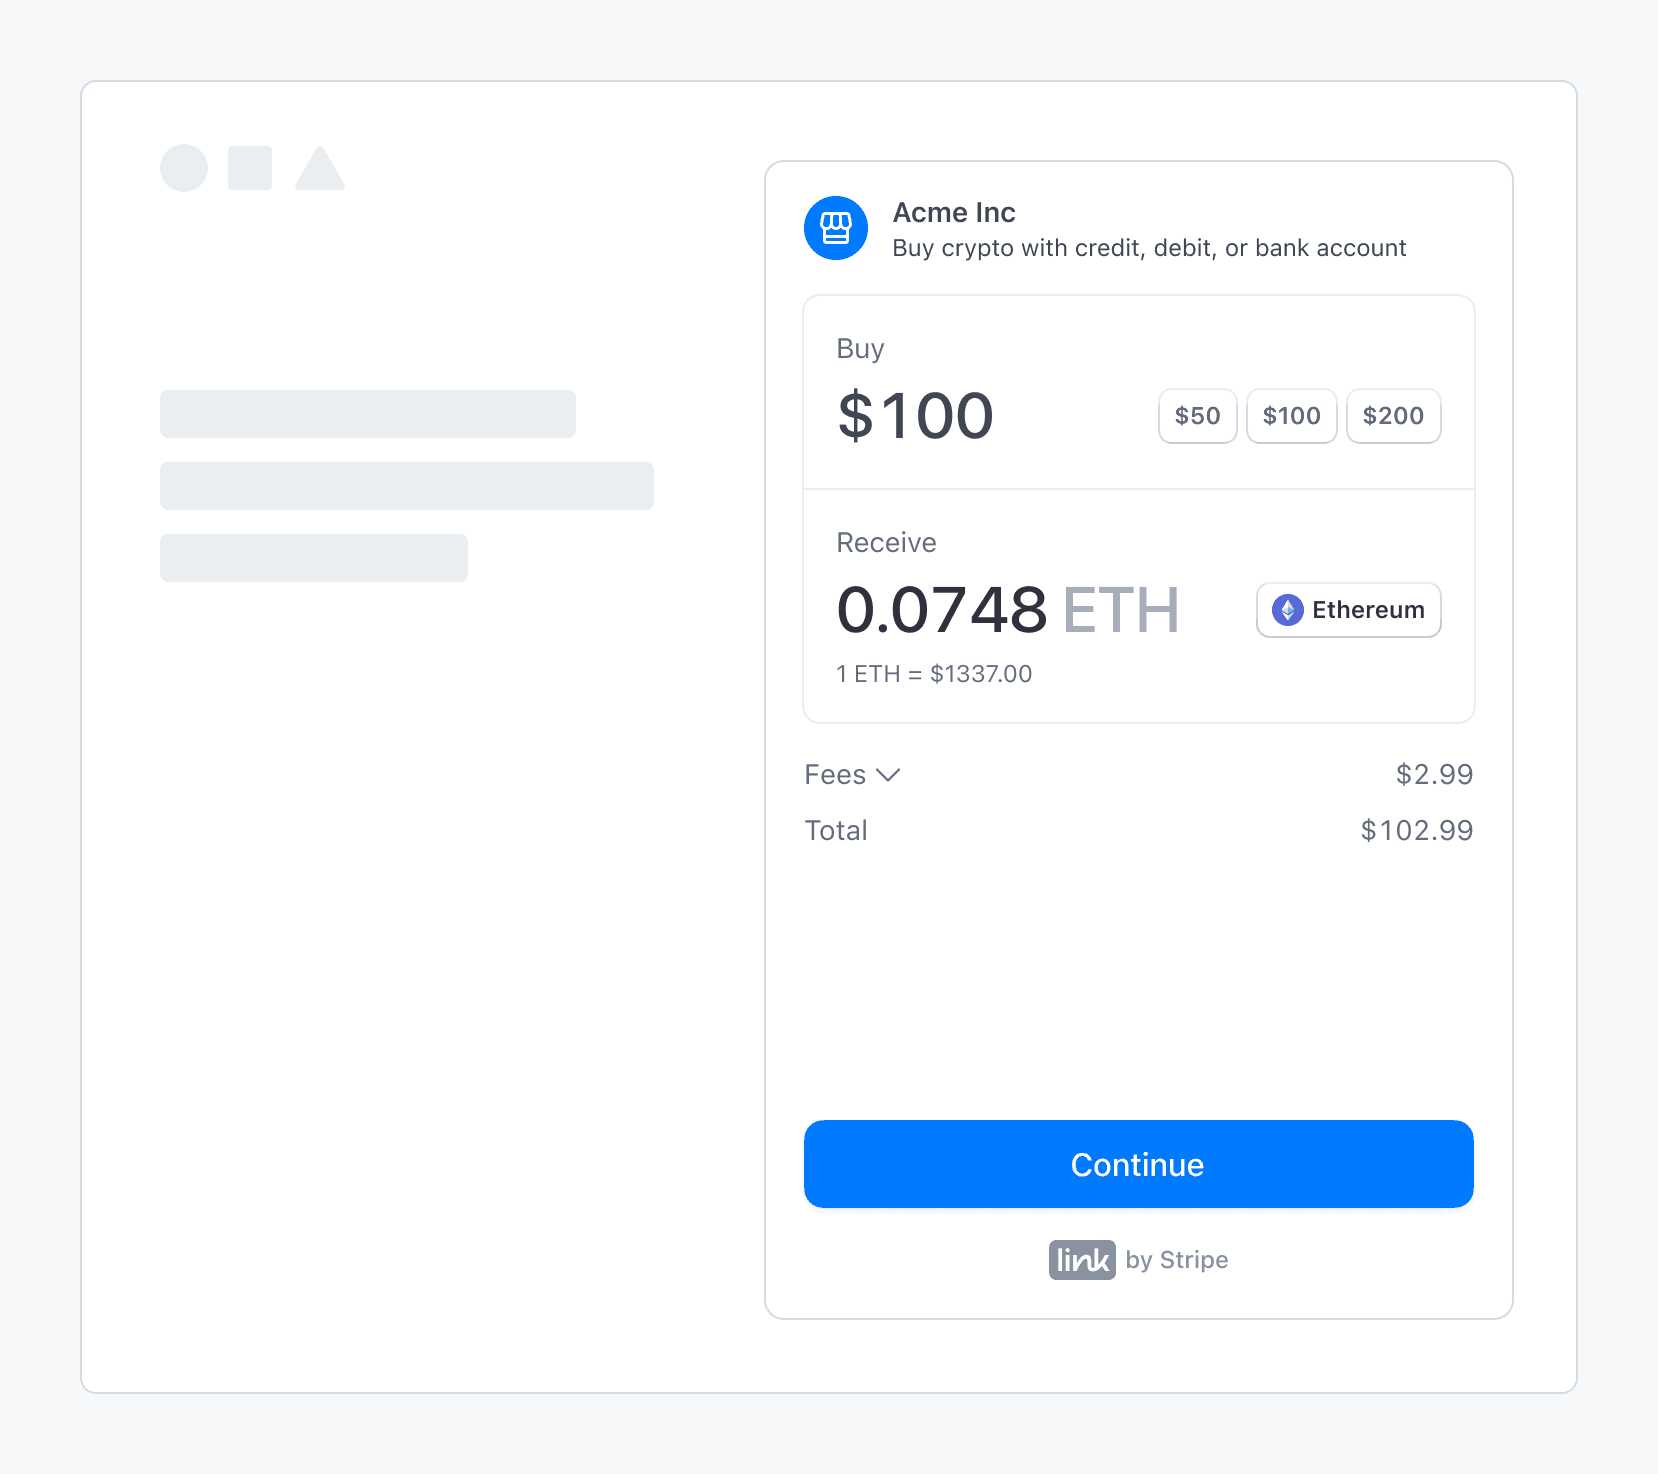
Stripe’s fiat-to-crypto onramp embedded within a third-party application
### Sandbox values
> Sandbox transaction amounts are overridden by our pre-decided limits.
Use the following values to complete an onramp transaction in *sandbox* (A sandbox is an isolated test environment that allows you to test Stripe functionality in your account without affecting your live integration. Use sandboxes to safely experiment with new features and changes):
- On the OTP screen, use `000000` for the verification code.
- On the personal information screen, use `000000000` for the SSN and `address_full_match` for address line 1.
- On the payment details screen, use the test credit card number `4242424242424242`.
## View integration usage
After you’ve launched the onramp, you can view customised usage reports in the [Stripe Dashboard](https://dashboard.stripe.com/crypto-onramp/reports). You can also return to the [onboarding page](https://dashboard.stripe.com/crypto-onramp/onboarding) to update the domains where you plan to host the onramp, and check the status of any onboarding tasks.
## Optional: Configure the onramp for mobile use
Integrate Stripe’s crypto on-ramp UI into mobile web views and browsers by minting a session, hosting the on-ramp UI, completing the purchase, and redirecting customers back to the mobile app.
### Mint a session
Similar to other integrations, you need to implement a server endpoint to [create a new on-ramp session](https://docs.stripe.com/crypto/onramp/embedded.md#create-onramp-session) for every customer visit. The endpoint returns a `client_secret` that can load the on-ramp UI or display an error if the on-ramp is unavailable.
### Host the onramp UI
Create a front end route (*for example, www.my-web3-wallet.com/onramp/*) to host the onramp UI. Your */onramp/* points to an onramp.html.
```html
Crypto Onramp
```
Where onramp.js consumes the `client_secret` from the URL and mounts the onramp UI:
```js
const stripeOnramp = StripeOnramp(<>);
initialize();
// initialize onramp element with client secret
function initialize() {
const url = window.location.href.replace(/\/$/, '');
const clientSecret = url.substring(url.lastIndexOf('/') + 1);
const onrampSession = stripeOnramp.createSession({
clientSecret,
// other client side options that customize the look and feel
});
onrampSession
.addEventListener('onramp_session_updated', handleSessionUpdate)
.mount("#onramp-element");
}
function handleSessionUpdate(event) {
const session = event.payload.session;
if (session.status === 'fulfillment_complete' || session.status === 'rejected') {
// redirect back to mobile app through universal link
window.location.assign('/onramp_success/' + session.id);
}
}
```
Configure universal links to deep link `/onramp_success` back to your mobile app. Consider providing a fallback or `onramp_success` page to prompt customers to manually switch back to your app.
### Complete the purchase
As with a standard integration, the front-end client controls the entire on-ramp UI. The UI adapts to fit the screen size. As the session state changes and we gather more `transaction_details`, the `CryptoOnrampSession` object updates accordingly. We generate webhooks and front-end events for every status transition. By using front-end event listeners, you can redirect customers back to your application flow when the `OnrampSession` completes.
### Redirect to the mobile app
Using a deep link or manual switch, customers can resume their flow in your mobile application. Your mobile application can use your back end to continue querying the `CryptoOnrampSession` state.
For example, if a customer is topping up their balance during initial setup, you can redirect them back to your application as soon as the session transitions to `fulfillment_processing`. You can allow customers to explore the rest of your application while polling the `OnrampSession` status in the background.
## Optional: Configure conversion quotes
The [Onramp Quotes](https://docs.stripe.com/api/crypto/onramp_quotes.md) API lets you fetch estimated quotes for on-ramp conversions into various cryptocurrencies on different networks. You can specify a fixed source or destination amount and limit the quotes to a subset of destination currencies or networks. This API allows you to display quotes in your product UI before directing the customer to the on-ramp widget. If the quote expires before the customer visits the on-ramp widget, the customer might see a slightly different quote in the on-ramp widget.
### Get a conversion quote
Use the [`GET /v1/crypto/onramp/quotes`](https://docs.stripe.com/api/crypto/onramp_quotes/retrieve.md) endpoint to get a conversion quote. The following table captures all of the available parameters for this endpoint:
| Parameter | Type | Default | Details |
| ------------------------ | ------------------------ | --------------------------------------------------------- | --------------------------------------------------------------------------------------------------------------------------------------------------------------------------------------------------------------------------------------------------------------------------------------------------------------------------------- |
| `source_currency` | String (optional) | `usd` | The [ISO-4217](https://www.iso.org/iso-4217-currency-codes.html) currency code. We currently only support `usd` and `eur`. |
| `source_amount` | String (optional) | `100.00` | A string representation of the fiat amount that you need to onramp. If `source_amount` is set, `destination_amount` must be null (they’re mutually exclusive, because you can only set a fixed amount for one end of the trade). |
| `destination_amount` | String (optional) | `null` | A string representation of the amount of `destination_currency` to be purchased. If `destination_amount` is set, `source_amount` must be null. When specifying this field, you must also set a single value for `destination_currencies` and a single value for `destination_networks` (so we know what cryptocurrency to quote). |
| `destination_currencies` | Array (optional) | `null`
- `['usdc', 'ethereum']` | The list of cryptocurrencies you want to generate quotes for. If left `null`, we retrieve quotes for all `destination_currencies` that `destination_networks` supports.
- Currencies: `btc`, `eth`, `sol`, `matic`, `usdc`, `xlm` |
| `destination_networks` | Array (optional) | `null`
- `['polygon', 'bitcoin', 'solana', 'ethereum']` | The list of cryptocurrency networks you want to generate quotes for. If left `null`, we retrieve quotes for `destination_currencies` in all networks.
- Networks: `bitcoin`, `ethereum`, `solana`, `polygon` , `stellar` |
### Example quote requests
To fetch all destination currency-network pairs with a default source amount of 100 USD, run the following command:
```bash
curl -G https://api.stripe.com/v1/crypto/onramp/quotes \
-u <>:
```
You receive a response similar to the following:
```json
{
"id": "cd35838481497f403988360cc0ff5ce5c5ce7451ce8938f86d379dff7157d33d",
"rate_fetched_at": 1674265380.6883376,
"destination_network_quotes": {
"ethereum": [
{
"id": "7eb9ccb7c1bffadf3773ca1f56ba3a352fe4a226328e72142925a80e7242b70c",
"destination_currency": "eth",
"destination_amount": "0.060232255577506866",
"destination_network": "ethereum",
"fees": {
"network_fee_monetary": "1.41",
"transaction_fee_monetary": "3.03"
},
"source_total_amount": "104.44"
},
{
"id": "398de047128b6dff1abbc41519811db68dd8bcb69939b87c4a4621b1740a1c5b",
"destination_currency": "usdc",
"destination_amount": "100.00",
"destination_network": "ethereum",
"fees": {
"network_fee_monetary": "5.63",
"transaction_fee_monetary": "3.07"
},
"source_total_amount": "108.70"
}
],
...
},
"livemode": true,
"source_currency": "usd",
"source_amount": "100.00"
}
```
To fetch all destination currency-network pairs with a source amount of 200 USD, run the following command:
```bash
curl -G https://api.stripe.com/v1/crypto/onramp/quotes \
-u <>: \
-d "source_amount"="200"
```
You receive a response similar to the following:
```json
{
"id": "2e5818944df6a2325c7e9c1e72d27174b9bedfc8e64ace47c081370a5b982a7b",
"rate_fetched_at": 1674265506.3408287,
"destination_network_quotes": {
"ethereum": [
{
"id": "d160a80828eabb6b6d4aeafac585eee62d95425c7fb7577866ab04b9a786df00",
"destination_currency": "eth",
"destination_amount": "0.253568242640499553",
"destination_network": "ethereum",
"fees": {
"network_fee_monetary": "1.45",
"transaction_fee_monetary": "12.71"
},
"source_total_amount": "214.20"
},
{
"id": "53f864cb28a42f11e1d9d5aff7e43ac96b056406f74cbf618399c6fa40f3d275",
"destination_currency": "usdc",
"destination_amount": "200.00",
"destination_network": "ethereum",
"fees": {
"network_fee_monetary": "5.80",
"transaction_fee_monetary": "12.76"
},
"source_total_amount": "218.56"
}
],
...
},
"livemode": true,
"source_currency": "usd",
"source_amount": "200.00"
}
```
To fetch quotes for ETH and SOL on the Ethereum and Solana networks, run the following command (which results in ETH on Ethereum and SOL on Solana). When you specify `destination_currencies` and `destination_networks`, each valid currency-network pair in their cross-product returns a quote. The default value for `destination_currencies` is all currencies and the default value for `destination_networks` is all networks.
```bash
curl -G https://api.stripe.com/v1/crypto/onramp/quotes \
-u <>: \
-d "source_amount"="200" \
-d "destination_currencies[]"="eth" \
-d "destination_currencies[]"="sol" \
-d "destination_networks[]"="ethereum" \
-d "destination_networks[]"="solana"
```
You receive a response similar to the following:
```json
{
"id": "c9ab6fd14f87290ef94b583f0dd346de8e197321e029776c12b7790cd83fb78c",
"rate_fetched_at": 1674265576.8238478,
"destination_network_quotes": {
"bitcoin": [],
"ethereum": [
{
"id": "97bbd7b9f8bc1a029264cdc28b47b636e989f8bcab96a80a3bded2094131e311",
"destination_currency": "eth",
"destination_amount": "0.253433817682353791",
"destination_network": "ethereum",
"fees": {
"network_fee_monetary": "1.46",
"transaction_fee_monetary": "12.71"
},
"source_total_amount": "214.17"
}
],
"polygon": [],
"solana": [
{
"id": "79f00923b96543aa69d140172c7cefd0e73a2ed089d8935e63dcf21028698e23",
"destination_currency": "sol",
"destination_amount": "16.767237943",
"destination_network": "solana",
"fees": {
"network_fee_monetary": "0.01",
"transaction_fee_monetary": "12.70"
},
"source_total_amount": "212.71"
}
]
},
"livemode": true,
"source_currency": "usd",
"source_amount": "200.00"
}
```
To fetch quotes for USDC on Ethereum and Solana, run the following command:
```bash
curl -G https://api.stripe.com/v1/crypto/onramp/quotes \
-u <>: \
-d "source_amount"="200" \
-d "destination_currencies[]"="usdc" \
-d "destination_networks[]"="ethereum" \
-d "destination_networks[]"="solana"
```
You receive a response similar to the following:
```json
{
"id": "8727e8de9a22915aea079973028054e31d362a328758a5953cee6ba1b6f22569",
"rate_fetched_at": 1674268717.432479,
"destination_network_quotes": {
"bitcoin": [],
"ethereum": [
{
"id": "603f29933c921d59b169572cf2d61da7d88f2a6973da0d6fcb686b3dec3de223",
"destination_currency": "usdc",
"destination_amount": "200.00",
"destination_network": "ethereum",
"fees": {
"network_fee_monetary": "5.88",
"transaction_fee_monetary": "12.76"
},
"source_total_amount": "218.64"
}
],
"polygon": [],
"solana": [
{
"id": "38b8388072e6272e7a0c0d5ee1161d3d747362a574f54fe76f1554ff60e3a007",
"destination_currency": "usdc",
"destination_amount": "200.00",
"destination_network": "solana",
"fees": {
"network_fee_monetary": "0.01",
"transaction_fee_monetary": "12.70"
},
"source_total_amount": "212.71"
}
]
},
"livemode": true,
"source_currency": "usd",
"source_amount": "200.00"
}
```
To fetch a quote for a single destination currency-network pair (ETH on Ethereum) with `destination_amount` specified, run the following command:
```bash
curl -G https://api.stripe.com/v1/crypto/onramp/quotes \
-u <>: \
-d "destination_amount"="0.42" \
-d "destination_currencies[]"="eth" \
-d "destination_networks[]"="ethereum"
```
You receive a response similar to the following:
```json
{
"id": "74f73859a8836293ce4f1e6757dc258c9f1016deea7b075faba8b5755d163168",
"rate_fetched_at": 1674268804.6989243,
"destination_network_quotes": {
"bitcoin": null,
"ethereum": [
{
"id": "f1adad5680b081031b03b89c174d25ce6b609416fc82f976423e95a089a10334",
"destination_currency": "eth",
"destination_amount": "0.420000000000000000",
"destination_network": "ethereum",
"fees": {
"network_fee_monetary": "1.45",
"transaction_fee_monetary": "21.06"
},
"source_total_amount": "719.53"
}
],
"polygon": null,
"solana": null
},
"livemode": true,
"source_currency": "usd",
"source_amount": "697.02"
}
```
## Optional: Listen to webhook events
We send a `crypto.onramp_session.updated` webhook every time the status of an onramp session changes post creation. We don’t send an event when a new session is created. [Configure webhooks](https://docs.stripe.com/webhooks.md) in the Dashboard.
The webhook uses the `CryptoOnrampSession` resource:
```json
{
"id": "evt_123",
"object": "event",
"data": {
"object": {
"id": "cos_0MYvv9589O8KAxCGPm84FhVR",
"object": "crypto.onramp_session",
"client_secret": "cos_0MYvv9589O8KAxCGPm84FhVR_secret_IGBYKVlTlnJL8UGxji48pKxBO00deNcBuVc",
"created": 1675794575,
"livemode": false,
"status": "initialized",
"transaction_details": {
"destination_currency": "eth",
"destination_amount": null,
"destination_network": "ethereum",
"fees": null,
"lock_wallet_address": false,
"source_currency": "usd",
"source_amount": null,
"destination_currencies": [
"eth"
],
"destination_networks": [
"ethereum"
],
"transaction_id": null,
"wallet_address": null,
"wallet_addresses": {
"bitcoin": null,
"ethereum": "0xB00F0759DbeeF5E543Cc3E3B07A6442F5f3928a2",
"polygon": null,
"solana": null,
"stellar": null,
"destination_tags": null
}
}
}
}
}
```
### Front-end events
You can subscribe to the following front-end events:
```js
// when the onramp UI is rendered
{
type: 'onramp_ui_loaded',
payload: {session: OnrampSession},
}
// when the onramp session object is updated
{
type: 'onramp_session_updated',
payload: {session: OnrampSession},
}
// for modal overlay render mode only
{
type: 'onramp_ui_modal_opened',
payload: {session: OnrampSession},
}
{
type: 'onramp_ui_modal_closed',
payload: {session: OnrampSession},
}
```
As shown above, you can subscribe or unsubscribe to events using the standard `addEventListener/removeEventListener` functions over OnrampSession. You can use `'*'` to match all events.
## Optional: Handle customer supportability and fraud
Stripe enforces limitations on the Embedded on-ramp for customer supportability and in the event of fraud attacks.
### Check customer supportability
Pass `customer_ip_address` during session creation so we can preemptively check the aforementioned limitation.
The endpoint returns `HTTP 400` with `code=crypto_onramp_unsupportable_customer` if the customer is in a geography we can’t support (based on `customer_ip_address`) You might want to hide the on-ramp option from customers in this case. Otherwise, our on-ramp UI renders in a `disabled` state.
Here’s a sample request illustrating this behaviour:
```bash
curl -X POST https://api.stripe.com/v1/crypto/onramp_sessions \
-u <>: \
-d "customer_ip_address"="8.8.8.8" \
```
Sample response (400):
```json
{
"error": {
"type": "invalid_request_error",
"code": "crypto_onramp_unsupportable_customer",
"message": "Based on the information provided about the customer, we're currently unable to support them."
}
}
```
### Handle fraud attacks
Stripe serves as the merchant of record and takes on the liability for disputes and fraud. We might decide to temporarily restrict creation of on-ramp sessions if we detect a high-risk situation (for example, if we see active attacks and exploits).
If we need to shut off the API because of an unbounded fraud attack, we return the following when anyone attempts to create a new session:
```bash
curl -X POST https://api.stripe.com/v1/crypto/onramp_sessions \
-u <>: \
```
You receive a response similar to the following:
```json
{
"error": {
"type": "api_error",
"code": "crypto_onramp_disabled",
"message": "The v1/crypto/onramp_sessions endpoint has been disabled temporarily. Stripe will get in contact with you about details of the outage.",
"updated": 1652025690
}
}
```
### Additional validation and errors
| Condition | HTTP status | Error code |
| --------------------------------------------------------------------------------------------------------------------------------------------------------------------------------------------------------------- | ----------- | ----------------------------------------------------------------------------- |
| We’re unable to mint new sessions because of an incident | 400 | `crypto_onramp_disabled` |
| Based on the `customer_ip_address` parameter, we’re unable to support the given consumer. | 400 | `crypto_onramp_unsupported_country` or `crypto_onramp_unsupportable_customer` |
| Malformed `customer_ip_address` is passed in to the `/v1/crypto/onramp_session` endpoint | 400 | `customer_ip_address` |
| `source_amount` and `destination_amount` are mutually exclusive, but the platform set both. | 400 | `crypto_onramp_invalid_source_destination_pair` |
| One of `destination_currency` and `destination_network` is set, but the other one isn’t | 400 | `crypto_onramp_incomplete_destination_currency_and_network_pair` |
| The combination of `destination_currency` and `destination_network` isn’t valid | 400 | `crypto_onramp_invalid_destination_currency_and_network_pair` |
| `source_amount` is set, but `source_currency` isn’t set | 400 | `crypto_onramp_missing_source_currency` |
| `source_amount` isn’t a positive number | 400 | `crypto_onramp_invalid_source_amount` |
| `destination_amount` is set, but `destination_currency` isn’t set | 400 | `crypto_onramp_missing_destination_currency` |
| `destination_amount` isn’t a positive number | 400 | `crypto_onramp_invalid_destination_amount` |
| The combination of `destination_currencies` and `destination_networks` doesn’t have any supported currencies | 400 | `crypto_onramp_invalid_destination_currencies_and_networks` |
| `destination_currency` isn’t included in `destination_currencies` | 400 | `crypto_onramp_conflicting_destination_currency` |
| `destination_network` isn’t included in `destination_networks` | 400 | `crypto_onramp_conflicting_destination_network` |
| At least one wallet address in `wallet_addresses` is associated with a network that isn’t included in `destination_networks` | 400 | `crypto_onramp_wallet_addresses_not_all_networks_supported` |
| No wallet addresses were provided in `wallet_addresses` but `lock_wallet_address` was set to true | 400 | `crypto_onramp_no_wallet_address_to_lock` |
| The business hasn’t set the `business_name` or `business_url` fields. These are populated in the [Dashboard](https://dashboard.stripe.com/settings/public/) under `Public business name` and `Business website` | 400 | `crypto_onramp_merchant_not_properly_setup` |
## Optional: Use session persistence
You can use session persistence to help you provide notifications and keep customers engaged with the on-ramp after fulfilling their purchase.
#### Advantages of session persistence
You might want to persist an on-ramp session across customer visits in some instances. For example, when a customer’s on-ramp session is disrupted or dropped, you could prompt them and provide ways to resume the on-ramp session later. Or, if a customer refreshes the page after completing the payment, you can retain the ability to notify them when a previous on-ramp purchase was fulfilled.
For this reason, the OnrampSession object is stateful and stored as a server side resource. By initialising the on-ramp UI using a previously used OnrampSession client secret, customers return to where they left off.
#### Session persistence configuration
A client secret is a unique identifier for the on-ramp session that stores the lifecycle of a session without leaking sensitive payment information. However, it exposes private information such as wallet addresses. Don’t log it, embed it in URLs, or expose it to anyone other than the customer. Make sure that you have TLS on any page that includes the client secret.
If you have a Web2-like account structure, you could link OnrampSession to your customer object and fetch it upon authentication. For an account-less Web3 application, it would add customer friction to require the use of message signing for authentication. Privacy-preserving local storage yields an acceptable customer experience.
## Optional: Configure the on-ramp by use case
You can configure the on-ramp session parameters based on use case:
- Wallets
- Dapp or NFT checkout
- Decentralised Exchange (DEX) integration
To make on-ramp appear to be part of your product UI, frame the on-ramp as a native component of your application.
## Wallet
Wallet customers have two main on-ramp entry points: wallet funding and transaction top-ups.
### Wallet funding
You can proactively prompt customers to fund their wallet after they create a new wallet or when their funds are critically low.
In these cases, consider specifying the following parameters:
- `wallet_addresses`: Use the wallet address already in use.
- `destination_networks`: Set to the default or selected network to reduce customer confusion.
- `destination_currencies`: You can leave this blank, but you can also restrict it to the native gas token or any desired cryptocurrencies. For example, if you offer a DeFi service in USDC, consider that the customer likely needs both USDC and the gas token.
- `destination_network`: Leave this blank to inherit the first value of the supported network.
- `destination_currency`: Leave this blank to inherit the first value of the supported cryptocurrencies.
The following code example shows the creation of an on-ramp session using several of these parameters:
```bash
curl -X POST https://api.stripe.com/v1/crypto/onramp_sessions \
-u <>: \
-d "customer_ip_address"="8.8.8.8" \
-d "wallet_addresses[ethereum]"="0xB00F0759DbeeF5E543Cc3E3B07A6442F5f3928a2" \
-d "wallet_addresses[solana]"="bufoH37MTiMTNAfBS4VEZ94dCEwMsmeSijD2vZRShuV" \
-d "destination_networks[]"="ethereum" \
-d "destination_networks[]"="solana"
```
### Transaction top-ups
When a Dapp or customer proposes a transaction, you might detect that the transaction fails because of insufficient funds. In this case, you can calculate the delta required for the transaction to complete. However, it’s often difficult to detect the requested amount or cryptocurrency for ERC or SPL tokens.
In these cases, consider specifying the following:
- `wallet_addresses`: Use the wallet address in use.
- `destination_networks`: Set to the selected network.
- `destination_currencies`: Restrict to the missing currencies when possible.
- `destination_network`: Set to the selected network (a required value if you want to set the amount).
- `destination_currency`: Set to the target currency (a required value if you want to set the amount).
- `destination_amount`: Set to the balance differences, leaving enough of a buffer for gas when applicable.
The following code example shows the creation of an on-ramp session using several of these parameters:
```bash
curl -X POST https://api.stripe.com/v1/crypto/onramp_sessions \
-u <>: \
-d "customer_ip_address"="8.8.8.8" \
-d "wallet_addresses[ethereum]"="0xB00F0759DbeeF5E543Cc3E3B07A6442F5f3928a2" \
-d "destination_networks[]"="ethereum" \
-d "destination_currencies[]"="usdc" \
-d "destination_network"="ethereum" \
-d "destination_currency"="usdc" \
-d "destination_amount"="10"
```
## Dapp or NFT checkout
You can use the on-ramp in checkout when you know the destination amount. For example, a Dapp might sell memberships for a fixed price, or a customer might want to buy a specific NFT from a marketplace.
In these cases, consider specifying the following:
- `wallet_addresses`: Use the connected wallet address.
- `destination_networks`: Use the connected network.
- `destination_currencies`: Use the presentment currency (the price in the currency the goods are quoted in).
- `destination_network`: Set to the selected network above (required if you want to set the amount).
- `destination_currency`: Set to the target currency above (required if you want to set the amount).
- `destination_amount`: Set it to either the balance difference or to cover the entire purchase amount. Some customers adopt both, using on-chain analytics with an almost even split. A customer might choose the full amount to simplify their tax cost basis or to avoid spending accumulated assets. In both cases, leave room for gas.
The following code example shows the creation of an on-ramp session using several of these parameters:
```bash
curl -X POST https://api.stripe.com/v1/crypto/onramp_sessions \
-u <>: \
-d "customer_ip_address"="8.8.8.8" \
-d "wallet_addresses[ethereum]"="0xB00F0759DbeeF5E543Cc3E3B07A6442F5f3928a2" \
-d "destination_networks[]"="ethereum" \
-d "destination_currencies[]"="eth" \
-d "destination_network"="ethereum" \
-d "destination_currency"="eth" \
-d "destination_amount"="0.2343"
```
## DEX
A DEX offers a unique opportunity to let customers buy any cryptocurrency with fiat. While a DEX can prompt customers to top up crypto when exchanging arbitrary crypto pairs using an existing interface, it’s better to have a dedicated customer flow that focuses on fiat to crypto only.
As the on-ramp lets you control your brand and UI, a DEX can build an on-ramp widget that uses Stripe’s ability to process fiat into select cryptocurrencies. The DEX can then complete the final exchange to arbitrary currencies. A DEX can also build an on-ramp widget for a specific token. For example, a DAO might endorse a specific liquidity pool and use a DEX to distribute their tokens and onboard new customers with fiat.
In these cases, consider specifying the following:
- `wallet_addresses`: Use the wallet address already in use.
- `destination_networks`: Set to the selected network.
- `destination_currencies`: Restrict to the selected cryptocurrency.
- `destination_network`: Set to the selected network (required if you want to set the amount).
- `destination_currency`: Set to the target currency (required if you want to set the amount).
- `destination_amount`: Set only if you can collect the customer’s intent ahead of time – leave blank for Stripe to suggest smart default values.
The following code example shows the creation of an on-ramp session using several of these parameters:
```bash
curl -X POST https://api.stripe.com/v1/crypto/onramp_sessions \
-u <>: \
-d "customer_ip_address"="8.8.8.8" \
-d "wallet_addresses[ethereum]"="0xB00F0759DbeeF5E543Cc3E3B07A6442F5f3928a2" \
-d "destination_networks[]"="ethereum" \
-d "destination_currencies[]"="eth" \
-d "destination_network"="ethereum" \
-d "destination_currency"="eth"
```