Recibe pagos y luego transfiérelos en tu marketplace
Recibe pagos de clientes y luego transfiere los fondos a los vendedores o proveedores de servicios de tu marketplace.
En esta guía, se muestra como aceptar pagos de clientes y transferir fondos a cuentas bancarias de vendedores o proveedores de servicios sin escribir código. Usa esta guía en los siguientes casos:
- Quieres aceptar pagos de clientes y pagar a vendedores o proveedores de servicios sin escribir código.
- Deseas probar con rapidez y sin programación si el producto se adecúa al mercado.
- Eres un mercado que vende directamente a los clientes finales (a diferencia de una plataforma SaaS que vende software para ayudar a otros a operar su propio negocio).
En este ejemplo, diseñamos un marketplace que les permite a diseñadores que hacen camisetas vender productos personalizados. Puedes aplicar los conceptos incluidos en esta guía a otros tipos de negocio.
Prerrequisitos
- Registra tu plataforma.
- Agrega datos de la empresa para activar tu cuenta.
- Completa el perfil de tu plataforma.
- Personaliza la configuración de marca de Connect en la página de configuración del Dashboard de Stripe y personaliza la configuración de marca de tu enlace de pago en la página de configuración de imagen de marca de Checkout.
Crea una cuenta conectada
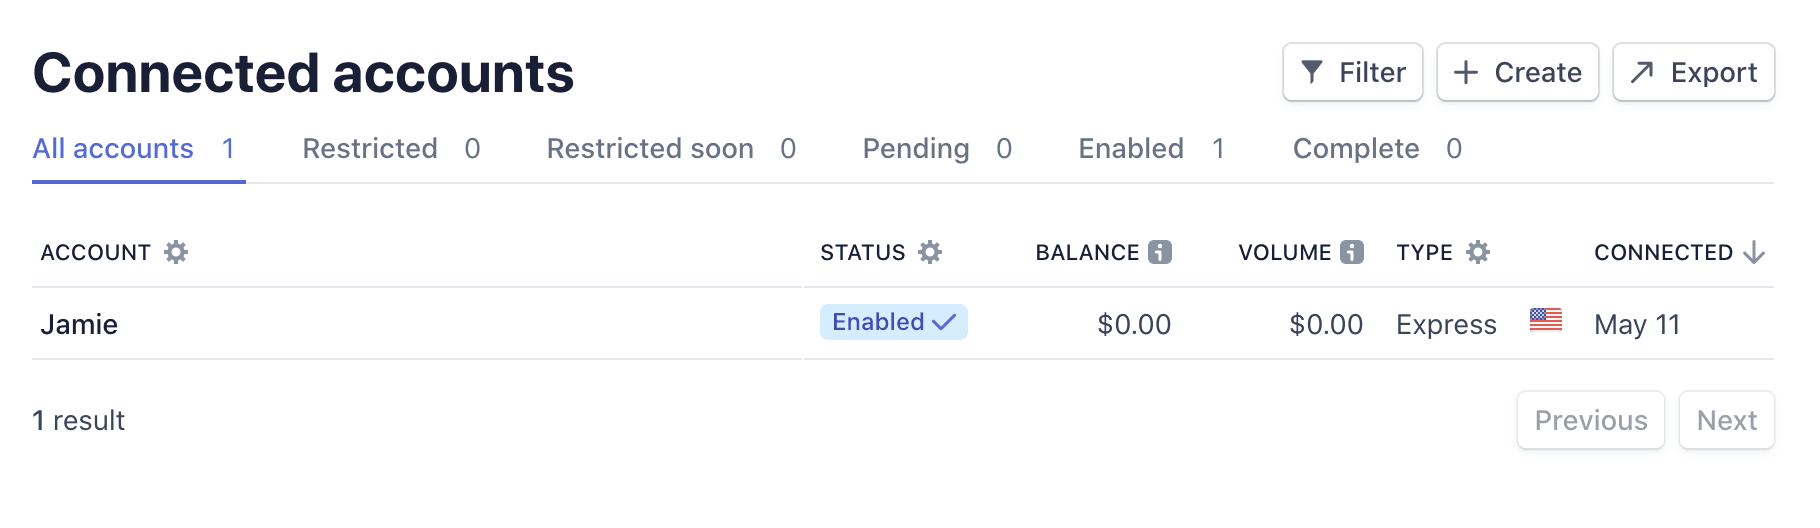
Cuando un vendedor o un proveedor de servicios crea una cuenta en tu marketplace, tienes que crear una cuenta de usuario (llamada cuenta conectada) para poder transferir fondos a su cuenta bancaria. Las cuentas conectadas representan a los vendedores o proveedores de servicios. En nuestro ejemplo del marketplace de camisetas, la cuenta conectada representa al diseñador que hace las camisetas.
Crear un enlace de onboarding para una cuenta conectada
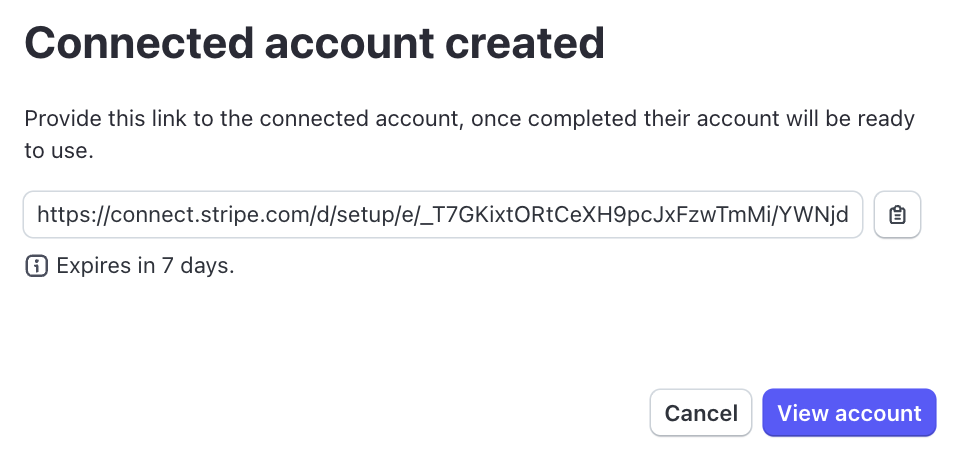
Con este enlace se dirige a los vendedores y proveedores de servicios a un formulario de registro en el que pueden brindar sus datos personales y la información de la cuenta bancaria para integrarse a tu marketplace. En nuestro ejemplo del marketplace de camisetas, tienes que compartir este enlace con el diseñador de camisetas para hacer su onboarding. Este enlace vence después de 90 días y solo un vendedor o proveedor de servicios puede usarlo. Después de que el usuario complete el flujo de onboarding, podrás ver los datos de la cuenta en la página Cuentas conectadas. Repite estos pasos siempre que tengas que agregar otros vendedores o proveedores de servicios.
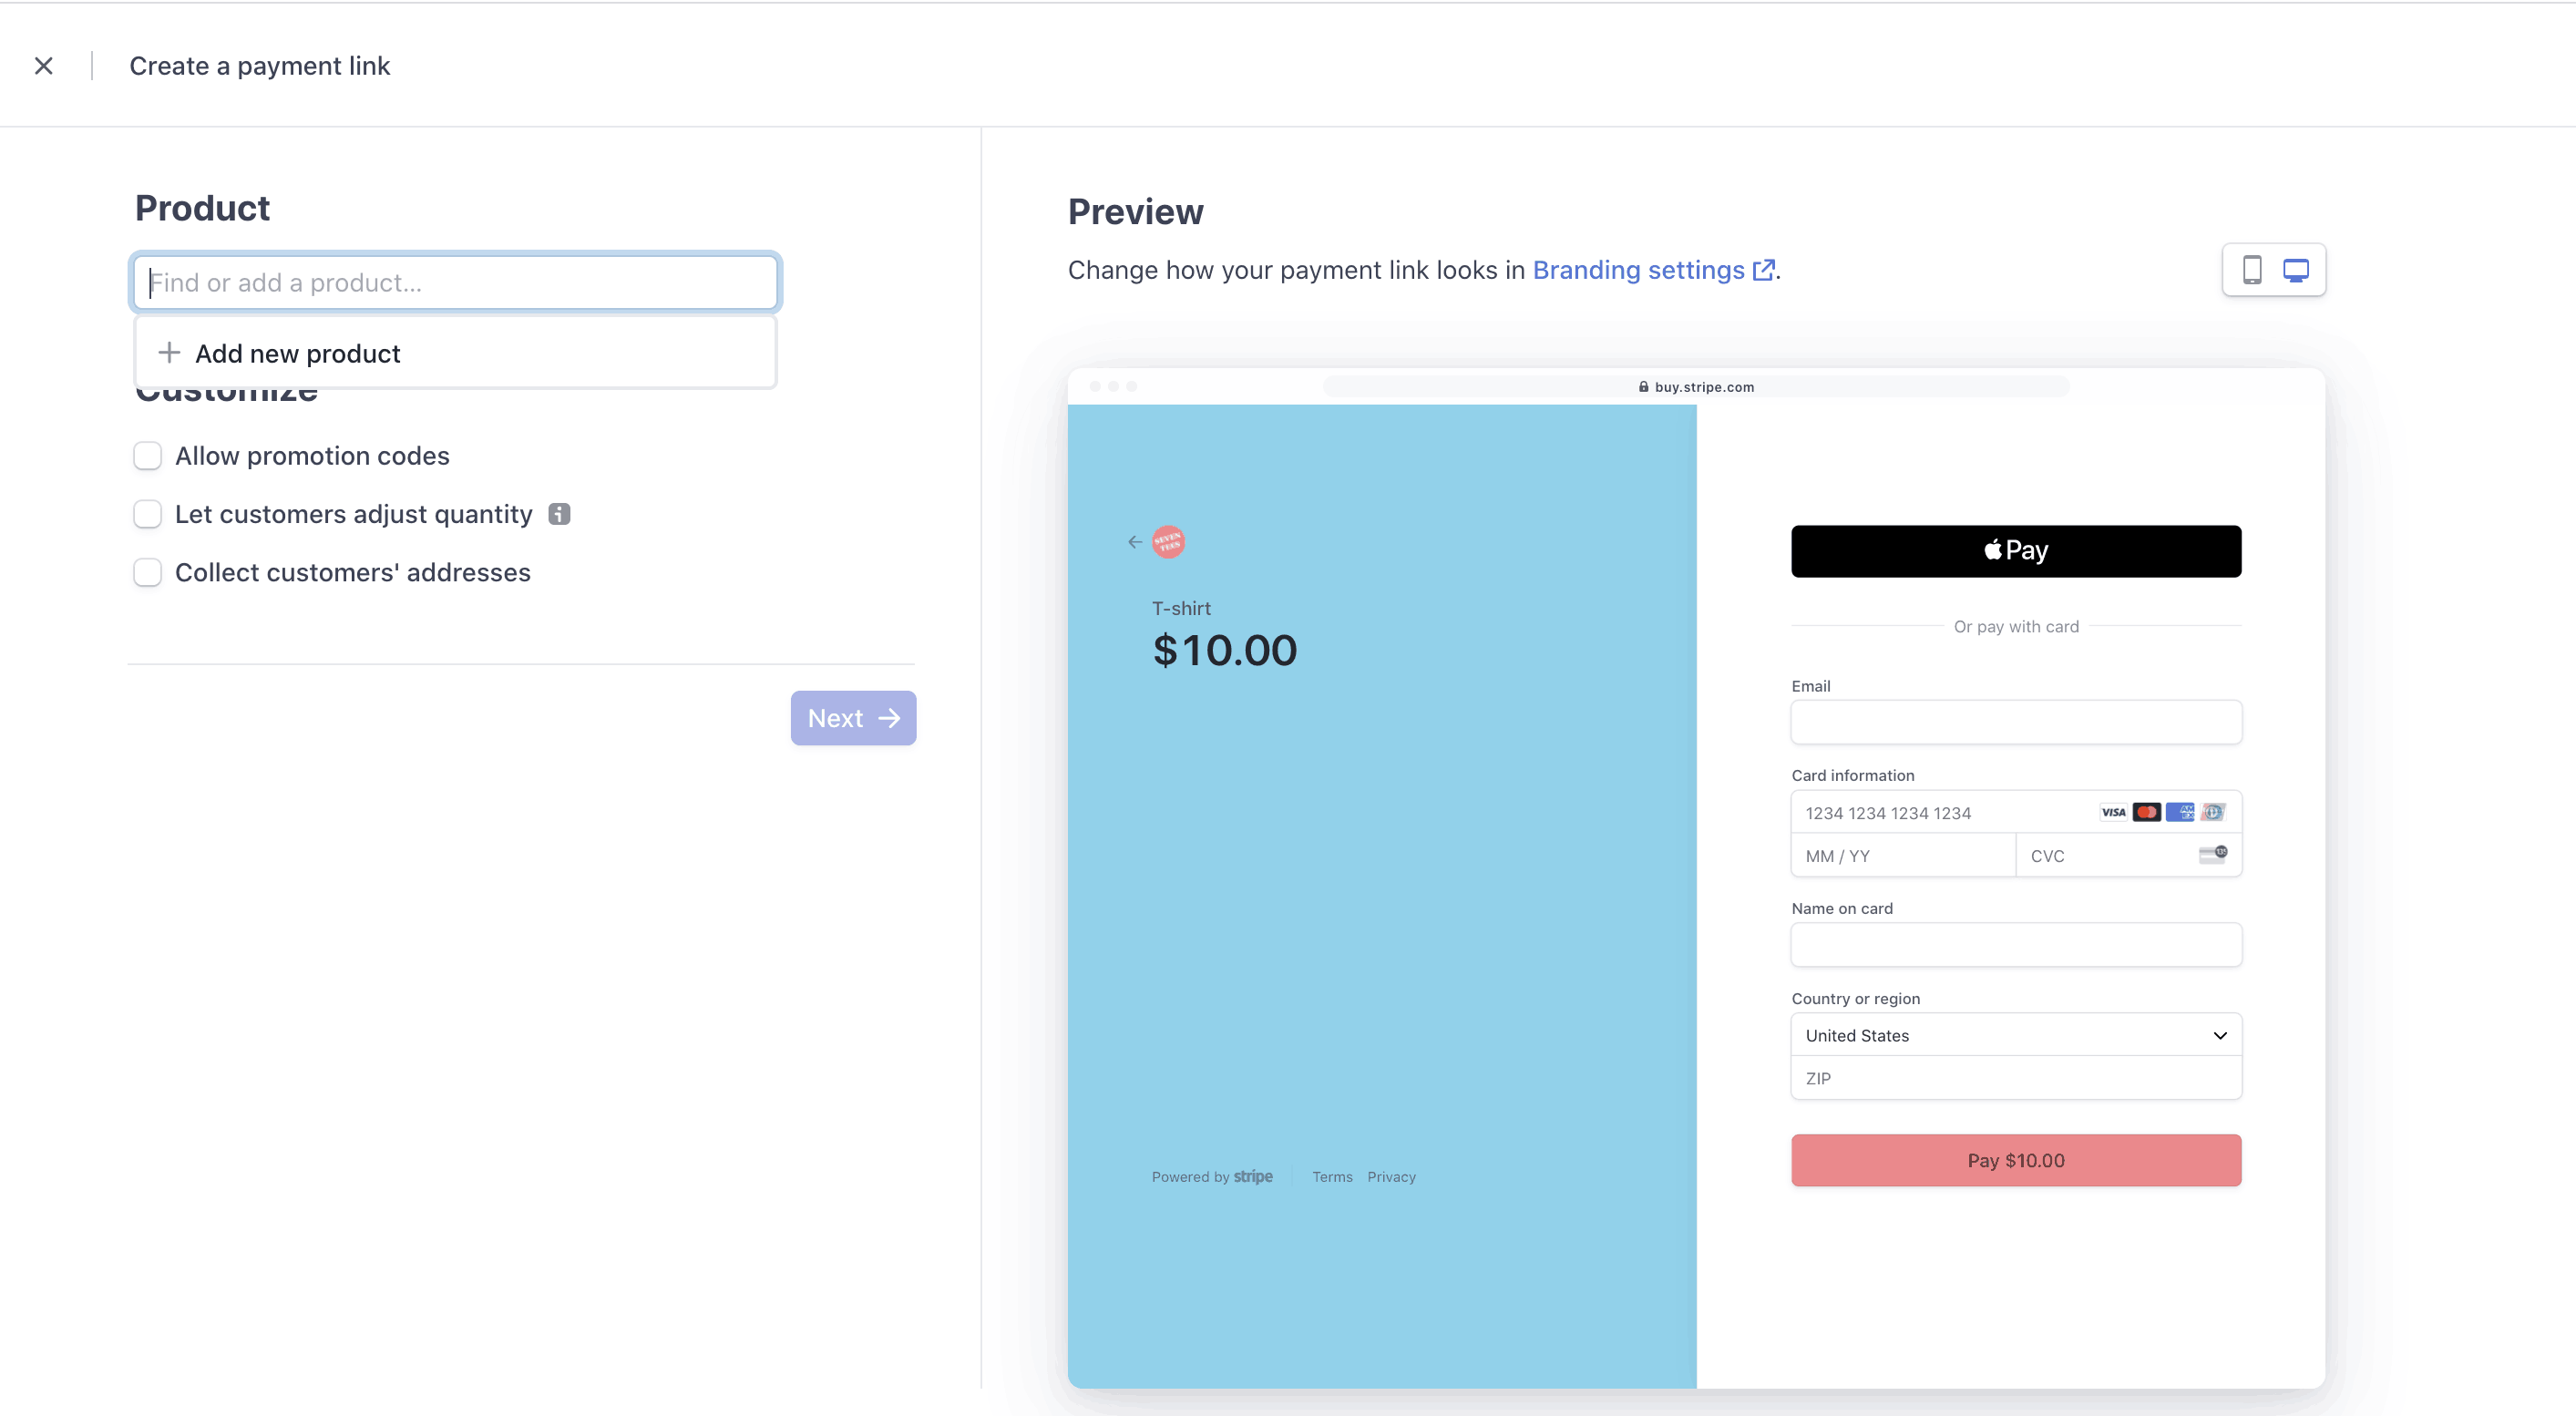
Crea un enlace de pago para aceptar pagos
Ahora que ya creaste una cuenta conectada, crea un enlace de pago para aceptar pagos de tus clientes, sin necesidad de código. Cuando envíes este enlace al cliente de tu marketplace, este entrará a una página alojada por Stripe desde la que podrá pagarte. En el ejemplo del marketplace de camisetas, los clientes compran camisetas a través de tu marketplace y tú le pagas al diseñador por el diseño y la creación de las camisetas. Para configurar esto, haz clic en +Crear enlace en la página de Payment Links y sigue los pasos.
Paso 2.1: Agrega el producto
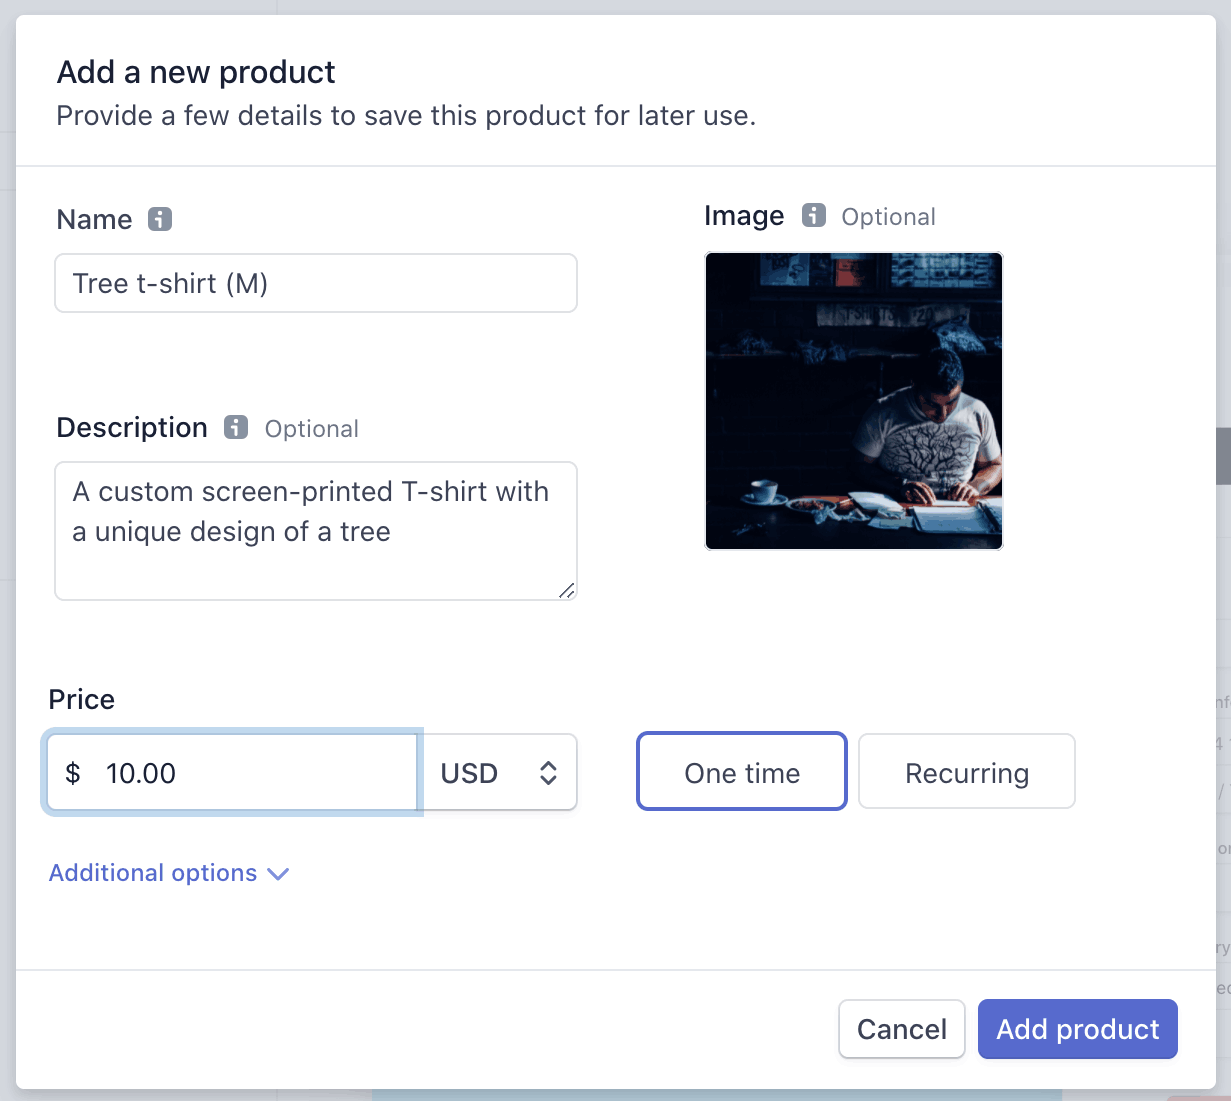
Como configuras Payment Links para un producto y un precio determinados, el primer paso es agregar el producto que quieres vender. Haz clic en +Agregar nuevo producto para agregarlo.
Configura el nombre, la descripción y el precio del producto que el cliente verá en la página de Checkout a la que lo rediriges. Después de ingresar la información del nuevo producto, haz clic en +Agregar producto para agregarlo. En este ejemplo, agregaremos camisetas talle M con estampa de árboles, entonces configuraremos el enlace de pago para este producto en particular. Si también quisiéramos vender camisetas talles S o con otros diseños, seguiríamos los pasos anteriores para crear un nuevo enlace de pago y un nuevo producto.
Paso 2.2: Personaliza el enlace de pago
Puedes personalizar tu enlace de pago para permitirles a los clientes que ingresen códigos de promoción, ajusten la cantidad del producto o ingresen su dirección de envío y facturación. En nuestro ejemplo del marketplace de camisetas, queremos que nuestros clientes puedan comprar una cantidad variable de camisetas. Además, tenemos que recopilar la dirección de envío del cliente para poder hacer el despacho. Para posibilitar ambas cosas, selecciona Permitir que el cliente ajuste la cantidad y Recopilar direcciones de clientes y, luego, haz clic en Siguiente.
Paso 2.3: Decide cuándo pagarle a tu cuenta conectada
Para pagarle a una cuenta conectada, tienes dos opciones.
- Si ya sabes a qué cuenta conectada quieres pagarle usando los fondos cobrados a través del enlace de pago, puedes transferirle los fondos automáticamente.
- Sin embargo, si no sabes con antelación a qué cuenta conectada corresponde pagarle o tienes que pagarles a varias cuentas conectadas, puedes transferir los fondos más tarde.

Comparte el enlace de pago con tus clientes
Ahora que ya has creado el enlace de pago, copia la URL del enlace de pago y compártela públicamente en tu sitio web o a través de una red social. Cuando el cliente haga clic en la URL del enlace de pago, verá tu página de Checkout personalizada (ver el ejemplo de abajo) y podrá ingresar su información de pago. El cliente puede pagar desde un dispositivo móvil o de escritorio con tarjeta, Apple Pay o Google Pay.
Después del pago
Paso 4.1: Visualiza tus pagos
Desde la página Pagos, verás la lista de pagos que tu empresa ha aceptado. Puedes hacer clic en un pago individual para ver más información relacionada, como la dirección de envío si optaste por recopilar este dato. Puedes ver las comisiones de la plataforma que tu empresa cobró por cada pago o ir a la página Saldo para ver el total de los fondos.
Paso 4.2: Cumplimiento del pedido
Una vez efectuado el pago, debes gestionar el cumplimiento del pedido. En el ejemplo del marketplace de camisetas, esto implicaría enviar las camisetas al comprador después del pago.
OpcionalAgrega más métodos de pago
Payment Links admite más de 20 métodos de pago. Puedes habilitar los métodos de pago en Configuración de métodos de pago. Después de habilitar los métodos de pago, Stripe muestra de forma dinámica los métodos de pago con mayor probabilidad de aumentar la conversión y los más relevantes para la moneda y la ubicación del cliente.
Precaución
Stripe comenzó a admitir más métodos de pago el 25 de enero de 2022. Los enlaces de pago creados antes de esa fecha solo admiten pagos con tarjetas y billeteras. Crea un nuevo enlace para habilitar más métodos de pago.
Algunos métodos de pago, como los débitos bancarios o los vales, demoran entre 2 y 14 días para confirmar el pago. Usa webhooks para recibir la notificación de cuándo se efectúa el pago y así podrás iniciar el cumplimiento del pedido. Consulta nuestra guía de cumplimiento.
Disputas
Por ser el comerciante a cargo del cobro, tu plataforma es responsable de las disputas. Asegúrate de conocer las mejores prácticas para responder a las disputas.
Transferencias
De manera predeterminada, todos los fondos que transfieres a una cuenta conectada se acumulan en el saldo de Stripe de la cuenta conectada y se transfieren diariamente en forma continua. Puedes modificar la frecuencia de las transferencias a cuentas bancarias desde la página de datos de la cuenta conectada, haciendo clic con el botón derecho del mouse en la sección Saldo y seleccionando Editar calendario de transferencias.
Rembolsos
Para emitir reembolsos, dirígete a la página de pagos. Selecciona pagos individuales haciendo click en la casilla que se encuentra a la izquierda de los pagos que quieras reembolsar. Luego de seleccionar un pago, Stripe mostrará un botón de Reembolsar en la esquina superior derecha de la página. Haz click en el botón Reembolsar para emitir un reembolso de todos los pagos que has seleccionado para el cliente.
Nota
Las cuentas conectadas no pueden iniciar reembolsos para pagos desde el Dashboard de Express por defecto. Si tus cuentas conectadas utilizan el Dashboard de Express, puedes procesar reembolsos para ellas, o habilitarlas para procesar reembolsos mediante la personalización de las funcionalidades del Dashboard de Express.