Using Treasury to move money
Learn how to use SetupIntents, PaymentMethods, and verify bank accounts with Stripe Treasury.
Homebox is a fictitious vertical SaaS that builds software for home services companies like HVAC, cleaners, and plumbers. This integration walks through some basic money movement using the Treasury endpoints of the Stripe API. To see how the company set up a Treasury financial account and issued payment cards, see Using Treasury to set up financial accounts and cards.
Using external bank accounts
Stripe Treasury provides platforms with a suite of account creation and money movement API endpoints to help store, manage, and move connected accounts’ funds. Platforms can fund a financial account, and move money between Treasury financial accounts and external bank accounts.
The Stripe API offers InboundTransfer and OutboundTransfer to facilitate moving money between connected accounts’ external bank accounts and their Treasury financial accounts. The Stripe API also offers OutboundPayment to facilitate moving money from connected accounts’ Treasury financial accounts to third-parties’ external bank accounts. All of these objects can leverage PaymentMethods to store external bank account details such as routing numbers and account numbers.
PaymentMethods explained
Within the Stripe API, you can save payment method information using a PaymentMethod object. For example, Homebox might save their vendors’ accounts as PaymentMethods to send money without having to re-enter and collect their information.
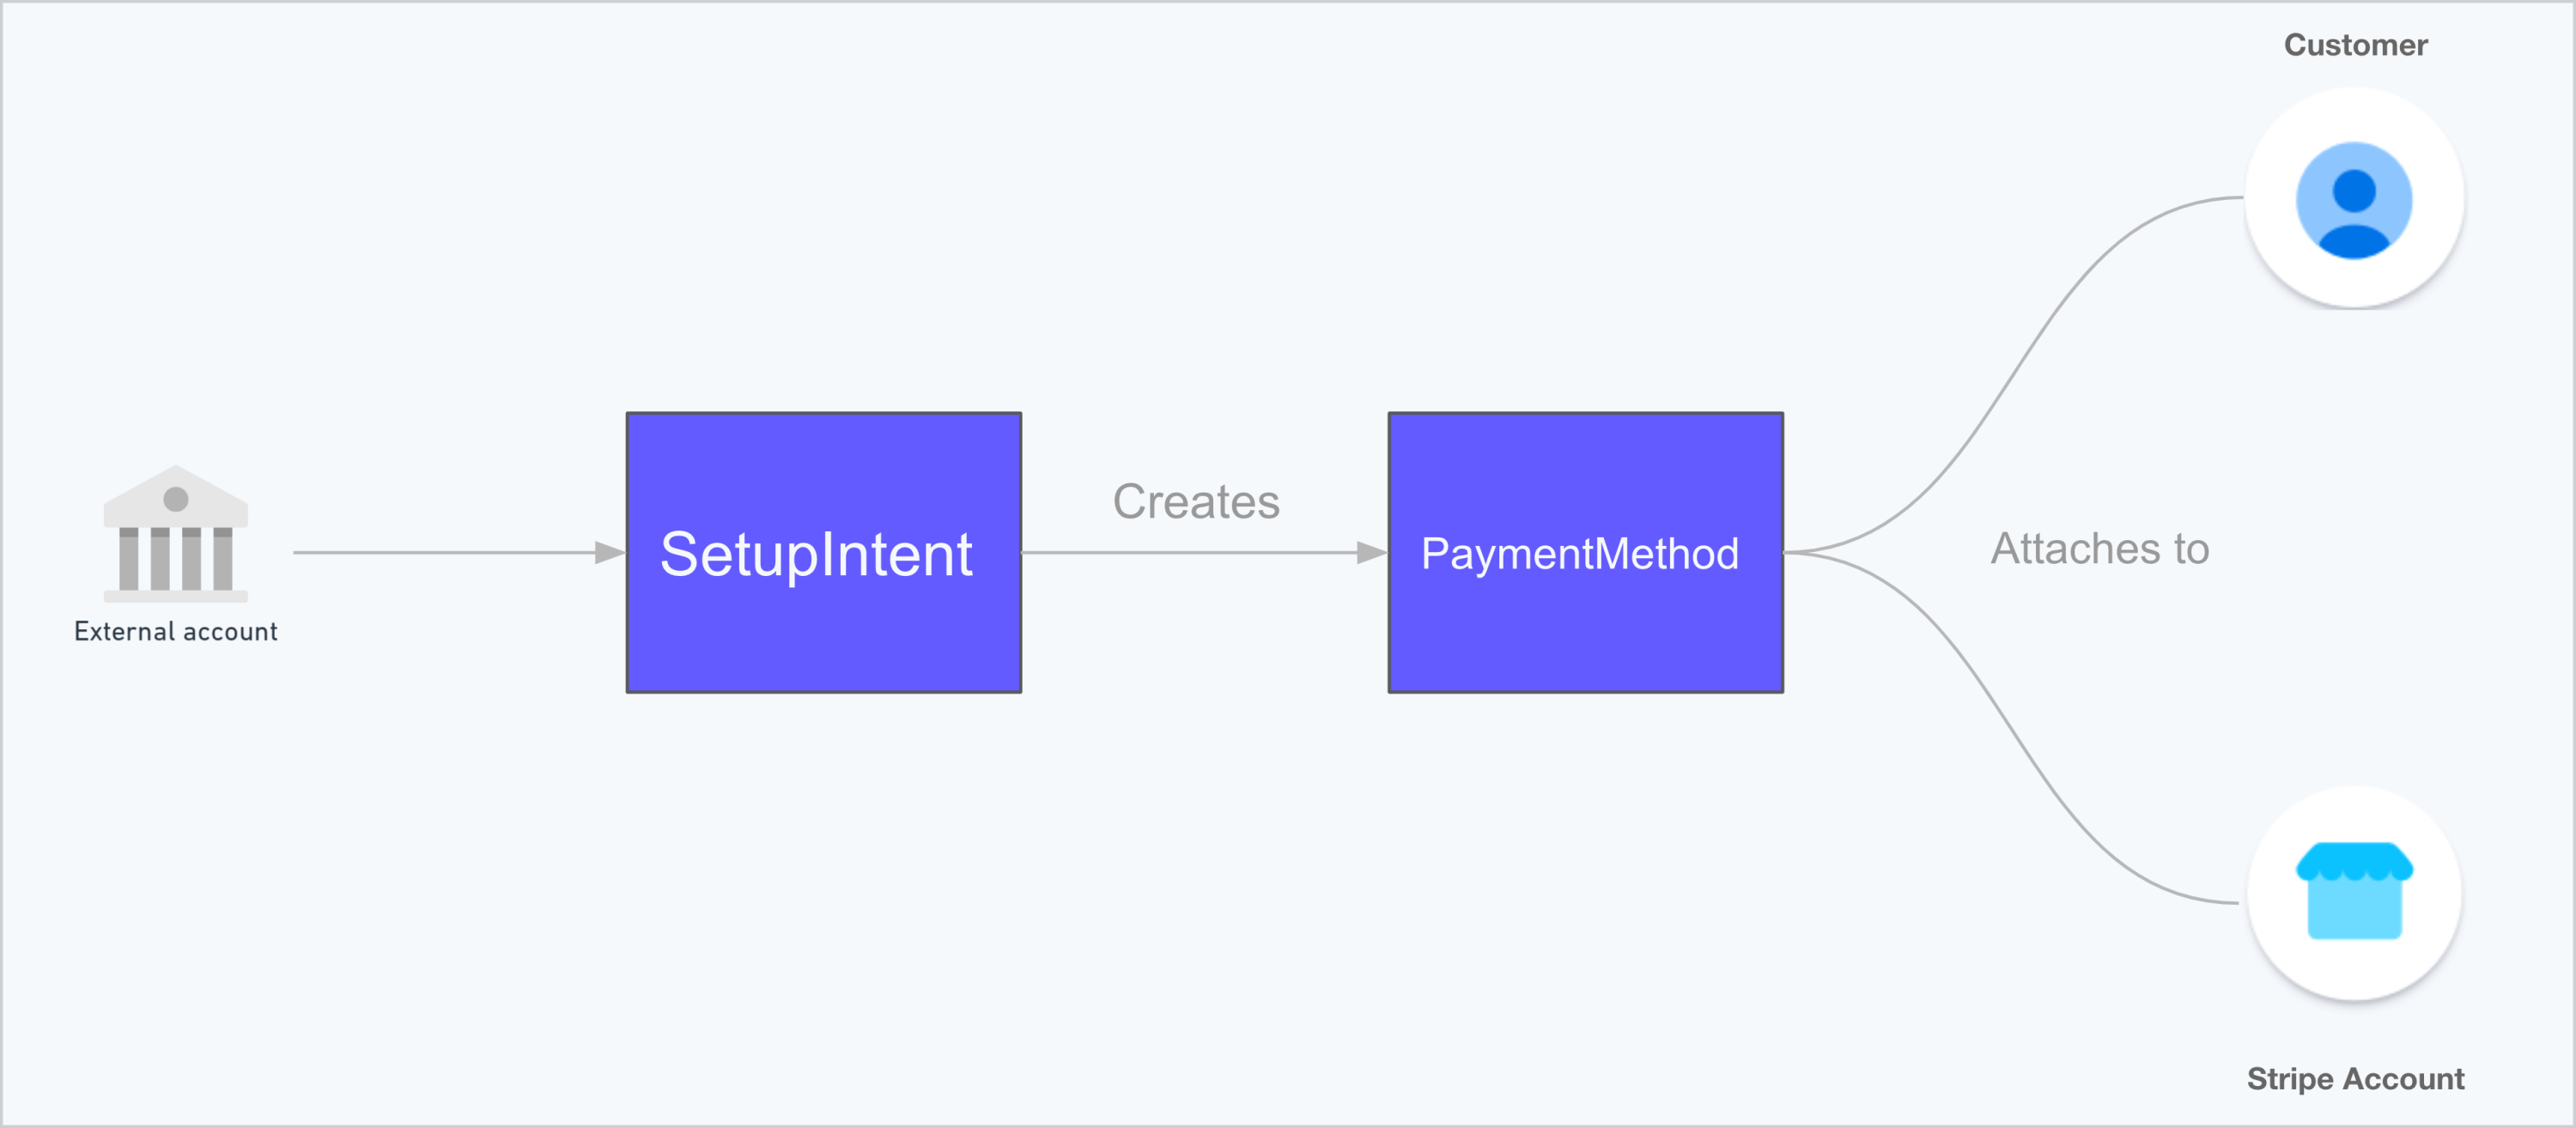
You can attach PaymentMethods that contain external bank account information to a customer (for sending money to a third party) or to a Stripe account (for pulling money from or sending money to an external bank account belonging to the Stripe accountholder). The “customer” refers to the Customer object in the Stripe API, which defines any third party. In Treasury usage, the customer is generally a vendor receiving payments from the Stripe accountholder rather than making payments to the Stripe accountholder. Use the SetupIntent object to set up both customer-attached and account-attached PaymentMethod objects.
The relevant API objects that you can use with a PaymentMethod depend on how they’re attached:
- Customer-attached: Use
OutboundPayments. - Account-attached: Use
InboundTransfersandOutboundTransfers.
PaymentMethod flow
InboundTransfers and OutboundTransfers overview
You can pull funds from a Stripe account’s external bank account using an InboundTransfer and push funds to their external bank account using an OutboundTransfer.
To successfully pull funds into a Treasury financial account with an InboundTransfer, external bank accounts must be verified by the Stripe accountholder. Bank accounts that are used to send funds out of a financial account with an OutboundTransfer don’t need to be verified.
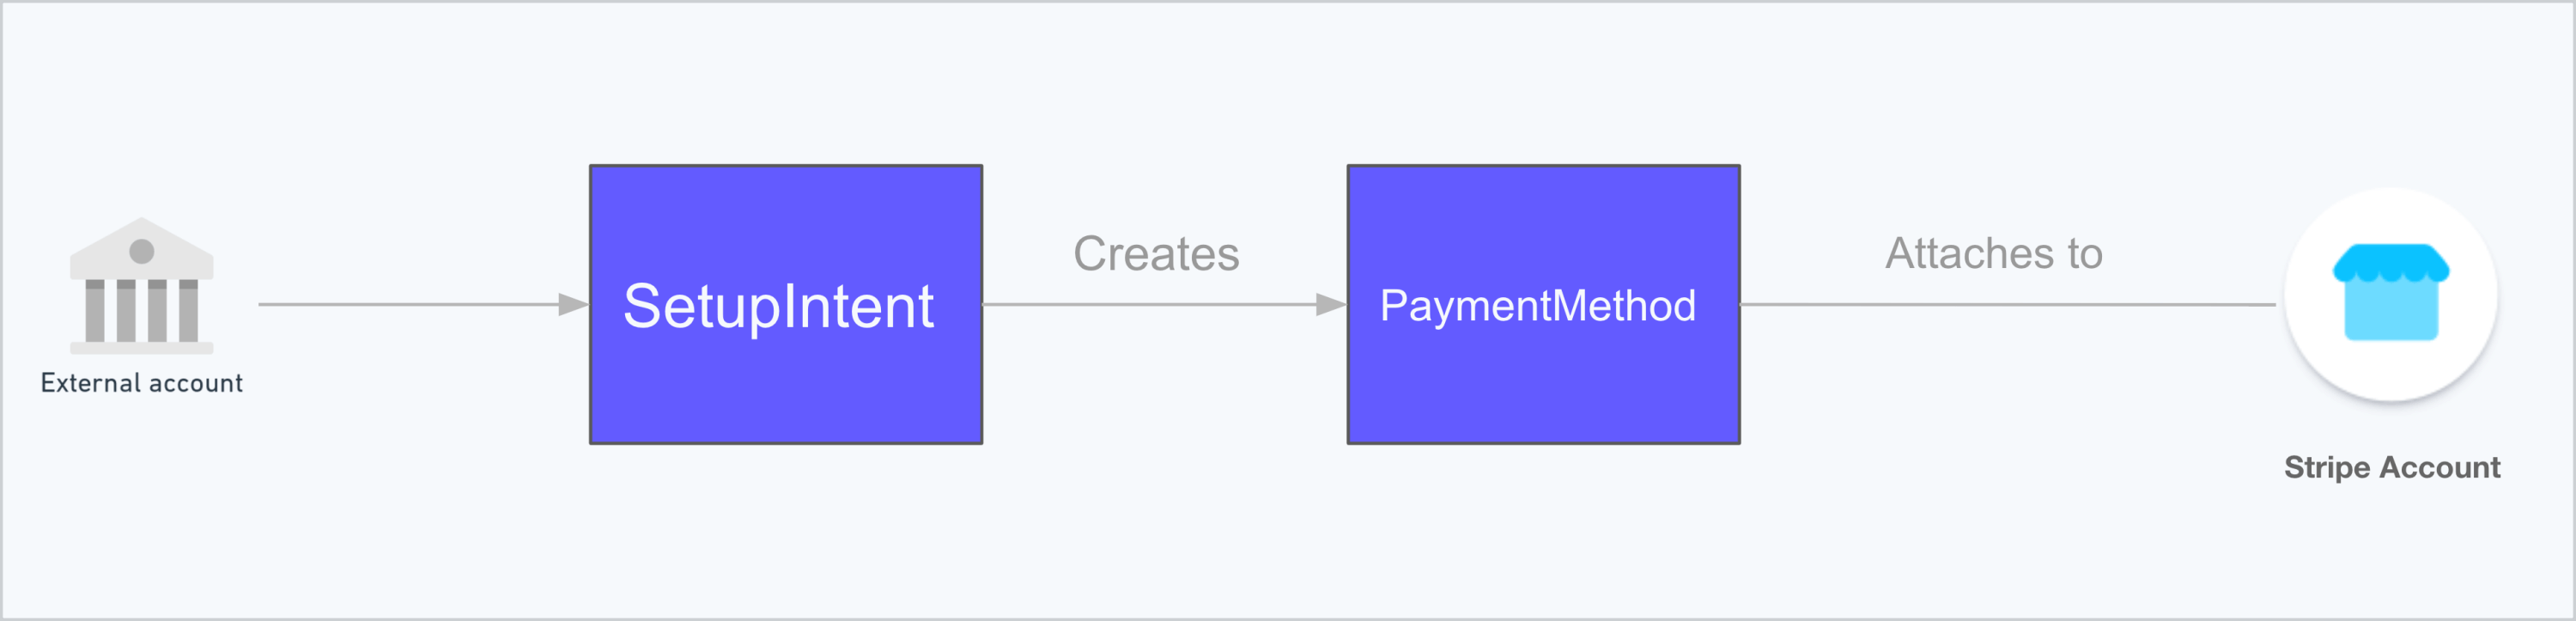
When an external bank account is used for either InboundTransfers or OutboundTransfers, you need to attach the corresponding PaymentMethod to the Stripe account rather than to a customer. You do this by using the attach_ parameter rather than the customer parameter when creating the PaymentMethod using SetupIntent.
InboundTransfers and OutboundTransfers flow.
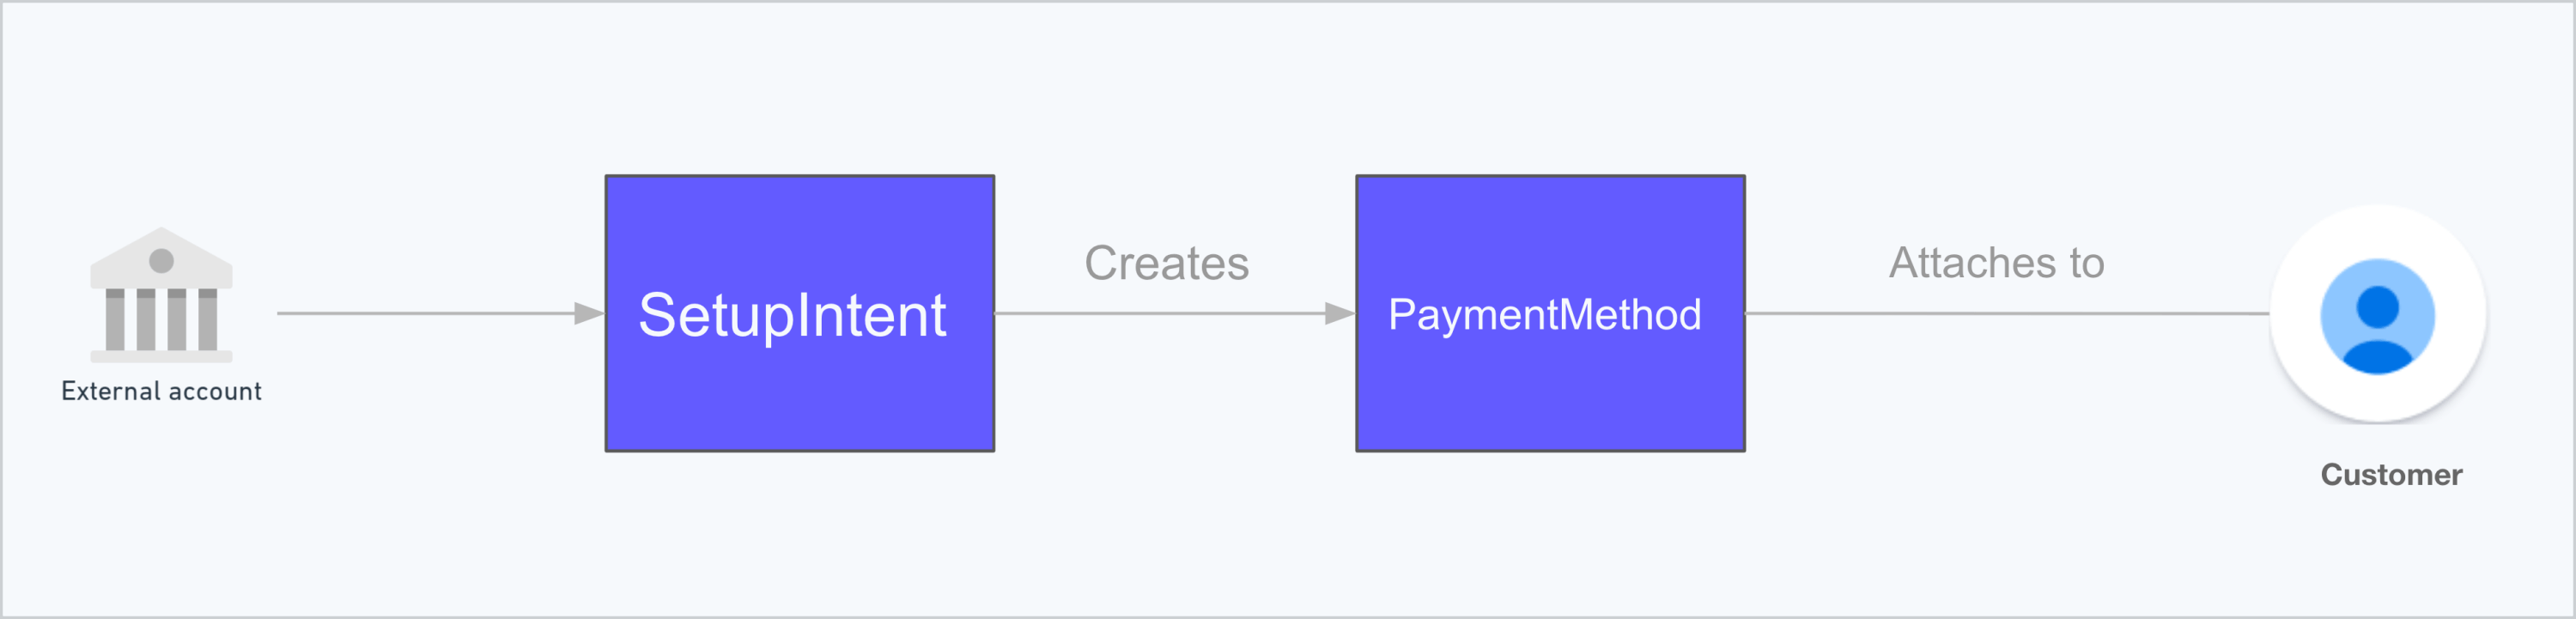
OutboundPayments
Platforms use the OutboundPayment API to send funds from a Treasury financial account to an external bank account owned by a third party.
You must attach PaymentMethods to a customer to use them with OutboundPayments. Bank accounts used for OutboundPayments don’t need to be verified.
OutboundPayments flow
Adding an external bank account
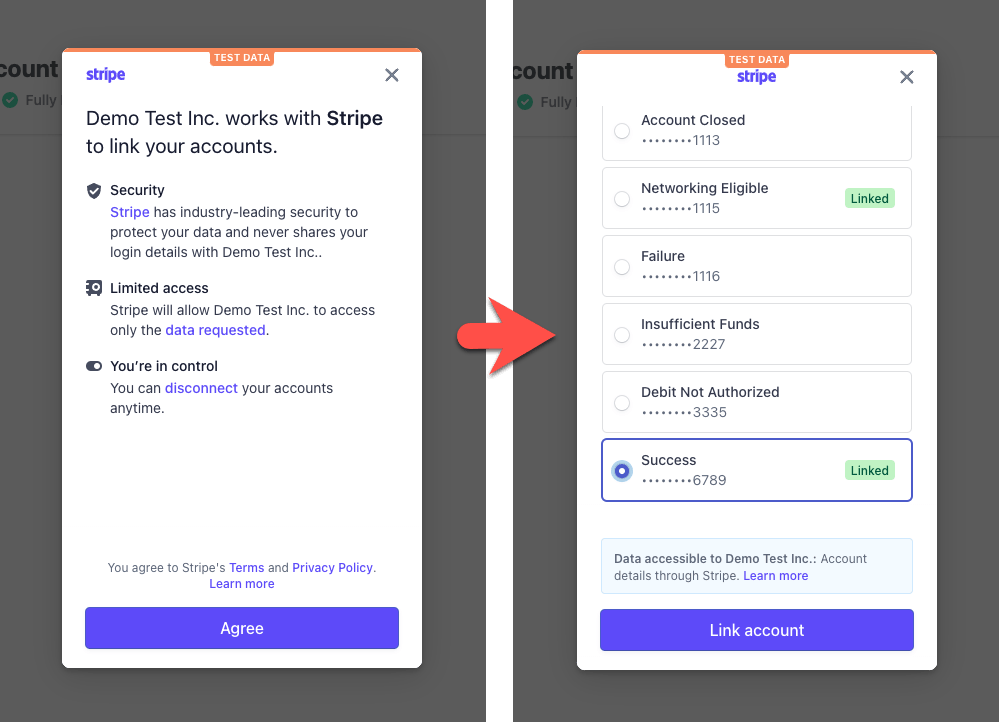
Homebox wants to link their customers’ own external bank accounts to their Treasury financial accounts. Homebox’s connected accounts want to keep all of their business capital in their financial accounts and use inbound transfers to pull money from their external account into their Treasury financial account. To enable their connected accounts to transfer money to and from their external accounts, Homebox creates a SetupIntent with the required parameters and attaches it to an account-attached PaymentMethod:
To send and receive money through OutboundTransfers or InboundTransfers, Homebox must specify an external bank account with the payment_ parameter. Before creating the live external bank account link, Homebox tests the flow using the test account numbers Stripe provides.
As shown in the preceding example, Homebox has defined the external bank account (payment_) and set attach_ as true, which enables the bank account information to be associated with the Stripe accountholder (rather than a third party). When the platform sends the request, the Treasury API responds with a SetupIntent:
{
  "id": "{{SETUP_INTENT_ID}}",
  "object": "setup_intent",
  "application": "{{APPLICATION_ID}}",
  "attach_to_self": true,
  "cancellation_reason": null,
  "client_secret": "{{SETUP_INTENT_SECRET}}",
  "created": 1642520861,
  "customer": null,
  "description": null,
  "flow_directions": [
    "inbound",
    "outbound"
  ],
  "last_setup_error": null,
  "latest_attempt": "{{ATTEMPT_ID}}",
  "livemode": false,
  "mandate": "{{MANDATE_ID}}",
  "metadata": {
  },
  "next_action": {
    "type": "verify_with_microdeposits",
    "verify_with_microdeposits": {
      "arrival_date": 1642579200,
      "hosted_verification_url": "https://payments.stripe.com/microdeposit/sacs_test_xxx",
      "microdeposit_type": "amounts"
    }
  },
  "on_behalf_of": null,
  "payment_method": "{{PAYMENT_METHOD_ID}}",
  "payment_method_options": {
    "us_bank_account": {
      "verification_method": "automatic"
    }
  },
  "payment_method_types": [
    "us_bank_account"
  ],
  "single_use_mandate": null,
  "status": "requires_confirmation",
  "usage": "off_session"
}
Verifying an external bank account
Homebox linked an external bank account in the previous section. The bank account must be verified, though, before Homebox can use it for InboundTransfers. Bank account verification enables the account owner to confirm ownership of the external bank account. To verify, Homebox can use Stripe Financial Connections for instant verification, or microdeposits (which take more time).
Stripe Financial Connections
Stripe offers Financial Connections to instantly verify an owned bank account. Financial Connections is a Stripe hosted flow integrated on the application’s client- and server-side.
There are three steps necessary for Homebox to collect and verify bank account information with Financial Connections:
Create a
SetupIntentwith the propertyattach_(replacing theto_ self customer_property), and the valueid instantfor theverification_property.method Provide the
client_to the frontend application to usesecret stripe.to collect bank account details, create acollectBankAccountForSetup PaymentMethod, and attach thatPaymentMethodto theSetupIntent.Nota
The account holder’s name in the
billing_parameter is required to create a US bank accountdetails PaymentMethod.Display the mandate terms to collect the authorization for the
PaymentMethodusage.
For step 1, Homebox develops the following code to create a SetupIntent server-side and pass the information to a handlebars.js template. This code assumes that an application has a user logged in to Stripe and that it passes the Stripe Account ID as part of the Session object (req.).
const stripe = require("stripe")(process.env.STRIPE_SECRET_KEY);
router.get('/add_bank_account', async (req, res) => {
  const account = await stripe.accounts.retrieve(req.session.accountId);
  const setupIntent = await stripe.setupIntents.create({
    attach_to_self: true,
    flow_directions: ['inbound', 'outbound'],
    payment_method_types: ['us_bank_account'],
    payment_method_options: {us_bank_account: {verification_method: "automatic"}}
  },{
    stripeAccount: account.id,
  });
  let client_secret= setupIntent.client_secret;
  res.render('add_bank_account', { account: account, client_secret: client_secret, stripe_pk: process.env.STRIPE_PUBLISHABLE_KEY });
});
Step 2 begins when Homebox passes the following data to the render function:
- The Stripe account ID.
- The client secret obtained from the
SetupIntentthat’s used as the identifier. - The platform’s publishable API key.
In this example, the client-side page renders with a button for the user to validate their bank account through Financial Connections.
Modal to add a bank account
Homebox creates the following code to drive the logic behind the preceding button.
const getBankAccount = async e => {
  paymentMethodButton.setAttribute("disabled", "disabled");
  // Calling this method triggers the Financial Connections modal to display.
  const response = await stripe.collectBankAccountForSetup("{{ client_secret }}", {
    billing_details: {
      name: "John Doe",
      email: "test@test.com",
    },
  });
  if (response.error)
  {
    console.error(response.error);
  }
  if (response.status == "requires_confirmation")
  {
    //Show confirmation modal
    AcceptBankAccountModal.classList.remove("hidden");
  }
};
In this code example, the script calls the collectUsBankAccountForSetup method and passes the client_ from the SetupIntent. An application dialog walks the user through linking their bank account.
Workflow for adding a bank account
Step 3 begins with the successful completion of the preceding workflow, as the SetupIntent status changes to requires_ and a modal displays an authorization message for the user to confirm.
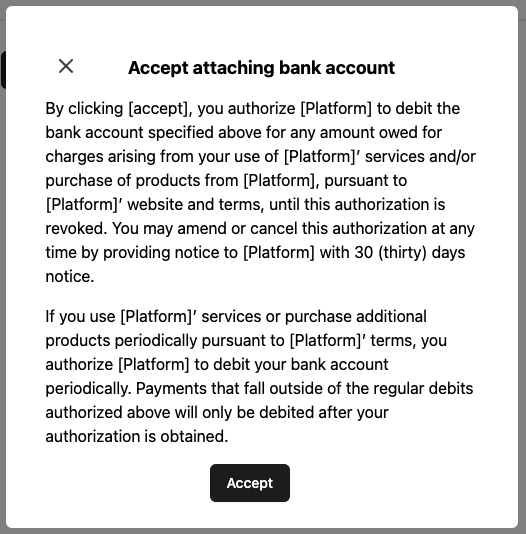
Authorization message
After the user clicks Accept, the code calls the confirmUsBankAccountSetup method and the bank account is stored as verified. The bank account can now be used for InboundTransfers.
const acceptBankAccount = async e => {
  acceptButton.setAttribute("disabled", "disabled");
  const response = await stripe.confirmUsBankAccountSetup("{{ client_secret }}");
  if (response.setupIntent.status == "requires_payment_method") {
    // Confirmation failed. Attempt again with a different payment method.
    console.log("Requires payment method")
  } else if (response.setupIntent.status == "succeeded") {
    // Confirmation succeeded! The account is now saved.
    // Display a message to customer.
    AcceptBankAccountModal.classList.add("hidden");
    console.log("Account added");
  } else if (response.setupIntent.next_action?.type == "verify_with_microdeposits") {
    // The account needs to be verified through microdeposits.
    // Display a message to consumer with next steps (consumer waits for
    // microdeposits, then enters an amount on a page sent to them through email).
    console.log("The account needs to be verified with microdeposits")
  }
};
Microdeposits
Microdeposits are small sums of money, typically a fraction of a US dollar, that Stripe deposits into an external bank account. Owners of the account can verify ownership of the account by confirming the exact amount of those deposits.
The SetupIntent object that Homebox created in the previous section includes a PaymentMethod ID.
{
  "id": "{{SETUP_INTENT_ID}}",
  …
  "on_behalf_of": null,
  "payment_method": "{{PAYMENT_METHOD_ID}}",
  "payment_method_options": {
…
 }
}
The SetupIntent also includes a next_ object with a URL defined in the hosted_ value.
{
  "id": "{{SETUP_INTENT_ID}}",
…
   "next_action": {
    "type": "verify_with_microdeposits",
    "verify_with_microdeposits": {
      "arrival_date": 1642579200,
      "hosted_verification_url": "https://payments.stripe.com/microdeposit/sacs_test_xxx",
      "microdeposit_type": "amounts"
    }
…
 }
Homebox provides the URL to the connected account owner to complete verification. The owner must follow the URL to verify receipt by entering the associated descriptor code of the microdeposit (in testing environments, use the value SM11AA).
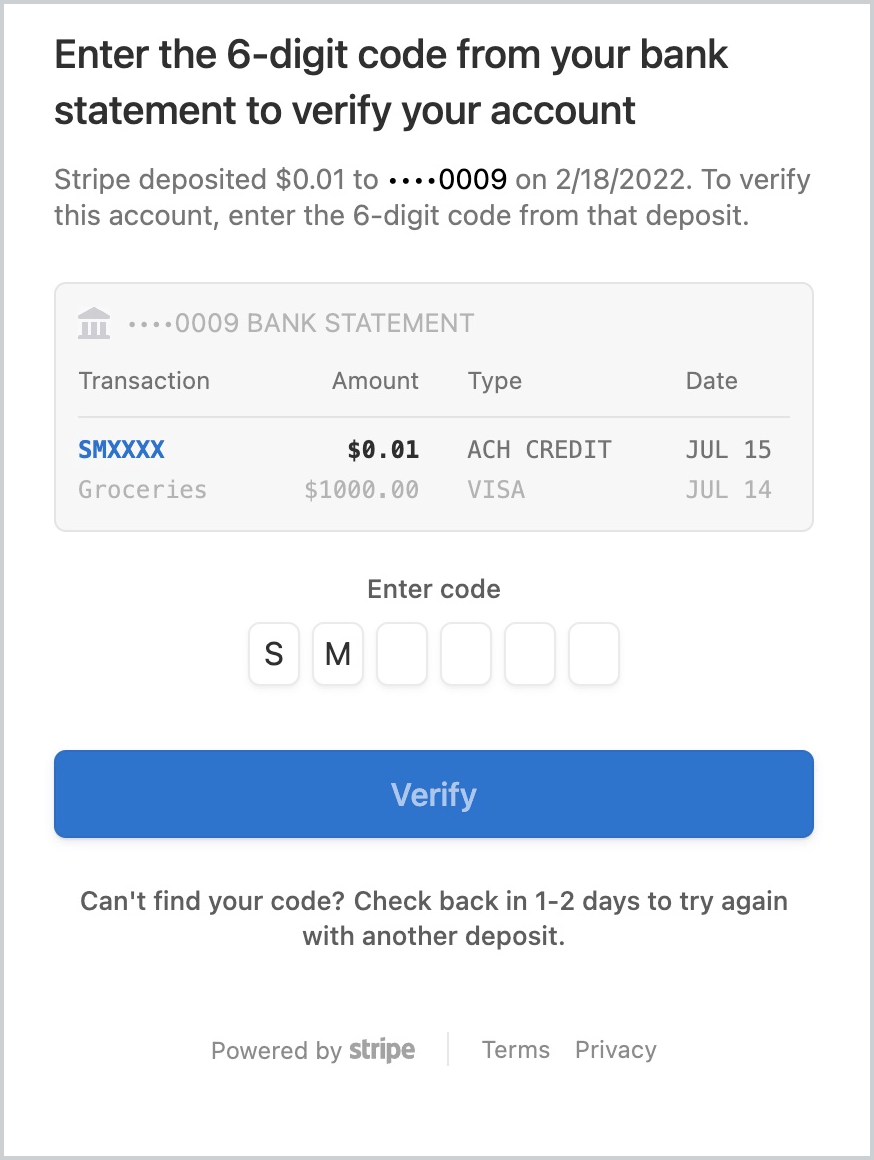
Microdeposit verification
Using PaymentMethods with InboundTransfers
Homebox can begin creating InboundTransfers using a bank account verified with one of the previously described methods.
The following request transfers 200 USD using an account-attached payment method into the financial account with the provided ID. The Stripe-Account header value identifies the Stripe account that owns both the financial account and the payment method.
If successful, the response provides the InboundTransfer object. The object includes a hosted_ that provides access to details of the transaction for the account holder on the Homebox platform.
{
    "id": "{{INBOUND_TRANSFER_ID}}",
    "object": "inbound_transfer",
    "amount": 20000,
    "created": 1648071297,
    "currency": "usd",
    "description": "Funds for repair",
    "financial_account": "{{FINANCIAL_ACCOUNT_ID}}",
    "hosted_regulatory_receipt_url": "https://payments.stripe.com/regulatory-receipt/{{IBT_URL}}",
    "linked_flows": null,
    "livemode": false,
    "metadata": {},
    "origin_payment_method": "{{PAYMENT_METHOD_ID}}",
    ...
    "statement_descriptor": "Invoice 12",
    "status": "processing",
    ...
}
Using PaymentMethods with OutboundPayments
You can also use a PaymentMethod to send funds to an external bank account owned by a third party using OutboundPayment objects.
Homebox wants to send funds to one of its connected account’s vendors on a recurring basis to pay for supplies. To do so, the platform needs to first get the customer ID using the Customers endpoint.
The response provides the customers for the associated connected account. Homebox identifies the correct customer and records their ID.
{
  "id": "{{CUSTOMER_ID}}",
  "object": "customer",
  "address": null,
  "balance": 0,
  "created": 1642523420,
  "currency": null,
  "default_source": null,
  "delinquent": false,
  "description": "Test Customer",
  "discount": null,
  "email": null,
  "invoice_prefix": "96A50A92",
  "invoice_settings": {
    "custom_fields": null,
    "default_payment_method": null,
    "footer": null
  },
  "livemode": false,
  "metadata": {
  },
  "name": null,
  "next_invoice_sequence": 1,
  "phone": null,
  "preferred_locales": [

  ],
  "shipping": null,
  "tax_exempt": "none"
}
Homebox then creates a SetupIntent using the ID. Because OutboundPayments are used for outbound money flows to third parties, Homebox makes sure to set flow_ to outbound and doesn’t use attach_, instead specifying a customer.
A successful call returns the following object to indicate the PaymentMethod is successfully attached to the customer.
{
  "id": "{{SETUP_INTENT_ID}}",
  "object": "setup_intent",
  "application": "{{APPLICATION_ID}}",
  "cancellation_reason": null,
  "client_secret": "{{SETUP_INTENT_SECRET}}",
  "created": 1642528487,
  "customer": "{{CUSTOMER_ID}}",
  "description": null,
  "flow_directions": [
    "outbound"
  ],
  "last_setup_error": null,
  "latest_attempt": null,
  "livemode": false,
  "mandate": null,
  "metadata": {
  },
  "next_action": null,
  "on_behalf_of": null,
  "payment_method": "{{PAYMENT_METHOD_ID}}",
  "payment_method_options": {
  },
  "payment_method_types": [
    "us_bank_account"
  ],
  "single_use_mandate": null,
  "status": "succeeded",
  "usage": "off_session"
}
Creating an OutboundPayment without a PaymentMethod
PaymentMethods aren’t required when sending or using OutboundPayments if you don’t have a need to store the recipient’s bank account, as in the case of one-off payments.
Homebox needed to pay a vendor 50 USD to cover the cost of supplies. To pay the vendor, the platform calls OutboundPayments with the external bank account information.
The successful call returns the following object:
{
  "id": "{{OUTBOUNDPAYMENT_ID}}",
  "object": "treasury.outbound_payment",
  "amount": 5000,
  "cancelable": true,
  "created": 1643033124,
  "currency": "usd",
  "customer": null,
  "description": null,
  "destination_payment_method": null,
  "destination_payment_method_details": {
    "billing_details": {
      "address": {
        "city": null,
        "country": null,
        "line1": null,
        "line2": null,
        "postal_code": null,
        "state": null
      },
      "email": null,
      "name": "John Doe",
      "phone": null
    },
    "type": "us_bank_account",
    "us_bank_account": {
      "account_holder_type": "individual",
      "bank_name": "STRIPE TEST BANK",
      "fingerprint": "SzrMIps1gg91aVKG",
      "last4": "6789",
      "network": "ach",
      "routing_number": "110000000"
    }
  },
  "end_user_details": {
    "present": false,
    "ip_address": null
  },
  "expected_arrival_date": 1643068800,
  "financial_account": "{{FINANCIAL_ACCOUNT_ID}}",
  "hosted_regulatory_receipt_url": "https://payments.stripe.com/regulatory-receipt/bot_test_xxx",
  "livemode": false,
  "metadata": {
  },
  "statement_descriptor": "payment_1",
  "status": "processing",
  "status_transitions": {
    "canceled_at": null,
    "failed_at": null,
    "posted_at": null,
    "processing_at": 1643033124,
    "returned_at": null
  },
  "transaction": "{{TRANSACTION_ID}}"
}